Werbung
Verfügbare Sprachen
Verfügbare Sprachen
Quicklinks
Werbung

Verwandte Anleitungen für Phoenix Contact AXC F 2152 STARTERKIT


Inhaltszusammenfassung für Phoenix Contact AXC F 2152 STARTERKIT
- Seite 1 Schnelleinstieg AXC F 2152 STARTERKIT 108307_de_01 PHOENIX CONTACT 1-12...
- Seite 2 AXC F 2152 STARTERKIT PHOENIX CONTACT 108307_de_01...
- Seite 3 Willkommen bei Wir freuen uns, dass Sie sich für unsere neue, offene Steuerungsplattform entschieden ha- ben. Lieferumfang: 1 x AXC F 2152 STARTERKIT 1 x Steckernetzteil 1 x Länderadapter für Steckernetzteil 1 x Patchkabel FL CAT5 PATCH 2,0 1 x Einjährige Laufzeitlizenz zur Verwendung des AXC F 2152 in der PROFICLOUD Besuchen Sie die PLCnext Community.
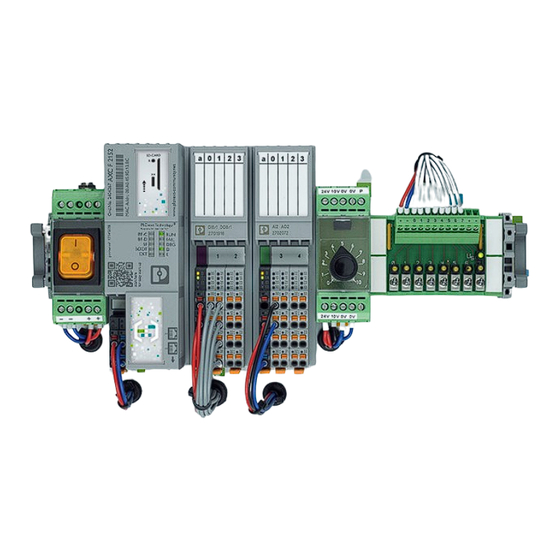
- Seite 4 AXC F 2152 STARTERKIT Überblick SD-CARD 24V 10V 0V 0V 24V 10V 0V 0V PHOENIX CONTACT 108307_de_01...
- Seite 5 AXC F 2152 STARTERKIT Wippschalter I/O (Ein/Aus) Controller AXC F 2152 Digitalein-/ausgabemodul AXL F DI8/1 DO8/1 1H Analogein-/ausgabemodul AXL F AI2 AO2 1H Potenziometer Schaltermodul 108307_de_01 PHOENIX CONTACT...
-
Seite 6: In Betrieb Nehmen
AXC F 2152 STARTERKIT In Betrieb nehmen PLCnext Engineer installieren Die Software PLCnext Engineer (Art.-Nr.: 1046008) steht unter phoenixcontact.net/products zum Download bereit. • Laden Sie die Software auf Ihren PC herunter. • Starten Sie die Installation per Doppelklick auf die *.exe-Datei. - Seite 7 AXC F 2152 STARTERKIT IP-Adresse einstellen • Öffnen Sie auf Ihrem PC die Systemein- stellungen „Netzwerk- und Freigabecen- ter“. • Wählen Sie „Adaptereinstellungen än- dern“. • Öffnen Sie per Rechtsklick das Kontext- menü der LAN-Verbindung und wählen Sie „Eigenschaften“. •...
- Seite 8 AXC F 2152 STARTERKIT Ethernet anschließen SD-CARD PLCnext 24V 10V 0V 0V ENGINEER 24V 10V 0V 0V • Verbinden Sie das Patchkabel mit Ihrem PC. • Schließen Sie das Patchkabel an die RJ45-Buchse (X1 oder X2) des Controllers an. PHOENIX CONTACT...
- Seite 9 AXC F 2152 STARTERKIT Steckernetzteil verbinden SD-CARD 24V 10V 0V 0V 24V 10V 0V 0V Versorgungsspannung einschalten • Stellen Sie den Wippschalter auf die Stellung I. 108307_de_01 PHOENIX CONTACT...
- Seite 10 AXC F 2152 STARTERKIT Beispielprojekt herunterladen • Öffnen Sie die PLCnext Community plcnext-community.net. • Laden Sie die Datei „AXC F 2152 Starterkit_Vxx.zip“ auf Ihren PC herunter. • Entpacken Sie die Datei und speichern Sie das Beispielprojekt im Verzeichnis „...\PLCnext Engineer\<Version>\Projects“ (Standardpfad: „C:\Benutzer\Öffentlich\Öffentliche Dokumente\PLCnext Engineer\<Version>\Projects“).
- Seite 11 AXC F 2152 STARTERKIT Besuchen Sie die PLCnext Community Scannen Sie den QR-Code und Sie gelangen direkt dorthin. In der PLCnext Community finden Sie Gebrauchsanleitungen, Tutorials, FAQs, ein Diskussionsforum sowie Links zu Software- und Firmware-Downloads. Nutzen Sie die Gelegenheit, Fragen zu stellen und Ihre Erfahrungen und Ergebnisse mit an- deren Anwendern und unserem Support-Team zu diskutieren.
- Seite 12 AXC F 2152 STARTERKIT PHOENIX CONTACT GmbH & Co. KG • Flachsmarktstraße 8 • 32825 Blomberg • Germany phoenixcontact.com...
- Seite 13 Quick start guide AXC F 2152 STARTERKIT 108307_en_01 PHOENIX CONTACT 1-12...
- Seite 14 AXC F 2152 STARTERKIT PHOENIX CONTACT 108307_en_01...
- Seite 15 Welcome to Thank you for selecting our new, open control platform. Scope of supply: 1 x AXC F 2152 STARTERKIT 1 x plug-in power supply unit 1 x country-specific adapter for the plug-in power supply unit 1 x patch cable FL CAT5 PATCH 2,0 1 x one-year runtime license for the use of AXC F 2152 in PROFICLOUD Visit our PLCnext Community.
- Seite 16 AXC F 2152 STARTERKIT Overview SD-CARD 24V 10V 0V 0V 24V 10V 0V 0V PHOENIX CONTACT 108307_en_01...
- Seite 17 AXC F 2152 STARTERKIT I/O rocker switch (on/off) AXC F 2152 controller AXL F DI8/1 DO8/1 1H digital I/O module AXL F AI2 AO2 1H analog I/O module Potentiometer Switch module 108307_en_01 PHOENIX CONTACT...
- Seite 18 AXC F 2152 STARTERKIT Startup Install PLCnext Engineer The PLCnext Engineer software (order no. 1046008) can be downloaded under phoenixcontact.net/products. • Download the software onto your computer. • Double-click on the *.exe file to start installation. • Follow the instructions of the installation wizard.
- Seite 19 AXC F 2152 STARTERKIT Set the IP address • In the Control Panel of your PC, open the “Network and Sharing Center”. • Select “Change adapter settings”. • Right-click on the LAN connection to open the context menu and select “Prop- erties”.
- Seite 20 AXC F 2152 STARTERKIT Connect Ethernet SD-CARD PLCnext 24V 10V 0V 0V ENGINEER 24V 10V 0V 0V • Connect the patch cable to your PC. • Connect the patch cable to the controller's RJ45 socket (X1 or X2). PHOENIX CONTACT...
- Seite 21 AXC F 2152 STARTERKIT Connect the power supply unit SD-CARD 24V 10V 0V 0V 24V 10V 0V 0V Switch the supply voltage on • Set the rocker switch to the I position. 108307_en_01 PHOENIX CONTACT...
- Seite 22 AXC F 2152 STARTERKIT Download the example project • Open the PLCnext Community plcnext-community.net. • Download the file “AXC F 2152 Starterkit_Vxx.zip” onto your computer. • Unpack the file and save the example project to the directory “...\PLCnext Engineer\<Version>\Projects” (standard path: “C:\Users\Public\Public documents\PLCnext Engineer\<Version>\Projects”).
- Seite 23 AXC F 2152 STARTERKIT Visit the PLCnext Community Scan the QR code for direct access. You will find operating instructions, tutorials, FAQs, a discussion forum, and links to software and firmware downloads in the PLCnext Community. Take the opportunity to ask questions and to discuss your experiences and results with other users and our Support Team.
- Seite 24 AXC F 2152 STARTERKIT PHOENIX CONTACT GmbH & Co. KG • Flachsmarktstraße 8 • 32825 Blomberg • Germany phoenixcontact.com...