
Verwandte Anleitungen für oventrop Regusol X-Uno 15


Inhaltszusammenfassung für oventrop Regusol X-Uno 15
- Seite 1 Stationen für die Solarthermie Regusol X-Uno 15 Regusol X-Uno 25 Regusol X-Duo 15 Regusol X-Duo 25 Montage- und Bedienungsanleitung...
-
Seite 2: Inhaltsverzeichnis
4.1.1 Systemdarstellung Regusol X-Uno 15/X-Uno 25 ........ - Seite 3 Regusol X-Uno 15/X-Uno 25 ........
-
Seite 4: Allgemeines
Allgemeines 1 Allgemeines 1.1 Informationen zur Bedienungsanleitung Diese Anleitung gibt wichtige Hinweise zum Um- gang mit dem Gerät. Voraussetzung für sicheres Arbeiten ist die Einhaltung aller angegebenen Sicherheitshinweise und Handlungsanweisungen. Diese Betriebsanleitung vor Beginn aller Arbeiten am und mit dem Gerät, insbesondere vor der In- stallation und Inbetriebnahme, sorgfältig durchle- sen! Die Anleitung sollte bei der Regusol X-Station ver-... -
Seite 5: Haftung
Allgemeines 1.3 Haftung Für Schäden und Störungen, die sich aufgrund der Nichtbeachtung der Betriebsanleitung ergeben, übernimmt der Hersteller keine Haftung. 1.4 Urheberschutz Die Betriebsanleitung vertraulich behandeln. Sie ist ausschließlich für die mit dem Gerät beschäftigten Personen bestimmt. Die Überlassung der Betriebs- anleitung an Dritte ohne schriftliche Genehmigung des Herstellers ist unzulässig. -
Seite 6: Sicherheitshinweise
Sicherheitshinweise 2 Sicherheitshinweise Das Gerät ist zum Zeitpunkt seiner Entwicklung nach geltenden, anerkannten Regeln der Technik entwickelt und hergestellt worden und gilt als be- triebssicher. Es können durch die Anwendung des Gerätes doch Gefahren ausgehen, wenn das Gerät von nicht fachgerecht ausgebildeten Personen, un- sachgemäß... -
Seite 7: Personal
Sicherheitshinweise 2.2 Personal Die Installation, Wartung und Reparatur darf nur von qualifiziertem Fachpersonal durchgeführt wer- den. WARNUNG! Verletzungsgefahr bei unzureichen- der Qualifikation! Unsachgemäßer Umgang kann zu er- heblichen Personen- und Sachschä- den führen. Deshalb: – Alle Tätigkeiten nur durch die in dieser Anleitung benannten Perso- nen durchführen lassen. -
Seite 8: Besondere Gefahren
Sicherheitshinweise 2.3 Besondere Gefahren Die hier aufgeführten Sicherheitshinweise und die Warnhinweise in den weiteren Kapiteln dieser An- leitung beachten, um Gesundheitsgefahren zu re- duzieren und gefährliche Situationen zu vermei- den. WARNUNG! Verbrennungsgefahr durch heiße Oberflächen! Kontakt mit heißen Bauteilen kann Verbrennungen verursachen. -
Seite 9: Ersatzteile
Sicherheitshinweise 2.4 Ersatzteile WARNUNG! Verletzungsgefahr durch falsche Ersatzteile! Falsche oder fehlerhafte Ersatzteile können zu Beschädigungen, Fehl- funktionen oder Totalausfall führen so- wie die Sicherheit beeinträchtigen. Deshalb: – Nur Originalersatzteile des Herstel- lers verwenden. Ersatzteile über Vertragshändler beziehen. 2.5 Betriebsanleitungen verbauter Kompo- nenten Neben dieser Betriebsanleitung gelten die im Fol- genden aufgeführten Betriebsanleitungen der ver-... -
Seite 10: Technische Daten
Technische Daten 3 Technische Daten Regusol Regusol Regusol Regusol X-Duo 25 X-Duo 15 X-Uno 25 X-Uno 15 Technische Daten allgemein max. Betriebsdruck 6 bar (Primärkreis) max. Betriebsdruck 3 bar (Sekundärseite) max. Betriebstemperatur 120 °C max. Förderhöhe (Primärseite) max. Förderhöhe (Sekundärseite) Leistungsklasse (bei nutzbarer solarer 25 kW... - Seite 11 Technische Daten Regusol Regusol Regusol Regusol X-Duo 25 X-Duo 15 X-Uno 25 X-Uno 15 Schwerkraftbremsen Widerstand Primärseite 200 mm WS Widerstand Sekundärseite 200 mm WS Materialien Armaturen Messing Dichtungen EPDM / AFREE 400 Isolierung Schwerkraftbremsen PPS / Messing Rohre Edelstahl 1.4301 Wärmeübertrager Edelstahl 1.4401 / Lot Kupfer Abmessungen...
-
Seite 12: Durchflussdiagramme
Technische Daten 3.1 Durchflussdiagramme 3.1.1 Regusol X-Uno/Duo 15 Primärseite · Durchfluss V [l/h] Abb. 1: Durchflussdiagramm X-Uno/Duo 15 Primärseite... -
Seite 13: Regusol X-Uno/Duo 15 Sekundärseite
Technische Daten 3.1 Durchflussdiagramme 3.1.2 Regusol X-Uno/Duo 15 Sekundärseite · Durchfluss V [l/h] Abb. 2: Durchflussdiagramm X-Uno/Duo 15 Sekundärseite... -
Seite 14: Regusol X-Uno/Duo 25 Primärseite
Technische Daten 3.1 Durchflussdiagramme 3.1.3 Regusol X-Uno/Duo 25 Primärseite · Durchfluss V [l/h] Abb. 3: Durchflussdiagramm X-Uno/Duo 25 Primärseite... -
Seite 15: Regusol X-Uno/Duo 25 Sekundärseite
Technische Daten 3.1 Durchflussdiagramme 3.1.4 Regusol X-Uno/Duo 25 Sekundärseite · Durchfluss V [l/h] Abb. 4: Durchflussdiagramm X-Uno/Duo 25 Sekundärseite... -
Seite 16: Pumpenkennlinien
Technische Daten 3.2 Pumpenkennlinien 3.2.1 Grundfos UPS 15-60 QH Chart Q [m Power Chart Q [m Abb. 5: Pumpenkennlinie Grundfos UPS 15-60 3.2.2 Grundfos Solar 15-60 QH Chart Q [m Power Chart Q [m Abb. 6: Pumpenkennlinie Grundfos Solar 15-60... -
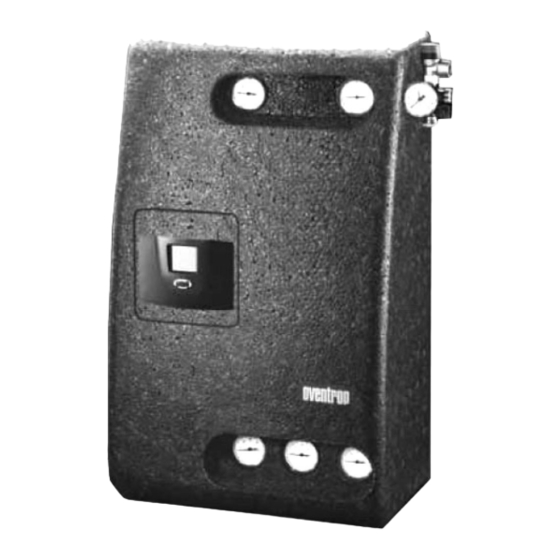
Seite 17: Aufbau Und Funktion
Aufbau und Funktion 4 Aufbau und Funktion 4.1 Regusol X-Uno 15 / X-Uno 25 Regusol X-Uno 15/X-Uno 25 sind elektronisch ge- regelte Armaturenbaugruppen mit Wärmeübertra- ger für die kontrollierte Übertragung der Wärmeen- ergie des Solarkreises (Primärkreis) an einen monovalenten Speicher (Sekundärkreis); z. B. für bestehende Speicher ohne direkten Solaran- schluss. -
Seite 18: Systemdarstellung Regusol X-Uno 15/X-Uno 25
Aufbau und Funktion 4.1.1 Systemdarstellung Regusol X-Uno 15 / X-Uno 25 Primärkreislauf (Solarkreis) Kugelhahn mit Sperrventil, Temperaturfühler- aufnahme und Thermometer im Griff Kugelhahn, Temperaturfühleraufnahme und Thermometer im Griff, mit Anschluss für Si- cherheitsgruppe Sicherheitsgruppe mit Sicherheitsventil (6 bar) Pumpe (Solarkreis) Isolierung Spül-, Füll- und Entleerungsanschluss... -
Seite 19: Ladekonzept Regusol X-Uno 15/X-Uno 25
Aufbau und Funktion 4.1.2 Ladekonzept Regusol X-Uno 15 / X-Uno 25 Abb. 10: Ladekonzept VFS: Durchfluss- und Temperatursensor Wärmeübertragereintritt vom Kollektor Kollektorfeld Wärmeübertrageraustritt zum Speicher Anschluss Pumpe Solarkreis untere Speichertemperatur Anschluss Pumpe Ladekreis obere Speichertemperatur Sp1: Speicher WT1: Wärmeübertrager Kollektortemperatur... -
Seite 20: Regusol X-Duo 15/X-Duo 25
Aufbau und Funktion 4.2 Regusol X-Duo 15 / X-Duo 25 Regusol X-Duo 15 / X-Duo 25 sind elektronisch ge- regelte Armaturengruppen mit Wärmeübertrager und 3-Wege-Umschaltventil für einen zweiten Se- kundärkreis für die kontrollierte Übertragung der Wärmeenergie des Solarkreises (Primärkreis) an einen Speicher (Sekundärkreis);... -
Seite 21: Systemdarstellung Regusol X-Duo 15/X-Duo 25
Aufbau und Funktion 4.2.1 Systemdarstellung Regusol X-Duo 15 / X-Duo 25 Primärkreislauf (Solarkreis) Kugelhahn mit Sperrventil, Temperaturfühler- aufnahme und Thermometer im Griff Kugelhahn, Temperaturfühleraufnahme und Thermometer im Griff, mit Anschluss für Si- cherheitsgruppe Sicherheitsgruppe mit Sicherheitsventil (6 bar) Pumpe (Solarkreis) Isolierung Spül-, Füll- und Entleerungsanschluss elektronischer Volumenstrom- und Tempera-... -
Seite 22: Ladekonzept Regusol X-Duo 15/X-Duo 25
Aufbau und Funktion 4.2.2 Ladekonzept Regusol X-Duo 15 / X-Duo 25 Abb. 14: Ladekonzept VFS: Durchfluss- und Temperatursensor Wärmeübertrageraustritt zum Speicher Kollektorfeld untere Speichertemperatur Anschluss Pumpe Solarkreis mittige Speichertemperatur Anschluss Pumpe Ladekreis obere Speichertemperatur Sp1: Speicher Umschaltventil für Schichtladung Kollektortemperatur Wärmeübertrager Wärmeübertragereintritt vom Kollektor... -
Seite 23: Ladekonzept Regusol X-Duo 15/X-Duo 25 Zweispeicherladung
Aufbau und Funktion 4.2.3 Ladekonzept Regusol X-Duo 15 / X-Duo 25 Zweispeicherladung ACHTUNG! Das Regelprogramm X1030 – 2 Speicherladung” ist werksseitig nicht voreingestellt und muss vor der Inbetriebnahme geladen werden! Siehe hierzu die Reglerdokumentation „Hinweise für den Installateur – Grundeinstellungen / Systemänderungen“! Abb. - Seite 24 Montage 5 Montage 5.1 Vorbereitungen Vor der Montage der Solarkreisstation: Platzierung der Solarkreisstation festlegen. Dabei Platzbedarf für das Ausdehnungsgefäß beachten. Positionierung und Verlauf der gesamten Zu- und Ableitungen zur Solarkreisstation festle- gen. WARNUNG! Lebensgefahr bei unzureichender Qualifikation! Unsachgemäße Montage kann zu er- heblichen Personen- und Sachschä- den führen.
-
Seite 25: Armaturenbaugruppe An Der Wand Montieren
Montage 5.2 Armaturenbaugruppe an der Wand montieren WARNUNG! Verletzungsgefahr bei unzureichen- der Qualifikation! Unsachgemäßer Umgang kann zu er- heblichen Personen- und Sachschä- den führen. Deshalb: – Montage nur durch eine zugelas- sene Gas- und Wasserfachkraft durchführen lassen. – Alle Arbeiten an der elektrischen Anlage nur durch eine zugelassene Elektrofachkraft durchführen las- sen. - Seite 26 Montage 10. Unterschale der Isolierung (2) in den Wandwin- kel (1) einhängen und als Bohrschablone für die Befestigungsschrauben der Armaturen- gruppe verwenden. 11. Vier Bohrlöcher (Pfeile) für die Befestigung der Armaturengruppe auswählen und an der Wand markieren. 12. Unterschale der Isolierung abnehmen. Löcher für die Befestigungsschrauben der Armaturen- gruppe bohren und mit Dübeln versehen.
- Seite 27 Montage 5.3 Versorgungsleitungen anschließen 5.3.1 Regusol X-Uno 15 / X-Uno 25 Versorgungsleitungen gemäß folgendem Schema anschließen: mittels 1" Klemmringverschraubung: 1 Solarkreis Vorlauf 2 Solarkreis Rücklauf 1" flachdichtend: 3 Speicherkreis Rücklauf 4 Speicherkreis Vorlauf HINWEIS! Passende Klemmringverschraubungs- Sets für den Solarkreis und Tüllenan- schluss-Sets für den Speicherkreis...
- Seite 28 Montage 5.3.2 Regusol X-Duo 15 / X-Duo 25 Versorgungsleitungen gemäß folgendem Schema anschließen: mittels 1" Klemmringverschraubung: Solarkreis Vorlauf Solarkreis Rücklauf 1" flachdichtend: Speicherkreis Rücklauf Speicherkreis Vorlauf I. (X1020-Schichtladung: Schichtspeicher oben, X1030-Zweispeicherladung: Speicher 1) Speicherkreis Vorlauf II. (X1020-Schichtladung: Schichtspeicher unten, X1030-Zweispeicherladung: Speicher 2) HINWEIS! Passende Klemmringverschraubungs- Sets für den Solarkreis und Tüllenan-...
-
Seite 29: Sicherheitsgruppe Montieren
Montage 5.4 Sicherheitsgruppe montieren Die beiliegende Sicherheitsgruppe an den An- schluss des rechten Kugelhahns am Primärkreis anschließen. Abb. 21: Sicherheitsgruppe montieren 5.5 Ausdehnungsgefäß montieren ACHTUNG! Zu hohe Dauertemperaturen und Dampfschläge können zu Sachscha- den führen ! Deshalb: – Nur ein für den Anwendungsfall und das Wärmeträgermedium geeignetes und für die Anlage korrekt dimensio- niertes Membranausdehnungsgefäß... -
Seite 30: Anschluss Elektrik
Montage 5.6 Anschluss Elektrik WARNUNG! Lebensgefahr bei unzureichender Qualifikation ! Unsachgemäße Montage kann zu er- heblichen Personen- und Sachschäden führen. Deshalb: – Montage nur durch eine zugelasse- ne Elektrofachkraft durchführen lassen. – Vor Beginn der Arbeiten prüfen, dass alle Komponenten span- nungslos sind. -
Seite 31: Ausführung X-Uno
Montage 5.6.1 Ausführung X-Uno Kollektor Regler Abb. 23: Ausführung X-Uno... -
Seite 32: Ausführung X-Duo
Montage 5.6.2 Ausführung X-Duo Kollektor Kollektor Regler Regler Abb. 24: Ausführung X-Duo Schichtladung Abb. 25: Ausführung X-Duo Zweispeicherladung... - Seite 33 Inbetriebnahme 6 Inbetriebnahme ACHTUNG! Sachschaden durch Fehlbedienung! Fehlbedienung und eine unvollständi- ge Installation können zu Fehlfunktion und Sachschaden führen! Deshalb: Vor (Erst-) Inbetriebnahme müssen folgende Istzustände überprüft wer- den: – Alle Kugelhähne müssen geöffnet sein! – Alle Schwerkraftsperren müssen geschlossen sein! –...
-
Seite 34: Spülen, Befüllen
Inbetriebnahme 6.1 Spülen, Befüllen Die Anlage ist werksseitig druckgeprüft, muss je- doch vor Befüllung erneut durch den Facharbeiter auf Dichtheit geprüft werden. WARNUNG! Verletzungsgefahr! Unsachgemäße Handhabung kann zu erheblichen Personen- und Sachschä- den führen. Deshalb: – Vor dem Befüllen/Spülen die Anlage unbedingt auf Dichtheit prüfen! –... -
Seite 35: Sekundärkreislauf Befüllen Und Entlüften
Inbetriebnahme 6.1.1 Sekundärkreislauf befüllen und entlüften 1. Befüllvorrichtung (nicht im Lieferumfang) an An- schluss (6) anschließen. 2. Sperrventil (1) öffnen (Abb. 27). 3. Kugelhähne (3) und (4) müssen geöffnet sein. 4. KFE-Hahn (5) langsam öffnen (längs zur Lei- tung) und Anlage auf den gewünschten Anla- gendruck füllen. - Seite 36 Inbetriebnahme Zusatzarbeiten nur bei Ausführung X-Duo: 8. Umschaltventil (1) vor dem Befüllen und Entlüf- ten manuell auf Mittelstellung drehen: Dazu die Sicherungsschraube (2) mit einem Schlitz- schraubendreher eindrücken und von Stellung „A“ auf „Hand“ stellen. Drehknopf (3) in Mittel- stellung drehen (Pfeilspitze zeigt waagerecht nach links).
- Seite 37 Inbetriebnahme 6.1.2 Primärkreislauf spülen, befüllen und entlüften ACHTUNG! Sachschaden! Verwendung von nicht geeigneten Flüssigkeiten führt zu Sachschaden ! Deshalb: – Primärseite der Anlage nur mit zu- gelassener Wärmeträgerflüssigkeit auf Glykolbasis (z.B. Tyfocor ) be- ® füllen! WARNUNG! Verletzungsgefahr! Unsachgemäße Handhabung kann zu schweren Verbrennungen durch heiße Wärmeträgerflüssigkeit führen ! Deshalb:...
- Seite 38 Inbetriebnahme Druckschlauch der Befüll- und Spülvorrich- tung (nicht im Lieferumfang) an Anschluss (1) anschließen. Spülschlauch an Anschluss (7) anschließen. Sperrventil im Kugelhahn (4) öffnen. Hierzu den Griff gegen den Uhrzeigersinn auf 45° stellen (siehe Abb. 30). Kugelhahn (5) schließen. Hierzu den Griff ge- gen den Uhrzeigersinn auf 90°...
- Seite 39 Inbetriebnahme 16. Sperrventil und Kugelhahn auf korrekte Ein- stellung prüfen. Beispieldarstellung: Links = Sperrventil geschlossen (Betriebsstellung) Rechts = Sperrventil geöffnet, Griff steht auf 45° 6.1.3 Hinweise/Tipps zur Inbetriebnahme Die im Primär- und Sekundärkreis eingesetz- ten Pumpen haben drei einstellbare Leistungs- Abb.
-
Seite 40: Demontage Und Entsorgung
Demontage und Entsorgung 7 Demontage und Entsorgung WARNUNG! Verletzungsgefahr bei unzureichen- der Qualifikation ! Unsachgemäßer Umgang kann zu er- heblichen Personen- und Sachschä- den führen. Deshalb: – Die Demontage darf nur von speziell ausgebildetem Fachpersonal aus- geführt werden. – Arbeiten an der elektrischen Anlage dürfen nur von Elektrofachkräften ausgeführt werden. - Seite 41 Demontage und Entsorgung 7.1 Demontage WARNUNG! Verletzungsgefahr bei unsachge- mäßer Demontage ! Gespeicherte Restenergien, kantige Bauteile, Spitzen und Ecken am und im Gerät können Verletzungen verur- sachen. Deshalb: – Vor Beginn der Arbeiten für ausrei- chenden Platz sorgen. – Mit offenen scharfkantigen Bautei- len vorsichtig umgehen.
- Seite 42 Demontage und Entsorgung 7.2 Entsorgung Sofern keine Rücknahme- oder Entsorgungsver- einbarung getroffen wurde, zerlegte Bestandteile der Wiederverwertung zuführen: Metalle verschrotten. Kunststoffelemente zum Recycling geben. Übrige Komponenten nach Materialbeschaffenheit sortiert entsorgen. ACHTUNG! Umweltschäden bei falscher Ent- sorgung ! Elektroschrott, Elektronikkomponen- ten, Schmier- und andere Hilfsstoffe unterliegen der Sondermüllbehand- lung und dürfen nur von zugelassenen Fachbetrieben entsorgt werden !
-
Seite 43: Anhang
Anhang 8 Anhang 8.1 Mitgeltende Unterlagen Bedienungsanleitung Pumpe Bedienungs- und Montageanleitung Regler Allgemeine Funktionsbeschreibung Regler Hydraulikschemen Regler Bedienungs- und Installationsanleitung Spei- cher (liegt nicht bei) Bedienungs- und Installationsanleitung Solar- kollektor (liegt nicht bei) Bedienungs- und Installationsanleitung sonsti- ger Komponenten der Heizungsanlage (liegt nicht bei) - Seite 44 Anhang F. W. OVENTROP GmbH & Co. KG Paul-Oventrop-Straße 1 D-59939 Olsberg Telefon +49 (0) 29 62 82-0 Telefax +49 (0) 29 62 82-400 Technische Änderungen vorbehalten E-Mail mail@oventrop.de Internet www.oventrop.de 136105180 02/2008...
- Seite 45 Stations pour la technique solaire Regusol X-Uno 15 Regusol X-Uno 25 Regusol X-Duo 15 Regusol X-Duo 25 Instructions de montage et mode d’emploi...
- Seite 46 4.1.1 Schéma d’installation Regusol X-Uno 15/X-Uno 25 ....... . .
- Seite 47 Regusol X-Uno 15/X-Uno 25 ........
-
Seite 48: Informations Générales
Informations générales 1 Informations générales 1.1 Informations concernant le mode d’emploi Ce mode d’emploi donne des conseils importants concernant la manipulation de l’appareil. Le res- pect de tous les conseils de sécurité et des instruc- tions est la condition pour un travail sûr. Ce mode d’emploi est à... -
Seite 49: Responsabilité
Informations générales 1.3 Responsabilité Nous déclinons toute responsabilité en cas de dommages ou dérangements causés par le non respect du mode d’emploi. 1.4 Droits d’auteur Le mode d’emploi est à traiter confidentiellement et est exclusivement destiné aux personnes s’occu- pant de l’appareil. Il est inadmissible de transmet- tre le mode d’emploi à... -
Seite 50: Conseils De Sécurité
Conseils de sécurité 2 Conseils de sécurité Au moment de son développement, l’appareil a été développé et fabriqué selon les règles reconnues et valables de la technique. Il est de fonctionnement sûr mais l’utilisation de l’appareil peut comporter des dangers s’il est mal utilisé ou non conformément aux règlements par des personnes non qualifiées. -
Seite 51: Personnel
Conseils de sécurité 2.2 Personnel L’installation, l’entretien et les réparations ne doivent être effectués que par des personnes qualifiées. DANGER! Risque de blessure en cas de qualifi- cation insuffisante! Une mauvaise manipulation peut entraî- ner des dommages corporels et des dégâts matériels considérables. -
Seite 52: Risques Particuliers
Conseils de sécurité 2.3 Risques particuliers Merci d’observer les conseils de sécurité et de dan- ger donnés ici et dans les chapitres suivants afin de réduire les risques mettant en danger la santé et afin d’éviter des situations dangereuses. DANGER! Risque de brûlure par surfaces chaudes! Le contact avec des composants... -
Seite 53: Pièces De Rechange
Conseils de sécurité 2.4 Pièces de rechange DANGER! Risque de blessure en cas de pièces de rechange inadaptées! Des pièces de rechange non adap- tées ou défectueuses peuvent non seulement entraîner des endomma- gements, dysfonctionnements ou une panne totale mais peuvent aussi être dangereuses. -
Seite 54: Données Techniques
Données techniques 3 Données techniques Regusol Regusol Regusol Regusol X-Duo 25 X-Duo 15 X-Uno 25 X-Uno 15 Données techniques générales Pression de service max. 6 bar (côté primaire) Pression de service max. 3 bar (côté secondaire) Température de service max. 120 °C Hauteur de refoulement max. - Seite 55 Données techniques Regusol Regusol Regusol Regusol X-Duo 25 X-Duo 15 X-Uno 25 X-Uno 15 Clapets ATS Résistance côté primaire 200 mm CE Résistance côté secondaire 200 mm CE Matériaux Robinetterie Laiton Joints EPDM / AFREE 400 Isolation Polypropylène expansé Clapets ATS Polyphénylsiloxane / Laiton Tubes Acier inoxydable 1.4301...
-
Seite 56: Diagrammes De Débit
Données techniques 3.1 Diagrammes de débit 3.1.1 Regusol X-Uno/Duo 15 côté primaire · Débit V [l/h] Illustr. 1: Diagramme de débit X-Uno/Duo 15 côté primaire... -
Seite 57: Regusol X-Uno/Duo 15 Côté Secondaire
Données techniques 3.1 Durchflussdiagramme 3.1.2 Regusol X-Uno/Duo 15 côté secondaire · Débit V [l/h] Illustr. 2: Diagramme de débit X-Uno/Duo 15 côté secondaire... -
Seite 58: Regusol X-Uno/Duo 25 Côté Primaire
Données techniques 3.1 Durchflussdiagramme 3.1.3 Regusol X-Uno/Duo 25 côté primaire · Débit V [l/h] Illustr. 3: Diagramme de débit X-Uno/Duo 25 côté primaire... -
Seite 59: Regusol X-Uno/Duo 25 Côté Secondaire
Données techniques 3.1 Durchflussdiagramme 3.1.4 Regusol X-Uno/Duo 25 côté secondaire · Débit V [l/h] Illustr. 4: Regusol X-Uno/Duo 25 côté secondaire... -
Seite 60: Courbes De Fonctionnement
Données techniques 3.2 Courbes de fonctionnement 3.2.1 Grundfos UPS 15-60 QH Chart Q [m Power Chart Q [m Illustr. 5: Courbes de fonctionnement Grundfos UPS 15-60 3.2.2 Grundfos Solar 15-60 QH Chart Q [m Power Chart Q [m Illustr. 6: Courbes de fonctionnement Grundfos Solar 15-60... -
Seite 61: Construction Et Fonctionnement
Construction et fonctionnement 4 Construction et fonctionnement 4.1 Regusol X-Uno 15/X-Uno 25 Le Regusol X-Uno 15/X-Uno 25 est un groupe de ro- binetterie à réglage électronique comportant un échangeur de chaleur pour une transmission contrô- lée de la chaleur du circuit solaire (circuit primaire) à... -
Seite 62: Schéma D'installation Regusol X-Uno 15/X-Uno
Construction et fonctionnement 4.1.1 Schéma d’installation Regusol X-Uno 15/X-Uno 25 Circuit primaire (circuit solaire) Robinet à tournant sphérique avec clapet ATS, raccordement pour sonde de température et thermomètre sur la manette Robinet à tournant sphérique avec raccordement pour sonde de température et thermomètre sur la manette, avec raccordement pour ensemble de sécurité... -
Seite 63: Concept De Réchauffage Regusol X-Uno 15/X-Uno
Construction et fonctionnement 4.1.2 Concept de réchauffage Regusol X-Uno 15 / X-Uno 25 Illustr. 10: Concept de réchauffage VFS: Sonde de débit et de température Entrée échangeur de chaleur venant du collec- teur Panneau collecteur Sortie échangeur de chaleur vers le réservoir Raccordement pompe circuit solaire Température inférieure réservoir... -
Seite 64: Regusol X-Duo 15/X-Duo
Construction et fonctionnement 4.2 Regusol X-Duo 15/X-Duo 25 Le Regusol X-Duo 15/X-Duo 25 est un groupe de ro- binetterie à réglage électronique comportant un échangeur de chaleur avec robinet inverseur à trois voies pour un deuxième circuit de réchauffage pour une transmission contrôlée de la chaleur du circuit so- laire (circuit primaire) à... -
Seite 65: Schéma D'installation Regusol X-Duo 15/X-Duo
Construction et fonctionnement 4.2.1 Schéma d’installation Regusol X-Duo 15 / X-Duo 25 Circuit primaire (circuit solaire) Robinet à tournant sphérique avec clapet ATS, raccordement pour sonde de température et thermomètre sur la manette Robinet à tournant sphérique avec raccordement pour sonde de température et thermomètre sur la manette, avec raccordement pour ensemble de sécurité... -
Seite 66: Concept De Réchauffage Regusol X-Duo 15/X-Duo
Construction et fonctionnement 4.2.2 Concept de réchauffage Regusol X-Duo 15 / X-Duo 25 Illustr. 14: Concept de réchauffage VFS: Sonde de débit et de température Sortie échangeur de chaleur vers le réservoir Panneau collecteur Température inférieure réservoir Raccordement pompe circuit solaire Température moyenne réservoir Raccordement pompe circuit de réchauffage Température supérieure réservoir... -
Seite 67: Concept De Réchauffage Regusol X-Duo 15/X-Duo 25 Réchauffage De Deux Réservoirs
Construction et fonctionnement 4.2.3 Concept de réchauffage Regusol X-Duo 15 / X-Duo 25 réchauffage de deux réservoirs ATTENTION! Le programme régulateur «X1030-2 réchauffa- ge par couches» n’est pas préréglé en usine et doit être chargé avant la mise en service! Voir documentation régulateur «Conseils pour l’installateur –... -
Seite 68: Montage
Montage 5 Montage 5.1 Préparation Avant le montage de la station circuit solaire: Déterminer le positionnement de la station circuit solaire en tenant compte de l’encombrement du vase d’expansion. Déterminer le positionnement et le tracé de tou- tes les conduites d’alimentation et de retour vers la station circuit solaire. -
Seite 69: Montage Mural Du Groupe De Robinetterie
Montage 5.2 Montage mural du groupe de robinetterie DANGER! Risque de blessure en cas de qualifi- cation insuffisante! Un mauvais montage peut entraîner des dommages corporels et des dégâts matériels considérables. Pour cette raison: – Le montage ne doit être effectué que par un spécialiste autorisé... - Seite 70 Montage 10. Accrocher la partie arrière de la coquille d’isola- tion (2) à l’équerre murale (1) et l’utiliser comme gabarit de perçage pour les vis de fixation du groupe de robinetterie. 11. Choisir quatre perçages (flèches) pour la fixation du groupe de robinetterie et les marquer sur le mur.
-
Seite 71: Raccordement Des Conduites D'alimentation
Montage 5.3 Raccordement des conduites d’alimen- tation 5.3.1 Regusol X-Uno 15 / X-Uno 25 Raccorder les conduites d’alimentation selon le schéma suivant: Moyennant raccords à serrage 1": 1 Circuit solaire aller 2 Circuit solaire retour A joints plats 1": 3 Circuit de réchauffage retour 4 Circuit de réchauffage aller... -
Seite 72: Regusol X-Duo 15/X-Duo 25
Montage 5.3.2 Regusol X-Duo 15/X-Duo 25 Raccorder les conduites d’alimentation selon le schéma suivant: Moyennant raccords à serrage 1": Circuit solaire aller Circuit solaire retour A joints plats 1": Circuit de réchauffage retour Circuit de réchauffage aller I. (X1020 réchauffage par couches: réservoir à... -
Seite 73: Montage De L'ensemble De Sécurité
Montage 5.4 Montage de l’ensemble de sécurité Raccorder l’ensemble de sécurité livré au raccorde- ment droit du robinet à tournant sphérique au circuit primaire. Illustr. 21: Montage de l’ensemble de sécurité 5.5 Montage du vase d’expansion ATTENTION! Des températures continues trop im- portantes et des chocs de vapeur peu- vent entraîner des dégâts matériels! Pour cette raison:... -
Seite 74: Raccordement Électrique
Montage 5.6 Raccordement électrique DANGER! Risque de mort en cas de qualifica- tion insuffisante! Un mauvais montage peut entraîner des dommages corporels et des dégâts matériels considérables. Pour cette raison: – Le montage ne doit être effectué que par un spécialiste en électricité auto- risé. -
Seite 75: Modèle X-Uno
Montage 5.6.1 Modèle X-Uno Collecteur Régulateur Illustr. 23: Modèle X-Uno... -
Seite 76: Modèle X-Duo
Montage 5.6.2 Modèle X-Duo Collecteur Collecteur Régulateur Régulateur Illustr. 24: Modèle X-Duo/Réchauffage par couches Illustr. 25: Modèle X-Duo/Réchauffage de deux réser- voirs... -
Seite 77: Mise En Service
Mise en service 6 Mise en service ATTENTION! Dégâts matériels par mauvaise de manipulation! Une mauvaise manipulation et une in- stallation incomplète peuvent entraîner des dysfonctionnements et dégâts matériels! Pour cette raison: Avant la mise en service, les états effec- tifs suivants sont à... -
Seite 78: Rinçage, Remplissage
Mise en service 6.1 Rinçage, remplissage Les stations sont soumises à un contrôle de pression en usine mais avant le remplissage, l’étanchéité de l’installation complète doit être testée par un spécia- liste. DANGER! Risque de blessure! Une mauvaise manipulation peut entraîner des dommages corporels et des dégâts matériels considérables. -
Seite 79: Remplissage Et Purge Du Circuit Secondaire
Mise en service 6.1.1 Remplissage et purge du circuit secondaire 1. Raccorder le dispositif de remplissage (pas joint à la livraison) au raccordement (6). 2. Ouvrir le clapet ATS (1) (illustr. 27). 3. Les robinets à tournant sphérique (3 et 4) doivent être ouverts. - Seite 80 Mise en service Travaux additionnels seulement pour modèle X-Duo: 8. Avant le remplissage et la purge, tourner à la main le robinet inverseur (1) en position intermédiaire: Pour cela, enfoncer la vis de fixation (2) à l’aide d’un tournevis et positionner de «A» sur «Hand» (main).
-
Seite 81: Rinçage, Remplissage Et Purge Du Circuit Primaire
Mise en service 6.1.2 Rinçage, remplissage et purge du circuit primaire ATTENTION! Dégât matériel! L’utilisation de liquides non adéquats mène à des dégâts matériels! Pour cette raison: – Ne remplir le côté primaire de l’instal- lation que d’un fluide caloporteur ap- prouvé... - Seite 82 Mise en service Raccorder le tuyau de pression du dispositif de remplissage et de rinçage (pas joint à la livraison) au raccordement (1). Raccorder le tuyau de rinçage au raccordement (7). Ouvrir le clapet ATS du robinet à tournant sphéri- que (4) en tournant la manette contre le sens des aiguilles d’une montre à...
-
Seite 83: Notes/Conseils Concernant La Mise En Service
Mise en service 16. Vérifier le réglage correct du clapet ATS et du robinet à tournant sphérique. Illustration exemplaire: Gauche = Clapet ATS fermé (position de service) Droite = Clapet ATS ouvert, manette sur position 45° 6.1.3 Notes/conseils concernant la mise en service Les pompes montées sur le circuit primaire et Illustr. -
Seite 84: Démontage Et Élimination
Démontage et élimination 7 Démontage et élimination DANGER! Risque de blessure en cas de qualifi- cation insuffisante! Une mauvaise manipulation peut entraî- ner des dommages corporels et des dégâts matériels considérables. Pour cette raison: – Ne faire effectuer le démontage que par des spécialistes. - Seite 85 Démontage et élimination 7.1 Démontage DANGER! Risque de blessure en cas de qualifi- cation insuffisante! Des énergies résiduelles accumulées, composants avec arêtes vives, pointes et carnes à l’extérieur et l’intérieur de l’appareil peuvent entraîner des blessu- res. Pour cette raison: –...
- Seite 86 Démontage et élimination 7.2 Elimination Si un accord de reprise ou d’élimination n’a pas été conclu, les composants démontés sont à amener à recyclage: Les métaux sont à mettre à la ferraille. Amener les éléments plastiques à recyclage. Eliminer les autres composants selon la qualité des matériaux.
-
Seite 87: Documents Accompagnants
Annexe 8 Annexe 8.1 Documents accompagnants Mode d’emploi pompe Mode d’emploi et instructions de montage régu- lateur Description de fonctionnement générale régula- teur Schémas hydrauliques régulateur Mode d’emploi et instructions de montage réser- voir (pas joints à la livraison) Mode d’emploi et instructions de montage collecteur solaire (pas joints à... - Seite 88 Annexe OVENTROP S.à.r.l. «Parc d’Activités Les Coteaux de la Mossig» 1, Rue Frédéric Bartholdi F-67310 Wasselonne Téléphone 03.88.59.13.13 Téléfax 03.88.59.13.14 Sous réserve de modifications techniques E-Mail mail@oventrop.fr Internet www.oventrop.fr 136105180 02/2008...
- Seite 89 Stations for solar energy Regusol X-Uno 15 Regusol X-Uno 25 Regusol X-Duo 15 Regusol X-Duo 25 Installation and operating instructions...
- Seite 90 System illustration Regusol X-Uno 15/X-Uno 25 ........
- Seite 91 Regusol X-Uno 15/X-Uno 25 ........
-
Seite 92: General Information
General information 1 General information 1.1 Information regarding operating instructions These operating instructions give important advice as to the handling of the appliance. The observance of all mentioned safety notes and instructions is the paramount for safe working conditions. Before working at or with the appliance, especial- ly before installation and initial operation, these operating instructions are to be read carefully! These instructions should remain with the... -
Seite 93: Liability
General information 1.3 Liability The manufacturer does not accept liability for damages or malfunctions caused by nonobser- vance of these operarting instructions. 1.4 Copyright The operating instructions are confidential. They are exclusively for the persons dealing with the appliance. Transfer of the operating instructions to a third person without written approval of the manufacturer is inadmissible. -
Seite 94: Safety Notes
Safety notes 2 Safety notes At the time of its development, the appliance was developed and manufactured according to the valid, approved rules of technology and is of high functional efficiency. The application of the appli- ance may, however, involve certain dangers if it is not used properly or correctly. -
Seite 95: Personnel
Safety notes 2.2 Personnel Installation, maintenance and repair may only be carried out by qualified trades persons. WARNING! Risk of injury! Improper use may lead to consider- able injuries to persons and damage to property. For this reason: – Any work may only be carried out by qualified persons. -
Seite 96: Specific Risks
Safety notes 2.3 Specific risks The safety notes shown here as well as the warn- ing notes in other chapters of these instructions are to be observed in order to reduce health risks and to avoid dangerous situations. WARNING! Risk of scalding by hot surfaces! Contact with hot components may lead to scalds. -
Seite 97: Spare Parts
Safety notes 2.4 Spare parts WARNING! Risk of injury! Wrong or faulty spare parts may not only lead to damages, malfunctions or a total loss of power but also impair safety. For this reason: – Only use original spare parts of the manufacturer. -
Seite 98: Technical Data
Technical data 3 Technical data Regusol Regusol Regusol Regusol X-Duo 25 X-Duo 15 X-Uno 25 X-Uno 15 General technical data Max. working pressure 6 bar (primary side) Max. working pressure 3 bar (secondary side) Max. working temperature 120 °C Max. pump head (primary side) Max. - Seite 99 Technical data Regusol Regusol Regusol Regusol X-Duo 25 X-Duo 15 X-Uno 25 X-Uno 15 Check valves Resistance primary circuit 200 mm WG Resistance secondary circuit 200 mm WG Materials Valves Brass Seals EPDM / AFREE 400 Insulation Expanded polypropylene PPS / Brass Pipes Stainless steel 1.4301 Heat exchanger...
-
Seite 100: Flow Charts
Technical data 3.1 Flow charts 3.1.1 Regusol X-Uno 15/Duo 15 primary side · Flow rate V [l/s] Illustr 1: Flow chart X-Uno/Duo 15 primary side... -
Seite 101: Regusol X-Uno 15/Duo 15 Secondary Side
Technical data 3.1 Durchflussdiagramme 3.1.2 Regusol X-Uno 15/Duo 15 secondary side · Flow rate V [l/s] IIustr. 2: Flow chart X-Uno/Duo 15 secondary side... -
Seite 102: Regusol X-Uno 15/Duo 25 Primary Side
Technical data 3.1 Durchflussdiagramme 3.1.3 Regusol X-Uno/Duo 25 primary side · Flow rate V [l/s] IIustr. 3: Flow chart X-Uno/Duo 25 primary side... -
Seite 103: Regusol X-Uno 15/Duo 25 Secondary Side
Technical data 3.1 Durchflussdiagramme 3.1.4 Regusol X-Uno/Duo 25 secondary side · Flow rate V [l/s] IIustr. 4: Flow chart X-Uno/Duo 25 secondary side... -
Seite 104: Pump Characteristics
Technical data 3.2 Pump characteristics 3.2.1 Grundfos UPS 15-60 QH Chart Q [m Power Chart Q [m Illustr. 5: Pump curves Grundfos UPS 15-60 3.2.2 Grundfos Solar 15-60 QH Chart Q [m Power Chart Q [m Illustr. 6: Pump curves Grundfos Solar 15-60... -
Seite 105: Construction And Function
Construction and function 4 Construction and function 4.1 Regusol X-Uno 15/X-Uno 25 Regusol X-Uno 15/X-Uno 25 are electronically controlled product assemblies with heat exchanger for the controlled transmission of the heat of the solar circuit (primary circuit) to a monovalent storage cylinder (secondary circuit);... -
Seite 106: System Illustration Regusol X-Uno 15/X-Uno
Construction and function 4.1.1 System illustration Regusol X-Uno 15 / X-Uno 25 Primary circuit (solar circuit) Ball valve with check valve, temperature sensor connection and thermometer inside handle Ball valve, temperature sensor connection and thermometer inside handle, with connection for safety group... -
Seite 107: Loading Concept Regusol X-Uno 15/X-Uno
Construction and function 4.1.2 Loading concept Regusol X-Uno 15 / X-Uno 25 Illustr. 10: Loading concept VFS: Flow and temperature sensor Heat exchanger entry point from collector Collector field Heat exchanger exit point to storage cylinder Connection pump solar circuit... -
Seite 108: Regusol X-Duo 15/X-Duo
Construction and function 4.2 Regusol X-Duo 15/X-Duo 25 Regusol X-Duo 15/X-Duo 25 are electronically controlled product assemblies with heat exchanger and three-way conversion valve for second loading circuit for a controlled transmis- sion of the heat of the solar circuit (primary cir- cuit) to a monovalent storage cylinder (secondary circuit);... -
Seite 109: System Illustration Regusol X-Duo 15/X-Duo
Construction and function 4.2.1 System illustration Regusol X-Duo 15 / X-Duo 25 Primary circuit Ball valve with check valve, temperature sen- sor connection and thermometer inside handle Ball valve, temperature sensor connection and thermometer inside handle, with connection for safety group Safety group with safety valve (6 bar) Pump (solar circuit) Insulation... -
Seite 110: Loading Concept Regusol X-Duo 15/X-Duo
Construction and function 4.2.2 Loading concept Regusol X-Duo 15 / X-Duo 25 Illustr. 14: Loading concept VFS: Flow and temperature sensor Heat exchanger exit point to storage cylinder Collector field Lower storage cylinder temperature Connection pump solar circuit Medium storage cylinder temperature Connection pump loading circuit Upper storage cylinder temperature Sp1:... -
Seite 111: Loading Concept Regusol X-Duo 15/X-Duo 25 Loading Of Two Storage Cylinders
Construction and function 4.2.3 Loading concept Regusol X-Duo 15 / X-Duo 25 loading of two storage cylinders ATTENTION! The control programme “X1030-2 loading of 2 storage cylinders” is not preset at works and has to be loaded before initial opera- tion! See control documentation “Notes for the installer –... - Seite 112 Installation 5 Installation 5.1 Preparations Before installation of the solar circuit station: Determine the positioning of the solar circuit station taking the required space for the ex- pansion tank into consideration. Determine positioning and route of all supply and return pipes to the solar circuit station. WARNING! Danger to life! Improper installation may lead to...
- Seite 113 Installation 5.2 Wall attachment of product assembly WARNING! Danger to life! Improper installation may lead to extensive injuries to persons and damage to property. For this reason: – Have installation only carried out by a qualified gas and water spe- cialist.
- Seite 114 Installation 10. Suspend rear insulation shell (2) in the angled wall bracket (1) and use as drilling jig for the fixing screws of the product assembly. 11. Choose four drill holes (arrows) for fixing the product assembly and mark them on the wall. 12.
- Seite 115 Installation 5.3 Connection of supply pipes 5.3.1 Regusol X-Uno 15/X-Uno 25 Connect supply pipes according to the following scheme: Using 1” compression fittings: 1 Solar circuit supply 2 Solar circuit return 1" flat sealing: 3 Storage cylinder circuit return 4 Storage cylinder circuit supply...
- Seite 116 Installation 5.3.2 Regusol X-Duo 15/X-Duo 25 Connect supply pipes according to the following scheme: Using 1" compression fittings: Solar circuit supply Solar circuit return 1" flat sealing: Storage cylinder circuit return Storage cylinder circuit supply I (X1020 storage cylinder loading: storage cylinder with loading operation section by section at the top, X1030 loading of two storage cylinders...
- Seite 117 Installation 5.4 Installation of safety group Connect the safety group included in the delivery to the right hand side ball valve connection at the primary circuit. Illustr. 21: Installation of safety group 5.5 Installation of expansion tank ATTENTION! Too high continuous temperatures and steam shocks may lead to damage to property! For this reason:...
-
Seite 118: Electrical Connection
Installation 5.6 Electrical connection WARNING! Danger to life! Improper installation may lead to extensive injuries to persons and damage to property. For this reason: – Installation should only be carried out by a qualified electrician. – Before starting work, please ensure that all components are disconnec- ted from power supply. - Seite 119 Installation 5.6.1 Model X-Uno Collector Control Illustr. 23: Model X-Uno...
- Seite 120 Installation 5.6.2 Model X-Duo Collector Collector Control Control Illustr. 24: Model X-Duo loading operation section Illustr. 25: Model X-Duo loading of two storage by section cylinders...
-
Seite 121: Initial Operation
Initial operation 6 Initial operation ATTENTION! Damage to property through oper- ating error! Operating errors and an incomplete installation may cause malfunction and damage to property!! For this reason: Before initial operation, the following conditions are to be checked: – All ball valves must be completely opened!! –... - Seite 122 Initial operation 6.1 Flushing, filling The Regusol X stations are pressure tested when leaving the factory. Before filling, the complete system however has to be subjected to a leakage test by the specialist tradesman. WARNING! Risk of injury! Improper use may lead to extensive injuries to persons and damage to property.
- Seite 123 Initial operation 6.1.1 Filling and bleeding of secondary circuit 1. Connect filling device (not supplied) to connec- tion (6). 2. Open check valve (1) (illustr. 27). 3. Ball valves (3 and 4) must be opened. 4. Open fill and drain valve (5) slowly (parallel to pipe) and fill installation until it reaches the desired pressure.
- Seite 124 Initial operation Additional work only for X-Duo model: 8. Turn conversion valve (1) to neutral position by hand. To do so, push in safety screw (2) by using a screwdriver and turn from position “A” to position “Hand”. Turn rotary knob (3) to me- dium position (arrow points vertically to the left).
- Seite 125 Initial operation 6.1.2 Flushing, filling and bleeding of primary circuit ATTENTION! Damage to property! The use of unsuitable liquids will cause damage to property! For this reason: – Only fill primary side with an appro- ved heat transfer medium on glycol basis (e.g.
- Seite 126 Initial operation Connect pressure hose of the filling and flus- hing device (not supplied) to connection (1). Connect flushing hose to connection (7). Open check valve in ball valve (4) by turning the handle anti-clockwise to 45°, see illustr. 30. Close ball valve (5) by turning the handle anti- clockwise to 90°.
- Seite 127 Initial operation 16. Check correct setting of check valve and ball valve. Example illustration: Left hand side = Check valve closed (operating position) Right hand side = Check valve opened, handle at 45° 6.1.3 Notes/Advice for initial operation The pumps installed in the primary and secon- dary circuit have three adjustable phases.
-
Seite 128: Removal And Disposal
Removal and disposal 7 Removal and disposal WARNING! Risk of injury! Improper use may lead to extensive injuries to persons and damage to property For this reason: – Removal must only be carried out by qualified trades persons. – Have any work at the electrical in- stallation only carried out by a qua- lified electrician. - Seite 129 Removal and disposal 7.1 Removal WARNING! Risk of injury if incorrectly disman- teled! Stored residual energies, angular components, points and edges at the outside and inside of the appliance may cause injuries. For this reason: – Before starting work, make sure that there is enough space.
- Seite 130 Removal and disposal 7.2 Disposal If no return or disposal arrangements have been made, dismantled components are to be recy- cled: Metals are to be scrapped. Plastic parts are to be recycled. Depending on the material they are made of, other components are to be disposed of accordingly.
-
Seite 131: Accompanying Documents
Appendix 8 Appendix 8.1 Accompanying documents Operating instructions pump Operating and installation instructions for con- troller General functional description for controller Diagram for hydronic controller Operating and installation instructions storage cylinder (not supplied) Operating and installation instructions solar collector (not supplied) Operating and installation instructions of other components of the heating installation (not supplied) - Seite 132 Appendix OVENTROP UK LTD. Unit I – The Loddon Centre Wade Road Basingstoke, Hampshire RG24 8FL Great Britain Telephone (0 12 56) 33 04 41 Telefax (Sales) (0 12 56) 33 05 25 Subject to technical modification Telefax (General) (0 12 56) 47 09 70...