Herunterladen Inhalt Inhalt Diese Seite drucken

Werbung

Verfügbare Sprachen
  • DE

Verfügbare Sprachen

  • DEUTSCH, seite 1
Quickstick smart
Sous-vide-Stick
Sous-vide Stick
Varilla Sous-vide
Variglia sous-vide
Stick sous-vide
10035556

Werbung

Inhaltsverzeichnis
loading

Inhaltszusammenfassung für Klarstein Quickstick smart

  • Seite 1 Quickstick smart Sous-vide-Stick Sous-vide Stick Varilla Sous-vide Variglia sous-vide Stick sous-vide 10035556...
  • Seite 3: Inhaltsverzeichnis

    Sehr geehrter Kunde, wir gratulieren Ihnen zum Erwerb Ihres Gerätes. Lesen Sie die folgenden Hinweise sorgfältig durch und befolgen Sie diese, um möglichen Schäden vorzubeugen. Für Schäden, die durch Missachtung der Hinweise und unsachgemäßen Gebrauch entstehen, übernehmen wir keine Haftung. Scannen Sie den folgenden QR-Code, um Zugriff auf die aktuellste Bedienungsanleitung und weitere Informationen rund um das Produkt zu erhalten.
  • Seite 4: Sicherheitshinweise

    SICHERHEITSHINWEISE • Kinder ab 8 Jahren, psychisch, sensorisch und körperlich eingeschränkte Menschen dürfen das Gerät nur benutzen, wenn sie vorher von einer für sie verantwortlichen Aufsichtsperson ausführlich mit den Funktionen und den Sicherheitsvorkehrungen vertraut gemacht wurden und die damit verbundenen Risiken verstehen. •...
  • Seite 5: Geräteübersicht

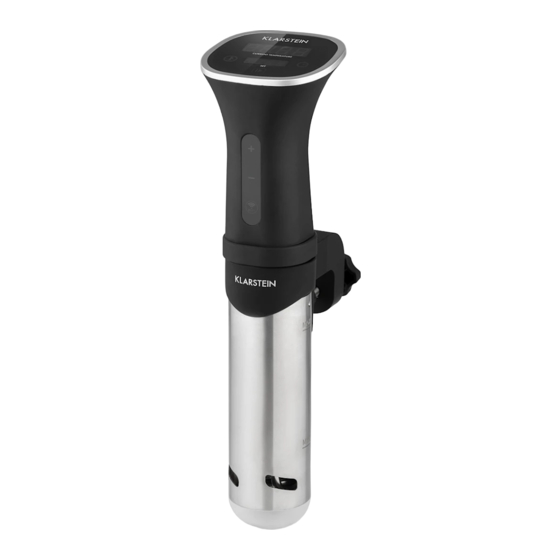
    GERÄTEÜBERSICHT Pumpendeckel Motorgehäuse Bedienfeld Pumpgehäuse Anpassungs-Tasten (+/-) Ringklemmknopf WiFi-Taste Verstellbare Ringklemme...
  • Seite 6: Bedienfeld Und Tasten

    BEDIENFELD UND TASTEN Aktuelle Temperatur Temperatur Timer Eingestellte Temperatur Start/Stop Das Bedienfeld besteht aus einel LED-Display, einer Zeitschaltuhr (Timer) und Tasten zur Temperaturregelung sowie einer Start/Stop-Taste. EINSTELLUNGEN Temperatureinheit ändern Halten Sie die Start/Stop- Taste etwa 3 Sekunden lang gedrückt, um zwischen den Temperatureinheiten Fahrenheit und Celsius umzuschalten.
  • Seite 7 Timer einstellen 1. Drücken Sie die Timer-Taste auf dem Bedienfeld und dann die Anpassungs-Tasten (+/-), um die Stunden einzustellen. 2. Drücken Sie die Timer-Taste, um den Stundenwert zu speichern, und drücken Sie dann die Anpassungs-Tasten (+/-), um die Minuten einzustellen. 3.
  • Seite 8 2. Positionieren Sie die Durchflussöffnungen an der Seite des Pumpendeckels, wie gewünscht. Führen Sie die Haltelaschen in die Schlitze ein und drehen Sie dann die Kappe gegen den Uhrzeigersinn, um sie zu arretieren. Durchflussöffnung Kalibrierung des Temperatursensors Der Temperatursensor auf dem Sous-vide-Stick ist extrem genau und wird im Werk kalibriert.
  • Seite 9: Bedienung

    BEDIENUNG Stellen Sie sicher, dass der Herd von Führen Sie den Sous-vide-Stock in die der Stromquelle getrennt ist. Bringen verstellbare Ringklemme ein. Sie die verstellbare Ringklemme an der Seite Ihres Topfes oder Behälters an und klemmen Sie sie dann fest. Füllen Sie den Topf mit Wasser bis zu einem gewissen Niveau zwischen der MIN- und MAX-Linie an der Seite des...
  • Seite 10: Gerätesteuerung Per Smartphone

    GERÄTESTEUERUNG PER SMARTPHONE Wenn Sie Ihr Klarstein-Gerät in Ihr heimisches WLAN einbinden, können Sie es ganz bequem über die dazugehörige Klarstein-App bedienen. Die App ermöglicht es Ihnen, nicht nur das Gerät über Ihr Smartphone fernzusteuern, sondern bietet Ihnen zudem Zugang zu Rezepten und weiterführenden Informationen.
  • Seite 11: Reinigung Und Pflege

    Fehlerbehebung bei Verbindungsproblemen Wenn Ihr Klarstein-Gerät im WLAN nicht gefunden werden kann, überprüfen Sie Folgendes: • Ist das Gerät eingesteckt? • Ist die WLAN-Funktion des Smartphones aktiviert? • Ist die WLAN-Funktion des Klarstein-Gerätes aktiviert? (Befolgen Sie die Anweisungen in der App.) •...
  • Seite 12: Hinweise Zur Entsorgung

    HINWEISE ZUR ENTSORGUNG Befindet sich die linke Abbildung (durchgestrichene Mülltonne auf Rädern) auf dem Produkt, gilt die Europäische Richtlinie 2012/19/EU. Diese Produkte dürfen nicht mit dem normalen Hausmüll entsorgt werden. Informieren Sie sich über die örtlichen Regelungen zur getrennten Sammlung elektrischer und elektronischer Gerätschaften.
  • Seite 13: Technical Data

    Dear Customer, Congratulations on purchasing this device. Please read the following instructions carefully and follow them to prevent possible damages. We assume no liability for damage caused by disregard of the instructions and improper use. Scan the QR code to get access to the latest user manual and more product information.
  • Seite 14: Safety Instructions

    SAFETY INSTRUCTIONS • This device may be only used by children 8 years old or older and persons with limited physical, sensory and mental capabilities and / or lack of experience and knowledge, provided that they have been instructed in use of the device by a responsible person who understands the associated risks.
  • Seite 15: Device Overview

    DEVICE OVERVIEW Pump covers Motor housing Control panel Pump housing Adjustment keys (+/-) Ring terminal button WiFi button Adjustable ring clamp...
  • Seite 16: Control Panel And Keys

    CONTROL PANEL AND KEYS Current temperature Temperature Timer Set temperature Start/Stop The control panel consists of an LED display, a timer, temperature control buttons and a start/stop button. SETTINGS Changing the temperature unit Press and hold the Start/Stop button for about 3 seconds to toggle between the temperature units Fahrenheit and Celsius.
  • Seite 17 Setting the timer 1. Press the Timer button on the control panel and then the adjustment buttons (+/-) to set the hours. 2. Press the Timer button to save the hour value and then press the adjustment buttons (+/-) to set the minutes. 3.
  • Seite 18 2. Position the flow openings on the side of the pump cover as desired. Insert the retaining tabs into the slots, then turn the cap counterclockwise to lock it in place. Flow opening Calibration of the temperature sensor The temperature sensor on the sous-vide stick is extremely accurate and is calibrated at the factory.
  • Seite 19: Operation

    OPERATION Make sure that the stove is disconnected Insert the sous-vide stick into the from the power source. Attach the adjustable ring clamp. adjustable ring clamp to the side of your pot or container and then clamp it in place. Fill the pot with water to a certain level between the MIN and MAX lines on the side of the pump housing.
  • Seite 20: Device Control By Smartphone

    Klarstein device is to be connected to. 3. Open the Klarstein app. 4. Sign in to your account. If you do not have an account, sign up in the Klarstein app. 5. Follow the instructions from the app. App Download Use the scan function of your smartphone to scan the QR code and save the app on your smartphone.
  • Seite 21: Cleaning And Care

    If your Klarstein device cannot be found in the WLAN, check the following: • Is the device plugged in? • Is the WiFi feature of my phone enabled? • Is the WiFi function of the Klarstein device activated? (Follow the instructions in the app) • Has the WLAN password been entered correctly? •...
  • Seite 22: Hints On Disposal

    HINTS ON DISPOSAL According to the European waste regulation 2012/19/EU this symbol on the product or on its packaging indicates that this product may not be treated as household waste. Instead it should be taken to the appropriate collection point for the recycling of electrical and electronic equipment.
  • Seite 23: Datos Técnicos

    Estimado cliente, Le felicitamos por la adquisición de este producto. Lea atentamente el siguiente manual y siga cuidadosamente las instrucciones de uso con el fin de evitar posibles daños. La empresa no se responsabiliza de los daños ocasionados por un uso indebido del producto o por haber desatendido las indicaciones de seguridad.
  • Seite 24: Indicaciones De Seguridad

    INDICACIONES DE SEGURIDAD • Este aparato puede ser utilizado por niños mayores de 8 años y personas con discapacidades físicas, sensoriales y mentales y/o con falta de experiencia y conocimientos, siempre y cuando hayan sido instruidos sobre el uso del aparato y comprendan los peligros y riesgos asociados.
  • Seite 25: Vista General Del Aparato

    VISTA GENERAL DEL APARATO Tapa de la bomba Carcasa del motor Panel de control Alojamiento de la bomba Botones de ajuste (+/-) Botón de la anilla de sujeción Botón WiFi Anilla de sujeción regulable...
  • Seite 26: Panel De Control Y Teclas

    PANEL DE CONTROL Y TECLAS Temperatura actual Temperatura Temporizador Temperatura seleccionada Start/Stop El panel de control se compone de una pantalla LED, un temporizador (timer) y botones para regular la temperatura, además de una tecla Start/stop. AJUSTES Modificar la unidad de temperatura Mantenga pulsado el botón Start/ Stop durante 3 segundos para cambiar la unidad de temperatura...
  • Seite 27: Programar El Temporizador

    Programar el temporizador 1. Pulse el botón del temporizador en el panel de control y, a continuación, pulse el botón de ajuste (+/-) para seleccionar las horas. 2. Pulse el botón del temporizador para guardar las horas y, a continuación, pulse los botones de ajuste (+/-) para seleccionar los minutos.
  • Seite 28 2. Oriente los orificios de flujo hacia el lateral de la tapa de la bomba según desee. Introduzca las patillas de sujeción por las ranuras y gire la tapa en sentido antihorario para bloquearla. Orificio de flujo Calibración del sensor de temperatura El sensor de temperatura del stick de cocción al vacío es muy preciso y se calibra durante el proceso productivo.
  • Seite 29 MANEJO Asegúrese de que el hornillo se haya Introduzca el stick de cocción al vacío en desconectado de la red eléctrica. la anilla ajustable. Coloque la anilla de sujeción regulable en el lateral de la olla o recipiente y sujétela. Llene la olla de agua hasta un nivel comprendido entre las líneas MIN y MAX situadas en el lateral del...
  • Seite 30: Control Del Dispositivo Por Smartphone

    Si conecta el aparato a su red WLAN doméstica, podrá controlarlo cómodamente mediante la App correspondiente de Klarstein. La App le permite no solo controlar el aparato mediante su smartphone, sino que también le ofrece acceso a recetas y otra información adicional.
  • Seite 31: Limpieza Y Cuidado

    Solución de problemas de conexión Si su dispositivo Klarstein no se encuentra en la WLAN, compruebe lo siguiente: • ¿Está enchufado el dispositivo? • ¿Está activada la función WiFi de mi teléfono? • ¿Está activada la función WiFi del dispositivo Klarstein? (Sigue las instrucciones de la aplicación)
  • Seite 32: Retirada Del Aparato

    RETIRADA DEL APARATO Si el aparato lleva adherida la ilustración de la izquierda (el contenedor de basura tachado) entonces rige la normativa europea, directiva 2012/19/UE. Este producto no debe arrojarse a un contenedor de basura común. Infórmese sobre las leyes territoriales que regulan la recogida separada de aparatos eléctricos y electrónicos.
  • Seite 33: Fiche Technique

    Chère cliente, cher client, Toutes nos félicitations pour l’acquisition de ce nouvel appareil. Veuillez lire attentivement et respecter les instructions de ce mode d’emploi afin d’éviter d’éventuels dommages. Nous ne saurions être tenus pour responsables des dommages dus au non-respect des consignes et à la mauvaise utilisation de l’appareil.
  • Seite 34: Consignes De Sécurité

    CONSIGNES DE SÉCURITÉ • Cet appareil peut être utilisé par des enfants de 8 ans ou plus et des personnes ayant des capacités physiques, sensorielles et mentales limitées et / ou dénuées d‘expérience et de connaissances, à condition d‘avoir été instruits au fonctionnement de l‘appareil par une personne responsable et d‘en comprendre les risques associés.
  • Seite 35: Aperçu De L'appareil

    APERÇU DE L‘APPAREIL Couvercle de la pompe Carter moteur Panneau de commande Carter de la pompe Touches d'ajustement (+/-) Bouton de serrage à anneau Touche WiFi Bouton de serrage réglable...
  • Seite 36: Panneau De Commande Et Touches

    PANNEAU DE COMMANDE ET TOUCHES Température actuelle Température Minuterie Température réglée Marche/arrêt Le panneau de commande comporte un affichage LED, une minuterie et des touches de contrôle de la température ainsi qu‘une touche marche / arrêt. RÉGLAGES Changement d‘unité de température Maintenez la touche Marche / Arrêt pendant environ 3 secondes pour basculer entre les unités de...
  • Seite 37 Réglage de la minuterie 1. Appuyez sur la touche de Minuterie du panneau de commande, puis sur les touches de réglage (+/-) pour régler les heures. 2. Appuyez sur la touche de la minuterie pour enregistrer la valeur de l‘heure, puis appuyez sur les touches de réglage (+/-) pour régler les minutes.
  • Seite 38 2. Positionnez les orifices de débit sur le côté du couvercle de la pompe comme vous le souhaitez. Insérez les languettes de retenue dans les fentes, puis tournez le capuchon dans le sens antihoraire pour le verrouiller en place. Libération de flux Etalonnage du capteur de température Le capteur de température du stick sous-vide est extrêmement précis et est étalonné...
  • Seite 39: Utilisation

    UTILISATION Assurez-vous que la cuisinière est Insérez le stick sous vide dans la bague débranchée de la source d'alimentation. de serrage réglable. Fixez la bague de serrage réglable sur le côté de votre casserole ou récipient, puis serrez-la en place. Remplissez la casserole d‘eau entre les lignes MIN et MAX sur le côté...
  • Seite 40: Contrôle De L'appareil Par Smartphone

    à distance l‘appareil via votre smartphone, mais vous donne également accès à des recettes et à des informations supplémentaires. Procédez comme suit pour connecter votre smartphone avec votre appareil Klarstein : 1. Téléchargez d‘abord l‘application Klarstein en scannant le code QR avec votre smartphone (voir ci-dessous) ou téléchargez-le directement depuis l‘App Store ou...
  • Seite 41: Nettoyage Et Entretien

    Dépannage des problèmes de connexion Si votre appareil Klarstein ne se trouve pas dans le WLAN, vérifiez les points suivants : • L‘appareil est-il branché ? • La fonction WiFi de mon téléphone est-elle activée ? • La fonction WiFi de l‘appareil Klarstein est-elle activée ? (Suivez les instructions dans l‘application)
  • Seite 42: Informations Sur Le Recyclage

    INFORMATIONS SUR LE RECYCLAGE Le pictogramme ci-contre apposé sur le produit signifie que la directive européenne 2012/19/UE s‘applique (poubelle à roues barrée d’une croix). Ces produits ne peuvent être jetés dans les poubelles domestiques courantes. Renseignez- vous concernant les règles appliquées pour la collecte d’appareils électriques et électroniques.
  • Seite 43: Dati Tecnici

    Gentile Cliente, La ringraziamo per aver acquistato il dispositivo. La preghiamo di leggere attentamente le seguenti istruzioni per l’uso e di seguirle per evitare possibili danni tecnici. Non ci assumiamo alcuna responsabilità per danni scaturiti da una mancata osservazione delle avvertenze di sicurezza e da un uso improprio del dispositivo.
  • Seite 44: Avvertenze Di Sicurezza

    AVVERTENZE DI SICUREZZA • Questo dispositivo può essere utilizzato da bambini a partire da 8 anni e da persone con limitate capacità fi siche e psichiche o con conoscenza ed esperienza limitate, solo se sono stati istruiti sulle modalità d’uso e comprendono i rischi e i pericoli connessi.
  • Seite 45: Descrizione Del Dispositivo

    DESCRIZIONE DEL DISPOSITIVO Coperchio della pompa Alloggiamento motore Pannello di controllo Alloggiamento pompa Tasti di regolazione (+/-) Manopola del morsetto ad anello Tasto Wi-Fi Morsetto ad anello regolabile...
  • Seite 46 PANNELLO DI CONTROLLO E TASTI Temperatura attuale Temperatura Timer Temperatura impostata Start/Stop Il pannello di controllo è composto da un display LED, un timer, tasti di regolazione della temperatura e tasto Start/Stop. IMPOSTAZIONI Cambiare l’unità di misura della temperatura Tenere premuto Start/Stop per circa 3 secondi per passare da Fahrenheit a Celsius e viceversa.
  • Seite 47 Impostare il timer 1. Premere Timer sul pannello di controllo e poi i tasti di regolazione (+/-) per impostare le ore. 2. Premere Timer per salvare le ore e premere poi i tasti di regolazione (+/-) per impostare i minuti. 3.
  • Seite 48 2. Posizionare le aperture di scorrimento sul lato del coperchio della pompa in base alle preferenze. Far passare la fascetta di fissaggio nella fessura e girare poi il tappo in senso antiorario per bloccarla. Aperture di scorrimento Calibrazione del sensore della temperatura Il sensore della temperatura dello stick sous-vide è...
  • Seite 49 UTILIZZO Assicurarsi che il fornello sia scollegato Far passare lo stick sous-vide nel dalla fonte di alimentazione. Installare morsetto ad anello regolabile. il morsetto ad anello regolabile sul bordo della pentola o del contenitore e stringerlo saldamente. Riempire la pentola d’acqua, assicurandosi che il livello di riempimento sia compreso tra le linee MIN.
  • Seite 50: Gestione Tramite Smartphone

    Per collegare il telefono al dispositivo Klarstein, procedere come segue: 1. Per prima cosa scaricare l‘app Klarstein scansionando il codice QR con lo smartphone (vedere sotto) o scaricarla direttamente dall‘App Store o da Google Play.
  • Seite 51: Pulizia E Manutenzione

    • Il dispositivo è collegato? • La funzione WiFi del telefono è abilitata? • La funzione WiFi del dispositivo Klarstein è attivata? (Seguire le istruzioni nell‘app) • La password WLAN è stata immessa correttamente? • Il router, il dispositivo Klarstein e lo smartphone sono nelle immediate vicinanze durante il tentativo di connessione? (Idealmente a non più...
  • Seite 52: Smaltimento

    SMALTIMENTO Se sul prodotto è presente la figura a sinistra (il cassonetto dei rifiuti mobile sbarrato), si applica la direttiva europea 2012/19/UE. Questi prodotti non possono essere smaltiti con i rifiuti normali. Informarsi sulle disposizioni vigenti in merito alla raccolta separata di dispositivi elettrici ed elettronici. Non smaltire i vecchi dispositivi con i rifiuti domestici.

Diese Anleitung auch für:

10035556

Inhaltsverzeichnis