OSRAM e:cue LIGHTDRIVE+ Installationsanleitung

Verwandte Anleitungen für OSRAM e:cue LIGHTDRIVE+

Inhaltszusammenfassung für OSRAM e:cue LIGHTDRIVE+
- Seite 1 Light is OSRAM Our Brand AB465960038, AB465970038 e:cue LIGHTDRIVE+ Setup Manual / Installationsanleitung...
- Seite 2 Diese Dokumentation bezieht sich auf den Firmwarestand: 1.1.6411 Published by/Herausgegeben von: OSRAM GmbH Karl-Schurz-Strasse 38 33100 Paderborn, Germany ©2019 OSRAM GmbH All rights reserved/Alle Rechte vorbehalten Subject to modification without prior notice. Alle Änderungen vorbehalten. Rechtschreib- Typographical and other errors do not jus- fehler oder andere Fehler rechtfertigen keinen tify any claim for damages.
-
Seite 31: Deutsch
Setup Manual - LIGHTDRIVE+ Deutsch... -
Seite 32: Sicherheitshinweise
Sicherheitshinweise Lesen Sie die Sicherheitshinweise im zusätzlichen Heft sorg- fältig. Sollten das Heft fehlen, kontaktieren Sie den Support der OSRAM BU Lighting Solutions für ein neues Exemplar. Stellen Sie sicher, dass die angegebenen Umgebungsbedin- gungen, Montage- und Installationsvoraussetzungen einge- halten werden. Alle anderen Anwendungen sind nicht zulässig und ein sicherer Betrieb ist nicht gewährleistet. -
Seite 33: Übersicht
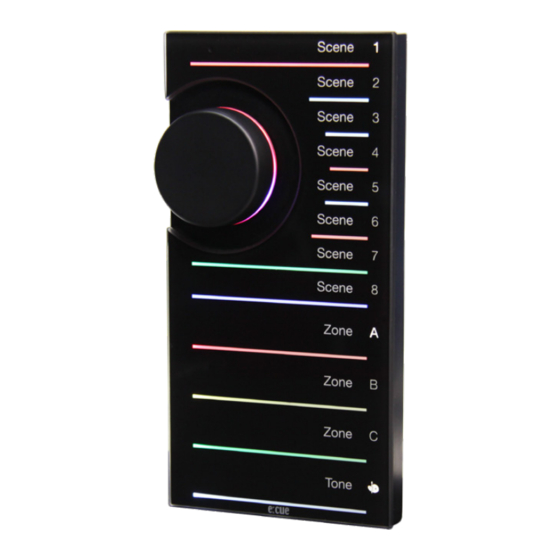
Setup Manual - LIGHTDRIVE+ Übersicht Das LIGHTDRIVE+ ist eine wandmontierte, selbstständige DMX512-Steuerung für dynamisches Licht. Berührungsempfindliche Tasten und ein Jog-Rad erlauben die intuitive Wahl von Farben und die Anpassung von Helligkeit und Effektgeschwin- digkeit. Auf acht Plätzen können selbsterstellte Einstellungen gespeichert werden. Ebenso möglich ist die Konfiguration über einen PC und eine USB-Schnittstelle. -
Seite 34: Allgemeine Hinweise
Setup Manual - LIGHTDRIVE+ Allgemeine Hinweise 23.1 Transport Transportieren Sie das Gerät nur in seiner originalen Verpackung um Schäden zu ver- meiden. Entpacken Sie das Gerät nur am Installationsort. Um Schäden bei Wechsel von Kälte zu Wärme durch Kondensationswasser zu verhindern, warten Sie nach dem Auspacken, bis das Gerät die Temperatur am Installationsort angenommen hat. -
Seite 35: Reparatur Und Wartung
Schicken Sie es zur Reparatur oder zum Ersatz an Ihren Distributor! 23.6 Technischer Support Bei technischen Problemen oder Fragen zum Gerät wenden Sie sich bitte an: OSRAM GmbH Kundenservice Karl-Schurz-Strasse 38 33100 Paderborn Deutschland +49 (5251) 54648-0... -
Seite 36: Montage
Setup Manual - LIGHTDRIVE+ Montage Das LIGHTDRIVE+ kann in gängigen Unterputzdosen installiert werden (DE, US, UK, JP und andere). Es wird empfohlen in einer Doppeldose zu montieren, um ausrei- chend Raum für Kabel zu haben. Befestigen Sie die Montageplatte für das LIGHTDRIVE+ auf der Dose, den Ausschnitt oben. -
Seite 37: Anschlüsse
Setup Manual - LIGHTDRIVE+ Anschlüsse Spannungsversorgung + Spannungsversorgung – DMX 2 Masse DMX 2+ 1 2 3 4 5 6 DMX 2– DMX 1 Masse DMX 1+ DMX 1– PoE Versorgung A Ausgang 1 Masse PoE Versorgung B Ausgang 1 Ethernet Rx–... -
Seite 38: Dip-Schalter
Setup Manual - LIGHTDRIVE+ DIP-Schalter Die DIP-Schalter bestimmen die grundlegende Konfiguration der verwendeten Leuchtentypen in den drei Zonen und Sperren für Funktionen. Die DIP-Schalter wer- den nur beim Anlegen der Versorgungsspannung eingelesen. Nach Änderungen an den DIP-Schaltern muss das LIGHTDRIVE+ von der Versorgungsspannung getrennt und wieder verbunden werden. -
Seite 39: Leuchtentypen
Setup Manual - LIGHTDRIVE+ 26.1 Leuchtentypen Leuchtentyp Monochrome Dynamisches Weiß RGBW 26.2 Zonen Das LIGHTDRIVE+ steuert bis zu drei Zonen, die von der Frontplatte gewählt werden können. Zones DMX 1, DMX-Adressen 1 ... 512 DMX 2, DMX-Adressen 1 ... 256 (Standardwert) DMX 2, DMX-Adressen 257 ... -
Seite 40: Weitere Konfigurationsmöglichkeiten
Setup Manual - LIGHTDRIVE+ Weitere Konfigurationsmöglichkeiten Mit dem LIGHTDRIVE+ Configurator kann die Konfiguration des LIGHTDRIVE+ wei- tergehend angepasst werden, zum Beispiel: y Gedimmte Lichtbalken: nur der Balken der aktiven Scene ist vollständig beleuch- tet, die inaktiven Scene-Balken sind gedimmt. y Start- und Endwerte der DMX-Kanäle für die Zones können frei definiert werden. Stromversorgung Als Stromversorgung für das LIGHTDRIVE+ dient ein externes 24 V-Netzteil mit Gleichspannung, oder Standard Power over Ethernet (PoE). -
Seite 41: Jog-Rad
Setup Manual - LIGHTDRIVE+ Wird das LIGHTDRIVE+ nicht benutzt, werden Balken und LEDs nach 30 Sekunden (Standard) gedimmt. Es wird wieder aktiviert, sobald das Jog-Rad benutzt oder eine Taste berührt wird. Der integrierte Bewegungssensor reaktiviert das LIGHTDRIVE+ ebenfalls, wenn der Benutzer sich dem Gerät nähert. Beim Reaktivieren bleiben alle Einstellungen wie Zone und Scene erhalten. - Seite 42 Setup Manual - LIGHTDRIVE+ Monochrome: Dynamic White: y Scene 1: Fade slow (On/Off) y Scene 1: CW WW fade slow y Scene 2: Fade medium (On/Off) y Scene 2: CW WW fade medium y Scene 3: Walk slow mid-size y Scene 3: Walk slow mid-size y Scene 4: Walk slow small y Scene 4: Walk slow small y Scene 5: Walk medium mid-size y Scene 5: Walk medium large...
-
Seite 43: Tone
Setup Manual - LIGHTDRIVE+ 29.4 Tone Sowohl zum Nutzen der Tone-Taste als auch zum Überschreiben von Scenes müssen die entsprechenden DIP- Schalter (DIP Schalter 8 & 10) in der ON-Position stehen. Der Tone-Taster hat drei verschiedene Funktionen. y Leuchten Zone-LED und Zone-Balken konstant, regelt das Jog-Rad die Helligkeit. Die Tone-LED und der Tone-Balken sind aus. -
Seite 44: Sperren Des Lightdrive
Setup Manual - LIGHTDRIVE+ 29.6 Sperren des LIGHTDRIVE+ Das LIGHTDRIVE+ kann über die Tasten auf der Front komplett gesperrt werden. y Berühren Sie die Tone-Taste (1), bis ein Signalton ausge- geben wird. Halten Sie die Taste weiterhin gedrückt. y Berühren Sie nun die Taste Scene 8 (2), halten Sie beide Tasten für mindestens fünf Sekunden gedrückt. -
Seite 45: Fortgeschrittene Programmierung
Setup Manual - LIGHTDRIVE+ Fortgeschrittene Programmierung Die fortgeschrittene Programmierung erlaubt die Erstellung komplexerer Scenes mit Effekten oder Einstellungen. Für die fortgeschrittene Programmierung müssen beide DIP- Schalter “Tone verwendbar” und “Scenes überschreibbar” in der ON-Position stehen. Für die fortgeschrittene Programmierung wählen Sie zuerst die Zone, mit der gearbeitet werden soll. -
Seite 46: Schritt 1: Kanalauswahl Für Rgbw (Nur Im Rgbw Modus)
Setup Manual - LIGHTDRIVE+ • Schritt 6: Helligkeitswert (LED für Szene 6 leuchtet) • Schritt 7: Zuweisung zu einer Szene (LED für Szene 1-8 leuchtet) Halten Sie die Zone C Taste für mindestens fünf Sekunden berührt, um die Programmierung abzubrechen. Durch einmaliges Berühren kann zum vorherigen Schritt zurückgekehrt werden. -
Seite 47: Schritt 2: Auswahl Blockgröße
Setup Manual - LIGHTDRIVE+ Verwenden Sie die Scene-Tasten um eine Schnellauswahl zu treffen: y Scene 1: Weißkanal dyn., RGB aus y Scene 5: RGB, Weiß (25% Fixwert) y Scene 2: Weißkanal aus, RGB dyn. y Scene 6: RGB, Weiß (50% Fixwert) y Scene 3: RGB, Weiß... -
Seite 48: Dynamisches Weiß
Setup Manual - LIGHTDRIVE+ typ, z. B. für DW oder RGB. Für monochrome Leuchten kann nur die Helligkeit be- stimmt werden, für Leuchten mit dynamischem Weiß die Farbtemperatur. Berühren Sie einen Scene-Taster (1) zur Auswahl einer Farbe, oder nutzen Sie das Jog-Rad (2), um durch alle verfügbaren Farben zu wechseln. -
Seite 49: Schritt 5: Effektgeschwindigkeit
Setup Manual - LIGHTDRIVE+ 30.5 Schritt 5: Effektgeschwindigkeit Dieser Schritt bestimmt die Effektgeschwindigkeit. Um die Richtung des Effektes zu wählen, sind positive und negative Werte möglich (plus = zu aufsteigenden DMX-Ad- ressen, minus = zu absteigenden DMX-Adressen). Mit den Scene-Tastern (1) können vordefinierte Werte gewählt werden: y Scene 1: -100% Geschwindigkeit y Scene 2: -66% Geschwindigkeit... -
Seite 50: Schritt 7: Zuweisung Zu Einer Scene
Setup Manual - LIGHTDRIVE+ 30.7 Schritt 7: Zuweisung zu einer Scene Alle Scene-LEDs blinken nun und die gewählten Einstellungen können als Scene gespeichert werden. Berühren Sie den Scene-Taster, auf dem die Scene gespeichert werden soll. Nach einem Signalton kehrt das LIGHTDRIVE+ in den Standardbetrieb zurück. -
Seite 51: Zurücksetzen
Setup Manual - LIGHTDRIVE+ Die Datei VERSION.TXT auf dem LIGHTDRIVE+ enthält Informationen über den ak- tuell installierten Firmwarestand und die MAC-Adresse. Ziehen Sie die neue Firmware per Drag-and-drop von Ihrem lokalen System auf das Laufwerk, das das LIGHT- DRIVE+ repräsentiert. Das LIGHTDRIVE+ erkennt die neue Firmware und installiert sie, falls sie neuer ist als die aktuell installierte Firmware. -
Seite 52: Technische Daten
Setup Manual - LIGHTDRIVE+ Technische Daten 35.1 Zertifizierung Das LIGHTDRIVE+ ist zertifiziert nach: CE Konformitätsprüfung nach IEC62368-1 mit Verweis auf IEC/EN60950-1 EN 55022:2010 (Radio disturbance) EN 55024:2010 (Immunity characteristics) EN 61000-4-2:2010 (Radio disturbance) EN 61000-4-3:2010 (Electostatic discharge) EN 61000-4-3:2006 + A1:2008 + A2:2010 (Radiated, radio-frequency, electromagnetic field immunity) EN 61000-4-4:2012 (Electrical fast transit/burst immunity) EN 61000-4-6:2014 (Immunity to conducted disturbances) - Seite 53 Setup Manual - LIGHTDRIVE+ Datenspeicherzeit: Max. 2 h über Gold Cap Benutzerschnittstellen: 8 Scene-Tasten 3 Zone-Tasten 1 Tone-Taste 1 Jog-Rad mit Taster Leuchtenkonfiguration: mit 3 x 2 DIP-Schaltern (1 ... 6) Systemkonfiguration: mit 4 DIP-Schaltern (7 ... 10) Ethernet/e:net: 10/100 MBit/s Ethernet-Verbindung: Steckverbindung für Klemmstecker Abisolierlänge: 6 mm...
-
Seite 54: Hilfe Bei Störungen
Setup Manual - LIGHTDRIVE+ Anschlüsse Halbleiterrelais: Steckverbindung für Klemmstecker Abisolierlänge: 6 mm Max. Durchmesser isoliertes Kabel: 2 mm Stärke Starrleitung: 0,14 ... 0,5 mm² Stärke Litze: 0,2 ... 0,5 mm² USB-Verbindung: für microUSB-B plug Nur für den Update oder zum Konfigurieren 4000842 Entspricht ANSI/UL Std. - Seite 55 Setup Manual - LIGHTDRIVE+ Gerät funktioniert, jedoch die an Prüfen Sie die korrekte Polung der geschlossenen Leuchten reagieren DMX-Anschlüsse. Prüfen Sie die nicht. korrekte Zuordnung der DMX-Zones mit der Anwendung LIGHTDRIVE+ Configurator. Die gewünschten Farben/Farbtempera- Prüfen Sie die korrekte Einstellung der turen werden nicht von den Leuchten DMX-Typen über die DIP-Schalter auf wiedergegeben.
- Seite 56 Setup Manual - LIGHTDRIVE+...
-
Seite 57: Appendix/Anhang
Setup Manual - LIGHTDRIVE+ Appendix/Anhang... -
Seite 60: Wiring Example/Beschaltungsbeispiel
Setup Manual - LIGHTDRIVE+ Wiring example/Beschaltungsbeispiel Power source 1: Out 1 GND Loads +Vcc 2: Out 1 3: Out 2 4: Out 2 GND 5: Digital In 1 6: Digital In 2 7: Digital Power Out 5 V DC... - Seite 61 Setup Manual - LIGHTDRIVE+ Notes/Notizen Notes/Notizen...
- Seite 62 OSRAM GmbH Sales Operations Head office / Zentrale: Karl-Schurz-Str. 38 Marcel-Breuer-Strasse 6 33100 Paderborn, Deutschland 80807 Munich, Germany +49 (5251) 54648-0 Phone +49 89 6213-0 support@ecue.com Fax +49 89 6213-2020 www.ecue.com www.osram.com Light is OSRAM Our Brand...