Auriol HG00073A Bedienungs- Und Sicherheitshinweis
Vorschau ausblenden
Andere Handbücher für HG00073A:
- Bedienungs- und sicherheitshinweise (169 Seiten) ,
- Bedienungs- und sicherheitshinweise (135 Seiten) ,
- Bedienungs- und sicherheitshinweise (75 Seiten)
Inhaltsverzeichnis
Werbung
Verfügbare Sprachen
Verfügbare Sprachen
Quicklinks
ESTACIÓN METEOROLÓGICA /
STAZIONE METEOROLOGICA
ESTACIÓN METEOROLÓGICA
Instrucciones de utilización y de seguridad
STAZIONE METEOROLOGICA
Indicazioni per l'uso e per la sicurezza
ESTAÇÃO METEOROLÓGICA
Instruções de utilização e de segurança
TEMPERATURE STATION
Operation and Safety Notes
TEMPERATURSTATION
Bedienungs- und Sicherheitshinweise
IAN 279818
Werbung
Kapitel
Inhaltsverzeichnis

Verwandte Anleitungen für Auriol HG00073A


Inhaltszusammenfassung für Auriol HG00073A
- Seite 1 ESTACIÓN METEOROLÓGICA / STAZIONE METEOROLOGICA ESTACIÓN METEOROLÓGICA Instrucciones de utilización y de seguridad STAZIONE METEOROLOGICA Indicazioni per l’uso e per la sicurezza ESTAÇÃO METEOROLÓGICA Instruções de utilização e de segurança TEMPERATURE STATION Operation and Safety Notes TEMPERATURSTATION Bedienungs- und Sicherheitshinweise IAN 279818...
- Seite 2 Instrucciones de utilización y de seguridad Página IT / MT Indicazioni per l’uso e per la sicurezza Pagina 28 Instruções de utilização e de segurança Página 52 GB / MT Operation and Safety Notes Page DE / AT / CH Bedienungs- und Sicherheitshinweise Seite...
- Seite 3 23 22 20 21...
-
Seite 5: Inhaltsverzeichnis
Introducción ..........Página Uso adecuado ..........Página Descripción de los elementos......Página Datos técnicos ..........Página Seguridad ............. Página Indicaciones generales de seguridad ..Página Indicaciones de seguridad sobre las pilas ... Página 10 Antes de la puesta en marcha .. -
Seite 6: Introducción
Estación meteorológica Introducción Enhorabuena por la adquisición de su nuevo producto. Ha optado por un producto de alta calidad. El manual de instrucciones forma parte de este producto. Contiene importantes indicaciones sobre seguridad, uso y elimina- ción. Antes de usar el producto, familiarícese con todas las indicaciones de manejo y de seguridad. -
Seite 7: Estación De Temperatura
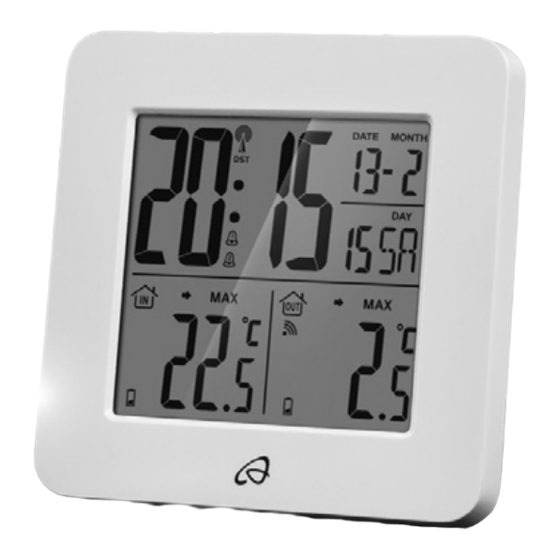
Temperatura exterior -Símbolo (sensor exterior) Indicación MAX / MIN para temperatura interior Tendencia de temperatura (temperatura interior) Temperatura interior - Símbolo (Estación de temperatura) Hora Símbolo Z (función de repetición de alarma) Indicación de segundos -Símbolo Indicación de día de la semana Indicación de la fecha (día / mes) Indicación DST (horario de verano) / -símbolo (alarma 1 / alarma 2) -
Seite 8: Sensor Exterior
Sensor exterior LED de control Dispositivo para colgar Compartimento de las pilas Tornillo (ø 3 mm) Taco (ø 7,7 mm) Datos técnicos Estación de temperatura: Rango de temperaturas: 0 – + 50 °C +32 – +122 °F Nota: Si la temperatura es inferior a 0 °C (32 °F) se mostrará... -
Seite 9: Seguridad
Alcance de transmisión HF: máx. 30 metros en terreno sin obstáculos Pilas: 2 x AA 1,5 V (incluidas en el volumen de sumi- nistro) Clase de protección: IPX4 Seguridad ¡GUARDAR TODAS LAS ADVERTENCIAS E INDICACIONES DE SEGURIDAD POR SI LAS NECESITA EN UN FUTURO! Indicaciones generales de seguridad Este producto puede ser utilizado por... -
Seite 10: Indicaciones De Seguridad Sobre Las Pilas
No exponga el aparato a campos elec- tromagnéticos extremadamente elevados. Esto podría afectar al funcionamiento del aparato. Tenga en cuenta que los daños produci- dos por manejo incorrecto, no seguimiento del manual de instrucciones o manipula- ción por parte de personas no autorizadas, están excluidos de la garantía. -
Seite 11: Antes De La Puesta En Marcha
Mantenga las pilas fuera del alcance de los niños. No las arroje al fuego, no las ponga en cortocircuito y no las desmonte. Reemplace todas las baterías a la vez. Utilice únicamente pilas del mismo tipo. En caso contrario existe peligro de explo- sión. -
Seite 12: Puesta En Marcha Del Sensor Exterior
Coloque la estación de temperatura en el soporte correspondiente Asegúrese de que los aparatos adyacen- tes no utilicen la misma frecuencia de 433 MHz. Estos aparatos pueden alterar la comunicación inalámbrica. No coloque los aparatos cerca o encima de placas de metal. La transmisión ina- lámbrica entre los dispositivos podría verse alterada. -
Seite 13: Puesta En Funcionamiento De La Estación De Temperatura
El sensor exterior ya está listo para fun- cionar y el LED de control se ilumina brevemente. Cierre la cubierta del compartimento de las pilas. Si fuera necesario, reinicie la estación de temperatura si no funciona correctamente. Para ello, mantenga pulsada la tecla / REGISTER (reinicie solo el sensor exterior). - Seite 14 cuanto se produce la conexión, el símbolo deja de parpadear y la temperatura se muestra en la pantalla LCD. Nota: si la estación de temperatura no recibe la señal del sensor exterior al cabo de 3 minu- tos, la estación meteorológica inicia entonces automáticamente la recepción de la señal de radiofrecuencia.
-
Seite 15: Estación De Temperatura
Si persiste la dificultad de recepción puede configurar manualmente la fecha y la hora (véase “Ajuste manual de idioma / zona horaria / hora / fechau”). Montar la estación de temperatura y/o el sensor externo en la pared: Nota: Para este paso de trabajo necesita un taladro y un destornillador con punta de estrella. -
Seite 16: Sensor Exterior
Sensor exterior Marque el agujero de perforación (ø aprox. 7,7 mm) en la pared. Realice el agujero con una taladro. Introduzca el taco en el agujero per- forado. Introduzca el tornillo en el taco con un destornillador. Enganche el sensor exterior con el dispo- sitivo para colgar en el tornillo. - Seite 17 los valores más rápidamente. Este modo de ajuste rápido puede emplearse también para los demás ajustes. Si no presiona ninguna tecla durante 30 segundos, la pantalla LCD regresa automáticamente a la indicación estándar. 4. Pulse la tecla SET / RESET, para ajustar el idioma deseado (GE = alemán, FR = francés, SP = español, IT = italiano, EN = inglés).
-
Seite 18: Visualización Del Horario De Verano
8. Pulse la tecla SET / RESET para ajustar el valor deseado. 9. Presione la tecla CLOCK para confirmar la entrada. 10. Repita los pasos 6 y 7 para ajustar los valores de minutos, segundos , año y fecha (día / mes). Nota: La indicación de segundos sólo se puede resetear a 00. -
Seite 19: Consultar Alarmas
1. Presione y mantenga presionada la tecla ALARM durante aprox. 3 segundos. Nota: Si se ha programado previamente una alarma, ésta se mostrará en la pan- talla. De lo contrario se muestra 0:00 o AM 12:00. 2. El indicador de las horas parpadea. Pulse la tecla SET / RESET para ajustar el valor deseado. -
Seite 20: Uso De La Función De Retraso De Alarma
Nota: El símbolo aparece en la pantalla LCD. La señal de alarma suena al alcanzarse la hora ajustada. Al cabo de 2 minutos se apaga la señal de alarma automática- mente. Pulse la tecla SELECT , SET / RESET ALARM , Tecla CLOCK para apa- gar la señal alarma antes de tiempo. -
Seite 21: Consultar Valores Máximos / Mínimos
Presione y mantenga presionada la tecla SELECT durante aprox. 3 segundos. La indicación °C parpadea. Pulse la tecla SET / RESET , para cam- biar entre las escalas de temperatura °C (Celsius) y °F (Fahrenheit). Presione la tecla SELECT para confirmar la entrada. -
Seite 22: Indicación De Estado De Las Pilas
Se pueden observar las siguientes indicaciones: = La temperatura aumenta. = La temperatura permanece constante. = La temperatura disminuye. Indicación de estado de las pilas Los símbolos aparecen en la pantalla LCD de la estación de temperatura cuando las pilas del sensor exterior o de la estación estén gastadas. - Seite 23 Retire este tipo de aparatos del alcance de la estación de temperatura / del sensor exterior, o retire brevemente las baterías de la estación meteorológica / del sensor exterior, cuando la pantalla muestre fallos. La recepción se puede reducir considerable- mente por algunos obstáculos, p.ej.
-
Seite 24: Limpieza Y Mantenimiento
Limpieza y mantenimiento Limpie el aparato sólo por fuera con un paño suave y seco. No proyecte agua hacia el sensor exte- rior bajo ninguna circunstancia, p.ej. con la manguera del jardín. El sensor exterior solamente está protegido contra la lluvia por la parte superior. -
Seite 25: Declaración De Conformidad
1, D-74167 Neckarsulm, declaramos en responsabilidad única que el producto: Estación meteorológica, modelo n.° HG00073A / HG00073B, versión: 09 / 2016, al que esta declaración hace referencia, cum- ple con todas las normas / y la normativa de los documentos de 1999 / 5 / CE. -
Seite 26: Garantía
Garantía El aparato ha sido fabricado cuidadosamente siguiendo exigentes normas de calidad y ha sido probado antes de su entrega. En caso de defecto del producto, usted tiene derechos legales frente al vendedor del mismo. Nues- tra garantía (abajo indicada) no supone una restricción de dichos derechos legales. - Seite 27 frágiles como, por ejemplo, los interruptores, baterías y piezas de cristal.
- Seite 28 Introduzione ..........Pagina 29 Utilizzo conforme alla destinazione d’uso ... Pagina 29 Descrizione dei componenti ......Pagina 29 Dati tecnici ............Pagina 31 Sicurezza ............Pagina 32 Avvisi di sicurezza generali ......Pagina 32 Avvertenze di sicurezza sulle batterie ..Pagina 33 Prima della messa in funzione ..
-
Seite 29: Introduzione
Stazione meteorologica Introduzione Congratulazioni per l‘acquisto del vostro nuovo prodotto. Avete optato per un prodotto di alta qualità. Le istruzioni d‘uso sono parte integrante di questo prodotto. Esse contengono impor- tanti avvertenze sulla sicurezza, l‘impiego e lo smaltimento. Prima dell‘utilizzo del prodotto, prendere conoscenza di tutte le istruzioni d‘uso e delle avvertenze di sicurezza. -
Seite 30: Stazione Metereologica Radiocontrallata
Simbolo (sensore esterno) Visualizzazione MAX / MIN per la temperatura interna Tendenza della temperatura (temperatura interna) Temperatura interna Simbolo (stazione metereologica radiocontrallata) Orario Simbolo Z (funzione SNOOZE - di ripetizione dell’allarme) Visualizzazione dei secondi Simbolo Visualizzazione del giorno della settimana Data (die / mese) Visualizzazione DST (ora legale) Simbolo... -
Seite 31: Dati Tecnici
Base Vite (ø 3 mm) Tassello (ø 7,7 mm) Sensore esterno LED di controllo Dispositivo di aggancio Vano batterie Vite (ø 3 mm) Tassello (ø 7,7 mm) Dati tecnici Stazione metereologica radiocontrallata: Campo di misurazione della temperatura: 0 – + 50 °C +32 –... -
Seite 32: Sicurezza
Consiglio: Se la temperatura è minore di – 20 °C (– 4 °F), viene visualizzato „LL.L“. Se la temperatura è maggiore di 60 °C (140 °F), viene visualizzato „HH.H“. Segnale di trasmissione ad alta frequenza: 433 MHz Area di copertura della trasmissione ad alta frequenza: max. -
Seite 33: Avvertenze Di Sicurezza Sulle Batterie
lasciare che i bambini giochino con l‘ap- parecchio. La pulizia e la manutenzione non devono essere eseguite dai bambini senza supervisione. Non esporre l’apparecchiatura ad un campo magnetico di alta intensità. Ciò potrebbe limitare la funzionalità dell’ap- parecchiatura. Prendere in considerazione il fatto che i danneggiamenti ad opera di maneggio scorretto, violazione delle istruzioni d’uso e causati da interventi di personale non... -
Seite 34: Prima Della Messa In Funzione
Tenere le batterie lontano dalla portata dei bambini, non gettarle nel fuoco, non cortocircuitarle e non smontarle. Sostituire sempre tutte le batterie contem- poraneamente. Utilizzare solamente batterie dello stesso tipo. In caso contrario sussiste il pericolo di esplosione. Se le batterie del vostro apparecchio dovessero aver perso dell’acido, estrarle immediatamente al fine di evitare danni all’apparecchio! - Seite 35 vicino a fonti di calore quali ad es. termosi- foni. Altrimenti si rischia di danneggiare le apparecchiature. Posizionare il rilevatore sull’apposito piedino Assicurarsi che le apparecchiature adia- centi non vengano messe in funzione con la stessa frequenza di 433 MHz. Queste apparecchiature potrebbero causare un disturbo del collegamento radio.
-
Seite 36: Messa In Funzione Del Sensore Esterno
Messa in funzione del sensore esterno Inserimento delle batterie: Rimuovere il coperchio del vano portabat- terie posto sul retro del sensore esterno. Inserire due batterie da 1,5 V di tipo AA (incluse nella fornitura) nel vano porta batterie Nota: Assicurarsi che la polarità sia corretta. - Seite 37 Chiudere il coperchio del vano portabat- terie. Collegamento del rilevatore di tem- peratura con il sensore esterno e il segnale radio DCF: Dopo aver inserito le batterie, il rilevatore cerca di effettuare un collegamento con il sensore esterno. Questa procedura può durare alcuni minuti.
- Seite 38 Qualora al momento dell’avvio non fosse pos- sibile alcuna sincronizzazione con l’orologio atomico, per prima cosa cambiare la posizione del rilevatore (mettendolo ad esempio nei pressi di una finestra). La ricezione può essere notevolmente limitata da ostacoli (ad esempio pareti in calcestruzzo) o da fonti di disturbo (ad esempio altri appa- recchi elettrici).
-
Seite 39: Stazione Metereologica Radiocontrallata
Se necessario controllare la parete con un lo- calizzatore di cavi prima di eseguire un foro. Stazione metereologica radiocontrallata Contrassegnare il punto dove eseguire il foro (ø ca. 7,7 mm) sulla parete. Eseguire il foro utilizzando un trapano. Inserire il tassello nel foro eseguito con il trapano. -
Seite 40: Impostazione Manuale Di Lingua / Fuso Orario / Orario / Data
Impostazione manuale di lingua / fuso orario / orario / data La ricezione del segnale radio DCF può es- sere disturbata o interrotta nel punto in cui il rilevatore è stato posto. In questo caso vi è la possibilità di impostare l’apparecchio ma- nualmente. - Seite 41 6. Per impostare il fuso orario sul fuso orario 2 (da –12 ore a +12 ore) premere il tasto SET / RESET. Nota: Qualora l’utilizzatore si trovasse in un Paese di ricezione del segnale DCF ma appartenente a un altro fuso orario, è...
-
Seite 42: Visualizzazione Dell'ora Legale
11. In seguito il display a cristalli liquidi si trova nuovamente nella visualizzazione standard. Visualizzazione dell’ora legale L’ora legale viene visualizzata nel display a cristalli liquidi con il simbolo DST . Il rileva- tore di temperatura riconosce automaticamente attraverso il segnale radio DCF se l’ora legale è... -
Seite 43: Richiamo Degli Orari Di Allarme
2. Lampeggia la visualizzazione dell’ora. Per impostare il valore desiderato premere il tasto SET / RESET 3. Per confermare il dato immesso, premere il tasto ALARM. Lampeggia la visualizza- zione dei minuti. 4. Per impostare il valore desiderato premere il tasto SET / RESET. 5. -
Seite 44: Utilizzo Della Funzione Di Ripetizione Della Suoneria
sono scaduti 2 minuti, il segnale acustico di allarme si interrompe automaticamente. Per disinserire anticipatamente il segnale acustico di allarme, premere il tasto SE- LECT , SET / RESET , ALARM Tasto CLOCK Nota: Il segnale acustico di allarme ri- suona ogni giorno all’orario impostato. Per attivare l’allarme 1, premere 3 volte il tasto SET / RESET. -
Seite 45: Richiamo Dei Valori Minimi E Massimi
Premere e mantenere premuto il tasto SE- LECT per circa 3 secondi. Lampeggia la visualizzazione °C. Per scegliere tra le scale di temperatura °C (Celsius) e °F (Fahrenheit) premere il tasto SET / RESET Confermare il dato inserito premendo il tasto SELECT. Richiamo dei valori minimi e massimi Il rilevatore di temperatura memorizza i valori... -
Seite 46: Visualizzazione Delle Batterie
Sono possibili le seguenti visualizza- zioni: = la temperatura aumenta. = la temperatura rimane costante. = la temperatura scende. Visualizzazione delle batterie I simboli appaiono sul display a cristalli liquidi del rilevatore di temperatura se le batterie dello stesso o del sensore esterno sono quasi scariche. - Seite 47 raggio del rilevatore / sensore esterno, oppure rimuovere per breve tempo le batterie dal rilevatore / sensore esterno. Ostacoli, quali per esempio pareti di cemento, possono causare problemi di ricezione. In questo caso Le consigliamo di posizionare la stazione in un luogo diverso (ad es. vicino ad una finestra).
-
Seite 48: Pulizia E Manutenzione
Pulizia e manutenzione Pulisca l’apparecchiatura solo sulla sua superficie esterna servendosi di una pezza morbida e asciutta. Non spruzzare assolutamente sul sensore esterno, ad es. con un tubo da giardino. Il sensore esterno è solo protetto contro la pioggia sulla superficie superiore. Smaltimento L’imballaggio è... -
Seite 49: Dichiarazione Di Conformità
Noi, OWIM GmbH & Co. KG, Stiftsbergstraße 1, D-74167 Neckarsulm, dichiariamo sotto la nostra esclusiva responsabilità che il prodotto: stazione meteorologica, modelli n° HG00073A / HG00073B, Versione: 09 / 2016, alla quale si riferisce questa dichiarazione, è conforme alle norme / documenti normativi di cui alla Direttiva 1999 / 5 / CE. -
Seite 50: Garanzia
La dichiarazione di conformità completa è reperibile alla pagina web www.owim.com Garanzia L‘apparecchio è stato prodotto secondo se- vere direttive di qualità e controllato con pre- mura prima della consegna. In caso di difetti del prodotto, l‘acquirente può far valere i propri diritti legali nei confronti del venditore. - Seite 51 possono essere identificate, pertanto, come parti soggette a usura (p. es., le batterie), né a danni su parti staccabili, come interruttore, batterie o simili, realizzate in vetro. IT/MT...
- Seite 52 Introdução .............Página 53 Utilização correcta .........Página 53 Descrição das peças ........Página 53 Dados técnicos ..........Página 55 Segurança .............Página 56 Indicações gerais de segurança ....Página 56 Indicações de segurança relativas às pilhas Página 57 Antes da colocação em funcionamento ...........Página 58 Indicações gerais ..........Página 58 Colocar o sensor exterior em funcionamento ...Página 59 Colocar a estação meteorológica...
-
Seite 53: Introdução
Estação meteorológica Introdução Damos-lhe os parabéns pela aquisição do seu novo produto. Acabou de adquirir um produto de grande qualidade. O manual de instruções é parte integrante deste produto. Contém indi- cações importantes referentes à segurança, utilização e eliminação. Familiarize-se com todas as indicações de utilização e de segu- rança do produto. -
Seite 54: Estação Meteorológica
Indicação de MÁX. / MÍN. para a temperatura interior Tendência da temperatura (Temperatura interior) Temperatura interior Símbolo (Estação meteorológica) Hora Símbolo Z (Função „snooze“) Indicação dos segundos Símbolo Indicação dos dias da semana Indicação da data (dia / mês) Indicação DST (horário de Verão) Símbolo (Alarme 1 / Alarme 2) 2.º... -
Seite 55: Sensor Exterior
Sensor exterior LED de controlo Orifício para pendurar Compartimento das pilhas Parafuso (ø 3 mm) Bucha (ø 7,7 mm) Dados técnicos Estação meteorológica: Amplitude de medição da temperatura: 0 – +50 °C +32 – +122 °F Nota: Se a temperatura for inferior a 0 °C (32 °F) é... -
Seite 56: Segurança
Amplitude de transmissão HF: máx. 30 metros em campo livre Pilhas: 2 x AA 1,5 V (incluídas no mate- rial fornecido) Classe de protecção: IPX4 Segurança GUARDE TODAS AS INDICAÇÕES DE SEGURANÇA E INSTRUÇÕES PARA FUTURA CONSULTA! Indicações gerais de segurança Ente aparelho pode ser utilizado por crianças a partir dos 8 anos, assim como por pessoas com capacidades físicas,... -
Seite 57: Indicações De Segurança Relativas Às Pilhas
elevados. Isso pode prejudicar o funcio- namento do aparelho. Tenha em atenção que a garantia não abrange danos causados por um manu- seamento inadequado, pela inobservân- cia do manual de instruções ou por uma intervenção por pessoal não autorizado. Indicações de segurança relativas às pilhas PERIGO DE MORTE! As... -
Seite 58: Antes Da Colocação Em Funcionamento
Utilize apenas pilhas do mesmo tipo. Caso contrário, existe perigo de explosão. Caso as pilhas do seu aparelho come- cem a derramar dentro deste, retire-as imediatamente, de forma a evitar danos no aparelho! Evite o contacto com a pele, olhos e mucosas. -
Seite 59: Colocar O Sensor Exterior Em Funcionamento
Certifique-se de que os aparelhos contí- guos não funcionam com a mesma fre- quência de 433 MHz. Estes aparelhos poderão causar interferências na ligação por rádio. Não coloque os aparelhos junto ou em cima de placas metálicas. A radiotrans- missão entre os aparelhos pode diminuir. Sinal de radiofrequência (DCF): O sinal DCF (emissor de sinal horário) consiste em impulsos temporais, emitidos por um dos... -
Seite 60: Colocar A Estação Meteorológica Em Funcionamento
Feche a tampa do compartimento das pilhas. Se necessário, se a estação meteorológica não estiver a funcionar correctamente, proceda a um reinício desta. Para isso, prima e mantenha premida a tecla Z REGISTER (somente reiniciar o sensor exterior). Colocar a estação meteorológica em funcionamento Colocar as pilhas:... - Seite 61 deixa de estar intermitente e a temperatura é mostrada no visor LC. Nota: Quando a estação meteorológica não recebe sinal do sensor exterior num período de 3 minutos, esta inicia automaticamente com a recepção do sinal de radiofrequência. A estação meteorológica começa a funcionar, após a recepção com sucesso do sinal do sensor exterior ou após 3 minutos, com a recepção do sinal de radiofrequência.
-
Seite 62: Estação Meteorológica
Caso a recepção do sinal de radiofrequên- cia continue a sofrer interferências, pode também configurar manualmente a hora e data (ver “Configurar manualmente idioma / fuso horário / hora / data”). Montar a estação meteorológica e / ou o sensor exterior numa parede: Nota: para esta tarefa necessita de um berbe- quim e de uma chave de fendas Philips. -
Seite 63: Sensor Exterior
Sensor exterior Marque o orifício de perfuração (ø aprox. 7,7 mm) na parede. Faça o furo com um berbequim. Insira a bucha no orifício de perfuração. Com uma chave de fendas Philips, aperte o parafuso na bucha. Pendure o sensor exterior colocando o orifício para pendurar no parafuso. - Seite 64 valores será mais rápida. Esta configura- ção rápida também pode ser utilizada para os próximos processos de configu- ração. Se não premir qualquer tecla no espaço de 30 segundos, o visor LC regressa automaticamente para a visuali- zação padrão. 4. Prima a tecla SET / RESET para configurar o idioma desejado (GE = alemão, FR = francês, SP = espanhol, IT = italiano, EN = inglês).
-
Seite 65: Indicar A Hora De Verão
7. Prima a tecla CLOCK para confirmar a sua configuração. A indicação das horas fica intermitente. 8. Prima a tecla SET / RESET para configurar o valor desejado. 9. Prima a tecla CLOCK para confirmar a sua configuração. 10. Repita os passos 6 e 7 para configurar os valores dos minutos, segundos , ano e data... -
Seite 66: Configurar A Hora De Alarme
Configurar a hora de alarme Dispõe da possibilidade de configurar duas horas de alarme diferentes. 1. Prima e mantenha premida a tecla ALARM durante aprox. 3 segundos. Nota: Quando já tiver sido configurado um alarme é indicada essa hora de alarme no visor LC. -
Seite 67: Ligar / Desligar O Alarme
Ligar / desligar o alarme Prima uma vez a tecla SET / RESET para activar o alarme 1. Prima duas vezes a tecla SET / RESET para activar o alarme 2. Prima três vezes a tecla SET / RESET para activar o alarme 1 e 2. Nota: É... -
Seite 68: Visualizar A Temperatura
Visualizar a temperatura No visor LC são indicadas a temperatura interior e a temperatura exterior Prima e mantenha premida a tecla SELECT durante aprox. 3 segundos. A indicação °C fica intermitente. Prima a tecla SET / RESET , para optar entre as escalas de temperatura °C (Cel- sius) e °F (Fahrenheit). -
Seite 69: Visualizar A Tendência Da Temperatura
Visualizar a tendência da temperatura Após uma ligação com sucesso ao sensor exterior são apresentadas a tendência da temperatura (exterior) e a tendência da temperatura (interior) São possíveis as seguintes indicações: = A temperatura está a subir. = A temperatura está constante. = A temperatura está... - Seite 70 como telemóveis, rádios, rádios CB, teleco- mandos ou microondas, etc. Retire estes aparelhos do alcance da estação de temperatura / do sensor exte- rior, ou remova momentaneamente as pilhas da estação de temperatura / do sensor exterior, se o visor apresentar interferências.
-
Seite 71: Limpeza E Conservação
Se a estação de temperatura não trabalhar corretamente, remova as pilhas para poucos instantes e coloque as depois novamente. Limpeza e conservação Limpe o aparelho apenas por fora com um pano seco e macio. Nunca borrife o sensor externo, por exemplo, com uma mangueira de jardim. -
Seite 72: Declaração De Conformidade
1, D-74167 Neckarsulm, declara, sob exclusiva responsabilidade que o produto: Estação meteorológica, modelo-n.º.: HG00073A / HG00073B, versão: 09 / 2016, ao qual se refere a presente declaração, se encontra em conformidade com as normas / documentos normativos da Directiva 1999 / 5 / CE. -
Seite 73: Garantia
Pode encontrar a declaração de conformi- dade completa em www.owim.com. Garantia O aparelho foi cuidadosamente fabricado segundo rigorosas directivas de qualidade e meticulosamente testado antes da sua distri- buição. Em caso de falhas deste aparelho, possui direitos legais relativamente ao vende- dor do aparelho. - Seite 74 A garantia é válida em caso de defeitos de material ou de fabrico. Esta garantia não é extensível a componentes do produto que se desgastam com o uso e que, por isso, podem ser consideradas peças de desgaste (por ex.º pilhas) ou a danos em peças frágeis, por ex.º...
- Seite 75 Introduction .............Page 76 Proper use ............Page 76 Description of parts and features ......Page 76 Technical data ............Page 78 Safety ..............Page 79 General safety information........Page 79 Safety instructions for batteries ......Page 80 Before initial use ..........Page 81 General information ..........Page 81 Preparing to use the outdoor sensor ....Page 82 Preparing the temperature station for use ..Page 82 Temperature station ...........Page 85...
-
Seite 76: Introduction
Temperature station Introduction We congratulate you on the purchase of your new product. You have chosen a high quality product. The instructions for use are part of the product. They contain important information concerning safety, use and disposal. Before using the product, please familiarise yourself with all of the safety information and instruc- tions for use. -
Seite 77: Temperature Station
MAX- / MIN display for indoor temperature Temperature trend (indoor temperature) Indoor temperature symbol (temperature station) Time symbol (snooze function) Seconds display symbol Day of the week display Date display (day / month) DST display (summer time) symbol (Alarm 1 / Alarm 2) time zone (ZONE) MAX- / MIN display (outdoor temperature) Radio signal... -
Seite 78: Technical Data
Battery compartment Screw (ø 3 mm) Dowel (ø 7.7 mm) Technical data Temperature station: Temperature measurement range: 0 – + 50 °C +32 – +122 °F Note: If the temperature is ≤ 0 °C (32 °F), the LC display shows “LL.L”. If the temperature is ≥ 50 °C (122 °F), the LC display shows “HH.H”. -
Seite 79: Safety
Safety YOU SHOULD STORE ALL SAFETY INFOR- MATION AND INSTRUCTIONS IN A SAFE PLACE IN CASE YOU NEED TO REFER TO THEM AGAIN IN THE FUTURE! General safety information This appliance can be used by children aged from 8 years and above and per- sons with reduced physical, sensory or mental capabilities or lack of experience and knowledge if they have been given... -
Seite 80: Safety Instructions For Batteries
Safety instructions for batteries DANGER TO LIFE! Batteries can be swallowed, which may represent a danger to life. If a battery has been swallowed, medical help is required immediately. Remove the batteries from the device if they are not going to be used for a pro- longed period. -
Seite 81: Before Initial Use
coming into contact with battery acid should be rinsed off with copious amounts of water and / or a doctor contacted if necessary! Before initial use Put the batteries first into the outdoor sensor, then into the temperature station. Note: Before initial use, remove the protective film from the device display. -
Seite 82: Preparing To Use The Outdoor Sensor
Radio signal (DCF): The DCF signal (time signal transmitter) is made up of time pulses transmitted from one of the highest precision clocks in the world close to Frankfurt / Main in Germany – it var- ies by 1 second in 1 million years. In ideal conditions, your temperature station can pick up this signal over a distance of up to approx. - Seite 83 Insert two 1.5 V batteries (AA) (in- cluded) into the battery compartment. Note: Make sure you fit the batteries the right way round (polarity). This is shown on the battery compartment (see. fig B). Close the battery compartment cover. Connecting the temperature station with the outdoor sensor and the DCF radio signal: After the batteries have been inserted, the...
- Seite 84 Note: Do not move the temperature station while it is receiving the signal. Otherwise this could interfere with reception.If synchronisation is not possible when the temperature station is being first set up, try changing the location (e.g. place the temperature station near to a window).
-
Seite 85: Temperature Station
Temperature station Mark the position of the hole (ø approx. 7.7 mm) on the wall. Drill the hole with an electric drill. Insert the dowel into the drilled hole. Using a crosshead screwdriver, screw the screw into the dowel. Hang the temperature station by placing the hanger on the screw. - Seite 86 2. Press the SET / RESET button to switch between the 12- and 24-hour clock dis- play modes. 3. Press the CLOCK button to confirm your settings. The language option flashes. Tip: If you press and hold down the SET / RESET button, you accelerate the process and reach the desired value more quickly.
-
Seite 87: Displaying Summer Time
CET. If you wish to know what the time is in the USA for example, then simply by setting the time zone value to e.g. –10 you will obtain the current local time in Los Angeles etc. 7. Press the CLOCK button to confirm your settings. -
Seite 88: Setting The Alarm Time
Press the CLOCK button again to return to the default display. Setting the alarm time You can set two different alarm times. 1. Press and hold down the ALARM button for about 3 seconds. Note: If an alarm time has been set be- fore, then that previously set alarm time appears in the LC display. -
Seite 89: Using The Snooze Button
button twice to activate Alarm 2. Press the SET / RESET button three times to activate Alarm 1 and Alarm 2. Note: The symbol appears in the LC display. The alarm signal sounds as soon as the set alarm time is reached. The alarm signal ceases automatically after a period of 2 minutes. -
Seite 90: Displaying Temperature
Displaying temperature The LC display shows the indoor temperature and the outdoor temperature Press and hold down the SELECT button for approx. 3 seconds. The °C dis- play flashes. Press the SET / RESET button to switch between the °C (Celsius) and °F (Fahr- enheit) temperature scales. -
Seite 91: Displaying Temperature Trends
Displaying temperature trends After successfully connecting with the outdoor sensor, the temperature station can display the temperature trend (outdoor) and the temperature trend (indoor) You may see the following displays: = The temperature is rising. = The temperature is constant. = The temperature is falling. - Seite 92 an object that transmits radio signals, it could cause interference. If the display indicates a problem, move such objects away from it or remove the batteries for a short while and then re- place them. Obstacles such as concrete walls can also cause that the reception is disturbed.
-
Seite 93: Cleaning And Maintenance
Cleaning and maintenance The device should only be cleaned on the outside with a soft dry cloth. Under no circumstances should you spray the outdoor sensor, e.g. with a garden hose. The outdoor sensor is only protected against rain from above. Disposal The packaging is made entirely of recyclable materials, which you... -
Seite 94: Declaration Of Conformity
We, OWIM GmbH & Co. KG, Stiftsbergstraße 1, D-74167 Neckarsulm, hereby declare un- der our sole responsibility that the product: Temperature station, model no.: HG00073A / HG00073B, Version: 09 / 2016, to which this declaration refers, complies with the stand- ards / normative documents of 1999 / 5 / EC. -
Seite 95: Warranty
Warranty The device has been manufactured to strict quality guidelines and meticulously examined before delivery. In the event of product defects you have legal rights against the retailer of this product. Your legal rights are not limited in any way by our warranty detailed below. The warranty for this device is 3 years from the date of purchase. - Seite 96 Einleitung ............Seite Bestimmungsgemäße Verwendung ....Seite Teilebeschreibung ..........Seite Technische Daten ..........Seite Sicherheit ............Seite 100 Allgemeine Sicherheitshinweise ......Seite 100 Sicherheitshinweise zu Batterien .....Seite 101 Vor der Inbetriebnahme ......Seite 102 Allgemeine Hinweise ........Seite 102 Außenfühler in Betrieb nehmen .......Seite 103 Temperaturstation in Betrieb nehmen .....Seite 104 Temperaturstation ..........Seite 106 Außenfühler ............Seite 106 Sprache / Zeitzone / Uhrzeit / Datum...
-
Seite 97: Einleitung
Temperaturstation Einleitung Wir beglückwünschen Sie zum Kauf Ihres neuen Produkts. Sie haben sich damit für ein hochwertiges Produkt entschieden. Die Bedie- nungsanleitung ist Teil dieses Produkts. Sie enthält wichtige Hinweise für Sicherheit, Ge- brauch und Entsorgung. Machen Sie sich vor der Benutzung des Produkts mit allen Bedien- und Sicherheitshinweisen vertraut. -
Seite 98: Teilebeschreibung
Teilebeschreibung LC-Display Temperaturtrend (Außentemperatur) Außentemperatur -Symbol (Außenfühler) MAX- / MIN-Anzeige für Innentemperatur Temperaturtrend (Innentemperatur) Innentemperatur -Symbol (Temperaturstation) Uhrzeit -Symbol (Schlummerfunktion) Sekundenanzeige -Symbol Wochentagsanzeige Datumsanzeige (Tag / Monat) DST-Anzeige (Sommerzeit) / -Symbol (Alarm 1 / Alarm 2) 2. Zeitzone (ZONE) MAX- / MIN-Anzeige (Außentemperatur) Radio Signal Temperaturstation / REGISTER-Taste (Schlummerfunktion /... -
Seite 99: Technische Daten
Dübel (ø 7,7 mm) Außenfühler Kontroll-LED Aufhängevorrichtung Batteriefach Schraube (ø 3 mm) Dübel (ø 7,7 mm) Technische Daten Temperaturstation: Temperaturmessbereich: 0 – +50 °C +32 – +122 °F Tipp: Beträgt die Temperatur weniger als 0 °C (32 °F), wird „LL.L“ angezeigt. Über- steigt die Temperatur 50 °C (122 °F), wird „HH.H“... -
Seite 100: Sicherheit
Batterien: 2 x AA 1,5 V (im Lieferumfang enthalten) Schutzklasse: IPX4 Sicherheit BEWAHREN SIE ALLE SICHERHEITSHIN- WEISE UND ANWEISUNGEN FÜR DIE ZUKUNFT AUF! Allgemeine Sicherheitshinweise Dieses Gerät kann von Kindern ab 8 Jahren und darüber sowie von Personen mit ver- ringerten physischen, sensorischen oder mentalen Fähigkeiten oder Mangel an Erfahrung und Wissen benutzt werden,... -
Seite 101: Sicherheitshinweise Zu Batterien
Beachten Sie, dass Beschädigungen durch unsachgemäße Handhabung, Nichtbe- achtung der Bedienungsanleitung oder Eingriff durch nicht autorisierte Personen von der Garantie ausgeschlossen sind. Sicherheitshinweise zu Batterien LEBENSGEFAHR! Batterien können verschluckt werden, was lebensgefährlich sein kann. Ist eine Batterie verschluckt worden, muss sofort medizinische Hilfe in Anspruch genommen werden. -
Seite 102: Vor Der Inbetriebnahme
Verwenden Sie nur Batterien des gleichen Typs. Andernfalls besteht Explosionsge- fahr. Falls die Batterien in Ihrem Gerät ausge- laufen sein sollten, entnehmen Sie diese sofort, um Schäden am Gerät vorzubeugen! Vermeiden Sie den Kontakt mit Haut, Augen und Schleimhäuten. Bei Kontakt mit Batteriesäure spülen Sie die betroffene Stelle mit reichlich Wasser ab und / oder suchen Sie einen Arzt auf! -
Seite 103: Außenfühler In Betrieb Nehmen
Geräte können eine Störung der Funkver- bindung verursachen. Stellen Sie die Geräte nicht neben oder auf Metallplatten. Die Funkübertragung zwischen den Geräten kann vermindert werden. Funksignal (DCF): Das DCF Signal (Zeitsignalsender) besteht aus Zeitimpulsen, die von einer der genaues- ten Uhren der Welt, in der Nähe von Frank- furt / Main, Deutschland, abgegeben werden –... -
Seite 104: Temperaturstation In Betrieb Nehmen
richtig arbeitet. Drücken und halten Sie dazu die Z / REGISTER-Taste (nur den Außensensor neu starten). Temperaturstation in Betrieb nehmen Batterien einsetzen: Öffnen Sie das Batteriefach auf der Rückseite der Temperaturstation. Setzen Sie zwei 1,5 V Batterien (AA) (im Lieferumfang enthalten) in das Batte- riefach ein. -
Seite 105: Temperaturstation Und / Oder Außenfühler An Der Wand Montieren
Die Temperaturstation startet nach erfolgrei- chem Empfang des Außenfühler-Signals bzw. nach 3 Minuten mit dem Empfang des Funksi- gnals. Dieser Vorgang kann bis zu 5 Minuten in Anspruch nehmen und wird im LC-Display durch das blinkende -Symbol angezeigt. Bei erfolgreichem Empfang des DCF-Funksig- nals wird das -Symbol dauerhaft im LC-Dis- play angezeigt. -
Seite 106: Temperaturstation
VORSICHT! LEBENS- UND VERLET- ZUNGSGEFAHR UND GEFAHR DER SACHBESCHÄDIGUNG! Lesen Sie die Bedien- und Sicherheitshinweise Ihrer Bohr- maschine aufmerksam durch. LEBENSGEFAHR! Ver- gewissern Sie sich, dass Sie nicht auf Strom-, Gas- oder Wasserleitungen stoßen, wenn Sie in die Wand bohren. Prüfen Sie ggf. mit einem Leitungssucher, bevor Sie in eine Wand bohren. -
Seite 107: Sprache / Zeitzone / Uhrzeit / Datum Manuell Einstellen
Hängen Sie den Außenfühler mit der Auf- hängevorrichtung an der Schraube auf. Hinweis: Stellen Sie sicher, dass der Außen- fühler nicht mit Wasser oder direkter Sonnen- einstrahlung in Kontakt kommt. Elektronische Geräte können den Funkempfang stören. Sprache / Zeitzone / Uhrzeit / Datum manuell einstellen Der Empfang des DCF-Funksignals kann am... - Seite 108 4. Drücken Sie die SET / RESET-Taste, um die gewünschte Sprache (GE = deutsch, FR = französisch, SP = spanisch, IT = italienisch, EN = englisch) einzustellen. 5. Drücken Sie die CLOCK-Taste, um Ihre Eingabe zu bestätigen. Die Zeitzonenan- zeige blinkt. 6.
-
Seite 109: Sommerzeit Anzeigen
10. Wiederholen Sie die Arbeitsschritte 6. und 7., um die Werte für Minuten, Sekun- , Jahr und Datum (Tag / Monat) einzustellen. Hinweis: Die Sekundenanzeige lässt sich nur auf 00 zurücksetzen. 11. Das LC-Display befindet sich im Anschluss wieder in der Standardanzeige. Sommerzeit anzeigen Die Sommerzeit wird im LC-Display durch das DST-Symbol... -
Seite 110: Alarmzeiten Aufrufen
erscheint die Anzeige 0:00 oder AM 12:00. 2. Die Stundenanzeige blinkt. Drücken Sie die SET / RESET-Taste , um den ge- wünschten Wert einzustellen. 3. Drücken Sie die ALARM-Taste, um Ihre Eingabe zu bestätigen. Die Minutenan- zeige blinkt. 4. Drücken Sie die SET / RESET-Taste, um den gewünschten Wert einzustellen. -
Seite 111: Schlummerfunktion Verwenden
Ablauf von 2 Minuten verstummt das Alarmsignal automatisch. Drücken Sie die SELECT / SET / RESET / ALARM / CLOCK-Taste , um das Alarmsignal vorzeitig auszuschalten. Hinweis: Das Alarmsignal ertönt jeden Tag zur eingestellten Uhrzeit. Drücken Sie 3 x die SET / RESET-Taste, um Alarm 1 zu deaktivieren. -
Seite 112: Minimal- / Maximal-Werte Aufrufen
Drücken Sie die SET / RESET-Taste , um zwischen den Temperaturskalen °C (Cel- sius) und °F (Fahrenheit) zu wählen. Drücken Sie die SELECT-Taste, um Ihre Eingabe zu bestätigen. Minimal- / Maximal- Werte aufrufen Die Temperaturstation speichert die Maximal- und Minimal-Werte des verbundenen Außen- fühlers sowie der Temperaturstation selbst. -
Seite 113: Batterieanzeige
Batterieanzeige Die Symbole erscheinen im LC-Display der Temperaturstation, wenn die Batterien des Außenfühlers oder der Tem- peraturstation schwach sind. Batterien wechseln Öffnen Sie das Batteriefach bzw. Entfernen Sie die verbrauchten Batterien. Setzen Sie je zwei neue 1,5 V Batterien (AA) in die Batteriefächer ein. Hinweis: Achten Sie auf die korrekte Polarität. -
Seite 114: Reinigung Und Pflege
Standort (z. B. in die Nähe eines Fensters). Beachten Sie unbedingt, dass der Außensen- sor immer im Umkreis von max. 30 Meter (Freifeld) von der Basisstation aufgestellt wer- den sollte. Die angegebene Reichweite ist die Freifeldreichweite und bedeutet, dass kein Hinderniss zwischen dem Außensensor und der Basisstation stehen sollte. -
Seite 115: Entsorgung
Entsorgung Die Verpackung besteht aus um- weltfreundlichen Materialien, die Sie über die örtlichen Recyclingstel- len entsorgen können. Möglichkeiten zur Entsorgung des ausgedienten Produkts erfahren Sie bei Ihrer Gemeinde- oder Stadtverwaltung. Werfen Sie Ihr Gerät, wenn es aus gedient hat, im Interesse des Umweltschutzes nicht in den Haus- müll, sondern führen Sie es einer fachgerechten Entsorgung zu. -
Seite 116: Konformitätserklärung
Wir, OWIM GmbH & Co. KG, Stiftsbergstraße 1, D-74167 Neckarsulm, erklären in alleiniger Verantwortung, dass das Produkt: Temperatur- station, Modell-Nr.: HG00073A / HG00073B, Version: 09 / 2016, auf das sich diese Erklärung bezieht, mit den Normen / normativen Doku- menten der 1999 / 5 / EG übereinstimmt. - Seite 117 Sie erhalten auf dieses Gerät 3 Jahre Garan- tie ab Kaufdatum. Die Garantiefrist beginnt mit dem Kaufdatum. Bitte bewahren Sie den Original-Kassenbon gut auf. Diese Unterlage wird als Nachweis für den Kauf benötigt. Tritt innerhalb von 3 Jahren ab dem Kaufdatum dieses Produkts ein Material- oder Fabrikations- fehler auf, wird das Produkt von uns –...
- Seite 118 D-74167 Neckarsulm Model no.: HG00073A / HG00073B Version: 09 / 2016 Estado de las informaciones · Versione delle informazioni · Estado das informações · Last Information Update · Stand der Informationen: 06 / 2016 · Ident.-No.: HG00073A / B062016-5 IAN 279818...