Auriol HG00073A Bedienungs- Und Sicherheitshinweise
Temperaturstation
Vorschau ausblenden
Andere Handbücher für HG00073A:
- Bedienungs- und sicherheitshinweise (169 Seiten) ,
- Bedienungs- und sicherheitshinweis (118 Seiten) ,
- Bedienungs- und sicherheitshinweise (75 Seiten)
Inhaltsverzeichnis
Werbung
Verfügbare Sprachen
Verfügbare Sprachen
TEMPERATURSTATION / TEMPERATURE
STATION / STATION MÉTÉO
TEMPERATURSTATION
Bedienungs- und Sicherheitshinweise
TEMPERATURE STATION
Operation and Safety Notes
STATION MÉTÉO
Instructions d'utilisation et consignes de sécurité
TEMPERATUURSTATION
Bedienings- en veiligheidsinstructies
METEOSTANICE
Pokyny pro obsluhu a bezpečnostní pokyny
ESTACIÓN METEOROLÓGICA
Instrucciones de utilización y de seguridad
ESTAÇÃO METEOROLÓGICA
Instruções de utilização e de segurança
IAN 279818
Werbung
Kapitel
Inhaltsverzeichnis

Verwandte Anleitungen für Auriol HG00073A


Inhaltszusammenfassung für Auriol HG00073A
- Seite 1 TEMPERATURSTATION / TEMPERATURE STATION / STATION MÉTÉO TEMPERATURSTATION Bedienungs- und Sicherheitshinweise TEMPERATURE STATION Operation and Safety Notes STATION MÉTÉO Instructions d‘utilisation et consignes de sécurité TEMPERATUURSTATION Bedienings- en veiligheidsinstructies METEOSTANICE Pokyny pro obsluhu a bezpečnostní pokyny ESTACIÓN METEOROLÓGICA Instrucciones de utilización y de seguridad ESTAÇÃO METEOROLÓGICA Instruções de utilização e de segurança IAN 279818...
- Seite 2 DE / AT / CH Bedienungs- und Sicherheitshinweise Seite GB / IE Operation and Safety Notes Page FR / BE Instructions d‘utilisation et consignes de sécurité Page NL /BE Bedienings- en veiligheidsinstructies Pagina 71 Pokyny pro obsluhu a bezpečnostní pokyny Strana 93 Instrucciones de utilización y de seguridad...
- Seite 3 23 22 20 21...
-
Seite 5: Inhaltsverzeichnis
Einleitung ............Seite Bestimmungsgemäße Verwendung ....Seite Teilebeschreibung ..........Seite Technische Daten ..........Seite Sicherheit ............Seite Allgemeine Sicherheitshinweise ......Seite Sicherheitshinweise zu Batterien .......Seite 10 Vor der Inbetriebnahme ......Seite 11 Allgemeine Hinweise .........Seite 11 Außenfühler in Betrieb nehmen ......Seite 12 Temperaturstation in Betrieb nehmen ....Seite 13 Temperaturstation ..........Seite 15 Außenfühler ............Seite 15 Sprache / Zeitzone / Uhrzeit / Datum... -
Seite 6: Einleitung
Temperaturstation Einleitung Wir beglückwünschen Sie zum Kauf Ihres neuen Produkts. Sie haben sich damit für ein hochwertiges Produkt entschieden. Die Bedie- nungsanleitung ist Teil dieses Produkts. Sie enthält wichtige Hinweise für Sicherheit, Ge- brauch und Entsorgung. Machen Sie sich vor der Benutzung des Produkts mit allen Bedien- und Sicherheitshinweisen vertraut. -
Seite 7: Teilebeschreibung
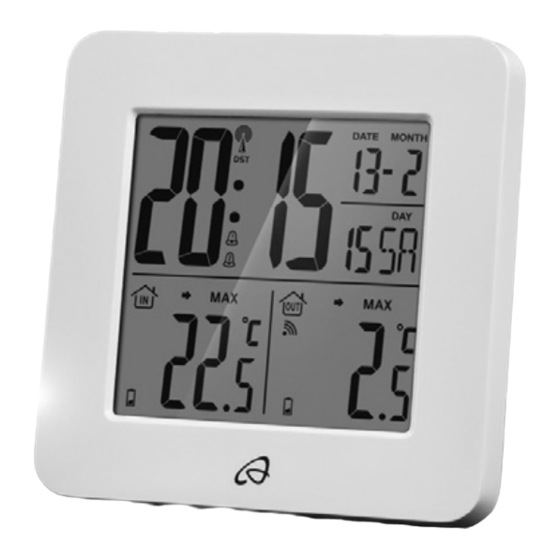
Teilebeschreibung LC-Display Temperaturtrend (Außentemperatur) Außentemperatur -Symbol (Außenfühler) MAX- / MIN-Anzeige für Innentemperatur Temperaturtrend (Innentemperatur) Innentemperatur -Symbol (Temperaturstation) Uhrzeit -Symbol (Schlummerfunktion) Sekundenanzeige -Symbol Wochentagsanzeige Datumsanzeige (Tag / Monat) DST-Anzeige (Sommerzeit) / -Symbol (Alarm 1 / Alarm 2) 2. Zeitzone (ZONE) MAX- / MIN-Anzeige (Außentemperatur) Radio Signal Temperaturstation / REGISTER-Taste (Schlummerfunktion /... -
Seite 8: Technische Daten
Dübel (ø 7,7 mm) Außenfühler Kontroll-LED Aufhängevorrichtung Batteriefach Schraube (ø 3 mm) Dübel (ø 7,7 mm) Technische Daten Temperaturstation: Temperaturmessbereich: 0 – +50 °C +32 – +122 °F Tipp: Beträgt die Temperatur weniger als 0 °C (32 °F), wird „LL.L“ angezeigt. Über- steigt die Temperatur 50 °C (122 °F), wird „HH.H“... -
Seite 9: Sicherheit
Batterien: 2 x AA 1,5 V (im Lieferumfang enthalten) Schutzklasse: IPX4 Sicherheit BEWAHREN SIE ALLE SICHERHEITSHIN- WEISE UND ANWEISUNGEN FÜR DIE ZUKUNFT AUF! Allgemeine Sicherheitshinweise Dieses Gerät kann von Kindern ab 8 Jahren und darüber sowie von Personen mit ver- ringerten physischen, sensorischen oder mentalen Fähigkeiten oder Mangel an Erfahrung und Wissen benutzt werden,... -
Seite 10: Sicherheitshinweise Zu Batterien
Beachten Sie, dass Beschädigungen durch unsachgemäße Handhabung, Nichtbe- achtung der Bedienungsanleitung oder Eingriff durch nicht autorisierte Personen von der Garantie ausgeschlossen sind. Sicherheitshinweise zu Batterien LEBENSGEFAHR! Batterien können verschluckt werden, was lebensgefährlich sein kann. Ist eine Batterie verschluckt worden, muss sofort medizinische Hilfe in Anspruch genommen werden. -
Seite 11: Vor Der Inbetriebnahme
Verwenden Sie nur Batterien des gleichen Typs. Andernfalls besteht Explosionsge- fahr. Falls die Batterien in Ihrem Gerät ausge- laufen sein sollten, entnehmen Sie diese sofort, um Schäden am Gerät vorzubeugen! Vermeiden Sie den Kontakt mit Haut, Augen und Schleimhäuten. Bei Kontakt mit Batteriesäure spülen Sie die betroffene Stelle mit reichlich Wasser ab und / oder suchen Sie einen Arzt auf! -
Seite 12: Außenfühler In Betrieb Nehmen
Geräte können eine Störung der Funkver- bindung verursachen. Stellen Sie die Geräte nicht neben oder auf Metallplatten. Die Funkübertragung zwischen den Geräten kann vermindert werden. Funksignal (DCF): Das DCF Signal (Zeitsignalsender) besteht aus Zeitimpulsen, die von einer der genaues- ten Uhren der Welt, in der Nähe von Frank- furt / Main, Deutschland, abgegeben werden –... -
Seite 13: Temperaturstation In Betrieb Nehmen
richtig arbeitet. Drücken und halten Sie dazu die Z / REGISTER-Taste (nur den Außensensor neu starten). Temperaturstation in Betrieb nehmen Batterien einsetzen: Öffnen Sie das Batteriefach auf der Rückseite der Temperaturstation. Setzen Sie zwei 1,5 V Batterien (AA) (im Lieferumfang enthalten) in das Batte- riefach ein. -
Seite 14: Temperaturstation Und / Oder Außenfühler An Der Wand Montieren
Die Temperaturstation startet nach erfolgrei- chem Empfang des Außenfühler-Signals bzw. nach 3 Minuten mit dem Empfang des Funksi- gnals. Dieser Vorgang kann bis zu 5 Minuten in Anspruch nehmen und wird im LC-Display durch das blinkende -Symbol angezeigt. Bei erfolgreichem Empfang des DCF-Funksig- nals wird das -Symbol dauerhaft im LC-Dis- play angezeigt. -
Seite 15: Temperaturstation
VORSICHT! LEBENS- UND VERLET- ZUNGSGEFAHR UND GEFAHR DER SACHBESCHÄDIGUNG! Lesen Sie die Bedien- und Sicherheitshinweise Ihrer Bohr- maschine aufmerksam durch. LEBENSGEFAHR! Ver- gewissern Sie sich, dass Sie nicht auf Strom-, Gas- oder Wasserleitungen stoßen, wenn Sie in die Wand bohren. Prüfen Sie ggf. mit einem Leitungssucher, bevor Sie in eine Wand bohren. -
Seite 16: Sprache / Zeitzone / Uhrzeit / Datum Manuell Einstellen
Hängen Sie den Außenfühler mit der Auf- hängevorrichtung an der Schraube auf. Hinweis: Stellen Sie sicher, dass der Außen- fühler nicht mit Wasser oder direkter Sonnen- einstrahlung in Kontakt kommt. Elektronische Geräte können den Funkempfang stören. Sprache / Zeitzone / Uhrzeit / Datum manuell einstellen Der Empfang des DCF-Funksignals kann am... - Seite 17 4. Drücken Sie die SET / RESET-Taste, um die gewünschte Sprache (GE = deutsch, FR = französisch, SP = spanisch, IT = italienisch, EN = englisch) einzustellen. 5. Drücken Sie die CLOCK-Taste, um Ihre Eingabe zu bestätigen. Die Zeitzonenan- zeige blinkt. 6.
-
Seite 18: Sommerzeit Anzeigen
10. Wiederholen Sie die Arbeitsschritte 6. und 7., um die Werte für Minuten, Sekun- , Jahr und Datum (Tag / Monat) einzustellen. Hinweis: Die Sekundenanzeige lässt sich nur auf 00 zurücksetzen. 11. Das LC-Display befindet sich im Anschluss wieder in der Standardanzeige. Sommerzeit anzeigen Die Sommerzeit wird im LC-Display durch das DST-Symbol... -
Seite 19: Alarmzeiten Aufrufen
erscheint die Anzeige 0:00 oder AM 12:00. 2. Die Stundenanzeige blinkt. Drücken Sie die SET / RESET-Taste , um den ge- wünschten Wert einzustellen. 3. Drücken Sie die ALARM-Taste, um Ihre Eingabe zu bestätigen. Die Minutenan- zeige blinkt. 4. Drücken Sie die SET / RESET-Taste, um den gewünschten Wert einzustellen. -
Seite 20: Schlummerfunktion Verwenden
Ablauf von 2 Minuten verstummt das Alarmsignal automatisch. Drücken Sie die SELECT / SET / RESET / ALARM / CLOCK-Taste , um das Alarmsignal vorzeitig auszuschalten. Hinweis: Das Alarmsignal ertönt jeden Tag zur eingestellten Uhrzeit. Drücken Sie 3 x die SET / RESET-Taste, um Alarm 1 zu deaktivieren. -
Seite 21: Minimal- / Maximal-Werte Aufrufen
Drücken Sie die SET / RESET-Taste , um zwischen den Temperaturskalen °C (Cel- sius) und °F (Fahrenheit) zu wählen. Drücken Sie die SELECT-Taste, um Ihre Eingabe zu bestätigen. Minimal- / Maximal- Werte aufrufen Die Temperaturstation speichert die Maximal- und Minimal-Werte des verbundenen Außen- fühlers sowie der Temperaturstation selbst. -
Seite 22: Batterieanzeige
Batterieanzeige Die Symbole erscheinen im LC-Display der Temperaturstation, wenn die Batterien des Außenfühlers oder der Tem- peraturstation schwach sind. Batterien wechseln Öffnen Sie das Batteriefach bzw. Entfernen Sie die verbrauchten Batterien. Setzen Sie je zwei neue 1,5 V Batterien (AA) in die Batteriefächer ein. Hinweis: Achten Sie auf die korrekte Polarität. -
Seite 23: Reinigung Und Pflege
Standort (z. B. in die Nähe eines Fensters). Beachten Sie unbedingt, dass der Außensen- sor immer im Umkreis von max. 30 Meter (Freifeld) von der Basisstation aufgestellt wer- den sollte. Die angegebene Reichweite ist die Freifeldreichweite und bedeutet, dass kein Hinderniss zwischen dem Außensensor und der Basisstation stehen sollte. -
Seite 24: Entsorgung
Entsorgung Die Verpackung besteht aus umweltfreundli- chen Materialien, die Sie über die örtlichen Recyclingstellen entsorgen können. Möglichkeiten zur Entsorgung des ausgedienten Produkts erfahren Sie bei Ihrer Gemeinde- oder Stadtverwaltung. Werfen Sie Ihr Gerät, wenn es aus gedient hat, im Interesse des Umweltschutzes nicht in den Haus- müll, sondern führen Sie es einer fachgerechten Entsorgung zu. -
Seite 25: Konformitätserklärung
Wir, OWIM GmbH & Co. KG, Stiftsbergstraße 1, D-74167 Neckarsulm, erklären in alleiniger Verantwortung, dass das Produkt: Temperatur- station, Modell-Nr.: HG00073A / HG00073B, Version: 09 / 2016, auf das sich diese Erklärung bezieht, mit den Normen / normativen Doku- menten der 1999 / 5 / EG übereinstimmt. - Seite 26 Sie erhalten auf dieses Gerät 3 Jahre Garan- tie ab Kaufdatum. Die Garantiefrist beginnt mit dem Kaufdatum. Bitte bewahren Sie den Original-Kassenbon gut auf. Diese Unterlage wird als Nachweis für den Kauf benötigt. Tritt innerhalb von 3 Jahren ab dem Kaufdatum dieses Produkts ein Material- oder Fabrikations- fehler auf, wird das Produkt von uns –...
- Seite 27 Introduction .............Page 28 Proper use ............Page 28 Description of parts and features ......Page 28 Technical data ............Page 30 Safety ..............Page 31 General safety information........Page 31 Safety instructions for batteries ......Page 32 Before initial use ..........Page 33 General information ..........Page 33 Preparing to use the outdoor sensor ....Page 34 Preparing the temperature station for use ..Page 34 Temperature station ...........Page 37...
-
Seite 28: Introduction
Temperature station Introduction We congratulate you on the purchase of your new product. You have chosen a high quality product. The instructions for use are part of the product. They contain important information concerning safety, use and disposal. Before using the product, please familiarise yourself with all of the safety information and instruc- tions for use. -
Seite 29: Temperature Station
MAX- / MIN display for indoor temperature Temperature trend (indoor temperature) Indoor temperature symbol (temperature station) Time symbol (snooze function) Seconds display symbol Day of the week display Date display (day / month) DST display (summer time) symbol (Alarm 1 / Alarm 2) time zone (ZONE) MAX- / MIN display (outdoor temperature) Radio signal... -
Seite 30: Technical Data
Battery compartment Screw (ø 3 mm) Dowel (ø 7.7 mm) Technical data Temperature station: Temperature measurement range: 0 – + 50 °C +32 – +122 °F Note: If the temperature is ≤ 0 °C (32 °F), the LC display shows “LL.L”. If the temperature is ≥ 50 °C (122 °F), the LC display shows “HH.H”. -
Seite 31: Safety
Safety YOU SHOULD STORE ALL SAFETY INFOR- MATION AND INSTRUCTIONS IN A SAFE PLACE IN CASE YOU NEED TO REFER TO THEM AGAIN IN THE FUTURE! General safety information This appliance can be used by children aged from 8 years and above and per- sons with reduced physical, sensory or mental capabilities or lack of experience and knowledge if they have been given... -
Seite 32: Safety Instructions For Batteries
Safety instructions for batteries DANGER TO LIFE! Batteries can be swallowed, which may represent a danger to life. If a battery has been swallowed, medical help is required immediately. Remove the batteries from the device if they are not going to be used for a pro- longed period. -
Seite 33: Before Initial Use
coming into contact with battery acid should be rinsed off with copious amounts of water and / or a doctor contacted if necessary! Before initial use Put the batteries first into the outdoor sensor, then into the temperature station. Note: Before initial use, remove the protective film from the device display. -
Seite 34: Preparing To Use The Outdoor Sensor
Radio signal (DCF): The DCF signal (time signal transmitter) is made up of time pulses transmitted from one of the highest precision clocks in the world close to Frankfurt / Main in Germany – it var- ies by 1 second in 1 million years. In ideal conditions, your temperature station can pick up this signal over a distance of up to approx. - Seite 35 Insert two 1.5 V batteries (AA) (in- cluded) into the battery compartment. Note: Make sure you fit the batteries the right way round (polarity). This is shown on the battery compartment (see. fig B). Close the battery compartment cover. Connecting the temperature station with the outdoor sensor and the DCF radio signal: After the batteries have been inserted, the...
- Seite 36 Note: Do not move the temperature station while it is receiving the signal. Otherwise this could interfere with reception.If synchronisation is not possible when the temperature station is being first set up, try changing the location (e.g. place the temperature station near to a window).
-
Seite 37: Temperature Station
Temperature station Mark the position of the hole (ø approx. 7.7 mm) on the wall. Drill the hole with an electric drill. Insert the dowel into the drilled hole. Using a crosshead screwdriver, screw the screw into the dowel. Hang the temperature station by placing the hanger on the screw. - Seite 38 2. Press the SET / RESET button to switch between the 12- and 24-hour clock dis- play modes. 3. Press the CLOCK button to confirm your settings. The language option flashes. Tip: If you press and hold down the SET / RESET button, you accelerate the process and reach the desired value more quickly.
-
Seite 39: Displaying Summer Time
CET. If you wish to know what the time is in the USA for example, then simply by setting the time zone value to e.g. –10 you will obtain the current local time in Los Angeles etc. 7. Press the CLOCK button to confirm your settings. -
Seite 40: Setting The Alarm Time
Press the CLOCK button again to return to the default display. Setting the alarm time You can set two different alarm times. 1. Press and hold down the ALARM button for about 3 seconds. Note: If an alarm time has been set be- fore, then that previously set alarm time appears in the LC display. -
Seite 41: Using The Snooze Button
button twice to activate Alarm 2. Press the SET / RESET button three times to activate Alarm 1 and Alarm 2. Note: The symbol appears in the LC display. The alarm signal sounds as soon as the set alarm time is reached. The alarm signal ceases automatically after a period of 2 minutes. -
Seite 42: Displaying Temperature
Displaying temperature The LC display shows the indoor temperature and the outdoor temperature Press and hold down the SELECT button for approx. 3 seconds. The °C dis- play flashes. Press the SET / RESET button to switch between the °C (Celsius) and °F (Fahr- enheit) temperature scales. -
Seite 43: Displaying Temperature Trends
Displaying temperature trends After successfully connecting with the outdoor sensor, the temperature station can display the temperature trend (outdoor) and the temperature trend (indoor) You may see the following displays: = The temperature is rising. = The temperature is constant. = The temperature is falling. - Seite 44 an object that transmits radio signals, it could cause interference. If the display indicates a problem, move such objects away from it or remove the batteries for a short while and then re- place them. Obstacles such as concrete walls can also cause that the reception is disturbed.
-
Seite 45: Cleaning And Maintenance
Cleaning and maintenance The device should only be cleaned on the outside with a soft dry cloth. Under no circumstances should you spray the outdoor sensor, e.g. with a garden hose. The outdoor sensor is only protected against rain from above. Disposal The packaging is made entirely of recyclable materials, which you may dispose of at local... -
Seite 46: Declaration Of Conformity
We, OWIM GmbH & Co. KG, Stiftsbergstraße 1, D-74167 Neckarsulm, hereby declare un- der our sole responsibility that the product: Temperature station, model no.: HG00073A / HG00073B, Version: 09 / 2016, to which this declaration refers, complies with the stand- ards / normative documents of 1999 / 5 / EC. -
Seite 47: Warranty
Warranty The device has been manufactured to strict quality guidelines and meticulously examined before delivery. In the event of product defects you have legal rights against the retailer of this product. Your legal rights are not limited in any way by our warranty detailed below. The warranty for this device is 3 years from the date of purchase. - Seite 48 Introduction .............Page 49 Utilisation conventionnelle .........Page 49 Description des pièces et éléments ....Page 49 Données techniques ...........Page 51 Sécurité ...............Page 52 Instructions générales de sécurité .....Page 52 Consignes de sécurité relatives aux piles ..Page 53 Avant la mise en service ......Page 54 Généralités ............Page 54 Mise en service du capteur extérieur ....Page 55...
-
Seite 49: Introduction
Station météo Introduction Nous vous félicitons pour l‘achat de votre nou- veau produit. Vous avez opté pour un produit de grande qualité. Le mode d‘emploi fait partie intégrante de ce produit. Il contient des indica- tions importantes pour la sécurité, l’utilisation et la mise au rebut. -
Seite 50: Station Météo
Température extérieure Symbole (capteur extérieur) Affichage MAX / MIN pour la tempéra- ture ambiante Tendance de la température (température ambiante) Température ambiante Symbole (station météo) Heure Symbole Z (répétition d’alarme) Affichage des secondes Symbole Affichage du jour de la semaine Affichage de la date (jour / mois) Affichage DST (heure d’été) Symbole... -
Seite 51: Données Techniques
Capteur extérieur Voyant à diode électroluminescente Dispositif d’accrochage Boîtier à piles Vis (ø 3 mm) Cheville (ø 7,7 mm) Données techniques Station météo : Plage de température : 0 – +50 °C +32 – +122 °F Conseil : si la température est inférieure à 0 °C (32 °F), «... -
Seite 52: Sécurité
Piles : 2 x AA 1,5 V (comprises dans la livraison) Classe de protection : IPX4 Sécurité CONSERVEZ POUR L’AVENIR L’ENSEMBLE DES INSTRUCTIONS DE SECURITE ET INS- TRUCTIONS ! Instructions générales de sécurité Cet appareil peut être utilisé par des en- fants de 8 ans et plus ainsi que par des personnes à... -
Seite 53: Consignes De Sécurité Relatives Aux Piles
respect du mode d’emploi ou de l’inter- vention sur l’appareil de personnes non autorisées. Consignes de sécurité relatives aux piles DANGER DE MORT ! Les piles peuvent être avalées et ainsi représenter un danger mortel. Contac- tez immédiatement un médecin en cas d’ingurgitation d’une pile. -
Seite 54: Avant La Mise En Service
Si vous constatez que les piles ont coulé dans le boîtier, retirezles immédiatement pour prévenir tout endommagement de l’appareil ! Évitez tout contact avec la peau, les yeux et les muqueuses. En cas de contact avec l’acide, rincez abondamment la zone à l’eau claire et / ou contactez un médecin ! Avant la mise en service Placez les piles d‘abord dans la... -
Seite 55: Mise En Service Du Capteur Extérieur
de 433 MHz. Ces appareils pourraient causer un dysfonctionnement de la trans- mission radio. N’installez pas les appareils à côté de plaques métalliques ou sur des plaques métalliques. Ceci pourrait réduire la transmission radio entre les appareils. Signal radio (DCF) : Le signal DCF (émetteur de signaux horaires) consiste en des impulsions d’horloge émises par l’une des horloges les plus exactes du... -
Seite 56: Mise En Service De La Station De Température
Le capteur extérieur est alors prêt à l’em- ploi et le voyant à diode électrolumines- cente s’allume brièvement. Fermez le couvercle du boîtier à piles. Redémarrez éventuellement la station de température lorsque celle-ci ne fonctionne pas correctement. Pour ce faire, maintenez la touche Z / REGISTER appuyée... - Seite 57 Indication : Lorsque la station de tempéra- ture ne recoit pas le signal de la sonde externe pendant 3 minutes, elle commence automati- quement à réceptionner le signal radio. La station de température démarre après la ré- ception réussie du signal de la sonde ou après 3 minutes avec la réception du signal radio.
-
Seite 58: Station Météo
Monter la station de température et / ou la sonde extérieure sur un mur : Remarque : une perceuse et un tournevis cruciforme sont nécessaires pour cette étape de travail. PRUDENCE ! DANGER DE BLES- SURES ET DE MORT ET RISQUE DE DOMMAGE MATERIEL ! Lisez attentive- ment le mode d’emploi et les instructions de sécurité... -
Seite 59: Réglage Manuel De La Langue / Du Fuseau Horaire / De L'heure / De La Date
Percez le trou à l’aide d’une perceuse électrique. Insérez la cheville dans le trou. À l’aide d’un tournevis cruciforme, vissez la vis dans la cheville. Accrochez le capteur extérieur sur la vis à l’aide du dispositif d’accrochage Remarque : Vérifiez que le capteur exté- rieur n’est pas directement exposé... - Seite 60 aussi utiliser ce réglage rapide pour les réglages suivants. Si vous n’activez aucune touche pendant 30 secondes, l’ACL repasse automatiquement à l’affichage par défaut. 4. Appuyez sur la touche SET / RESET pour choisir la langue voulue (GE = allemand, FR = français, SP = espagnol, IT = italien, EN = anglais).
-
Seite 61: Affichage De L'heure D'été
8. Appuyez sur la touche SET / RESET pour régler la valeur souhaitée. 9. Appuyez sur la touche CLOCK pour confirmer le paramètre saisi. 10. Répétez les étapes 6. et 7. pour régler les minutes, les secondes , l’année et la date (jour / mois). -
Seite 62: Consultation Des Heures D'alarme
1. Appuyez sur la touche ALARM maintenez-la enfoncée pendant environ 3 secondes. Remarque : si une alarme a déjà été réglée auparavant, l’heure d’alarme ré- glée apparaît sur l’écran. Dans le cas contraire, l’affichage 0:00 ou AM 12:00 apparaît. 2. L’affichage des heures clignote. Appuyez sur la touche SET / RESET pour régler la valeur souhaitée. -
Seite 63: Utilisation De La Fonction Répétition De Sonnerie
fois sur la touche SET/RESET pour activer l’alarme 2. Appuyez 3 fois sur la touche SET/RESET pour activer l’alarme 1 et 2. Remarque : le symbole s’af- fiche sur l’écran à cristaux liquides. Le signal sonore d’alarme retentit dès que l’heure d’alarme réglée est atteinte. Au bout de 2 minutes, le signal sonore d’alarme s’arrête automatiquement. -
Seite 64: Affichage De La Température
Appuyez sur la touche SELECT pour désactiver la fonction de répétition d’alarme. Affichage de la température La température intérieure ainsi que la tem- pérature extérieure s’affichent sur l’écran à cristaux liquides. Appuyez sur la touche SELECT maintenez-la enfoncée pendant environ 3 secondes. -
Seite 65: Affichage Tendance Températures
Pour remettre les valeurs à zéro, appuyez sur la touche SET / RESET pendant l’affichage des valeurs maximales et des minimales. Appuyez sur la touche SELECT pour reve- nir à l’affichage standard. Affichage tendance températures Dès que la connexion au capteur externe est établie, la tendance température (extérieure) ainsi que la tendance température (inté- rieure) -
Seite 66: Dépannage
Remarque : veillez à respecter la pola- rité. Celle-ci est indiquée dans le boîtier à piles (voir également Ill. B + D). Fermez les boîtiers à piles. Dépannage Remarque : cet appareil contient des composants électroniques. Ne pas installer l’appareil à proximité de sources d’interfé- rences telles que téléphones mobiles, appa- reils radio, postes CB, télécommandes ou fours à... -
Seite 67: Nettoyage Et Entretien
Le froid (températures extérieures inférieures à 0 °C) peut influencer la puissance de la batterie du capteur extérieur et ainsi réduire la transmission radio. Un autre facteur qui peut conduire à des troubles de réception sont les piles vides ou faibles du capteur extérieur. - Seite 68 Afin de contribuer à la protection de l’environnement, veuillez ne pas jeter le produit usé dans les ordures ménagères, mais le mettre au rebut de manière adéquate. Veuillez vous renseigner auprès des autorités responsables pour les déchetteries et leurs horaires d’ouverture.
-
Seite 69: Déclaration De Conformité
Stiftsbergstraße 1, D-74167 Neckarsulm, dé- clarons sous notre seule et unique responsabi- lité que le produit : Station météo, modèle n° : HG00073A / HG00073B, version : 09 / 2016, auquel se rapporte la présente déclaration, est conforme aux normes /documents norma- tifs de la Directive 1999 / 5 / CE. - Seite 70 Si un problème matériel ou de fabrication devait survenir dans 3 ans suivant la date d‘achat de ce produit, nous assurons à notre discrétion la réparation ou le remplacement de l‘appareil sans frais supplémentaires. La garantie prend fin si le produit est endommagé suite à...
- Seite 71 Inleiding ............Pagina 72 Doelmatig gebruik ......... Pagina 72 Beschrijving van de onderdelen ....Pagina 72 Technische gegevens ........Pagina 74 Veiligheid ............Pagina 75 Algemene veiligheidsinstructies ..... Pagina 75 Veiligheidsinstructies voor het gebruik van batterijen ..........Pagina 76 Vóór de ingebruikname .....
-
Seite 72: Inleiding
Temperatuurstation Inleiding Hartelijk gefeliciteerd met de aankoop van uw nieuwe product. U heeft voor een hoogwaar- dig product gekozen. De gebruiksaanwijzing is een deel van het product. Deze bevat belang- rijke aanwijzingen voor veiligheid, gebruik en verwijdering. Maakt U zich voor de ingebruik- name van het product met alle bedienings- en veiligheidsvoorschriften vertrouwd. - Seite 73 -symbool (buitensensor) MAX- / MIN-weergave voor binnentem- peratuur Temperatuurtrend (binnentemperatuur) Binnentemperatuur -symbool (temperatuurstation) Tijd -symbool (sluimerfunctie) Secondeweergave -symbool Weekdagweergave Datumweergave (dag /maand) DST-weergave (zomertijd) Symbool (alarm 1 / alarm 2) 2e tijdzone (ZONE) MAX- / MIN-weergave (buitentemperatuur) Radiosignaal Temperatuurstation / REGISTER-toets (snooze/ REGISTER) SELECT-toets (“selecteren”) SET / RESET-toets (“instellen”...
-
Seite 74: Technische Gegevens
Buitensensor Controle-led Ophanginrichting Batterijvakje Schroef (ø 3 mm) Plug (ø 7,7 mm) Technische gegevens Temperatuurstation: Temperatuurmeetbereik: 0 – +50 °C +32 – +122 °F Tip: wanneer de temperatuur lager is dan 0 °C (32 °F), dan wordt „LL.L“ getoond. Wanneer de temperatuur hoger wordt dan 50 °C (122 °F), dan wordt „HH.H“... -
Seite 75: Veiligheid
Batterijen: 2 x AA 1,5 V (bij de levering in- begrepen) Beschermingsklasse: IPX4 Veiligheid BEWAAR ALLE VEILIGHEIDSTECHNISCHE INSTRUCTIES EN AANWIJZINGEN OM DEZE EVENTUEEL LATER TE KUNNEN RAADPLEGEN! Algemene veiligheidsinstructies Dit apparaat kan door kinderen vanaf 8 alsook personen met verminderde psy- chische, sensorische of mentale vaardig- heden of een gebrek aan ervaring en / of kennis worden gebruikt, als zij onder... -
Seite 76: Veiligheidsinstructies Voor Het Gebruik Van Batterijen
Beschadigingen door ondeskundig ge- bruik, negeren van de handleiding of in- grepen door niet-geautoriseerde personen zijn van de garantieverlening uitgesloten. Veiligheidsinstructies voor het gebruik van batterijen LEVENSGE VAAR! Batterijen kunnen worden inge- slikt, hetgeen levensgevaarlijk kan zijn. Wanneer een batterij werd ingeslikt, dient men onmiddellijk een arts te consulteren. -
Seite 77: Vóór De Ingebruikname
Gebruik alleen batterijen van hetzelfde type. In het andere geval bestaat explo- siegevaar. Lekken de batterijen in uw apparaat, ver- wijder ze dan direct om schade aan het apparaat te vermijden! Vermijd het contact van huid, ogen en slijmvliezen met batterijzuur. In geval van contact met batterijzuur moeten de des- betreffende plekken met veel water wor- den afgespoeld en / of moet een arts... -
Seite 78: Radiografisch Signaal (Dcf)
433 MHz worden gebruikt. Deze appa- raten kunnen een storing in de radiover- binding veroorzaken. Plaats de apparaten niet naast of op metalen platen. De radioverbinding tus- sen de apparaten kan hierdoor negatief worden beïnvloed. Radiografisch signaal (DCF): Het DCF-signaal (zender van het tijdsignaal) bestaat uit tijdimpulsen die door een van de meest nauwkeurige klokken ter wereld, in de buurt van Frankfurt / Main, Duitsland, worden... -
Seite 79: Temperatuurstation In Gebruik Nemen
Sluit het batterijvakje. Start het temperatuurstation eventueel op- nieuw wanneer het niet optimaal functio- neert. Druk daarvoor op de Z / REGISTER- toets en houdt deze ingedrukt (alleen de buitensensor nieuw starten). Temperatuurstation in gebruik nemen Batterijen plaatsen: Open het batterijvak aan de achter- kant van het temperatuurstation. - Seite 80 automatisch met de ontvangst van het radio- grafische signaal. Na succesvolle ontvangst van het signaal van de buitensensor of na het verstrijken van 3 minuten start het temperatuurstation met de ontvangst van het radiografische signaal. Dit proces kan tot 5 duren minuten en wordt op het LC-display weergegeven door middel van het knipperende -symbool Bij een succesvolle ontvangst van het DCF-sig-...
-
Seite 81: Temperatuurstation
Temperatuurstation en / of buiten- sensor aan de wand monteren: Opmerking: Voor deze handeling heeft u een kruiskopschroevendraaier nodig. VOORZICHTIG! LEVENSGEVAAR EN GEVAAR VOOR LETSEL EN MATE- RIËLE SCHADE! Lees ook de bedienings- en veiligheidsinstructies van uw boormachine zorgvuldig door. LEVENSGE- VAAR! Waarborg dat u niet op stroom-, gas- of waterleidingen stoot als u in de wand boort. -
Seite 82: Taal / Tijdzone / Kloktijd / Datum Handmatig Instellen
Hang de buitensensor met de ophangin- richting aan de schroef. Opmerking: waarborg dat de buitensen- sor niet in contact komt met water of directe zonnestralen. Elektronische apparatuur kan de radio-ontvangst storen. Taal / Tijdzone / Kloktijd / Datum handmatig instellen De ontvangst van het radiografisch DCF-sig- naal kan op de standplaats van het tempera- tuurstation gestoord resp. - Seite 83 Spaans, IT = Italiaans, EN = Engels) in te stellen. 5. Druk op de CLOCK-toets, om uw invoer te bevestigen. De weergave van de tijd- zone knippert. 6. Druk op de SET / RESET-toets om de ge- wenste tijdzone voor tijdzone 2 (– 12 uur tot + 12 uur) in te stellen.
-
Seite 84: Zomertijd Weergeven
jaar en datum (dag / maand) in te stellen. Opmerking: de secondewijzer kan al- leen maar worden teruggezet naar ‚00‘. 11. Vervolgens bevindt het lc-display zich weer in de standaardmodus. Zomertijd weergeven De zomertijd wordt op het LC-display automa- tisch weergegeven via het DST-symbool Via het radiografisch DCF-signaal herkent het temperatuurstation automatisch of de zomer- tijd geldt of niet. -
Seite 85: Alarmtijden Oproepen
2. De uurweergave knippert. Druk op de SET / RESET-toets om de gewenste waarde in te stellen. 3. Druk op de ALARM-toets om uw invoer te bevestigen. De minutenweergave knippert. 4. Druk op de SET / RESET-toets, om de ge- wenste waarde in te stellen. -
Seite 86: Sluimerfunctie Gebruiken
CLOCK-toets om het alarmsignaal voortijdig te deactiveren. Opmerking: het alarmsignaal klinkt elke dag op het ingestelde tijdstip. Druk 3 x op de SET / RESET-toets, om alarm 1 te deactiveren. Druk 2 x op de SET / RESET-toets, om alarm 2 te deacti- veren. -
Seite 87: Minimale / Maximale Waarde Oproepen
Minimale / maximale waarde oproepen Het temperatuurstation slaat de maximale en minimale waarden van de aangesloten bui- tensensor net zoals die van het temperatuur- station zelf op. Druk op de SELECT-toets om de maxi- male waarden van de binnen- en buiten- temperatuur op te roepen. -
Seite 88: Batterij-Indicator
Batterij-indicator De symbolen verschijnen op het LC-display van het temperatuurstation, als de batterijen van de buitensensor of het temperatuurstation leeg raken. Batterijen vervangen Open het batterijvakje Verwijder de verbruikte batterijen. Plaats 2 nieuwe 1,5 V batterijen (AA) in het batterijvakje. Opmerking: let op de juiste polariteit. -
Seite 89: Reiniging En Onderhoud
duidelijk wordt verstoord. Verander in dit ge- val de standplaats (bijv. in de buurt van een raam). Let erop, dat de buitensensor steeds binnen een bereik van max. 30 meter (vrije veld) van het basisstation wordt gepositioneerd. De aangegeven reikwijdte is de reikwijdte in het vrije veld, wat betekent, dat er zich geen hindernissen tussen de buitensensor en het basisstation bevinden. -
Seite 90: Verwijdering
Verwijdering De verpakking bestaat uit milieuvriendelijke materialen die u via de plaatselijke recycling- diensten kunt afvoeren. Informatie over de mogelijkheden om het uitgediende artikel na gebruik af te voeren, verstrekt uw gemeentelijke overheid. Gooi uw apparaat, wanneer het afgedankt wordt, niet weg met het huisvuil maar voer deze af volgens de geldende plaatselijke voor- schriften om het milieu te sparen. -
Seite 91: Verklaring Van Overeenstemming
Wij OWIM GmbH & Co. KG, Stiftsbergstraße 1, D-74167 Neckarsulm, verklaren in eigen verantwoordelijkheid dat het product: Tempe- ratuurstation, modelnr.: HG00073A / HG00073B, versie: 09 / 2016, waarop deze verklaring betrekking heeft, overeenstemt met de normen / normatieve documenten van de richtlijn 1999 / 5 / EG. - Seite 92 U ontvangt op dit apparaat 3 jaar garantie vanaf de aankoopdatum. De garantieperiode start op de dag van aankoop. Bewaar de ori- ginele kassabon alstublieft. Dit document is nodig als bewijs voor aankoop. Wanneer binnen 3 jaar na de aankoopdatum van dit product een materiaal- of productiefout optreedt, dan wordt het product door ons –...
- Seite 93 Úvod ..............Strana Použití ke stanovenému účelu ...... Strana Popis dílů ............Strana Technické údaje ..........Strana Bezpečnost ..........Strana Všeobecné bezpečnostní pokyny ....Strana Bezpečnostní pokyny k bateriím ....Strana Před uvedením do provozu .... Strana Všeobecné pokyny ........Strana Uvedení...
-
Seite 94: Úvod
Meteostanice Úvod Blahopřejeme Vám ke koupi nového výrobku. Rozhodli jste se pro kvalitní produkt. Návod k obsluze je součástí tohoto výrobku. Obsahuje důležité pokyny pro bezpečnost, použití a li- kvidaci. Před použitím výrobku se seznamte se všemi pokyny k obsluze a bezpečnostními pokyny. -
Seite 95: Venkovní Čidlo
Teplota uvnitř Symbol (meteostanice) Přesný čas Symbol Z (funkce usínání) Zobrazení vteřiny Symbol Zobrazení dne v týdnu Zobrazení data (den / měsíc) Zobrazení DST (letní čas) Symbol (alarm 1 / alarm 2) 2. časové pásmo (ZONE) Zobrazení MAX / MIN (teplota venku) Rádiový... -
Seite 96: Technické Údaje
Technické údaje Meteostanice: Měřicí rozsah teploty: 0 – +50 °C +32 – +122 °F Tip: Je-li teplota nižší než 0 °C (32 °F), zob- razí se „LL.L“. Pokud teplota překročí 50 °C (122 °F), zobrazí se „HH.H“. Rozlišení teploty: 0,1 °C Rádiový... -
Seite 97: Bezpečnost
Bezpečnost USCHOVEJTE VŠECHNY BEZPEČNOSTNÍ POKYNY A NÁVODY PRO BUDOUCNOST! Všeobecné bezpečnostní pokyny Tento přístroj mohou používat děti starší než 8 let, osoby se sníženými fyzickými, senzorickými nebo duševními schopnosti nebo s nedostatečnými zkušenostmi a znalostmi o používání přístroje jen tehdy, jestliže byly poučeny o jeho bezpečném používání... - Seite 98 což může být životu nebezpečné. V pří- padě spolknutí baterie je nezbytné oka- mžitě vyhledat lékařskou pomoc. Odstraňte baterie ze zařízení v případě, že se zařízení delší dobu nepoužívá. POZOR! NEBEZPEČÍ EX- PLOZE! Nenabíjitelné baterie nikdy znovu nenabíjejte. Při vložení dbejte na správnou polaritu! Tato je zobrazena na schránkách na baterie.
-
Seite 99: Před Uvedením Do Provozu
Před uvedením do provozu Nasaďte baterie nejprve do venkov- ního čidla a teprve potom do stanice teploměru. Upozornění: Před prvním použitím stáhněte ochranou fólii z displeje. Všeobecné pokyny POZOR! Při volbě místa instalace se ujistěte, že zařízení nejsou vystavena přímému slunečnímu záření, vibraci, prachu, horku, chladnu a vlhkosti. -
Seite 100: Uvedení Venkovního Čidla Do Provozu
Při optimálních podmínkách přijímá stanice teploměru tyto signály až ve vzdálenosti cca 1.500 km od Frankfurt / Main. Uvedení venkovního čidla do provozu Vložení baterií: Sundejte kryt přihrádky na baterie na zadní straně venkovního čidla. Vložte dvě baterie (AA) 1,5 V (sou- část dodávky) do schránky na baterie Upozornění: Dbejte na správnou pola-... - Seite 101 Spojení stanice teploměru s venkov- ním čidlem a rádiovým signálem DCF: Stanice teploměru se po vložení baterií pokusí o navázání spojení s venkovním čidlem. Tento postup může trvat několik minut. Symbol bliká. V případě úspěšného spojení s venkov- ním čidlem přestane symbol blikat a na LCD displeji se zobrazí...
-
Seite 102: Meteostanice
V případě, že je příjem rádiového signálu nadále rušen, můžete přesný čas a datum nastavit ručně (viz „Ruční nastavení jazyka / časového pásma / přesného času / data“). Montáž stanice teploměru a venkov- ního čidla na stěnu: Upozornění: Pro montáž potřebujete vrtačku a křížový... -
Seite 103: Venkovní Čidlo
Venkovní čidlo Označte na stěně vrtací díru (ø cca 7,7 mm). Vyvrtejte vrtačkou otvor. Zasuňte do vyvrtaného otvoru hmoždinku Šroubovákem na šrouby s křížovou dráž- kou našroubujte šroub do hmoždinky. Venkovní čidlo se závěsným zařízením pověste na šroub. Upozornění: Zajistěte, aby venkovní čidlo nepřišlo do styku s vodou nebo přímým slu- nečním zářením. - Seite 104 Tip: Držte tlačítko SET / RESET stisknuté. Tak docílíte zrychleného nastavení hod- not. Rychlé nastavení můžete užít i pro následující nastavovací postupy. Nestisk- nete-li po dobu 30 vteřin žádné tlačítko, vrátí se LC displej automaticky zpět ke standardnímu zobrazení. 4. Stiskněte tlačítko SET / RESET pro nastavení požadovaného jazyka (GE = němčina, FR = francouzština, SP = španělština, IT = italština, EN = angličtina).
-
Seite 105: Zobrazení Letního Času
7. Stiskněte tlačítko CLOCK pro potvrzení zadání. Zobrazení hodin bliká. 8. Stiskněte tlačítko SET / RESET pro nasta- vení požadované hodnoty. 9. Stiskněte tlačítko CLOCK pro potvrzení zadání. 10. Zopakujte kroky 6. a 7., aby se nastavily hodnoty pro minuty, vteřiny , rok a da- (den / měsíc). -
Seite 106: Nastavení Času Alarmu
Nastavení času alarmu Máte možnost nastavit dva různé časy alarmu. 1. Stiskněte a držte stisknuté tlačítko ALARM po dobu cca 3 vteřin. Upozornění: Byl-li předtím nastaven alarm, objeví se nastavený čas alarmu na displeji LC. Jinak se objeví zobrazení 0:00 nebo AM 12:00. 2. -
Seite 107: Použití Funkce Usínání
Stiskněte 3 x tlačítko SET / RESET pro akti- vaci alarmů 1 a 2. Upozornění: Na LC displeji se objeví symbol resp. . Signál alarmu zazní, jakmile je dosažen nastavený přesný čas. Po uplynutí doby 2 minut signál alarmu automaticky ztichne. Stiskněte tlačítko Tlačítko SELECT , Tla- čítko SET / RESET... -
Seite 108: Vyvolání Minimálních / Maximálních Hodnot
Stiskněte a držte stisknuté tlačítko SELECT po dobu cca 3 vteřin. Zobrazení °C bliká. Stiskněte tlačítko SET / RESET pro vý- běr mezi jednotkami °C (Celsius) a °F (Fahrenheit). Stiskněte tlačítko SELECT pro potvrzení zadání. Vyvolání minimálních / maximálních hodnot Stanice teploměru ukládá... -
Seite 109: Zobrazení Stavu Baterie
Jsou možná následující zobrazení: = Teplota stoupá. = Teplota zůstává konstantní. = Teplota klesá. Zobrazení stavu baterie Symboly se objeví na LC dis- pleji, jestliže jsou baterie venkovního čidla nebo stanice slabé. Výměna baterií Otevřete schránku na baterie resp. Vyjměte opotřebované baterie. Vložte dvě... -
Seite 110: Čistění A Ošetřování
Překážky, jako například betonové stěny, mo- hou vést ke znatelnému rušení příjmu. V tomto případě zvolte jiné stanoviště (např. v blízkosti okna). Dbejte na umístění venkovního čidla v okruhu maximálně 30 m (volný prostor) od základní stanice. Udaný dosah je podmíněný volným prostorem, mezi venkovním čidlem a základní... -
Seite 111: Likvidace
Likvidace Obal se skládá z ekologicky vhodných mate- riálů, které můžete zlikvidovat v místních recy- klačních střediscích. Informujte se o možnostech odstranění použi- tého výrobku do odpadu u vaší místní obecní nebo městské správy. Neodhazujte použitý výrobek v zájmu ochrany životního prostředí do domovního odpadu. -
Seite 112: Prohlášení O Shodě
My, společnost OWIM GmbH & Co. KG, Stiftsbergstraße 1, D-74167 Neckarsulm, prohlašujeme s výhradní odpovědností, že vý- robek: Meteostanice, číslo modelu: HG00073A / HG00073B, verze: 09 / 2016, ke kterému se toto prohlášení vztahuje, odpovídá normám / normativním dokumentům směrnice 1999 / 5 / ES. - Seite 113 si dobře originál pokladní stvrzenky. Tuto stvr- zenku budete potřebovat jako doklad o za- koupení. Pokud se do 3 let od data zakoupení tohoto výrobku vyskytne vada materiálu nebo výrobní vada, výrobek Vám – dle našeho rozhodnutí – bezplatně opravíme nebo vyměníme. Tato záruka zaniká, jestliže se výrobek poškodí, neodborně...
- Seite 114 Introducción ..........Página 115 Uso adecuado ..........Página 115 Descripción de los elementos..... Página 115 Datos técnicos ..........Página 117 Seguridad ..........Página 118 Indicaciones generales de seguridad ..Página 118 Indicaciones de seguridad sobre las pilas Página 119 Antes de la puesta en marcha ..
-
Seite 115: Introducción
Estación meteorológica Introducción Enhorabuena por la adquisición de su nuevo producto. Ha optado por un producto de alta calidad. El manual de instrucciones forma parte de este producto. Contiene importantes indicaciones sobre seguridad, uso y elimina- ción. Antes de usar el producto, familiarícese con todas las indicaciones de manejo y de seguridad. -
Seite 116: Estación De Temperatura
Temperatura exterior -Símbolo (sensor exterior) Indicación MAX / MIN para temperatura interior Tendencia de temperatura (temperatura interior) Temperatura interior - Símbolo (Estación de temperatura) Hora Símbolo Z (función de repetición de alarma) Indicación de segundos -Símbolo Indicación de día de la semana Indicación de la fecha (día / mes) Indicación DST (horario de verano) / -símbolo (alarma 1 / alarma 2) -
Seite 117: Sensor Exterior
Sensor exterior LED de control Dispositivo para colgar Compartimento de las pilas Tornillo (ø 3 mm) Taco (ø 7,7 mm) Datos técnicos Estación de temperatura: Rango de temperaturas: 0 – + 50 °C +32 – +122 °F Nota: Si la temperatura es inferior a 0 °C (32 °F) se mostrará... -
Seite 118: Seguridad
Alcance de transmisión HF: máx. 30 metros en terreno sin obstáculos Pilas: 2 x AA 1,5 V (incluidas en el volumen de sumi- nistro) Clase de protección: IPX4 Seguridad ¡GUARDAR TODAS LAS ADVERTENCIAS E INDICACIONES DE SEGURIDAD POR SI LAS NECESITA EN UN FUTURO! Indicaciones generales de seguridad Este producto puede ser utilizado por... -
Seite 119: Indicaciones De Seguridad Sobre Las Pilas
No exponga el aparato a campos elec- tromagnéticos extremadamente elevados. Esto podría afectar al funcionamiento del aparato. Tenga en cuenta que los daños produci- dos por manejo incorrecto, no seguimiento del manual de instrucciones o manipula- ción por parte de personas no autorizadas, están excluidos de la garantía. -
Seite 120: Antes De La Puesta En Marcha
Mantenga las pilas fuera del alcance de los niños. No las arroje al fuego, no las ponga en cortocircuito y no las desmonte. Reemplace todas las baterías a la vez. Utilice únicamente pilas del mismo tipo. En caso contrario existe peligro de explo- sión. -
Seite 121: Puesta En Marcha Del Sensor Exterior
Coloque la estación de temperatura en el soporte correspondiente Asegúrese de que los aparatos adyacen- tes no utilicen la misma frecuencia de 433 MHz. Estos aparatos pueden alterar la comunicación inalámbrica. No coloque los aparatos cerca o encima de placas de metal. La transmisión ina- lámbrica entre los dispositivos podría verse alterada. -
Seite 122: Puesta En Funcionamiento De La Estación De Temperatura
El sensor exterior ya está listo para fun- cionar y el LED de control se ilumina brevemente. Cierre la cubierta del compartimento de las pilas. Si fuera necesario, reinicie la estación de temperatura si no funciona correctamente. Para ello, mantenga pulsada la tecla / REGISTER (reinicie solo el sensor exterior). - Seite 123 cuanto se produce la conexión, el símbolo deja de parpadear y la temperatura se muestra en la pantalla LCD. Nota: si la estación de temperatura no recibe la señal del sensor exterior al cabo de 3 minu- tos, la estación meteorológica inicia entonces automáticamente la recepción de la señal de radiofrecuencia.
-
Seite 124: Estación De Temperatura
Si persiste la dificultad de recepción puede configurar manualmente la fecha y la hora (véase “Ajuste manual de idioma / zona horaria / hora / fechau”). Montar la estación de temperatura y/o el sensor externo en la pared: Nota: Para este paso de trabajo necesita un taladro y un destornillador con punta de estrella. -
Seite 125: Sensor Exterior
Sensor exterior Marque el agujero de perforación (ø aprox. 7,7 mm) en la pared. Realice el agujero con una taladro. Introduzca el taco en el agujero per- forado. Introduzca el tornillo en el taco con un destornillador. Enganche el sensor exterior con el dispo- sitivo para colgar en el tornillo. - Seite 126 los valores más rápidamente. Este modo de ajuste rápido puede emplearse también para los demás ajustes. Si no presiona ninguna tecla durante 30 segundos, la pantalla LCD regresa automáticamente a la indicación estándar. 4. Pulse la tecla SET / RESET, para ajustar el idioma deseado (GE = alemán, FR = francés, SP = español, IT = italiano, EN = inglés).
-
Seite 127: Visualización Del Horario De Verano
8. Pulse la tecla SET / RESET para ajustar el valor deseado. 9. Presione la tecla CLOCK para confirmar la entrada. 10. Repita los pasos 6 y 7 para ajustar los valores de minutos, segundos , año y fecha (día / mes). Nota: La indicación de segundos sólo se puede resetear a 00. -
Seite 128: Consultar Alarmas
1. Presione y mantenga presionada la tecla ALARM durante aprox. 3 segundos. Nota: Si se ha programado previamente una alarma, ésta se mostrará en la pan- talla. De lo contrario se muestra 0:00 o AM 12:00. 2. El indicador de las horas parpadea. Pulse la tecla SET / RESET para ajustar el valor deseado. -
Seite 129: Uso De La Función De Retraso De Alarma
Nota: El símbolo aparece en la pantalla LCD. La señal de alarma suena al alcanzarse la hora ajustada. Al cabo de 2 minutos se apaga la señal de alarma automática- mente. Pulse la tecla SELECT , SET / RESET ALARM , Tecla CLOCK para apa- gar la señal alarma antes de tiempo. -
Seite 130: Consultar Valores Máximos / Mínimos
Presione y mantenga presionada la tecla SELECT durante aprox. 3 segundos. La indicación °C parpadea. Pulse la tecla SET / RESET , para cam- biar entre las escalas de temperatura °C (Celsius) y °F (Fahrenheit). Presione la tecla SELECT para confirmar la entrada. -
Seite 131: Indicación De Estado De Las Pilas
Se pueden observar las siguientes indicaciones: = La temperatura aumenta. = La temperatura permanece constante. = La temperatura disminuye. Indicación de estado de las pilas Los símbolos aparecen en la pantalla LCD de la estación de temperatura cuando las pilas del sensor exterior o de la estación estén gastadas. - Seite 132 Retire este tipo de aparatos del alcance de la estación de temperatura / del sensor exterior, o retire brevemente las baterías de la estación meteorológica / del sensor exterior, cuando la pantalla muestre fallos. La recepción se puede reducir considerable- mente por algunos obstáculos, p.ej.
-
Seite 133: Limpieza Y Mantenimiento
Limpieza y mantenimiento Limpie el aparato sólo por fuera con un paño suave y seco. No proyecte agua hacia el sensor exte- rior bajo ninguna circunstancia, p.ej. con la manguera del jardín. El sensor exterior solamente está protegido contra la lluvia por la parte superior. -
Seite 134: Declaración De Conformidad
1, D-74167 Neckarsulm, declaramos en responsabilidad única que el producto: Estación meteorológica, modelo n.° HG00073A / HG00073B, versión: 09 / 2016, al que esta declaración hace referencia, cum- ple con todas las normas / y la normativa de los documentos de 1999 / 5 / CE. -
Seite 135: Garantía
Garantía El aparato ha sido fabricado cuidadosamente siguiendo exigentes normas de calidad y ha sido probado antes de su entrega. En caso de defecto del producto, usted tiene derechos legales frente al vendedor del mismo. Nues- tra garantía (abajo indicada) no supone una restricción de dichos derechos legales. - Seite 136 frágiles como, por ejemplo, los interruptores, baterías y piezas de cristal. 136 ES...
- Seite 137 Introdução ..........Página 138 Utilização correcta ........Página 138 Descrição das peças ........Página 138 Dados técnicos ..........Página 140 Segurança ..........Página 141 Indicações gerais de segurança ....Página 141 Indicações de segurança relativas às pilhas ............Página 142 Antes da colocação em funcionamento ........
-
Seite 138: Introdução
Estação meteorológica Introdução Damos-lhe os parabéns pela aquisição do seu novo produto. Acabou de adquirir um produto de grande qualidade. O manual de instruções é parte integrante deste produto. Contém indi- cações importantes referentes à segurança, utilização e eliminação. Familiarize-se com todas as indicações de utilização e de segu- rança do produto. -
Seite 139: Estação Meteorológica
Indicação de MÁX. / MÍN. para a temperatura interior Tendência da temperatura (Temperatura interior) Temperatura interior Símbolo (Estação meteorológica) Hora Símbolo Z (Função „snooze“) Indicação dos segundos Símbolo Indicação dos dias da semana Indicação da data (dia / mês) Indicação DST (horário de Verão) Símbolo (Alarme 1 / Alarme 2) 2.º... -
Seite 140: Sensor Exterior
Sensor exterior LED de controlo Orifício para pendurar Compartimento das pilhas Parafuso (ø 3 mm) Bucha (ø 7,7 mm) Dados técnicos Estação meteorológica: Amplitude de medição da temperatura: 0 – +50 °C +32 – +122 °F Nota: Se a temperatura for inferior a 0 °C (32 °F) é... -
Seite 141: Segurança
Amplitude de transmissão HF: máx. 30 metros em campo livre Pilhas: 2 x AA 1,5 V (incluídas no mate- rial fornecido) Classe de protecção: IPX4 Segurança GUARDE TODAS AS INDICAÇÕES DE SEGURANÇA E INSTRUÇÕES PARA FUTURA CONSULTA! Indicações gerais de segurança Ente aparelho pode ser utilizado por crianças a partir dos 8 anos, assim como por pessoas com capacidades físicas,... -
Seite 142: Indicações De Segurança Relativas Às Pilhas
elevados. Isso pode prejudicar o funcio- namento do aparelho. Tenha em atenção que a garantia não abrange danos causados por um manu- seamento inadequado, pela inobservân- cia do manual de instruções ou por uma intervenção por pessoal não autorizado. Indicações de segurança relativas às pilhas PERIGO DE MORTE! As... -
Seite 143: Antes Da Colocação Em Funcionamento
Utilize apenas pilhas do mesmo tipo. Caso contrário, existe perigo de explosão. Caso as pilhas do seu aparelho come- cem a derramar dentro deste, retire-as imediatamente, de forma a evitar danos no aparelho! Evite o contacto com a pele, olhos e mucosas. -
Seite 144: Colocar O Sensor Exterior Em Funcionamento
Certifique-se de que os aparelhos contí- guos não funcionam com a mesma fre- quência de 433 MHz. Estes aparelhos poderão causar interferências na ligação por rádio. Não coloque os aparelhos junto ou em cima de placas metálicas. A radiotrans- missão entre os aparelhos pode diminuir. Sinal de radiofrequência (DCF): O sinal DCF (emissor de sinal horário) consiste em impulsos temporais, emitidos por um dos... -
Seite 145: Colocar A Estação Meteorológica Em Funcionamento
Feche a tampa do compartimento das pilhas. Se necessário, se a estação meteorológica não estiver a funcionar correctamente, proceda a um reinício desta. Para isso, prima e mantenha premida a tecla Z REGISTER (somente reiniciar o sensor exterior). Colocar a estação meteorológica em funcionamento Colocar as pilhas:... - Seite 146 deixa de estar intermitente e a temperatura é mostrada no visor LC. Nota: Quando a estação meteorológica não recebe sinal do sensor exterior num período de 3 minutos, esta inicia automaticamente com a recepção do sinal de radiofrequência. A estação meteorológica começa a funcionar, após a recepção com sucesso do sinal do sensor exterior ou após 3 minutos, com a recepção do sinal de radiofrequência.
-
Seite 147: Estação Meteorológica
Caso a recepção do sinal de radiofrequên- cia continue a sofrer interferências, pode também configurar manualmente a hora e data (ver “Configurar manualmente idioma / fuso horário / hora / data”). Montar a estação meteorológica e / ou o sensor exterior numa parede: Nota: para esta tarefa necessita de um berbe- quim e de uma chave de fendas Philips. -
Seite 148: Sensor Exterior
Sensor exterior Marque o orifício de perfuração (ø aprox. 7,7 mm) na parede. Faça o furo com um berbequim. Insira a bucha no orifício de perfuração. Com uma chave de fendas Philips, aperte o parafuso na bucha. Pendure o sensor exterior colocando o orifício para pendurar no parafuso. - Seite 149 valores será mais rápida. Esta configura- ção rápida também pode ser utilizada para os próximos processos de configu- ração. Se não premir qualquer tecla no espaço de 30 segundos, o visor LC regressa automaticamente para a visuali- zação padrão. 4. Prima a tecla SET / RESET para configurar o idioma desejado (GE = alemão, FR = francês, SP = espanhol, IT = italiano, EN = inglês).
-
Seite 150: Indicar A Hora De Verão
7. Prima a tecla CLOCK para confirmar a sua configuração. A indicação das horas fica intermitente. 8. Prima a tecla SET / RESET para configurar o valor desejado. 9. Prima a tecla CLOCK para confirmar a sua configuração. 10. Repita os passos 6 e 7 para configurar os valores dos minutos, segundos , ano e data... -
Seite 151: Configurar A Hora De Alarme
Configurar a hora de alarme Dispõe da possibilidade de configurar duas horas de alarme diferentes. 1. Prima e mantenha premida a tecla ALARM durante aprox. 3 segundos. Nota: Quando já tiver sido configurado um alarme é indicada essa hora de alarme no visor LC. -
Seite 152: Ligar / Desligar O Alarme
Ligar / desligar o alarme Prima uma vez a tecla SET / RESET para activar o alarme 1. Prima duas vezes a tecla SET / RESET para activar o alarme 2. Prima três vezes a tecla SET / RESET para activar o alarme 1 e 2. Nota: É... -
Seite 153: Visualizar A Temperatura
Visualizar a temperatura No visor LC são indicadas a temperatura interior e a temperatura exterior Prima e mantenha premida a tecla SELECT durante aprox. 3 segundos. A indicação °C fica intermitente. Prima a tecla SET / RESET , para optar entre as escalas de temperatura °C (Cel- sius) e °F (Fahrenheit). -
Seite 154: Visualizar A Tendência Da Temperatura
Visualizar a tendência da temperatura Após uma ligação com sucesso ao sensor exterior são apresentadas a tendência da temperatura (exterior) e a tendência da temperatura (interior) São possíveis as seguintes indicações: = A temperatura está a subir. = A temperatura está constante. = A temperatura está... - Seite 155 como telemóveis, rádios, rádios CB, teleco- mandos ou microondas, etc. Retire estes aparelhos do alcance da estação de temperatura / do sensor exte- rior, ou remova momentaneamente as pilhas da estação de temperatura / do sensor exterior, se o visor apresentar interferências.
-
Seite 156: Limpeza E Conservação
Se a estação de temperatura não trabalhar corretamente, remova as pilhas para poucos instantes e coloque as depois novamente. Limpeza e conservação Limpe o aparelho apenas por fora com um pano seco e macio. Nunca borrife o sensor externo, por exemplo, com uma mangueira de jardim. -
Seite 157: Declaração De Conformidade
1, D-74167 Neckarsulm, declara, sob exclusiva responsabilidade que o produto: Estação meteorológica, modelo-n.º.: HG00073A / HG00073B, versão: 09 / 2016, ao qual se refere a presente declaração, se encontra em conformidade com as normas / documentos normativos da Directiva... -
Seite 158: Garantia
Pode encontrar a declaração de conformi- dade completa em www.owim.com. Garantia O aparelho foi cuidadosamente fabricado segundo rigorosas directivas de qualidade e meticulosamente testado antes da sua distri- buição. Em caso de falhas deste aparelho, possui direitos legais relativamente ao vende- dor do aparelho. - Seite 159 A garantia é válida em caso de defeitos de material ou de fabrico. Esta garantia não é extensível a componentes do produto que se desgastam com o uso e que, por isso, podem ser consideradas peças de desgaste (por ex.º pilhas) ou a danos em peças frágeis, por ex.º...
- Seite 160 OWIM GmbH & Co. KG Stiftsbergstraße 1 D-74167 Neckarsulm Model no.: HG00073A / HG00073B Version: 09 / 2016 Stand der Informationen · Last Information Update Version des informations · Stand van de informatie Stav informací · Estado de las informaciones Estado das informações: 06 / 2016...