Herunterladen Inhalt Inhalt Diese Seite drucken
Inhaltsverzeichnis

Werbung

Verfügbare Sprachen
  • DE

Verfügbare Sprachen

  • DEUTSCH, seite 65
RELOJ RADIOCONTROLADO
Instrucciones de utilización y de seguridad
OROLOGIO RADIOCOMANDATO
Indicazioni per l'uso e per la sicurezza
RELÓGIO SEM FIOS
Instruções de utilização e de segurança
RADIO-CONTROLLED CLOCK
Operation and Safety Notes
FUNKUHR
Bedienungs- und Sicherheitshinweise
5
Z31163

Werbung

Inhaltsverzeichnis
loading

Inhaltszusammenfassung für Auriol Z31163

  • Seite 1 RELOJ RADIOCONTROLADO Instrucciones de utilización y de seguridad OROLOGIO RADIOCOMANDATO Indicazioni per l’uso e per la sicurezza RELÓGIO SEM FIOS Instruções de utilização e de segurança RADIO-CONTROLLED CLOCK Operation and Safety Notes FUNKUHR Bedienungs- und Sicherheitshinweise Z31163...
  • Seite 2 Instrucciones de utilización y de seguridad Página IT / MT Indicazioni per l’uso e per la sicurezza Pagina Instruções de utilização e de segurança Página GB / MT Operation and Safety Notes Page DE / AT / CH Bedienungs- und Sicherheitshinweise Seite...
  • Seite 3 9 8 7...
  • Seite 4 12 13...
  • Seite 6: Inhaltsverzeichnis

    Uso adecuado .................Página Descripción de las piezas ............Página Datos técnicos ..................Página Volumen de suministro ............Página Seguridad Indicaciones generales de seguridad ............Página Indicaciones de seguridad referentes a las pilas ........Página 10 Antes de la puesta en servicio ..........Página 11 Puesta en funcionamiento Colocación de las pilas ................Página 11 Recepción de la señal de radiofrecuencia (DCF) .........Página 12 Ajuste de los parámetros básicos ............Página 13...
  • Seite 7: Uso Adecuado

    Reloj radiocontrolado Uso adecuado El radio-reloj dispone de una indicación de fecha y un despertador con dos alarmas programables. El radio-reloj muestra la temperatura en el lu- gar de emplazamiento del aparato, así como la presión atmosférica y una indicación de tendencia de la evolución de dicha presión. Otro valor de indicación es la tendencia del tiempo, la cual se calcula mediante evalua- ción de las oscilaciones de la presión atmosférica.
  • Seite 8: Datos Técnicos

    Soporte vertical Tecla ▼ ALARM ON / OFF Tecla ▲ °C / °F Tecla SNOOZE / LIGHT Tecla WEATHER / UNIT Tecla MODE / SET Datos técnicos Pila: 2 x AA, 1,5 V (incluidas en el volumen de suministro) Radioseñal: Rango de temperaturas: 0 °C hasta +50 °C Resolución de temperatura: 0,1 °C...
  • Seite 9: Seguridad

    Seguridad ¡CONSERVE TODAS LAS INDICACIONES DE SEGURIDAD Y ADVERTENCIAS PARA FUTURAS CONSULTAS! Indicaciones generales de seguridad Por su seguridad, los niños o las personas que carezcan de los cono- cimientos o la experiencia necesarios para manipular el aparato o aquéllas cuyas capacidades físicas, sensoriales o psicológicas estén limitadas, no deberán utilizar el aparato sin la supervisión o las indi- caciones de una persona responsable.
  • Seite 10: Indicaciones De Seguridad Referentes A Las Pilas

    Indicaciones de seguridad referentes a las pilas ¡PRECAUCIÓN! ¡PELIGRO DE EXPLOSIÓN! ¡Nunca recargue las pilas! ¡Tenga en cuenta la polaridad correcta al colocar las pilas! Ésta está indicada en el compartimento de las pilas. Si fuera necesario, limpie los contactos de las pilas y del aparato antes de introducir las pilas.
  • Seite 11: Antes De La Puesta En Servicio

    Antes de la puesta en servicio Montaje mural: Nota: para el montaje en una pared maciza necesita un tornillo y un taco (ø 6 mm). Eventualmente necesitará otros materiales de montaje para otro tipo de superficies. En caso necesario consulte a un técnico especializado. Cuelgue el aparato con el dispositivo para colgar en un tornillo.
  • Seite 12: Recepción De La Señal De Radiofrecuencia (Dcf)

    Nota: si no se pulsa ninguna tecla al cabo de 12 segundos, el apa- rato comenzará a buscar la señal de radiofrecuencia DCF. Recepción de la señal de radiofrecuencia (DCF) Nota: La estación meteorológica mide inicialmente la presión atmosférica y busca la señal de radiofrecuencia DCF. Este proceso requiere algunos minutos, durante los cuales parpadeará...
  • Seite 13: Ajuste De Los Parámetros Básicos

    Finalice la búsqueda de la señora horaria (DCF), pulsando simultá- neamente las teclas ▲ °C / °F y ▼ ALARM ON / OFF . Man- tenga pulsadas ambas teclas durante 3 segundos, hasta que se escuche una señal acústica y desaparezca el símbolo de radiofre- cuencia de la pantalla.
  • Seite 14 – Segundos: se muestra en la indicación de la hora – Año: se muestra en la indicación de la fecha junto a “yr” – Mes: se muestra en la indicación de la fecha en “MONTH” – Día: se muestra en la indicación de la fecha en “DAY”...
  • Seite 15: Ajuste Del Despertador

    Ajuste del despertador El artículo dispone de dos despertadores programables. Éstos se programan de la siguiente manera: 1. Pulse la tecla MODE / SET para acceder al modo de alarma. En la pantalla se muestran alternativamente las indicaciones Alarm 1 y Alarm 2 2.
  • Seite 16: Puesta En Funcionamiento De La Indicación De La Presión Atmosférica Y La Tendencia Del Tiempo

    Puesta en funcionamiento de la indicación de la presión atmosférica y la tendencia del tiempo Las indicaciones en la pantalla muestra la presión atmosférica abso- luta actual y la tendencia de la misma mediante una flecha: Nota: Después de la puesta en funcionamiento, se debe indicar en el aparato la altura geográfica del emplazamiento actual para permitir una tendencia aproximada del tiempo en base a los datos de la presión del aire.
  • Seite 17: Ajuste De La Unidad De Temperatura

    Están disponibles las siguientes entradas: ligeramente lluvia y soleado nublado nublado viento Indicación Ajuste de la unidad de temperatura Pulse la tecla ▲°C / °F para mostrar la temperatura en grados Celsius o Fahrenheit. Nota: La unidad seleccionada se muestra junto a la indicación de la temperatura.
  • Seite 18: Solución De Problemas

    Solución de problemas Nota: el aparato contiene componentes electrónicos. No coloque el aparato cerca de fuentes de interferencias como teléfonos móviles, apara- tos de radiotransmisión, emisoras de banda ciudadana, mandos a distan- cia o microondas, etc. Ello podría afectar a la recepción de la señal inalámbrica.
  • Seite 19: Información

    Nosotros Milomex Ltd., c / o Milomex Services, Hilltop Cottage, Barton Road, Pulloxhill, Bedfordshire, MK45 5HP, UK, declaramos en responsabi- lidad única que el producto: Radio-reloj, modelo n.° Z31163, versión: 03 / 2012, al que esta declaración hace referencia, cumple con todas las...
  • Seite 20 rirse, estos documentos pueden descargarse de la página www.milomex.com. 20 ES...
  • Seite 21 Utilizzo secondo la destinazione d’uso ....Pagina 22 Descrizione dei componenti ..........Pagina 22 Dati Tecnici ..................Pagina 23 Fornitura ....................Pagina 23 Sicurezza Avvertenze di sicurezza generali ............Pagina 24 Avvertenze di sicurezza sulle batterie ............Pagina 24 Prima della messa in funzione .........Pagina 25 Messa in funzione Inserimento delle batterie ................Pagina 26 Ricezione del segnale radio (DCF) ............Pagina 26...
  • Seite 22: Utilizzo Secondo La Destinazione D'uso

    Orologio radiocomandato Utilizzo secondo la destinazione d’uso L’orologio radiocomandato dispone di un’indicatore di data e di una sve- glia con due orari di sveglia programmabili. L’orologio radiocomandato mostra la temperatura in corrispondenza dell’apparecchio come anche la pressione atmosferica ed il trend della pressione stessa. Un ulteriore valore visualizzato è...
  • Seite 23: Dati Tecnici

    Piedino base ▼ Tasto ALARM ON / OFF ▲ Tasto °C / °F Tasto SNOOZE / LIGHT Tasto WEATHER / UNIT Tasto MODE / SET Dati Tecnici Batteria: 2 x AA, 1,5 V (contenuta nella fornitura) Segnale orologio radiocomandato: Campo di misurazione temperatura: da 0 °C a +50 °C Risoluzione temperatura: 0,1 °C Campo di misurazione...
  • Seite 24: Sicurezza

    Sicurezza CONSERVARE TUTTE LE AVVERTENZE DI SICUREZZA E TUTTI GLI AV- VISI PER IL FUTURO! Avvertenze di sicurezza generali Le persone, inclusi i bambini, che a causa delle loro capacità fisiche, sensoriali o mentali o a causa della loro inesperienza o mancata co- noscenza non sono in grado di usare l’apparecchio in sicurezza, non possono usare l’apparecchio senza assistenza o supervisione da parte di una persona responsabile.
  • Seite 25: Prima Della Messa In Funzione

    Prestare attenzione alla polarità corretta delle batterie quando esse vengono inserite! La polarità è riportata nei vani portabatterie. Se necessario, pulire i contatti delle batterie e dell’apparecchio prima di inserirle. Rimuovere immediatamente le batterie esauste dall’apparecchio. Persiste forte pericolo di perdite! Non smaltire le batterie nei rifiuti domestici! Ogni consumatore è...
  • Seite 26: Messa In Funzione

    Montaggio con piede di appoggio: Premere i perni dei piedi di appoggio nelle relative sagomature dell’apparecchio (vedere la fig. C). Messa in funzione Rimuovere la pellicola protettiva del display dopo aver montato l’apparecchio. Inserimento delle batterie Aprire il vano portabatterie tirando leggermente in alto il coperchio del vano portabatterie .
  • Seite 27 Segnale radio (DCF): Il segnale DCF (trasmettitore dell‘orario) è costituito da impulsi di orari tra- smessi da uno degli orologi più esatti del mondo, situato nelle vicinanze di Francoforte sul Meno (Frankfurt / Main) in Germania – subisce una varia- zioni di un solo secondo nell’arco di in un milione di anni.
  • Seite 28: Adattamento Delle Impostazioni Di Base

    Adattamento delle impostazioni di base 1. Premere il tasto MODE / SET e tenerlo premuto 3 secondi. Viene emesso un breve tono acustico. Avviso: Le impostazioni che possono essere modificate lampeggiano nel display. Possono essere adattate una dopo l’altra differenti impo- stazioni.
  • Seite 29: Impostazione Degli Orari Di Sveglia

    l’orologio riceva un segnale solo sporadicamente. Alla ricezione del segnale, l’orologio si imposta automaticamente sull’ora corretta del segnale radio (DCF) (= ora in Germania = MEZ = GMT+1 = UTC +1). Il giorno della settimana viene visualizzato nella seguente lingua: Visualizzazione lampeg- Lingua: giante:...
  • Seite 30: Disinserimento Del Segnale Dell'allarme

    2. Impostare ora l’allarme desiderato tenendo premuto il tasto MODE / , sino a che la visualizzazione dell’ora inizia a lampeggiare. 3. Premere il tasto ▲ °C / °F e ▼ ALARM ON / OFF per impostare il valore desiderato. 4.
  • Seite 31: Messa In Funzione Dell'indicatore Di Pressione Atmosferica E Del Trend Meteorologico

    Messa in funzione dell’indicatore di pressione atmosferica e del trend meteorologico Le visualizzazioni sul display mostrano la pressione atmosferica attuale as- soluta e il trend della pressione atmosferica per mezzo di una freccia: Avviso: Dopo la messa in funzione, è necessario comunicare all’articolo l’altezza geografica del luogo di installazione, al fine di permettere la visualizzazione del trend meteorologico, sulla base dei dati di pressione atmosferica.
  • Seite 32: Impostazione Dell'unità Di Temperatura

    Sono disponibili le seguenti immissioni: poco pioggia e soleggiato nuvoloso nuvoloso tempesta Visualizza- zione Impostazione dell’unità di temperatura Premere sul tasto ▲°C / °F per visualizzare la temperatura in °Celsius o in °Fahrenheit. Avviso: L’unità selezionata viene visualizzata accanto alla visualizzazione della temperatura.
  • Seite 33: Accensione Dell'illuminazione

    Accensione dell’illuminazione Premere sul tasto SNOOZE- / LIGHT per accendere per ca. 5 secondi l’illuminazione del display. Eliminazione degli errori Avviso: L’apparecchio contiene componenti elettronici. Non porre l’ap- parecchio nelle vicinanze di fonti di disturbo quali telefoni cellulari, appa- recchi radio, radio CB, telecomandi o forni a microonde ecc. La ricezione radio ne può...
  • Seite 34: Smaltimento

    Smaltimento L’imballaggio è composto da materiali ecologici che possono essere smaltiti presso i siti di riciclaggio locali. Informazioni sulle possibilità di smaltimento del prodotto consumato sono disponibili presso la sede dell’amministrazione comunale e cittadina. Per la salvaguardia dell’ambiente, quando il vostro apparecchio non funziona più, non gettarlo nei rifiuti domestici, portarlo bensì...
  • Seite 35: Informazioni

    Pulloxhill, Bedfordshire, MK45 5HP, UK, dichiariamo sotto nostra unica responsabilità, che il prodotto: orologio radiocomandato modello n°: Z31163 · versione: 03 / 2012, a cui fa riferimento la presente dichiara- zione, è conforme alle norme / documenti normativi della 1999 / 5 / EC.
  • Seite 36 Utilização Correcta ..............Página 37 Descrição das peças ..............Página 37 Dados técnicos ................Página 38 Material fornecido ..............Página 38 Segurança Indicações gerais de segurança ............Página 39 Indicações de segurança relativas às pilhas .........Página 39 Antes da colocação em funcionamento ....Página 40 Colocação em funcionamento Colocar as pilhas ..................Página 41 Receber o sinal de radiofrequência (DCF) ..........Página 41 Ajustar as configurações básicas ............Página 43...
  • Seite 37: Utilização Correcta

    Relógio sem fios Utilização Correcta O rádio-despertador possui uma função de indicação de hora, bem como um despertador com duas horas de despertar ajustáveis. O rádio-desper- tador indica a temperatura no local onde o aparelho se encontra, bem como a pressão atmosférica e apresenta a tendência da evolução da pressão.
  • Seite 38: Dados Técnicos

    Pé de suporte ▼ Tecla ALARM ON / OFF ▲ Tecla °C / °F Tecla SNOOZE / LIGHT Tecla WEATHER / UNIT Tecla MODE / SET Dados técnicos Pilhas: 2 x AA, 1,5 V (incluídas no material fornecido) Sinal de radiofrequência: Amplitude de medição da temperatura: 0 °C a +50 °C...
  • Seite 39: Segurança

    Segurança GUARDE TODAS AS INDICAÇÕES DE SEGURANÇA E INSTRUÇÕES PARA FUTURAS UTILIZAÇÕES! Indicações gerais de segurança O aparelho não deve ser utilizado por crianças ou pessoas sem co- nhecimento ou experiência para o manusear ou que sofram de limita- ções das capacidades físicas, sensoriais ou mentais, sem a vigilância ou orientação de uma pessoa responsável pela sua segurança.
  • Seite 40: Antes Da Colocação Em Funcionamento

    Ao colocar as pilhas, tenha em atenção a polaridade correcta! Esta é indicada nos compartimentos das pilhas. Se necessário, limpe os contactos das pilhas e do aparelho antes da sua colocação. Retire de imediato as pilhas gastas do aparelho. Existe um elevado risco de derrame! As pilhas não devem ser depositadas no lixo doméstico! Cada consu- midor é...
  • Seite 41: Colocação Em Funcionamento

    Montagem com pé de suporte: Pressione os pinos do pé de suporte nos respectivos entalhes do aparelho (ver Fig. C). Colocação em funcionamento Remova a película protectora do visor após ter montado o aparelho. Colocar as pilhas Abra o compartimento das pilhas , levantando a tampa compartimento das pilhas ligeiramente para cima.
  • Seite 42 demorar alguns minutos e é sinalizado pelo símbolo de radiofrequência intermitente. Sinal de radiofrequência (DCF): O sinal DCF (emissor de sinal temporal) consiste em impulsos temporais, emitidos por um dos relógios mais precisos do mundo, nas proximidades de Frankfurt / Main, Alemanha – varia 1 segundo num milhão de anos. Em condições ideais, a sua estação meteorológica recebe estes sinais até...
  • Seite 43: Ajustar As Configurações Básicas

    Ajustar as configurações básicas 1. Prima a tecla MODE / SET e mantenha premida durante 3 segundos. É audível um breve sinal sonoro. Indicação: As configurações que podem ser alteradas ficam de seguida intermitentes no visor. Pode ser adaptadas diversas configura- ções consecutivamente.
  • Seite 44: Ajustar As Horas De Despertar

    que a hora receba sinal apenas ocasionalmente, devido a distância excessiva. Ao receber um sinal, a hora ajusta-se automaticamente para a hora correcta do sinal de radiofrequência (DCF) (= hora alemã = MEZ = GMT+1 = UTC +1). O dia da semana é...
  • Seite 45: Desligar O Sinal De Alarme

    2. Ajuste agora a hora de alarme pretendida, mantendo premida a tecla MODE / SET até piscar a indicação da hora. 3. Prima a tecla ▲ °C / °F e a tecla ▼ ALARM ON / OFF para ajustar o valor pretendido. 4.
  • Seite 46 Indicação: Após a colocação em funcionamento, deve ser comunicada ao artigo a altitude da sua localização, de forma a possibilitar a indicação de uma tendência meteorológica geral, baseada nos dados da pressão atmosférica. Para isso é imprescindível ajustar as condições meteorológicas actuais. Proceda da seguinte forma: 1.
  • Seite 47: Ajustar A Unidade De Temperatura

    Ajustar a unidade de temperatura Prima a tecla ▲°C / °F para exibir a temperatura em °Celsius ou em °Fahrenheit. Indicação: a unidade seleccionada é indicada junto à temperatura. A unidade de temperatura oficial na Europa é °C. Ajustar a unidade da pressão atmosférica Prima a tecla WEATHER / UNIT para exibir a pressão atmosférica em hectopascais (hPa), em millibar (mb) ou em polegadas de mercúrio...
  • Seite 48: Limpeza E Conservação

    telemóveis, rádios, rádios CB, telecomandos ou microondas, etc. A recep- ção da radiofrequência pode diminuir por essa razão. Caso sejam indicadas avarias no visor, retire as pilhas e, após cerca de um minuto, volte a colocar. Indicação: desta forma o aparelho é reposto às configurações de fábrica e todos os ajustes efectuados terão de ser repetidos.
  • Seite 49: Informações

    A empresa Milomex Ltd., c / o Milomex Services, Hilltop Cottage, Barton Road, Pulloxhill, Bedfordshire, MK45 5HP, UK, declara, sob exclusiva res- ponsabilidade, que o produto: Rádio-despertador, Modelo N.º: Z31163 · Versão: 03 / 2012, ao qual a presenta declaração se refere, se encontra em conformidade com as normas / documentos normativos da Directiva 1999 / 5 / CE.
  • Seite 50 50 PT...
  • Seite 51 Proper use ....................Page 52 Description of parts and features ........Page 52 Technical data ..................Page 53 Scope of delivery ................Page 53 Safety ......................Page 53 General Safety Information ................Page 54 Safety advice concerning batteries ............Page 54 Before initial use ................Page 55 Preparations for use ..............Page 55 Inserting the batteries ..................Page 56 DCF radio signal reception .................Page 56...
  • Seite 52: Radio-Controlled Clock

    Radio-controlled clock Proper use The radio clock has a date display and an alarm clock with two wake-up times that can be set. The radio clock displays the temperature at the location of the device as well as the barometric pressure and a trend display of barometric pressure development.
  • Seite 53: Technical Data

    ▼ ALARM ON / OFF button ▲ °C / °F button SNOOZE / LIGHT button WEATHER / UNIT button MODE / SET button Technical data Batteries: 2 x AA, 1.5 V (included in delivery) Radio clock signal: Temperature measurement range: 0 °C to +50 °C Temperature resolution: 0.1 °C Barometric pressure...
  • Seite 54: General Safety Information

    General Safety Information Children or persons lacking knowledge or experience in handling the device or have limited physical, sensory or mental abilities, must not use the device without supervision or instruction by a person responsible for their safety. Children must be supervised at all times to prevent them from playing with the device.
  • Seite 55: Before Initial Use

    Keep batteries away from children. Do not throw batteries into a fire. Never short-circuit them or take them apart. Always replace all batteries at the same time and only use batteries of the same type. If the batteries in your device have leaked, remove them immediately to prevent damage to the device! Avoid contact with the skin, eyes and mucous membranes.
  • Seite 56: Inserting The Batteries

    Inserting the batteries Open the battery compartment by pushing the battery compart- ment cover slightly upwards. Open the battery compartment and insert the included batteries (AA, 1.5 V ) aligned to the polarity indi- cated in the battery compartment. The weather trend display begins to blink as soon as the batteries are inserted.
  • Seite 57: Adjusting The Basic Settings

    Reception can be considerably impaired by obstacles (e.g. concrete walls) or sources of interference (e.g. other electrical devices). In the event of re- ception problems, change the position of the weather station (e.g. to some- where near a window). The time signal is updated daily at 03:00. If the search for the signal is not successful, it is repeated at 04:00.
  • Seite 58 The following settings appear on the display: – Time format: “Hr” appears in the time display next to “24hr / 12hr“ – Hour: Appears in the time display – Minutes: Appears in the time display – Seconds: Appears in the time display –...
  • Seite 59: Setting The Wake-Up Time

    Blinking display: Language: Russian English Setting the wake-up time This device has two wake-up times which can be set. They are set as follows: 1. Press the MODE / SET button briefly in order to get to alarm mode. Alarm 1 and Alarm 2 alternate on the display.
  • Seite 60: Setting Up Barometric Pressure And Weather Trend

    Press any button except for the SNOOZE- / LIGHT button to stop the alarm signal until the next day. It is not necessary to reactivate the alarm. It switches itself automatically to the alarm time which has already been set. Setting up barometric pressure and weather trend The display indicates the absolute current barometric pressure...
  • Seite 61: Setting The Temperature Unit

    Note: Please take the weather forecast from your local weather forecasting service into account as well as the forecast from your weather station. If there are discrepancies between the information from your device and from the local weather forecasting service, please take the advice of the latter as authoritative.
  • Seite 62: Switching On The Illumination

    Note: The selected unit is displayed in the barometric pressure unit display . The official unit for barometric pressure in Europe is the hectopascal or the millibar. Switching on the illumination Press the SNOOZE- / LIGHT button to switch off the display illumi- nation for approximately 5 seconds.
  • Seite 63: Disposal

    Disposal The packaging is made entirely of recyclable materials which you can dispose of at your local recycling facilities. Contact your local refuse disposal authority for more details of how to dispose of your worn-out product. When your appliance has come to the end of its life, please do not throw it out with your household refuse, but in the interests of the environment take it to a suitable centre where it can be disposed of properly.
  • Seite 64: Information

    We, Milomex Ltd., c / o Milomex Services, Hilltop Cottage, Barton Road, Pulloxhill, Bedfordshire, MK45 5HP, UK, hereby declare under our sole responsibility that the product: Radio clock, Model No.: Z31163, Version: 03 / 2012, to which this declaration refers, complies with the standards / normative documents of 1999 / 5 / EC.
  • Seite 65 Inhaltsverzeichnis Bestimmungsgemäße Verwendung ........Seite 66 Teilebeschreibung ................Seite 66 Technische Daten ................Seite 67 Lieferumfang ..................Seite 67 Sicherheit ....................Seite 67 Allgemeine Sicherheitshinweise ..............Seite 68 Sicherheitshinweise zu Batterien ..............Seite 68 Vor der Inbetriebnahme ............Seite 69 Inbetriebnahme Batterien einlegen ..................Seite 70 Funksignal (DCF) empfangen ..............Seite 70 Grundeinstellungen anpassen ..............Seite 72 Weckzeiten einstellen..................Seite 73 Alarmsignal ausschalten ................Seite 74...
  • Seite 66: Bestimmungsgemäße Verwendung

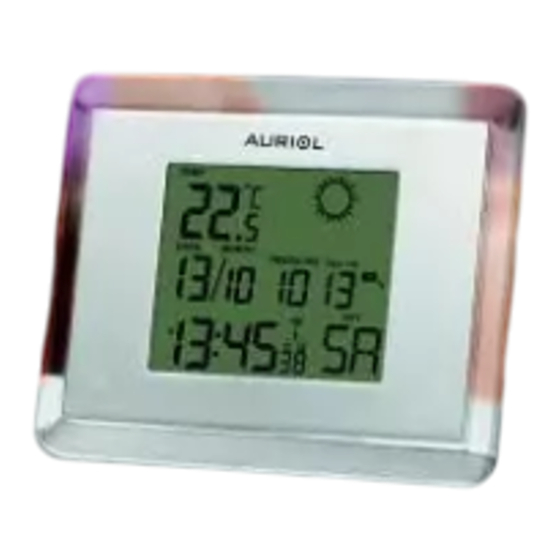
    Funkuhr Bestimmungsgemäße Verwendung Q Die Funkuhr verfügt über eine Datumsanzeige sowie einen Wecker mit zwei einstellbaren Weckzeiten. Die Funkuhr zeigt die Temperatur am Standort des Gerätes an sowie den Luftdruck und eine Trendanzeige der Luftdruckentwicklung. Ein weiterer Anzeigewert ist der Wettertrend, der durch Auswertung der Luftdruckschwankungen berechnet wird.
  • Seite 67: Technische Daten

    ▼ ALARM ON / OFF-Taste ▲ °C / °F-Taste SNOOZE / LIGHT-Taste WEATHER / UNIT-Taste MODE / SET-Taste Technische Daten Q Batterie: 2 x AA, 1,5 V (im Lieferumfang enthalten) Funkuhrsignal: Temperaturmessbereich: 0 °C bis +50 °C Temperaturauflösung: 0,1 °C Luftdruckmessbereich: 850 hPa bis 1050 hPa Erfassungszyklus Luftfeuchtigkeit: 1 Std.
  • Seite 68: Allgemeine Sicherheitshinweise

    Allgemeine Sicherheitshinweise Q J K inder oder Personen, denen es an Wissen oder Erfahrung im Umgang mit dem Gerät mangelt, oder die in ihren körperlichen, sensorischen oder geistigen Fähigkeiten eingeschränkt sind, dürfen das Gerät nicht ohne Aufsicht oder Anleitung durch eine für ihre Sicherheit verantwort- liche Person benutzen.
  • Seite 69: Vor Der Inbetriebnahme

    J B atterien gehören nicht in den Hausmüll! Jeder Verbraucher ist gesetz- lich verpflichtet, Batterien ordnungsgemäß zu entsorgen! J H alten Sie Batterien von Kindern fern, werfen Sie die Batterien nicht ins Feuer, schließen Sie sie nicht kurz und nehmen Sie sie nicht auseinander. J T auschen Sie immer alle Batterien gleichzeitig aus und verwenden Sie nur Batterien des gleichen Typs.
  • Seite 70: Inbetriebnahme

    Inbetriebnahme Q j E ntfernen Sie die Schutzfolie des Displays, nachdem Sie das Gerät montiert haben. Batterien einlegen Q j Ö ffnen Sie das Batteriefach , indem Sie die Batteriefachabdeckung des Batteriefachs leicht nach oben ziehen. Legen Sie die beiliegenden Batterien (AA, 1,5 V ) gemäß...
  • Seite 71 Funksignal (DCF): Das DCF-Signal (Zeitsignalsender) besteht aus Zeitimpulsen, die von einer der genauesten Uhren der Welt, in der Nähe von Frankfurt / Main, Deutschland, abgegeben werden – sie variiert um 1 Sekunde in 1 Million Jahren. Ihre Wetterstation empfängt diese Signale unter optimalen Bedingungen bis zu einer Distanz von ca.
  • Seite 72: Grundeinstellungen Anpassen

    Grundeinstellungen anpassen Q 1. Drücken Sie die MODE / SET-Taste und halten Sie sie 3 Sekunden gedrückt. Es ertönt ein kurzer Piepton. Hinweis: Die Einstellungen, die verändert werden können, blinken im Folgenden im Display. Es können nacheinander verschiedene Einstellun- gen angepasst werden. 2.
  • Seite 73: Blinkende Anzeige

    gelegentlich ein Signal erhält. Die Uhr stellt sich dann bei Empfang des Signals automatisch auf die korrekte Zeit des Funksignals (DCF) ein (= deutsche Zeit = MEZ = GMT+1 = UTC +1). In folgenden Sprache wird der Wochentag angezeigt: Blinkende Anzeige: Sprache: Deutsch Französisch...
  • Seite 74: Alarmsignal Ausschalten

    3. Drücken Sie die ▲ °C / °F-Taste und ▼ ALARM ON / OFF-Taste um den gewünschten Wert einzustellen. 4. Bestätigen Sie Ihre Eingabe durch Drücken der MODE / SET-Taste. Wiederholen Sie Schritt 3, um den Wert für die Minuten einzustellen. Hinweis: Die Anzeigen Alarm 1 und Alarm 2 zeigen an, dass der betreffende Alarm eingeschaltet ist.
  • Seite 75 Hinweis: Nach der Inbetriebnahme muss dem Artikel die geographische Höhe seines Standorts mitgeteilt werden, um einen groben Trend des Wetters, basierend auf den Luftdruckdaten, zu ermöglichen. j S tellen Sie hierzu unbedingt das aktuelle Wetter ein. Gehen Sie hierbei folgendermaßen vor: 1.
  • Seite 76: Temperatureinheit Einstellen

    Temperatureinheit einstellen Q j D rücken Sie auf die ▲°C / °F-Taste , um die Temperatur entweder in °Celsius oder in °Fahrenheit anzuzeigen. Hinweis: Die gewählte Einheit wird neben der Temperaturanzeige angezeigt. Die amtliche Temperatureinheit in Europa ist das °C. Lufttdruckeinheit einstellen Q j...
  • Seite 77: Reinigung Und Pflege

    CB-Radios, Fernbedienungen oder Mikrowellen etc. auf. Der Funkempfang kann dadurch vermindert werden. j E ntnehmen Sie die Batterien und setzen Sie sie nach etwa einer Minute wieder ein, wenn das Display Störungen anzeigt. Hinweis: Hierdurch wird das Gerät auf die Werkseinstellungen zurück- gesetzt und alle selbst vorgenommenen Einstellungen müssen erneut einge- stellt werden.
  • Seite 78: Informationen

    Wir Milomex Ltd., c / o Milomex Services, Hilltop Cottage, Barton Road, Pulloxhill, Bedfordshire, MK45 5HP, UK, erklären in alleiniger Verantwortung, dass das Produkt: Funkuhr Model-Nr.: Z31163 · Version: 03 / 2012, auf das sich diese Erklärung bezieht, mit den Normen / normativen Dokumenten der 1999 / 5 / EC übereinstimmt.
  • Seite 79 DE/AT/CH...
  • Seite 80 Hilltop Cottage Barton Road Pulloxhill Bedfordshire MK45 5HP Model-No.: Z31163 Version: 03 / 2012 © by ORFGEN Marketing Estado de las informaciones · Versione delle informazioni Estado das informações · Last Information Update Stand der Informationen: 03 / 2012 · Ident.-No.: Z31163032012-5...

Inhaltsverzeichnis