Herunterladen Inhalt Inhalt Diese Seite drucken
Invacare HomeFill II IOH200AW Bedienungsanleitung
Vorschau ausblenden Andere Handbücher für HomeFill II IOH200AW:
Inhaltsverzeichnis

Werbung

Verfügbare Sprachen
  • DE

Verfügbare Sprachen

  • DEUTSCH, seite 119
Operator Manual
HomeFill
User: Before using the product, read this manual
and save for future reference.
Supplier: This manual must be given to the end user.
For more information regarding
Invacare products, parts, and services,
please visit www.invacare.eu.com
®
Model IOH200AW
English UK. . . . . . . . . . . . . . 2
Czech . . . . . . . . . . . . . . . . 39
French . . . . . . . . . . . . . . . . 77
German . . . . . . . . . . . . . . 119
Italian. . . . . . . . . . . . . . . . 163
Polish. . . . . . . . . . . . . . . . 206
II Compressor

Werbung

Inhaltsverzeichnis
loading

Inhaltszusammenfassung für Invacare HomeFill II IOH200AW

  • Seite 1 Polish....206 User: Before using the product, read this manual and save for future reference. Supplier: This manual must be given to the end user. For more information regarding Invacare products, parts, and services, please visit www.invacare.eu.com...
  • Seite 2 DO NOT OPERATE THIS EQUIPMENT WITHOUT FIRST READING AND UNDERSTANDING THIS MANUAL. IF YOU ARE UNABLE TO UNDERSTAND THE DANGERS, WARNINGS, CAUTIONS, AND INSTRUCTIONS, CONTACT INVACARE TECHNICAL SERVICES BEFORE ATTEMPTING TO USE THIS EQUIPMENT - OTHERWISE, SERIOUS INJURY OR PROPERTY DAMAGE MAY RESULT. DANGER Users MUST NOT SMOKE while using this device.
  • Seite 3: Inhaltsverzeichnis

    TABLE OF CONTENTS SPECIAL NOTES ..........4 TYPICAL PRODUCT PARAMETERS ....6 LABEL LOCATION ..........8 DEALER INFORMATION ........9 HOMEFILL II INFORMATION ......10 SECTION 1—GENERAL GUIDELINES ....11 SECTION 2—INITIAL SETUP ......15 Initial Set Up of Compressor............15 SECTION 3—CHECKLIST AND CYLINDER INSPECTION ..........
  • Seite 4: Special Notes

    WARNING Invacare products are specifically designed and manufactured for use in conjunction with Invacare accessories. Accessories designed by other manufacturers have not been tested by Invacare and are not recommended for use with Invacare products. HomeFill II Compressor Part No 1145804...
  • Seite 5: Recycling Information

    SPECIAL NOTES RECYCLING INFORMATION This product is supplied by an environmentally aware manufacturer which adheres to the Waste Electrical and Electronic Equipment (WEEE) Directive 2002/96/CE. This product may contain substances that could be harmful to the environment if disposed of in places (landfills) which are not deemed appropriate by current legislation.
  • Seite 6: Typical Product Parameters

    TYPICAL PRODUCT PARAMETERS Regulatory Listing: EN/IEC 60601-1-2 EMC Alternating Current Type BF equipment Unit running Unit not running Attention - Consider Accompanying Documents DO NOT smoke Class II, Double Insulation This product complies with Directive 93/42/EEC concerning medical devices. The launch date of this product is stated in the EC declaration of conformity.
  • Seite 7 Depth: 16 inches (40.64 cm) Weight: 33 lbs (14.97 kg) Shipping Weight: 39 lbs (17.69 kg) CONSERVER/REGULATOR SPECIFICATIONS Oxygen Output Settings 1 - 5 L/min pulse 2 L/min. continuous Part No 1145804 HomeFill II Compressor ®...
  • Seite 8: Label Location

    LABEL LOCATION DANGER - RISK OF ELECTRIC SHOCK DO NOT remove cover. Refer servicing to qualified service personnel. DANGER- RISK OF FIRE NO SMOKING - Keep ALL sources of ignition out of the room in which this product is located and away from areas where oxygen is being delivered.
  • Seite 9: Dealer Information

    DEALER INFORMATION NOTE: Invacare recommends leaving a full cylinder of oxygen with the patient after setting up the HomeFill II compressor. Before leaving a HomeFill II Compressor with a user, the following checklist MUST be completed: ❑ Make sure the pressure test on cylinder has not expired.
  • Seite 10: Homefill Ii Information

    NOTICE The HomeFill II compressor is for use with specially designed Invacare Platinum™5 and Platinum 9 HomeFill II compatible oxygen concentrators. The oxygen concentrator can be set to maximum flow rate of when operating with HomeFill II compressor: Platinum 5 - 2.5 L/min.
  • Seite 11: Section 1-General Guidelines

    SECTION 1—GENERAL GUIDELINES SECTION 1—GENERAL GUIDELINES WARNING SECTION 1 - GENERAL GUIDELINES contains important information for the safe operation and use of this product. DO NOT use this product or any available optional equipment without first reading and fully understanding these instructions and any additional instructional material such as Owner’s Manuals, Service Manuals or Instruction Sheets supplied with this product or optional equipment.
  • Seite 12 If you use these types of products Invacare suggests you wash your hands prior to using the HomeFill unit. Should the bottle fitting come into contact with any such substance it should be wiped with a damp cloth prior to being connected to the compressor.
  • Seite 13 SECTION 1—GENERAL GUIDELINES WARNING (CONTINUED) NEVER oil or lubricate the compressor coupler or bottle fittings. NEVER use any penetrating oil or lubricant such as WD-40 or 3 in One. If you experience connection difficulties, please verify that the bottle fitting has been inserted straight down into the compressor coupler.
  • Seite 14 SECTION 1—GENERAL GUIDELINES WARNING (CONTINUED) NEVER transport a compressor with a cylinder connected to or stored on the compressor, otherwise injury or damage can occur. DO NOT store filled oxygen bottles near a furnace, hot water tank, in the trunk of a car or in other areas of high temperature.
  • Seite 15: Section 2-Initial Setup

    SECTION 2—INITIAL SETUP SECTION 2—INITIAL SETUP NOTE: Suppliers Only - Refer to Dealer Information on page 9 prior to performing this procedure. Initial Set Up of Compressor Compressor Initial Setup Checklist Before operating the HomeFill II Compressor for the first time, complete the following checklist: ❑...
  • Seite 16 SECTION 2—INITIAL SETUP Compressor Transportation NOTE: For this procedure, refer to FIGURE 2.1. WARNING NEVER transport a compressor with a cylinder connected to or stored on the compressor as this may result in injury or damage. CAUTION When transporting the compressor, take care no to bump the compressor or the connectors into obstacles.
  • Seite 17 SECTION 2—INITIAL SETUP 4. Plug the opposite end of the power cord into the wall socket. Wall Compressor (REAR) Socket Electrical Connection Power Cord FIGURE 2.2 Installing the Power Cord Connecting the Compressor to the Concentrator NOTE: For this procedure, refer to FIGURE 2.3 on page 18. 1.
  • Seite 18 SECTION 2—INITIAL SETUP DETAIL “A” DETAIL “B” Insert End of Interconnect Compressor Interconnect Hose into Hose Inlet/Outlet Fitting CONCENTRATOR TOP VIEW Inlet Fitting Power Outlet Fitting Cord DETAIL “C” Inlet/Outlet Fitting Metal FIGURE 2.3 Connecting the Compressor to the Concentrator HomeFill II Compressor Part No 1145804...
  • Seite 19: Section 3-Checklist And Cylinder Inspection

    ❑ Push the compressor power switch to the Off (O) position. ❑ Repeat this checklist when filling another cylinder. Cylinder Prefill Inspection WARNING ONLY use cylinders that have the Invacare HomeFill II connection and label. All cylinders MUST be inspected before attempting to fill. Otherwise, injury or damage may occur.
  • Seite 20 SECTION 3—CHECKLIST AND CYLINDER INSPECTION FIGURE 3.1 Cylinder Prefill Inspection HomeFill II Compressor Part No 1145804 ®...
  • Seite 21 SECTION 3—CHECKLIST AND CYLINDER INSPECTION The Hydrostatic Testing Date Aluminum cylinders MUST be tested every five years. WARNING DO NOT fill cylinders that have not been tested in the past five years. Otherwise, serious personal injury may result. For replacement contact your supplier. External Examination 1.
  • Seite 22: Section 4-Compressor Operation

    SECTION 4—COMPRESSOR OPERATION SECTION 4—COMPRESSOR OPERATION Connecting/Disconnecting the Cylinder to/from the Compressor Connecting the Cylinder to the Compressor WARNING NEVER use tools of any kind to connect/disconnect the cylinder and the compressor. Otherwise, severe injury and/or damage may occur. DO NOT drop oxygen cylinders. Use both hands when handling/transporting oxygen cylinders.
  • Seite 23 SECTION 4—COMPRESSOR OPERATION 4. To reset the connector momentarily push DOWN on the outer ring (sleeve) of the connector fillport until GREEN dots are visible (FIGURE 4.1). NOTE: If the outer ring (sleeve) is in the UP position (GREEN dots not visible), the connector fillport will be unable to accept the cylinder fillport.
  • Seite 24 SECTION 4—COMPRESSOR OPERATION Compressor Cylinder/Regulator Assembly Cylinder Fillport Connector Fillport Outer Ring (Sleeve) Cylinder Gauge PULL UP Regulator Cylinder Regulator Flow Dial Cylinder Gauge Outlet (Cannula) Connection NOTE: For clarity, fillport Cylinder Fillport covers are not shown. Power Switch Connector Fillport Compressor Cradle...
  • Seite 25 SECTION 4—COMPRESSOR OPERATION Disconnecting the Cylinder from the Compressor WARNING NEVER use any type of tool to connect/disconnect the cylinder and the compressor. Otherwise, severe injury and/or damage may occur. NOTE: For this procedure, refer to FIGURE 4.3 and FIGURE 4.4 on page 26.
  • Seite 26 SECTION 4—COMPRESSOR OPERATION 5. When the cylinder fillport is disconnected from the connector fillport, release the outer ring (sleeve) of the connector fillport and use both hands to remove the cylinder from the compressor cradle. WARNING The fillport cover on the connector fillport and the cylinder fillport MUST be replaced after filling and when not in use.
  • Seite 27: Turning The Compressor On

    SECTION 4—COMPRESSOR OPERATION Turning the Compressor On NOTE: For this procedure, refer to FIGURE 4.5 on page 28. 1. Make sure the concentrator is On. Refer to the concentrator Owner’s Manual. CAUTION The concentrator flow rate to the patient MUST be set at a maximum of 2.5 L/min.
  • Seite 28 SECTION 4—COMPRESSOR OPERATION oxygen level reaches 90%. Refer to Troubleshooting/ Cylinder Fill Times on page 33 if the light does not go Off within 10 minutes. NOTE: Refer to Troubleshooting/ Cylinder Fill Times on page 33 if the Attention (red) light and audible alarm are on. 6.
  • Seite 29: Setting The Flow Knob To The Prescribed Setting

    SECTION 4—COMPRESSOR OPERATION Setting the Flow Knob to the Prescribed Setting NOTE: For this procedure, refer to FIGURE 4.6. 1. Attach the nasal cannula to the outlet fitting of the cylinder. 2. Turn the flow knob to the L/min. setting prescribed by your doctor or therapist.
  • Seite 30: Technical Description

    Its intended function and use is to supply pressurized oxygen to fill Invacare proprietary gas cylinders for ambulatory use while the patient receives therapeutic oxygen from an accessory oxygen concentrator. The IOH200AW gas system is...
  • Seite 31: Section 5-Indicator Lights

    SECTION 5—INDICATOR LIGHTS SECTION 5—INDICATOR LIGHTS INDICATOR LIGHT COMPRESSOR EFFECT COLOUR STATUS None Compressor is Off. flowing to user if concentrator is On. Below Normal - Compressor is On and Cylinder filling not warming up (0-3 started. YELLOW minutes after power is flowing to user if On).
  • Seite 32 SECTION 5—INDICATOR LIGHTS INDICATOR LIGHT COMPRESSOR EFFECT COLOUR STATUS ATTENTION - RED Compressor is On. Compressor does not (Audible Alarm) Cylinder NOT filling start filling or stops Causes: filling Full cylinder attached when unit turned On - Unit MUST be turned replace with empty Off and On before filling cylinder...
  • Seite 33: Section 6-Troubleshooting/ Cylinder Fill Times

    36. 5. If performing STEPS 1-4 does not cause any indicator lights to come on, contact your home health care provider or Invacare for service. RED light On 1.Check the cylinder gauge to see if it is full. Cylinder full - Remove the cylinder and turn the unit Off (O).
  • Seite 34 Turn the compressor On ( ). If the YELLOW light remains on after 10 minutes, proceed to STEP 3. 3. The concentrator may need service. Contact your home health care provider or Invacare. Fill times exceed 1. Ensure the cylinder regulator is set to Off. maximum recommended 2.
  • Seite 35 1. Refill cylinder 2. Check that the cannula is straight and is not not being delivered. pinched. If damaged, replace. 3. Contact your home health care provider or Invacare for service. CYLINDER FILL TIMES Cylinder Concentrator Flow Rate to Patient: Filling (Platinum 5 up to 2.5 L/min.
  • Seite 36: Section 7-Maintenance

    SECTION 7—MAINTENANCE SECTION 7—MAINTENANCE Cleaning the Compressor Filter WARNING Push the power switch to the Off (O) position and unplug the compressor before cleaning. DO NOT operate the compressor when the filter is not installed. CAUTION DO NOT unplug by pulling the cord, as this could result in damage.
  • Seite 37: Cabinet

    SECTION 7—MAINTENANCE Cabinet WARNING Push the power switch to the Off (O) position and unplug the compressor before cleaning. To avoid electric shock, DO NOT remove cabinet. 1. Clean the cabinet with a mild household cleaner and a non-abrasive cloth or sponge. Part No 1145804 HomeFill II Compressor...
  • Seite 38: Customer Service And Warranty Information

    Dublin – Ireland • Tel: (353) 1 810 7084 • Fax: (353) 1 810 7085 • ireland@invacare.com • www.invacare.ie Italia: Invacare Mecc San s.r.l., Via dei Pini 62, I-36016 Thiene (VI) • Tel: (39) 0445 38 00 59 • Fax: (39) 0445 38 00 34 • italia@invacare.com • www.invacare.it Nederland: Invacare BV, Celsiusstraat 46, NL-6716 BZ Ede •...
  • Seite 39 Kompresor HomeFill ® Model IOH200AW Uživatel: Před použitím výrobku si přečtěte tento návod a uschovejte ho pro budoucí referenci. Dealer: Tento návod musíte předat konečnému uživateli. Prosím navštivte www.invacare.eu.com, kde najdete více informací o výrobcích, náhradních dílech a službách společnosti Invacare.
  • Seite 40 PŘED TÍM PŘEČETLI POROZUMĚLI TOMUTO NÁVODU. POKUD NEROZUMÍTE NEBEZPEČÍ, UPOZORNĚNÍM, VÝSTRAHÁM A INSTRUKCÍM, KONTAKTUJTE TECHNICKÝ SERVIS SPOLEČNOSTI INVACARE PŘED TÍM, NEŽ TOTO ZAŘÍZENÍ ZAČNETE POUŽÍVAT - JINAK TO MŮŽE VÉST K VÁŽNÉMU ZRANĚNÍ NEBO POŠKOZENÍ MAJETKU. NEBEZPEČÍ Uživatelé NESMÍ KOUŘIT při používání tohoto zařízení.
  • Seite 41 OBSAH ZVLÁŠTNÍ POZNÁMKY ............ 42 TYPICKÉ PARAMETRY VÝROBKU ........ 44 UMÍSTĚNÍ NÁLEPKY ............46 INFORMACE O DEALEROVI ........... 47 INFORMACE O HOMEFILL II ........... 48 ČÁST 1—VŠEOBECNÉ POKYNY ........49 ČÁST 2—POTEN NASTAVEN ......... 53 Poten nastaven kompresoru ......... 53 ČÁST 3—SEZNAM A INSPEKCE CILINDRU ....
  • Seite 42: Zvláštní Poznámky

    ZVLÁŠTNÍ POZNÁMKY Ujistěte se, že všechny součástky jsou nepoškozené při dodání. V případe poškození NEPOUŽÍVEJTE. Kontaktujte Invacare pro další instrukce. V tomto návodu se používají signální slova, vztahující se k hazardním nebo nebezpečným praktikám, které mohou mít za následek zranění osob nebo poškození majetku. V následující...
  • Seite 43 ZVLÁŠTNÍ POZNÁMKY UPOZORNĚNÍ Produkty Invacare jsou speciálně navrženy a vyrobeny k použití s Invacare příslušenstvím. \Příslušenství navrhované jinými výrobci nebylo testováno společností Invacare a nedoporučují se používat s Invacare produkty. INFORMACE O RECYKLOVÁNÍ Tento produkt dodává výrobce, který si je vědom ochrany životního prostředí...
  • Seite 44: Typické Parametry Výrobku

    TYPICKÉ PARAMETRY VÝROBKU Regulační seznam: EN/IEC 60601-1-2 EMC Střídavý proud Zařízení typu BF Jednotka v provozu Jednotka není v provozu Pozor - Prohlédněte doprovodné dokumenty NEKUŘTE Třída II, Dvojitá izolace Tento výrobek vyhovuje požadavkům směrnice 93/42/EHS o zdravotnických prostředcích. Datum uvedení tohoto výrobku na trh je uvedeno v proh- lášení...
  • Seite 45 Váha: 33 liber (14,97 kg) Váha při dodání: 39 liber (17,69 kg) SPECIFIKACE KONZERVÁTORU/REGULÁTORU Výstup kyslíku Nastavení 1 - 5 L/min pulsy 2 L/min. plynulý Part No 1145804 Kompresor HomeFill ®...
  • Seite 46: Umístění Nálepky

    UMÍSTĚNÍ NÁLEPKY POZOR - NEBEZPEČÍ ÚRAZU ELEKTRICKÝM PROUDEM NESNÍMEJTE kryt. O servis požádejte kvalifikovaný personál. POZOR - NEBEZPEČÍ OHNĚ NEKOUŘIT - VŠECHNY vznětlivé předměty se musí odstranit z místnosti, kde je umístěn tento výrobek a z prostor, kde se kyslík používá. Textilie, oleje a jiné...
  • Seite 47: Informace O Dealerovi

    INFORMACE O DEALEROVI POZNÁMKA: Invacare doporučuje ponechat plný cilindr kyslíku u pacienta po instalaci kompresoru HomeFill II. Před předáním kompresoru HomeFill II uživateli, je třeba vykonat následující operace: ❑ Ujistěte se, že tlakový test cilindru nepozbyl platnosti. ❑ Proveďte instruktáž uživatele o bezpečném používání...
  • Seite 48: Informace O Homefill Ii

    UPOZORNĚNÍ Kompresor HomeFill II se používá se speciálně navrženými kyslíkovými koncentrátory společnosti Invacare Platinum™ 5 a Platinum 9, které jsou kompatibilní s HomeFill II. Kyslíkový koncentrátor se může nastavit na následující hodnoty maximálního průtoku, když pracuje s kompresorem HomeFill II: Platinum 5 - 2,5 L/min.
  • Seite 49: Část 1-Všeobecné Pokyny

    ČÁST 1—VŠEOBECNÉ POKYNY ČÁST 1—VŠEOBECNÉ POKYNY UPOZORNĚNÍ ČÁST 1 - VŠEOBECNÉ POKYNY obsahuje důležité informace týkající se bezpečného provozu a použití tohoto výrobku. NEPOUŽÍVEJTE tento výrobek ani jiné dostupné doplňkové zařízení aniž byste si úplně přečetli a pochopili tyto instrukce a jakýkoli další materiál s instrukcemi, jako např.
  • Seite 50 Pokud tyto typy produktů používáte, Invacare navrhuje, abyste si před použitím jednotky HomeFill umyli ruce. Pokud armatura láhve přijde do styku s takovými látkami, měla by se před připojením ke kompresoru očistit vlhkým hadříkem.
  • Seite 51 ČÁST 1—VŠEOBECNÉ POKYNY UPOZORNĚNÍ (POKRAČOVÁNÍ) NIKDY nepoužívejte žádný prolínavý olej nebo mazadlo jako např. WD-40 nebo 3 in One. Pokud máte problém se zapojením, ověřte, že armatura láhve byla nasazena přímo dolů do spojovače kompresoru. Pokud problém setrvává, požádejte o pomoc svého dodavatele. Chraňte kyslíkové...
  • Seite 52: Část 1-Všeobecné Pokyny

    ČÁST 1—VŠEOBECNÉ POKYNY UPOZORNĚNÍ (POKRAČOVÁNÍ) NIKDY nepřevážejte kompresor s cilindrem buď připojeným nebo položeným na kompresoru, jinak může dojít ke zranění nebo poškození. NESKLADUJTE naplněné kyslíkové láhve v blízkosti kotle, nádrže na horkou vodu, v zavazadlovém prostoru auta nebo jiném místě s vysokou teplotou. Skladování v takových prostorách může mít za následek výbuch láhve nebo požár.
  • Seite 53: Část 2-Poten Nastaven

    ČÁST 2—POTEN NASTAVEN ČÁST 2—POTEN NASTAVEN POZNMKA: Pouze dealei - Viz Informace o dealerovi na stran 47 ped vykonnm tto procedury. Poten nastaven kompresoru Seznam operac potenho nastaven kompresoru Ped prvnm poutm kompresoru HomeFill II vykonejte nsledujc operace: ❑ Pro kompresor vyberte msto. ❑...
  • Seite 54 ČÁST 2—POTEN NASTAVEN Pemisovn kompresoru POZNMKA: K proveden tto procedury nahldnte do OBRZEK 2.1. UPOZORNN NIKDY nepevejte kompresor s cilindrem bu pipojenm nebo poloenm na kompresoru, jinak me dojt ke zrann nebo pokozen. VSTRAHA Pi pemisovn kompresoru dvejte pozor, abyste kompresor nebo konektory neotloukali o jin pedmty.
  • Seite 55 ČÁST 2—POTEN NASTAVEN 3. Zapojte elektrickou ru do ppojky na zadn stran kompresoru. 4. Zapojte druh konec elektrick ry do zsuvky ve zdi. Kompresor Stna (ZADN STRANA) Zsuvka Elektrick Spojen Elektrick OBRZEK 2.2 Instalace elektrick ry Zapojen kompresoru ke koncentrtoru POZNMKA: K proveden tto procedury nahldnte do OBRZEK 2.3 na stran 56.
  • Seite 56 ČÁST 2—POTEN NASTAVEN DETAIL “A” DETAIL “B” Zavite pebytenou Spojovac Kompresor spojovac hadiku a Hadika pomoc upevovacch emnk ji zajistte na zadn stran KONCENTRTOR POHLED SVRCHU Vstupn armatura Elektrick Vstupn armatura DETAIL “C” Vstupn/vstupn armatura Kovov zpadka OBRZEK 2.3 Zapojen kompresoru ke koncentrtoru Kompresor HomeFill Part No 1145804 ®...
  • Seite 57: Část 3-Seznam A Inspekce Cilindru

    ❑ Pokud naplňujete další cilindr, opakujte tento postup. Inspekce před naplněním cilindru UPOZORNĚNÍ Používejte POUZE cilindry, které mají přípojku a nálepku Invacare HomeFill II. Všechny cilindry MUSÍ být zkontrolovány před tím, než se je budete snažit naplnit. Jinak by mohlo dojít ke zranění nebo poškození.
  • Seite 58 ČÁST 3—SEZNAM A INSPEKCE CILINDRU OBRÁZEK 3.1 Inspekce před naplněním cilindru Kompresor HomeFill Part No 1145804 ®...
  • Seite 59 ČÁST 3—SEZNAM A INSPEKCE CILINDRU Hydrostatická testovací data Hliníkové cilindry MUSÍ projít testováním každých pět let. UPOZORNĚNÍ NENAPLŇUJTE cilindry, které nebyly testovány během posledních pěti let. Jinak by mohlo dojít k vážnému zranění osob. Požádejte svého dealera o výměnu. Vnější kontrola 1.
  • Seite 60: Část 4-Operace Kompresoru

    ČÁST 4—OPERACE KOMPRESORU ČÁST 4—OPERACE KOMPRESORU Připojení/odpojení cilindru ke/od kompresoru Připojení cilindru ke kompresoru UPOZORNĚNÍ NIKDY nepoužívejte žádné nástroje při připojování/odpojování cilindru a kompresoru. Jinak by mohlo dojít k vážnému zranění a/nebo poškození. NIKDY nesmíte upustit kyslíkový cilindr. Při zacházení/přemisťování kyslíkových cilindrů používejte obě...
  • Seite 61 ČÁST 4—OPERACE KOMPRESORU 4. Na okamžik stlačte DOLŮ vnější kroužek (rukáv) plnícího vstupu konektoru až se objeví ZELENÉ tečky a tak znovu nastavte konktor (OBRÁZEK 4.1). POZNÁMKA: Pokud je vnější kroužek (rukáv) v poloze NAHORU (ZELENÉ tečky nejsou viditelné), plnící vstup konektoru nebude moci přijmout plnící...
  • Seite 62 ČÁST 4—OPERACE KOMPRESORU Kompresor Montáž cilindr/regulátor Plnící vstup cilindru Plnicí vstup konektoru Vnější kroužek Měřák (rukáv) cilindru VYTÁHNOUT Regulátor Cilindr Měřák Stupnice regulátoru toku cilindru Výstupní (kanylová) POZNÁMKA: Pro přípojka zjednodušení Plnící vstup cilindru nejsou zobrazeny kryty plnícího vstupu. Vypínač Plnící...
  • Seite 63 ČÁST 4—OPERACE KOMPRESORU Odpojení cilindru od kompresoru UPOZORNĚNÍ NIKDY nepoužívejte žádné nástroje při připojování/odpojování cilindru a kompresoru. Jinak by mohlo dojít k vážnému zranění a/nebo poškození. POZNÁMKA: K provedení této procedury nahlédněte do OBRÁZEK 4.3 a OBRÁZEK 4.4 na stranì 64. 1.
  • Seite 64 ČÁST 4—OPERACE KOMPRESORU 5. Když je plnící vstup cilindru odpojen od plnícího vstupu konektoru, uvolněte vnější kroužek (rukáv) plnícího vstupu konektoru a oběma rukama sejměte cilindr z podpěrné konstrukce compresoru. UPOZORNĚNÍ Kryt plnícího vstupu na plnícím vstupu konektoru a plnící vstup cilindru MUSÍ...
  • Seite 65: Zapnutí Kompresoru

    ČÁST 4—OPERACE KOMPRESORU Zapnutí kompresoru POZNÁMKA: K provedení této procedury nahlédněte do OBRÁZEK 4.5 na stranì 66. 1. Ujistěte se, že koncentrátor je zapnutý. Nahlédněte do Návodu k použití koncentrátoru. VÝSTRAHA Měřítko toku koncentrátoru k pacientovi MUSÍ být nastaveno na maximum 2,5 L/min. nebo méně pro modely Platinum 5 a 5 L/min.
  • Seite 66 ČÁST 4—OPERACE KOMPRESORU plnění, když hladina kyslíku dosáhne 90%. Viz een problm / Plnc doba cilindru na stranì 71 pokud světlo nezhasne do 10 minut. POZNÁMKA: Viz een problm / Plnc doba cilindru na stranì 71 pokud svítí (ČERVENÉ) světlo Pozor a zní zvuková signalizace.
  • Seite 67: Nastavení Průtokového Knoflíku Do Předepsané Polohy

    ČÁST 4—OPERACE KOMPRESORU Nastavení Průtokového knoflíku do předepsané polohy POZNÁMKA: K provedení této procedury nahlédněte do OBRÁZEK 4.6. 1. Připojte nosní kanylu do výstupního zařízení cilindru. 2. Otočte průtokový knoflík na L/min. nastavení předepsané Vaším lékařem nebo terapeutem. UPOZORNĚNÍ Protože změna nastavení L/min. na knoflíku průtoku bude ovlivňovat dávku dodaného kyslíku, NEUPRAVUJTE nastavení...
  • Seite 68: Technický Popis

    Invacare patentovaných plynových cilindrů pro ambulantní použití v době, kdy pacient dostává terapeutický kyslík z připojeného kyslíkového koncentrátoru. Plynový systém IOH200AW je určen k použití s Invacare Platinum kyslíkovým koncentrátorem s integrálním HF2 připojeným vstupem, který může dodat plyn v koncentraci vyšší...
  • Seite 69: Část 5-Světelné Indikátory

    ČÁST 5—SVĚTELNÉ INDIKÁTORY ČÁST 5—SVĚTELNÉ INDIKÁTORY BARVA STAV VÝSLEDEK SVĚTELNÝCH KOMPRESORU INDIKÁTORŮ Žádný Kompresor je proudí k uživateli Vypnutý. pokud je koncentrátor Zapnutý. Pod normál - ŽLUTÁ Kompresor je Plnění cilindru zapnutý a zahřívá nezačalo. se (0-3 minuty po proudí k uživateli Zapnutí).
  • Seite 70 ČÁST 5—SVĚTELNÉ INDIKÁTORY BARVA STAV VÝSLEDEK SVĚTELNÝCH KOMPRESORU INDIKÁTORŮ POZOR - ČERVENÁ Kompresor je Kompresor nezačne (Zvuková signalizace) Zapnutý. Cilindr plnit nebo přestane se NEPLNÍ plnit Příčiny: Jednotka se MUSÍ Plný cilindr byl Vypnout a Zapnout připojen k Zapnuté než může dojít k jednotce - vyměňte plnění.
  • Seite 71: Část 6-Een Problm / Plnc Doba Cilindru

    4. Vyistte vzduchov filtry. Viz Údržba na stran 74. 5. Kdy po vykonn KROK 1-4 se indiktory nerozsvt, podejte Vae zdravotnick zazen nebo Invacare o servis. ERVEN svtlo svt 1.Zkontrolujte mk cilindru jestli nen pln. Cilindr je pln - Odpojte ho a vypnte jednotku (O).
  • Seite 72 (viz nvod k pouit koncentrtoru). Pokud ZELEN plnc svtlo nezhasne, je mon, e kompresor a/nebo koncentrtor potevuj servis. Kontaktujte sv zdravotnick zazen nebo Invacare. Plis hlasit zvuk pi 1. Podejte Vae zdravotnick zazen nebo zapnutm kompresoru. Invacare o servis.
  • Seite 73 1. Naplte cilindr se nedodv. 2. Zkontrolujte, e kanyla je rovn a nen peruen. Pokud je pokozen, vymte ji. 3. Podejte Vae zdravotnick zazen nebo Invacare o servis. PLNC DOBY CILINDRU Plnc Prtok koncentrtoru k pacientovi: doby (Platinum 5 a do 2,5 L/min. a cilindru Platinum 9 a 5 L/Min.)
  • Seite 74: Část 7-Údržba

    ČÁST 7—ÚDRŽBA ČÁST 7—ÚDRŽBA Čištění filtru kompresoru UPOZORNĚNÍ Před čištěním zmáčkněte vypínač do polohy Vypnuto a vytáhněte šňůru kompresoru ze zásuvky. NEPOUŽÍVEJTE kompresor bez naistalovaného filtru. VÝSTRAHA Při odpojování ze zásuvky NETAHEJTE za šňůru, jinak by mohlo dojít k poškození. POZNÁMKA: K provedení...
  • Seite 75: Skříňka

    ČÁST 7—ÚDRŽBA Skříňka UPOZORNĚNÍ Před čištěním zmáčkněte vypínač do polohy Vypnuto a vytáhněte šňůru kompresoru ze zásuvky. NESUNDÁVEJTE skříňku, zabráníte tak úrazu elektrickým proudem. 1. Skøíòku vymyjte jemným èistícím prostøedkem pro domácnost a mìkkým hadøíkem nebo houbou. Part No 1145804 Kompresor HomeFill ®...
  • Seite 76 Dublin – Ireland • Tel: (353) 1 810 7084 • Fax: (353) 1 810 7085 • ireland@invacare.com • www.invacare.ie Italia: Invacare Mecc San s.r.l., Via dei Pini 62, I-36016 Thiene (VI) • Tel: (39) 0445 38 00 59 • Fax: (39) 0445 38 00 34 • italia@invacare.com • www.invacare.it Nederland: Invacare BV, Celsiusstraat 46, NL-6716 BZ Ede •...
  • Seite 77 Utilisateur : Lire ce manuel avant d'utiliser cet appareil, et le conserver en cas de besoin. Distributeur : Ce manuel doit être remis à l’utilisateur final. Pour de plus amples informations sur les produits Invacare, les pièces détachées et le service client, veuillez vous rendre sur www.invacare.fr...
  • Seite 78 ET COMPRIS CE MANUEL. SI VOUS N'ÊTES PAS CAPABLE DE COMPRENDRE LES DANGERS, LES MISES EN GARDE, LES AVERTISSEMENTS, ET LES INSTRUCTIONS, CONTACTEZ LES SERVICES TECHNIQUES INVACARE AVANT DE TENTER D'UTILISER CET APPAREIL - SINON, DES BLESSURES GRAVES OU DES DOMMAGES MATÉRIELS PEUVENT SURVENIR.
  • Seite 79 TABLE DES MATIÈRES REMARQUES SPÉCIALES ........ 80 PARAMÈTRES TYPES DU PRODUIT ....82 EMPLACEMENT DU LABEL ......84 INFORMATIONS REVENDEUR ......85 INFORMATIONS SUR LE HOMEFILL II ....86 SECTION 1—PRÉSENTATION GLOBALE ... 87 SECTION 2—PREMIÈRE MISE EN SERVICE ..91 Première mise en service du compresseur..........
  • Seite 80: Remarques Spéciales

    REMARQUES SPÉCIALES Vérifier toutes les pièces contre les dommages dûs au transport. En cas de dommage, NE PAS utiliser. Contacter Invacare pour de plus amples informations. Des mots-indicateurs sont utilisés dans ce manuel et s’appliquent aux dangers ou pratiques dangereuses qui pourraient entraîner des blessures ou des dégâts matériels.
  • Seite 81: Informations De Recyclage

    Les produits Invacare sont spécialement conçus et fabriqués pour être utilisés conjointement avec les accessoires Invacare. Les accessoires conçus par d’autres fabricants n’ont pas été testés par Invacare et leur utilisation n’est pas recommandée avec les produits Invacare. INFORMATIONS DE RECYCLAGE Ce produit a été...
  • Seite 82: Paramètres Types Du Produit

    PARAMÈTRES TYPES DU PRODUIT Liste des EN/IEC 60601-1-2 EMC réglementations : Courant alternatif Équipement de Type BF Appareil en marche Appareil à l'arrêt Attention - Consulter la documentation jointe NE PAS fumer Classe II, double isolation Ce produit est conforme à la Directive 93/42/CEE sur les dispositifs médicaux.
  • Seite 83 Profondeur : 40,64 cm (16 inches) Poids : 14,97 kg (33 lbs) Poids d’expédition : 17,69 kg (39 lbs) CONSERVATION/SPÉCIFICATIONS DU DÉTENDEUR ET DE LA VALVE À LA DEMANDE Sortie d'oxygène Réglages de 1 - 5 L/impulsion min 2 L/min. en continu Part No 1145804 Compresseur HomeFill ®...
  • Seite 84: Emplacement Du Label

    EMPLACEMENT DU LABEL DANGER - RISQUE DE CHOC ELECTRIQUE NE PAS enlever le couvercle. Confier toute réparation à un personnel qualifié pour les réparations. DANGER - RISQUE D'INCENDIE NE PAS FUMER - Eloignez toute source d'ignition hors de la pièce dans laquelle se trouve ce produit et hors des zones de distribution d'oxygène.
  • Seite 85: Informations Revendeur

    INFORMATIONS REVENDEUR REMARQUE : Invacare recommande de laisser une bouteille d'oxygène pleine au patient, après avoir installé le compresseur Homefill II. Avant de laisser un compresseur Homefill II avec un utilisateur, les points suivants DOIVENT être vérifiés: ❑ Assurez vous que la date du test de pression sur la bouteille n'a pas expiré.
  • Seite 86: Informations Sur Le Homefill Ii

    AVIS Le compresseur Homefill II est spécifiquement désigné pour fonctionner avec les concentrateurs d'oxygène compatibles Invacare Platinum™5 et Platinum 9. Le concentrateur d'oxygène peut être réglé sur un taux de débit maximum lorsqu'il fonctionne avec le compresseur Homefill II : Platinum 5 - 2.5 L/min.
  • Seite 87: Section 1-Présentation Globale

    SECTION 1—PRÉSENTATION GLOBALE SECTION 1—PRÉSENTATION GLOBALE MISE EN GARDE La SECTION 1 – DIRECTIVES GÉNÉRALES contient des informations importantes sur le fonctionnement et l’utilisation correcte de ce produit. N'UTILISEZ PAS ce produit ou tout autre produit optionnel sans avoir au préalable lu et compris ces instructions et toutes instructions complémentaires comme le manuel de l'utilisateur, manuels d'entretien et feuilles d'instruction...
  • Seite 88 NE PAS démonter. L'appareil est fourni avec double isolation et n'a pas de pièces réutilisables. Si un quelconque dépannage est nécessaire, contactez le Service Technique Invacare. Si le cordon d'alimentation ou la prise du compresseur sont abîmés, s'il ne fonctionne pas correctement, s'il est tombé ou endommagé, ou plongé...
  • Seite 89 Si vous utilisez ce type de produit, Invacare vous suggère de vous laver les mains avant d'utiliser l'appareil Homefill II. Si l'embout de la bouteille entre en contact avec ce genre de substances, il doit être préalablement nettoyé...
  • Seite 90 SECTION 1—PRÉSENTATION GLOBALE MISE EN GARDE (SUITE) Avant de déplacer ou de repositionner le compresseur ou le concentrateur, poussez TOUJOURS le bouton de commande sur Arrêt/Off (O), débranchez les cordons d'alimentation AC et le tuyau d'interconnexion entre le compresseur et le concentrateur.
  • Seite 91: Section 2-Première Mise En Service

    SECTION 2—PREMIÈRE MISE EN SERVICE SECTION 2—PREMIÈRE MISE EN SERVICE REMARQUE: Distributeurs uniquement - Se reporter Informations revendeur à la page 85 avant de lancer cette procédure. Première mise en service du compresseur Liste des points à vérifier avant la mise en service du compresseur Avant de se servir du compresseur Homefill II pour la première fois, procédez aux vérifications suivantes:...
  • Seite 92: Transporter Le Compresseur

    SECTION 2—PREMIÈRE MISE EN SERVICE Transporter le compresseur REMARQUE: Pour cette procédure, se reporter à la FIGURE 2.1. MISE EN GARDE Ne JAMAIS transporter un compresseur avec une bouteille branchée ou posée sur le compresseur, car des blessures ou des dommages pourraient se produire. ATTENTION Lors du transport du compresseur, veillez à...
  • Seite 93 SECTION 2—PREMIÈRE MISE EN SERVICE 2. Assurez-vous que le bouton est sur la postion Off (Arrêt) 3. Branchez le cordon d'alimentation dans le connecteur électrique à l'arrière du compresseur. 4. Branchez l'autre extrémité du cordon d'alimentation dans la prise murale. Prise Compresseur Murale...
  • Seite 94 SECTION 2—PREMIÈRE MISE EN SERVICE DÉTAIL “A” DÉTAIL “B” Insérez l'extrémité du Tuyau Compresseur tuyau d'interconnection d'interconnection dans la prise d'entrée/sortie CONCENTRATEUR Câble VUE DE HAUT Prise d'entrée d'alimentation Prise de sortie DÉTAIL “C” Prise d'entrée/sortie Taquet métallique FIGURE 2.3 Connecter le compresseur au concentrateur Compresseur HomeFill Part No 1145804 ®...
  • Seite 95: Section 3-Liste Des Points Àvérifier Et Inspection De La Bouteille

    Inspection du préremplissage de la bouteille MISE EN GARDE Utiliser UNIQUEMENT les bouteilles munies du branchement et du label Invacare Homefill II. Toutes les bouteilles DOIVENT être inspectées avant de tenter de les remplir. Sinon, des blessures ou des dommages pourraient survenir.
  • Seite 96 SECTION 3—LISTE DES POINTS À VÉRIFIER ET INSPECTION FIGURE 3.1 Inspection du préremplissage de la bouteille Compresseur HomeFill Part No 1145804 ®...
  • Seite 97 SECTION 3—LISTE DES POINTS À VÉRIFIER ET INSPECTION La date de test hydrostatique Les bouteilles en aluminium DOIVENT subir des tests de ré-épreuve tous les cinq ans. MISE EN GARDE NE PAS remplir des bouteilles qui n'ont pas été testées au cours des cinq dernières années.
  • Seite 98: Section 4-Fonctionnement Du Compresseur

    SECTION 4—FONCTIONNEMENT DU COMPRESSEUR SECTION 4—FONCTIONNEMENT DU COMPRESSEUR Branchement/débranchement de la bouteille du compresseur Branchement de la bouteille au compresseur MISE EN GARDE NE JAMAIS utiliser d'outil de quelque sorte que ce soit pour brancher/débrancher la bouteille et le compresseur. Sinon, de graves blessures et/ou des dommages peuvent survenir.
  • Seite 99 SECTION 4—FONCTIONNEMENT DU COMPRESSEUR ATTENTION NE PAS relier le connecteur (canule) de sortie à l’appareil HomeFill II ou la bouteille ne fonctionnera pas normalement. 4. Poussez momentanément sur la BAGUE externe (manchon) du connecteur d'alimentation jusqu'à ce que des points VERTS appparaissent et que vous puissiez remettre le connecteur (FIGURE 4.1).
  • Seite 100 SECTION 4—FONCTIONNEMENT DU COMPRESSEUR 6. Positionner la bouteille dans le berceau du compresseur (FIGURE 4.2). 7. Aligner l’orifice de remplissage de la bouteille avec l’orifice de remplissage du connecteur (FIGURE 4.2). 8. Poussez la bague externe (manchon) du connecteur d'alimentation vers le HAUT tout en poussant l'ensemble bouteille/régulateur vers le BAS pour relier la bouteille au connecteur d'alimentation (FIGURE 4.2).
  • Seite 101 SECTION 4—FONCTIONNEMENT DU COMPRESSEUR Ensemble bouteille / Compresseur valve à la demande et détendeur Orifice de remplissage de la bouteille Connecteur d'orifice de remplissage Bague externe Jauge de (Manchon) bouteille TIRER VERS LE HAUT Valve à la demande Régulateur Jauge de Sélecteur de régulation bouteille du débit...
  • Seite 102 SECTION 4—FONCTIONNEMENT DU COMPRESSEUR Débranchement de la bouteille du compresseur MISE EN GARDE NE JAMAIS utiliser d'outil de quelque sorte que ce soit pour brancher/débrancher la bouteille et le compresseur. Sinon, de graves blessures et/ou des dommages peuvent survenir. REMARQUE : Pour cette procédure, se reporter aux FIGURE 4.3 et FIGURE 4.4 à...
  • Seite 103 SECTION 4—FONCTIONNEMENT DU COMPRESSEUR 5. Lorsque l’orifice de remplissage de la bouteille est débranché du connecteur de remplissage, relâchez la bague externe (manchon) du connecteur et retirer la bouteille du berceau du compresseur à l’aide des deux mains pour enlever la bouteille. MISE EN GARDE Le bouchon du connecteur de remplissage ainsi que le bouchon du connecteur de la bouteille DOIVENT être...
  • Seite 104: Mettre Le Compresseur En Marche

    SECTION 4—FONCTIONNEMENT DU COMPRESSEUR Bouchon de l'orifice de remplissage de la bouteille Bouchon du connecteur de l'orifice de remplissage FIGURE 4.4 Bouchons de connecteurs Mettre le compresseur en marche REMARQUE : Pour cette procédure, se reporter à la FIGURE 4.5 à la page 106. 1.
  • Seite 105 SECTION 4—FONCTIONNEMENT DU COMPRESSEUR 3. Assurez-vous que la bouteille est branchée au compresseur. Se reporter Branchement de la bouteille au compresseur à la page 98. 4. Mettre le bouton de commande sur la position Marche (On) ( ). 5. Examinez le panneau de contrôle. Les situations suivantes devraient se produire : A.
  • Seite 106 SECTION 4—FONCTIONNEMENT DU COMPRESSEUR Attention (témoin Panneau de lumineux ROUGE et contrôle alarme sonore) Au dessous de Remplissage (Témoin lumineux la normale VERT) (Témoin lumineux JAUNE) Plein (Témoin lumineux VERT) Interrupteur FIGURE 4.5 Mettre le compresseur en marche Compresseur HomeFill Part No 1145804 ®...
  • Seite 107: Réglage Du Bouton De Débit Sur Le Taux Prescrit

    SECTION 4—FONCTIONNEMENT DU COMPRESSEUR Réglage du bouton de débit sur le taux prescrit REMARQUE : Pour cette procédure, se reporter à la FIGURE 4.6. 1. Attacher la canule nasale à l'embout de distribution de la bouteille. 2. Tournez le bouton du taux de débit sur le réglage prescrit par votre médecin ou votre thérapiste.
  • Seite 108: Description Technique

    5L/Min. pour le Platinum 9. Le système à oxygène Homefill II comprend le compresseur IOH200AW, les tubes de connexion, et les bouteilles portables d'Invacare avec un régulateur intégral de débit et un connecteur de remplissage interlock. Le compresseur IOH200AW comprend un compresseur multistage, un réservoir interne, un système de contrôle...
  • Seite 109 SECTION 4—FONCTIONNEMENT DU COMPRESSEUR Le compresseur IOH200AW peut remplir des bouteilles pour une utilisation ambulatoire par les patients. Les bouteilles portables fournies par Invacare possèdent un port interlock pouvant s'adapter uniquement sur le compresseur IOH200AW d'Invacare. La bouteille contient également un régulateur de flux intégral avec des paramètres fiwes et...
  • Seite 110: Section 5-Témoins Lumineux

    SECTION 5—TÉMOINS LUMINEUX SECTION 5—TÉMOINS LUMINEUX COULEUR DES STATUT DU EFFET TÉMOINS COMPRESSEUR LUMINEUX Aucun Le compresseur est transmis à arrêté. l'utilisateur si le concentrateur est en marche. au dessous de la Le compresseur Le remplissage de la fonctionne et est en bouteille n'a pas normale - JAUNE préchauffage (0-3...
  • Seite 111 SECTION 5—TÉMOINS LUMINEUX COULEUR DES STATUT DU EFFET TÉMOINS COMPRESSEUR LUMINEUX Plein - VERT Le compresseur est en Le remplissage de la fonctionnement. La bouteille s'arrête bouteille a terminé de Ne peut pas remplir une se remplir (plein/full) - autre bouteille tant que enlever la bouteille (le le compresseur ne sera témoin lumineux...
  • Seite 112: Section 6-Dépannage/Périodes De

    Enlevez la bouteille et replacez la. Démarrez le compresseur ( ). 3. Si la bouteille n'est pas pleine et qu'elle est reliée correctement, le compresseur peut être endommagé. Contactez votre centre de santé ou Invacare. Compresseur HomeFill Part No 1145804 ®...
  • Seite 113 à L'ÉTAPE 2. alternativement 2. Le concentrateur a peut être besoin d'être révisé, contactez votre centre de santé ou au dessous du niveau Invacare. normal, témoin (JAUNE) s'allume et s'éteint au dessous du niveau 1. Assurez-vous que le concentrateur a préchauffé...
  • Seite 114 Contactez votre centre de santé ou Invacare. Bruit excessif lorsque le 1. Appelez votre centre de santé ou Invacare compresseur est en pour tout dépannage. marche. Sifflements venant du 1.
  • Seite 115 SECTION 6—DÉPANNAGE/PÉRIODES DE REMPLISSAGE DE LA TEMPS DE REMPLISSAGE DE LA BOUTEILLE Temps de Débit du concentrateur vers le patient : remplissa (Platinum 5 jusqu'à 2.5 L/min. et ge de la Platinum 9 jusqu'à 5 L/min.) bouteille *HF2PC9 *HF2PCL4 *HF2PCL6 HF2PCE8 NORMALE 2 hr 20 min...
  • Seite 116: Section 7-Entretien

    SECTION 7—ENTRETIEN SECTION 7—ENTRETIEN Nettoyage du Filtre du compresseur MISE EN GARDE Poussez le bouton de commande sur la position d'Arrêt/Off (O) et débranchez le compresseur avant de le nettoyer. NE PAS faire fonctionner le compresseur sans que le filtre ne soit installé.
  • Seite 117: Capot Supérieur

    SECTION 7—ENTRETIEN Capot supérieur MISE EN GARDE Mettez l'interrupteur sur la position Arrêt/Off (O) et débranchez le ventilateur avant de le nettoyer. Pour éviter les risques d’électrocution, NE PAS retirer le capot supérieur. 1. Nettoyer le capot supérieur avec un produit nettoyant doux et un chiffon ou une éponge douce.
  • Seite 118: Service Après-Vente Et Informations De Garantie

    Dublin – Ireland • Tel: (353) 1 810 7084 • Fax: (353) 1 810 7085 • ireland@invacare.com • www.invacare.ie Italia: Invacare Mecc San s.r.l., Via dei Pini 62, I-36016 Thiene (VI) • Tel: (39) 0445 38 00 59 • Fax: (39) 0445 38 00 34 • italia@invacare.com • www.invacare.it Nederland: Invacare BV, Celsiusstraat 46, NL-6716 BZ Ede •...
  • Seite 119 Benutzer: Lesen Sie bitte vor Verwendung dieses Produktes dieses Benutzerhandbuch und bewahren Sie es für den weiteren Gebrauch auf. Händler: Dieses Handbuch muss dem Endbenutzer übergeben werden. Weitere Informationen zu Produkten, Teilen und Serviceleistungen von Invacare erhalten Sie unter www.invacare.de.
  • Seite 120 VERSTANDEN ZU HABEN. SOLLTEN SIE PROBLEME HABEN, DIE BESCHRIEBENEN GEFAHREN, WARNUNGEN, HINWEISE UND ANWEISUNGEN ZU VERSTEHEN, NEHMEN SIE BITTE VOR DEM VERSUCH DIESES ZUBEHÖR ZU VERWENDEN, MIT INVACARE KONTAKT AUF - ANDERNFALLS KÖNNEN SCHWERE VERLETZUNGEN ODER SACHBESCHÄDIGUNGEN DIE FOLGE SEIN. GEFAHR Den Benutzern ist das RAUCHEN während der...
  • Seite 121 INHALTSVERZEICHNIS BESONDERE HINWEISE ........ 122 TYPISCHE PRODUKTPARAMETER ....124 ETIKETTSTELLE ........... 126 HÄNDLERDATEN ........127 HOMEFILL II INFORMATIONEN ....128 ABSCHNITT 1—ALLGEMEINE RICHTLINIEN .. 129 ABSCHNITT 2—ERSTINBETRIEBNAHME ..134 Erstinbetriebnahme des Kompressors............134 ABSCHNITT 3—CHECKLISTE UND DRUCKFLASCHENINSPEKTION ....139 Checkliste für den Kompressorbetrieb............139 Kontrolle der Vorabbefüllung der Druckflasche........
  • Seite 122: Besondere Hinweise

    BESONDERE HINWEISE BESONDERE HINWEISE Überprüfen Sie alle Teile auf Transportschäden. Wenn Beschädigungen vorliegen, NICHT verwenden. Kontaktieren Sie Invacare für weitere Anweisungen. In dieser Anleitung werden Signalwörter verwendet, welche Gefahren oder unsichere Vorgehensweisen, welche Verletzungen und Beschädigungen hervorrufen können, kennzeichnen. Die Definitionen der Signalwörter finden Sie in der folgenden Tabelle.
  • Seite 123 BESONDERE HINWEISE WARNUNG Die Produkte von Invacare werden speziell für den Gebrauch mit Invacare-Zubehör entwickelt und hergestellt. Von anderen Herstellern entworfenes Zubehör wurde von Invacare nicht getestet und wird daher nicht für die Verwendung mit Produkten von Invacare empfohlen. RECYCLINGHINWEISE Dieses Produkt ist von einem umweltbewussten Hersteller geliefert worden, der gemäß...
  • Seite 124: Typische Produktparameter

    TYPISCHE PRODUKTPARAMETER Behördliche EN/IEC 60601-1-2 EMC Zulassung: Wechselspannung Vollisoliert, Schutzklasse BF Achtung! Begleitpapiere beachten RAUCHEN VERBOTEN Doppelt isoliert, Klasse II Dieses Produkt entspricht der Richtlinie 93/42/EWG über Medizinprodukte. Der Markteinführungszeitpunkt für dieses Produkt ist in der CE-Konformitätserklärung angegeben. HomeFill II Kompressor Part No 1145804 ®...
  • Seite 125 TYPISCHE PRODUKTPARAMETER - KOMPRESSOR Betriebstemperatur: 50 bis 95°F (10 bis 35°C) bei 20 bis 60% nicht kondensierender Feuchte Lagerungstemperatur: -10 bis 95°F (-23 bis 35°C) bei 15 bis 95% Feuchte Notwendiger 14 - 21 PSI (96.5-144.7 kPa) Eingangsdruck: Notwendige 2 l/min. Durchstrommenge: Notwendiger O -Anteil...
  • Seite 126: Etikettstelle

    ETIKETTSTELLE ACHTUNG - GEFAHR VON ELEKTRISCHEM SCHLAG Entfernen Sie NICHT die Abdeckung. Wartungsarbeiten dürfen nur von qualifiziertem Servicepersonal durchgeführt werden. ACHTUNG - FEUERGEFAHR RAUCHEN VERBOTEN - Halten Sie alle möglichen Quellen von Funken von dem Raum, in dem sich dieses Produkt befindet und Bereichen, in denen Sauerstoff angeliefert wird, fern.
  • Seite 127: Händlerdaten

    HÄNDLERDATEN HINWEIS: Invacare empfiehlt, dem Patienten eine volle Sauerstoffdruckflasche dazulassen, nachdem der HomeFill II Kompressor eingestellt wurde. Bevor ein HomeFill II Kompressor einem Anwender übergeben wird, MUSS folgende Checkliste durchgegangen werden: ❑ Stellen Sie sicher, dass der Drucktest der Druckflasche noch gültig ist.
  • Seite 128: Homefill Ii Informationen

    Patienten ermöglicht, eigene tragbare Sauerstoff-Druckflaschen für den Eigengebrauch zu befüllen. HINWEIS Der HomeFill II Kompressor ist für den Gebrauch mit speziell entwickelten Invacare Platinum™5 und Platinum 9 HomeFill II kompatiblen Sauerstoffkonzentratoren bestimmt. Der Sauerstoffkonzentrator kann während des Betriebs mit dem HomeFill II Kompressor auf maximale Strömungsrate eingestellt werden:...
  • Seite 129: Abschnitt 1-Allgemeine Richtlinien

    ABSCHNITT 1—ALLGEMEINE RICHTLINIEN ABSCHNITT 1—ALLGEMEINE RICHTLINIEN WARNUNG ABSCHNITT 1 – ALLGEMEINE RICHTLINIEN enthält wichtige Informationen für den sicheren Betrieb und die sichere Verwendung dieses Produkts. Verwenden Sie dieses Produkt oder irgendein verfügbares Sonderzubehör NICHT ohne zuvor diese Anweisungen, sowie alle anderen Bedienungsunterlagen, wie das Benutzerhandbuch, das Wartungshandbuch oder die zusammen mit diesem Produkt oder dem Sonderzubehör gelieferten Hinweisblätter vollständig gelsen und...
  • Seite 130 Das Gerät NICHT auseinander nehmen. Dieses Gerät ist mit einer doppelten Isolierung versehen und hat keine zu wartenden Teile. Wenn Wartungsarbeiten erforderlich sind, kontaktieren Sie bitte den Invacare Kundendienst. Wenn das Netzkabel oder der Netzstecker des Kompressors beschädigt ist, wenn er nicht korrekt arbeitet, er gestürzt oder beschädigt ist oder in Wasser eingetaucht war, rufen Sie bitte...
  • Seite 131 Substanzen sind zum Beispiel Handcremes oder Lotionen, Speiseöle, Bräunungscremes oder Sonnenschutzmittel und vergleichliche ölige Produkte. Wenn Sie diese Arten von Produkten verwenden, rät Invacare Ihnen, sich die Hände zu waschen, bevor Sie das HomeFill Gerät verwenden. Sollten die Flaschenverbindungsstücke in...
  • Seite 132: Umgang Mit Dem Gerät

    ABSCHNITT 1—ALLGEMEINE RICHTLINIEN WARNUNG (FORTS.) Das Gerät sowie die Sauerstoffschläuche und Kabel von heißen oder beheizten Oberflächen (z. B. Heizöfen, Heizdecken, Herdplatten u. ä.) fern halten. Der HomeFill II ist zum Schutze des Anwenders mit einem Hochdruck-Sicherheitsventil ausgerüstet. Wenn dieses aktiviert ist, ertönt von dieser Sicherheitseinrichtung ein extrem lautes Geräusch.
  • Seite 133 ABSCHNITT 1—ALLGEMEINE RICHTLINIEN WARNUNG (FORTS.) Transportieren Sie NIEMALS einen Kompressor, wenn eine Druckflasche daran befestigt oder angebracht ist, ansonsten können Verletzungen oder Schäden die Folge sein. Lagern Sie befüllte Sauerstoff-Druckflaschen NICHT in der Nähe von Öfen, Heißwasserboilern, im Kofferraum eines Autos oder in Umgebungen mit hoher Temperatur.
  • Seite 134: Abschnitt 2-Erstinbetriebna Hme

    ABSCHNITT 2—ERSTINBETRIEBNAHME ABSCHNITT 2—ERSTINBETRIEBNA HINWEIS: Nur für Fachhändler bestimmt - Siehe Händlerdaten auf Seite 127 Vor Inbetriebnahme durchlesen. Erstinbetriebnahme des Kompressors Checkliste für die Erstinbetriebnahme des Kompressors Gehen Sie vor der Erstbenutzung des HomeFill II Kompressors folgende Checkliste durch: ❑ Auswahl eines Aufstellungsorts für den Kompressor. ❑...
  • Seite 135 ABSCHNITT 2—ERSTINBETRIEBNAHME Der Kompressor sollte auf einer festen ebenen Oberfläche, wie z.B. einem Tisch oder dem Ready Gestell stehen. Part No 1145804 HomeFill II Kompressor ®...
  • Seite 136: Verbinden Des Netzkabels

    ABSCHNITT 2—ERSTINBETRIEBNAHME Transport des Kompressors HINWEIS: Nähere Angaben zu diesem Verfahren finden Sie in ABBILDUNG 2.1. WARNUNG Transportieren Sie NIEMALS einen Kompressor, wenn eine Druckflasche daran befestigt oder angebracht ist, ansonsten können Verletzungen oder Schäden die Folge sein. VORSICHT Achten Sie beim Transport des Kompressors darauf, nicht mit dem Kommpressor oder den Anschlüssen gegen Hindernisse zu stoßen.
  • Seite 137: Verbinden Des Kompressors An Den Konzentrator

    ABSCHNITT 2—ERSTINBETRIEBNAHME 1. Stellen Sie sicher, dass der Kompressor auf einer festen ebenen Oberfläche, wie z.B. einem Tisch oder dem Ready Gestell steht. 2. Stellen Sie sicher, dass der Netzschalter des Kompressors in "AUS" (Off) (O) Stellung steht. 3. Verbinden Sie das Netzkabel mit dem elektrischen Anschluss auf der Rückseite des Kompressors.
  • Seite 138 ABSCHNITT 2—ERSTINBETRIEBNAHME 3. Rollen Sie überflüssigen Verbindungsschlauch ggf. auf und befestigen Sie diesen auf der Rückseite des Konzentrators mit den Befestigungsstreifen. DETAIL “A” DETAIL “B” Verbinden der Enden des Verbindungs Kompressor Verbindungsschlauchs Schlauch mit dem Einlass-/Auslassstutzen KONZENTRATOR DRAUFSICHT Einlassstutzen Netz Auslassstutzen Kabel DETAIL “C”...
  • Seite 139: Abschnitt 3-Checkliste Und Druckflascheninspektion

    Checkliste erneut durch. Kontrolle der Vorabbefüllung der Druckflasche WARNUNG Verwenden Sie AUSSCHLIESSLICH Druckflaschen, welche über einen Invacare HomeFill II Anschluss und das entsprechende Etikett verfügen. Alle Druckflaschen MÜSSEN vor einem Befüllungsversuch kontrolliert werden. Ansonsten kann es zu Verletzungen und/oder Schäden kommen.
  • Seite 140 ABSCHNITT 3—CHECKLISTE UND DRUCKFLASCHENINSPEKTION ABBILDUNG 3.1 Kontrolle der Vorabbefüllung der Druckflasche HomeFill II Kompressor Part No 1145804 ®...
  • Seite 141: Der Termin Für Den Hydrostatischen Test

    ABSCHNITT 3—CHECKLISTE UND DRUCKFLASCHENINSPEKTION Der Termin für den hydrostatischen Test Aluminiumdruckflaschen MÜSSEN alle fünf Jahre getestet werden. WARNUNG Befüllen Sie NUR Druckflaschen, die innerhalb der letzten fünf Jahre getestet wurden. Ansonsten kann dies zu schweren Verletzungen führen. Wenden Sie sich für Ersatzdruckflaschen an Ihren Fachhändler.
  • Seite 142: Abschnitt 4- Kompressorbetrieb

    ABSCHNITT 4—KOMPRESSORBETRIEB ABSCHNITT 4— KOMPRESSORBETRIEB Anschließen/Trennen der Druckflasche am/vom Kompressor Anschließen der Druckflasche am Kompressor WARNUNG Verwenden Sie NIE irgendwelche Werkzeuge für das Anschließen/Trennen der Druckflasche am bzw. vom Kompressor. Ansonsten kann es zu schweren Verletzungen und/oder Schäden kommen. Lassen Sie Sauerstoff-Druckflaschen NICHT fallen. Verwenden Sie bei der Handhabung/beim Transport von Sauerstoff-Druckflaschen stets beide Hände.
  • Seite 143 ABSCHNITT 4—KOMPRESSORBETRIEB 3. Entfernen Sie die Druckflasche und die Abdeckungen der Anschluss-Füllöffnung. VORSICHT Schließen Sie den Ausgang (Kanüle) NICHT am HomeFill II-Gerät an, ansonsten arbeitet die Sauerstoff-Druckflasche nicht ordnungsgemäß. 4. Drücken Sie den äußeren Ring (die Manschette) der Anschluss-Füllöffnung kurz nach UNTEN, bis die GRÜNEN Punkte sichtbar sind, um die Verbindung zurückzustellen (ABBILDUNG 4.1).
  • Seite 144 ABSCHNITT 4—KOMPRESSORBETRIEB HERUNTER Äußerer Ring DRÜCKEN (Manschette) Anschluss-Füllöffnung GRÜNE Punkte ZIEHEN SIE DIE MANSCHETTE SO WEIT ZURÜCK BIS DIE GRÜNEN PUNKTE SICHTBAR SIND, BEVOR SIE DIE DRUCKFLASCHE ANSCHLIESSEN. ABBILDUNG 4.1 Zurücksetzen der Anschluss-Füllöffnung 5. Fassen Sie die Druckflaschen-/Reglereinheit in dem Bereich hinter der Druckflaschenanzeige an (ABBILDUNG 4.2).
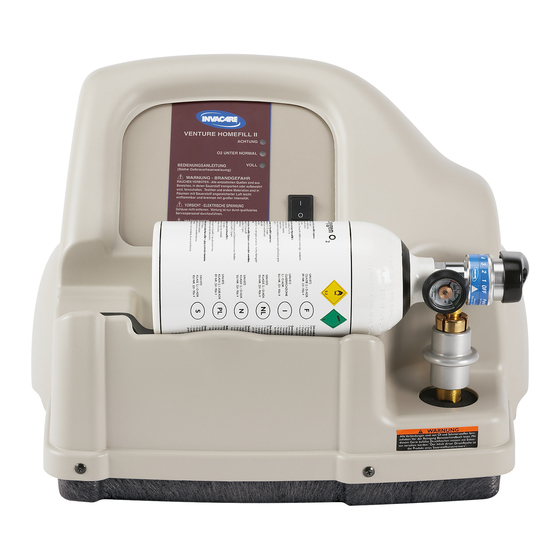
  • Seite 145 ABSCHNITT 4—KOMPRESSORBETRIEB Kompressor Druckflaschen-/ Reglereinheit Anschluss-Füllö ffnung Anschluss-Füllö ffnung Äußerer Ring (Manschette) Druckflaschen anzeige HOCHZIEHEN Regler Druckflasche Regler-Strömungsrad Druckflasch enanzeige Auslass (Kanüle) HINWEIS: Der Deutlichkeit Anschluss-Füllöffnun wegen sind die Füllöffnungsabde ckungen nicht Netzschalter abgebildet. Anschluss- Füllöffnung Kompressora ufnahme Äußerer Ring (Manschette) ABBILDUNG 4.2 Anschließen der Druckflasche am Kompressor...
  • Seite 146: Trennen Der Druckflasche Vom Kompressor

    ABSCHNITT 4—KOMPRESSORBETRIEB Trennen der Druckflasche vom Kompressor WARNUNG Verwenden Sie NIE irgendwelche Werkzeuge für das Anschließen/Trennen der Druckflasche am bzw. vom Kompressor. Ansonsten kann es zu schweren Verletzungen und/oder Schäden kommen. HINWEIS: Nähere Angaben zu diesem Verfahren finden Sie in ABBILDUNG 4.3 und ABBILDUNG 4.4 auf Seite 148.
  • Seite 147 ABSCHNITT 4—KOMPRESSORBETRIEB 5. Wenn die Druckflaschen-Füllöffnung von der Anschluss-Füllöffnung getrennt ist, lösen Sie den äußeren Ring (Manschette) der Anschluss-Füllöffnung und entfernen die Druckflasche mit beiden Händen aus der Kompressoraufnahme. WARNUNG Die Abdeckungen an der Anschluss-Füllöffnung und der an der Druckflasche MÜSSEN wieder aufgesetzt werden, wenn diese nicht gebraucht werden.
  • Seite 148: Kompressor Einschalten

    ABSCHNITT 4—KOMPRESSORBETRIEB Anschlussabdeckung der Anschlussabdeckung der ABBILDUNG 4.4 Anschlussabdeckungen Kompressor einschalten HINWEIS: Für dieses Verfahren, siehe ABBILDUNG 4.5 auf Seite 150. 1. Stellen Sie sicher, dass der Konzentrator eingeschaltet ist. Siehe Benutzerhandbuch Konzentrator. VORSICHT Die Durchströmungsrate des Konzentrators MUSS auf höchstens 2,5 l/min oder weniger für Platinum S Modelle und auf 5 l/min für Platinum 9 Modelle eingestellt sein.
  • Seite 149 ABSCHNITT 4—KOMPRESSORBETRIEB 3. Stellen Sie sicher, dass die Druckflasche an den Kompressor angeschlossen ist. Siehe Anschließen der Druckflasche am Kompressor auf Seite 142. 4. Bringen Sie den Netzschalter auf dem Bedienfeld in "EIN" (On) ( ) Stellung. 5. Beobachten Sie das Bedienfeld. Folgende Abläufe sollten eintreten: A.
  • Seite 150 ABSCHNITT 4—KOMPRESSORBETRIEB VORSICHT (ROTES Licht Bedienfeld und akustisches Signal) Befüllen (GRÜNES Licht) unter normal - (GELBES Licht) Voll (GRÜNES Licht) Netzsc halter ABBILDUNG 4.5 Kompressor einschalten HomeFill II Kompressor Part No 1145804 ®...
  • Seite 151: Einstellen Des Strömungsknopfes Auf Den Vorgeschriebenen Wert

    ABSCHNITT 4—KOMPRESSORBETRIEB Einstellen des Strömungsknopfes auf den vorgeschriebenen Wert HINWEIS: Für dieses Verfahren, siehe ABBILDUNG 4.6. 1. Verbinden der Nasenkannüle mit dem Auslassanschluss der Druckflasche. 2. Drehen Sie den Knopf auf die von Ihrem Arzt oder Therapeuten empfohlene Durchflussmenge. WARNUNG Ändern Sie die Durchflusseinstellung NICHT, ohne dass Sie durch Ihren Arzt oder Therapeuten dazu aufgefordert werden, da die Veränderung der Durchflussmenge die...
  • Seite 152: Technische Beschreibung

    Füllsystem zur Verschreibung für den Sauerstoff-Langzeittherapie-Gebrauch. Seine Funktion und Anwendung ist die Versorgung von komprimiertem Sauerstoff, um Gasdruckflaschen von Invacare für den ambulanten Gebrauch zu befüllen, während der Patient mit therapeutischen Sauerstoff von einem zusätzlichen Sauerstoff-Konzentrator versorgt wird. Das IOH200AW Füllstation-System ist für den Gebrauch mit Invacare...
  • Seite 153 Der IOH200AW Kompressor kann für das Befüllen von Druckflaschen für den portablen Gebrauch durch ambulante Patienten verwendet werden. Die Invacare Gasdruckflaschen verfügen über einen selbstverriegelnden Anschlussstutzen, der nur auf den Invacare IOH200AW Kompressor passt. Die Gasdruckflasche verfügt darüberhinaus über einen integrierten Durchflussregler mit festen, wählbaren Durchflusseinstellungen.
  • Seite 154: Abschnitt 5-Anzeigeleuchten

    ABSCHNITT 5—ANZEIGELEUCHTEN ABSCHNITT 5—ANZEIGELEUCHTEN FARBE DER KOMPRESSORZU EFFEKT LEUCHTE STAND Keiner Kompressor ist AUS. Strömung zu Anwender wenn Konzentrator eingeschaltet. unter normal - GELB Kompressor ist Befüllen der eingeschaltet und in Druckflasche nicht Aufwärmphase (0-3 gestartet. Minuten nach Strömung zu Einschalten).
  • Seite 155 ABSCHNITT 5—ANZEIGELEUCHTEN FARBE DER KOMPRESSORZU EFFEKT LEUCHTE STAND Voll - GRÜN Kompressor ist Befüllen der eingeschaltet. Befüllung Druckflasche wird der Druckflasche unterbrochen abgeschlossen (voll) - Weitere Druckflasche Entnehmen der kann nicht befüllt Druckflasche (Anzeige werden VOLL leuchtet in >10 Min.) der Kompressor oder ausgeschaltet und...
  • Seite 156: Fehlerbehebung/ Füllzeiten Für Druckflaschen

    4. Luftfilter reinigen. Siehe Wartung auf Seite 160. 5. Wenn trotz der SCHRITTE 1-4 die Anzeigen nicht aufleuchten, kontaktieren Sie Ihren Fachhändler oder Invacare für Abhilfe. ROTES Licht leuchtet. 1.Überprüfen, ob die Druckflaschenanzeige VOLL anzeigt. Druckflasche voll - Entnehmen der Druckflasche und Ausschalten des Geräts (O).
  • Seite 157 2. Der Konzentrator muss möglicherweise oder gewartet werden, kontaktieren Sie Ihren Leuchte O unter normal Fachhändler oder Invacare. (GELB) geht an und aus Leuchte O unter normal 1. Sicherstellen, dass der Konzentrator mindestens 20 Minuten warmgelaufen ist. Sind (GELB) erlischt nicht.
  • Seite 158 Zischendes Geräusch vom 1. Schalten Sie den Durchflussregler aus. Regulator bei 2. Dauert das zischende Geräusch weiter an, ausgeschaltetem kontaktieren Sie Ihren Fachhändler oder Invacare. Durchflussregler. Trotz eingeschaltetem 1. Befüllen Sie die Sauerstoffdruckflasche. Regulator wird kein O 2. Überprüfen, ob die Kanüle gerade und ungeknickt ist.
  • Seite 159: Druckflaschen-Füllzeiten

    ABSCHNITT 6—FEHLERBEHEBUNG/ FÜLLZEITEN FÜR DRUCKFLASCHEN-FÜLLZEITEN Druckflas Konzentrator Strömungsrate chen-Füll zum Patienten: zeiten (Platinum S bis zu 2,5 l/min. und Platinum 9 bis zu 5 l/min) *HF2PC9 *HF2PCL4 *HF2PCL6 HF2PCE8 NORMAL 2 Std. 20 Min. 60 Min. 1 Std. 25 Min. 2 Std.
  • Seite 160: Abschnitt 7-Wartung

    ABSCHNITT 7—WARTUNG ABSCHNITT 7—WARTUNG Reinigung des Kompressor-Filters WARNUNG Drücken Sie den Netzschalter in die "AUS" (Off) Stellung (O) und ziehen Sie den Netzstecker, bevor Sie mit der Reinigung beginnen. Verwenden Sie den Kompressor NICHT ohne eingesetzten Filter. VORSICHT Ziehen Sie den Netzstecker NICHT, in dem Sie an dem Kabel ziehen, da sonst Beschädigungen entstehen könnten.
  • Seite 161: Gehäuse

    ABSCHNITT 7—WARTUNG Gehäuse WARNUNG Drücken Sie den Netzschalter in die "AUS" (Off) Stellung (O) und ziehen Sie den Netzstecker, bevor Sie mit der Reinigung beginnen. Um einen Stromschlag zuvermeiden, das Gehäuse NICHT entfernen. 1. Das Gehäuse mit einem milden Haushaltsreiniger und einem abriebfreien Tuch oder Schwamm reinigen.
  • Seite 162: Kundeninformation Über Service Und Wartungen

    Dublin – Ireland • Tel: (353) 1 810 7084 • Fax: (353) 1 810 7085 • ireland@invacare.com • www.invacare.ie Italia: Invacare Mecc San s.r.l., Via dei Pini 62, I-36016 Thiene (VI) • Tel: (39) 0445 38 00 59 • Fax: (39) 0445 38 00 34 • italia@invacare.com • www.invacare.it Nederland: Invacare BV, Celsiusstraat 46, NL-6716 BZ Ede •...
  • Seite 163: Manuale Dell'operatore

    Modello IOH200AW Utente: Prima di utilizzare questo prodotto leggere il presente manuale e conservarlo per consultazione successiva. Distributore: Consegnare il presente manuale all’utente finale. Per maggiori informazioni relative a prodotti, parti di ricambio e servizi Invacare, visitare il sito www.invacare.it...
  • Seite 164 CIRCA I PERICOLI, LE AVVERTENZE, I MESSAGGI DI ATTENZIONE E LE ISTRUZIONI RISULTANO DI DIFFICILE COMPRENSIONE, CONTATTARE IL SERVIZIO ASSISTENZA DI INVACARE PRIMA DI TENTARE DI UTILIZZARE QUESTO APPARECCHIO. IN CASO CONTRARIO, SUSSISTE IL RISCHIO DI LESIONI GRAVI PER LE PERSONE O DI DANNI ALLE PROPRIETÀ.
  • Seite 165 INDICE NOTE SPECIALI ........... 166 PARAMETRI TIPICI DEL PRODOTTO ..... 168 POSIZIONE DELLE ETICHETTE ...... 170 INFORMAZIONI PER IL DISTRIBUTORE ..171 INFORMAZIONI SU HOMEFILL II ....172 SEZIONE 1—INDICAZIONI GENERALI ... 173 SEZIONE 2—PREPARAZIONE INIZIALE ..178 Preparazione iniziale del compressore ..........178 SEZIONE 3—LISTA DI CONTROLLO E ISPEZIONE DELLA BOMBOLA ........
  • Seite 166: Note Speciali

    NOTE SPECIALI Controllare tutti i componenti per verificare che non siano stati danneggiati durante il trasporto. In presenza di danni, NON utilizzare l'apparecchio. Contattare Invacare per ulteriori istruzioni. Le parole utilizzate in questo manuale per le segnalazioni si riferiscono a situazioni o procedure pericolose che potrebbero causare lesioni alle persone o danni alle proprietà.
  • Seite 167: Informazioni Per Il Riciclo

    I prodotti Invacare sono specificamente progettati e fabbricati per essere utilizzati insieme agli accessori Invacare. Gli accessori progettati da altri costruttori non sono stati testati da Invacare e pertanto se ne sconsiglia l'utilizzo con i prodotti Invacare. INFORMAZIONI PER IL RICICLO Questo prodotto è...
  • Seite 168: Parametri Tipici Del Prodotto

    PARAMETRI TIPICI DEL PRODOTTO Norme: EN/IEC 60601-1-2 Corrente alternata Apparecchio tipo BF In funzione Non in funzione Attenzione - Consultare la documentazione acclusa NON fumare Classe II, doppio isolamento Questo prodotto è conforme alla direttiva 93/42/CEE riguardante i dispositivi medici. La data di lancio di questo prodotto è...
  • Seite 169 PARAMETRI TIPICI DEL PRODOTTO - COMPRESSORE Temperatura d'esercizio: 10 - 35 °C (50 - 95 °F) con 20% - 60% di umidità non condensante Temperatura di -23 - 65 °C (-10 - 150 °F) con 15% - 95% di umidità immagazzinamento: Pressione di ingresso 96,5-144,7 kPa (14 - 21 PSI)
  • Seite 170: Posizione Delle Etichette

    POSIZIONE DELLE ETICHETTE PERICOLO - RISCHIO DI SCOSSA ELETTRICA NON rimuovere il coperchio. Per qualsiasi intervento, rivolgersi a personale qualificato. PERICOLO - RISCHIO DI INCENDIO VIETATO FUMARE - Tenere TUTTE le fonti di incendio fuori dal locale in cui è ubicato questo prodotto e lontane dalle aree in cui viene erogato ossigeno.
  • Seite 171: Informazioni Per Il Distributore

    INFORMAZIONI PER IL DISTRIBUTORE NOTA: Invacare raccomanda di lasciare presso il paziente una bombola piena di ossigeno dopo aver preparato il compressore HomeFill II. Prima di lasciare a un utente un compressore HomeFill II, COMPLETARE la lista di controllo seguente: ❑...
  • Seite 172: Informazioni Su Homefill Ii

    AVVISO Il compressore HomeFill II è destinato all'uso con i concentratori di ossigeno compatibili con HomeFill II specificamente progettati Invacare Platinum™5 e Platinum 9. Quando viene utilizzato con il compressore HomeFill II, il concentratore di ossigeno può essere impostato sulla...
  • Seite 173: Sezione 1-Indicazioni Generali

    SEZIONE 1—INDICAZIONI GENERALI SEZIONE 1—INDICAZIONI GENERALI AVVERTENZA La SEZIONE 1 - INDICAZIONI GENERALI contiene informazioni importanti per il funzionamento e l'utilizzo in sicurezza di questo prodotto. NON utilizzare questo prodotto o qualsiasi altro apparecchio opzionale disponibile senza aver prima letto per intero e aver compreso queste istruzioni ed eventuale altro materiale informativo quali i manuali per l'utente, i manuali di manutenzione o i fogli di istruzioni forniti con questo...
  • Seite 174 Qualora sia necessario un intervento di manutenzione, contattare il servizio assistenza di Invacare. Se il cavo o la spina del compressore sono danneggiati, o se il compressore non funziona correttamente, è caduto o è stato danneggiato o è...
  • Seite 175 Se si utilizza questo tipo di prodotti, Invacare suggerisce di lavare le mani prima di utilizzare l'unità HomeFill. Se il raccordo della bombola viene in contatto con tali sostanze, pulirlo a fondo con un panno umido prima di collegarlo al compressore.
  • Seite 176 SEZIONE 1—INDICAZIONI GENERALI AVVERTENZA (CONTINUA) L'apparecchio HomeFill II è dotato di una valvola di sfogo dell'alta pressione per garantire l'incolumità dell'utente. Se attivata, questa funzione di sicurezza produrrà un suono molto forte. Se si sente questo suono, spegnere l'unità posizionandola su Off e contattare il fornitore di apparecchiature per la cura a domicilio o a un addetto dell'assistenza tecnica.
  • Seite 177 SEZIONE 1—INDICAZIONI GENERALI AVVERTENZA (CONTINUA) NON lasciare bombole di ossigeno piene vicino a una caldaia, a un serbatoio di acqua calda, nel baule di una macchina o in altro luogo molto caldo. La conservazione delle bombole in questo tipo di luoghi può causarne lo scoppio o provocare un incendio.
  • Seite 178: Sezione 2-Preparazione Iniziale

    SEZIONE 2—PREPARAZIONE INIZIALE SEZIONE 2—PREPARAZIONE INIZIALE NOTA: Solo per i distributori - Fare riferimento Informazioni Per Il Distributore alla pagina 171 prima di eseguire questa procedura. Preparazione iniziale del compressore Lista di controllo per la preparazione iniziale del compressore Prima di utilizzare il compressore HomeFill II per la prima volta, completare la lista di controllo seguente: ❑...
  • Seite 179: Collegamento Del Cavo Di Alimentazione

    SEZIONE 2—PREPARAZIONE INIZIALE Trasporto del compressore NOTA: Per questa procedura, fare riferimento alla FIGURA 2.1. AVVERTENZA Non trasportare MAI un compressore cui è ancora collegata una bombola o su cui è appoggiata una bombola; possono verificarsi lesioni o danni. ATTENZIONE Quando si trasporta il compressore, fare attenzione a non urtare con il compressore stesso o con i connettori contro eventuali ostacoli.
  • Seite 180 SEZIONE 2—PREPARAZIONE INIZIALE 1. Verificare che il compressore sia collocato su una superficie rigida stabile e piana, come ad esempio un tavolo o il Ready Rack. 2. Accertarsi che l'interruttore sia posizionato su Off (O). 3. Inserire il cavo di alimentazione nel connettore elettrico posto sul retro del compressore.
  • Seite 181 SEZIONE 2—PREPARAZIONE INIZIALE DETTAGLIO “A” DETTAGLIO “B” Inserire l'estremità del Tubo flessibile Compressore tubo flessibile nel di collegamento raccordo di ingresso/uscita CONCENTRATORE Cavo di VISTA SUPERIORE Raccordo di ingresso alimentazione Raccordo di uscita DETTAGLIO “C” Raccordo di ingresso/uscita Linguetta di metallo FIGURA 2.3 Collegamento del compressore al concentratore Part No 1145804 Compressore HomeFill...
  • Seite 182: Sezione 3-Lista Di Controlloe Ispezione Della Bombola

    Ispezione preliminare al riempimento della bombola AVVERTENZA Utilizzare SOLTANTO bombole dotate della connessione per Invacare HomeFill II e della relativa etichetta. Tutte le bombole DEVONO essere ispezionate prima di iniziare a riempirle. In caso contrario, possono verificarsi lesioni o danni.
  • Seite 183 SEZIONE 3—LISTA DI CONTROLLO E ISPEZIONE DELLA BOMBOLA FIGURA 3.1 Ispezione preliminare al riempimento della bombola Part No 1145804 Compressore HomeFill ®...
  • Seite 184 SEZIONE 3—LISTA DI CONTROLLO E ISPEZIONE DELLA BOMBOLA Frequenza del test idrostatico Le bombole di alluminio DEVONO essere testate ogni cinque anni. AVVERTENZA NON riempire le bombole non testate negli ultimi cinque anni. In caso contrario, possono verificarsi gravi lesioni. Per la sostituzione, rivolgersi al proprio rivenditore.
  • Seite 185: Sezione 4-Funzionamento Del Compressore

    SEZIONE 4—FUNZIONAMENTO DEL COMPRESSORE SEZIONE 4—FUNZIONAMENTO DEL COMPRESSORE Connessione/Disconnessione della bombola dal compressore Connessione della bombola al compressore AVVERTENZA Non utilizzare MAI strumenti di alcun tipo per connettere/disconnettere la bombola e il compressore. In caso contrario, possono verificarsi gravi lesioni e/o danni. NON far cadere le bombole di ossigeno.
  • Seite 186 SEZIONE 4—FUNZIONAMENTO DEL COMPRESSORE ATTEZIONE NON collegare la connessione di uscita (cannula) all'unità HomeFill II, altrimenti la bombola non funzionerà correttamente. 4. Spingere brevemente in BASSO l'anello esterno (manicotto) del raccordo di riempimento del connettore fino a rendere visibili i puntini VERDI per ripristinare il connettore (FIGURA 4.1).
  • Seite 187 SEZIONE 4—FUNZIONAMENTO DEL COMPRESSORE 6. Posizionare la bombola nell'intelaiatura del compressore (FIGURA 4.2). 7. Allineare il raccordo di riempimento della bombola con il raccordo di riempimento del connettore (FIGURA 4.2). 8. Tirare in ALTO l'anello esterno (manicotto) del raccordo di riempimento del connettore spingendo contemporaneamente in BASSO il complesso bombola/regolatore per collegare il raccordo di...
  • Seite 188: Tirare In Alto

    SEZIONE 4—FUNZIONAMENTO DEL COMPRESSORE Compressore Complesso bombola/regolatore Raccordo di riempimento bombola Raccordo di riempimento connettore Anello esterno (manicotto) Manometro della bombola TIRARE IN ALTO Regolatore Bombola Manometr Regolatore di flusso o della Connessione bombola uscita (cannula) NOTA: Per Raccordo di maggiore chiarezza, riempimento i coperchi dei...
  • Seite 189 SEZIONE 4—FUNZIONAMENTO DEL COMPRESSORE Disconnessione della bombola dal compressore AVVERTENZA Non utilizzare MAI strumenti di alcun tipo per connettere/disconnettere la bombola e il compressore. In caso contrario, possono verificarsi gravi lesioni e/o danni. NOTA: Per questa procedura, fare riferimento alla FIGURA 4.3 e alla FIGURA 4.4 a pagina 191.
  • Seite 190 SEZIONE 4—FUNZIONAMENTO DEL COMPRESSORE Complesso SPINGERE IN bombola/regolatore BASSO Anello Manometro Raccordo di esterno della bombola riempimento (manicotto) Compressore bombola Raccordo di riempimento del connettore FIGURA 4.3 Disconnessione della bombola dal compressore 5. Quando il raccordo di riempimento della bombola è scollegato dal raccordo di riempimento del connettore, rilasciare l'anello esterno (manicotto) del raccordo di riempimento del connettore e con due mani rimuovere la...
  • Seite 191: Accensione Del Compressore

    SEZIONE 4—FUNZIONAMENTO DEL COMPRESSORE 7. Esaminare il manometro della bombola per accertarsi che quest'ultima sia piena (l'ago deve trovarsi nell'area VERDE). Se la bombola non è piena, procedere come indicato nel seguito: • Ripetere Connessione della bombola al compressore a pagina 185.
  • Seite 192 SEZIONE 4—FUNZIONAMENTO DEL COMPRESSORE ATTENZIONE La portata del concentratore al paziente DEVE essere impostata su un massimo di 2,5 l/min o meno per i modelli Platinum 5 e su 5 l/min su modelli Platinum 9. In caso contrario, il livello di ossigeno al compressore sarà pari al <90% e il compressore non riempirà...
  • Seite 193 SEZIONE 4—FUNZIONAMENTO DEL COMPRESSORE NOTA: Se la spia rossa Attenzione e l'allarme sonoro vengono attivati, Fare riferimento Risoluzione Dei Problemi / Tempi Di Riempimento Della Bombola alla pagina 199. 6. Rimuovere la bombola piena. Fare riferimento Disconnessione della bombola dal compressore alla pagina 189.
  • Seite 194: Impostazione Della Manopola Di Flusso Sul Valore Prescritto

    SEZIONE 4—FUNZIONAMENTO DEL COMPRESSORE Impostazione della manopola di flusso sul valore prescritto NOTA: Per questa procedura, fare riferimento alla FIGURA 4.6. 1. Collegare la cannula nasale al raccordo di uscita della bombola. 2. Portare la manopola di flusso sul valore di l/min prescritto dal medico o dal terapista.
  • Seite 195: Descrizione Tecnica

    Platinum 5 e 5 l/min per i modelli Platinum 9. Il sistema di rifornimento di ossigeno HomeFill II consta di un compressore di gas IOH200AW, dei tubi di connessione e delle bombole di gas portatili fornite da Invacare con regolatore di flusso integrale e raccordo di riempimento interdipendente.
  • Seite 196 SEZIONE 4—FUNZIONAMENTO DEL COMPRESSORE Il compressore IOH200AW viene utilizzato per il riempimento di bombole portatili destinate a pazienti ambulatoriali. Le bombole di gas portatili di Invacare sono dotate di un raccordo di riempimento interdipendente utilizzabile esclusivamente con il gruppo compressore IOH200AW Invacare.
  • Seite 197: Sezione 5-Spie Luminose

    SEZIONE 5—SPIE LUMINOSE SEZIONE 5—SPIE LUMINOSE COLORE DELLE SPIE STATO DEL EFFETTO LUMINOSE COMPRESSORE Nessuno Compressore spento. Flusso di O all'utente se il concentratore è acceso. Insufficiente - GIALLO Il compressore è Il riempimento della acceso e si sta bombola non è ancora riscaldando (0-3 minuti iniziato.
  • Seite 198 SEZIONE 5—SPIE LUMINOSE COLORE DELLE SPIE STATO DEL EFFETTO LUMINOSE COMPRESSORE Bombola piena - VERDE Il compressore è Il riempimento della acceso. Il riempimento bombola viene della bombola è interrotto. terminato (bombola Non è possibile piena) - Rimuovere la riempire un'altra bombola (la spia di bombola finché...
  • Seite 199: Sezione 6-Risoluzione Dei Problemi / Tempi Di Riempimento Della Bombola

    5. Se, nonostante l'esecuzione dei PUNTI da 1-4, non si accende alcuna spia luminosa, contattare il proprio fornitore di apparecchiature per la cura a domicilio o il servizio assistenza di Invacare. Spia ROSSA ACCESA 1.Controllare il manometro della bombola per verificare se è...
  • Seite 200 2. Il concentratore potrebbe richiedere in corso (VERDE) si l'intervento di un tecnico; contattare il fornitore alternano di apparecchiature per la cura a domicilio o oppure Invacare. La spia O insufficiente si accende e si spegne La spia O insufficiente 1.
  • Seite 201 Invacare. Compressore troppo 1. Contattare il fornitore di apparecchiature per rumoroso quando è la cura a domicilio o Invacare per assistenza. acceso. Il regolatore emette un 1. Spegnere il selettore di flusso. sibilo quando il selettore 2.
  • Seite 202 SEZIONE 6—RISOLUZIONE DEI PROBLEMI / TEMPI DI TEMPI DI RIEMPIMENTO DELLA BOMBOLA Tempi di Portata del concentratore al paziente: riempime (Platinum 5 fino a 2,5 l/min e nto della Platinum 9 fino a 5 l/min) bombola *HF2PC9 *HF2PCL4 *HF2PCL6 HF2PCE8 NORMALE 2 h 20 min 60 min...
  • Seite 203: Sezione 7-Manutenzione

    SEZIONE 7—MANUTENZIONE SEZIONE 7—MANUTENZIONE Pulizia del filtro del compressore AVVERTENZA Portare l'interruttore di alimentazione in posizione Off (O) e staccare il compressore dalla presa di corrente prima di effettuare la pulizia. NON azionare il compressore con il filtro smontato. ATTENZIONE NON staccare il cavo di alimentazione dalla presa tirandolo;...
  • Seite 204: Alloggiamento

    SEZIONE 7—MANUTENZIONE Alloggiamento AVVERTENZA Portare l'interruttore di alimentazione in posizione Off (O) e staccare il compressore dalla presa di corrente prima di effettuare la pulizia. Per evitare scosse elettriche, NON rimuovere l’alloggiamento. 1. Pulire l’alloggiamento con un detergente delicato e con un panno o una spugna non abrasiva.
  • Seite 205: Informazioni Sul Servizio Assistenza Al Cliente E Sulla Garanzia

    Dublin – Ireland • Tel: (353) 1 810 7084 • Fax: (353) 1 810 7085 • ireland@invacare.com • www.invacare.ie Italia: Invacare Mecc San s.r.l., Via dei Pini 62, I-36016 Thiene (VI) • Tel: (39) 0445 38 00 59 • Fax: (39) 0445 38 00 34 • italia@invacare.com • www.invacare.it Nederland: Invacare BV, Celsiusstraat 46, NL-6716 BZ Ede •...
  • Seite 206 Podręcznika należy zachować, aby móc korzystać z niego w razie konieczności. Sprzedawca: Niniejszy podręcznik należy przekazać końcowemu użytkownikowi. Więcej informacji na temat produktów firmy Invacare, części oraz napraw, znajduje się na stronie www.invacare.eu.com...
  • Seite 207 TRUDNOŚCI ZE ZROZUMIENIEM NIEBEZPIECZEŃSTW, OSTRZEŻEŃ, PRZESTRÓG ORAZ INSTRUKCJI NALEŻY, PRZED PODEJMOWANIE PRÓB OBSŁUGI URZĄDZENIA, SKONTAKTOWAĆ SIĘ Z DZIAŁEM OBSŁUGI TECHNICZNEJ FIRMY INVACARE. W PRZECIWNYM WYPADKU MOŻE DOJŚĆ DO POWAŻNYCH URAZÓW LUB DO USZKODZENIA MIENIA. NIEBEZPIECZEŃSTWO Podczas użytkowania niniejszego urządzenia NIE WOLNO PALIĆ...
  • Seite 208 SPIS TREŚCI UWAGI SPECJALNE ............209 TYPOWE PARAMETRY PRODUKTU ......211 LOKALIZACJA ETYKIETY ..........213 INFORMACJE O SPRZEDAWCY ........214 HOMEFILL II - INFORMACJE ........215 CZĘŚĆ 1—OGÓLNE WSKAZÓWKI ......216 CZĘŚĆ 2—USTAWIENIA WSTĘPNE ......220 Ustawienia wstępne kompresora ........ 220 CZĘŚĆ...
  • Seite 209: Uwagi Specjalne

    Należy sprawdzić wszystkie elementy pod kątem uszkodzeń związanych z transportem. NIE WOLNO używać urządzenia, gdy jest ono uszkodzone. W celu uzyskania dalszych wskazówek proszę skontaktować się z firmą Invacare. W niniejszym podręczniku użyto pewnych określeń ostrzegawczych, odnoszących się do zagrożeń lub czynności niebezpiecznych, które mogą...
  • Seite 210: Informacje Dotyczące Utylizacji

    Produkty firmy Invacare zostały specjalnie zaprojektowane i wyprodukowane w celu stosowania ich z wyposażeniem dodatkowym firmy Invacare. Wyposażenie dodatkowe innych producentów nie zostało sprawdzone przez firmę Invacare i nie zaleca się jego stosowania z produktami firmy Invacare. INFORMACJE DOTYCZĄCE UTYLIZACJI Ten produkt jest dostarczany przez producenta dbającego o...
  • Seite 211: Typowe Parametry Produktu

    TYPOWE PARAMETRY PRODUKTU Wykaz norm: EN/IEC 60601-1-2 EMC Prąd zmienny Urządzenie typu BF Urządzenie pracuje Urządzenie nie pracuje Uwaga – Należy zapoznać się z dostarczoną dokumentacją ZAKAZ palenia Klasa II, podwójna izolacja Ten produkt spełnia wymagania dyrektywy 93/42/EWG dotyczącej urządzeń medycznych. Data wprowadzenia tego produktu na rynek jest ustalona w deklaracji zgodności WE.
  • Seite 212 TYPOWE PARAMETRY PRODUKTU - KOMPRESOR Zakres temperatur 50 do 95° F (10 do 35° C) @ wilgotność od 20 do 60% - bez kondensacji roboczych: Zakres temperatur -10 do 150° F (-23 do 65° C) @ wilgotność od 15 do 95% przechowywania: Wymagane ciśnienie 14 - 21 PSI (96,5-144,7 kPa)
  • Seite 213: Lokalizacja Etykiety

    LOKALIZACJA ETYKIETY UWAGA – NIEBEZPIECZEŃSTWO PORAŻENIA PRĄDEM NIE WOLNO zdejmować pokrywy. W przypadku konieczności serwisowania należy przekazać je wykwalifikowanemu pracownikowi serwisu. UWAGA – NIEBEZPIECZEŃSTWO ZAPŁONU ZAKAZ PALENIA – Nie wolno dopuścić, aby w pomieszczeniu, w którym znajduje się urządzenie, lub w okolicy miejsc zaopatrzenia urządzenia w tlen, znajdowały się...
  • Seite 214: Informacje O Sprzedawcy

    INFORMACJE O SPRZEDAWCY UWAGA: Firma Invacare zaleca, pozostawienie pacjentowi pełnej butli z tlenem, po zainstalowaniu kompresora HomeFill II. Przed pozostawieniem użytkownikowi kompresora HomeFill II, NALEŻY wypełnić poniższą listę kontrolną: ❑ Należy upewnić się, że nie upłynęła data ważności kontrolki ciśnienia znajdująca się na butli.
  • Seite 215: Homefill Ii - Informacje

    POWIADOMIENIE Kompresor HomeFill II przeznaczony jest do użytku ze specjalnie zaprojektowanymi koncentratorami tlenowymi firmy Invacare: Platinum 5 oraz Platinum 9. ™ W czasie pracy z kompresorem HomeFill II koncentrator tlenu można ustawić na następujące wartości przepływu maksymalnego: Platinum 5 –...
  • Seite 216: Część 1-Ogólne Wskazówki

    CZĘŚĆ 1—OGÓLNE WSKAZÓWKI CZĘŚĆ 1—OGÓLNE WSKAZÓWKI OSTRZEŻENIE CZĘŚĆ 1 - OGÓLNE WSKAZÓWKI zawiera informacje istotne dla bezpiecznej obsługi i eksploatacji niniejszego produktu. NIE WOLNO stosować niniejszego produktu, ani żadnego z urządzeń dodatkowych, przed zapoznaniem się z niniejszymi instrukcjami oraz ze wszystkimi innymi wskazówkami, takimi jak te, które znajdują...
  • Seite 217 W przypadku, gdy zaistnieje konieczność dokonania naprawy należy skontaktować się z Obsługą Techniczną firmy Invacare. W przypadku uszkodzenia przewodu lub wtyczki kompresora, gdy nie pracuje on odpowiednio, kompresor upadł, jest uszkodzony lub został...
  • Seite 218 W przypadku, gdy użytkownik zastosował produkty tego rodzaju, firma Invacare zaleca umycie rąk przed rozpoczęciem eksploatacji urządzenia HomeFill. W przypadku kontaktu przewodów butli z tego rodzaju substancjami należy przed podłączeniem kompresora...
  • Seite 219 CZĘŚĆ 1—OGÓLNE WSKAZÓWKI OSTRZEŻENIE (C.D.) Urządzenie HomeFill wyposażone jest, dla bezpieczeństwa użytkownika, w zawór redukcji wysokiego ciśnienia. W przypadku uruchomienia, zabezpieczenie to wyda bardzo głośny dźwięk. W razie wystąpienia dźwięku należy wyłączyć urządzenie i skontaktować się z firmą dostarczającą urządzenie do domu lub z przedstawicielem handlowym. Przed transportem lub przesuwaniem kompresora lub koncentratora, należy ZAWSZE ustawić...
  • Seite 220: Część 2-Ustawienia Wstępne

    CZĘŚĆ 2—USTAWIENIA WSTĘPNE CZĘŚĆ 2—USTAWIENIA WSTĘPNE UWAGA: Informacja dla sprzedawców - Patrz Informacje o sprzedawcy na stronie 214 przed rozpoczęciem procedury. Ustawienia wstępne kompresora Lista kontrolna ustawień wstępnych kompresora Przed rozpoczęciem pierwszej eksploatacji kompresora HomeFill II należy wypełnić poniższą listę kontrolną: ❑...
  • Seite 221 CZĘŚĆ 2—USTAWIENIA WSTĘPNE Transport kompresora UWAGA: Informacje dotyczące tej procedury przedstawiono na RYSUNEK 2.1. OSTRZEŻENIE NIE WOLNO transportować kompresora z podłączoną lub zamocowaną butlą z tlenem, gdyż może to być przyczyną kalectwa lub uszkodzeń. PRZESTROGA W czasie transportu kompresora należy uważać, aby nie uderzyć...
  • Seite 222 CZĘŚĆ 2—USTAWIENIA WSTĘPNE 1. Upewnij się, że kompresor leży na twardej, płaskiej powierzchni, takiej jak blat stołu lub półka. 2. Upewnij się, że wyłącznik zasilania kompresora ustawiony jest w pozycji Off/Wył (O). 3. Podłącz przewód zasilania do złącza zasilania znajdującego się na tylnej powierzchni kompresora. 4.
  • Seite 223 CZĘŚĆ 2—USTAWIENIA WSTĘPNE 3. Pozostałą część węża łączącego należy zwinąć i zabezpieczyć na tylnej powierzchni koncentratora za pomocą odpowiednich pasów. INFORMACJE INFORMACJE SZCZEGÓŁOWE „A” SZCZEGÓŁOWE „B” Włóż koniec węża Łączący Kompresor łączącego do złącza Wąż napływu/odpływu KONCENTRATOR Zasilanie WIDOK Z GÓRY Złącze napływu Przewód Złącze odpływu...
  • Seite 224: Część 3-Lista Kontrolna Oraz Kontrola Butli

    CZĘŚĆ 3—LISTA KONTROLNA ORAZ KONTROLA BUTLI CZĘŚĆ 3—LISTA KONTROLNA ORAZ KONTROLA BUTLI Lista kontrolna eksploatacji kompresora Poniższą listę należy wypełnić za każdym razem, gdy używa się kompresora HomeFill II do napełniania butli: ❑ Upewnij się, że koncentrator był włączony przez co najmniej trzydzieści minut.
  • Seite 225 CZĘŚĆ 3—LISTA KONTROLNA ORAZ KONTROLA BUTLI RYSUNEK 3.1 Kontrola wstępnego napełnienia butli Kompresor HomeFill Part No 1145804 ®...
  • Seite 226 CZĘŚĆ 3—LISTA KONTROLNA ORAZ KONTROLA BUTLI Data przeprowadzenia próby hydrostatycznej Butle aluminiowe MUSZĄ być testowane co pięć lat. OSTRZEŻENIE NIE NALEŻY napełniać butli, które nie były przetestowane w ciągu ostatnich pięciu lat. W przeciwnym przypadku może dojść do poważnych obrażeń ciała użytkownika. W sprawie wymiany butli należy skontaktować...
  • Seite 227 CZĘŚĆ 3—LISTA KONTROLNA ORAZ KONTROLA BUTLI 3. Skontroluj zespół cylindra/regulatora pod kątem następujących czynników i wymień w przypadku ich obecności: • Zanieczyszczenia, olej lub smar • Widoczne oznaki uszkodzeń • Oznaki korozji wewnątrz zaworu • Oznaki działania nadmiernej temperatury lub uszkodzenia wskutek działania płomieni Kompresor HomeFill Part No 1145804...
  • Seite 228: Część 4-Eksploatacja Kompresora

    CZĘŚĆ 4—EKSPLOATACJA KOMPRESORA CZĘŚĆ 4—EKSPLOATACJA KOMPRESORA Podłączanie/odłączanie butli do/od kompresora Podłączanie butli do kompresora OSTRZEŻENIE Do podłączania/odłączania butli do/od kompresora NIGDY nie należy używać jakichkolwiek narzędzi. W przeciwnym przypadku może dojść do ciężkich obrażeń ciała użytkownika i/lub do uszkodzenia sprzętu. NIE WOLNO upuszczać...
  • Seite 229 CZĘŚĆ 4—EKSPLOATACJA KOMPRESORA PRZESTROGA NIE WOLNO podłączać złącza wylotowego (kaniuli) do urządzenia HomeFill II; w przeciwnym przypadku butla Conserving Cylinder będzie działać nieprawidłowo. 4. Aby zresetować łącznik należy szybko wcisnąć W DÓŁ pierścień zewnętrzny (osłona) złącza portu napełniania, do momentu pojawienia się ZIELONYCH kropek (RYSUNEK 4.1).
  • Seite 230 CZĘŚĆ 4—EKSPLOATACJA KOMPRESORA 8. Pociągnij KU GÓRZE pierścień zewnętrzny (osłonę) złącza portu napełniania, jednocześnie wciskając KU DOŁOWI zestaw butli/regulatora w celu połączenia portu napełniania do złącza portu napełniania (RYSUNEK 4.2). UWAGA: Butla jest połączona prawidłowo, gdy było słychać „kliknięcie”. Kompresor Zestaw butla/regulator Port napełniania...
  • Seite 231 CZĘŚĆ 4—EKSPLOATACJA KOMPRESORA Odłączanie butli od kompresora OSTRZEŻENIE Do podłączania/odłączania butli do/od kompresora NIGDY nie należy używać jakichkolwiek narzędzi. W przeciwnym przypadku może dojść do ciężkich obrażeń ciała użytkownika i/lub do uszkodzenia sprzętu. UWAGA: Informacje dotyczące tej procedury przedstawiono RYSUNEK 4.3 na RYSUNEK 4.4 na stronie 232. 1.
  • Seite 232 CZĘŚĆ 4—EKSPLOATACJA KOMPRESORA 5. W przypadku, gdy port napełniania butli jest odłączony od złącza portu napełniania, zwolnij zewnętrzny pierścień (osłonę) złącza portu napełniania i wyjmij oburącz butlę ze stelaża kompresora. OSTRZEŻENIE Osłona portu napełniania na złączu portu napełniania oraz na porcie napełniania butli MUSI być wymieniona po zakończeniu napełniania, gdy butla jest nie używana.
  • Seite 233: Włączanie Kompresora

    CZĘŚĆ 4—EKSPLOATACJA KOMPRESORA Włączanie kompresora UWAGA: Informacje dotyczące tej procedury przedstawiono na RYSUNEK 4.5 na stronie 234. 1. Upewnij się, że koncentrator jest włączony. Zob. podręcznik użytkownika koncentratora. PRZESTROGA Przepływu z koncentratora do pacjenta NIE MOŻE przekraczać 2,5 l/min dla modeli Platinum 5 i 5 l/min. dla modeli Platinum 9.
  • Seite 234 CZĘŚĆ 4—EKSPLOATACJA KOMPRESORA napełniania butli na stronie 239 jeśli lampka nie zgaśnie w ciągu 10 minut. UWAGA: Patrz RozwiĄzywanie problemów / czas napełniania butli na stronie 239 w przypadku uruchomienia lampki alarmu (CZERWONA) oraz alarmu dźwiękowego. 6. Zdemontuj pełną butlę. Patrz Odłączanie butli od kompresora na stronie 231.
  • Seite 235: Ustawienie Gałki Przepływu Na Zalecane Wartości Parametrów

    CZĘŚĆ 4—EKSPLOATACJA KOMPRESORA Ustawienie gałki przepływu na zalecane wartości parametrów UWAGA: Informacje dotyczące tej procedury przedstawiono na RYSUNEK 4.6. 1. Podłącz kaniulę donosową do zaworu odpływowego butli. 2. Obróć pokrętło przepływu na wartość (l/min) zalecaną przez lekarza lub terapeutę. OSTRZEŻENIE Zmiana ustawienia przepływu (l/min) powoduje zmianę...
  • Seite 236 Kompresor IOH200AW może być stosowany do napełniania przenośnych butli, przeznaczonych do stosowania przez pacjentów w warunkach ambulatoryjnych. Przenośne butle dostarczone przez firmę Invacare wyposażone są w system złączy do napełniania kompatybilnych wyłącznie z oprzyrządowaniem kompresora IOH200AW. Butla z gazem zawiera ponadto zintegrowany regulator przepływu ze stałymi, możliwymi do wybrania, ustawieniami.
  • Seite 237: Część 5-Lampki Wskażnikowe

    CZĘŚĆ 5—LAMPKI WSKAŻNIKOWE CZĘŚĆ 5—LAMPKI WSKAŻNIKOWE LAMPKI STAN DZIAŁANIE WSKAŻNIKOWE W KOMPRESORA KOLORZE CZERWONYM Brak Kompresor jest Jeśli koncentrator jest wyłączony. włączony, O przepływa w kierunku użytkownika. Obniżony poziom O Kompresor jest Proces napełniania włączony i nagrzewa butli jeszcze się nie ŻÓŁTA się...
  • Seite 238 CZĘŚĆ 5—LAMPKI WSKAŻNIKOWE LAMPKI STAN DZIAŁANIE WSKAŻNIKOWE W KOMPRESORA KOLORZE CZERWONYM Pełny - ZIELONA Kompresor jest Proces napełniania włączony. butli zatrzymuje się Zakończono Nie można napełnić napełnianie butli kolejnej (butla jest pełna) – butli, dopóki należy zdemontować nie wyłączy się i butlę...
  • Seite 239: Część 6-Rozwiązywanie Problemów / Czas

    5. Jeśli postępowanie opisane w ETAPACH 1-4 nie spowodowało zaświecenia lampek kontrolnych należy skontaktować się z firmą dostarczającą urządzenie do domu lub z firmą Invacare, w celu uzyskania informacji o naprawie. Dioda On/Wł. świeci się na 1. Sprawdź wskaźnik, czy nie wskazuje na to, że CZERWONO butla jest pełna.
  • Seite 240 (ŻÓŁTA lampka) oraz ponownie do ETAPU 2. napełniania (ZIELONA 2. Koncentrator może wymagać naprawy. Należy lampka) skontaktować się z firmą dostarczającą urządzenie do domu lub z firmą Invacare. Lampka obniżonego poziomu O (ŻÓŁTA) zapala się i gaśnie Lampka obniżonego 1.Upewnij się, że koncentrator się rozgrzał, przez poziomu O co najmniej 20 minut.
  • Seite 241 Invacare. Kompresor po włączeniu 1. Należy skontaktować się z firmą dostarczającą pracuje zbyt głośno. urządzenie do domu lub z firmą Invacare w sprawie naprawy. Syczenie wydobywające 1. Ustaw przełącznik przepływu w pozycji Off/Wył. się z regulatora, w 2.
  • Seite 242: Napełniania Butli

    CZĘŚĆ 6—ROZWIĄZYWANIE PROBLEMÓW / CZAS Czas napełniania butli Czas Prędkość przepływu z koncentratora do napełniani pacjenta: a butlii (Platinum 5 - do 2,5 l/min.; Platinum 9 - do 5 l/min.) *HF2PC9 *HF2PCL4 *HF2PCL6 HF2PCE8 NORMALN 2 godz i 1 godz i 2 godz i 20 min 60 min...
  • Seite 243: Część 7-Konserwacja

    CZĘŚĆ 7—KONSERWACJA CZĘŚĆ 7—KONSERWACJA Czyszczenie filtra kompresora OSTRZEŻENIE Przed rozpoczęciem czyszczenia należy ustawić wyłącznik zasilania w pozycji Off/wył. (O) i odłączyć urządzenie od źródła zasilania. NIE WOLNO uruchamiać kompresora bez zainstalowanego filtra. PRZESTROGA NIE WOLNO odłączać urządzenia poprzez pociąganie za przewód.
  • Seite 244: Obudowa

    CZĘŚĆ 7—KONSERWACJA Obudowa OSTRZEŻENIE Przed rozpoczęciem czyszczenia należy ustawić wyłącznik zasilania w pozycji Off/wył. (O) i odłączyć urządzenie od źródła zasilania. Aby zapobiec porażeniu prądem elektrycznym, NIE WOLNO zdejmować obudowy. 1. Obudowę należy czyścić łagodnym środkiem czyszczącym i miękką szmatką lub gąbką (niepowodującą zarysowań).
  • Seite 245 CZĘŚĆ 7—KONSERWACJA Kompresor HomeFill Part No 1145804 ®...
  • Seite 246: Informacje Dotyczące Obsługi Klienta Igwarancji

    Dublin – Ireland • Tel: (353) 1 810 7084 • Fax: (353) 1 810 7085 • ireland@invacare.com • www.invacare.ie Italia: Invacare Mecc San s.r.l., Via dei Pini 62, I-36016 Thiene (VI) • Tel: (39) 0445 38 00 59 • Fax: (39) 0445 38 00 34 • italia@invacare.com • www.invacare.it Nederland: Invacare BV, Celsiusstraat 46, NL-6716 BZ Ede •...
  • Seite 247 INFORMACJE DOTYCZĄCE OBSŁUGI KLIENTA I NOTES Kompresor HomeFill Part No 1145804 ®...
  • Seite 248 Invacare. Trademarks EU Representative are identified by ™ and ®. All trademarks Invacare Deutschland are owned by or licensed to Invacare Gmbh Corporation or its subsidiaries unless Kleiststraße 49, D-32457 otherwise noted. Porta Westfalica...

Inhaltsverzeichnis