EKOM DK50 2V/50 Handbuch
Vorschau ausblenden
Andere Handbücher für DK50 2V/50:
- Benutzerhandbuch (352 Seiten) ,
- Anleitung zur installation, bedienung und wartung (92 Seiten) ,
- Benutzerhandbuch (164 Seiten)
Inhaltsverzeichnis
Werbung
Verfügbare Sprachen
Verfügbare Sprachen
Quicklinks
Werbung
Kapitel
Inhaltsverzeichnis
Fehlerbehebung

Verwandte Anleitungen für EKOM DK50 2V/50


Inhaltszusammenfassung für EKOM DK50 2V/50
-
Seite 2: Inhaltsverzeichnis
DK50 2V/50 DK50 2x2V/110 CONTENTS IMPORTANT INFORMATION ......................... 2 CONFORMITY WITH THE REQUIREMENTS OF EUROPEAN UNION DIRECTIVES .... 2 INTENDED USE ......................... 2 CONTRAINDICATIONS AND SIDE-EFFECTS ................. 2 WARNINGS AND SYMBOLS ..................... 2 ... -
Seite 3: Important Information
DK50 2V/50 DK50 2x2 2V/110 MPORTANT T INFORMA ATION CONFOR RMITY WIT H THE REQ QUIREMEN NTS OF EU ROPEAN U UNION DIR ECTIVES his product conforms t to the requ irements of f the Medic cal Device Directive (9 93/42/EEC) ), and is fe for the in... -
Seite 4: Warnings
DK50 2V/50 DK50 2x2V/110 Terminal for ground connection Handling mark on package – FRAGILE Handling mark on package – THIS SIDE UP Handling mark on package – KEEP DRY Handling mark on package – TEMPERATURE LIMITATIONS Handling mark on package – LIMITED STACKING Mark on package –... -
Seite 5: General Safety Warnings
DK50 2V/50 DK50 2x2V/110 Translation of the user manual is performed in accordance with the best available knowledge. The Slovak version is to be used in the event of any uncertainties. This user manual is the original instructions. Translation is performed in accordance with the best available knowledge. -
Seite 6: Storage And Transport
DK50 2V/50 DK50 2x2V/11 ORAGE AN ND TRANS SPORT The com mpressor is shipped fro om the facto ory in a tran nsport pack aging. This protects th e device fro damage e during tran nsport. The ori iginal com mpressor packaging must be... -
Seite 7: Technical Data
DK50 2V/50 DK50 2x2V/110 TECHNICAL DATA Compressors are designed for dry and ventilated indoor environments with the following conditions: Temperature : +5°C to +40°C, Max. relative humidity.: 70%, Max. absolute humidity. 15 g/m Tab.1 DK50 DK50 DK50 DK50 6 – 8 bar... - Seite 8 DK50 2V/50 DK50 2x2V/110 Tab. 2 DK50 DK50 8 – 10 bar 2V/50 2V/50S Nominal voltage / V / Hz 230/50 230/50 frequency (*) Performance Lit.min at 8 bar Working pressure (**) 8.0 – 10.0 8.0 – 10.0 Performance with KJF-2 at 8 bar Max.
- Seite 9 DK50 2V/50 DK50 2x2V/110 Tab.3 DK50 DK50 DK50 DK50 5 – 7 bar 2x2V/110 2x2V/110S 2x2V/110/M 2x2V/110S/M Nominal voltage / 230/50 230/60 230/50 230/60 230/50 230/60 230/50 230/60 V / Hz frequency (*) 3x400/50 115/60 3x400/50 115/60 3x400/50 115/60 3x400/50...
- Seite 10 DK50 2V/50 DK50 2x2V/110 Tab. 4 DK50 DK50 DK50 DK50 6 – 8 bar 2x2V/110 2x2V/110S 2x2V/110/M 2x2V/110S/M Nominal voltage / 230/50 230/60 230/50 230/60 230/50 230/60 230/50 230/60 V / Hz frequency (*) 3x400/50 115/60 3x400/50 115/60 3x400/50 115/60...
- Seite 11 DK50 2V/50 DK50 2x2V/110 Tab. 5 DK50 DK50 DK50 DK50 8 – 10 bar 2x2V/110 2x2V/110S 2x2V/110/M 2x2V/110S/M Nominal voltage / 230/50 230/60 230/50 230/60 230/50 230/60 230/50 230/60 V / Hz frequency (*) 3x400/50 115/60 3x400/50 115/60 3x400/50 115/60...
- Seite 12 DK50 2V/50 DK50 2x2V/110 7.1. Free air delivery (FAD) correction due to elevation FAD correction table Elevation [mamsl] 0 - 1500 1501 - 2500 2501 - 3500 3501 - 4500 FAD [l/min] FAD x 1 FAD x 0.8 FAD x 0.71 FAD x 0.60...
- Seite 13 DK50 2V/50 DK50 2x2V/110 Guidance and manufacturer's declaration - electromagnetic immunity Pursuant to IEC 60601-1-2:2014 - Medical electrical equipment - Part 1-2: General requirements for basic safety and essential performance - Collateral Standard:Electromagnetic disturbances The equipment is intended for use in the electromagnetic environment specified below. The customer or the user of the equipment should assure that it is used in such an environment.
- Seite 14 DK50 2V/50 DK50 2x2V/110 Guidance and manufacturer's declaration - electromagnetic immunity Pursuant to IEC 60601-1-2:2014 - Medical electrical equipment - Part 1-2: General requirements for basic safety and essential performance - Collateral Standard:Electromagnetic disturbances The equipment is intended for use in the electromagnetic environment specified below. The customer or the user of the equipment should assure that it is used in such an environment.
-
Seite 15: Product Description
S110 Used to redu uce the leve el of noise g generated b by the comp pressor DK50 2V/50 DK50 2 2V/50S 50 2x2V/11 DK50 2x x2V/110S P-DK50 2V 50, , 2x2V 110-4_ _07-2019-MD... -
Seite 16: Accessories
DK50 2V/50 DK50 2x2V/110 8.2. Accessories Accessoriesnot included in the standard order must be ordered separately! 8.2.1. Automatic condensate drain The automatic condensate drain (AOK) automatically drains condensate from the compressor’s air tank based on a pre-set time interval. The condensate drain (AOK) is a suitable accessory for compressor models without dryers. -
Seite 17: Product Functionality
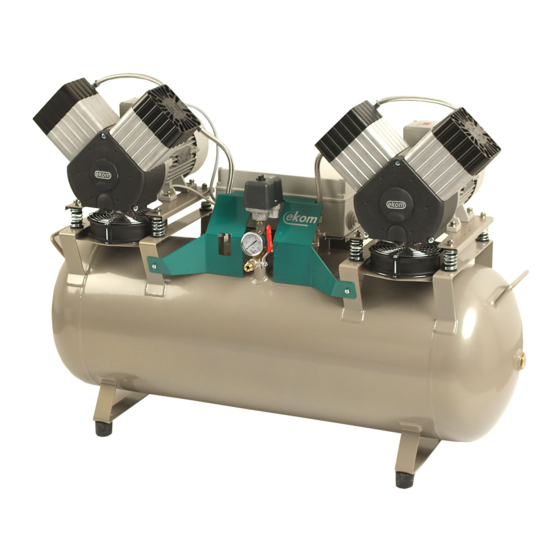
Compressed, oil-free filtered air is stored in the air tank ready for use. Condensate must be drained from the air tank at regular intervals (see Chapter 19.1). Compressor with membrane dryer(DK50 2V/50/M)(Fig. 1) The compressor aggregate (1) draws in air through an inlet filter (8) and compresses it, feeding it to the cooler (14) through the filter (15) and the check valve (3) into the dryer (9), and feeds the clean and dry air into the air tank (2). - Seite 18 DK50 2V/50 DK50 2x2V/110 The air pump (1) draws in atmospheric air through an inlet filter (8) and compresses it, feeding it through the coolers (14) and the filter (15) into the dryer (9) and the dry, clean air is then fed through the non-return valve (3) into the air tank (2).
- Seite 19 DK50 2V/50 DK50 2x2V/110 DK50 2V/50/M DK50 2x2V/110/M Fig. 2 - Compressor NP-DK50 2V 50, 2x2V 110-4_07-2019-MD A -18- 07/2019...
- Seite 20 DK50 2V/50 DK50 2x2V/110 DK50 2V/50 DK50 2x2V/110 Fig. 3 - Cabinet 07/2019 -19- NP-DK50 2V 50, 2x2V 110-4_07-2019-MD A...
- Seite 21 DK50 2V/50 DK50 2x2V/110 3A - DK50 2V/50S NP-DK50 2V 50, 2x2V 110-4_07-2019-MD A -20- 07/2019...
- Seite 22 DK50 2V/50 DK50 2x2V/110 3B - DK50 2x2V/110S 07/2019 -21- NP-DK50 2V 50, 2x2V 110-4_07-2019-MD A...
-
Seite 23: Pneumatic Diagram
DK50 2V/50 DK50 2x2V/110 10. PNEUMATIC DIAGRAM DK50 2V/50/M DK50 2V/50 NP-DK50 2V 50, 2x2V 110-4_07-2019-MD A -22- 07/2019... - Seite 24 DK50 2V/50 DK50 2x2V/110 DK50 2x2V/110/M 230 V DK50 2x2V/110/M 400 V 07/2019 -23- NP-DK50 2V 50, 2x2V 110-4_07-2019-MD A...
- Seite 25 DK50 2V/50 DK50 2x2V/110 DK50 2x2V/110 230 V DK50 2x2V/110 400 V Legend for compressed air diagram 1. Inlet filter 10. Air tank 2. Motor 11. Drain valve 3. Fan 12. Cooler 4. Relief valve 13. Coalescence filter 5. Noise silencer 14.
-
Seite 26: Installation
DK50 2V/50 DK50 2x2V/11 INSTAL LLATION 11. CO ONDITIONS S FOR USE Comp pressors ma ay only be i nstalled an d operating g in dry, we ll-ventilated d and clean environme with e environmen ntal parame eters that m meet the re equirements s specified... -
Seite 27: Placement Of The Compressor
DK50 2V/50 DK50 2x2V/110 12. PLACEMENT OF THE COMPRESSOR The device shall only be installed by a qualified professional. Unwrap the compressor from the packaging. 12.1. Handling and releasing the compressor Position the compressor at the site of future operation (Fig. 4) Fig. - Seite 28 DK50 2V/50 DK50 2x2V/110 Remove the transport securing elements/bolts from the air pumps. (Fig. 5) Remove all devices used to secure the air pumps once the compressor set has been installed and mounted at the site of final installation! Fig.
-
Seite 29: Placement Of The Compressor In The Cabinet
Remove the connecting strip (33) in front of the cabinet. Before placing the compressor without the dryer (DK50 2V/50) into the cabinet, please follow Chapter 12.3 to add sound insulation foam into the cabinet. Insert the compressor into the cabinet using the positioning truck (35), place the connecting strip in front of the cabinet and adjust the position of the compressor so that the two “V”... - Seite 30 DK50 2V/50 DK50 2x2V/110 12.3. Adding sound-insulating material into the cabinet(DK50 2V/50) A component from the sound-insulating material is to be installed in the opening of the cabinet of the compressor without a dryer. This component is provided in the basic equipment delivered with the product.
-
Seite 31: Pneumatic Connections
DK50 2V/50 DK50 2x2V/110 13. PNEUMATIC CONNECTIONS 13.1. Connecting to the compressed air outlet(Fig. 7) Route the pressure line from the compressed air outlet (1) on the compressor to the device. Route the pressure hose through the opening in the rear wall of the cabinet for cabinet-mounted compressors. -
Seite 32: E Lectrical Connections
DK50 2V/50 DK50 2x2V/11 14. EL ECTRICAL L CONNECT TIONS The pro oduct is equ uipped with a grounded d plug. Ensure full comp pliance wit h all local l electrical l codes. T The mains voltage a frequen cy must co omply with the data s stated on th... -
Seite 33: Connection Diagram
DK50 2V/50 DK50 2x2V/110 15. CONNECTION DIAGRAM DK50 2V/50 6 - 8 bar, 8 - 10 bar 1/N/PE ~ 230V/50Hz, 230V/60Hz ELECTRIC OBJECT OF 1st. CAT. DK50 2V/50/M 6 - 8 bar, 8 - 10 bar 1/N/PE ~ 230V/50Hz, 230V/60Hz ELECTRIC OBJECT OF 1st. - Seite 34 DK50 2V/50 DK50 2x2V/110 DK50 2V/50 6 - 8 bar 1/N/PE ~ 400V 50 Hz MAINS TN-S [TN-C-S] ELECTRIC OBJECT OF 1st. CAT. DK50 2x2V/110 5 - 7 bar, 6 - 8 bar, 8 - 10 bar 1/N/PE ~ 230V/50Hz, 230V/60Hz ELECTRIC OBJECT OF 1st.
- Seite 35 DK50 2V/50 DK50 2x2V/110 DK50 2x2V/110/M 5 - 7 bar, 6 - 8 bar, 8 - 10 bar 1/N/PE ~ 230V/50Hz, 230V/60Hz ELECTRIC OBJECT OF 1st. CAT. DK50 2x2V/110 5 - 7 bar, 6 - 8 bar, 8 - 10 bar...
- Seite 36 DK50 2V/50 DK50 2x2V/110 DK50 2x2V/110/M 5 - 7 bar, 6 - 8 bar, 8 - 10 bar 1/N/PE ~ 400V 50 Hz MAINS TN-S [TN-C-S] ELECTRIC OBJECT OF 1st. CAT. Skrinka kompresora 1/N/PE ~ 230V/50Hz, 230V/60Hz 115V/60Hz ELECTRIC OBJECT OF 1st. CAT.
-
Seite 37: Operation
DK50 2V/50 DK50 2x2V/110 Legend for electrical diagram M1,M2 Compressor motor Pressure switch E1,E2 Compressor fan Terminal strip Dryer fan Condensate drain valve M10,M20 Relief valve Hour meter Temperature switch Switch E10,E11 Cabinet fan Timer relay Connector F1,2 Breaker Socket... -
Seite 38: Switching The Compressor On
DK50 2V/50 DK50 2x2V/110 The compressor is not equipped with a backup power supply. 17. SWITCHING THE COMPRESSOR ON (Fig. 13) Start the compressor (without a cabinet) at the pressure switch (1) by turning the switch (2) to position “I.” This starts the compressor and fills the tank to the switching off pressure, which then shuts off the compressor. -
Seite 39: Maintenance
DK50 2V/50 DK50 2x2V/110 MAINTENANCE 19. DEVICE MAINTENANCE Warning! The operator shall ensure completion of repeated testing of the device at least once every 24 months (EN 62353) or at intervals defined by applicable national legal regulations. A record of these test results shall be completed (e.g. per EN 62353, Annex G) together with the measurement methods. -
Seite 40: Maintenance Intervals
DK50 2V/50 DK50 2x2V/110 19.1. Maintenance intervals user Qualifiedprofessional 07/2019 -39- NP-DK50 2V 50, 2x2V 110-4_07-2019-MD A... -
Seite 41: Operational Checks
DK50 2V/50 DK50 2x2V/110 19.2. Operational checks Check air pump condition – the air pumps should be operating normally without excessive vibration or noise. Troubleshoot any problem or call in service personnel if trouble is detected Visually inspect fan operation – the fans must be operating when the air pumps are running. - Seite 42 DK50 2V/50 DK50 2x2V/11 19.5. Conden nsate drain Compre essors (Fig g. 14) Draining g the con densate fr rom the p ressure ve essel is recomm mended du ring regula ar operatio n. Switch off the compre ssor at th e mains.
- Seite 43 DK50 2V/50 DK50 2x2V/110 19.7. Replacing the inlet filter and pre-filter (Fig. 17) The inlet filter is located inside the compressor crankcase cover. Inlet filter replacement: Pull out the rubber plug by hand (2). Remove the used filter (1).
- Seite 44 DK50 2V/50 DK50 2x2V/11 19.10 0. Procedu ure for con nnecting a c compresso or disconne ected from m the cabine Prior to o any ma aintenance or repai r work, s switch off the com pressor a disconn nect it from m the mains s (pull out t the mains p...
- Seite 45 DK50 2V/50 DK50 2x2 2V/110 K50 2x2V/1 230V K50 2V/50, DK50 2x2V V/110 400V P-DK50 2V 50, , 2x2V 110-4_ _07-2019-MD 07/2019...
- Seite 46 DK50 2V/50 DK50 2x2V/11 Fig. 19 Installin ng the jum per (see Fi ig. 19) : Disco onnect the product from m the mains s by pulling the plug ou ut of the soc cket. Rem move the cov ver on the e electrical pa anel (on the...
- Seite 47 DK50 2V/50 DK50 2x2 2V/110 ninstalling the jumpe r (see Fig. 20): Disconnec ct the produc ct from the mains by p ulling the p lug out of th he socket. Remove th he cover on the electric cal panel (o n the comp pressor).
- Seite 48 DK50 2V/50 DK50 2x2V/11 DK50 2 2x2V/110 230V DK50 2 2V/50, DK50 0 2x2V/110 400V 07/2019 -47- N N P-DK50 2V 5 5 0, 2x2V 110- - 4_07-2019-MD A...
- Seite 49 DK50 2V/50 DK50 2x2 2V/110 Fig. 20 ompressor with cabine et - when o operating in n the cabin net, there M MUST NOT T be an el lectrical onnection(Fi ig.20). ote : A jump per which is not insta alled into th he termina al strip sho...
-
Seite 50: Troubleshooting
DK50 2V/50 DK50 2x2V/110 TROUBLESHOOTING CAUTION! BEFORE PROCEEDING, DEPRESSURIZE THE AIR TANK TO ZERO AND DISCONNECT THE DEVICE FROM THE MAINS. The equipment, in particular the cooling fan, must be kept clean to ensure the long-term efficiency of the cooler – the cooling fins must be cleaned occasionally to remove any dust. -
Seite 51: Repair Service
DK50 2V/50 DK50 2x2V/110 Compressor is Damaged piston bearing, piston rod, Replace damaged bearing noisy (knocking, motor bearing metal noises) Loose or cracked spring Replace damaged spring Dryer doesn't dry Cooling fan not working Replace the fan (condensed water in... - Seite 52 DK50 2V/50 DK50 2x2V/110 INHALTSVERZEICHNIS WICHTIGE INFORMATIONEN ......................52 ÜBEREINSTIMMUNG MIT DEN ANFORDERUNGEN DER EU-RICHTLINIEN ..... 52 BESTIMMUNGSGEMÄßE VERWENDUNG ................52 GEGENANZEIGEN UND NEBENWIRKUNGEN ..............52 WARNHINWEISE UND -SYMBOLE ..................52 ...
-
Seite 53: N Anford Derungenn Der Eu
DK50 2V/50 DK50 2x2 2V/110 ICHTIGE IN NFORMATI ONEN ÜBEREI NSTIMMUN NG MIT DE N ANFORD DERUNGEN N DER EU- RICHTLINI eses Produ ukt erfüllt d die Anforde erungen de er Medizinp produktricht linie (93/42 2/EEG) und d ist bei estimmungs sgemäßer V Verwendung... -
Seite 54: Warnhinweise
DK50 2V/50 DK50 2x2V/110 Erdungsanschluss Klemme für Erdungsanschluss Handhabungshinweis auf Verpackung – ZERBRECHLICH Handhabungshinweis auf Verpackung – HIER OBEN Handhabungshinweis auf Verpackung – VOR NÄSSE SCHÜTZEN Handhabungshinweis auf Verpackung – ZULÄSSIGE TEMPERATURBEREICHE Handhabungshinweis auf Verpackung – BESCHRÄNKT STAPELBAR Hinweis auf Verpackung – RECYCELBARES MATERIAL... -
Seite 55: Allgemeine Sicherheitswarnungen
DK50 2V/50 DK50 2x2V/110 Das Benutzerhandbuch entspricht zum Zeitpunkt seines Drucks den Produktmodellen und deren Erfüllung der geltenden Sicherheits- und Technikstandards. Der Hersteller behält alle Rechte an seinen Konfigurationen, Verfahren und Namen. Die Übersetzung des Benutzerhandbuchs erfolgte nach bestem Wissen. Bei Unsicherheiten gilt die slowakische Version. -
Seite 56: Lagerung Und Transport
DK50 2V/50 DK50 2x2V/110 LAGERUNG UND TRANSPORT Der Kompressor wird ab Werk in einer Transportverpackung versendet. Diese schützt das Gerät während des Transports vor Schäden. Die Originalverpackung des Kompressors muss bei jedem Transport verwendet werden. Transportieren Sie den Kompressor in aufrechter Position und stets mit Transportsicherung. -
Seite 57: Technische Daten
DK50 2V/50 DK50 2x2V/110 TECHNISCHE DATEN Die Kompressoren wurden für trockene und belüftete Innenräume mit den folgenden Umgebungsbedingungen entwickelt: Temperatur: +5°C bis +40°C Max. relative Feuchtigkeit: 70 % Max. absolute Feuchtigkeit. 15 g/m Tab.1 DK50 DK50 DK50 DK50 6 – 8 bar... - Seite 58 DK50 2V/50 DK50 2x2V/110 Tab. 2 DK50 DK50 8 – 10 bar 2V/50 2V/50S Nennspannung / Frequenz V / Hz 230/50 230/50 Kapazität Lit.min bei 8 bar Arbeitsdruck (**) 8,0 – 10,0 8,0 – 10,0 Max. Strom Motorleistung Volumen Drucklufttank Lit.
- Seite 59 DK50 2V/50 DK50 2x2V/110 Tab.3 DK50 DK50 DK50 DK50 5 – 7 bar 2x2V/110 2x2V/110S 2x2V/110/M 2x2V/110S/M Nennspannung / 230/50 230/60 230/50 230/60 230/50 230/60 230/50 230/60 V / Hz Frequenz (*) 3x400/50 115/60 3x400/50 115/60 3x400/50 115/60 3x400/50 115/60 Kapazität bei 5 bar...
- Seite 60 DK50 2V/50 DK50 2x2V/110 Tab. 4 DK50 DK50 DK50 DK50 6 – 8 bar 2x2V/110 2x2V/110S 2x2V/110/M 2x2V/110S/M Nennspannung / 230/50 230/60 230/50 230/60 230/50 230/60 230/50 230/60 V / Hz Frequenz (*) 3x400/50 115/60 3x400/50 115/60 3x400/50 115/60 3x400/50 115/60 Kapazität...
- Seite 61 DK50 2V/50 DK50 2x2V/110 Tab. 5 DK50 DK50 DK50 DK50 8 – 10 bar 2x2V/110 2x2V/110S 2x2V/110/M 2x2V/110S/M Nennspannung / Frequenz 230/50 230/60 230/50 230/60 230/50 230/60 230/50 230/60 V / Hz 3x400/50 115/60 3x400/50 115/60 3x400/50 115/60 3x400/50 115/60 Kapazität...
-
Seite 62: Konformitätserklärung Für Elektromagnetische Verträglichkeit
DK50 2V/50 DK50 2x2V/110 7.1. Korrektur des Luftfördervolumens (FAD) unter Berücksichtigung der Höhe über dem Meeresspiegel FAD-Korrekturtabelle Höhe über dem Meeresspiegel 0 – 1500 1501 – 2500 2501 – 3500 3501 – 4500 in Metern [m ü. NHN] FAD [l/min]... - Seite 63 DK50 2V/50 DK50 2x2V/110 Anleitung und Herstellererklärung – elektromagnetische Immunität Gemäß IEC 60601-1-2:2014 - Medizinische elektrische Geräte - Teil 1-2: Allgemeine Festlegungen für die Sicherheit einschließlich der wesentlichen Leistungsmerkmale – Ergänzungsnorm: Elektromagnetische Störgrößen - Anforderungen und Prüfungen Das Gerät ist für die Verwendung in der nachfolgend beschriebenen elektromagnetischen Umgebung bestimmt: Der Kunde oder Benutzer des Geräts sollte sicherstellen, dass sie in einer derartigen Umgebung...
- Seite 64 DK50 2V/50 DK50 2x2V/110 Anleitung und Herstellererklärung – elektromagnetische Immunität Gemäß IEC 60601-1-2:2014 - Medizinische elektrische Geräte - Teil 1-2: Allgemeine Festlegungen für die Sicherheit einschließlich der wesentlichen Leistungsmerkmale – Ergänzungsnorm: Elektromagnetische Störgrößen - Anforderungen und Prüfungen Das Gerät ist für die Verwendung in der nachfolgend beschriebenen elektromagnetischen Umgebung bestimmt: Der Kunde oder Benutzer des Geräts sollte sicherstellen, dass sie in einer derartigen Umgebung...
-
Seite 65: Produk Ktbeschr Reibung
Membr rantrockner in einem G Gehäuse chrank S11 fü ür die Minde erung der d urch den K ompressor verursachte en Geräusc DK50 2V/50 DK50 2 2V/50S 50 2x2V/11 DK50 2x x2V/110S P-DK50 2V 50, , 2x2V 110-4_ _07-2019-MD 07/2019... -
Seite 66: Druckreglersatz
DK50 2V/50 DK50 2x2V/110 8.2. Zubehör Zubehör, das nicht Teil der standardmäßigen Bestellung ist, muss separat bestellt werden. 8.2.1. Automatischer Kondensatablauf Der automatische Kondensatablauf (Automatic Condensate Drain; AOK) lässt das Kondensat automatisch und gemäß einem vorgegebenen Zeitintervall aus dem Kompressor-Luftbehälter ab. -
Seite 67: Kondensat- Und Filtereinheit
Das Kondensat muss in regelmäßigen Intervallen aus dem Druckluftbehälter abgelassen werden (siehe Kapitel 19.1). Kompressor mit Membrantrockner (DK50 2V/50/M) (Abb. 1) Das Kompressoraggregat (1) zieht Außenluft durch einen Ansaugfilter (8) ein und komprimiert sie. Dann wird die Luft zum Kühler (14) durch den Filter (15) und das Prüfventil (3) zum Trockner (9) gespeist, anschließend wird die trockene und saubere Luft in den Luftbehälter (2) eingespeist. - Seite 68 DK50 2V/50 DK50 2x2V/110 Kompressor mit Membrantrockner (DK50 2x2V/110/M) (Abb. 1) Das Kompressoraggregat (1) zieht Außenluft durch einen Ansaugfilter (8) ein und komprimiert sie. Dann wird die Luft durch den Kühler (14) und den Filter (15) in den Trockner (9) gespeist, anschließend wird die trockene, saubere Luft durch das Absperrventil (3) in den Luftbehälter (2)
- Seite 69 DK50 2V/50 DK50 2x2V/110 Abb. 1 - Kompressor mit Trockner DK50 2V/50/M DK50 2x2V/110/M NP-DK50 2V 50, 2x2V 110-4_07-2019-MD A -68- 07/2019...
- Seite 70 DK50 2V/50 DK50 2x2V/110 Abb. 2 - Kompressor DK50 2V/50 DK50 2x2V/110 07/2019 -69- NP-DK50 2V 50, 2x2V 110-4_07-2019-MD A...
- Seite 71 DK50 2V/50 DK50 2x2V/110 Abb.3 – Schrank 3A - DK50 2V/50S NP-DK50 2V 50, 2x2V 110-4_07-2019-MD A -70- 07/2019...
- Seite 72 DK50 2V/50 DK50 2x2V/110 3B - DK50 2x2V/110S 07/2019 -71- NP-DK50 2V 50, 2x2V 110-4_07-2019-MD A...
-
Seite 73: Druckluftplan
DK50 2V/50 DK50 2x2V/110 10. DRUCKLUFTPLAN DK50 2V/50/M DK50 2V/50 NP-DK50 2V 50, 2x2V 110-4_07-2019-MD A -72- 07/2019... - Seite 74 DK50 2V/50 DK50 2x2V/110 DK50 2x2V/110/M 230 V DK50 2x2V/110/M 400 V 07/2019 -73- NP-DK50 2V 50, 2x2V 110-4_07-2019-MD A...
- Seite 75 DK50 2V/50 DK50 2x2V/110 DK50 2x2V/110 230 V DK50 2x2V/110 400 V Legende für Druckluftplan 1. Ansaugfilter 10. Luftbehälter 2. Kompressor 11. Ablassventil 3. Lüfter 12. Kühler 4. Ablassventil 13. Koaleszenzfilter 5. Schalldämpfer 14. Membrantrockner 6. Rückschlagventil 15. Kondensatauffangflasche 7. Manometer 16.
-
Seite 76: Installation
DK50 2V/50 DK50 2x2V/110 INSTALLATION 11. EINSATZBEDINGUNGEN Kompressoren dürfen nur in trockenen, gut belüfteten und sauberen Umgebungen mit Umweltbedingungen verwendet werden, die die in Kapital 7, Technische Daten, definierten Anforderungen erfüllen. Der Kompressor muss so installiert werden, dass er für die Bedienung und Wartung jederzeit leicht zugänglich ist. -
Seite 77: Aufstellen Des Kompressors
DK50 2V/50 DK50 2x2V/110 12. AUFSTELLEN DES KOMPRESSORS Das Gerät darf nur von einem qualifizierten Fachmann installiert werden. Nehmen Sie den Kompressor aus seiner Verpackung. 12.1. Handhabung und Freigabe des Kompressors Stellen Sie den Kompressor am künftigen Einsatzort auf (Abb. 4). - Seite 78 DK50 2V/50 DK50 2x2V/110 Entfernen Sie die Transportstützen von den Aggregaten. (Abb. 5) Entfernen Sie alle für die Sicherung des Kompressoraggregats verwendeten Komponenten, nachdem das Kompressor-Set am endgültigen Einsatzort installiert und montiert wurde! Abb. 5 DK50 2V/50 DK50 2x2V/110...
-
Seite 79: Platzieren Des Kompressors Auf Dem Schrank
Kompressoreinbau Entfernen Sie die Anschlussleiste (33) vor dem Gehäuse. Bevor Sie den Kompressor ohne den Trockner (DK50 2V/50) in das Gehäuse einsetzen, befolgen Sie bitte Kapitel 12.3 für das Hinzufügen von Schallisolierungsschaum in das Gehäuse. Setzen Sie den Kompressor mithilfe des Positionierungsrollwagens (35) in das Gehäuse ein, platzieren Sie die Anschlussleiste vor dem Gehäuse und justieren Sie die Position des... -
Seite 80: Gehäuseeinbau Von Schallschutzmaterial(Dk50 2V/50)
DK50 2V/50 DK50 2x2V/110 12.3. Gehäuseeinbau von Schallschutzmaterial(DK50 2V/50) Ein Bauteil aus Schallschutzmaterial ist in die Gehäuseöffnung des Kompressors ohne Trockner einzubauen. Dieses Teil ist in der mit dem Produkt gelieferten Grundausstattung enthalten. 12.4. Ventil-Installation auf dem Kondensatablauf vom Schrank(DK50 2x2V/110) (Abb. -
Seite 81: Pneumatische Anschlüsse
DK50 2V/50 DK50 2x2V/110 13. PNEUMATISCHE ANSCHLÜSSE 13.1. Anschluss an den Druckluftausgang(Abb. 7) Führen Sie die Druckleitung vom Druckluftausgang (1) am Kompressor zum Gerät. Führen Sie den Druckschlauch bei Kompressoren mit Schrankmontage durch die Öffnung an der Rückwand des Schranks. -
Seite 82: Elektrische Anschlüsse
DK50 2V/50 DK50 2x2V/11 14. EL LEKTRISCH HE ANSCH HLÜSSE Das Pro odukt wird m mit einem N Netzkabel m mit Schutzko ontaktstecke ern geliefert Befolge n Sie un nbedingt a alle örtlic chen Vors schriften f für die E Elektrik. -
Seite 83: Anschlussdiagramm
DK50 2V/50 DK50 2x2V/110 15. ANSCHLUSSDIAGRAMM DK50 2V/50 6 - 8 bar, 8 - 10 bar 1/N/PE ~ 230V/50Hz, 230V/60Hz ELEKTRISCHES OBJEKT 1. KAT. DK50 2V/50/M 6 - 8 bar, 8 - 10 bar 1/N/PE ~ 230V/50Hz, 230V/60Hz ELEKTRISCHES OBJEKT 1. KAT. - Seite 84 DK50 2V/50 DK50 2x2V/110 DK50 2V/50 6 - 8 bar 1/N/PE ~ 400V 50 Hz NETZ TN-S [TN-C-S] ELEKTRISCHES OBJEKT 1. KAT DK50 2x2V/110 5 - 7 bar, 6 - 8 bar, 8 - 10 bar 1/N/PE ~ 230V/50Hz, 230V/60Hz ELEKTRISCHES OBJEKT 1.
- Seite 85 DK50 2V/50 DK50 2x2V/110 DK50 2x2V/110/M 5 - 7 bar, 6 - 8 bar, 8 - 10 bar 1/N/PE ~ 230V/50Hz, 230V/60Hz ELEKTRISCHES OBJEKT 1. KAT. DK50 2x2V/110 5 - 7 bar, 6 - 8 bar, 8 - 10 bar...
- Seite 86 DK50 2V/50 DK50 2x2V/110 DK50 2x2V/110/M 5 - 7 bar, 6 - 8 bar, 8 - 10 bar 1/N/PE ~ 400V 50 Hz NETZ TN-S [TN-C-S] ELEKTRISCHES OBJEKT 1. KAT. Kompressorschrank 1/N/PE ~ 230V/50Hz, 230V/60Hz 115V/60Hz ELEKTRISCHES OBJEKT 1. KAT.
-
Seite 87: Bedienung
DK50 2V/50 DK50 2x2V/110 Legende für Elektroschaltplan M1,M2 Kompressormotor Druckschalter E1,E2 Kompressorlüfter Anschlusskasten Trocknerlüfter Kondensatablassventil M10,M20 Ablassventil Stundenzähler Temperaturschalter Schalter E10,E11 Schranklüfter Timer-Relais Stecker F1,2 Sicherheitsschalter Buchse Q11,12 Schutz BEDIENUNG DAS GERÄT DARF NUR DURCH GESCHULTES PERSONAL BEDIENT WERDEN! DAS GERÄT BEI GEFAHR VOM STROMNETZ TRENNEN (NETZSTECKER ZIEHEN). -
Seite 88: Einschalten Des Kompressors
DK50 2V/50 DK50 2x2V/110 Der Kompressor besitzt keine Reserveenergiequelle. 17. EINSCHALTEN DES KOMPRESSORS (Abb. 13) Starten Sie den Kompressor (ohne Gehäuse) am Druckschalter (1), indem Sie den Schalter (2) auf Position „I“ stellen. Dadurch wird der Kompressor gestartet und der Tank bis zum Ausschaltdruck gefüllt, wodurch der Kompressor abgeschaltet wird. -
Seite 89: Wartung
DK50 2V/50 DK50 2x2V/110 WARTUNG 19. WARTUNG DES GERÄTS Warnung! Der Bediener muss mindestens alle 24 Monate (EN62353) oder in Intervallen, die durch geltende nationale Rechtsvorschriften vorgegeben sind, das Gerät regelmäßig testen. Die Testergebnisse sind aufzuzeichnen (z. B. gemäß EN 62353, Anhang G), darin sind auch die Messverfahren zu nennen. -
Seite 90: Wartungsintervalle
DK50 2V/50 DK50 2x2V/110 19.1. Wartungsintervalle Benutzer QualifizierteFachkraft 07/2019 -89- NP-DK50 2V 50, 2x2V 110-4_07-2019-MD A... -
Seite 91: Überprüfung Der Stromanschlüsse
DK50 2V/50 DK50 2x2V/110 19.2. Betriebsprüfungen Aggregatzustand prüfen – die Aggregate sollten normal, ohne übermäßige Schwingung oder Geräuschentwicklung laufen. Beheben Sie Probleme oder rufen Sie einen Servicemitarbeiter, falls ein Fehler erkannt wurde Sichtprüfung des Lüfterbetriebs – die Lüfter müssen anlaufen, wenn ein Aggregat in Betrieb ist. - Seite 92 DK50 2V/50 DK50 2x2V/11 19.5. Konden nsatablauf Kompre essoren (A Abb. 14) empfo ohlen, Konden nsat Druckbe ehälter während rmalen Betriebs abzulas ssen. Schal ten Sie den n Kompress sor am Stro omnetz aus. Se enken Sie d den Luftdru ck im Gerä...
-
Seite 93: Austausch Des Ansaugfilters Und Vorfilters
DK50 2V/50 DK50 2x2V/110 19.7. Austausch des Ansaugfilters und Vorfilters Der Ansaugfilter befindet sind im Kurbelwellengehäuse des Kompressors.(Abb. 17) Austausch des Ansaugfilters: Ziehen Sie den Gummistopfen mit der Hand heraus (2). Entfernen Sie den gebrauchten Filter (1). Setzen Sie einen neuen Filter ein und setzen Sie den Gummistopfen wieder ein. - Seite 94 DK50 2V/50 DK50 2x2V/11 19.10 0. Vorgehe ensweise schließen eines Scha altschrank getrennt Kompre essors Vor jeder Wartungs- oder Repa araturarbeit ist der Ko mpressor a auszuschalt ten und du Ziehen des s Netzsteck kers vom Str romnetz zu t trennen.
- Seite 95 DK50 2V/50 DK50 2x2 2V/110 K50 2x2V/1 230V K50 2V/50, DK50 2x2V V/110 400V P-DK50 2V 50, , 2x2V 110-4_ _07-2019-MD 07/2019...
- Seite 96 DK50 2V/50 DK50 2x2V/11 Abb. 1 Installie eren des Ju umpers (si iehe Abb. 1 19): Tren nen Sie das s Gerät vom m Stromnetz z, indem Si e den Steck ker aus der r Steckdose e ziehen. Entfe ernen Sie d ie Abdecku ng von der...
- Seite 97 DK50 2V/50 DK50 2x2 2V/110 einstalliere en des Jum mpers (siehe e Abb. 20): Trennen S Sie das Gerä ät vom Stro mnetz, inde em Sie den Stecker au us der Steck kdose ziehe Entfernen Sie die Abd deckung von n der Schal lttafel (des K...
- Seite 98 DK50 2V/50 DK50 2x2V/11 DK50 2 2x2V/110 230V DK50 2 2V/50, DK50 0 2x2V/110 400V 07/2019 -97- N N P-DK50 2V 5 5 0, 2x2V 110- - 4_07-2019-MD A...
- Seite 99 DK50 2V/50 DK50 2x2 2V/110 . 20 ompressor m mit Gehäus se – Beim B Betrieb in e einem Scha ltschrank D DARF KEIN NERLEI elek ktrischer nschluss vo rhanden se ein (Abb. 20 nweis: Ein Jumper, de er nicht auf der Klemm mleiste insta alliert wurde...
-
Seite 100: Fehlerbehebung
DK50 2V/50 DK50 2x2V/110 FEHLERBEHEBUNG VORSICHT! BEVOR SIE FORTFAHREN, VERRINGERN SIE DEN LUFTDRUCK IM DURCKLUFTBEHÄLTER AUF NULL UND TRENNEN SIE DAS GERÄT VOM STROMNETZ. Das Gerät, vor allem der Kühlventilator, muss sauber gehalten werden, damit die langfristige Funktion des Kühlers gewährleistet ist. Die Kühllamellen müssen gelegentlich vom Staub befreit werden. -
Seite 101: Informationen Zu Reparaturbetrieben
DK50 2V/50 DK50 2x2V/110 Niedriger Druck im Hoher Druckluftverbrauch des Druckluftbehälter Geräts, Undichtigkeit im (Kompressor läuft Druckluftverteilersystem, niedrige durchgängig) Geräteleistung Störung des Aggregats Störung des Trockners Betrieb des Luftaustritt innerhalb des Kontrolle des Kompressors über pneumatischen Verteilersystems Druckluftverteilungssystems – einen längeren... - Seite 102 DK50 2V/50 DK50 2x2V/110 TABLES DES MATIÈRES INFORMATIONS IMPORTANTES ..................... 102 CONFORMITE AUX EXIGENCES DES DIRECTIVES DE L’UNION EUROPEENNE ..102 UTILISATION PRÉVUE ......................102 CONTRE-INDICATIONS ET EFFETS SECONDAIRES ............102 AVERTISSEMENTS ET SYMBOLES ..................102 ...
-
Seite 103: Informations Importantes
DK50 2V/50 DK50 2x2 2V/110 FORMATIO ONS IMPOR RTANTES CONFOR RMITE AUX X EXIGENC CES DES D DIRECTIVES S DE L’UNI ION EUROP PEENNE e produit sa atisfait aux exigences de la direc ctive relativ ve aux disp ositifs méd icaux (93/4 42/CEE). -
Seite 104: Avertissements
DK50 2V/50 DK50 2x2V/110 Raccordement (Mise) à la terre Borne de connexion de mise à la terre Marque de manipulation sur l’emballage – FRAGILE Marque de manipulation sur l’emballage - HAUT Marque de manipulation sur l’emballage – TENIR AU SEC Marque de manipulation sur l’emballage –... -
Seite 105: Avertissements Généraux De Sécurité
DK50 2V/50 DK50 2x2V/110 Le présent manuel de l’utilisateur présente, au moment de son impression, la configuration du produit, ainsi que sa conformité avec les normes techniques et de sécurité applicables. Le fabricant se réserve tous les droits sur la protection de sa configuration, des méthodes d’installation et des dénominations utilisées. -
Seite 106: Stockage Et Transport
DK50 2V/50 DK50 2x2V/110 STOCKAGE ET TRANSPORT Le compresseur est expédié dans un emballage de transport depuis l’usine. Cela permet de protéger l’appareil durant le transport. L’emballage original du compresseur doit être utilisé pour le transport dès que cela est possible. Transportez le compresseur en position verticale et sécurisez-le à... -
Seite 107: Données Techniques
DK50 2V/50 DK50 2x2V/110 DONNÉES TECHNIQUES Les compresseurs sont conçus pour des environnements intérieurs secs et ventilés présentant les conditions suivantes : Température : + 5 °C à + 40 °C Humidité relative maximale : 70 % Humidité absolue maximale : 15 g/m Tab.1... - Seite 108 DK50 2V/50 DK50 2x2V/110 Tab. 2 DK50 DK50 8 – 10 bars 2V/50 2V/50S Tension nominale / V / Hz 230/50 230/50 Fréquence (*) Capacité à 8 bars Lit.min Pression de travail (**) 8,0 – 10,0 8,0 – 10,0 Courant maximal Puissance du moteur Volume du réservoir d’air...
- Seite 109 DK50 2V/50 DK50 2x2V/110 Tab.3 DK50 DK50 DK50 DK50 5 – 7 bars 2x2V/110 2x2V/110S 2x2V/110/M 2x2V/110S/M Tension nominale / 230/50 230/60 230/50 230/60 230/50 230/60 230/50 230/60 V / Hz Fréquence (*) 3x400/50 115/60 3x400/50 115/60 3x400/50 115/60 3x400/50 115/60 Capacité...
- Seite 110 DK50 2V/50 DK50 2x2V/110 Tab. 4 DK50 DK50 DK50 DK50 6 – 8 bars 2x2V/110 2x2V/110S 2x2V/110/M 2x2V/110S/M Tension nominale / 230/50 230/60 230/50 230/60 230/50 230/60 230/50 230/60 V / Hz Fréquence (*) 3x400/50 115/60 3x400/50 115/60 3x400/50 115/60...
- Seite 111 DK50 2V/50 DK50 2x2V/110 Tab. 5 DK50 DK50 DK50 DK50 8 – 10 bars 2x2V/110 2x2V/110S 2x2V/110/M 2x2V/110S/M Tension nominale / 230/50 230/60 230/50 230/60 230/50 230/60 230/50 230/60 V / Hz Fréquence (*) 3x400/50 115/60 3x400/50 115/60 3x400/50 115/60...
- Seite 112 DK50 2V/50 DK50 2x2V/110 7.1. Correction de la distribution d’air libre (FAD) en raison de l’altitude Tableau de correction FAD Altitude [mètres au-dessus 0 - 1500 1501 - 2500 2501 - 3500 3501 - 4500 du niveau de la mer]...
- Seite 113 DK50 2V/50 DK50 2x2V/110 Directives et déclaration du fabricant - immunité électromagnétique Conformément à IEC 60601-1-2:2014 - Appareils électromédicaux – Partie 1-2: Règles générales pour la sécurité de base et les performances essentielles – Norme collatérale: Perturbations électromagnétiques - Exigences et essais L'appareil est destiné...
- Seite 114 DK50 2V/50 DK50 2x2V/110 Directives et déclaration du fabricant - immunité électromagnétique Conformément à IEC 60601-1-2:2014 - Appareils électromédicaux – Partie 1-2: Règles générales pour la sécurité de base et les performances essentielles – Norme collatérale: Perturbations électromagnétiques - Exigences et essais L'appareil est destiné...
-
Seite 115: Description Du Produit
à mem mbrane dan s une armo oire rmoire S110 ert à réduire e le niveau sonore pro oduit par le c compresseu DK50 2V/50 DK50 2 2V/50S 50 2x2V/11 DK50 2x x2V/110S P-DK50 2V 50, , 2x2V 110-4_ _07-2019-MD 07/2019... -
Seite 116: Régulateur De Pression
DK50 2V/50 DK50 2x2V/110 8.2. Accessoires Les accessoires non inclus dans la commande standard doivent être commandés séparément ! 8.2.1. Purge automatique de condensat La purge automatique des condensats (AOK) purge automatiquement les condensats du réservoir d’air du compresseur selon un intervalle de temps prédéfini. La purge de condensat (AOK) est un accessoire indiqué... -
Seite 117: Fonctionnalité Du Produit
L’air comprimé, filtré, propre et exempt d’huile est stocké dans le réservoir d’air et prêt à l’emploi. Le condensat doit être évacué du réservoir d’air à intervalles réguliers (voir chapitre 19.1). Compresseur avec sécheur à membrane(DK50 2V/50/M). (Fig. 1) L’agrégat du compresseur (1) aspire l’air à travers un filtre d’entrée (8), le comprime et l’envoie au refroidisseur (14) à... - Seite 118 DK50 2V/50 DK50 2x2V/110 Compresseur avec sécheur à membrane (DK50 2x2V/110/M). (Fig. 1) L’agrégat du compresseur (1) aspire l’air atmosphérique à travers un filtre d’entrée (8), le comprime, le conduit à travers les refroidisseurs (14) et le filtre (15), vers le sécheur (9) et l’air propre et sec est ensuite conduit à...
- Seite 119 DK50 2V/50 DK50 2x2V/110 Fig. 1 - Compresseur avec sécheur DK50 2V/50/M DK50 2x2V/110/M NP-DK50 2V 50, 2x2V 110-4_07-2019-MD A -118- 07/2019...
- Seite 120 DK50 2V/50 DK50 2x2V/110 Fig. 2 - Compresseur DK50 2V/50 DK50 2x2V/110 07/2019 -119- NP-DK50 2V 50, 2x2V 110-4_07-2019-MD A...
- Seite 121 DK50 2V/50 DK50 2x2V/110 Fig. 3 - Armoire 3A - DK50 2V/50S NP-DK50 2V 50, 2x2V 110-4_07-2019-MD A -120- 07/2019...
- Seite 122 DK50 2V/50 DK50 2x2V/110 3B - DK50 2x2V/110S 07/2019 -121- NP-DK50 2V 50, 2x2V 110-4_07-2019-MD A...
-
Seite 123: Schéma Pneumatique
DK50 2V/50 DK50 2x2V/110 10. SCHÉMA PNEUMATIQUE DK50 2V/50/M DK50 2V/50 NP-DK50 2V 50, 2x2V 110-4_07-2019-MD A -122- 07/2019... - Seite 124 DK50 2V/50 DK50 2x2V/110 DK50 2x2V/110/M 230 V DK50 2x2V/110/M 400 V 07/2019 -123- NP-DK50 2V 50, 2x2V 110-4_07-2019-MD A...
- Seite 125 DK50 2V/50 DK50 2x2V/110 DK50 2x2V/110 230 V DK50 2x2V/110 400 V Légende des schémas d’air comprimé 1. Filtre d’entrée 10. Réservoir d’air 2. Compresseur 11. Soupape de vidange 3. Ventilateur 12. Refroidisseur 4. Soupape de décharge 13. Filtre coalescent 5.
-
Seite 126: Installation
DK50 2V/50 DK50 2x2V/110 INSTALLATION 11. CONDITIONS D’EMPLOI Les compresseurs doivent être installés et utilisés uniquement dans des environnements secs, bien ventilés et propres, avec des paramètres environnementaux conformes aux exigences spécifiées au chapitre 7, Caractéristiques techniques. Le compresseur doit être installé de sorte à... -
Seite 127: Positionnement Du Compresseur
DK50 2V/50 DK50 2x2V/110 12. POSITIONNEMENT DU COMPRESSEUR L’appareil doit uniquement être installé par un professionnel qualifié. Défaites l’emballage du compresseur. 12.1. Manipulation et libération du compresseur Positionnez le compresseur sur le site de fonctionnement choisi (Fig. 4) Fig. - Seite 128 DK50 2V/50 DK50 2x2V/110 Retirez les stabilisateurs de transport des agrégats. (Fig. 5) Retirez tous les appareils utilisés pour fixer les agrégats du compresseur une fois que le compresseur a été installé et monté sur le dernier site d’installation ! Obr.
- Seite 129 Retirez la barrette de raccordement (33) à l’avant de l’armoire. Avant de placer le compresseur dans l’armoire sans le sécheur (DK50 2V/50), veuillez- vous référer au chapitre 12.3 pour l’ajout de la mousse d’isolation acoustique dans l’armoire. ...
- Seite 130 DK50 2V/50 DK50 2x2V/110 12.3. Ajout de matériau insonorisant dans l’armoire Un composant en matériau insonorisant doit être installé dans l’ouverture du boîtier du compresseur non doté d’un sécheur. Ce composant est fourni en même temps que les équipements de base, avec le produit..
-
Seite 131: Raccords Pneumatiques
DK50 2V/50 DK50 2x2V/110 13. RACCORDS PNEUMATIQUES 13.1. Raccordement à la prise d’air comprimé(Fig. 7) Faites passer le tuyau de pression, de la sortie d’air comprimé (1) située sur le compresseur, à l’appareil. Pour les compresseurs montés en armoire, faites passer le tuyau de pression à... -
Seite 132: B Ranchements Électriques
DK50 2V/50 DK50 2x2V/11 14. BR RANCHEME ENTS ÉLEC CTRIQUES L’appar reil est équip pé d’une pr rise mise à l la terre. Vérifiez la conform mité de l’ap ppareil aux x codes éle ectriques l locaux. La fréquence e et la tensio on du sect teur doive... -
Seite 133: Schéma De Raccordement
DK50 2V/50 DK50 2x2V/110 15. SCHÉMA DE RACCORDEMENT DK50 2V/50 6 - 8 bar, 8 - 10 bar 1/N/PE ~ 230V/50Hz, 230V/60Hz OBJET ÉLECTRIQUE de 1ère CATÉGORIE DK50 2V/50/M 6 - 8 bar, 8 - 10 bar 1/N/PE ~ 230V/50Hz, 230V/60Hz OBJET ÉLECTRIQUE de 1ère CATÉGORIE... - Seite 134 DK50 2V/50 DK50 2x2V/110 DK50 2V/50 6 - 8 bar 1/N/PE ~ 400V 50 Hz RÉSEAU ÉLECTRIQUE TN-S [TN-C-S] OBJET ÉLECTRIQUE de 1ère CATÉGORIE DK50 2x2V/110 5 - 7 bar, 6 - 8 bar, 8 - 10 bar 1/N/PE ~ 230V/50Hz, 230V/60Hz OBJET ÉLECTRIQUE de 1ère CATÉGORIE...
- Seite 135 DK50 2V/50 DK50 2x2V/110 DK50 2x2V/110/M 5 - 7 bar, 6 - 8 bar, 8 - 10 bar 1/N/PE ~ 230V/50Hz, 230V/60Hz OBJET ÉLECTRIQUE de 1ère CATÉGORIE DK50 2x2V/110 5 - 7 bar, 6 - 8 bar, 8 - 10 bar 1/N/PE ~ 400V 50 Hz RÉSEAU ÉLECTRIQUE TN-S [TN-C-S]...
- Seite 136 DK50 2V/50 DK50 2x2V/110 DK50 2x2V/110/M 5 - 7 bar, 6 - 8 bar, 8 - 10 bar 1/N/PE ~ 400V 50 Hz RÉSEAU ÉLECTRIQUE TN-S [TN-C-S] OBJET ÉLECTRIQUE de 1ère CATÉGORIE Skrinka kompresora 1/N/PE ~ 230V/50Hz, 230V/60Hz 115V/60Hz OBJET ÉLECTRIQUE de 1ère CATÉGORIE...
-
Seite 137: Fonctionnement
DK50 2V/50 DK50 2x2V/110 Légende des schémas électriques M1, M2 Moteur du compresseur Pressostat E1, E2 Ventilateur du compresseur Barrette de raccordement Ventilateur du dessiccateur Soupape de vidange du condensat M10, M20 Soupape de décharge Horomètre Commutateur de température Commutateur E10, E11 Ventilateur de l’armoire... -
Seite 138: Mise Sous Tension Du Compresseur
DK50 2V/50 DK50 2x2V/110 Pour les compresseurs montés sur armoire, faites basculer le commutateur (4) situé sur la face avant de l’armoire en position « I » ; un voyant vert indique que l’appareil est en marche. (Fig. 13) ... -
Seite 139: Maintenance
DK50 2V/50 DK50 2x2V/110 MAINTENANCE 19. MAINTENANCE DE L’APPAREIL Avertissement ! L’opérateur doit s’assurer que des tests répétés de l’appareil sont effectués au moins une fois tous les 24 mois (EN 62353) ou à des intervalles définis par les réglementations nationales applicables. -
Seite 140: Intervalles De Maintenance
DK50 2V/50 DK50 2x2V/110 19.1. Intervalles de maintenance professionnel utilisateur qualifié 07/2019 -139- NP-DK50 2V 50, 2x2V 110-4_07-2019-MD A... - Seite 141 DK50 2V/50 DK50 2x2V/110 19.2. Contrôles opérationnels Contrôle de l’état de l’agrégat - les agrégats doivent fonctionner normalement sans vibrations ou bruits excessifs. Résolvez tout problème ou contactez le personnel d’entretien si vous en détectez un. Contrôle visuel du fonctionnement du ventilateur - assurez-vous que les ventilateurs sont en marche lors du fonctionnement des agrégats.
- Seite 142 DK50 2V/50 DK50 2x2V/11 19.5. Purge d de condens Compre esseurs (F ig. 14) Il est r recommand é d’évacue er le conde ensat du r écipient sous pr ression lors du fonction nnement rég gulier. Débr ranchez le comp presseur du u secteur.
-
Seite 143: Remplacement De L'élément Filtrant
DK50 2V/50 DK50 2x2V/110 19.7. Remplacement du filtre d'entrée et du préfiltre (Fig. 17) Le filtre d’entrée se trouve à l’intérieur du capot du carter du compresseur. Remplacement du filtre d’entrée : Retirez le bouchon en caoutchouc (2) à la main. - Seite 144 DK50 2V/50 DK50 2x2V/11 19.10 0. Procédu ure de racc cordement d’un comp presseur à déconnect té de l’arm oire Avant to oute opéra ation d’ent tretien ou de réparat tion, éteig nez le com mpresseur r et débranc chez-le du s secteur (dé...
- Seite 145 DK50 2V/50 DK50 2x2 2V/110 K50 2x2V/1 230V K50 2V/50, DK50 2x2V V/110 400V P-DK50 2V 50, , 2x2V 110-4_ _07-2019-MD 07/2019...
- Seite 146 DK50 2V/50 DK50 2x2V/11 Fig. 19 Installa ation du cav valier (voir r fig. 19): Débr ranchez le p produit du s secteur en r retirant la fic che de la pr rise. Retir rez le capot t du pannea au électrique e (du comp resseur).
- Seite 147 DK50 2V/50 DK50 2x2 2V/110 Dé ésinstallati on du cava alier (voir f fig. 20): Débranche ez le produi t du secteu r en retirant t la fiche de e la prise. Retirez le c capot du pa anneau élec ctrique (du c compresseu...
- Seite 148 DK50 2V/50 DK50 2x2V/11 DK50 2 2x2V/110 230V DK50 2 2V/50, DK50 0 2x2V/110 400V 07/2019 -147- N N P-DK50 2V 5 5 0, 2x2V 110- - 4_07-2019-MD A...
- Seite 149 DK50 2V/50 DK50 2x2 2V/110 Fig. 20 ompresseur r avec armo oire - en ca as d’utilisat tion d’un co ompresseur r avec arm oire, il ne d doit être réa alisé AUCU UN raccorde ement élect rique(Fig.20 emarque : U Un cavalier r qui n’est p pas installé...
-
Seite 150: Dépannage
DK50 2V/50 DK50 2x2V/110 DÉPANNAGE MISE EN GARDE ! AVANT TOUTE INTERVENTION SUR L’APPAREIL, RÉDUISEZ À ZÉRO LA PRESSION DANS LE RÉSERVOIR D’AIR ET DÉBRANCHEZ L’APPAREIL DU SECTEUR. L’équipement, notamment le ventilateur de refroidissement, doit être maintenu en bon état de propreté... -
Seite 151: Service De Réparation
DK50 2V/50 DK50 2x2V/110 Utilisation prolongée Fuite dans le système de distribution Vérifiez le système de distribution d’air du compresseur pneumatique comprimé – resserrez les joints non Bague de piston usée hermétiques Filtre d’entrée obstrué Remplacez les bagues de piston Électrovanne défectueuse... -
Seite 152: Installation Record
DK50 2V/50 DK50 2x2V/110 ANNEX / ANHANG/ANNEXE / ПРИЛОЖЕНИЕ 23. INSTALLATION RECORD 1. Product: (model) 2. Serial number: DK50 2V/50 DK50 2V/50S DK50 2V/50/M DK50 2V/50S/M DK50 2x2V/110 DK50 d2x2V/110S DK50 2x2V/110/M DK50 2x2V/110S/M 3.1. User’s name: 3.2. Address of installation: 4. - Seite 153 DK50 2V/50 DK50 2x2V/110 23. INSTALLATIONSPROTOKOLL 1. Produkt: (Modell) 2. Seriennummer: DK50 2V/50 DK50 2V/50S DK50 2V/50/M DK50 2V/50S/M DK50 2x2V/110 DK50 d2x2V/110S DK50 2x2V/110/M DK50 2x2V/110S/M 3.1. Benutzername: 3.2. Aufstellungsort: 4. An den Kompressor angeschlossene Geräte: 5. Installation / Inbetriebnahme: 6.
-
Seite 154: Registre D'installation
DK50 2V/50 DK50 2x2V/110 23. REGISTRE D’INSTALLATION Produit : (modèle) 2. Numéro de série : DK50 2V/50 DK50 2V/50S DK50 2V/50/M DK50 2V/50S/M DK50 2x2V/110 DK50 d2x2V/110S DK50 2x2V/110/M DK50 2x2V/110S/M 3.1. Nom de l’utilisateur : 3.2. Adresse de l’installation : 4. - Seite 155 DK50 0 2V V/50 DK50 0 2x x2V/1 EKOM spol. s s r.o., riemyselná 503 31/18, 921 01 PI IEŠŤANY, Slova ak Republic el.: +421 33 796 67255, fax: +421 1 33 7967223 -mail: ekom@e kom.sk, www.e kom.sk NP-DK50 2x2V 1...