Panasonic RR-XS350 Bedienungsanleitung
Digitales diktiergerät
Inhaltsverzeichnis
E
Operating Instructions
Bedienungsanleitung
Istruzioni per l'uso
Instrucciones de funcionamiento
Manual de Instruções
Digitales Diktiergerät
Magnétophone à puce
Model No.
Mode d'emploi
IC Recorder
Registratore IC
Grabadora IC
Gravador de IC
RR-XS350
VQT4J69
M0512KZ0
ENGLISH
DEUTSCH
ITALIANO
FRANÇAIS
ESPAÑOL
PORTUGUÊS
Inhaltsverzeichnis

Verwandte Anleitungen für Panasonic RR-XS350


Inhaltszusammenfassung für Panasonic RR-XS350
- Seite 1 Operating Instructions ENGLISH Bedienungsanleitung DEUTSCH Istruzioni per l’uso Mode d’emploi ITALIANO Instrucciones de funcionamiento Manual de Instruções FRANÇAIS IC Recorder ESPAÑOL Digitales Diktiergerät PORTUGUÊS Registratore IC Magnétophone à puce Grabadora IC Gravador de IC RR-XS350 Model No. VQT4J69 M0512KZ0...
-
Seite 2: Supplied Accessories
Before connecting, operating or adjusting this product, please read the instructions completely. Please keep this manual for future reference. Supplied accessories Please check and identify the supplied Direct Sales at Panasonic UK accessories. • Order accessory and consumable items for your Use numbers indicated in parentheses when product with ease and confidence by phoning our asking for replacement parts. -
Seite 3: Inhaltsverzeichnis
Features Table of contents Recording Preparation Supplied accessories...........2 This unit supports the Linear PCM (hereinafter Features ..............3 referred to as “PCM”) recording. You can switch the microphone position to ZOOM to Part names ............5 record with the sound in front of you emphasised. Screen display .............6 Recording settings optimised according to recording Inserting the battery ..........7... - Seite 4 Table of contents Common menu ..........32 Advanced Operations BEEP/LED Selecting the recording scene (SCENE SELECT) ..........15 Using with a computer Changing the sound quality .......16 System requirements.........33 Switching microphone sensitivity .......17 Connecting this unit to a computer ....34 Reducing low frequency noise during Opening folders of this unit ........36 recording............17 Importing files to a computer/Organising files ...37...
-
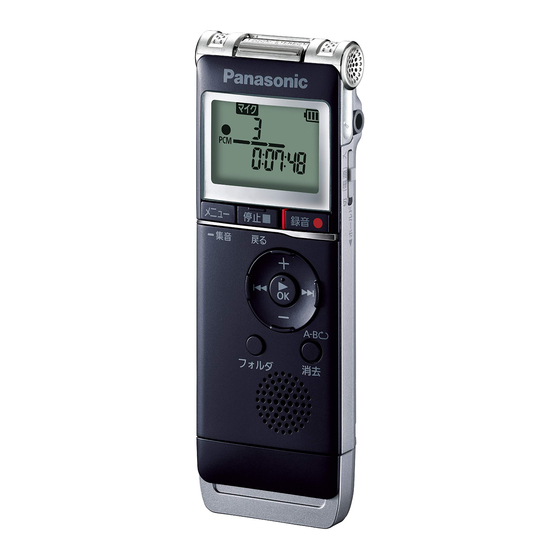
Seite 5: Part Names
Part names 6 MENU 7 + (Volume up) 8 u (Fast backward) 9 – (Volume down) 10 i (Fast forward) 11 q OK 12 FOLDER 13 Built-in speaker 14 ERASE/A-B& 15 External microphone jack ( 16 OPR/HOLD switch (OPR: Operation) 17 LINE/MIC switch 18 Recording indicator (Status indicator) 19 Headphone/earphone jack (... -
Seite 6: Screen Display
Screen display The following explains the screen items. Some items may not be displayed simultaneously. Repeat play/A-B Repeat playback ( ➜ pages 20, 22) Folder name ( ➜ page 10) Battery indicator ( ➜ page 7) Screen display during playback SD card ( ➜... -
Seite 7: Inserting The Battery
Inserting the battery Open the battery/SD card slot cover ( The remaining battery level is displayed as below while this unit is operating. Blinking ● If the battery runs out, “ ” blinks. Replace the battery as soon as possible. ●... -
Seite 8: Hold Function
Turning the Power ON/OFF Hold function OPR/HOLD switch: Button operations are ignored when the Hold function is on. To switch the Hold function on: Slide the OPR/HOLD switch to the [HOLD] side during recording or playback. “ ” appears and the Hold function turns on. Turning the power ON: To switch the Hold function off: Slide the OPR/HOLD switch to [ON] side to turn the... -
Seite 9: Setting The Clock
Setting the clock The clock is used as a file name ( ➜ page 38) or to preserve recording date and time information. Set the correct date and time. The date and time need to be set after the battery is replaced. Press +, –... -
Seite 10: File And Folder
File and Folder Selecting the folder File • When the unit is not in the stop state, press [STOP g/RETURN]. Recorded audio data from the starting point to Press [FOLDER]. the ending point is saved as a file. The saved data is called a file. Each press: Folder Status... -
Seite 11: Switching Microphone Position
Switching microphone position Recording You can switch the microphone position to ZOOM to Note when recording record with the sound in front of you emphasised. Switch the microphone position depending on the use. This unit is equipped with a high-sensitivity microphone. Accordingly, if a breath or wind directly hits the STEREO ZOOM... - Seite 12 Recording • If you press [MENU] during recording or while • Turn the power on. ( ➜ page 8) recording is paused, the indication switches • When the unit is not in the stop state, press between the remaining recording time and [STOP g/RETURN].
-
Seite 13: Playing
Playing Adjusting the volume • When the unit is not in the stop state, press [STOP g/RETURN]. Turn up the volume: Press +. • Select a folder. ( ➜ page 10) Turn down the volume: Press –. • Select a file. (See below) Volume range is 0 to 20. -
Seite 14: Deleting Files And Formatting
Deleting files and formatting Delete unnecessary files. Press u, i to select the deletion method and press [q OK] to enter. • When the unit is not in the stop state, press • When you want to delete only one file, [STOP g/RETURN]. -
Seite 15: Selecting The Recording Scene (Scene Select)
Selecting the recording scene (SCENE SELECT) This unit offers recommended recording settings for each recording scene. Selecting the recording scene enables easy recording with the most appropriate settings. Press +, – to select • When the unit is not in the stop state, press [STOP g/RETURN]. -
Seite 16: Changing The Sound Quality
Changing the sound quality You can change the sound quality. This allows you to provide the best sound quality for the particular purpose. Press +, – to select “PCM”, “XP”, • When the unit is not in the stop state, press [STOP g/RETURN]. -
Seite 17: Switching Microphone Sensitivity
Switching microphone Reducing low frequency sensitivity noise during recording Switch the microphone sensitivity according to the Sound of low frequency range is reduced during volume of the sound source. When the sound source microphone recording. This is effective when volume is loud, set the sensitivity to “ ” (LOW). reducing noise of air conditioning equipment, When it is low, set the sensitivity to “... -
Seite 18: Preventing Unnecessary Recording (Vas)
Preventing unnecessary recording (VAS) When VAS (Voice Activated System) is set, if silence continues for approx. 2 seconds during microphone recording, the recording is paused automatically. If the unit detects sound, the recording resumes. Adjusting the VAS operation level: • When the unit is not in the stop state, press [STOP g/RETURN]. -
Seite 19: Recording At A Specified Time (Timer Recording)
Recording at a specified time (TIMER RECORDING) Press +, – to select the minute for • When the unit is not in the stop state, press the time to start recording and [STOP g/RETURN]. press i. • If an SD card is selected as the recording destination, insert the SD card beforehand. -
Seite 20: Changing The Playback Speed
Changing the playback speed A-B Repeat play The playback speed can be adjusted in 21 steps from Playback repeats between the start point (A) the slow speed of 0.5 times normal speed (50%) to and finish point (B) if those points are set. the fast speed of 2 times normal speed (200%). -
Seite 21: Shadowing
Shadowing Shadowing is a learning method to repeat an example immediately after it is heard. You can use Example Practice the shadowing function of this unit to repeat the A-B repeat section (example) and a no-sound section A-B repeat section No-sound section (practice). -
Seite 22: Playback From A Specified Position (Time Search)
Playback from a specified Repeat play (REPEAT) position (TIME SEARCH) Press and hold [MENU] for at least approx. 2 seconds during playback Playback is possible from the time-specified or while the unit is stopped. position. The repeat mode changes each time you Press [MENU] during playback. -
Seite 23: Reducing Noise During Playback (Noise Cancel)
Reducing noise during playback (NOISE CANCEL) This function reduces noise during playback to make the target sound easier to hear. • When the unit is not in the stop state, press Type Effect [STOP g/RETURN]. Does not perform noise reduction. Press [MENU]. -
Seite 24: Using An Sd Card
For details on SD cards that are confirmed to operate correctly according to our manufacturing standards, Insert the SD card see the support site below. and close the battery/ http://panasonic.net/support/ Terminal side SD card slot cover. ● If “SD” is not displayed on the screen even though... -
Seite 25: Listening To Music On This Unit (Mp3 Music Files)
Listening to music on this unit (MP3 music files) ● Only MP3 files and PCM (WAV) files recorded • Transfer music files to this unit from the on this unit can be played. computer. ( ➜ page 41) ● The track information (ID3 tag , etc.) of a file Selecting a file from folder “MUSIC”: is not displayed on the unit. - Seite 26 - Files (MP3 files or PCM files) recorded to an SD card with some Cancelling folder cue: Panasonic IC recorders other than this unit can be played with this unit if you just switch the SD cards using the procedure below.
-
Seite 27: Dividing Files
Dividing files You can divide 1 file into 2 files at a specified position. A necessary part can be extracted or an unnecessary part can be cut. While playing, press Press +, – to select “ ” and [STOP g/RETURN] at the point press [q OK] to enter. -
Seite 28: Recording By Connecting An External Microphone
Recording by connecting an external microphone Use this setting when recording by connecting an external microphone to the external microphone/Line-in jack of this unit. Connect the external microphone. • When the unit is not in the stop state, press [STOP g/RETURN]. External microphone (not supplied) Slide the LINE/MIC switch to [MIC]. -
Seite 29: Copying To Other Devices
Copying to other devices Connect the headphone/earphone jack Start recording on the external device. ( ) of this unit with the audio input (mic) Play the file that you want to copy on this terminal of the external device with an unit. -
Seite 30: Recording From Other Devices
Recording from other devices This is the method to record to the “LINE” folder by connecting an external device to the external microphone/Line-in jack of this unit. Press [STOP g/RETURN]. • When the unit is not in the stop state, press [STOP g/RETURN]. -
Seite 31: Listening To The Audio Using Earphones
Plug type: ø 3.5 mm stereo mini plug device and adjust the being recorded Recommended additional earphones: input/output level. Panasonic RP-HV154, RP-HJE120 If the level meter swings (the product number is correct as of May 2012.) and “ ” is displayed,... -
Seite 32: Common Menu
Common menu The following are the settings used for both recording and playback. Common settings operation BEEP (Beep sound) The button operation sound can be set. • When the unit is not in the stop state, press : Beep sound. [STOP g/RETURN]. -
Seite 33: System Requirements
Depending on the computer environment, malfunctions may occur (e.g. Audio data recorded on this unit cannot be used. etc.). Panasonic and Panasonic dealers cannot be held liable for any lost audio data or other direct or indirect damage except in cases of intentional of gross negligence. -
Seite 34: Connecting This Unit To A Computer
Connecting this unit to a computer You can copy files recorded on this unit to the computer. Do not use the supplied cable with other devices. • Start the computer beforehand. Caution: Use only the supplied USB extension cable • Turn the unit off beforehand. with a ferrite core when connecting to computer. - Seite 35 ● When the unit is connected to the computer, the computer may not start (restart). It is recommended that the unit is removed from the computer when starting (restarting) the computer. ● Operation is not guaranteed in the following cases. •...
-
Seite 36: Opening Folders Of This Unit
Opening folders of this unit The illustrations show Windows XP (OS). The display may differ depending on the OS. 2. Right-click to open the “IC RECORDER • Connect this unit to a Computer beforehand. ( ➜ page 34) (G:)” (this unit). (Folder structure on this unit ➜... -
Seite 37: Importing Files To A Computer/Organising Files
Importing files to a computer/Organising files ● Using [drag and drop], you can import the files to the • Connect this unit to a Computer beforehand. computer as well. ( ➜ page 34) ● Never disconnect the unit or remove the SD card Importing files recorded on this unit while “... -
Seite 38: File Name
File name Names of files recorded on this unit: Example: Recording information: September 20, 2012, 17:20/folder MIC/MP3 File number (001 to 199) 001_120920_1720V0.MP3 Recording information (1-byte number, 6 characters) Recording time (1-byte number, 4 characters) Folder name (V or L) “_”... - Seite 39 Returning the files imported to the computer File name in the MUSIC folder and order of to this unit: playback: By returning the files imported to the computer to this If numbers are added at the beginning of file names in unit, such files can be played back on this unit.
-
Seite 40: Folder Structure On This Unit
Folder structure on this unit The “ ” and “ ” folders are displayed as MIC and LINE for the built-in memory (MIC_SD and LINE_SD for the SD card) on the computer, and recorded files in each of the folders are played back. The “... -
Seite 41: Transferring Music Files To This Unit
Transferring music files to this unit You can enjoy music by transferring music files stored in the computer to this unit. This unit can play back MP3 and PCM (WAV) music files. Only PCM (WAV) files recorded on this unit. Transferring music files to this unit ●... -
Seite 42: Q & A (Frequently Asked Questions)
“MUSIC” folder. ( ➜ page 41) But cannot play files with other formats (i.e. ADPCM and TRC formats) because the recording format is different. Can I use a manganese battery? • A manganese battery and nickel-cadmium battery cannot be used. Panasonic recommends using an alkaline battery. -
Seite 43: Error Messages
Error messages Error message Checkpoints • This is displayed when you attempt to record more than the maximum number of files (199) that can be recorded. ( ➜ page 10) • This is displayed when you attempt to record to the internal memory or SD card without free space. -
Seite 44: Troubleshooting Guide
Troubleshooting guide Before requesting service, make the following checks. If you are in doubt about some of the check points, or if the remedies indicated in the chart do not solve the problem, consult your dealer for instructions. Symptom Checkpoints Battery Cannot use a battery that can •... - Seite 45 SD card. • For details on cards that are confirmed to operate correctly according to our manufacturing standards, see the support site below. http://panasonic.net/support/ • VAS is functioning. ( ➜ page 18) Noise is heard from the • If you brush this unit with your hand or an object touches this unit during recorded voice.
- Seite 46 Troubleshooting guide Symptom Checkpoints Recording Recorded sound is distorted. • Lower the microphone sensitivity ( ➜ page 17) or move further away from the There is a noise at the recording sound source. beginning of sound. If the sound is still distorted, set the LOW CUT FILTER to ON ( ➜ page 17) before recording.
- Seite 47 Symptom Checkpoints Playing No sound from the speaker. • There is no sound when you have connected earphones. ( ➜ page 31) Cannot hear any sound. • Adjust the sound volume. ( ➜ page 13) A file in the “MIC” or “LINE” •...
- Seite 48 Troubleshooting guide Symptom Checkpoints Playing There is no sound from the • Ensure the plug is inserted firmly. earphones or it is difficult to • Wipe the plug clean. hear or noisy. The selected file changes on its • If this unit is connected to a computer and then a file on the unit is deleted, the own.
- Seite 49 Symptom Checkpoints Others Cannot delete a file or folder. • If MP3 music files transferred from the computer are Read-only or subfolders are created in the “MUSIC” folder, they cannot be deleted on this unit. Delete them on the computer. ( ➜ page 37) Cannot divide a file.
-
Seite 50: Specifications
Specifications Power USB2.0 (Hi-Speed) DC 5 V / 150 mA Dry-cell battery DC 1.5 V (1 AAA LR03 battery ø 3.5 mm, 16 Ω, (alkaline battery)) Audio Earphone Output Max. 6 + 6 mW Audio ø 20 mm, 8 Ω, Speaker Sampling frequency 44.1 kHz [PCM 44.1kHz]... - Seite 51 Battery life (may be less depending on the operating conditions.) When the Panasonic alkaline (AAA LR03) battery is used Sound quality Play PCM 44.1kHz (Stereo) approx. 29 h. 30 min. approx. 12 h. 30 min. XP 192kbps (Stereo) approx. 35 h. 30 min. approx. 14 h.
-
Seite 52: Care And Use
Care and use To reduce risk of radio interference caused by • Battery mishandling can cause electrolyte headphone-, earphone- or microphone cables, leakage which can damage items the fluid only use adequate accessories with a cable contacts and may cause a fire. If electrolyte length of less than 3 m. - Seite 53 g SD card compatibility g Allergies microSD card and microSDHC card can be used • Discontinue use if you experience discomfort on devices that support each card. (microSD with the earphones or any other parts that card can also be used on devices that support directly contact your skin.
-
Seite 54: Maintenance
Care and use Precautions for listening with the Headphones or Earphones • Do not play your headphones or earphones at a high volume. Hearing experts advise against continuous extended play. • If you experience a ringing in your ears, reduce volume or discontinue use. •... - Seite 55 -If you see this symbol- Information on Disposal for Users of Waste Electrical & Electronic Equipment (private households) This symbol on the products and/or accompanying documents means that used electrical and electronic products should not be mixed with general household waste.
-
Seite 58: Ein- Und Ausschalten Des Gerätes
Ein- und Ausschalten Dieses Handbuch beschreibt die grundlegenden Arbeitsvorgänge und Funktionen des Geräts. des Gerätes Mitgeliefertes Zubehör Einschalten des Gerätes: Den OPR/HOLD-Schalter auf die [ON]-Seite schieben, 1 USB-Verlängerungskabel um das Gerät einzuschalten. Anschließend schaltet sich die Display-Beleuchtung ein. Einlegen der Batterie Ausschalten des Gerätes: Den OPR/HOLD-Schalter zur [OFF]-Seite schieben, während das Gerät im gestoppten Zustand ist. -
Seite 59: Einstellen Der Uhr
Einstellen der Uhr [MENU] drücken. +, – zur Einstellung der Minute drücken. u, i zur Änderung der Einstellung drücken, um u, i drücken, um „DATE“ auszuwählen zwischen den Punkten hin und her zu schalten und und [q OK] zur Eingabe drücken. anschließend +, –... -
Seite 60: Auswahl Des Ordners
Auswahl des Ordners Wechseln der Mikrofonposition [FOLDER] drücken. Wenn die SD-Karte gewählt wird, wird „SD“ auf dem Bildschirm angezeigt. Empfohlene Mikrofonposition Einsatzweisen Umschalten zwischen dem internen STEREO Geeignet zum Aufzeichnen Speicher und einer SD-Karte Funktioniert wie von Ereignissen wie einer [FOLDER] für 1 Sekunde oder länger gedrückt ein gewöhnliches Besprechung oder einer... -
Seite 61: Wiedergabe
Aufnahme Wiedergabe [REC *] drücken. (Aufnahme beginnt.) [q OK] drücken. (Die Wiedergabe beginnt.) Jedes Drücken: Einstellen der Lautstärke Pausieren Wiederaufnahme der Aufnahme Anhalten der Aufnahme: Erhöhen der Lautstärke: + drücken. [STOP g/RETURN] drücken. Verringern der Lautstärke: – drücken. Funktionen bei Wiedergabe Sprung (Skip): u, i drücken. - Seite 62 Löschen von Dateien und Formatieren Auswahl des Aufnahme- Ortes (SCENE SELECT) Es gibt drei Methoden zum Löschen von Dateien. Eine Datei auswählen und dann löschen. Alle Dateien im gewählten Ordner löschen. [MENU] drücken. (Dateien in Unter-Ordnern und der Ordner selbst können nicht gelöscht werden) u, i drücken, um „SCENE“...
-
Seite 63: Verändern Der Tonqualität
Verändern der Tonqualität Umschalten der Mikrofonempfindlichkeit [MENU] drücken. u, i drücken, um „MODE“ [MENU] drücken. auszuwählen und [q OK] zur Eingabe drücken. u, i drücken, um „ “ auszuwählen +, – drücken, um „PCM“, „XP“, „LP“ und [q OK] zur Eingabe drücken. oder „SLP“... -
Seite 64: Reduzieren Von Niederfrequenten Störgeräuschen Während Der Aufnahme
Reduzieren von niederfrequenten Verhindern einer unerwünschten Störgeräuschen während der Aufnahme (VAS) Aufnahme [MENU] drücken. u, i drücken, um „VAS“ auszuwählen [MENU] drücken. und [q OK] zur Eingabe drücken. u drücken, bis „ “ (blinkt) angezeigt +, – drücken, um „On“ auszuwählen, und wird und [q OK] zur Eingabe drücken. -
Seite 65: Aufnahme Zu Einer Festgelegten Zeit (Timer Recording)
Aufnahme zu einer festgelegten Zeit (TIMER RECORDING) +, – drücken, um die Stunde für die [MENU] drücken. Anfangszeit der Aufnahme auszuwählen, und u, i drücken, um „ “ auszuwählen i drücken. und [q OK] zur Eingabe drücken. +, – drücken, um die Minute für die +, –... - Seite 66 Ändern der A-B-Wiederholwiedergabe Wiedergabegeschwindigkeit [ERASE/A-B&] während der Wiedergabe drücken. [q OK] während der Wiedergabe drücken. Der Startpunkt (A) ist festgelegt und „ “ (leuchtet) und „ “ (blinkt) werden angezeigt. u, i drücken, um die Aufnahmegeschwindigkeit anzupassen. [ERASE/A-B&] am gewünschten Endpunkt (B) drücken.
- Seite 67 Shadowing Die zur Wiedergabe mit Shadowing [MENU] drücken. gewünschte Datei auswählen und [q OK] u, i drücken, um „ “ auszuwählen drücken. und [q OK] zur Eingabe drücken. [ERASE/A-B&] drücken. +, – drücken, um „On“ auszuwählen, und Der Startpunkt (A) ist festgelegt und „ “...
-
Seite 68: Wiedergabe Von Einer Festgelegten Position (Time Search)
Wiedergabe von einer festgelegten Wiederholwiedergabe Position (TIME SEARCH) (REPEAT) Während der Wiedergabe [MENU] drücken. [MENU] mindestens 2 Sekunden lang während der Wiedergabe oder während das Wiedergabe stoppt und die gegenwärtige Gerät gestoppt ist drücken. Wiedergabeposition (Zeit) wird angezeigt. Der Wiederholmodus ändert sich jedes Mal, wenn Die Wiedergabestartposition einstellen. -
Seite 69: Rauschminderung Während Der Wiedergabe (Noise Cancel)
Rauschminderung während der Wiedergabe (NOISE CANCEL) [MENU] drücken. Effekt u, i drücken, um „NC“ auszuwählen Die Rauschunterdrückung wird nicht ausgeführt. und [q OK] zur Eingabe drücken. Störgeräusche werden in großem +, – drücken, um die Art von NOISE CANCEL Umfang reduziert. (Rauschunterdrückung) auszuwählen und Störgeräusche werden in geringem [q OK] zur Eingabe drücken. -
Seite 70: Benutzung Einer Sd-Karte
Bestätigung vorliegt, dass sie gemäß unseren Herstellungsstandards ordnungsgemäß funktionieren, Zum Entfernen der SD-Karte: siehe die unten angegebene Support-Website. Das Gerät ausschalten und die Abdeckung des http://panasonic.net/support/ Batterie-/SD-Kartensteckplatzes öffnen. ● Wenn „SD“ nicht auf dem Bildschirm angezeigt wird, Die SD-Karte vorsichtig schieben. -
Seite 71: Hören Von Musik Mit Diesem Gerät (Mp3 -Musikdateien)
- Dateien (MP3-Dateien oder PCM-Dateien), die auf • [STOP g/RETURN] drücken. (Wiedergabe ist abgeschlossen.) einer SD-Karte mit anderen digitalen Diktiergeräten von Panasonic als diesem Gerät aufgenommen wurden, können g Informationen zum Ordner „MUSIC“ auf diesem Gerät abgespielt werden, indem die SD-Karten •... -
Seite 72: Teilen Von Dateien
Teilen von Dateien Aufnahme mit einem extern angeschlossenen Mikrofon Während der Wiedergabe [STOP g/RETURN] an dem Punkt drücken, Den LINE/MIC-Schalter auf [MIC] schieben. an dem die Datei geteilt werden soll. [MENU] drücken. Das externe Mikrofon anschließen. u, i drücken, um „DIV“ auszuwählen Externes Mikrofon (nicht mitgeliefert) und [q OK] zur Eingabe drücken. -
Seite 73: Aufnahme Von Anderen Geräten
Aufnahme von anderen Geräten Den LINE/MIC-Schalter auf [LINE] [REC *] für 1 Sekunde oder länger schieben. gedrückt halten. [MENU] drücken. Das Gerät geht in den Aufnahme- Bereitschaftszustand über. i drücken, bis „ “ (blinkend) Wiedergabe des externen Geräts und erscheint, und [q OK] zur Eingabe drücken. Einstellung des Input/Output-Levels. -
Seite 74: Mithören Des Tons Über Ohrhörer
Steckerausführung: ø 3,5 mm Stereo-Klinkenstecker u, i drücken, um den Einstellpunkt Empfohlener zusätzlicher Ohrhörer: („BEEP“ oder „LED“) zu wählen, und Panasonic RP-HV154, RP-HJE120 [q OK] zur Eingabe drücken. (Stand Mai 2012) • Der blinkende Einstellpunkt ist der gegenwärtig Überwachen der ausgewählte. -
Seite 75: Systemanforderungen
Je nach der Betriebsumgebung des Computers kann es vorkommen, dass Fehlfunktionen auftreten (z.B. Audiodaten, die auf diesem Gerät aufgenommen wurden, können nicht verwendet werden. usw.). Panasonic und Panasonic- Fachhändler übernehmen keinerlei Haftung für den Verlust von Audiodaten sowie andere direkte oder Folgeschäden, die nicht auf vorsätzliche oder grobe Fahrlässigkeit auf Hersteller- bzw. -
Seite 76: Anschließen Dieses Gerätes An Einen Computer
Anschließen dieses Gerätes an einen Computer ● Wenn das Gerät an den Computer angeschlossen ist, startet Abdeckung des USB-Steckers abziehen. der Computer möglicherweise nicht (Neustart). Daher wird Das Gerät in den Computer stecken. empfohlen, das Gerät vom Computer abzutrennen, wenn der Computer gestartet (bzw. -
Seite 77: Pflege Und Verwendung
Pflege und Verwendung Um das Risiko von Funkstörungen durch • Falscher Umgang mit Batterien kann Austreten Kopfhörer-, Ohrhörer- oder Mikrofonkabel zu von Elektrolyt verursachen, wodurch Teile, verringern, nur geeignete Zubehörteile mit einer die mit der austretenden Batterieflüssigkeit in Kabellänge von weniger als 3 m verwenden. Kontakt kommen, beschädigt werden können g Einheit und Brände verursacht werden können. - Seite 78 Pflege und Verwendung g SD-Karten-Kompatibilität g Allergien Die microSD-Karte und die microSDHC-Karte können • Beenden Sie die Verwendung sofort, wenn Sie mit Geräten verwendet werden, die die jeweilige Unwohlsein beim Aufsetzen der Ohrhörer oder Karte unterstützen. (Die microSD-Karte kann auch anderer die Haut berührenden Teile verspüren.
-
Seite 79: Vorsichtsmaßregeln Zum Hören Mit Den Kopfhörern Oder Ohrhörern
Vorsichtsmaßregeln zum Hören mit den Kopfhörern oder Ohrhörern • Vermeiden Sie ein Abspielen über Kopfhörer oder Ohrhörer mit hoher Lautstärke. Gehörexperten warnen vor sehr langer fortgesetzter Wiedergabe. • Wenn Sie ein Ohrensausen hören, verringern Sie die Lautstärke oder beenden die Verwendung. •... -
Seite 80: Pflege Und Instandhaltung
Pflege und Instandhaltung Die Außenfl ächen des Gerätes mit einem trockenen, weichen Tuch reinigen. • Bei starker Verschmutzung des Gerätes ein Tuch mit Wasser anfeuchten, gründlich auswringen, die Schmutzflecken damit abwischen und anschließend mit einem trockenen Tuch nachreiben. • Keine Lösungsmittel einschließlich Benzin, Verdünner, Alkohol, Haushaltsreiniger, chemisch behandelte Reinigungstücher, usw. - Seite 81 -Bedeutung des nachstehend abgebildeten Symbols- Benutzerinformationen zur Entsorgung von elektrischen und elektronischen Geräten (private Haushalte) Entsprechend der grundlegenden Firmengrundsätzen der Panasonic-Gruppe wurde ihr Produkt aus hochwertigen Materialien und Komponenten entwickelt und hergestellt, die recycelbar und wieder verwendbar sind. Dieses Symbol auf Produkten und/oder begleitenden Dokumenten bedeutet, dass elektrische und elektronische Produkte am Ende ihrer Lebensdauer vom Hausmüll getrennt entsorgt werden müssen.
-
Seite 82: Accessori In Dotazione
Accensione/spegnimento In questo manuale vengono illustrate le operazioni e le funzioni di base dell’unità. Accensione: Fare scorrere l’interruttore OPR/HOLD verso il lato [ON] Accessori in dotazione per accendere l’unità. Il display si illumina. Spegnimento: 1 Cavo di prolunga USB Fare scorrere l’interruttore OPR/HOLD verso il lato [OFF] mentre l’unità... -
Seite 83: Impostazione Dell'orologio
Impostazione dell’orologio Premere [MENU]. Premere +, – per impostare i minuti. Per cambiare l’impostazione, premere u, i per Premere u, i per selezionare “DATE”, spostarsi tra le voci, quindi premere nuovamente +, – quindi premere [q OK] per confermare. per effettuarne l’impostazione. Premere [q OK] per confermare. -
Seite 84: Selezione Della Cartella
Selezione della cartella Cambiamento della posizione del microfono Premere [FOLDER]. Se è selezionata la scheda SD, sullo schermo viene visualizzato “SD”. Posizione del Utilizzi raccomandati microfono Passare dalla memoria interna alla scheda STEREO Adatto per registrare eventi SD e viceversa Funziona come un come riunioni o esibizioni Tenere premuto [FOLDER] per più... -
Seite 85: Operazioni Durante La Riproduzione
Registrazione Riproduzione Premere [REC *]. (Inizia la registrazione.) Premere [q OK]. (Ha inizio la riproduzione.) A ogni pressione: Registrazione in pausa continua Regolazione del volume Interruzione della registrazione: Premere [STOP g/RETURN]. Per alzare il volume: Premere +. Per abbassare il volume: Premere –. Operazioni durante la riproduzione Salta (Skip): Premere u, i. - Seite 86 Eliminazione di file e formattazione Selezione della scena di registrazione (SCENE SELECT) I file possono essere eliminati mediante tre metodi. Consente di selezionare un file e di eliminarlo. Consente di eliminare tutti i file nella cartella Premere [MENU]. selezionata. (I file nelle sottocartelle e nella cartella corrente non possono essere eliminati) Premere u, i per selezionare : Consente di eliminare tutti i dati, ad esempio...
- Seite 87 Variazione della qualità Cambiare la sensibilità audio del microfono Premere [MENU] . Premere [MENU]. Premere u, i per selezionare “MODE”, Premere u, i per selezionare “ ”, quindi premere [q OK] per confermare. quindi premere [q OK] per confermare. Premere +, – per selezionare “PCM”, “XP”, Premere +, –...
- Seite 88 Riduzione del rumore a bassa Prevenzione delle frequenza durante la registrazione registrazioni inutili (VAS) Premere [MENU] . Premere [MENU]. Premere u, i per selezionare “VAS”, Premere u fino a quando appare “ ” quindi premere [q OK] per confermare. (lampeggiante), quindi premere [q OK] per confermare.
- Seite 89 Registrazione a un orario specificato (TIMER RECORDING) Premere +, – per selezionare l’ora di inizio Premere [MENU]. registrazione, quindi premere i. Premere u, i per selezionare “ ”, Premere +, – per selezionare i minuti di quindi premere [q OK] per confermare. inizio registrazione, quindi premere i.
- Seite 90 Variazione della Ripetizione A-B velocità di riproduzione Premere [ERASE/A-B&] durante la riproduzione. Premere [q OK] durante la riproduzione. Viene impostato il punto di inizio (A) e vengono visualizzati “ ” (illuminato) e “ ” (lampeggiante). Premere u, i per regolare la velocità di Premere [ERASE/A-B&] nel punto finale registrazione.
- Seite 91 Shadowing Selezionare il file che si desidera riprodurre Premere [MENU]. con la funzione di shadowing, quindi Premere u, i per selezionare “ ”, premere [q OK]. quindi premere [q OK] per confermare. Premere [ERASE/A-B&]. Premere +, – per selezionare “On”, quindi Viene impostato il punto di inizio (A) e vengono premere [q OK] per confermare.
- Seite 92 Riproduzione a partire da un Riproduzione con posizione specifica (TIME SEARCH) ripetizione (REPEAT) Premere [MENU] durante la riproduzione. Tenere premuto [MENU] per almeno 2 secondi circa durante la riproduzione o La riproduzione si interrompe e viene visualizzata la mentre l’unità è arrestata. posizione di riproduzione corrente (tempo).
- Seite 93 Riduzione del rumore durante la riproduzione (NOISE CANCEL) Premere [MENU]. Tipo Effetto Non esegue alcuna riduzione del Premere u, i per selezionare “NC”, rumore. quindi premere [q OK] per confermare. Consente di eseguire una consistente Premere +, – per selezionare il tipo di riduzione del rumore.
-
Seite 94: Inserimento Della Scheda Sd
Spegnere l’unità e aprire il coperchio della batteria/ assistenza. alloggiamento della scheda SD. http://panasonic.net/support/ Spingere delicatamente la scheda SD. ● Se è inserita ed è stata selezionata una scheda SD Quando la scheda SD fuoriesce leggermente, estrarla ma sulla schermata non è... - Seite 95 - I file (MP3 o PCM) registrati su una scheda SD con alcuni • Premere [q OK]. registratori IC Panasonic diversi da questa unità possono • Premere [STOP g/RETURN]. (La riproduzione è terminata.) essere riprodotti con questa unità se si passa alle schede SD attenendosi alla procedura seguente.
- Seite 96 Divisione di file Registrazione mediante un microfono esterno Durante la riproduzione, premere [STOP g/RETURN] nel punto in cui si Far scorrere l’interruttore LINE/MIC su desidera dividere il file. [MIC]. Premere [MENU]. Collegare il microfono esterno. Premere u, i per selezionare “DIV”, Microfono esterno (non in dotazione) quindi premere [q OK] per confermare.
- Seite 97 Registrazione da altri dispositivi Far scorrere l’interruttore LINE/MIC Tenere premuto [REC *] per più di su [LINE]. 1 secondo. L’unità entra in standby durante la registrazione. Premere [MENU]. Attivare la riproduzione sul dispositivo Premere i fino a quando appare “ ”...
-
Seite 98: Monitoraggio Della Registrazione In Corso
Premere [MENU]. Tipo di spina: presa mini ø 3,5 mm stereo Premere u, i per selezionare la voce Auricolari addizionali consigliati: Panasonic RP-HV154, RP-HJE120 di impostazione (“BEEP” o “LED”), quindi (a partire da maggio 2012) premere [q OK] per confermare. -
Seite 99: Requisiti Di Sistema
A seconda dell’ambiente del computer potrebbero verificarsi malfunzionamenti (ad esempio i dati audio registrati in questa unità potrebbero essere inutilizzabili, ecc.). Panasonic e i rivenditori Panasonic non possono essere ritenuti responsabili per perdita dei dati audio o altri danni diretti o indiretti, eccetto nei casi di negligenza intenzionale o grave. -
Seite 100: Collegamento Di Questa Unità A Un Computer
Collegamento di questa unità a un computer ● Quando l’unità viene collegata al computer, il computer Rimuovere il coperchio della presa USB. potrebbe non avviarsi (riavvio). Si consiglia di staccare Inserire l’unità nel computer. l’unità dal computer quando si avvia (riavvia) il computer. ●... -
Seite 101: Cura E Utilizzo
Cura e utilizzo Per ridurre il rischio di interferenze radio causate • L’errato utilizzo delle batterie può causare da cavi delle cuffie, auricolari o microfoni, usare perdita dell’elettrolita, che può danneggiare solo accessori adeguati con un cavo lungo meno gli elementi che entrano a contatto con il di 3 m. - Seite 102 Cura e utilizzo g Compatibilità della scheda SD g Allergie La scheda microSD e la scheda microSDHC • Interrompere l’uso in caso di disturbi con possono essere utilizzate sui rispettivi dispositivi gli auricolari o qualsiasi altra parte a diretto che le supportano. (La scheda microSD può essere contatto con la pelle.
- Seite 103 Precauzioni per l’ascolto con cuffi e o auricolari • Non utilizzare le cuffie o gli auricolari ad alto volume. Gli otorini sconsigliano l’utilizzo prolungato. • Qualora si percepisca un ronzio nelle orecchie, ridurre il volume e interrompere l’utilizzo. • Non utilizzare alla guida di un motociclo. Può infatti distogliere l’attenzione dal traffico e in molti Paesi è...
- Seite 104 Manutenzione Pulire l’unità con un panno morbido e asciutto. • Se l’unità è molto sporca, strizzare un panno inumidito con acqua, togliere lo sporco e terminare la pulizia con un panno asciutto. • Non usare solventi, compresi benzolo, diluenti, alcol, detersivi da cucina, pulitori chimici, ecc. Essi potrebbero causare la deformazione dell’involucro o rovinare la vernice.
- Seite 105 -Se vedete questo simbolo- Informazioni per gli utenti sullo smaltimento di apparecchiature elettriche ed elettroniche obsolete (per i nuclei familiari privati) Questo simbolo sui prodotti e/o sulla documentazione di accompagnamento significa che i prodotti elettrici ed elettronici usati non devono essere mescolati con i rifiuti domestici generici.
-
Seite 106: Allumer Et Éteindre L'appareil
Allumer et éteindre l’appareil Ce mode d’emploi décrit les opérations et les fonctions de base de l’appareil. Allumer l’appareil : Déplacez le commutateur OPR/HOLD sur [ON] pour Accessoires fournis allumer l’appareil. L’écran s’allume. Éteindre l’appareil : 1 câble prolongateur USB Déplacez le commutateur OPR/HOLD sur [OFF] pendant Insérer la pile que l’appareil est en état d’arrêt. -
Seite 107: Régler L'horloge
Régler l’horloge Appuyez sur +, – pour régler les minutes. Appuyez sur [MENU]. Pour modifier les réglages, appuyez sur u, i Appuyez sur u, i pour sélectionner pour passer d’un élément à l’autre, puis appuyez “DATE”, puis appuyez sur [q OK]. encore sur +, –... - Seite 108 Sélectionner le dossier Changer la position du microphone Appuyez sur [FOLDER]. Position du Utilisations Si la carte SD est sélectionnée, “SD” est affiché sur microphone recommandées l’écran. STEREO Adéquat pour enregistrer Fonctionne comme des réunions ou des Passer entre la mémoire interne et la carte un microphone stéréo spectacles par un nombre ordinaire.
-
Seite 109: Régler Le Volume
Enregistrer Lire Appuyez sur [REC *]. (L’enregistrement Appuyez sur [q OK]. (La lecture commence.) commence.) Chaque fois que vous appuyez : Régler le volume Pause Reprise de l’enregistrement Montez le volume : Appuyez sur +. Arrêter l’enregistrement : Baissez le volume : Appuyez sur –. Appuyez sur [STOP g/RETURN]. - Seite 110 Supprimer des fichiers et formater Sélectionner la scène d’enregistrement (SCENE SELECT) Il existe trois méthodes pour effacer des fichiers. Sélectionner un fichier, puis le supprimer. Supprimer tous les fichiers dans le dossier Appuyez sur [MENU]. sélectionné. (Les fichiers dans les sous-dossiers et le fichier courant ne peuvent pas être supprimés) Appuyez sur u, i pour sélectionner : Supprimer toutes les données, telles que tous...
- Seite 111 Modifier la qualité du son Changer la sensibilité du microphone Appuyez sur [MENU] . Appuyez sur u, i pour sélectionner Appuyez sur [MENU]. “MODE”, puis appuyez sur [q OK]. Appuyez sur u, i pour sélectionner Appuyez sur +, – pour sélectionner “PCM”, “...
- Seite 112 Réduire les bruits à basse Éviter les enregistrements fréquence durant l’enregistrement inutiles (VAS) Appuyez sur [MENU] . Appuyez sur [MENU]. Appuyez sur u jusqu’à ce que “ ” Appuyez sur u, i pour sélectionner (clignotant) soit affiché, puis appuyez sur “VAS”, puis appuyez sur [q OK].
- Seite 113 Enregistrer à un moment spécifié (TIMER RECORDING) Appuyez sur +, – pour sélectionner l’heure Appuyez sur [MENU]. de départ de l’enregistrement, puis appuyez Appuyez sur u, i pour sélectionner sur i. “ ”, puis appuyez sur [q OK]. Appuyez sur +, – pour sélectionner la Appuyez sur +, –...
- Seite 114 Changer la vitesse de lecture Lecture répétée A-B Appuyez sur [ERASE/A-B&] durant la Appuyez sur [q OK] durant la lecture. lecture. Appuyez sur u, i pour ajuster la Le point de début (A) est spécifié et “ ” (allumé) et vitesse de lecture.
- Seite 115 Répétition parallèle Sélectionnez le fichier à lire avec la Appuyez sur [MENU]. répétition parallèle, puis appuyez sur Appuyez sur u, i pour sélectionner [q OK]. “ ”, puis appuyez sur [q OK]. Appuyez sur [ERASE/A-B&]. Appuyez sur +, – pour sélectionner “On”, Le point de début (A) est spécifié...
-
Seite 116: Lecture Répétée (Repeat)
Lecture à partir d’une position Lecture répétée (REPEAT) définie (TIME SEARCH) Appuyez au moins 2 secondes sur [MENU] durant la lecture ou lorsque l’appareil est Appuyez sur [MENU] pendant la lecture. arrêté. La lecture s’arrête et la position de lecture actuelle Le mode de répétition change chaque fois que vous (temps) est affichée. - Seite 117 Réduction du bruit durant la lecture (NOISE CANCEL) Appuyez sur [MENU]. Type Effet N’effectue pas de réduction de bruit. Appuyez sur u, i pour sélectionner Effectue une réduction importante du “NC”, puis appuyez sur [q OK]. bruit. Appuyez sur +, – pour sélectionner le type Effectue une réduction modérée du bruit.
-
Seite 118: Utiliser Une Carte Sd
Éteignez l’appareil et ouvrez le couvercle de la pile/ nos standards de fabrication, veuillez consulter le site carte SD. d’assistance ci-dessous. Appuyez doucement sur la carte SD. http://panasonic.net/support/ Lorsque la carte SD ressort légèrement, retirez-la ● Si “SD” n’est pas affiché sur l’écran lorsqu’une soigneusement. - Seite 119 Exemples de dossiers autres que MIC, LINE, et MUSIC terminée.) - Les fichiers (fichiers MP3 ou PCM) enregistrés sur une carte SD avec d’autres dictaphones Panasonic peuvent être g À propos du dossier “MUSIC” lus avec cet appareil en changeant simplement les cartes SD selon la procédure ci-dessous.
- Seite 120 Diviser des fichiers Enregistrer en branchant un microphone externe Durant la lecture, appuyez sur [STOP g/RETURN] au point où vous Déplacez le commutateur LINE/MIC sur souhaitez diviser le fichier. [MIC]. Appuyez sur [MENU]. Branchez le microphone externe. Appuyez sur u, i pour sélectionner Microphone externe “DIV”, puis appuyez sur [q OK].
- Seite 121 Enregistrer à partir d’autres appareils Déplacez le commutateur LINE/MIC Appuyez au moins 1 seconde sur [REC *]. sur [LINE]. L’appareil passe en attente d’enregistrement. Lancez la lecture sur l’appareil externe, et Appuyez sur [MENU]. ajustez le niveau d’entrée/sortie. Appuyez sur i jusqu’à ce que “ ”...
- Seite 122 Appuyez sur [MENU]. Type de fiche : mini-fiche stéréo ø 3,5 mm Appuyez sur u, i pour sélectionner Écouteurs supplémentaires recommandés : Panasonic RP-HV154, RP-HJE120 une option (“BEEP” ou “LED”), puis (À partir de mai 2012) appuyez sur [q OK].
-
Seite 123: Configuration Système Requise
Suivant l’environnement de l’ordinateur, des dysfonctionnements (tels que l’impossibilité d’utiliser les données audio enregistrées sur cet appareil) peuvent se produire. Panasonic et les revendeurs de produits Panasonic ne peuvent être tenus responsables pour toute perte de données audio ni pour tout autre dommage direct ou indirect, à l’exception des cas de négligence grossière intentionnelle. -
Seite 124: Débrancher L'appareil
Raccorder cet appareil à un ordinateur ● Lorsque l’appareil est connecté à l’ordinateur, il se peut Retirez le couvercle de la fiche USB. que l’ordinateur ne puisse pas démarrer (ou redémarrer). Il est recommandé de déconnecter l’appareil de l’ordinateur Insérez l’appareil dans l’ordinateur. lors du démarrage (redémarrage) de l’ordinateur. -
Seite 125: Entretien Et Conseils D'utilisation
Entretien et conseils d’utilisation Pour réduire le risque d’interférences radio • Ne laissez pas la ou les batterie dans un causées par des câbles de microphone ou véhicule exposé aux rayons du soleil pendant d’écouteurs, utilisez uniquement des accessoires une période prolongée avec les portes et vitres adéquats avec un câble de moins de 3 m. - Seite 126 Entretien et conseils d’utilisation g Compatibilité des cartes SD g Allergies Des cartes microSD et microSDHC peuvent être • En cas d’inconfort avec les écouteurs ou toute utilisées avec les appareils les prenants en charge. autre partie directement en contact avec votre (Les cartes microSD peuvent aussi être utilisées peau, cessez l’utilisation.
- Seite 127 Précautions d’écoute avec un casque ou des écouteurs • N’utilisez pas un volume trop élevé avec un casque ou des écouteurs. Les spécialistes de l’ouïe déconseillent une écoute prolongée. • En cas de bourdonnement dans les oreilles, réduisez le volume ou cessez l’utilisation. •...
- Seite 128 Entretien Nettoyez cet appareil avec un chiffon doux et sec. • Si l’appareil est très sale, essorez un chiffon mouillé avec de l’eau, essuyez l’appareil, puis séchez avec un chiffon sec. • N’utilisez aucun solvant tel que benzène, diluant, alcool, détergent de cuisine, chiffon imprégné chimiquement, etc.
- Seite 129 - Si vous voyez ce symbole - Informations relatives à l’évacuation des déchets, destinées aux utilisateurs d’appareils électriques et électroniques (appareils ménagers domestiques) Lorsque ce symbole figure sur les produits et/ou les documents qui les accompagnent, cela signifie que les appareils électriques et électroniques ne doivent pas être jetés avec les ordures ménagères.
-
Seite 130: Encendido Y Apagado De La Unidad
Encendido y apagado Este manual describe las operaciones y funciones básicas de la unidad. de la unidad Accesorios suministrados Encendido de la unidad: Deslice el interruptor OPR/HOLD hacia [ON] para activar la 1 Cable alargador de USB alimentación. A continuación, se encenderá el visualizador. Apagado de la unidad: Inserción de la pila Deslice el interruptor OPR/HOLD hacia [OFF] mientras... -
Seite 131: Ajuste Del Reloj
Ajuste del reloj Pulse [MENU]. Pulse +, – para establecer los minutos. Para cambiar los ajustes pulse u, i para Pulse u, i para seleccionar “DATE” y desplazarse entre los elementos, y a continuación pulse [q OK] para confirmar. pulse +, – de nuevo para realizar el ajuste. Pulse [q OK] para confirmar. - Seite 132 Selección de la carpeta Cambio de la posición del micrófono Pulse [FOLDER]. Si se selecciona la tarjeta SD, se mostrará “SD” en la pantalla. Posición del micrófono Usos recomendados ESTÉREO Resulta adecuado para Cambio entre la memoria interna y la Funciona como un grabar eventos tales como tarjeta SD...
- Seite 133 Grabación Reproducción Pulse [REC *]. (Comienza la grabación.) Pulse [q OK]. (Comienza la reproducción.) Cada pulsación: Pausa Reanudar la grabación Ajuste del volumen Detención de la grabación: Pulse [STOP g/RETURN]. Subir el volumen: Pulse +. Bajar el volumen: Pulse –. Operaciones durante la reproducción Saltar: Pulse u, i.
- Seite 134 Eliminación de archivos y formateo Selección de la situación para la grabación (SCENE SELECT) Hay tres métodos para eliminar archivos. Seleccione un archivo y, a continuación, elimínelo. Elimina todos los archivos de la carpeta Pulse [MENU]. seleccionada. (Los archivos de las subcarpetas y Pulse u, i para seleccionar “SCENE”...
- Seite 135 Cambio de la calidad Modificación de la del sonido sensibilidad del micrófono Pulse [MENU] . Pulse [MENU]. Pulse u, i para seleccionar “MODE” y Pulse u, i para seleccionar “ ” y pulse [q OK] para confirmar. pulse [q OK] para confirmar. Pulse +, –...
- Seite 136 Reducción del ruido de baja Prevención de una frecuencia durante la grabación grabación innecesaria (VAS) Pulse [MENU] . Pulse [MENU]. Pulse u, i para seleccionar “VAS” y Pulse u hasta que se muestre “ ” pulse [q OK] para confi rmar. (parpadeando) y pulse [q OK] para confirmar.
- Seite 137 Grabación a una hora especificada (TIMER RECORDING) Pulse +, – para seleccionar la hora para Pulse [MENU]. iniciar la grabación y pulse i. Pulse u, i para seleccionar “ ” y Pulse +, – para seleccionar el minuto para pulse [q OK] para confirmar. iniciar la grabación y pulse i.
- Seite 138 Modificación de la Reproducción de velocidad de reproducción repetición A-B Pulse [ERASE/A-B&] durante la Pulse [q OK] durante la reproducción. reproducción. Pulse u, i para ajustar la velocidad de Se ha establecido el punto de inicio (A) y se reproducción. muestran “...
- Seite 139 Imitación Seleccione el archivo que desee reproducir Pulse [MENU]. con imitación y pulse [q OK]. Pulse u, i para seleccionar “ ” y Pulse [ERASE/A-B&]. pulse [q OK] para confirmar. Se ha establecido el punto de inicio (A) y se Pulse +, –...
-
Seite 140: Reproducción De Repetición (Repeat)
Reproducción desde una posición Reproducción de específica (TIME SEARCH) repetición (REPEAT) Pulse [MENU] durante la reproducción. Pulse y mantenga pulsado [MENU] durante al menos 2 segundos aproximadamente La reproducción se detiene y se muestra la posición durante la reproducción, o mientras la de reproducción actual (tiempo). - Seite 141 Reducción de ruido durante la reproducción (NOISE CANCEL) Pulse [MENU]. Tipo Efecto No se realiza ninguna reducción de Pulse u, i para seleccionar “NC” y ruido. pulse [q OK] para confirmar. Se lleva a cabo una gran reducción de Pulse +, – para seleccionar el tipo de NOISE ruido.
- Seite 142 SD. sitio de asistencia a continuación. Empuje la tarjeta SD con suavidad. http://panasonic.net/support/ Cuando la tarjeta SD sobresalga ligeramente, sáquela ● Si no aparece “SD” en la pantalla, a pesar de haber despacio.
- Seite 143 • Pulse [STOP g/RETURN]. (Reproducción terminada.) - Los archivos (MP3 o PCM) grabados en una tarjeta SD con algunas grabadoras CI de Panasonic que no sean esta g Acerca de la carpeta “MUSIC” unidad, se pueden reproducir con esta unidad simplemente •...
- Seite 144 División de archivos Grabación mediante la conexión de un micrófono externo Durante la reproducción, pulse [STOP g/RETURN] en el punto en el que Deslice el interruptor LINE/MIC a la desea dividir el archivo. posición [MIC]. Pulse [MENU]. Conecte el micrófono externo. Pulse u, i para seleccionar “DIV”...
- Seite 145 Grabación desde otros dispositivos Deslice el interruptor LINE/MIC a la Pulse y mantenga pulsado [REC *] posición [LINE]. durante 1 segundo o más. La unidad pasará al modo de espera de grabación. Pulse [MENU]. Inicie la reproducción del dispositivo Pulse i hasta que aparezca “ ”...
- Seite 146 Pulse [MENU]. Tipo de clavija: mini clavija estéreo de ø 3,5 mm Pulse u, i para seleccionar el ajuste Auriculares adicionales recomendados: Panasonic RP-HV154, RP-HJE120 (“BEEP” o “LED”) y pulse [q OK] para (Desde mayo de 2012) confirmar. Control de la •...
-
Seite 147: Requisitos Del Sistema
Según el entorno del ordenador, pueden producirse fallos de funcionamiento (por ejemplo, no pueden utilizarse los datos de audio grabados en esta unidad. etc.). Panasonic y los distribuidores de Panasonic no se responsabilizan de ninguna pérdida de datos de audio u otros daños directos o indirectos excepto en casos de negligencia intencional o grave. - Seite 148 Conexión de esta unidad a un ordenador ● Cuando la unidad esté conectada al ordenador, éste Retire la cubierta de la clavija USB tirando puede que no se inicie (reinicie). Se recomienda retirar de ella. la conexión de la unidad con el ordenador cuando se Conecte la unidad en el ordenador.
-
Seite 149: Cuidados Y Uso
Cuidados y uso Para reducir el riesgo de interferencias • La manipulación incorrecta de las pilas puede provocadas por los cables de los auriculares, provocar fugas de electrolito que pueden dañar los audífonos o el micrófono, utilice únicamente elementos como los contactos del líquido los accesorios adecuados, con cables de una y provocar un incendio. - Seite 150 Cuidados y uso g Compatibilidad de las tarjetas SD g Alergias Las tarjetas microSD y microSDHC se pueden • Si le molestan los auriculares o cualquier otro utilizar en dispositivos que sean compatibles con elemento que entre en contacto directo con la cada una de ellas.
- Seite 151 Precauciones para el uso de auriculares o audífonos • No utilice los auriculares o los audífonos a un volumen muy elevado. Los especialistas en audición aconsejan evitar su uso continuo y prolongado. • Si nota un pitido en los oídos, baje el volumen o deje de utilizarlos. •...
-
Seite 152: Información Útil
Además puede contactarnos directamente a través de nuestro Contact Center: deformación de la carcasa exterior o el deterioro Panamá 800-PANA (800-7262) del revestimiento. Colombia 01-8000-94PANA (01-8000-947262) Ecuador 1800-PANASONIC (1800-726276) Costa Rica 800-PANA737 (800-7262737) El Salvador 800-PANA (800-7262) Guatemala 1-801-811-PANA (1-801-811-7262) Chile 800-390-602 Desde teléfono Celular: 797-5000... - Seite 153 -Si ve este símbolo- Información sobre la eliminación para los usuarios de equipos eléctricos y electrónicos usados (particulares) La aparición de este símbolo en un producto y/o en la documentación adjunta indica que los productos eléctricos y electrónicos usados no deben mezclarse con la basura doméstica general.
-
Seite 154: Ligar/Desligar O Aparelho
Ligar/desligar o aparelho Este manual descreve funções e operações básicas. Ligar o aparelho: Faça deslizar o interruptor OPR/HOLD para o lado [ON] Acessórios fornecidos para ligar o aparelho. Depois, acender-se-á o visor. Desligar o aparelho: 1 Cabo de extensão USB Faça deslizar o interruptor OPR/HOLD para o lado desligado Introduzir a pilha [OFF] enquanto a unidade estiver no estado de paragem. -
Seite 155: Acertar O Relógio
Acertar o relógio Pressione +, – para definir o minuto. Pressione [MENU]. Para alterar a definição, pressione u, i para Pressione u, i para seleccionar se mover entre os itens e pressione depois +, – “DATE” e pressione [q OK] para confirmar. novamente para confirmar a definição. -
Seite 156: Seleccionar A Pasta
Seleccionar a pasta Mudar a posição do microfone Pressione [FOLDER]. Posição do microfone Usos recomendados Se o cartão SD for seleccionado, “SD” é apresentado ESTÉREO Adequado para a gravação no ecrã. Funciona como um de evento, tais como uma microfone estéreo reunião ou espectáculo Alternar entre a memória interna e o cartão normal. -
Seite 157: Ajustar O Volume
Gravação Reprodução Pressione [REC *]. (A gravação tem início.) Pressione [q OK]. (A reprodução é iniciada.) Cada vez que pressiona: Pausa Retomar a gravação Ajustar o volume Parar a gravação: Aumentar o volume: Pressione +. Pressione [STOP g/RETURN]. Diminuir o volume: Pressione –. Operações durante a reprodução Saltar (Omitir): Pressione u, i. - Seite 158 Eliminar ficheiros e formatação Seleccionar o cenário de gravação (SCENE SELECT) Existem três métodos para eliminar ficheiros. Seleccione um ficheiro e depois elimine-o. Elimine todos os ficheiros na pasta Pressione [MENU]. seleccionada. (Não é possível eliminar os ficheiros nas subpastas e na pasta real.) Pressione u, i para seleccionar : Elimine todos os dados, tais como todos os “SCENE”...
-
Seite 159: Alterar A Sensibilidade Do Microfone
Alterar a qualidade do Alterar a sensibilidade do microfone Pressione [MENU] . Pressione [MENU]. Pressione u, i para seleccionar Pressione u, i para seleccionar “ ” e “MODE” e pressione [q OK] para pressione [q OK] para confirmar. confirmar. Pressione +, – para seleccionar “ ”... - Seite 160 Reduzir o som de baixa Evitar gravações frequência durante a gravação desnecessárias (VAS) Pressione [MENU] . Pressione [MENU]. Pressione u até “ ” (a piscar) ser Pressione u, i para seleccionar “VAS” apresentado e pressione [q OK] para e pressione [q OK] para confi rmar. confirmar.
- Seite 161 Gravar a uma hora especificada (TIMER RECORDING) Pressione +, – para seleccionar as horas da Pressione [MENU]. hora de início da gravação e pressione i. Pressione u, i para seleccionar “ ” e Pressione +, – para seleccionar os minutos pressione [q OK] para confirmar.
- Seite 162 Alterar a velocidade de reprodução Reprodução com repetição de A-B Pressione [ERASE/A-B&] durante a Pressione [q OK] durante a reprodução. reprodução. Pressione u, i para ajustar a O ponto de início (A) fica definido e aparecem as velocidade da gravação. indicações “...
- Seite 163 Seguimento Seleccione o ficheiro que pretende Pressione [MENU]. reproduzir com seguimento e pressione Pressione u, i para seleccionar “ ” e [q OK]. pressione [q OK] para confirmar. Pressione [ERASE/A-B&]. Pressione +, – para seleccionar “On” e O ponto de início (A) fica definido e aparecem as pressione [q OK] para confirmar.
- Seite 164 Reprodução a partir de uma posição Reprodução com especificada (TIME SEARCH) repetição (REPEAT) Pressione [MENU] durante a reprodução. Pressione e mantenha pressionado [MENU] durante pelo menos 2 segundos durante A reprodução pára e é apresentada a posição a reprodução ou enquanto a unidade está (tempo) actual da reprodução.
- Seite 165 Redução do ruído durante a reprodução (NOISE CANCEL) Pressione [MENU]. Tipo Efeito Não realiza uma redução do ruído. Pressione u, i para seleccionar “NC” e Realiza uma grande quantidade de pressione [q OK] para confirmar. redução do ruído. Pressione +, – para seleccionar o tipo de Realiza uma pequena quantidade de NOISE CANCEL e pressione [q OK] para redução do ruído.
- Seite 166 Desligue a unidade e abra a tampa da bateria/ranhura nossas normas de fabrico, consulte o site abaixo. do cartão SD. http://panasonic.net/support/ Empurre cuidadosamente o cartão SD. ● Se “SD” não for apresentado no ecrã, mesmo apesar Quando o cartão SD ficar ligeiramente saliente, puxe...
- Seite 167 Exemplos de pastas diferentes de MIC, LINE e MUSIC concluída.) - Os ficheiros (ficheiros MP3 ou ficheiros PCM) gravados num cartão SD com alguns gravadores de IC da Panasonic g Acerca da pasta “MUSIC” diferentes desta unidade podem ser reproduzidos com esta •...
- Seite 168 Dividir ficheiros Gravar ligando um microfone externo Durante a reprodução, pressione [STOP g/RETURN] no ponto onde pretende Faça deslizar o interruptor LINE/MIC para dividir o ficheiro. [MIC]. Pressione [MENU]. Ligue o microfone externo. Pressione u, i para seleccionar “DIV” Microfone externo e pressione [q OK] para confirmar.
- Seite 169 Gravar a partir de outros dispositivos Faça deslizar o interruptor LINE/MIC Pressione e mantenha pressionado [REC *] durante 1 ou mais segundos. para [LINE]. A unidade entra em espera da gravação. Pressione [MENU]. Coloque em reprodução o dispositivo Pressione i até visualizar “ ”...
- Seite 170 Tipo de ficha: minificha mono com um ø de 3,5 mm Pressione u, i para seleccionar o Auriculares adicionais recomendados: Panasonic RP-HV154, RP-HJE120 item de definição (“BEEP” ou “LED”) e (À data de Maio de 2012) pressione [q OK] para confirmar.
-
Seite 171: Requisitos Do Sistema
Dependendo do ambiente do computador, podem ocorrer falhas no funcionamento (por exemplo, não poder utilizar os dados de áudio gravados no aparelho. etc.). A Panasonic e os distribuidores Panasonic não se responsabilizam pela perda dos dados de áudio ou outros danos directos ou indirectos, excepto nos casos de negligência intencional ou flagrante. - Seite 172 Ligar a unidade a um computador ● Quando a unidade está ligada ao computador, este pode Puxe para fora a tampa da ficha USB. não iniciar (reiniciar). É aconselhável remover a unidade do computador quando iniciar (reiniciar) o computador. Introduza a unidade no computador. ●...
- Seite 173 Cuidados e utilização Para reduzir o risco de interferência de rádio • O manuseamento incorrecto das pilhas pode causado pelos cabos dos auscultadores, auriculares causar o vazamento dos electrólitos, o que ou microfone, utilize apenas acessórios adequados pode danificar os contactos e causar um com um comprimento de cabo inferior a 3 m.
- Seite 174 Cuidados e utilização g Compatibilidade do cartão SD g Alergias O cartão microSD e o cartão microSDHC podem • Suspenda o uso se sentir desconforto com ser utilizados em dispositivos que suportam cada os auriculares ou quaisquer outras partes cartão. (O cartão microSD pode também ser directamente em contacto com a sua pele.
- Seite 175 Precauções para ouvir com os Auscultadores ou Auriculares • Não reproduza os auscultadores ou auriculares com um volume alto. Os especialistas em audição desaconselham uma audição contínua e prolongada. • Se ouvir um zumbido nos ouvidos, baixe o volume ou suspenda o uso. •...
-
Seite 176: Manutenção
Se o fizer, pode deformar a http://www.lar.panasonic.com caixa exterior ou danificar o revestimento. E também diretamente com o nosso Contact Center: Panamá 800-PANA (800-7262) Colombia 01-8000-94PANA (01-8000-947262) Ecuador 1800-PANASONIC (1800-726276) Costa Rica 800-PANA737 (800-7262737) El Salvador 800-PANA (800-7262) Guatemala 1-801-811-PANA (1-801-811-7262) Chile 800-390-602... - Seite 177 -Se vir este símbolo- Informações sobre a eliminação de resíduos para utilizadores de equipamentos eléctricos e electrónicos (utilizadores particulares) Este símbolo nos produtos e/ou documentos anexos significa que os produtos eléctricos e electrónicos usados não devem ser misturados com os resíduos urbanos indiferenciados.
- Seite 178 Pursuant to at the directive 2004/108/EC, article 9(2) Panasonic Testing Centre Panasonic Marketing Europe GmbH Winsbergring 15, 22525 Hamburg, Germany Web Site: http://panasonic.net © Panasonic Corporation 2012 VQT4J69...