Herunterladen Inhalt Inhalt Diese Seite drucken
Selve commeo Multi Send Betriebsanleitung
Vorschau ausblenden Andere Handbücher für commeo Multi Send:
Inhaltsverzeichnis

Werbung

Verfügbare Sprachen

Verfügbare Sprachen

D
GB
F
NL
PL
S
Betriebsanleitung
commeo Multi Send . . . . . . . . . . . . . . . . . . . Seite 3
D
Bitte bewahren Sie die Anleitung auf!
Operating instruction
commeo Multi Send . . . . . . . . . . . . . . . . . . Page 33
GB
Keep these instructions in a safe place!
Instrukcja obsługi
commeo Multi Send . . . . . . . . . . . . . . . . Strona 123
PL
Proszę zachować instrukcję!

Werbung

Kapitel

Inhaltsverzeichnis
loading

Inhaltszusammenfassung für Selve commeo Multi Send

  • Seite 1 Multi Send . . . . . . . . . . . . . . . . . .
  • Seite 2: Inhaltsverzeichnis

    Inhaltsverzeichnis 1. Sicherheitshinweise .................... 5 2. Gerätebeschreibung ................... 6 3. Allgemeines ......................8 3.1. Bestimmungsgemäße Verwendung ............8 3.2. SELVE-commeo-Funk .................. 8 4. Montage ....................... 9 5. Inbetriebnahme ....................10 6. Werkseinstellung ....................11 7. Funktionserklärung ................... 12 7.1. Status-LED ....................12 7.2. Fahrtasten AUF , STOPP , AB  ............12 7.3. Kanal-/Gruppenwahltaste ................. 12 7.4. AUTO/MAN-Umschaltung ................12 7.5. Menü-Aufrufen .................... 12 7.6. Zwischenposition 1 ..................13 7.7. Zwischenposition 2 ..................14 7.8. SELECT-Taste/PROG-Taste ............... 14 7.9. Einlernen des Funks ................... 14...
  • Seite 3 Inhaltsverzeichnis 9. USB-Anschluss ....................30 10. Batteriewechsel ....................31 11. Wartung und Pflege ..................31 12. Technische Daten ....................32 13. Allgemeine Konformitätserklärung ..............32 14. SELVE-Service-Hotline ..................32...
  • Seite 4: Sicherheitshinweise

    Sicherheitshinweise 1. Sicherheitshinweise • Nur in trockenen Räumen verwenden. • Verwenden Sie nur unveränderte SELVE-Originalteile. • Personen aus dem Fahrbereich der Anlagen fernhalten. Warnung! • Kinder von Steuerungen fernhalten. • Landesspezifische Bestimmungen beachten. • Verbrauchte Batterien fachgerecht entsorgen. • Batterien nur durch identischen Typ (LR 03; AAA) ersetzen. • W ird die Anlage durch ein oder mehrere Geräte gesteuert, muss der Fahrbereich der Anlage während des Betriebes einsehbar sein. • Gerät enthält verschluckbare Kleinteile.
  • Seite 5: Gerätebeschreibung

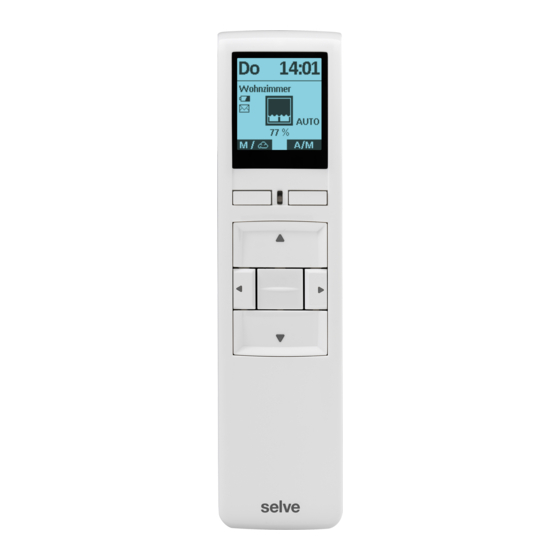
    Gerätebeschreibung 2. Gerätebeschreibung Beschreibung des commeo Multi Send 1 Display 10 USB micro-B Anschluss 2 Display-Taste rechts 11 Programmier-Taste/PROG 3 Display-Taste links 12 Select-Taste/SELECT 4 Status-LED 5 AUF-Taste  6 Kanalwahltaste links  7 STOPP-Taste 8 Kanalwahltaste rechts  9 AB-Taste ...
  • Seite 6 Gerätebeschreibung Beschreibung des Displays Betriebsmodus 1 Wochentag 2 Gewählter Kanal/Gruppe 3 N ächste Schaltzeiten für die gewählte Gruppe 4 Z uordnung Display-Taste links Funktion: MENÜ aufrufen Funktion: <1 s drücken für MENÜ aufrufen, =1 s drücken für Sensorvisualisie- rung aufrufen 5 Uhrzeit 6 Meldungen 7 Z uordnung Display-Taste rechts Funktion: AUTO/MAN-Umschaltung Menümodus 1 Anzeige Menüpunkt 2 Menü 3 Z uordnung Display-Taste links Funktion: Z urück ohne Speichen der Einstellungen 4 Z uordnung Display-Taste rechts Funktion: Z urück mit Speichen der Einstellungen Sensorvisualisierung 1 Funkverbindung zum Sensor 2 Gemessene Werte der Sonnensensoren 3 Gemessener Windwert...
  • Seite 7: Allgemeines

    Sachen ergibt oder dieses Risiko durch andere Sicherheitseinrichtungen abgedeckt ist. • D er Betreiber genießt keinerlei Schutz vor Störungen durch andere Fernmelde- anlagen und Endeinrichtungen, auch nicht durch Funkanlagen, die ordnungsgemäß im gleichen Frequenzbereich betrieben werden. 3.2. SELVE-commeo-Funk Der SELVE-commeo-Funk sendet und empfängt Funksignale auf der Funkfrequenz 868,1 MHz. Bei commeo handelt es sich um ein bidirektionales Funksystem bei dem sowohl Daten im Empfänger wie auch im Sender gespeichert werden. Das Zurückset- zen des Antriebes oder Löschen der Senderliste führt zu einer Fehlermeldung beim Sender. In die Empfänger lassen sich alle SELVE-commeo-Sender einlernen. Es können bis zu 16 Sender in einem Empfänger eingelernt werden. Die Bedienungsanleitung der...
  • Seite 8: Montage

    Montage 4. Montage Hinweis: Achten Sie darauf, dass die Steuerung nicht im Bereich metallischer Flächen oder magnetischer Felder installiert und betrieben wird. Metallische Flächen oder Glas- scheiben mit Metallbeschichtung, die innerhalb der Funkstrecke liegen, können die Reichweite erheblich reduzieren. Funkanlagen, die auf der gleichen Frequenz senden, können zur Störung des Emp- fangs führen. Es ist zu beachten, dass die Reichweite des Funksignals durch den Gesetzgeber und die baulichen Maßnahmen begrenzt ist. Montage Wandhalterung • P rüfen Sie vor der Montage an der gewünschten Montageposition die einwandfreie Funktion von Sender und Empfänger.
  • Seite 9: Inbetriebnahme

    Inbetriebnahme 5. Inbetriebnahme Erste Schritte um Sprache, Standort und Datum/Uhrzeit einzustellen: Drücken Sie die STOPP-Taste um den commeo Multi Send in Betrieb zu nehmen. Das Menü Sprache wird angezeigt. Stellen Sie mit den Tasten  und  die gewünschte Sprache ein. Bestätigen Sie die Eingabe mit der Taste Das Menü Standort wird angezeigt. Stellen Sie nächstgelegene Stadt in der Städteauswahl mit den Tasten  oder  ein. Ist diese Einstellung nicht genau genug, gehen Sie mit den Tasten  und  auf die Einstellung für den Längen- und Breiten g rad. Die Einstellung der Werte erfolgt mit den Tasten  und . Eine Einstellung der Zeitzone ist normalerweise nicht notwendig. Bestätigen Sie die Eingabe mit der Taste Das Menü Datum/Uhrzeit wird angezeigt. Die Einstellungen für das Menü Datum/Uhrzeit sind vom Werk voreingestellt. Ist die Einstellung falsch, gehen Sie mit den Tasten  und  auf die Einstellungen. Die Einstellung der Werte erfolgt mit den Tasten  und . Bestätigen Sie die Eingabe mit der Taste Der commeo Multi Send springt in den Betriebsmodus.
  • Seite 10: Werkseinstellung

    Werkseinstellung 6. Werkseinstellung Folgende Werte sind voreingestellt. Datum/Urzeit • Aktuelles Datum und Uhrzeit (MEZ) Programm Zentrale ON, Gruppe 1–9 OFF • A stro Abend, block Schaltzeiten Montag–Freitag  07:00 Uhr  Astro Abend Schaltzeiten Samstag–Sonntag  08:00 Uhr  Astro Abend Hinweis: Durch Betätigen der RESET-Funktion im Menü Funktion wird der commeo Multi Send in die Werkseinstellung zurückgesetzt. Die Empfänger sind weiterhin ein- gelernt.
  • Seite 11: Funktionserklärung

    Funktionserklärung 7. Funktionserklärung 7.1. Status-LED Ein Funksignal wird durch das grüne Aufleuchten der Status-LED signalisiert. Im Falle einer Meldung schaltet die LED nach kurzer Zeit von Grün auf Rot um. Sollte noch kein Empfänger auf dem Kanal eingelernt sein leuchtet die LED orange. 7.2. Fahrtasten AUF , STOPP , AB  Mit den Fahrtasten können im Betriebsmodus die jeweiligen Empfänger des gewählten Kanals/Gruppe gefahren werden. Bei einer Markise ist AUF  die Einfahrt und AB  die Ausfahrt. Befindet sich der commeo Multi Send in einem Menüpunkt so kann über diese Tasten die Auswahl vorgenommen werden. 7.3. Kanal-/Gruppenwahltaste Mit der Kanal-/Gruppenwahltaste können Sie die 20 Kanäle, 9 Gruppen und die Zentral g ruppe auswählen. Der Zentralbefehl beinhaltet automatisch alle eingelernten Empfänger. 7.4. AUTO/MAN-Umschaltung In der Stellung werden automatische und manuelle Fahrbefehle vom commeo Multi Send gesendet. In der Stellung werden nur manuelle Fahrbefehle vom commeo Multi Send gesendet (z. B. AUF, STOPP, AB per Tastendruck).
  • Seite 12: Zwischenposition 1

    Funktionserklärung 7.6. Zwischenposition 1 Die Zwischenposition ist eine frei wählbare Position zwischen der oberen und unteren End l age. Zwischenposition 1 einstellen: Bedienung Fahrt Antrieb mit der A UF-Taste in die obere End l age fah r en. STOPP-Taste drücken und anschließend zu s ätzlich die AB-Taste drücken. Beide gedrückt halten. Nach 3 Sekunden beginnt die Programmierfahrt. Die Position bei gehaltener STOPP-Taste mit der AB- und AUF-Taste einstellen. >3 s Loslassen der STOPP-Taste speichert die Position. Zwischenposition 1 anfahren: Bedienung Fahrt AB-Taste zweimal kurz nacheinander drücken.
  • Seite 13: Zwischenposition 2

    Funktionserklärung 7.7. Zwischenposition 2 Die Zwischenposition ist eine frei wählbare Position zwischen der oberen und unteren End l age. Zwischenposition 2 einstellen: Bedienung Fahrt Antrieb mit der AB-Taste in die untere End l age fah r en. STOPP-Taste drücken und anschließend zu s ätzlich die AUF-Taste drücken. Beide gedrückt halten. Nach 3 Sekunden beginnt die Programmierfahrt. Die Position bei gehaltener STOPP-Taste mit der AUF- >3 s und AB-Taste einstellen. Loslassen der STOPP-Taste speichert die Position. Zwischenposition 2 anfahren: Bedienung Fahrt AUF-Taste zweimal kurz nacheinander drücken. 7.8. SELECT-Taste/PROG-Taste Die SELECT-Taste und PROG-Taste sind für das Einlernen und Einstellen der Empfän- ger. Die Anweisungen entnehmen Sie der Empfänger-/Antriebsanleitung. 7.9. Einlernen des Funks Die Anweisungen entnehmen Sie der Empfänger-/Antriebsanleitung.
  • Seite 14: Programmierung

    Programmierung 8. Programmierung 8.1. Menüübersicht und Hauptmenü Durch Drücken der Display-Taste links rufen Sie im Betriebsmodus das Haupt - menü auf. Navigation durchs Menü Mit den Tasten  und  gehen Sie auf den gewünschten Menüpunkt. Der gewählte Menüpunkt wird invertiert angezeigt. Wählen Sie den Menüpunkt mit der Taste oder aus. Mit der Taste springen Sie in das Hauptmenü und dem Betriebs- modus zurück (veränderte Einstellungen im Menü Datum/Uhrzeit werden nicht ge s peichert). 8.2. Datum/Uhrzeit einstellen Die Einstellungen für das Menü Datum/Uhrzeit sind vom Werk voreingestellt. Ist die Einstellung falsch, gehen Sie mit den Tasten  und  auf die Einstellungen. Die Einstellung der Werte erfolgt mit den Tasten  und . springen Sie in das Haupt menü zurück Mit der Taste ohne zu speichern. Mit der Taste speichern Sie die Einstellungen und s pringen in das Haupt menü zurück.
  • Seite 15: Schaltzeiten Einstellen, Menü Programm

    Programmierung 8.3. Schaltzeiten einstellen, Menü Programm Im Menü Programm werden die Schaltuhren für die Zentrale und den Gruppen aktiviert und deaktiviert. Für eine Schaltuhr sind die folgenden Einstellungen möglich. Individuelle Funktion Die Schaltzeit wird für morgens und abends von Ihnen fest eingestellt. Astro Funktion D ie Astro Funktion berechnet die Schaltzeiten morgens und abends nach den Dämme r ungszeiten. Astro Abend Funktion D ie Astro Abend Funktion berechnet die Schaltzeiten abends nach der Dämme- rungszeit. Die Schaltzeit morgens wird von Ihnen fest eingestellt. Hinweis zur Astro und Astro Abend Funktion: F ür die Astro Funktionen muss im Menü Standort die geografische Lage eingestellt sein. Die berechnete Zeit kann im Menü Astroverschiebung +/- 120 Minuten ver- schoben werden.
  • Seite 16: Programmierung

    Programmierung Sperrzeiten D ie Sperrzeiten begrenzen die Dämmerungszeiten der Astro Funktionen im Sommer, sodass die Schaltzeit morgens nicht zu früh und abends nicht zu spät ausgeführt wird. Beispiele: D ie Sperrzeit für morgens (Auf) von 07:00 Uhr sorgt dafür, dass die Schaltzeit der Astro Funktion im Sommer nicht vor 07:00 Uhr ausgeführt wird. D ie Sperrzeit für abends (Ab) von 21:00 Uhr sorgt dafür, dass die Schaltzeit der Astro Funktion im Sommer nicht nach 21:00 Uhr ausgeführt wird. Es ist keine Sperrzeit für morgens (Auf) eingestellt. Es ist keine Sperrzeit für abends (Ab) eingestellt. H inweis: Die Zeiteinstellung , dass keine Sperrzeit eingestellt ist, erreichen Sie bei der Zeiteinstellung zwischen 23:59 und 00:00 Uhr.
  • Seite 17: Empfänger, Kanäle Und Gruppen Verwalten, Menü Verwaltung

    Programmierung 8.4. Empfänger, Kanäle und Gruppen verwalten, Menü Verwaltung Im Menü Verwaltung ist es möglich den Empfängern, Kanälen und Gruppen zur b esseren Unterscheidung eindeutige Namen zu vergeben. Auch werden in diesem Menü die Zielpositionen für Schaltzeiten festgelegt wie auch die Kanalzuordnung zu den Gruppen organisiert. 8.4.1. Empfänger, Kanäle und Gruppen benennen, Menü Empfänger-, Kanal-, Gruppen name Im Menü Empfänger-, Kanal-, Gruppenname ist es möglich den Empfängern, K a n älen und Gruppen zur besseren Unterscheidung Namen zu vergeben. Der E mpfängername wird auch bei einer Meldung eines Empfängers angezeigt. Vergeben Sie einen eindeutigen Namen für den Empfänger um diese später besser unter s cheiden...
  • Seite 18: Zielposition Für Schaltzeiten Einstellen, Menü Zielposition Programm

    Programmierung 8.4.2. Zielposition für Schaltzeiten einstellen, Menü Zielposition Programm Im Menü Zielposition Programm kann für die Auf- und Abschaltzeit der Gruppen und Zentrale eine Zielposition festgelegt werden. Vom Werk aus ist die Zielposition für eine Aufschaltzeit auf obere Endlage und für eine Abschaltzeit auf untere Endlage einge- stellt. Folgende Positionen können angefahren werden: O bere Endlage, Antrieb fährt bis in seine Endlage oben. Untere Endlage, Antrieb fährt bis in seine Endlage unten. Z wischenposition 1, kann über den Handsender im Empfänger eingestellt w erden (siehe 7.6.). Z wischenposition 2, kann über den Handsender im Empfänger eingestellt werden (siehe 7.7.). K eine Zielposition, sondern eine Freigabe der Sonnenautomatik bei gleichzeitig eingelernten Sonnensensor. Der Empfänger fährt den Behang in tägliche Ruhe- lage. K eine Zielposition, sondern eine Sperrung der Sonnenautomatik bei gleichzeitig eingelernten Sonnensensor. Der Empfänger fährt den Behang in die nächtliche Ruhelage. Hinweis: Die Position der Ruhelagen ist abhängig von der Einstellung der Empfänger- anwendung. Das Menü Zielposition Programm ist ausgewählt. Mit den Tasten , ,  und  wählen Sie die zu verändernde Zielposition. Durch Drücken der Taste wird die gewählte Position verändert. Durch mehrfaches Drücken der Taste kommen Sie zur gewünschten Zielpositionen. Mit der Taste springen Sie in das Menü Verwaltung zurück ohne zu speichern. Mit der Taste speichern Sie die Einstellungen und s pringen in das Menü Verwaltung zurück.
  • Seite 19: Kanäle Einer Gruppe Zuordnen, Menü Kanalzuordnung Gruppe

    Programmierung 8.4.3. Kanäle einer Gruppe zuordnen, Menü Kanalzuordnung Gruppe Im Menü Kanalzuordnung Gruppe ordnen Sie der Gruppe 1 bis 9 die Kanäle zu, w elche Sie in der Gruppe haben möchten. Der Gruppe 1 sind vom Werk aus die Ka n äle 1 bis 10 und der Gruppe 2 die Kanäle 11 bis 20 zugeordnet. Diese Zuordnung kann von Ihnen verändert werden. In der Kanalauswahl haben diese Piktogramme die folgende Bedeutung: Kanal ist nicht belegt und kann nicht ausgewählt werden. Kanal ist belegt und der Gruppe nicht zugeordnet. K anal ist belegt und der Gruppe zugeordnet. Das Menü Kanalzuordnung Gruppe ist ausgewählt. Hier im Beispiel ist es Gruppe 3. Mit den Tasten  und  wählen Sie die Gruppe aus, denen Sie Kanäle zuweisen oder ändern möchten. Mit der Taste springen Sie in das Menü Verwaltung zurück ohne zu speichern. Mit der Taste oder gelangen Sie in das Menü in dem Sie Kanäle für die Gruppe auswählen können. Die Kanalauswahl für die gewählte Gruppe wird angezeigt.
  • Seite 20: Kanäle/Gruppen Auf T Ippbetrieb Umstellen, Menü Tippbetrieb

    Programmierung 8.4.4. Kanäle/Gruppen auf T ippbetrieb umstellen, Menü Tippbetrieb Im Menü Tippbetrieb lassen sich einzelne Kanäle oder Gruppen auf eine T ippbetriebs- funktion umstellen, um die Wendung einer Jalousie mühelos einzustellen. Im Display wird der Tippbetrieb im Betriebsmodus durch ein Jalousiesymbol angezeigt. Im Tipp- betrieb fährt der Antrieb mit einer Verzögerung von 0,5 Sekunden los. Beim Loslassen der Fahrtaste innerhalb der ersten Sekunde der Fahrt stoppt der Antrieb sofort. Wird der Antrieb länger 1 Sekunde durchgängig gefahren, geht der Antrieb in Selbsthaltung. Das Menü Zielposition Tippbetrieb ist ausgewählt. Mit den Tasten  und  wählen Sie den Kanal oder die Grup- pe aus. Mit der Taste  stellen Sie den Tippbetrieb aus ( Mit der Taste  stellen Sie den Tippbetrieb ein ( Mit der Taste springen Sie in das Menü Verwaltung zurück ohne zu speichern. Mit der Taste speichern Sie die Einstellungen und s pringen in das Menü Verwaltung zurück.
  • Seite 21: Rückmeldungen Vom Empfänger, Menü Meldungen

    Programmierung 8.5. Rückmeldungen vom Empfänger, Menü Meldungen Im Menü Meldungen werden Ihnen Meldungen zu den Empfängern angezeigt. Wenn eine neue Meldung vorhanden ist, sehen Sie das im Betriebsmodus am Briefsymbol im Display. In der Meldung wird Ihnen die Meldenummer, Grund, Empfängername sowie der Zeitpunkt mitgeteilt. Die Meldungen können im Menü Meldungen gelöscht werden.
  • Seite 22: Weitere Einstellungen, Menü Einstellungen

    Programmierung 8.6. Weitere Einstellungen, Menü Einstellungen Im Menü Einstellungen können Sie weitere Einstellungen für die Schaltuhr, Astro Pro- gramme, Anzeige und Sprache vornehmen. 8.6.1. Urlaubsfunktion, Menü Urlaub Die Urlaubsfunktion simuliert ein bewohntes Haus, wenn Sie im Urlaub sind. Ist die Funktion aktiv (ON), werden die Schaltzeiten zeitversetzt zu den programmieren Zeiten zufällig in einem Bereich von +/- 15 Minuten ausgeführt. Das Menü Urlaub ist ausgewählt. Mit der Taste  stellen Sie die Urlaubsfunktion aus ( Mit der Taste  stellen Sie die Urlaubsfunktion ein ( Mit der Taste springen Sie in das Menü Einstellungen zurück ohne die Änderung zu speichern. Mit der Taste speichern Sie die Änderung und springen in das Menü Einstellungen zurück. 8.6.2. Standort für Dämmerungszeitberechnung der Astrofunktion, Menü Stand- Der Standort ist wichtig für die Berechnung der Dämmerungszeit der Astrofunktionen. Wählen Sie an dieser Stelle die Stadt aus, die Ihrem Standort am nächsten ist. Ist diese Einstellung nicht genau genug, können Sie den Längen- und Breitengrad für Ihren Standort einstellen. Westliche Längengrade und südliche Breitengrade werden mit negativen Vorzeichen dargestellt. Die Werte für Ihren Standort können Sie einem Atlas, einem Navigationsgerät oder dem Internet entnehmen.
  • Seite 23: Anpassung Der Astrozeit, Menü Astroverschiebung

    Programmierung 8.6.3. Anpassung der Astrozeit, Menü Astroverschiebung Im Menü Astroverschiebung kann die berechnete Astrozeit für morgens und abends angepasst werden. Die Astrozeit kann maximal +/- 120 Minuten verschoben werden. Im unteren Menüfeld wird die aktuelle Astrozeit inklusive der Verschiebung angezeigt. Das Menü Astroverschiebung ist ausgewählt. Mit den Tasten  und  wählen Sie die einzustellende Astro- verschiebung aus. Mit den Tasten  und  geben Sie die Veränderung in Minuten ein. Mit der Taste springen Sie in das Menü Einstellungen zurück ohne die Änderung zu speichern. Mit der Taste speichern Sie die Änderung und springen in das Menü Einstellungen zurück. 8.6.4. Anpassung der Spracheinstellung, Menü Sprache Im Menü Sprache können Sie Ihre Landessprache einstellen. Es stehen 13 Sprachen zur Verfügung. Das Menü Sprache ist ausgewählt. Mit den Tasten  und  wählen Sie die gewünschte Sprache aus. Mit der Taste springen Sie in das Menü Einstellungen zurück ohne die Änderung zu speichern. Mit der Taste speichern Sie die Änderung und springen in das Menü Einstellungen zurück.
  • Seite 24: Displayanzeige Einstellen, Menü Display

    Programmierung 8.6.5. Displayanzeige einstellen, Menü Display Im Menü Display können Sie die Hintergrundbeleuchtung des Displays ein- und aus- schalten und die Dauer einstellen. Die eingeschaltete Zeit kann zwischen 5 Sekunden und 30 Sekunden in 5 Sekunden Schritte angepasst werden. Zur längeren Batterienlebensdauer wird der commeo Multi Send in einen Energiespar- modus geschaltet. Die Zeit bis zum Abschalten kann zwischen 1 Minute und 5 Minuten in Minutenschritte eingestellt werden. Hinweis: Eine längere Leuchtdauer des Displays und ein verzögertes Abschalten in den Energiesparmodus verkürzt die Batterielebensdauer. Das Menü Display ist ausgewählt. Mit den Tasten  und  wählen Sie die Einstellung aus. Mit der Taste  und  schalten Sie die Funktion an und aus oder geben die Veränderung ein. Mit der Taste springen Sie in das Menü Einstellungen zurück ohne die Änderung zu speichern. Mit der Taste speichern Sie die Änderung und springen in das Menü Einstellungen zurück. 8.6.6. Nicht benutze Kanäle/Gruppen ausblenden, Menü Anzeigemodus Im Menü Anzeigemodus können Sie die nicht benutzte Kanäle und Gruppen im Betriebsmodus zur leichteren Bedienung ausblenden, sodass die Kanäle bei der Kanal-/Gruppenauswahl nicht mit angezeigt werden. In den Menüs werden die Kanäle und Gruppen weiterhin angezeigt.
  • Seite 25: Sensorvisualisierung

    Programmierung 8.6.7. Sensorvisualisierung Mit der Sensorvisualisierung lassen sich die Messwerte eines commeo Sensor WS/ WSRF im Display anzeigen. Auch wird der Tageslichtzustand des ausgewählten E mpfängers in der Grafik angezeigt. Bei eingeschalteter Visualisierung kann die Anzeige im Betriebsmodus durch Drücken der linken Display-Taste für 1 Sekunde auf- gerufen werden. Durch Drücken einer der beiden Display-Tasten kommen Sie zurück zum Betriebsmodus. Um die Werte anzuzeigen, muss im Menü Sensorvisualisierung ein Empfänger aus- gewählt werden, in dem ein Sensor eingelernt ist. Beispielhafte Anzeige des Displays in der Sensorvisualisierung Symbolerklärungen Funkverbindung zum Sensor Das Symbol signalisiert, dass die Verbindung zum Empfänger hergestellt ist und kein Problem mit dem Sensor vorliegt, sodass die Daten aktuell sind. S1–S3 Gemessene Lichtwerte der Sonnensensoren Es werden die drei gemessenen Sonnenwerte in klx angezeigt, bei Werten unter 1000 lx wir nur ein Lichtwert angezeigt. Gemessener Windwert Anzeige der aktuell gemessenen Windgeschwindigkeit in m/s. Windalarm Das Symbol signalisiert, dass im Empfänger Windalarm vorliegt.
  • Seite 26: Sensorparametrierung

    Programmierung Das Menü Sensorvisualisierung ist ausgewählt. Mit der Taste  stellen Sie die Visualisierung aus ( Mit der Taste  stellen Sie die Visualisierung ein ( Bei eingeschalteter Visualisierung wird ein auswählbarer Emp- fänger angezeigt. Es werden nur Empfänger mit eingelernter Sensorik angezeigt. Mit der Taste  gehen Sie auf den ausgewählten Empfänger. Mit der Taste  und  können Sie einen anderen Empfänger wählen. Der ausgewählte Empfänger bewegt sich kurz. Mit der Taste springen Sie in das Menü Einstellungen zurück ohne die Änderung zu speichern. Mit der Taste speichern Sie die Änderung und springen in das Menü Einstellungen zurück. 8.7. Sensorparametrierung Mit der Sensorparametrierung lassen sich die Werte der Automatik- und Schutzfunk- tionen, die durch einen commeo Sensor WS/WSRF ausgelöst werden, anzeigen und einstellen. Die Werte können für jeden Empfänger einzeln angezeigt und eingestellt werden. Die Beschreibung dieser Funktionen und deren Einstellung finden Sie in der commeo Sensor WS/WSRF Betriebsanleitung unter Punkt 7. Funktionen. Diese Anleitung beschreibt nur das Abfragen der Sensorinformation. Nach Auswahl eines Empfängers mit eingelerntem Sensor können im Menü Sensor- information alle vorhanden Informationen angezeigt werden. Nicht alle Empfänger- profile nutzen alle Sensoren. Nicht genutzte oder vorhandene Sensoren werden nicht in der Empfängerinformation angezeigt. Die folgenden Anzeigen sind möglich: Sensorstatus Eine Sensorik ist eingelernt und betriebsbereit. Eine Sensorik ist eingelernt und der Testmodus läuft. V on der eingelernten Sensorik kann zurzeit kein Signal empfangen werden (Sensorikverlust). Wind Der Windsensor im Empfänger ist aktiv. Der Windsensor ist aktiv und der Empfänger ist im Windalarm.
  • Seite 27 Programmierung Helligkeit/Tageslichtzustand Der Empfänger ist im Tageslichtzustand Sonnig. Der Empfänger ist im Tageslichtzustand Hell. Der Empfänger ist im Tageslichtzustand Dämmerig. Der Empfänger ist im Tageslichtzustand Dunkel. Temperatur 21 °C Anzeige der aktuellen Temperatur. Eingestellte Temperaturschwelle ist unterschritten. Eingestellte Temperaturschwelle ist überschritten. Das Menü Sensorparametrierung ist ausgewählt. Mit den Tasten  und  wählen Sie den gewünschten Emp- fänger aus. Mit der Taste oder gelangen Sie in das Menü für die Sensorinformation. Die Information ist mit der Taste abzurufen. Mit den Tasten  und  können Sie sich die vorhandenen Informationen anschauen. Mit 3x Drücken der Taste springen Sie in das Menü S ensorvisualisierung zurück.
  • Seite 28: Geräteinformation Und Zurücksetzen Der Programmierung, Menü Funktion

    Programmierung 8.8. Geräteinformation und zurücksetzen der Programmierung, Menü Funktion Im Menü Funktion können Sie Geräteinformationen abrufen sowie die Programmie- rung zurücksetzen. 8.8.1. Geräteinformation, Menü Info Im Menü Info werden Ihnen die Softwareversion und die Seriennummer des Gerätes angezeigt. Mit der Taste oder springen Sie in das Menü Funktion zurück. 8.8.2. Zurücksetzen der Programmierung, Menü Reset Durch Betätigen der RESET-Funktion wird die Programmierung des commeo Multi Send in die Werkseinstellung zurückgesetzt. Die Empfänger sind weiterhin eingelernt. Nach dem Zurücksetzen wird die Inbetriebnahme durchlaufen (siehe 5.). Das Menü Reset ist ausgewählt. Mit der Taste springen Sie in das Menü Funktion zurück ohne den commeo Multi Send zurückzusetzen. Mit der Taste bestätigen Sie das Zurücksetzen des c ommeo Multi Send und gelangen zur Inbetriebnahme.
  • Seite 29: Usb-Anschluss

    USB-Anschluss 9. USB-Anschluss Über den USB-Anschluss haben Sie die Möglichkeit die Programmierung des commeo Multi Send über die kostenlose SELVE Software commeo Multi Send Konfigurations­ tool vorzunehmen. Nähere Informationen sowie die Software selbst finden Sie auf der SELVE Homepage www.selve.de Hinweis: Der USB-Anschluss kann nicht genutzt werden um den commeo Multi Send mit Strom zu versorgen oder die Batterien zu laden. Schließen Sie den commeo Multi Send nicht dauerhaft an den USB an, da dieser dann nicht in den Energiesparmodus geht und die Batterien sehr schnell verbraucht. Nicht alle USB-Kabel eignen sich zur Datenübertragung und sind nur USB-Ladekabel. Reine USB-Ladekabel können nicht für die Software verwendet werden und die Anzeige in der Software geht nicht auf Online.
  • Seite 30: Batteriewechsel

    Batteriewechsel/Wartung und Pflege 10. Batteriewechsel Wenn das Batteriesymbol im Display auftaucht, sollten Sie die Batterien wechseln. Der commeo Multi Send kann noch weiter verwendet werden. Wird das große durch- gestrichene Batteriesymbol angezeigt, sind die Batterien soweit verbraucht, dass keine Funktion mehr möglich ist. 1. L ösen Sie die Schraube und ziehen Sie die Klammer ab. 2. Entnehmen Sie die Batterien. 3. L egen Sie die neuen Batterien (LR 03; AAA) l agerichtig ein. B atterien gehören nicht in den Hausmüll. Bitte bringen Sie die verbrauchten Batte- rien zu Ihrer örtlichen Sammelstelle. 11. Wartung und Pflege Reinigen Sie das Gerät nur mit einem feuchten Tuch. Verwenden Sie kein Reinigungs- mittel, da dieses den Kunststoff angreifen kann.
  • Seite 31: D Technische Daten/Konformitätserklärung

    Technische Daten/Konformitätserklärung 12. T echnische Daten Nennspannung: 3 V DC Batterietyp: LR 03 (AAA), 1,5 V Alkali-Batterien Schutzart: IP 20 Zulässige Umgebungstemperatur: -10 bis +55 °C Funkfrequenz: 868,1 und 868,3 MHz Max. Sendeleistung: 10 mW Die maximale Funkreichweite beträgt im Gebäude bis zu 25 m und im freien Feld bis zu 350 m. Es können pro Kanal bis zu 32 Empfänger und pro Sender bis zu 64 Empfänger einge- lernt werden. Technische Änderungen vorbehalten. 13. Allgemeine Konformitätserklärung Hiermit erklärt die Firma SELVE GmbH & Co. KG, dass sich der commeo Multi Send in Übereinstimmung mit den grundlegenden Anforderungen und den anderen relevanten Vorschriften der Richtlinie 2014/53/EU befindet. Die Konformitätserklärung ist ein- sehbar unter www.selve.de. 14. SELVE-Service-Hotline • Hotline: Telefon 02351 925-299 • D ownload der Bedienungsanleitungen unter www.selve.de oder QR-scan...
  • Seite 32 Contents 1. Safety instructions .................... 35 2. Device description .................... 36 3. General ....................... 38 3.1. Designated use ................... 38 3.2. SELVE commeo radio ................38 4. Installation ......................39 5. Initial operation ....................40 6. Default setting ....................41 7. Explanation of functions .................. 42 7.1. Status LED ....................42 7.2. Moving button UP , STOP , DOWN  ..........42 7.3. Channel and group option key ..............42 7.4. AUTO/MAN-shift ..................42 7.5. Call up menu ....................42 7.6. Intermediate position 1 ................43 7.7. Intermediate position 2 ................44 7.8. SELECT button/PROG button ..............44 7.9. T ransmitter programming procedure ............44 8. Programming .
  • Seite 33 Contents 9. USB-connection ....................60 10. Changing the battery ..................61 11. Maintenance ...................... 61 12. Technical data ....................62 13. General declaration of conformity ..............62 14. SELVE Service Hotline ..................62...
  • Seite 34: Safety Instructions

    Safety instructions 1. Safety instructions • Use in dry rooms only. • For use with unmodified original SELVE parts only. • Personen aus dem Fahrbereich der Anlagen fernhalten. Warning! • Keep persons away from the systems operating range. • Always observe country-specific regulations. • Dispose of used batteries properly. • Replace batteries with identical type (LR 03; AAA) only. • I f the system is controlled by one or more devices, the system operating range must be visible during operation. • The equipment contains small parts that could be swallowed.
  • Seite 35: Device Description

    GB Device description 2. Device description Description of commeo Multi Send 1 Display 10 USB micro B connection 2 Display button right 11 Programming button/PROG 3 Display button left 12 Select button/SELECT 4 Status LED 5 UP button  6 Channel select button left  7 STOP button 8 Channel select button right  9 DOWN button ...
  • Seite 36: Device Description

    Device description Description of displays Operating mode 1 Weekday 2 Selected channel/group 3 N ext switching times for the selected group 4 A llocation display button left Function: Call up MENU Function: push <1 s to call up MENU, push =1 s to call up sensor visualisation 5 Time 6 Messages 7 A llocation display button right Function: AUTO/MAN-shift Menu mode 1 Display menu option 2 Menu 3 A llocation display button left Function: b ack without saving of the settings 4 A llocation display button right Function: b ack with saving of the settings Sensor visualization 1 Radio connection to the server 2 Measured values of the sun sensors 3 Measured wind value 4 Wind alarm 5 Frost...
  • Seite 37: General

    The commeo Multi Send has an energy-saving mode for a longer battery service life. The commeo Multi Send can be reactivated from the energy-saving mode by a move- ment of the device or by a keystroke. 3.1. Designated use The commeo Multi Send may only be used for controlling roller shutter and sun protec- tion systems. • P lease note that radio sets cannot be operated in areas with increased risk of inter- ference (e.g. hospitals, airports). • T he remote control is only permitted for equipment and systems with which a mal- function in the hand-held transmitter or receiver does not present a risk to persons, animals or objects, or this risk is covered by other safety devices. • T he operator does not enjoy any protection from disturbances by other remote s ignalling equipment and terminal equipment (for example, also by radio sets ope- rated in the same frequency range in accordance with regulations). 3.2. SELVE commeo radio The SELVE commeo radio transmits and receives radio signals on the radio frequency 868.1 MHz. commeo is a bidirectional radio system that saves data in the receiver as well as the transmitter. The resetting of the drive or deleting of the transmitter list will lead to an error message at the transmitter. All SELVE commeo transmitters can be programmed into the receivers. Up to 16 trans- mitters can be programmed into one receiver. Please adhere to the transmitter operat- ing instructions.
  • Seite 38: Installation

    Installation 4. Installation Note: Ensure that the controls are not installed and operated in the vicinity of metal surfaces or magnetic fields. Metal surfaces or panes of glass with a metallisation within the transmission path can reduce the range considerably. Radio sets transmitting at the same frequency could interfere with reception. It should be noted that the range of the radio signal is restricted by legislation and constructional measures. Installing the wall mount • B efore installing in the position required, check that the transmitter and receiver are functioning properly. • F ix the mount to the wall with the two screws provided. The hole distance is 69 mm.
  • Seite 39: Initial Operation

    GB Initial operation 5. Initial operation First steps to set language, location and date/time: Push the STOP button to put the commeo Multi Send into operation The menu Language will be shown. Set the requested language by using the  and  buttons. Confirm your entry by using the button. The menu Location will be shown. Set the nearest city in the city selection by using the buttons  or . When the setting is not exact enough, go via using the buttons  and  to the setting of the longitude and latitude. The set- ting of the values is possible by using the  and  buttons. A setting of the time zone is normally not necessary. Confirm your entry by using the button. The menu Date/Time will be shown. The setting of the menu Date/Time is preset. In case the setting is wrong, go to the settings by using the buttons  and . The setting of the values is possible by using the  and  buttons. Confirm your entry by using the button. The commeo Multi Send will move into the operating mode.
  • Seite 40: Default Setting

    Default setting 6. Default setting The following values are preset. Date/Time • Current date and current time (GMT) Program Center ON, group 1–9 OFF • A stro evening, block Switching times monday–friday  07:00 h  Astro evening Switching times saturday–sunday  08:00 h  Astro evening Note: By using the RESET function in the menu Function the commeo Multi Send will be set back into default setting. The receivers are still programmed.
  • Seite 41: Explanation Of Functions

    GB Explanation of functions 7. Explanation of functions 7.1. Status LED A radio signal is indicated by the status LED lighting up green. In case of message, the LED will switch from green to red after a short time. If no receiver has been taught in on the channel yet, the LED will light up orange. 7.2. Moving button UP , STOP , DOWN  By using the moving buttons, the respective receiver of the selected channel/group can be moved in the operating mode. At an awning UP  is the retraction and DOWN  the extending of the awning. When the commeo Multi Send is currently in a menu option, the selection can be made by these buttons. 7.3. Channel and group option key With the channel and group option key you can select the 20 channels, 9 groups and the central group. The central command automatically contains all taught-in receivers. 7.4. AUTO/MAN-shift In the position automatic and manual moving commands of the commeo Multi Send are transmitted. In the position only manual moving commands of the commeo Multi Send will be transmitted (e.g. UP, STOP, DOWN by key stroke).
  • Seite 42: Intermediate Position 1

    Explanation of functions 7.6. Intermediate position 1 The intermediate position is a position between the upper and lower end limits that can be freely selected. Set intermediate position 1: Operation Drive Move the drive to the upper end position with the UP button. Push the STOP button and then additionally push the DOWN button. Keep both pushed. After 3 seconds, the programming run starts. Set the position with the DOWN and UP buttons while keeping the STOP button pushed. >3 s Releasing the STOP button will save the position. Travel to intermediate position 1: Operation Drive Push the DOWN button twice quickly in sequence.
  • Seite 43: Intermediate Position 2

    GB Explanation of functions 7.7. Intermediate position 2 The intermediate position is a position between the upper and lower end limits that can be freely selected. Set intermediate position 2: Operation Drive Move the drive to the lower end position with the DOWN button. Push the STOP button and then additionally push the UP button. Keep both pushed. After 3 seconds, the programming run starts. Set the position with the UP and DOWN buttons while >3 s keeping the STOP button pushed. Releasing the STOP button will save the position. Travel to intermediate position 2: Operation Drive Push the UP button twice quickly in sequence. 7.8. SELECT button/PROG button The SELECT button and PROG button are meant for teaching in and setting the re c eivers. The instructions can be taken from the receiver/motor manual. 7.9. T ransmitter programming procedure The instructions can be taken from the receiver/motor manual.
  • Seite 44: Programming

    Programming 8. Programming 8.1. Overview of the menu and Main menu By pressing the display button on the left , you will call up the Main menu in the operating mode Navigation through the menu By using the buttons  and  you can go to the requested menu point. The selected menu point will be shown inverted. Select the menu point with the button or . By using the button you will get back into the Main menu and into the operation mode (modified settings in the menu Date/Time will not be saved). 8.2. Set date/time The setting of the menu Date/Time is preset. In case the setting is wrong, go to the settings by using the buttons  and . The setting of the values is possible by using the  and  buttons. With the button you will get back into the main menu without saving. With the button you will save the settings and get back into the Main menu.
  • Seite 45: Set Switching Times, Program Menu

    GB Programming 8.3. Set switching times, Program menu In the menu Programm, the time switches for the central and the groups will be acti- vated and deactivated. The following settings are possible for a time switch. Individual function T he switching time will be set as a default for the mornings and the evenings from you. Astro function T he astro function will calculate the switching times in the mornings and in the e venings according to twilight. Astro evening function T he astro function will calculate the switching times in the evenings according to twilight. The switching time in the morning will be set from you. Note to the astro and astro evening function: F or the astro function the geographic location has to be set in the menu Location. The calculated time can be shifted by +/- 120 minutes in the menu Astro drift. Block T he switching times can be set in two blocks, for weekdays (Monday until Friday) and for the weekend (Saturday until Sunday).
  • Seite 46 Programming Blocking times T he blocking times are limiting the twilight times of the astro function in the summer so that the switching time in the mornings will not be executed too early and not too late in the evenings. Examples: T he blocking time for the morning (UP) of 07:00 am provides that the switching time of the astro function will not be exe- cuted before 07:00 am in the summer. T he blocking time for the evening (DOWN) of 09:00 pm pro- vides that the switching time of the astro function will not be executed after 9 pm in the summer. There is no blocking time set for the morning (UP). There is no blocking time set for the evening (DOWN). N ote: The time setting that no blocking time is set can be reached at the time setting between 23:59 and 00:00 h. The menu Program is selected. With the buttons  and  you can select a group. With the button  you will switch off the time switch ( With the button  you will switch on the time switch ( you will get back into the Main menu. With the button With the button or you will reach the menu for the switching time setting. The switching time function is selected. With the buttons  and  you will select the setting. With the button  and  you will change the settings and times. With the button you will get back into the menu Pro- gram without saving.
  • Seite 47: Administer Receivers, Channels Und Groups, Menu Administration

    GB Programming 8.4. Administer receivers, channels und groups, menu Administration In the menu Administration it is possible to give receivers, channels and groups clear names for a better differentiation. Also the target positions for the switching times can be determined in this menu as well as the channel assignment for the groups can be organised. 8.4.1. Name receivers, channels and groups, menu Receiver, channel and group name In the menu Receiver, channel and group name it is possible to give receivers, c hannels and groups names for a better distinction. The receiver name will also be shown at a message of a receiver. Please give a clear name for the receiver in order to distinguish them better later. The names for the groups and channels will later also be shown at the selection of groups and channels to ease the manual operation. Depend- ing on the characters, it is possible to use up to 18 characters for a name. The menu Receiver, channel or group name is selected. In this example we have a channel name. The receiver, channel or group selection is shown. With the buttons  and  you will chose the receiver, channel or group that has to be renamed. When you name receivers, the selected receivers will move shortly to ease the selection.
  • Seite 48: Set Target Position For Switching Times, Menu Target Program

    Programming 8.4.2. Set target position for switching times, menu Target program In the menu Target program it is possible to fix a target position for the switching off and switching on times of groups and centrals. In the factory setting the target position for a switching on time is set to upper end limit positon and for switching off time is set to lower end limit position. The following positions can be approached: Upper end limit position, drive moves to its upper end limit position. Lower end limit position, drive moves to its lower end limit position. I ntermediate positon 1, can be set via the hand-held transmitter on the receiver (see 7.6.). I ntermediate position 2, can be set via the hand-held transmitter on the receiver (see 7.7.). N o target position but an approval of the sun automatic at the same time pro- grammed sun sensor. The receiver will move the system into the daily neutral position. N o target position but a blocking of the sun automatic at the same time pro- grammed sun sensor. The receiver will move the system into the nightly neutral position. N ote: The position of the neutral position is dependent on the setting of the receiver use. The menu Target program is selected. With the buttons , ,  and  you will choose the target position that needs to be changed. By pushing the button the selected position will be changed. By pushing the button several times you will get to the target position. With the button you will get back into the menu Admin- istration without saving. With the button you can save the settings and get back into the menu Administration.
  • Seite 49: Assign Channels To A Group, Menu Assignment Channel/Group

    GB Programming 8.4.3. Assign channels to a group, menu Assignment channel/group In the menu Assignment channel/group you can assign channels which you want to have in the group to the group 1 to 9. Factory set, the channels 1 to 10 are assigned to group 1 and the channels 11 to 20 are assigned to group 2. This assignment can be changed from you. In the channel selection these pictograms have the following meaning: Channel is not used and can not be selected. Channel is used and is not assigned to the group. C hannel is used and assigned to the group. The menu Assignment channel/group is selected. In this example it is group 3. With the buttons  and  you can select the group of which you want to assign channels or which you want to change. With the button you will get back into the menu Admin- istration without saving. With the button or you will get into the menu in which you can select channels for the group. The channel selection for the selected group will be shown. With the buttons , ,  and  you will select the channel which you want to assign to the group or which you want to delete. By pushing the button the channel will be assigned or deleted. With the button you will get back into the menu Assign- ment channel/group without saving. With the button you will save the channel assignment and will get back into the menu Assignment channel/group.
  • Seite 50: Shift Channels/Groups Into Touch Control, Menu Touch Control

    Programming 8.4.4. Shift channels/groups into touch control, menu Touch control In the menu Touch control single channels or groups can be shifted into touch control in order to set the turn of a venetian blind easily. In the display, the touch control mode will be shown with the venetian blind symbol in the operating mode. In the touch con- trol mode the drive will start moving with a time-delay of 0.5 seconds. When releasing the moving button within the first second of the move, the drive will stop immediately. When the drive is moved longer than 1 second, the drive will go into self-retaining. The menu Target position Touch control is selected. With the buttons  and  you will select the channel or group. With the button  you will switch off the touch control mode With the button  you will switch on the touch control mode With the button you will get back into the menu Admin- istration without saving. With the button you can save the settings and get back into the menu Administration.
  • Seite 51: Feedback From A Receiver, Menu Messages

    GB Programming 8.5. Feedback from a receiver, menu Messages In the menu Messages you will get messages concerning the receiver. When a new message was received you will see that in the operating mode with the letter symbol in the display. In this message you will be informed on the report number, reason, receiver name as well as the time. The messages can be deleted in the menu Messages. The messages are dependent on the receiver type and its connection as well as on the set sensors. The most important messages which will be shown are: Message Cause Overload One drive was blocked during the movement. Obstacle One drive has been moved onto an obstacle. Radio One receiver did not confirm the moving command. Sensor loss One in the receiver programmed sensor does no longer send signals to the receiver. Alarm A sensor has given the alert or there is an emergency signal on the extensions. Wind alarm A wind sensor has given a wind alarm. Command not exe- A command could not have been executed from the receiver.
  • Seite 52: Further Settings, Menu Adjustment

    Programming 8.6. Further settings, menu Adjustment In the menu Adjustment you can make further settings for the time switch, astro pro- grammes, display and language. 8.6.1. Holiday function, menu Holiday The holiday function simulates an occupied house when you are on holiday. When the function is activated (ON) the switching times will be executed time-delayed to the programmed times randomly in a time of +/- 15 minutes. The menu Holiday is selected. With the button  you will switch off the holiday function ( With the button  you will switch on the holiday function ( With the button you will get back into the menu Adjust- ment without saving the modifications. With the button you can save the modifications and will get back into the menu Adjustment. 8.6.2. Location for twilight time calculation of the astro function, menu Location The location is important for the calculation of the twilight time of the astro function. Select the city which is nearest to your location. When this setting is not exact enough, you can set the longitude and latitude for your location. Western longitudes and south- ern latitude will be presented with negative signs. The values for your location can be found in an atlas, a GPS or on the internet. The menu Location is selected. Set the nearest city in the city selection by using the buttons  or . When the setting is not exact enough, go via using the buttons  and  to the setting of the longitude and latitude. The set- ting of the values is possible by using the  and  buttons.
  • Seite 53: Adjustment Of Astro Time, Menu Astro Drift

    GB Programming 8.6.3. Adjustment of astro time, menu Astro drift In the menu Astro drift the calculated astro time for the mornings and evening can be adjusted. T he astro time can maximally be shifted by +/- 120 minutes. In the lower menu field the current astro time including the shift will be shown. The menu Astro drift is selected. With the buttons  and  you will select the astro drift that has to be set. With the buttons  and  you can enter the modifications in minutes. With the button you will get back into the menu Adjust- ment without saving the modifications. With the button you can save the modifications and will get back into the menu Adjustment. 8.6.4. Adjustment of the language setting, menu Language In the menu Language, you can set your local language. There are 13 languages to select from. The menu Language is selected. Set the requested language by using the  and  buttons. With the button you will get back into the menu Adjust- ment without saving the modifications. With the button you can save the modifications and will get back into the menu Adjustment.
  • Seite 54: Set Display Screen, Menu Display

    Programming 8.6.5. Set display screen, menu Display In the menu Display you can switch the backlight of the display on and off and can set the duration. The set time can be adjusted between 5 and 30 seconds in 5 second steps. For a longer battery service life the commeo Multi Send will be switched into an energy saving mode. The time for the switch off can be set between 1 minute and 5 minutes in one minute steps. N ote: A longer lighting duration and a delayed switch off into the energy saving mode will shorten the battery service life. The menu Display is selected. With the buttons  and  you will select the setting. With the button  and  you will switch the function on and off or will be able to enter the modification. With the button you will get back into the menu Adjust- ment without saving the modifications. With the button you can save the modifications and will get back into the menu Adjustment. 8.6.6. Hide not used channels/groups, menu Display mode In the menu Display mode you can hide not used channels and groups in the operat- ing mode for easier operation so that the channels will not be shown at the channel/ group selection. In the menus the channels and groups will furthermore be shown. The menu Display mode is selected. With the button  you will switch off the mode ( ). All chan- nels and groups are shown. With the button  you will switch on the mode ( ). Only the used channels and groups are shown. With the button you will get back into the menu Adjust- ment without saving the modifications. With the button you can save the modifications and will get back into the menu Adjustment.
  • Seite 55: Sensor Visualization

    GB Programming 8.6.7. Sensor visualization With the sensor visualization measured values of a commeo Sensor WS/WSRF can be shown in the display. Also the daylight condition of the selected receiver is shown in the graphics.When visualization is switched on, the notification can be called up in operation mode by pushing the left display button for 1 second. By pushing of one of the two display buttons you will get back into the operation mode. To show the values, a receiver in which a sensor is programmed has to be selected in the menu Sensor visualization. Examples for the notification on the display in the sensor visualization Explanation of symbols Radio connection to the sensor The symbol signals that the connection to the receiver has been established and that there is no problem with the sensor so that all data are up to date. S1–S3 Measured light values of the sun sensors The three measured sun values will be shown in klx, for values below 1000 lx only a light value will be shown. Measured wind value Display of the currently measured wind speed in m/s. Wind alarm The symbol signals that there is a wind alarm in the receiver. Frost alarm The symbol signals that there is a frost alarm in the receiver. Daylight condition of the receiver T he graphics show the current daylight condition of the receiver (sunny, cloudy, night, including rain and when frost snow) cloudy sunny night rain rain and frost alarm Measured temperature The currently measured temperature in the housing of the sensor will be shown in °C. At strong direct sunlight the value may be distorted. Tempera- tures above 30 °C will not be shown.
  • Seite 56: Sensor Parametrization

    Programming The menu Sensor visualization is selected. With the button  you will switch off the visualization ( With the button  you will switch on the visualization ( When the visualization is switched on a selectable receiver will be shown. Only receivers with programmed sensors will be shown. With the button  you will move to the selected receiver. With the button  and  you can chose another receiver. The selected receiver will move shortly. With the button you will get back into the menu Adjust- ment without saving the modifications. With the button you can save the modifications and will get back into the menu Adjustment. 8.7. Sensor parametrization With the sensor parametrization the values of the automatic and protection function, that are released by the commeo Sensor WS/WSRF, are shown and set. T he values can be shown and set individually for each receiver. The description of this function and their setting can be found in the commeo Sensor WS/WSRF instruction under point 7. Function. This instruction describes the query of the sensor information only. After selection of a receiver with programmed sensor all existing information can be shown in the menu Sensor information. Not all receiver profiles are using all sen- sors. Not used or existing sensors will not be shown in the receiver information. The following displays are possible: Sensor status A sensor is programmed and ready for operation. A sensor is programmed and the test mode is running. N o signal can be received from the programmed sensor (sensor loss). Wind The wind sensor in the receiver is active. The wind sensor is active and the receiver is in wind alarm.
  • Seite 57 GB Programming Brightness/daylight condition The receiver is in the mode daylight condition Sunny. The receiver is in the mode daylight condition Bright. The receiver is in the mode daylight condition Twilight. The receiver is in the mode daylight condition Dark. Temperature 21 °C Display of the current temperature. Set temperature threshold is undercut. Set temperature threshold is exceeded. The menu Sensor parametrization is selected. With the buttons  and  you will select the requested recei- ver. With the button or you will get into the menu for the sensor information. The information can be called up with button. With the buttons  and  you can see the existing informati- By pushing the button 3 times you will get back into the menu Sensor visualization.
  • Seite 58: Device Information And Resetting Of Programming, Menu Function

    Programming 8.8. Device information and resetting of programming, menu Function In the menu Function you can call up device information as well as resetting the pro- gramming. 8.8.1. Device information, menu Information In the menu Information you will see the software information and the serial number of the device. With the button or you will get back into the menu Function. 8.8.2. Resetting of the programming, menu Reset By confirming of the RESET function the programming of the commeo Multi Send will be set back into factory setting. The receivers are furthermore programmed. After the resetting the start-up will be passed through (see 5.). The menu Reset is selected. With the button you will get back into the menu Func- tion without resetting the commeo Multi Send. With the button you confirm the resetting of the commeo Multi Send and will get to the start-up.
  • Seite 59: Usb-Connection

    GB USB-connection 9. USB-connection Via the USB connection you have the possibility to program the commeo Multi Send via the free of charge SELVE software commeo Multi Send configuration tool. Further information as well as the software can be found on the SELVE homepage www.selve.de Note: Further information as well as the software can be found on the SELVE home- page. The USB connection can not be used to supply the commeo Multi Send with power or to charge the batteries. Do not connect the commeo Multi Send perma- nently to the USB as it will not go into the energy-saving mode and the batteries will be used very quickly. Not all USB cables are suitable for data transmission and are only...
  • Seite 60: Changing The Battery

    Changing the battery/Maintenance 10. Changing the battery When the battery symbol will show up on the display, you should change the bat- teries. The commeo Multi Send can still be used. When the big crossed out battery symbol will show up, the batteries are used so that no function is no longer possible. 1. U nbolt the screw and pull of the clip. 2. Take out the batteries. 3. I nsert the new batteries (LR 03; AAA) in the correct position. B atteries don’t belong into the domestic garbage. Please take the batteries used up to your local gathering point. 11. Maintenance Clean the device with a damp cloth only. Do not use a cleansing agent since this could damage the plastic.
  • Seite 61: Technical Data

    GB Technical data/General declaration of conformity 12. T echnical data Nominal voltage: 3 V DC Battery type: LR 03 (AAA), 1.5 V alkaline batteries Safety class: IP 20 Permissible ambient temperature: -10 to +55 °C Radio frequency: 868.1 and 868.3 MHz Max. transmission output: 10 mW The maximum radio range is up to 25 m indoors and up to 350 m in the open field. It is possible to program up to 32 receivers per channel and up to 64 receivers per transmitter. Subject to change without prior notice! 13. General declaration of conformity SELVE GmbH & CO. KG company, hereby declares that the commeo Multi Send is in conformity with the basic requirements and other relevant provisions of the Directive 2014/53/EU. The declaration of conformity can be looked up at www.selve.de. 14. SELVE Service Hotline • Hotline : Phone +49 2351 925-299 • D ownload the operating manuals at www.selve.de or QR scan...
  • Seite 62 Spis treści 1. Wskazówki dotyczące bezpieczeństwa ............125 2. Opis urządzenia ....................126 3. Informacje ogólne ................... 128 3.1. Zastosowanie zgodne z przeznaczeniem ..........128 3.2. Radio SELVE-commeo ................128 4. Montaż ......................129 5. Uruchomienie ....................130 6. Ustawienia fabryczne ..................131 7. Wyjaśnienie funkcji ..................132 7.1. Dioda LED statusu ..................132 7.2. Przyciski W GÓRĘ , STOP , W DÓŁ  ..........132 7.3. Przycisk wyboru kanału/grupy ..............132 7.4. Przełączenie AUTO/MAN ................. 132 7.5. Wywołanie Menu ..................132 7.6. Pozycja pośrednia 1 ................. 133 7.7. Pozycja pośrednia 2 .................. 134 7.8. Przycisk Select/Przycisk PROG .............. 134 7.9. Opis programowania nadajnika .............. 134...
  • Seite 63: Pl Spis Treści

    Spis treści 9. Złącze USB ...................... 150 10. Wymiana baterii ....................151 11. Konserwacja i pielęgnacja ................151 12. Dane techniczne ..................... 152 13. Ogólne oświadczenie zgodności ..............152 14. Infolinia serwisowa SELVE ................152...
  • Seite 64: Wskazówki Dotyczące Bezpieczeństwa

    Wskazówki dotyczące bezpieczeństwa 1. Wskazówki dotyczące bezpieczeństwa • Stosować wyłącznie w suchych pomieszczeniach. • Stosować wyłącznie oryginalne części SELVE. • Nie przebywać w bezpośrednim zasięgu działania urządzeń. Uwaga! • Nie dopuszczać dzieci do urządzeń sterujących. • Przestrzegać przepisów obowiązujących w danym kraju. • Z użyte baterie usunąć w sposób zgodny z przepisami ochrony środowiska. • Baterie zastąpić wyłącznie bateriami tego samego typu (LR 03; AAA). • J eśli instalacja sterowana jest za pomocą jednego lub kilku urządzeń, podczas pracy musi być ona dobrze widoczna. • Urządzenie składa się z elementów łatwych do połknięcia.
  • Seite 65 PL Opis urządzenia 2. Opis urządzenia Opis urządzenia commeo Multi Send 1 Wyświetlacz 10 Przyłącze USB micro-B 2 Prawy przycisku wyświetlacza 11 Przycisk programowania/PROG 3 Lewy przycisk wyświetlacza 12 Przycisk Select/SELECT 4 Dioda LED statusu 5 Przycisk GÓRA  6 Lewy przycisk wyboru kanału  7 Przycisk STOP 8 Prawy przycisk wyboru kanału  9 Przycisk DÓŁ ...
  • Seite 66: Opis Urządzenia

    Opis urządzenia Opis wyświetlaczy Tryb ruchu 1 Dzień tygodnia 2 Wybrany kanał/grupa 3 K olejne pory przełączania dla wybranej grupy 4 P rzyporządkowanie lewego przycisku wyświetlacza Funkcja: wywoływanie MENU Funkcja: wcisnąć <1 s, aby wywołać MENU, wcisnąć =1 s, aby wywołać wizu- alizację czujników 5 Godzina 6 Komunikaty 7 P rzyporządkowanie prawego przycisku wyświetlacza Funkcja: przełączenie AUTO/MAN Tryb menu 1 Punkt menu wyświetlacza 2 Menu 3 P rzyporządkowanie lewego przycisku wyświetlacza Funkcja: powrót bez zapisywania ustawień 4 P rzyporządkowanie prawego przycisku wyświetlacza Funkcja: powrót z zapisem ustawień Wizualizacja czujnika 1 Połączenie radiowe z czujnikiem 2 Wartości pomiarów czujników słońca 3 Wartość pomiaru wiatru 4 Alarm wiatrowy 5 Mróz...
  • Seite 67: Informacje Ogólne

    • U żytkownik nie jest chroniony przed zakłóceniami wywołanymi przez inne instalacje telekomunikacyjne i urządzenia końcowe, również przez instalacje radiowe, które prawidłowo pracują w tym samym zakresie częstotliwości. 3.2. Radio SELVE-commeo Radio Selve-commeo wysyła i odbiera sygnały radiowe na częstotliwości radiowej 868,1 MHz. commeo jest dwukierunkowym systemem sterowania radiowego, gdzie dane zapisywane są w pamięci zarówno urządzeń nadawczych, jak i odbiorczych. Resetowanie napędu lub kasowanie listy wysyłki prowadzi do komunikatu o błędzie w nadajniku. Wszystkie nadajniki SELVE-commeo można dostroić jako odbiorniki. Istnieje możliwość...
  • Seite 68 Montaż 4. Montaż Wskazówka: Należy zwrócić uwagę, aby urządzenie sterujące nie zostało zainstalowane i eksplo- atowane w pobliżu powierzchni metalowych oraz w zasięgu pól magnetycznych. Powierzchnie metalowe lub szyby metalizowane, znajdujące się na linii działania sygna- łu radiowego, mogą w znacznym stopniu ograniczyć jego zasięg. Nadajniki radiowe, pracujące na tej samej częstotliwości, mogą powodować zakłóce- nia odbioru. Należy wziąć pod uwagę, że zakres sygnału radiowego jest ograniczony przez ustawo- dawcę oraz uwarunkowania konstrukcyjne. Montaż uchwytu naściennego • P rzed rozpoczęciem montażu w wybranym miejscu należy sprawdzić prawidłowe funkcjonowanie nadajnika i odbiornika. • U chwyt przymocować do ściany za pomocą dwóch kotew i śrub. Rozstaw śrub wynosi 69 mm.
  • Seite 69 PL Uruchomienie 5. Uruchomienie Pierwsze kroki niezbędne do ustawienia języka, lokalizacji oraz daty/czasu: Wcisnąć przycisk STOP, aby uruchomić commeo Multi Send. Wyświetlone zostanie menu Język. Za pomocą przycisków  i  należy ustawić żądany język. Potwierdzenie wyboru odbywa się przyciskiem Wyświetlone zostanie menu Miejscowość. Należy ustawić najbliżej położone miasto w polu wyboru miasta za pomocą przycisków  lub . Jeżeli ustawienie to nie jest wystarczająco dokładne, przyciska- mi  i  należy przejść do ustawienia długości i szerokości geograficznej. Ustawienie wartości odbywa się za pomocą przycisków  i . Ustawienie strefy czasowej nie jest zwycza- jowo konieczne. Potwierdzenie wyboru odbywa się przyciskiem Wyświetlone zostanie menu Data/czas. Ustawienia dla menu Data/czas są ustawione fabrycznie. Jeżeli ustawienie jest błędne, przyciskami  i  należy przejść do ustawień. Ustawienie wartości odbywa się za pomocą przy- cisków  i . Potwierdzenie wyboru odbywa się przyciskiem commeo Multi Send przechodzi w tryb pracy.
  • Seite 70: Ustawienia Fabryczne

    Ustawienia fabryczne 6. Ustawienia fabryczne Następujące wartości są ustawione fabrycznie. Data/czas • Aktualna data i godzina (CET) Program Centrala ON, grupa 1–9 OFF • A stro wieczór, blok Czas uruchomienia poniedziałek–piątek  07:00  Astro wieczór Czas uruchomienia sobota–niedziela  08:00  Astro wieczór Wskazówka: Uruchomienie funkcji RESET w menu Funkcja, commeo Multi Send jest cofany do ustawień fabrycznych. Odbiorniki są w dalszym ciągu dostrojone.
  • Seite 71 PL Wyjaśnienie funkcji 7. Wyjaśnienie funkcji 7.1. Dioda LED statusu Wysłanie sygnału radiowego sygnalizowane jest zapaleniem się zielonej kontrolki LED statusu. W przypadku komunikatu, kontrolka LED po chwili przełącza się z zielonego na czerwony. Jeżeli na danym kanale nie ma jeszcze dostrojonego odbiornika, kontro- lka LED zapali się na pomarańczowo. 7.2. Przyciski W GÓRĘ , STOP , W DÓŁ  Za pomocą przycisków ruchu, w trybie pracy można uruchamiać dane odbiorniki wybranego kanału/grupy. W przypadku markizy, W GÓRĘ  oznacza wjazd, natomiast W DÓŁ  wyjazd. Jeżeli commeo Multi Send znajduje się w punkcie menu, to za pośrednictwem tych przycisków można dokonać wyboru. 7.3. Przycisk wyboru kanału/grupy Za pomocą przycisku wyboru kanały można wybrać 20 kanałów, 9 grup i grupę cen- tralną. Polecenie centralne obejmuje automatycznie wszystkie dostrojone odbiorniki.
  • Seite 72 Wyjaśnienie funkcji 7.6. Pozycja pośrednia 1 Pozycja pośrednia to dowolnie wybrana pozycja pomiędzy krańcowym położeniem górnym i dolnym. Ustawienie pozycji pośredniej 1: Obsługa Ruch Za pomocą przycisku W GÓRĘ ustawić napęd w górnej pozycji krańcowej. Wcisnąć przycisk STOP , a następnie wcisnąć dodatko- wo przycisk W DÓŁ. Przytrzymać oba przyciski. Po 3 sekundach rozpocznie się ruch programowania. Ustawić pozycję przy wciśniętym przycisku STOP za pomocą przycisków W GÓRĘ i W DÓŁ. >3 s Zwolnienie przycisku STOP zapisuje pozycję. Uruchomienie pozycji pośredniej: Obsługa Ruch Dwukrotnie krótko wcisnąć przycisk W DÓŁ.
  • Seite 73 PL Wyjaśnienie funkcji 7.7. Pozycja pośrednia 2 Pozycja pośrednia to dowolnie wybrana pozycja pomiędzy krańcowym położeniem górnym i dolnym. Ustawienie pozycji pośredniej 2: Obsługa Ruch Za pomocą przycisku W DÓŁ ustawić napęd w dolnej pozycji krańcowej. Wcisnąć przycisk STOP, a następnie wcisnąć dodatko- wo przycisk W GÓRĘ. Przytrzymać oba przyciski. Po 3 sekundach rozpocznie się ruch programowania. Ustawić pozycję przy wciśniętym przycisku STOP za >3 s pomocą przycisków W DÓŁ i W GÓRĘ. Zwolnienie przycisku STOP zapisuje pozycję. Uruchomienie pozycji pośredniej 2: Obsługa Ruch Dwukrotnie krótko wcisnąć przycisk W GÓRĘ. 7.8. Przycisk Select/Przycisk PROG Przycisk SELECT/PROG służą do dostrajania odbiorników. Zalecenia znajdują się w instrukcji obsługi odbiorników/napędu.
  • Seite 74 Programowanie 8. Programowanie 8.1. Lista menu i Menu główne Po wciśnięciu lewego przycisku wyświetlacza w trybie roboczym wyświetlone zostanie Menu główne. Nawigacja w menu Za pomocą przycisków  i  należy przejść do wybranego punktu menu. Wybrany punkt menu wyświetlany jest w sposób odwrócony. Wybrać punkt men przyciskiem lub . Za pomocą przycisku następuje przejście do Menu główne i trybu roboczego (zmienione ustawienia w menu Data/czas nie są zapisywane).
  • Seite 75 PL Programowanie 8.3. Ustawienie czasów uruchomienia, menu Program W menu Program aktywowane i deaktywowane są włączniki czasowe dla centrali i grup. Dla jednego włącznika czasowego istnieje możliwość następujących ustawień. Funkcja indywidualna Możliwość dowolnego ustawienia załączenia porannego i wieczornego na stałe. Funkcja astro F unkcja astro oblicza poranny i wieczorny czas załączenia w oparciu o porę zmierz- chu i świtu. Funkcja astro wieczór F unkcja astro wieczór oblicza czas wieczornego uruchomienia w oparciu o porę zmierzchu. Czas uruchomienia rano ustawiany jest wedle własnego uznania. Wskazówka odnośnie funkcji astro i astro wieczór: D la funkcji Astro, w menu Miejscowość należy ustawić położenie geograficzne. Obliczony czas może być przesunięty o +/- 120 minut w menu Przesunięcie astral- Bloki C zasy uruchomienia można ustawić w dwóch blokach, dla dni roboczych (ponie- działek do piątku) oraz weekendu (sobota – niedziela). Indywidualnie I stnieje możliwość indywidualnego ustawienia czasów uruchomienia – dla każdego dnia tygodnia osobno. Czasy uruchomienia Aktywacja odbywa się o ustawionej uprzednio porze. Przykłady: C zas uruchomienia rano (w górę) ustawiono na godzinę...
  • Seite 76 Programowanie Czas blokady C zasy blokady ograniczają pory świtu i zmierzchu funkcji Astro latem tak, by czas uruchomienia rano nie był wykonywany za wcześnie, a wieczorem zbyt późno. Przykłady: C zas blokady rano (w górę) o godzinie 07:00 zapewnia, że aktywacja funkcji Astro latem nie nastąpi przed godziną 07:00. C zas blokady wieczorem (w dół) o godzinie 19:00 zapewnia, że aktywacja funkcji Astro zimą nie nastąpi po godzinie 21:00 Nie ustawiono czasu blokady na rano (w górę). Nie ustawiono czasu blokady na wieczór (w dół). W skazówka: Die Zeiteinstellung , dass keine Sperrzeit eingestellt ist, errei- chen Sie bei der Zeiteinstellung zwischen 23:59 und 00:00 Uhr. Wybrano menu Program. Za pomocą przycisków  i  dokonuje się wyboru grupy. Za pomocą przycisku  można wyłączyć wyłącznik czasowy Za pomocą przycisku  można załączyć wyłącznik czasowy Za pomocą przycisku następuje przejście do Menu główne. Za pomocą przycisku lub następuje przejście do menu ustawień wyłącznika czasowego. Wybrano funkcję wyłącznika czasowego.
  • Seite 77 PL Programowanie 8.4. Zarządzanie odbiornikami, kanałami i grupami, menu Administracja W menu Administracja istnieje możliwość nadania poszczególnym odbiornikom, kanałom i grupom jednoznaczne nazwy w celu lepszego ich rozróżnienia. W menu tym ustala się także pozycje docelowe czasów uruchomienia, a także przyporządkowanie kanałów do grup. 8.4.1. Nazwanie odbiorników, kanałów i grup, menu Nazwa odbiornika, kanału, grupy W menu Nazwa odbiornika, kanału, grupy istnieje możliwość nadania nazw odbior- nikom, kanałom i grupom w celu lepszej ich identyfikacji. Nazwa odbiornika pokazy- wana jest także przy komunikacie odbiornika. Należy nadawać jednoznaczne nazwy odbiornikom, aby móc je później lepiej rozróżniać. Nazwy grup i kanałów pokazywane są później przy wyborze grup i kanałów, aby ułatwić manualną obsługę. Nazwa może składać się maksymalnie z 18 znaków. Wybrano menu Nazwa odbiornika, kanału, grupy. Na tym przykładzie jest to nazwa kanału. Wyświetlana jest nazwa odbiorcy, kanału lub wybór grupy. Za pomocą przycisków  i  dokonuje się wyboru odbiorcy, kanału lub grupy, której nazwa ma być zmieniona. Wybierając odbiorcę, nazwa odbiorcy na wyświetlaczu lekko się poruszy, aby ułatwić wybór. Za pomocą przycisku następuje przejście do menu Administracja bez zapisywania zmian. Za pomocą przycisku lub przechodzi się do menu, w którym można nadać nową nazwę wybranemu odbiorcy,...
  • Seite 78 Programowanie 8.4.2. Ustawienie pozycji docelowej czasów uruchomienia, menu Program doce- lowy W menu Program docelowy można ustalić pozycję docelową dla czasu włączenia i wyłączenia grup i centrali. Ustawienie fabryczne zakłada pozycję docelową załączenia jako górną pozycję krańcową, natomiast docelowa pozycja wyłączenia to dolna pozy- cja krańcowa. Istnieje możliwość ustawienia następujących pozycji: Górna pozycja krańcowa, napęd przesuwa się aż do pozycji krańcowej górnej. Dolna pozycja krańcowa, napęd przesuwa się aż do pozycji krańcowej dolnej. P ozycja pośrednia 1, może być ustawiona za pośrednictwem nadajnika ręcznego w odbiorniku (zob. 7.6.). P ozycja pośrednia 2, może być ustawiona za pośrednictwem nadajnika ręcznego w odbiorniku (zob. 7.7.). B rak pozycji docelowej, zwolnienie automatyki słonecznej przy jednoczesnym dostrojeniu czujnika słońca. Odbiornik ustawia zasłonę w dziennej pozycji spo- czynkowej. B rak pozycji docelowej, lecz blokada automatyki słonecznej przy jednoczesnym dostrojeniu czujnika słonecznego. Odbiornik ustawia zasłonę w nocnej pozycji spoczynkowej. W skazówka: Pozycje spoczynkowe są zależne od ustawień zastosowania odbiorni- ków. Wybrano menu Program docelowy. Za pomocą przycisków , ,  i  proszę wybrać pozycję docelową, która ma być zmieniona. Wciskając przycisk następuje zmiana wybranej pozycji. Przy kilkukrotnym wciśnię- ciu przycisku przechodzi się do wybranej pozycji. Za pomocą przycisku następuje przejście do menu Administracja bez zapisywania zmian. Za pomocą przycisku następuje zapisanie ustawień...
  • Seite 79 PL Programowanie 8.4.3. Przyporządkowanie kanałów do grupy, menu Przyporządkowanie kanałów do grupy W menu Przyporządkowanie kanałów do grupy można przyporządkować grupie 1 do 9 te kanały, które chce się mieć w grupie. Grupie 1 fabrycznie przyporządkowano kanały 1 do 10, a grupie 2 kanały 11 do 20. Przyporządkowanie to można zmienić. W wyborze kanałów, poniższe piktogramy mają następujące znaczenie: Kanał nie jest zajęty i nie może być wybrany. Kanał jest zajęty i nie jest przyporządkowany do grupy. K anał jest zajęty i przyporządkowany do grupy. Wybrano menu Przyporządkowanie kanałów do grupy. W tym przykładzie jest to grupa 3. Za pomocą przycisków  i  proszę wybrać grupę, z której będą przyporządkowywane kanały, bądź zmieniane. Za pomocą przycisku następuje przejście do menu Administracja bez zapisywania zmian. Za pomocą przycisku lub przechodzi się do menu, w którym można wybrać kanały do grupy. Wyświetlana jest selekcja kanałów dla wybranej grupy. Za pomocą przycisków , ,  i  proszę wybrać kanał, który ma być dodany do grupy lub z niej usunięty. Wciskając przycisk kanał jest dodawany lub usuwany.
  • Seite 80 Programowanie 8.4.4. Przestawianie kanałów/grup na tryb impulsowy, menu Tryb impulsowy W menu Tryb impulsowy można przestawiać poszczególne kanały lub grupy na funk- cjonowanie w trybie impulsowym, aby łatwo ustawiać obracanie żaluzji. Na wyświetla- czu tryb impulsowy pokazywany jest w trybie pracy za pomocą symbolu żaluzji. W trybie impulsowym napęd rusza z opóźnieniem 0,5 sekundy. W przypadku puszcze- nia przycisku w pierwszej sekundzie ruchu, napęd zatrzymuje się natychmiast. Jeśli napęd będzie poruszany nieprzerwanie dłużej niż przez 1 sekundę, przejdzie w tryb samopodtrzymania. Wybrane jest menu Sterowanie impulsowe (Pozycja docelowa w trybie impulsowym). Za pomocą przycisków  i  można wybierać kanał lub grupę. Za pomocą przycisku  można wyłączyć tryb impulsowy ( Za pomocą przycisku  można włączyć tryb impulsowy ( Za pomocą przycisku następuje przejście do menu Administracja bez zapisywania zmian. Za pomocą przycisku następuje zapisanie ustawień i przejście do menu Administracja.
  • Seite 81 PL Programowanie 8.5. Komunikaty zwrotne odbiornika, menu Wiadomość W menu Wiadomość wyświetlane są komunikaty odnośnie odbiorników. Gdy pojawi się nowy komunikat, widać to w trybie roboczym po ikonce na wyświetlaczu. W komunikacie podawany jest numer, przyczyna, nazwa odbiornika, a także czas. Komunikaty można skasować w menu Wiadomość. Komunikaty są zależne od rodzaju odbiornika i jego przyłącza, a także od dostrojonych czujników, Najważniejsze komunikaty, które są pokazywane to: Komunikat Przyczyna Przeciążenie Zablokowany napęd w czasie jazdy. Przeszkoda Napęd najechał na przeszkodę. Radio Odbiornik nie potwierdził polecenia radiowego. Utrata czujnika Układ sensoryczny dostrojony w odbiorniku nie wysyła sygnałów do odbiornika.
  • Seite 82 Programowanie 8.6. Dalsze ustawienia, menu Ustawianie W menu Ustawianie można dokonać dalszych ustawień wyłącznika czasowego, pro- gramów Astro, wyświetlacza i języka. 8.6.1. Funkcja urlopu, Menu urlop Funkcja urlopu symuluje zamieszkanie domu, gdy domownicy wyjechali na urlop. Gdy funkcja jest aktywna (ON), czasy uruchamiania są wykonywane z przypadkowym prze- sunięciem czasowym względem ustawionych czasów w zakresie +/- 15 minut. Wybrano menu Urlop. Za pomocą przycisku  następuje wyłączenie funkcji urlopu Za pomocą przycisku  następuje włączenie funkcji urlopu Za pomocą przycisku następuje przejście do menu Ustawianie bez zapisania zmian. Za pomocą przycisku następuje zapisanie zmian i przej- ście do menu Ustawianie. 8.6.2. Lokalizacja na potrzeby obliczania pory zmierzchu/świtu, menu Miejsco- wość Lokalizacja jest ważna do obliczania godziny świtu i zmierzchu funkcji Astro. W tym miejscu należy wybrać miasto, które jest najbliższe miejsca zamieszkania. Jeżeli usta- wienie to nie jest wystarczająco dokładne, można wprowadzić długość i szerokość geograficzną swojej lokalizacji. Zachodnie stopnie długości geograficznej i południowe stopnie szerokości geograficznej wprowadza się ze znakiem ujemnym. Wartości dla swojej lokalizacji można sprawdzić w atlasie, nawigacji lub w Internecie. Wybrano menu Miejscowość. Należy ustawić najbliżej położone miasto w polu wyboru mia- sta za pomocą przycisków  lub . Jeżeli ustawienie to nie jest wystarczająco dokładne, przyci- skami  i  należy przejść do ustawienia długości i szeroko- ści geograficznej. Ustawienie wartości odbywa się za pomocą...
  • Seite 83 PL Programowanie 8.6.3. Dostosowanie czasu Astro, menu Przesunięcie astralne W menu Przesunięcie astralne można dostosować obliczony czas Astro dla pory porannej i wieczornej. Czas Astro może być przesunięty o maksymalnie +/- 120 minut. W dolnym polu menu pokazywany jest aktualny czas Astro wraz z przesunięciem. Wybrano menu Przesunięcie astralne. Za pomocą przycisków  i  należy wybrać przesunięcie Astro, które ma być ustawione. Za pomocą przycisków  i  należy wprowadzić zmianę w minutach. Za pomocą przycisku następuje przejście do menu Ustawianie bez zapisania zmian. Za pomocą przycisku następuje zapisanie zmian i przej- ście do menu Ustawianie. 8.6.4. Dostosowanie ustawień językowych, menu Język W menu Język można ustawić swój język ojczysty. Do wyboru jest 13 różnych języków. Wybrano Menu Język. Za pomocą przycisków  i  należy ustawić żądany język. Za pomocą przycisku następuje przejście do menu Ustawianie bez zapisania zmian. Za pomocą przycisku następuje zapisanie zmian i przej- ście do menu Ustawianie.
  • Seite 84 Programowanie 8.6.5. Ustawienie wyświetlacza, menu Display W menu Display można włączyć i wyłączyć podświetlenie tła wyświetlacza oraz czas podświetlenia. Ustawienie czasu może wynosić od 5 sekund do 30 sekund i jest usta- wiane w etapach co 5 sekund. W celu zapewnienia dłuższej żywotności baterii, commeo Multi Send przełączany jest w tryb oszczędzania energii. Czas do wyłączenia można ustawić dowolnie od 1 minu- ty do 5 minut w etapach co minutę. Wskazówka: Dłuższy czas świecenia wyświetlacza i opóźnione przełączenie w tryb oszczędzania energii skraca okres żywotności baterii. Wybrano menu Display. Za pomocą przycisków  i  dokonuje się ustawień. Za pomocą przycisków  i  należy wyłączyć bądź włączyć funkcję lub wprowadzić zmiany. Za pomocą przycisku następuje przejście do menu Ustawianie bez zapisania zmian. Za pomocą przycisku następuje zapisanie zmian i przej- ście do menu Ustawianie. 8.6.6. Ukrycie niewykorzystanych kanałów/grup, menu Tryb wyświetlania W menu Tryb wyświetlania można w celu ułatwienia obsługi ukryć nieużywane k anały i grupy w trybie roboczym tak, by kanały te nie były pokazywane przy wyborze kanału/ grupy. W poszczególnych Menu kanały i grupy te są w dalszym ciągu wyświetlane. Wybrano menu Tryb wyświetlania. Za pomocą przycisku  można ustawić wyłączenie trybu ). Wszystkie kanały i grupy są pokazywane. Za pomocą przycisku  można włączyć tryb ( ). Pokazy- wane są wyłącznie używane kanały i grupy. Za pomocą przycisku następuje przejście do menu Ustawianie bez zapisania zmian. Za pomocą przycisku następuje zapisanie zmian i przej- ście do menu Ustawianie.
  • Seite 85 PL Programowanie 8.6.7. Wizualizacja czujnik Wizualizacja czujników umożliwia pokazywanie na wyświetlaczu wartości pomiarów commeo Sensor WS/WSRF. W sposób graficzny pokazywany jest również stan światła dziennego w wybranym odbiorniku. Przy włączonej wizualizacji, w trybie pracy można wywołać pokazywanie naciskając lewy przycisk na wyświetlaczu przez 1 sekundę. Wciśnięcie któregoś z przycisków na wyświetlaczu spowoduje powrót do trybu pracy. Aby pokazać wartości, konieczne jest wybranie w menu Wizualizacja czujnik odbior- nika, do którego zaprogramowany jest czujnik. Przykładowe wskazania na wyświetlaczu przy wizualizacji czujnika Objaśnienia symboli Połączenie radiowe z czujnikiem Ten symbol wskazuje, że występuje połączenie z odbiornikiem i nie ma pro- blemów z czujnikiem, a dane są aktualne. S1–S3 Wartości pomiarów światła czujników słońca Pokazywane są trzy wartości pomiarów światła w klx, w przypadku wartości poniżej 1000 lx pokazywana jest tylko jedna wartość. Wartość pomiaru wiatru Pokazuje aktualnie mierzoną prędkość wiatru w m/s. Alarm wiatrowy Ten symbol wskazuje, że w odbiorniku występuje alarm wiatrowy. Alarm mrozowy Ten symbol wskazuje, że w odbiorniku występuje alarm mrozowy. Stan światła dziennego w odbiorniku G rafika pokazuje aktualny stan światła dziennego w odbiorniku (słonecznie, pochmurnie, noc, wraz z deszczem, a przy mrozie śnieg) pochmurnie słonecznie noc deszcz...
  • Seite 86 Programowanie Wybrane jest menu Wizualizacja czujnik. Za pomocą przycisku  można wyłączyć wizualizację ( Za pomocą przycisku  można włączyć wizualizację ( W przypadku włączonej wizualizacji pokazywany jest odbior- nik do wyboru. Widoczne są tylko odbiorniki z zaprogramowa- nymi czujnikami. Za pomocą przycisku  można wybrać odbiornik. Za pomo- cą przycisku  i  można wybrać inny odbiornik. Wybrany odbiornik krótko się poruszy. Za pomocą przycisku można wrócić do menu Ustawia- nie bez zapisywania zmian. Za pomocą przycisku można zapisać zmiany i wrócić do menu Ustawianie. 8.7. Parametryzacja czujnika Parametryzacja czujnika umożliwia pokazywanie i ustawianie wartości funkcji automa- tycznych i ochronnych, które wywoływane są przez commeo Sensor WS/WSRF. W artości można pokazywać i ustawiać dla każdego odbiornika odrębnie. Opis tych funkcji i ich ustawianie znajduje się w instrukcji commeo Sensor WS/WSRF w punkcie 7. Funkcje. Niniejsza instrukcja opisuje wyłącznie wyszukiwanie informacji czujnika. Po wybraniu odbiornika z zaprogramowanym czujnikiem w menu Info. z czujników można zobaczyć wszystkie dostępne informacje. Nie wszystkie profile odbiorników wykorzystują wszystkie czujniki. Niewykorzystywane lub niedostępne czujniki nie będą...
  • Seite 87 PL Programowanie Jasność/stan światła dziennego Odbiornik znajduje się w stanie słonecznie. Odbiornik znajduje się w stanie jasno. Odbiornik znajduje się w stanie zmierzch. Odbiornik znajduje się w stanie ciemno. Temperatura 21 °C Pokazywanie aktualnej temperatury. Nie osiągnięto ustawionego progu temperatury. Przekroczono ustawiony próg temperatury. Wybrane jest menu Parametryzacja czujnika. Za pomocą przycisków  i  można wybrać pożądany odbiornik. Za pomocą przycisków lub można przejść do menu informacji czujników. Informacje można wywołać za pomocą przycisku . Za pomocą przycisków  i  można przeglądać dostępne informacje. Wciskając 3x przycisk można wrócić do menu Wizuali- zacja czujnik.
  • Seite 88 Programowanie 8.8. Informacja o sprzęcie i resetowanie programowania, menu Funkcja W menu Funkcja można wywołać informacje o sprzęcie, a także zresetować progra- mowanie. 8.8.1. Informacja o sprzęcie, menu Info W menu Info wyświetlane są informacje o wersji oprogramowania i numerze seryjnym lub można cofnąć się do menu Funkcja. urządzenia. Za pomocą przycisku 8.8.2. Resetowanie programowania, menu Reset Uruchomienie funkcji RESET powoduje zresetowanie programowania commeo Multi Send do ustawień fabrycznych. Odbiorniki pozostają w dalszym ciągu dostrojone . Po zresetowaniu następuje wdrożenie procedury uruchomienia (zob. 5.). Wybrano Menu Reset. Za pomocą przycisku następuje przejście do menu Funkcja bez wykonania resetu commeo Multi Send. Za pomocą przycisku następuje potwierdzenie zreseto- wania commeo Multi Send i wdrożenie procedury uruchomie- nia.
  • Seite 89 PL Złącze USB 9. Złącze USB Za pośrednictwem złącza USB istnieje możliwość zaprogramowania commeo Multi Send za pośrednictwem bezpłatnego oprogramowania SELVE commeo Multi Send – Narzędzie konfiguracyjne. Bliższe informacje, a także samo oprogramowanie znajduje się na stronie internetowej SELVE www.selve.pl Wskazówka: Złącze USB nie może być wykorzystane do zasilania commeo Multi Send lub ładowania baterii. Nie wolno przyłączać commeo Multi Send na stałe do złącza USB, ponieważ nie nastąpi wtedy przełączenie w tryb oszczędzania energii i dojdzie do bardzo szybkiego rozładowania baterii. Nie wszystkie kable USB nadają się do przesyłania danych i ładowania przez USB. Kabli USB do ładowania nie można wyko- rzystywać do oprogramowania, a odczyty w oprogramowaniu nie są możliwe on­line.
  • Seite 90: Wymiana Baterii

    Wymiana baterii/Konserwacja i pielęgnacja 10. Wymiana baterii Gdy na wyświetlaczu pojawi się symbol , należy wymienić baterie. commeo Multi Send może być dalej użytkowany. Gdy na wyświetlaczu pojawi się duży, przekreślony symbol baterii oznacza to, że baterie są tak wyczerpane, że nie ma możliwości wyko- nania żadnej funkcji. 1. L Odkręcić śrubę i zdjąć klamrę. 2. Wyjąć baterie. 3. W łożyć prawidłowo nowe baterie (LR 03; AAA). B aterii nie wolno wyrzucać razem ze śmieciami domowymi. Należy je odnieść do właściwego lokalnie punktu zbiórki baterii. 11. Konserwacja i pielęgnacja Urządzenie wolno czyścić wyłącznie wilgotną ściereczką. Nie wolno stosować środków czyszczących, ponieważ mogą one działać żrąco na tworzywo sztuczne.
  • Seite 91: Dane Techniczne

    Częstotliwość: 868,1 i 868,3 MHz Max. moc sygnału: 10 mW Maksymalny zasięg sygnału radiowego w budynku wynosi do 25 m, natomiast na wolnej przestrzeni do 350 m. Do jednego kanału można zaprogramować maksymalnie 32 odbiorniki, a do jednego nadajnika maksymalnie 64 odbiorniki. Zastrzega się możliwość wprowadzenia zmian technicznych! 13. Ogólne oświadczenie zgodności Firma SELVE GmbH & Co. KG oświadcza niniejszym, że produkt o nazwie commeo Multi Send jest zgodny z podstawowymi wymogami oraz innymi ważnymi przepisami dyrektywy 2014/53/EU. Oświadczenie zgodności jest do wglądu na stronie www.selve.de. 14. Infolinia serwisowa SELVE • Infolinia: Telefon +49 2351 925-299 • I nstrukcje obsługi do pobrania na www.selve.de lub przez zeskanowanie kodu QR...
  • Seite 92 SELVE GmbH & Co. KG Werdohler Landstraße 286 D-58513 Lüdenscheid Tel.: +49 2351 925-299 Fax: +49 2351 925-111 Internet: www.selve.de E-Mail: info@selve.de...

Inhaltsverzeichnis