Herunterladen Inhalt Inhalt Diese Seite drucken

Werbung

Verfügbare Sprachen
  • DE

Verfügbare Sprachen

  • DEUTSCH, seite 1
Karaoke-Tower
10029400
10029401
www.auna-multimedia.com

Werbung

Inhaltsverzeichnis
loading

Inhaltszusammenfassung für auna multimedia 10029401

  • Seite 1 Karaoke-Tower 10029400 10029401 www.auna-multimedia.com...
  • Seite 2: Inhaltsverzeichnis

    Sehr geehrter Kunde, wir gratulieren Ihnen zum Erwerb Ihres Gerätes . Lesen Sie die folgenden Anschluss- und Anwendungs- hinweise sorgfältig durch und befolgen Sie diese, um möglichen technischen Schäden vorzubeugen . Für Schäden, die durch Missachtung der Sicherheitshinweise und unsachgemäßen Gebrauch entstehen, übernehmen wir keine Haftung .
  • Seite 3: Lieferumfang

    Dieses Symbol zeigt an, dass das Gerät über eine doppelte Isolierung zwischen der gefährlichen Eingangsspannung und den vom Benutzer zugänglichen Teilen verfügt . Warnung: Gefahr eines Stromschlags Setzen Sie das Gerät nicht Regen oder Feuchtigkeit aus . Warnung: Explosionsgefahr (Batterien) Legen Sie die Batterien richtig herum ein.
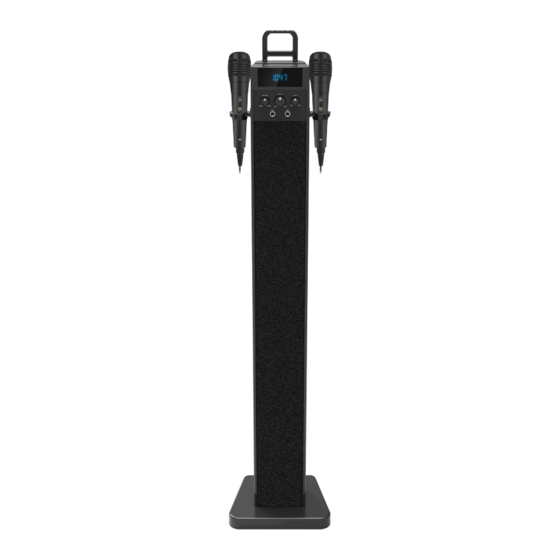
  • Seite 4: Location Of Controls

    LOCATION OF CONTROLS Bedienelemente CHARGING PORT DC 5V Power Source Tun+ Tun- Vol+ Vol- 1 2 3 4 56 1. POWER button: Press to turn the tower speaker 8. MIC 1 jack. POWER: Ein-und Ausschalten der Lautsprecher off or on. 9.
  • Seite 5: Fernbedienung

    REMOTE CONTROL – LOCATIO CONTROLS Fernbedienung POWER: EIN/AUS 2 MEM CLOCK: • Wiederholt drücken, um zwischen gespei- cherten Radio-Stationen zu wechseln . • Drücken, um die Uhrzeit einzustellen . 3 TUNE/MEM: • 3 Sekunden gedrückt halten, um automa- tisch nach UKW-Sendern zu suchen . •...
  • Seite 6: Einrichtung

    Einrichtung POWER SOURCE Stromversorgung POWER SOURCE Insert the small plug from the supplied Stecken Sie den kleinen Stecker des Netzgerätes in den AC/DC adapter to the DC in jack on Insert the small plug from the supplied Gleichstromanschluss des Gerätes . Schließen Sie den the unit.
  • Seite 7: Charging Externa Built-In Dc 5V Usb Port

    It can charge various external devices, e.g. ipod, ipho or tablet etc. can charge various external devices, e.g. ipod, iphone, ipad, smart phone CHARGING EXTERNA r tablet etc. L DEVICE BY CHARGING EXTERNA L DEVICE BY 1/. Take out the holding bracket 4/.
  • Seite 8: Bedienung

    (1) Listening fro Bedienung 8. Press the BASS button Wiedergabe von einem AUX-IN-Anschluss CHARGING PORT 9. Press the EQ preset mo DC 5V 1 . Verbinden Sie den Aux-Out-Ausgang einer externen Audioquelle preset EQ effect as des (wie DVD-Player, Fernseher, Videorekorder usw.) mit den AUX-IN- Anschlüssen auf der Rückseite des Turms mit Hilfe der mitgeliefer- 10.
  • Seite 9: Radio Hören Und Einstellen

    BT verbinden Das erste Mal verbinden 1 . Schalten Sie den Turm ein . Drücken Sie SOURCE und wählen Sie BT . 2 . Die BT-LED blinkt ununterbrochen, während das Gerät gesucht wird . 3 . Wenn der Tower gefunden wurde, erscheint der Name „HiTower“ . Falls ein Passwort verlangt wird, geben Sie „0000“...
  • Seite 10: Einstellen Der Uhr

    Speichern eines Senders 1 . Befolgen Sie die Anweisungen zum Einstellen eines Senders . 2 . Nachdem Sie den gewünschten Sender eingestellt haben, drücken Sie MEM/CLOCK . 3 . Drücken Sie TUN+/CLOCK+ oder TUN-/CLOCK- auf der Fernbedienung, um die gewünschte Sen- derfrequenz einzustellen .
  • Seite 11: Problembehebung

    8 . Drücken Sie TUN+/CLOCK+ oder TUN-/CLOCK- auf der Fernbedienung, um die Minute einzustel- len . 9 . Drücken Sie ALARM auf der Fernbedienung, um die Einstellung zu bestätigen . 10 . Wenn der Alarm ausgelöst wird, wird der voreinstellte Sender eingeschaltet . 11 .
  • Seite 12: Technische Daten

    Technische Daten Artikelnummer 10029400 10029401 Stromversorgung 18 V 1,6 A Stromversorgung der Fernbedienung CD 3 V, 1x CR 2025 Batterie (inklusive) Stromverbrauch 30 W Radio Bandbreite 87,5 MHz - 108 MHz Impedanz der Lautsprecher linker Kanal 8 Ohm rechter Kanal 8 Ohm Entsorgung Befindet sich die linke Abbildung (durchgestrichene Mülltonne auf Rädern) auf dem Produkt,...
  • Seite 13: Safety Instructions

    Dear Customer, Congratulations on purchasing this equipment. Please read this manual carefully and take care of the following hints on installation and use to avoid technical damages. Any failure caused by ignoring the items and cautions mentioned in the operation and installation instructions are not covered by our warranty and any liability.
  • Seite 14: Scope Of Supply

    This symbol indicates that this product incorporates double insulation between hazardous mains voltage and user accessible parts. Use only with a cart, stand, tripod, bracket, or table specified by the manufacturer, or sold with the apparatus. When a cart is used, use caution when moving the cart/apparatus . Warning: Danger of electric shock Do not expose this device to rain or humidity.
  • Seite 15: Location Of Controls

    LOCATION OF CONTROLS Location of Controls CHARGING PORT DC 5V Power Source Tun+ Tun- Vol+ Vol- 1 2 3 4 56 1. POWER button: Press to turn the tower speaker 8. MIC 1 jack. POWER button: Press to turn the tower speaker off or on. off or on.
  • Seite 16: Remote Control

    REMOTE CONTROL – LOCATIO CONTROLS Remote Control POWER button: Press to turn the unit on or off. 2 MEM CLOCK button: • Press to cycle through saved radio stations. • Press to set the time . 3 TUNE/MEM button: • Press 3 seconds to search automatically FM stations .
  • Seite 17: Installation

    Installation POWER SOURCE Power Source POWER SOURCE Insert the small plug from the supplied Insert the small plug from the supplied AC/DC adapter AC/DC adapter to the DC in jack on Insert the small plug from the supplied to the DC in jack on the unit . Insert the AC/DC adapter the unit.
  • Seite 18 It can charge various external devices, e.g. ipod, ipho or tablet etc. can charge various external devices, e.g. ipod, iphone, ipad, smart phone CHARGING EXTERNA r tablet etc. L DEVICE BY CHARGING EXTERNA L DEVICE BY 1/. Take out the holding bracket 4/.
  • Seite 19: Basic Operation

    (1) Listening fro Basic Operation 8. Press the BASS button Listening from AUX IN jack CHARGING PORT 9. Press the EQ preset mo DC 5V 1 . Connect the Aux out jack from the external audio player (such as preset EQ effect as des DVD player, TV, VCR …etc.) to the AUX IN jacks on the rear of tower speaker by the supplied RCA connection cable as the figure below: 10.
  • Seite 20 Setting up BT pairing Initial pairing 1 . Switch on the tower speaker . Press the SOURCE button and select BT . 2 . The BT LED will blink non-stop in searching for device . 3 . When a device is found, it will show the name “HiTower” If the device require a password, enter „0000“...
  • Seite 21: Setting The Clock

    Saving a Radio Station 1 . Follow the instructions for tuning the FM radio . 2 . After tuning to the desired station, press the MEM/CLOCK button . 3 . Press the MEM/CLOCK button to save the current radio station to the selected preset . Here are 30 stations can be saved to the tower speaker’s memory.
  • Seite 22: Troubleshooting

    Troubleshooting Problem What to do Check the connection of the AC/DC adapter No power between the tower speaker and wall outlet . Check that the volume control is NOT at minimum . No sound Check that it is NOT set to mute . Inspect or replace the battery.
  • Seite 23: Technical Data

    Technical Data Item number 10029400 10029401 Power source 18 V 1 .6 A Power source of remote control CD 3 V, 1x CR 2025 battery (included) Power consumption 30 W Radio Coverage 87,5 MHz - 108 MHz Impedance of Speakers...
  • Seite 24: Consignes De Sécurité

    Chère cliente, cher client, Toutes nos félicitations pour l’acquisition de ce nouvel appareil. Veuillez lire attentivement et respecter les consignes suivantes de branchements et d’utilisation pour éviter d’éventuels dommages techniques. Nous ne saurions être tenus pour responsables des dommages dus au non-respect des consignes et à la mauvaise utilisation de l’appareil.
  • Seite 25: Contenu De La Livraison

    Ce symbole indique que l’appareil est équipé d’une double isolation entre la ten- sion dangereuse d’entrée et les parties accessibles à l’utilisateur. Attention : risques d’électrocution Ne pas exposer l’appareil à la pluie ou à l’humidité. Attention : risques d’explosion (piles) Introduire les piles en respectant les polarités.
  • Seite 26: Éléments De Commande

    LOCATION OF CONTROLS Éléments de commande CHARGING PORT DC 5V Power Source Tun+ Tun- Vol+ Vol- 1 2 3 4 56 1. POWER button: Press to turn the tower speaker 8. MIC 1 jack. POWER : allumer et éteindre les enceintes off or on.
  • Seite 27: Télécommande

    REMOTE CONTROL – LOCATIO CONTROLS Télécommande 1 . POWER : éteint/allumé 2 . MEM CLOCK : • Appuyer plusieurs fois pour parcourir les stations de radio sauvegardées . • Appuyer pour régler l’heure. 3 . TUNE/MEM • Rester appuyer pendant 3 secondes pour effectuer une recherche automa- tique de stations UKW .
  • Seite 28: Installation

    Installation POWER SOURCE Alimentation électrique POWER SOURCE Insert the small plug from the supplied Brancher la petite fiche du bloc d’alimentation dans la AC/DC adapter to the DC in jack on Insert the small plug from the supplied prise de courant continu de l’appareil. Puis brancher la the unit.
  • Seite 29 It can charge various external devices, e.g. ipod, ipho or tablet etc. can charge various external devices, e.g. ipod, iphone, ipad, smart phone CHARGING EXTERNA r tablet etc. L DEVICE BY CHARGING EXTERNA L DEVICE BY 1/. Take out the holding bracket 4/.
  • Seite 30: Utilisation

    (1) Listening fro Utilisation 8. Press the BASS button Diffusion par prise AUX IN CHARGING PORT 9. Press the EQ preset mo DC 5V 1 . Relier la sortie Aux-Out à une source audio externe (comme un preset EQ effect as des lecteur de DVD, un téléviseur, un caméscope etc .) aux prises AUX- IN situées à...
  • Seite 31 Connexion BT Première connexion 1 . Mettre la tour en marche. Appuyer sur SOURCE et sélectionner BT 2 . La LED BT clignote en permanence pendant la détection de l’appareil. 3 . Lorsque la tour a été détectée, le nom « HiTower » s’affiche. Si un mot de passe est exigé, entrer « 0000 »...
  • Seite 32 Sauvegarde d’une station 1 . Suivre les instructions de réglage d’une station. 2 . Une fois la station souhaitée détectée, appuyer sur MEM/CLOCK. 3 . Appuyer sur TUN+/CLOCK+ ou TUN-/CLOCK- de la télécommande pour régler la fréquence de la station souhaitée . 4 .
  • Seite 33: Résolution Des Problèmes

    minutes . 9 . Appuyer de nouveau sur la touche ALARM de la télécommande pour confirmer le réglage. 10 . Lorsque le réveil se déclenche, la station sélectionnée est diffusée. 11 . Appuyer sur la touche ALARM de la télécommande pour activer et désactiver le réveil. Résolution des problèmes Problème Solution...
  • Seite 34: Fiche Technique

    Fiche technique Numéro d’article 10029400 10029401 Alimentation électrique 18 V 1,6 A Alimentation électrique de la télé- CD 3 V, 1x CR 2025 pile (inclue) commande Consommation électrique 30 W Largeur de bande radio 87,5 MHz - 108 MHz Impédance des enceintes...
  • Seite 35: Avvertenze Di Sicurezza

    Gentile cliente, La ringraziamo per aver acquistato il nostro prodotto . La preghiamo di leggere attentamente le se- guenti istruzioni e di seguirle per evitare eventuali danni . Non ci assumiamo alcuna responsabilità per danni derivati da una mancata osservazione delle avvertenze di sicurezza e da un uso improprio del dispositivo .
  • Seite 36: Consegna

    Questo simbolo indica che il dispositivo è dotato di doppio isolamento tra la ten- sione di ingresso pericolosa e le parti accessibili all’utente. Attenzione: pericolo di scosse elettriche Non esporre il dispositivo alla pioggia o all'umidità . Attenzione: rischio di esplosione (pile) Inserire le pile correttamente .
  • Seite 37: Comandi

    LOCATION OF CONTROLS Comandi CHARGING PORT DC 5V Power Source Tun+ Tun- Vol+ Vol- 1 2 3 4 56 1. POWER button: Press to turn the tower speaker 8. MIC 1 jack. POWER: premere per accendere e spegnere gli altoparlanti . off or on.
  • Seite 38: Telecomando

    REMOTE CONTROL – LOCATIO CONTROLS Telecomando POWER: ON / OFF 2 MEM CLOCK: • Premere ripetutamente per cambiare i ca- nali radio salvati . • Premere per impostare l’ora. 3 TUNE/MEM: • Tenere premuto per 3 secondi per cercare automaticamente i canali FM . •...
  • Seite 39: Installazione

    Installazione POWER SOURCE Alimentazione POWER SOURCE Insert the small plug from the supplied Inserire il connettore dell’alimentatore alla presa DC AC/DC adapter to the DC in jack on Insert the small plug from the supplied IN posta sul dispositivo . Ora collegare la spina ad una the unit.
  • Seite 40 It can charge various external devices, e.g. ipod, ipho or tablet etc. can charge various external devices, e.g. ipod, iphone, ipad, smart phone CHARGING EXTERNA r tablet etc. L DEVICE BY CHARGING EXTERNA L DEVICE BY 1/. Take out the holding bracket 4/.
  • Seite 41: Utilizzo

    (1) Listening fro Utilizzo 8. Press the BASS button Riproduzione da ingresso AUX-IN CHARGING PORT 9. Press the EQ preset mo DC 5V 1 . Collegare l’uscita Aux-Out di una fonte audio esterna (come let- preset EQ effect as des tore DVD, televisore, video registratore ecc .) agli attacchi AUX-IN posti sul retro del dispositivo tramite il cavo RCA incluso nella 10.
  • Seite 42 Collegamento BT Collegamento iniziale 1 . Accendere il dispositivo . Premere SOURCE e selezionare BT . 2 . La spia a LED lampeggia ininterrottamente durante la ricerca del dispositivo . 3 . Quando il dispositivo viene trovato, appare il nome “HiTower” . Se viene richiesta una password, inserire “0000”...
  • Seite 43: Impostare Il Timer

    Salvare un canale radio 1 . Seguire le indicazioni per sintonizzare la radio . 2 . Dopo aver impostato un canale, premere MEM/CLOCK . 3 . Premere TUN+/CLOCK oppure TUN-/CLOCK sul telecomando per regolare la frequenza radio desiderata . 4 . Premere MEM/CLOCK per aggiungere il canale attuale in una postazione di memoria . È possibile salvare 30 canali .
  • Seite 44: Risoluzione Dei Problemi

    Risoluzione dei problemi Problema Soluzioni Il dispositivo non si Controllare il collegamento dell’alimentatore tra il di- accende spositivo e la presa . Verificare che il volume non sia impostato al minimo. Assenza di suono Verificare se gli altoparlanti sono stati disattivati. Controllare le pile ed eventualmente sostituirle .
  • Seite 45: Dati Tecnici

    Dati tecnici 10029400 10029401 Articolo numero 18 V 1,6 A Alimentazione Alimentazione del telecomando CD 3 V, 1x CR 2025 pile (incluse) 30 W Consumo energetico 87,5 MHz - 108 MHz Larghezza banda radio Impedenza degli altoparlanti Canale sinistro 8 Ohm...
  • Seite 46: Indicaciones De Seguridad

    Estimado cliente, Le felicitamos por la adquisición de este producto. Lea atentamente el siguiente manual y siga cuidado- samente las instrucciones de uso con el fin de evitar posibles daños. La empresa no se responsabiliza de los daños ocasionados por un uso indebido del producto o por haber desatendido las indicaciones de seguridad .
  • Seite 47: Contenido Del Envío

    Este símbolo le muestra que el aparato dispone de un aislamiento doble entre la tensión de entrada de riesgo y las partes accesibles al usuario. Advertencia: riesgo de descarga eléctrica No exponga el aparato a la humedad ni a la lluvia . Advertencia: riesgo de explosión (pilas) Asegúrese de colocar correctamente las pilas .
  • Seite 48: Controles

    LOCATION OF CONTROLS Controles CHARGING PORT DC 5V Power Source Tun+ Tun- Vol+ Vol- 1 2 3 4 56 1. POWER button: Press to turn the tower speaker 8. MIC 1 jack. POWER: Encender y apagar los altavoces off or on. 9.
  • Seite 49: Mando A Distancia

    REMOTE CONTROL – LOCATIO CONTROLS Mando a distancia POWER: EIN/AUS 2 MEM CLOCK: • Pulse varias veces para elegir entre las dis- tintas estaciones de radio memorizadas . • Pulse una vez para ajustar la hora . 3 TUNE/MEM: • Mantenga pulsado el botón tres segundos para buscar automáticamente emisoras FM .
  • Seite 50: Instalación

    Instalación POWER SOURCE Suministro eléctrico POWER SOURCE Insert the small plug from the supplied Encaje el enchufe pequeño del cable de alimentación AC/DC adapter to the DC in jack on Insert the small plug from the supplied en el conector para corriente continua del aparato . Co- the unit.
  • Seite 51 It can charge various external devices, e.g. ipod, ipho or tablet etc. can charge various external devices, e.g. ipod, iphone, ipad, smart phone CHARGING EXTERNA r tablet etc. L DEVICE BY CHARGING EXTERNA L DEVICE BY 1/. Take out the holding bracket 4/.
  • Seite 52: Utilización

    (1) Listening fro Utilización 8. Press the BASS button Reproducción desde una conexión AUX-IN CHARGING PORT 9. Press the EQ preset mo DC 5V 1 . Conecte la salida Aux Out de una fuente externa de audio (como preset EQ effect as des reproductores DVD, televisores, grabadoras de vídeo, etc .) a la conexión AUX-IN situada en la parte trasera de la torre con ayuda 10.
  • Seite 53 Conexión a través de BT Primera conexión 1 . Encienda la torre. Pulse el botón SOURCE y seleccione BT. 2 . El LED BT se ilumina de manera intermitente mientras el dispositivo realiza la búsqueda . 3 . Cuando se haya detectado la torre, aparecerá el nombre «HiTower». En caso de que se le requiera introducir una contraseña, teclee «0000»...
  • Seite 54: Ajuste De La Hora

    Memorizar emisoras 1 . Siga las instrucciones de configuración de una emisora. 2 . Cuando haya configurado la emisora deseada, pulse MEM/CLOCK. 3 . Pulse TUN+/CLOCK+ o TUN-/CLOCK- en el mando a distancia para configurar la frecuencia de radio . 4 .
  • Seite 55: Resolución De Problemas

    8 . Pulse TUN+/CLOCK+ o TUN-/CLOCK- en el mando a distancia para configurar los minutos. 9 . Pulse MEM/CLOCK en el mando a distancia para confirmar los ajustes. 10 . Cuando la alarma comience a sonar, se activará la emisora deseada . 11 .
  • Seite 56: Datos Técnicos

    Datos técnicos Número de artículo 10029400 10029401 Suministro eléctrico 18 V 1,6 A Suministro eléctrico del mando a CD 3 V, 1 pila CR 2025 (incluida) distancia Consumo de energía 30 W Ancho de banda de radio 87,5 MHz - 108 MHz...

Diese Anleitung auch für:

10029400

Inhaltsverzeichnis