Herunterladen Inhalt Inhalt Diese Seite drucken
Inhaltsverzeichnis

Werbung

Verfügbare Sprachen
  • DE

Verfügbare Sprachen

  • DEUTSCH, seite 38
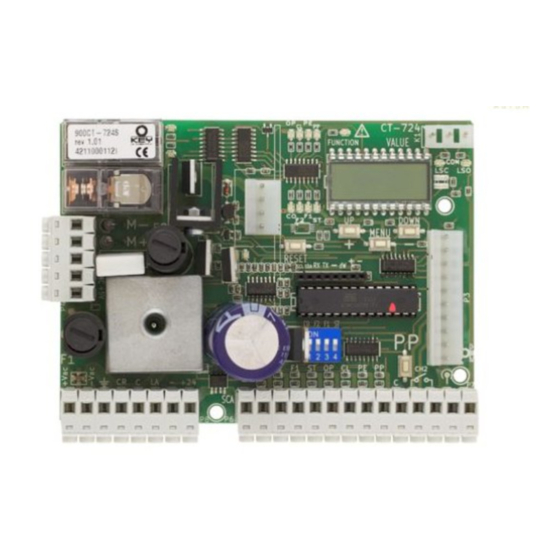
Centrale 24Vdc per un motore scorrevole, basculante o barriera 24 Vdc, con gestione encoder
24Vdc control unit for one sliding or overhead door motor or barrier, with encoder
Centrale 24Vcc pour moteur coulissant, basculant ou barrière 24 Vcc, avec gestion encodeur
24Vdc Steuergerät für einen Schiebe-oder Schwenktormotor oder 24 Vdc-Schranken mit Encoder-Regelung
Central 24Vcc para un motor corredizo, basculante o barrera 24 Vcc, con gestión codificador
Central 24Vdc para um motor deslizável, basculante ou barreira 24 Vdc, com gestão codificador
Centrala 24Vdc dla bram przesuwnych, wahadłowych lub szlabanów 24 Vdc, o sterowaniu enkoderowym
CT-724S
Istruzioni ed avvertenze per l'installazione e l'uso
Instructions and warnings for installation and use
Instructions et avertissements pour l'installation et l'usage
Anleitungen und Hinweise zu Installation und Einsatz
Instrucciones y advertencias para su instalación y uso
Instruções e advertências para a instalação e utilização
Instrukcje i zalecenia dotyczące instalacji i użytkowania

Werbung

Inhaltsverzeichnis
loading

Inhaltszusammenfassung für Key Automation CT-724S

  • Seite 1 Central 24Vdc para um motor deslizável, basculante ou barreira 24 Vdc, com gestão codificador Centrala 24Vdc dla bram przesuwnych, wahadłowych lub szlabanów 24 Vdc, o sterowaniu enkoderowym CT-724S Istruzioni ed avvertenze per l’installazione e l’uso Instructions and warnings for installation and use Instructions et avertissements pour l’installation et l’usage...
  • Seite 2 INDICE Avvertenze per la sicurezza pag. 3 Introduzione al prodotto pag. 4 Descrizione della centrale pag. 4 Descrizione dei collegamenti pag. 4 Modelli e caratteristiche tecniche pag. 4 Elenco cavi necessari pag. 5 Verifiche preliminari pag. 5 Installazione del prodotto pag.
  • Seite 3: Avvertenze Per La Sicurezza

    Se sostanze liquide penetrano all’interno delle parti dei componenti dell’automazione, scollegare immediatamente l’alimentazione elet- la progettazione e la fabbricazione dei dispositivi che trica e rivolgersi al Servizio Assistenza Key Automation. L’utilizzo compongono il prodotto e le informazioni contenute dell’automazione in tali condizioni può causare situazioni di pericolo;...
  • Seite 4: Introduzione Al Prodotto

    2 - INTrODUZIONE Al prODOTTO 2.1 - Descrizione del prodotto La CT-724S è dotata di un display che permette una facile program- La centrale CT-724S è il più moderno ed efficiente sistema di controllo mazione ed il costante monitoraggio dello stato degli ingressi; inoltre per i motori Key Automation per l’apertura e la chiusura elettrica di...
  • Seite 5: Dati Tecnici

    - Alimentazione protetta contro i cortocircuiti all’interno della centra- occorre ponticellare i morsetti relativi alla sicurezza non installata, è le, sui motori e sugli accessori collegati. sufficiente disabilitare la funzione da dip switch. - Regolazione della potenza con parzializzazione della corrente. - Possibilità...
  • Seite 6: Installazione Del Prodotto

    4 - INsTAllAZIONE DEl prODOTTO 4.1 - collegamenti elettrici ATTENZIONE - Prima di effettuare i collegamenti verificare che la centrale non sia alimentata COnnETTORE MOTORE COnnETTORE ALIMEnTAZIOnI Morsettiera collegamenti alimentazione motore 24Vdc ed encoder +Vac Alimentazione da trasformatore 24÷26 Vac (12 A picco) Alimentazione motore (rosso o marrone) -Vac Alimentazione da trasformatore 24÷26 Vac (12 A picco)
  • Seite 7 COnnETTORE SICuREZZE E COMAnDI Spia cancello aperto, 24 V, 50 mA max, tra SCA e - Costa sicurezza, On/OFF contatto nC tra CO e C (attenzione, con dip switch 1 in On disabilita ingresso sicurezza COSTA) Fotocellule (chiusura) contatto nC tra F1 e C (attenzione, con dip switch 3 in On disabilita ingresso sicurezza FOTOCELLuLA 1) La fotocellula interviene in qualsiasi momento durante la chiusura dell’automazione provocando l’immediato blocco del moto invertendo il senso di marcia Fotocellule (apertura) contatto nC tra F2 e C (attenzione, con dip switch 2 in On disabilita ingresso sicurezza FOTOCELLuLA 2)
  • Seite 8: Autoapprendimento Della Corsa

    Anomalie di funzionamento Oltre alla segnalazione su display, il lampeggiante segnala la situa- In questo paragrafo vengono elencate alcune anomalie di funzio- zione di errore tramite una sequenza di due lampeggi brevi pausa namento che si possono presentare. due lampeggi brevi ALLARME EnCODER La centrale non legge segnali dall’encoder 1.
  • Seite 9 AUTOApprENDIMENTO DEllA COrsA E DEI pArAMETrI prINCIpAlI 1. Sbloccare il cancello, portarlo in posizione centrale e ribloccarlo 2. Premere COnTEMPORAnEAMEnTE i tasti + e MEnu per più di 5 secondi e prepararsi a premere (se necessario) il tasto DOWN (vedi figura) 3.
  • Seite 10: Collaudo E Messa In Servizio Dell'automazione

    5 - COllAUDO E MEssA IN sErVIZIO DEll’AUTOMAZIONE Il collaudo dell impianto va eseguito da un tecnico qualificato che dalle normative, in particolare la norma En12445 che indica i meto- deve effettuare le prove richieste dalla normativa di riferimento in di di prova per gli automatismi per porte e cancelli.
  • Seite 11 6 - ApprOfONDIMENTI - MENU AVANZATO Per modificare i parametri del MENU AVANZATO si procede come Il MEnu AVAnZATO permette di personalizzare ulteriormente l’im- indicato per il MEnu bASE pianto modificando dei parametri non accessibili dal menu base nell’ultima colonna sono indicati parametri utilizzati solo per un Per accedere al menu AVAnZATO si preme e si tiene premuto per 5 tipo specifico di automazione: secondi il tasto MEnu...
  • Seite 12 Key Automation non è però il produttore della vostra nare più a lungo possibile ed in completa sicurezza. Concordate automazione, che è invece il risultato di un’opera di analisi, valu- con il vostro installatore un piano di manutenzione con frequenza tazione, scelta dei materiali, e realizzazione dell’impianto eseguita...
  • Seite 13 NOTE...
  • Seite 14: Inhaltsverzeichnis

    INDEX safety warnings p. 15 product overview p. 16 Description of the control unit p. 16 Description of the connections p. 16 Models and characteristics p. 16 List of cables needed p. 17 preliminary checks p. 17 Installing the product p.
  • Seite 15: Safety Warnings

    - If liquid spills into any part of the automation components, immedi- Read the instructions carefully before you start the installation. ately disconnect the power supply and contact the Key Automation Customer Service. The use of the automation under these condi- The design and manufacture of the devices making tions can be dangerous.
  • Seite 16: Product Overview

    2.1 - Description of the product CT-724S is equipped with a display that allows easy programming The CT-724S control unit is the most modern and efficient control sys- and constant monitoring of inputs; in addition, the menu structure tem for Key Automation motors for opening and closing electric sliding allows easy setting of working time and operating modes.
  • Seite 17: Technical Data

    - Power supply protected against short circuits within the unit, on terminals related to the safety not installed, by simply disabling the motor and connected accessories. function with the dip switch. - Power adjustment with chopping of the current. - Ability to operate with an optional battery without power supply. - Detection of obstacles by monitoring the encoder from the motor.
  • Seite 18: Product Installation

    4 - prODUCT INsTAllATION 4.1 - electrical connections WARnInG - before making connections, verify that the installation is not powered MOTOR COnnECTOR POWER COnnECTOR Terminal block for power connections, for 24Vdc motor and +Vac Transformer Power 24÷26 Vac (12 A peak) encoder -Vac Transformer Power 24÷26 Vac (12 A peak)
  • Seite 19: Normal Display Mode

    COnnECTIOn FOR SAFETY AnD COnTROLS Status indicator light, 24 V, 50 mA max, between SCA and - Safety edge, On/OFF contact between CO and C (attention, with dip switch 1 On it disables EDGE safety input) Photocells (closing), nC contact between F1 and C (attention, with dip switch 3 On it disables PHOTOCELL 1 safety input) Photocells will work at any time during closing of the automation, causing an immediate stop and reversing the direction of movement Photocells (opening), nC contact between F2 and C (attention, with dip switch 2 On it disables PHOTOCELL 2 safety input)
  • Seite 20: Self-Learning Of The Travel

    Malfunctions In addition to signals on the display, the flashing light signals the This section lists some malfunctions that may arise. error by a sequence of two short flashes pause two short flashes EnCODER ALARM The control unit does not read signals from the encoder 1.
  • Seite 21: Customizing The Installation - Basic Menu

    sElf-lEArNING Of ThE TrAVEl AND MAIN pArAMETErs 1. unlock the gate, door or barrier, bring it to a central position and lock it again 2. Press buttons + and MEnu SIMuLTAnEOuSLY for more than 5 seconds and get ready to press (if necessary) the DOWN button (see figure) 3.
  • Seite 22: Testing And Commissioning

    5 - TEsTING AND COMMIssIONING ThE AUTOMATION The testing of the automation must be performed by qualified tech- regulations, in particular the EN12445 standard, which specifies the nicians who must perform the tests required by relevant legisla- testing methods for the automation of doors and gates. tion related to risks, ensuring compliance with the provisions of the 5.1 Testing All installation components must be tested following the procedures...
  • Seite 23: Insights - Advanced Menu

    6 - INsIGhTs - ADVANCED MENU The ADVAnCED MEnu allows you to further customize the instal- ceed as indicated for the bASIC MEnu lation by changing some parameters not accessible from the basic In the last column are indicated the parameters used only for a menu specific type of automation: SL sliding motor, BA barrier, BL over- To access the ADVAnCED menu, hold down the MEnu button for 5...
  • Seite 24: Instructions And Warnings For The End User

    Agree with your barriers. However, Key Automation is not the manufacturer of your installer on a maintenance plan on a periodic basis; Key Automation automation, which is rather the result of a process of analysis, eval-...
  • Seite 25 NOTEs...
  • Seite 26 sOMMAIrE Avertissements pour la sécurité page 27 Introduction au produit page 28 Description de la centrale page 28 Description des branchements page 28 Modèles et caractéristiques tech- page 28 niques page 29 Liste des câbles nécessaires Contrôles préliminaires page 29 Installation du produit page 30 branchements électriques...
  • Seite 27: Avertissements Pour La Sécurité

    à l'installation ATTENTION - la société Key Automation s.p.A. se ré- en tenant compte des avertissements suivants : serve le droit de modifier à tout moment et sans préa- vis les données et les informations indiquées dans ce...
  • Seite 28: Introduction Au Produit

    2.1 - Description du produit Le CT-724S est équipé d'un écran permettant une programmation facile La centrale CT-724S est le système le plus moderne et le plus efficace et une surveillance constante du statut des entrées. De plus, la structure de contrôle des moteurs Key Automation pour l'ouverture et la fermeture...
  • Seite 29: Niques

    - Alimentation protégée contre les courts-circuits à l'intérieur de la cen- pas nécessaire de créer de pont entre les bornes relatives au disposi- trale, sur les moteurs et sur les accessoires reliés. tif de sécurité non installé, il suffit de désactiver la fonction depuis le - Régulation de la puissance avec découpage du courant.
  • Seite 30: Installation Du Produit

    4 - INsTAllATION DU prODUIT 4.1 - branchements électriques ATTENTION - Avant d'effectuer les branchements, vérifier que l'alimentation de la centrale soit coupée COnnECTEuR MOTEuR COnnECTEuR ALIMEnTATIOnS Plaque de connexions d'alimentation du moteur 24Vcc et de l'enco- +Vca Alimentation par transformateur 24÷26 Vca (12 crête) deur -Vca Alimentation par transformateur 24÷26 Vca (12 crête)
  • Seite 31: Affichage En Mode Normal

    COnnECTEuR DISPOSITIFS DE SÉCuRITÉ ET COMMAnDES Voyant portail ouvert, 24 V, 50 mA max, entre SCA et - barre de sécurité, On/OFF contact nC entre CO et C (attention, avec micro-interrupteur 1 sur On, l'entrée sécurité bARRE est désactivée) Photocellule (fermeture) contact nC entre F1 et C (attention, avec micro-interrupteur 3 sur On, l'entrée sécurité PHOTOCEL- LuLE 1 est désactivée) La cellule photo-électrique intervient à...
  • Seite 32: Auto-Apprentissage De La Course

    Anomalies de fonctionnement Outre le signalement sur l'écran, le clignotant indique la situation Ce paragraphe fournit la liste de certaines anomalies de fonctionne- d'erreur à l'aide d'une séquence de deux clignotements rapides, une ment susceptibles de se présenter. pause et deux clignotements rapides ALARME EnCODEuR La centrale ne lit pas les signaux envoyés par l'encodeur.
  • Seite 33: Personnalisation Du Système - Menu Base

    AUTO-ApprENTIssAGE DE lA COUrsE ET DEs pArAMÈTrEs prINCIpAUX 1. Débloquer le portail, le mettre en position centrale et le bloquer à nouveau 2. Appuyer SIMuLTAnÉMEnT sur les touches + et MEnu pendant plus de 5 secondes et se préparer à appuyer (si nécessaire) sur la touche DOWN (voir figure).
  • Seite 34: Essai Et Mise En Service

    5 - EssAI ET MIsE EN sErVICE DE l'AUTOMATION L'essai de l'installation doit être effectué par un technicien qualifié normatives, en particulier celles de la norme En12445 indiquant les qui devra procéder aux essais requis par la norme de référence en méthodes d'essai pour les automatismes relatifs aux portes et portails.
  • Seite 35: Approfondissements - Menu Avancé

    6 - ApprOfONDIssEMENTs - MENU AVANCÉ Le MEnu AVAnCÉ permet de personnaliser l'installation ultérieurement Pour modifier les paramètres du MENU AVANCÉ, procéder comme en modifiant des paramètres non accessibles depuis le Menu base indiqué pour le MEnu bASE Pour accéder au menu AVAnCÉ, appuyer et maintenir enfoncé pendant Les paramètres utilisés pour un type spécifique d'automation sont 5 secondes la touche MEnu indiqués dans la dernière colonne :...
  • Seite 36: Instructions Et Avertissements Desti

    Key Automation n'est cependant pas le concepteur toute sécurité. Définir un programme d'entretien à fréquence périodique de votre automation, étant en revanche le résultat d'un travail d'ana- avec l'installateur.
  • Seite 37 NOTEs...
  • Seite 38 INhAlTsVErZEIChNIs sicherheitshinweise S. 39 produkteinführung S. 40 beschreibung des Steuergeräts S. 40 beschreibung der Anschlüsse S. 40 Modelle und technische Merkmale S. 40 Liste der nötigen Kabel S. 41 VOrAbKONTrOllEN S. 41 produktinstallation S. 42 Elektrische Anschlüsse S. 42 Ansicht des normalmodus S.
  • Seite 39: Sicherheitshinweise

    Sollte die Abschaltvorrichtung nicht sichtbar sein, ein Schild mit der Aufschrift “In WARTunG” anbringen. bei Zweifel jeglicher Art die Installation abbrechen und ggf. Erläute- rungen beim Kundendienst Key Automation anfragen. Das Steuergerät muss mit einer Stromleitung verbunden werden, die sicher geerdet ist.
  • Seite 40: Produkteinführung

    2 - prODUKTEINfÜhrUNG 2.1 - produktbeschreibung Die CT-724S ist mit einem Display ausgestattet, das eine einfache Das Steuergerät CT-724S ist das modernste und effizienteste Steu- Programmierung und kontinuierliche überwachung des Status der ersystem für Motoren der Key Automation zum automatischen Öffnen Eingänge erlaubt.
  • Seite 41: Technische Daten

    - Gegen Kurzschlüsse im Steuergerät, an den Motoren und am an- - Ausschaltung der Sicherheitseingänge durch Dip Switch: Die geschlossenen Zubehör isolierte Versorgung. Klemmen der nicht installierten Sicherheit müssen nicht überbrückt - Leistungsregulierung mit Teillaststufen des Stroms. werden, es reicht aus, die Funktion mit Dip Switch zu sperren. - Hinderniserkennung durch überwachung des Encoders in den - Funktion bei Stromausfall durch optionale batterie Motoren.
  • Seite 42: Produktinstallation

    4 - prODUKTINsTAllATION 4.1 - stromanschlüsse ACHTunG - bevor die Verbindungen durchgeführt werden, sicherstellen, dass die Stromzufuhr abgeschaltet ist. MOTORVERbInDER STROMVERbInDER Verbindungsklemmen 24Vdc Motorversorgung und Encoder +Vac Transformatorspeisung 24÷26 Vac (12 A Spannungsspitze) Motorspeisung (rot oder braun) Transformatorspeisung 24÷26 Vac (12 A Spannungsspitze) Motorspeisung (grün oder weiß) Erdung Kodierer (weiß)
  • Seite 43: Sicherheits- Und Bedienverbinder

    SICHERHEITS- unD bEDIEnVERbInDER Anzeige Tor offen, 24 V, 50 mA max. zwischen SCA und - Sicherheitsleiste, On/OFF wie nC -Kontakt zwischen CO und C (Achtung: mit Dip Switch 1 auf On wird der Sicherheitsein- gang LEISTE gesperrt) Fotozellen (Schließung) nC Kontakt zwischen F1 u. C (Achtung: mit Dip Switch 3 auf On Sicherheitseingang FOTOZELLE 1 gesperrt) Greift an jedem Punkt der automatischen Schließung ein und bewirkt die sofortige blockierung des Motors und die Richtungs- umkehr.
  • Seite 44: Selbstlernen Des Laufs

    betriebsstörungen Zusätzlich zur Displaymeldung weist das blinklicht mit der Se- In diesem Absatz werden einige betriebsstörungen aufgelistet, die quenz von zwei kurzen blinkzeichen, einer Pause und wieder zwei auftreten können. kurzen blinkzeichen auf den vorliegenden Fehler hin. ALARM EnCODER Das Steuergerät liest nicht die Encodermeldungen 1.
  • Seite 45: Beschreibung

    sElbsTlErNEN DEs lAUfs UND DEr hAUpTpArAMETEr 1. Das Tor entriegeln, in mittlere Stellung bringen und wieder anhalten. 2. GLEICHZEITIG die Tasten + und MEnü mehr als 5 Sekunden drücken und dann (wenn nötig) die Taste DOWn drücken (siehe Abbildung). 3. Wenn die erste bewegung KEInE Öffnung ist, die Taste DOWn drücken, um das Selbstlernen zu DOWN stoppen.
  • Seite 46: Test Und Inbetriebnahme Der Automation

    5 – TEsT UND INbETrIEbNAhME DEr AUTOMATION Die Endabnahme der Anlage muss von einem qualifizierten Techni- sondere entsprechend der Richtlinie En12445, in der Testmetho- ker durchgeführt werden, der alle von der bezugsnorm geforderten den für Automationen der Türen und Tore genannt sind. Proben bezüglich, der bestehenden Restrisiken ausführt, insbe- 5.1 Test Alle Komponenten der Anlage müssen entsprechend der jeweiligen...
  • Seite 47: Vertiefung - Erweitertes Menü

    6 - VErTIEfUNG - ErWEITErTEs MENÜ Das ERWEITERTE MEnü ermöglicht durch Parameteränderungen, um die Parameter des ERWEITERTEn MEnü zu ändern, wie im die nicht im GRunDMEnü möglich sind, die Anlage individuell an- GRunDMEnü angegeben, vorgehen. zulegen. In der letzten Spalte sind Parameter angegeben, die nur für einen Für den Zugriff auf das ERWEITERTE MEnü, die MEnü...
  • Seite 48: Anweisungen Und Hinweise Für Den Endbenutzer

    Rollläden, sowie Schranken für Parkplätze oder Straßensperren bedarf Ihre Automation, wie jedes andere Gerät, einer regelmäßi- her. Key Automation ist jedoch nicht der Hersteller Ihrer Automation. gen Wartung. Vereinbaren Sie mit Ihrem Installateur einen War- Sie ist das Ergebnis von Analysen, Auswertung, Materialwahl und tungsplan mit regelmäßigen Abständen.
  • Seite 49 ANMErKUNGEN...
  • Seite 50 ÍNDICE Advertencias de seguridad pág. 51 Introducción al producto pág. 52 Descripción de la central pág. 52 Descripción de las conexiones pág. 52 Modelos y características técnicas pág. 52 Lista cables necesarios pág. 53 Comprobaciones preliminares pág. 53 Instalación del producto pág.
  • Seite 51: Advertencias De Seguridad

    Servicio de asistencia Key Automation. que componen el producto, así como la información El uso de la automatización en tales condiciones puede originar que contiene esta manual respetan las normativas vi- situaciones peligrosas;...
  • Seite 52: Introducción Al Producto

    2.1 - Descripción del producto bido. La central CT-724S es el sistema más moderno y eficaz de control La CT-724S está dotada de una pantalla que permite una programa- para motores Key Automation para la apertura y el cierre eléctricos de ción fácil y una monitorización constante del estado de las entradas;...
  • Seite 53: Datos Técnicos

    - Alimentación protegida contra cortocircuitos dentro de la central, no es necesario puentear los bornes relativos a la seguridad no ins- en los motores y en los accesorios conectados. talada, basta con deshabilitar la función desde dip switch. - Regulación de la potencia con parcialización de la corriente. - Posibilidad de funcionamiento en ausencia de tensión de red me- - Detección de los obstáculos mediante monitorización del codifica- diante una batería opcional.
  • Seite 54: Instalación Del Producto

    4- INsTAlACIÓN DEl prODUCTO 4.1- conexiones eléctricas ATENCIÓN - antes de realizar las conexiones compruebe que no se esté alimentando la central CONECTOr pArA MOTOr CONECTOr AlIMENTACIÓN Bornera conexiones alimentación motor 24Vcc y codificador +Vca Alimentación de transformador 24÷26 Vca (12 En pico) Alimentación motor (rojo o marrón) -Vca Alimentación de transformador 24÷26 Vca (12 En pico)
  • Seite 55 CONECTOr DE INDICADOrEs DE sEGUrIDAD y CONTrOlEs Testido cancela abierta, 24 V, 50 mA máx. entre SCA y - banda de seguridad, On/OFF, contacto nC entre CO y C (atención, con dip switch 1 en On deshabilita la entrada de seguri- dad bAnDA) Fotocélula (cierre) contacto nC entre F1 y C (atención, con dip switch 3 en On deshabilita la entrada de seguridad FO- TOCÉLuLA 1)
  • Seite 56 Anomalías de funcionamiento Además de la señal en la pantalla, la luz intermitente señala la En este parágrafo se ennumeran algunas anomalían de funciona- situación de error mediante una secuencia de dos parpadeos miento que se pueden presentar. breves-pausa-dos parpadeos breves AlArMAs CODIfICADOr la central no lee señales del codificador 1.
  • Seite 57 AprENDIZAJE AUTOMÁTICO DEl rECOrrIDO y DE lOs pArÁMETrOs prINCIpAlEs 1. Desbloquee la cancela , llévelo a la posición central y vuelva a bloquearla 2. Presione A LA VEZ las teclas + y MEnú durante más de 5 segundos y prepárese para presionar (si es necesario) la tecla DOWN (vea figura) 3.
  • Seite 58: Ensayo Y Puesta En Servicio De La Automatización

    5 - ENsAyO y pUEsTA EN sErVICIO DE lA AUTOMATIZACIÓN El ensayo de la instalación debe realizarlo un técnico calificado el do el respeto de cuanto prevén las normativas, especialmente la cual deberá llevar a cabo las pruebas requeridas por la normati- En12445, que indica los métodos de prueba para las automatiza- va de referencia en función de los riesgos presentes, comproban- ciones de puertas y cancelas.
  • Seite 59 6 - prOfUNDIZACIONEs - MENÚ AVANZADO El MEnú AVAnZADO permite personalizar adicionalmente la instalación modificando los parámetros a los cuales no se puede acceder desde el menú base Para acceder al menú AVANZADO presione, y mantenga presionada durante 5 segundos, la tecla MENÚ Para modificar los parámetros del MENÚ...
  • Seite 60 útil larga y barreras para aparcamientos y carreteras. Key Automation no es el funcionar de manera segura. Establezca con su instalador un plano productor de su automatización, que es el resultado de una obra de de manutención con frecuencia periódica;...
  • Seite 61 NOTAs...
  • Seite 62 ÍNDICE Advertências para a segurança pág. 63 Introdução ao produto pág. 64 Descrição da central pág. 64 Descrição das ligações pág. 64 Modelos e características técnicas pág. 64 Lista de cabos necessários pág. 65 Verificações preliminares pág. 65 Instalação do produto pág.
  • Seite 63: Advertências Para A Segurança

    A concepção e a produção dos dispositivos que com- trica e dirija-se ao Serviço de Assistência Key Automation. põem o produto e as informações contidas no pre- A utilização da máquina nestas condições pode provocar situações sente manual respeitam as normas vigentes sobre a de perigo.
  • Seite 64: Introdução Ao Produto

    2 - INTrODUÇÃO AO prODUTO 2.1 - Descrição do produto A CT-724S está equipada com um visor que permite uma fácil pro- A central CT-724S é o mais moderno sistema de controlo para os gramação e constante monitorização do estado das entradas; além motores Key Automation para a abertura e fecho eléctrico de portões...
  • Seite 65: Dados Técnicos

    - Alimentação protegida contra os curto-circuitos no interior da cen- não é necessário ligar em ponte os bornes relativos à segurança tral, nos motores e acessórios ligados. não instalada, basta desactivar a função do dip switch. - Regulação da potência com parcialização da corrente. - Possibilidade de funcionamento na ausência da tensão de rede - Detecção dos obstáculos através da monitorização do codificador através da bateria opcional.
  • Seite 66: Instalação Do Produto

    4 - INsTAlAÇÃO DO prODUTO 4.1 - ligações eléctricas ATENÇÃO - Antes de efectuar as ligações, verifique se a central está alimentada COnECTOR MOTOR COnECTOR ALIMEnTAÇÕES Placa de bornes ligações alimentação motor 24Vdc e codificador +Vac Alimentação de transformador 24÷26 Vac (12 A pico) Alimentação motor (vermelho ou castanho) -Vac Alimentação de transformador 24÷26 Vac (12 A pico)
  • Seite 67 COnECTOR SEGuRAnÇAS E COMAnDOS Piloto portão aberto, 24 V, 50 mA máx, entre SCA e - Costa mecânica, seja ON/OFF seja 8.2 kΩ contacto NC entre CO e C (atenção, com dip switch 1 em ON desactiva entrada segurança COSTA) Fotocélulas (fecho) contacto nC entre F1 e C (atenção, com dip switch 3 em On desactiva entrada segurança FOTOCÉLuLA 1) O contacto pode ser desactivado.
  • Seite 68 Anomalias de funcionamento Além da sinalização no visor, o sinal intermitente assinala a neste parágrafo, são listadas algumas anomalias de funcionamen- situação de erro através de uma sequência de duas intermitências to que se podem apresentar. breves, pausa, duas intermitências breves ALARME CODIFICADOR A central não lê...
  • Seite 69 AUTO-AprENDIZAGEM DO CUrsO E DOs pArÂMETrOs prINCIpAIs 1. Desbloquear o portão, levá-lo à posição central e bloqueá-lo novamente 2. Pressionar SIMuLTAnEAMEnTE os botões + e MEnu durante mais de 5 segundos e preparar-se para pressionar (se necessário) o botão DOWN (ver figura) 3.
  • Seite 70: Colocação Em Serviço

    5 - TEsTE E COlOCAÇÃO EM sErVIÇO DA MÁqUINA O teste do sistema deve ser executado por um técnico qualificado das disposições previstas pelas normativas, em particular a norma que deve efectuar os testes solicitados pela normativa de referên- En12445 que indica os métodos de teste a máquinas para portas cia em função dos riscos presentes, verificando o cumprimento e portões.
  • Seite 71 6 - DEsENVOlVIMENTO - MENU AVANÇADO O MEnu AVAnÇADO permite personalizar posteriormente o siste- Para alterar os parâmetros do MEnu AVAnÇADO procede-se ma alterando parâmetros não acessíveis no menu base como indicado para o MEnu bASE Para aceder ao menu AVAnÇADO pressiona-se ou mantém-se Na última coluna são indicados parâmetros apenas para um tipo pressionado durante 5 segundos o botão MEnu específico de máquina:...
  • Seite 72 7 - INsTrUÇõEs E ADVErTêNCIAs DEsTINADAs AO UTIlIZADOr fINAl Key Automation S.r.l. produz sistemas para a automação de por- ilização. Qualquer intervenção de controlo, manutenção ou repara- tões, portas de garagem, portas automáticas, persianas, cancelas ção deve ser efectuada apenas por pessoal qualificado;...
  • Seite 73 NOTAs...
  • Seite 74 spIs TrEŚCI Zalecenia dotyczące bezpieczeństwa str. 75 Wprowadzenie do produktu str. 76 Opis centrali str. 76 Opis połączeń str. 76 Modele i dane techniczne str. 76 Spis niezbędnych przewodów str. 77 Kontrole wstępne str. 77 Montaż produktu str. 78 Połączenia elektryczne str.
  • Seite 75: Zalecenia Dotyczące Bezpieczeństwa

    Musi zostać wypełniona przez wyspecjalizo- obowiązującymi przepisami lokalnymi. wanego technika do spraw instalacji. UWAGA - Key Automation s.r.l. ma prawo do zmian biorąc pod uwagę sytuacje ryzyka, które mogą zaist- danych i informacji wskazanych w tym podręczniku w nieć...
  • Seite 76: Wprowadzenie Do Produktu

    2.1 - Opis produktu Każde inne użycie centrali jest zabronione. Centrala CT-724S jest najnowocześniejszym i najskuteczniejszym Model CT-724S wyposażony jest w wyświetlacz umożliwający łatwe systemem kontroli dla silników Key Automation do elektrycznego programowanie oraz ciągłe monitorowanie stanu wejść; ponadto otwierania i zamykania bram przesuwnych, drzwi wahadłowych i szla- struktura menu pozwala na łatwe ustawienie czasu i logiki pracy.
  • Seite 77: Dane Techniczne

    - Zasilanie jest chronione przed zwarciem wewnątrz centrali, na sil- nie należy używać mostka dla zacisków przy nie zainstalowanym nikach i dodatkowych akcesoriach. zabezpieczeniu; wystarczy dezaktywować funkcję bezpośrednio z - Regulacja mocy z regulatorem ilości przepływu prądu. dip switch. - Wykrywanie przeszkód za pomocą monitorowania enkoderem sil- - Możliwość...
  • Seite 78: Instalacja Produktu

    4 - INsTAlACJA prODUKTU 4.1 - połączenia elektryczne UWAGA - Przed dokonaniem podłączeń należy sprawdzić, czy centrala nie jest zasilana ŁĄCZE SILNIKA ŁĄCZE ZASILANIA Skrzynka zaciskowa podłączeń zasilania silnika 24Vdc i enko- +Vac Zasilanie z transformatora 24÷26 Vac (12 A szczytowe) dera -Vac Zasilanie z transformatora 24÷26 Vac (12 A szczytowe)
  • Seite 79: Wyświetlenie Trybu Normalnego

    ŁĄCZE ZABEZPIECZEŃ I STEROWAŃ Kontrolka brama otwarta, 24 V, 50 mA max, między SCA i - Listwa zabezpieczająca, zarówno WŁ/WYŁ jak i 8.2 kΩ styk NC między CO i C (uwaga, dip switch 1 na WŁ, dezaktywuje wejście zabezpieczające LISTWY) Fotokomórki (zamykanie) styk NC między F1 a C (uwaga, dip switch 3 na WŁ...
  • Seite 80: Samozapamiętywanie Ruchu

    błędy w funkcjonowaniu Poza sygnalizacją na wyświetlaczu, lampka ostrzegawcza sygnali- W tym paragrafie wskazano niektóre z błędów jakie mogą się poja- zuje sytuację wystąpienia błędu poprzez sekwencję dwóch krótkich wić przy funkcjonowaniu systemu. mignięć przerwy i dwóch długich mignięć ALARM EnKODERA Centrala nie czyta sygnałów enkodera.
  • Seite 81: Personalizacja Instalacji - Menu Podstawowe

    sAMOZApAMIęTyWANIE rUChU I pArAMETrÓW GŁÓWNyCh 1. Odblokować bramę, ustawić ją w pozycji środkowej i ponownie zablokować 2. Nacisnąć RÓWNOCZEŚNIE przyciski: + i MENU przez ponad 5 sekund i przygotować się do naci- śnięcia (jeśli konieczne) przycisk W DÓŁ (zob. rysunek) 3.
  • Seite 82: Próba Techniczna

    5 - prÓbA TEChNICZNA I UrUChOMIENIE AUTOMATyKI Procedura testowania instalacji musi być przeprowadzona przez zgodność instalacji z obowiązującymi normami, a szczególnie z po- wykwalifikowanego technika, który musi przeprowadzić przewi- stanowieniami EN 12445, która określa metody testów dla syste- dziane próby mające na celu określenie obecności ryzyka i określić mów automatyki drzwi i bram.
  • Seite 83 6 - INfOrMACJE DODATKOWE - MENU ZAAWANsOWANE MEnu ZAAWAnSOWAnE pozwala na dalszą personalizację in- Aby zmienić parametry MENU ZAAWANSOWANEGO należy po- stalacji, modyfikując parametry, do których nie ma dostępu z menu stępować tak, jak opisano to dla MENU PODSTAWOWEGO podstawowego W ostatniej kolumnie wskazano parametry używane jedynie dla Aby uzyskać...
  • Seite 84 7 - INsTrUKCJE I ZAlECENIA DlA UżyTKOWNIKA KOńCOWEGO Key Automation S.r.l. produkuje systemy automatyki dla bram, drzwi Odblokowanie i ruch ręczny: przed wykonaniem tej czynności nale- garażowych, drzwi automatycznych, okiennic, szlabanów parkingo- ży zwrócić uwagę na fakt, iż odblokowanie może mieć miejsce tylko wych i drogowych.
  • Seite 85 UWAGI...
  • Seite 86 NOTE...
  • Seite 87: Dichiarazione Di Conformità

    Direttive Europee. Key Automation S.r.l. guarantees such a conformity only if the control unit is used as a control/management unit for automation system in typical configuration of installation and with peripherals which conform to the European Directives...
  • Seite 88 Key Automation S.r.l. Via A. Volta 30 - 30020 Noventa di Piave (VE) T. +39 0421.307.456 - F. +39 0421.656.98 Instruction version info@keyautomation.it - www.keyautomation.it 580ISCT-724 rev09...

Inhaltsverzeichnis