clage CEX 9 ELECTRONIC MPS Montageanleitung
Vorschau ausblenden
Andere Handbücher für CEX 9 ELECTRONIC MPS:
- Handbuch (20 Seiten) ,
- Gebrauchsanleitung (56 Seiten) ,
- Montageanleitung (56 Seiten)

Verwandte Anleitungen für clage CEX 9 ELECTRONIC MPS


Inhaltszusammenfassung für clage CEX 9 ELECTRONIC MPS
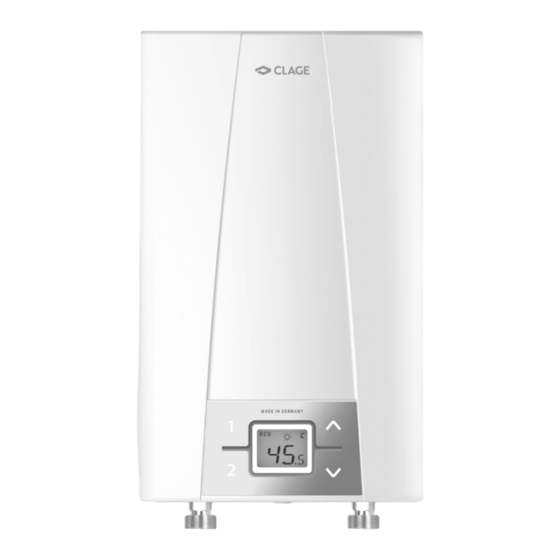
- Seite 1 Montageanleitung für den Fachhandwerker Installing instructions for the professional E-Kompaktdurchlauferhitzer CEX 9 E-compact instant water heater CEX 9 > > > >...
-
Seite 2: Inhaltsverzeichnis
CEX 9 ELECTRONIC MPS ® Inhaltsverzeichnis Contents 1. Übersichtsdarstellung ....... 3 1. -
Seite 3: Übersichtsdarstellung
CLAGE 1. Übersichtsdarstellung 1. Overview Bei Ersatzteilbestellungen stets Gerätetyp und Serien When ordering spare parts, please always specify the nummer angeben! appliance model and serial number. Durchführungstülle Grommet Geräteunterteil Anschlussklemme Bottom part Connecting terminal Durchflussgeber Flow sensor Heizelement mit SDB Rückflussverhinderer... -
Seite 4: Sicherheitshinweise
CEX 9 ELECTRONIC MPS ® 2. Sicherheitshinweise 2. Safety instructions Lesen Sie diese Anleitung bis zur letzten Seite sorgfältig Please read these instructions carefully before installing or durch, bevor Sie das Gerät installieren oder benutzen! using the appliance! Keep the instructions handy with the Bewahren Sie diese Anleitung für spätere Verwendung... - Seite 5 CLAGE 2. Sicherheitshinweise 2. Safety instructions • Die auf dem Typenschild angegebe- • The values stated on the rating plate nen Werte müssen eingehalten wer- must be observed. den. • In case of malfunction, disconnect • Im Störungsfall schalten Sie sofort the fuses immediately.
-
Seite 6: Technische Daten
CEX 9 ELECTRONIC MPS ® 3. Technische Daten 3. Technical specifications CEX 9 ELECTRONIC MPS ® Model Energieeffizienzklasse Energy efficiency class Nennleistung / -strom 6,0 / 9,6 kW (27,3 / 40 A) Rated capacity / rated current Gewählte Leistung @ 230 V... -
Seite 7: Typische Installationen
CLAGE 5. Typische Installationen 5. Typical installations AufputzInstallation: Versorgung einer Zapfstelle AufputzInstallation: Versorgung mehrerer Zapfstellen Direct connection: Supply for one outlet Direct connection: Supply for multiple outlets Empfohlene Handbrause: CXH (Art.Nr. 0300-0086) Recommended handset: CXH (art.no. 0300-0086) MADE IN GERMANY MADE IN GERMANY Maßangaben in mm... -
Seite 8: Installation
CEX 9 ELECTRONIC MPS ® 6. Installation 6. Installation Zu beachten sind: The following regulations must be observed: • VDE 0100 • Installation must comply with all • EN 8062 statutory regulations, as well as • Bestimmungen der örtlichen those of the local electricity and Energie... -
Seite 9: Installation
CLAGE 6. Installation 6. Installation Gerät befestigen Mounting the appliance 1. Wasserzuleitungen vor der Installation 1. Thoroughly rinse the water supply gründlich durchspülen, um Schmutz pipes before installation to remove aus den Leitungen zu entfernen. soiling from the pipes. 2. Gerät an die Wand halten; dann 2. -
Seite 10: Wiring Diagram
CEX 9 ELECTRONIC MPS ® 7. Elektroanschluss 7. Electrical connection Nur durch den Fachmann! Only by a specialist! Zu beachten sind: Please observe: Schaltplan Wiring diagram • VDE 0100 • The installation must comply with current IEC and national local regu... -
Seite 11: Electrical Connection
CLAGE 7. Elektroanschluss 7. Electrical connection 1. Manteln Sie die fest verlegte Leitung 1. Dismantle off the power cable so that so ab, dass Sie das Kabel mit der you can insert the cable with the clad- Ummantelung durch die Spritz wasser- ding through the water splash protec- tülle bis zur Zugentlastung in das... -
Seite 12: Erstinbetriebnahme
CEX 9 ELECTRONIC MPS ® 8. Erstinbetriebnahme 8. Initial operation Vor dem elektrischen Anschluss Before making the electrical connec die Wasserleitungen und das tion, fill the mains and the appliance Gerät durch mehrfaches, langsa with water by carefully opening and mes Öffnen und Schließen des... -
Seite 13: Fernsteuerung
CLAGE 9. Erstinbetriebnahme 8. Erstinbetriebnahme 9. Initial operation 8. Initial operation 6. Öffnen Sie das Warmwasserzapfventil. 8. Explain the user how the instantane- Überprüfen Sie die Funktion des Durch- ous water heater works and hand over lauferhitzers. the operating instructions. -
Seite 14: Sperr-Level
CEX 9 ELECTRONIC MPS ® 8. Erstinbetriebnahme 8. Initial operation Sperr-Level Lock level Der Umfang der Bedienung des Gerätes The operating mode of the appliance can kann einge schränkt werden. Die be restricted. The service menu can be Konfiguration erfolgt über das Service- used to configure the appliance. -
Seite 15: Service-Menü
CLAGE 9. ServiceMenü 9. Service menu Das ServiceMenü gibt eine Übersicht The service menu offers an overview über Systemparameter und dient zur of system parameters and is used for Diagnose. diagnostics. Zum Aktivieren des Menüs drücken Sie Press key and key simultaneously Service-Menü... - Seite 16 CEX 9 ELECTRONIC MPS ® 9. ServiceMenü 9. Service menu Fehlernummer von »0« bis »9« und dem ones each shifted 1 position backwards. dazugehörigen Fehler. Der zuletzt auf- “LL“: Lock level getretene Fehler wird immer an Position The operating mode of the appliance can »0«...
- Seite 17 CLAGE 9. ServiceMenü 9. Service menu »tL«: Temperaturlimit ing the jumper to enable the limitation. Menüpunkt-Reihenfolge Die maximale Temperatur des Gerätes »Service-Menü«: “IIC“: Signal kann auf einen beliebigen Wert innerhalb Menu item order of “Service menu“: Information about the quality of the radio...
-
Seite 18: Umwelt Und Recycling
CEX 9 ELECTRONIC MPS ® 10. Umwelt und Recycling 10. Environment and recycling Ihr Produkt wurde aus hochwertigen, Your product was manufactured from wiederverwendbaren Materialien und high-quality, reusable materials and Kompo nenten hergestellt. Beachten Sie components. Please respect in case of... - Seite 19 CLAGE...
- Seite 20 CEX 9 ELECTRONIC MPS ®...
- Seite 21 CLAGE...
- Seite 23 CLAGE Sommaire Índice 1. Vue d’ensemble ........20 1.
-
Seite 24: Vue D'ensemble
CEX 9 ELECTRONIC MPS ® 1. Vue d’ensemble 1. Sinposis Il faut toujours indiquer le type d‘appareil et le numéro Ao fazer encomendas de peças de substituição, especifi de série lors d‘une commande de pièces de rechange! car sempre o tipo de aparelho e o número de série! Manchon de traversée... -
Seite 25: Consignes De Sécurité
La dernière édition à jour de la présente notice est disponible en A versão mais recente deste manual de instruções está disponível ligne à l’adresse : www.clage.de/downloads. online em www.clage.de/downloads. • N’utilisez l’appareil que s’il a été... - Seite 26 CEX 9 ELECTRONIC MPS ® 2. Consignes de sécurité 2. Informações de segurança • L’appareil ne doit jamais être exposé a temperaturas negativas. au gel. • Os valores indicados na placa de • Il faut respecter les valeurs indi- identificação devem ser respeitados.
-
Seite 27: Caractéristiques Techniques
CLAGE 3. Caractéristiques techniques 3. Datos técnicos Type CEX 9 ELECTRONIC MPS ® Tipo Classe d’efficacité énergétique Eficiência energética classe Puissance (courant nominal) 6,0 / 9,6 kW (27,3 / 40 A) Potência nominal (corrente nominal) Puissance sélectionnée (courant sélectionné) Potência seleccionada (corrente... -
Seite 28: Exemple D'installation
CEX 9 ELECTRONIC MPS ® 5. Exemple d’installation 5. Exemplo para a instalação Pose en saillie : alimentation d‘un point de prélèvement Pose en saillie : alimentation de plusieurs points de Ligação directa: Fornecimento a um ponto de saída de água prélèvement... -
Seite 29: Installation
CLAGE 6. Installation 6. Instalação Doivent être respectées : A ter em conta: • VDE 0100 • VDE 0100 • EN 806 2 • EN 8062 • Dispositions des entreprises de dis • Regulamentos das empresas locais tribution d’énergie et d’eau de abastecimento de energia e de água... -
Seite 30: Fixation De L'appareil
CEX 9 ELECTRONIC MPS ® 6. Installation 6. Instalação Fixar o aparelho Fixation de l’appareil 1. Rincez soigneusement les conduites 1. Limpar cuidadosamente as linhas De d’eau avant utilisation pour en éliminer abastecimento de água antes de efec- les impuretés. -
Seite 31: Branchement Électrique
CLAGE 7. Branchement électrique 7. Ligação à corrente eléctrica Réservé au professionnel! Só pelo profissional autorizado! Schéma de câblage Doivent être respectées: A ter em conta: Esquema da instalação • VDE 0100 • VDE 0100 eléctrica • EN8062 • EN8062 •... - Seite 32 CEX 9 ELECTRONIC MPS ® 7. Branchement électrique 7. Ligação à corrente eléctrica 1. Dénudez le câble posé à demeure de 1. Descarnar o cabo eléctrico de modo sorte qu’il puisse être introduit dans a que se possa inserir os fios no liga- l’appareil avec sa gaine à...
-
Seite 33: Première Mise En Service
CLAGE 8. Première mise en service 8. Primeira colocação em funcionamento Avant de procéder au branchement Antes de efectuar a ligação à corrente électrique, remplir les conduites d’eau eléctrica, encher as canalizações de et l’appareil avec de l’eau en ouvrant água e o aparelho de água, e purgá... -
Seite 34: Commande À Distance
CEX 9 ELECTRONIC MPS ® 8. Première mise en service 8. Primeira colocação em funcionamento 6. Ouvrez le robinet d’eau chaude. Controle o funcionamento do esquen- Vérifiez le fonctionnement du chauffe- tador instantâneo. eau instantané. 7. O aquecimento de água é activado 7. -
Seite 35: Niveau De Blocage
CLAGE 8. Première mise en service 8. Primeira colocação em funcionamento Nivel de bloqueo Niveau de blocage L’étendue des fonctions de l’appareil peut Se puede limitar el manejo del aparato. être limitée. La configuration s’effectue La configuración se realiza a través del par le biais du menu Service. -
Seite 36: Menu Service
CEX 9 ELECTRONIC MPS ® 9. Menu Service 9. Menú de serviço de assistência técnica Le menu Service contient une vue O menú de serviço de assistência técni d‘ensemble des paramètres du sys ca mostra uma vista de conjunto sobre tème et sert au diagnostic. - Seite 37 CLAGE 9. Menu Service 9. Menú de serviço de assistência técnica une position avant (code « 1 »). sempre registado na posição »0«, e os erros anteriores correspondem a uma posição « LL » : Niveau de blocage para trás. L’étendue des fonctions de l’appareil peut être limitée.
- Seite 38 CEX 9 ELECTRONIC MPS ® 9. Menu Service 9. Menú de serviço de assistência técnica « 2 » Éclairage toujours éteint do prime teclas e no modo de aquecimen- to e desliga automaticamente após algum « tL » : Limite de température tempo (configuração de fábrica)
-
Seite 39: Environnement Et Recyclage
CLAGE 10. Environnement et recyclage 10. Meio ambiente e reciclagem Ce produit a été fabriqué avec des O seu produto foi fabricado com materiais matériaux et des composants de qualité e componentes reutilizáveis de grande supérieure qui sont réutilisables. Lors de qualidade. - Seite 40 CLAGE GmbH Pirolweg 1–5 21337 Lüneburg Deutschland Telefon: +49 4131 8901-0 Telefax: +49 4131 83200 E-Mail: service@clage.de Internet: www.clage.de Kurzanleitung Quick reference guide Pfeiltaste nach oben Programmtaste 1 Arrow key up Programme button 1 Programmtaste 2 Pfeiltaste nach unten Programme button 2...