Herunterladen Inhalt Inhalt Diese Seite drucken
HQ Power VDPL310FC2 Bedienungsanleitung

HQ Power VDPL310FC2 Bedienungsanleitung

Uniled superslim 6 – 3 x 8 w rgbw-led mit dmx-steuerung

Werbung

Verfügbare Sprachen
  • DE

Verfügbare Sprachen

VDPL310FC2
UNILED SUPERSLIM 6 - 3 X 8 W RGBWAP WITH DMX CONTROL
UNILED SUPERSLIM 6 - 3 X 8 W RGBWAP-LED MET DMX-STURING
UNILED SUPERSLIM 6 - 3 X LED RGBWAP DE 8 W AVEC PILOTAGE DMX
UNILED SUPERSLIM 6 - 3 X 8 W RGBWAP CON CONTROL DMX
UNILED SUPERSLIM 6 - 3 X 8 W RGBW-LED MIT DMX-STEUERUNG
3
12
21
30
39

Werbung

Inhaltsverzeichnis
loading

Inhaltszusammenfassung für HQ Power VDPL310FC2

  • Seite 1: Inhaltsverzeichnis

    VDPL310FC2 UNILED SUPERSLIM 6 – 3 X 8 W RGBWAP WITH DMX CONTROL UNILED SUPERSLIM 6 – 3 X 8 W RGBWAP-LED MET DMX-STURING UNILED SUPERSLIM 6 – 3 X LED RGBWAP DE 8 W AVEC PILOTAGE DMX UNILED SUPERSLIM 6 – 3 X 8 W RGBWAP CON CONTROL DMX UNILED SUPERSLIM 6 –...
  • Seite 2 VDPL310FC2 V. 01 – 29/04/2014 ©Velleman nv...
  • Seite 3: Safety Instructions

    VDPL310FC2 USER MANUAL Introduction To all residents of the European Union Important environmental information about this product This symbol on the device or the package indicates that disposal of the device after its lifecycle could harm the environment. Do not dispose of the unit (or batteries) as unsorted municipal waste;...
  • Seite 4: General Guidelines

    VDPL310FC2 General Guidelines Refer to the Velleman® Service and Quality Warranty on the last pages of this manual. Keep this device away from dust and extreme temperatures. Make sure the ventilation openings are clear at all times. For sufficient air circulation, leave at least 1" (± 2.5 cm) in front of the openings.
  • Seite 5: Mounting The Device

    VDPL310FC2 Installation Choose a suitable mounting spot. Mount the device in the desired angle using the included bracket. Connect the power cord to the mains. Disconnect after use. Mounting the Device  Have the device installed by a qualified person, respecting EN 60598-2-17 and all other applicable norms.
  • Seite 6: Stand-Alone Mode

    VDPL310FC2 Control Panel Navigation Access the control panel functions using the four panel buttons [4,6] located near the display [5]. Button Function MENU to access the menu, quit the current function without saving the setting, or quit the menu to scroll upward in a list of functions or options, or increase a value...
  • Seite 7: Master/Slave Mode

    VDPL310FC2 Stand-Alone Mode with Built-in Program To set the device to stand-alone mode with a built-in program: Unplug any connection from the DMX input [8] of the device. Press MENU until <P--> is displayed and press ENTER. Use UP and DOWN to select a built-in program: o <P1>: 6 colours switching...
  • Seite 8: Inserting/Replacing The Battery

    VDPL310FC2 10.1 Inserting/Replacing the Battery Warning! Do not puncture batteries or throw them in fire as they may explode. Do not attempt to recharge non-rechargeable batteries (alkaline). Dispose of batteries in accordance with local regulations. Keep batteries away from children.
  • Seite 9: Master Dimmer

    VDPL310FC2 Master Dimmer To adjust the overall brightness of the light output, press % and then press + or – to set the desired brightness. Adding a Strobe Effect To add a strobe effect, proceed as follows: Press STROBE and then press + or – to set the desired strobe speed.
  • Seite 10: Cleaning And Maintenance

    VDPL310FC2 Channel From Description No function Strobe slow to fast 12 channel mode: Channel From Description Master dimmer 0–100 % Red 0–100 % Green 0–100 % Blue 0–100 % Amber 0–100 % White 0–100 % Purple 0–100 % No function...
  • Seite 11: Technical Specifications

    VDPL310FC2 Technical Specifications power supply 100–240 VAC 50/60 Hz power consumption 26 W IP rate IP44 LEDs 3 x 8 W RGBWAP/FC high-power LED beam angle 25° field angle 44° dimensions 187 x 152 x 187 mm weight 1.6 kg Use this device with original accessories only.
  • Seite 12: Gebruikershandleiding

    VDPL310FC2 GEBRUIKERSHANDLEIDING Inleiding Aan alle ingezetenen van de Europese Unie Belangrijke milieu-informatie betreffende dit product Dit symbool op het toestel of de verpakking geeft aan dat, als het na zijn levenscyclus wordt weggeworpen, dit toestel schade kan toebrengen aan het milieu. Gooi dit toestel (en eventuele batterijen) niet bij het gewone huishoudelijke afval;...
  • Seite 13: Algemene Richtlijnen

    VDPL310FC2 Algemene richtlijnen Raadpleeg de Velleman® service- en kwaliteitsgarantie achteraan deze handleiding. Bescherm het toestel tegen stof en extreme temperaturen. Zorg ervoor dat de verluchtingsopeningen niet verstopt geraken. Voorzie een ruimte van minstens 1" (± 2,5 cm) tussen het toestel en elk ander object.
  • Seite 14: Het Toestel Monteren

    VDPL310FC2 Installatie Kies een geschikte montageplaats. Monteer het toestel in de gewenste hoek met de meegeleverde beugel. Koppel de voedingskabel aan het lichtnet. Ontkoppel na gebruik. Het toestel monteren  Laat een geschoolde technicus dit toestel installeren conform EN 60598-2-17 en andere toepasselijke normen.
  • Seite 15 VDPL310FC2 Gebruik Het toestel kan in gebruikt worden in:  autonome modus: automatisch of muziekgestuurd  master/slave-modus  autonome modus met afstandsbediening  DMX512-gestuurde modus. Controlepaneel Bedien het paneel met behulp van de vier toetsen [4,6] naast de display [5].
  • Seite 16 VDPL310FC2 Autonome modus met gepersonaliseerde statische kleur U kunt een eigen kleur creëren door de lichtintensiteit van de rode (r), groene (g), blauwe (b), witte (W), amberkleurige (A) en purperen (P) leds te regelen. Om een gepersonaliseerde statische kleur te gebruiken: Ontkoppel alle DMX-aansluitingen [8] van het toestel.
  • Seite 17: Gebruik Met Afstandsbediening

    VDPL310FC2 Master/slave-modus In master/slave-modus kunt u meerdere toestellen aansluiten op één mastertoestel in een reeks. Alle slavetoestellen functioneren synchroon met het mastertoestel. Het eerste toestel in de reeks functioneert als mastertoestel. De toestellen in master/slave-modus instellen: Ontkoppel alle DMX-aansluitingen [8] van het mastertoestel (het eerste toestel in de reeks).
  • Seite 18: Automatisch Programma

    VDPL310FC2 Gepersonaliseerde statische kleur U kunt een eigen kleur creëren door de lichtintensiteit van de rode (R), groene (G), blauwe (B), witte (W), amberkleurige (A) en purperen (UV) leds te regelen. Om een gepersonaliseerde statische kleur te gebruiken: Om de lichtintensiteit van de rode leds te regelen, druk op R en daarna op + of – om de gewenste intensiteit in te stellen.
  • Seite 19 VDPL310FC2  In het geval van de 8-kanaalsmodus, zult u het startadres van het eerste toestel moeten instellen op 1 (CH1–8), van het tweede toestel op 9 (1 + 8) (CH9–16), van het derde op 17 (9 + 8) (CH17–24), enz. De hoogste startwaarde is 505.
  • Seite 20: Reiniging En Onderhoud

    VDPL310FC2 Kanaal Omschrijving Snelheid automatisch programma traag naar snel Dimsnelheid zoals ingesteld in menu Dimsnelheid uit Dimsnelheid 1 Dimsnelheid 2 Dimsnelheid 3 Reiniging en onderhoud  Alle gebruikte schroeven moeten goed zijn aangespannen en mogen geen sporen van roest vertonen.
  • Seite 21: Mode D'emploi

    VDPL310FC2 MODE D'EMPLOI Introduction Aux résidents de l'Union européenne Informations environnementales importantes concernant ce produit Ce symbole sur l'appareil ou l'emballage indique que l’élimination d’un appareil en fin de vie peut polluer l'environnement. Ne pas jeter un appareil électrique ou électronique (et des piles éventuelles) parmi les déchets municipaux non sujets au tri sélectif ;...
  • Seite 22: Directives Générales

    VDPL310FC2 Directives générales Se référer à la garantie de service et de qualité Velleman® en fin du mode d'emploi. Protéger cet appareil contre la poussière et les températures extrêmes. Veiller à ce que les fentes de ventilation ne soient pas bloquées. Laisser une distance minimale de 2,5 cm entre l’appareil et tout autre objet.
  • Seite 23 VDPL310FC2 Description Se référer aux illustrations en page 2 de ce mode d'emploi. double étrier afficheur entrée d'alimentation + porte-fusible charnière boutons de contrôle sortie d’alimentation récepteur IR pour télécommande crochet de sécurité sortie DMX boutons de contrôle entrée DMX Installation Choisir un emplacement de montage approprié.
  • Seite 24 VDPL310FC2 par le bruit électrique. La résistance de terminaison DMX n’est rien d’autre qu’une fiche XLR avec une résistance de 120 Ω de broche 2 vers broche 3. Cette fiche XLR est connectée à la sortie XLR [11] du dernier appareil de la série.
  • Seite 25 VDPL310FC2 Mode autonome avec une couleur statique personnalisée Il est possible de créer une couleur personnalisée en ajustant l'intensité de la LED rouge (r), verte (g), bleue (b), blanche (W), ambrée (A) et pourpre (P). Pour utiliser une couleur statique personnalisée : Déconnecter toute connexion de l'entrée DMX [8] de l'appareil.
  • Seite 26: Mode Maître/Esclave

    VDPL310FC2 Mode maître/esclave Le mode maître/esclave permet de connecter plusieurs appareils à un appareil maître dans une série. Tous les appareils esclave fonctionneront en parfaite synchronisation avec l'appareil maître. Le premier appareil dans la série fonctionne comme appareil maître. Mettre les appareils en mode maître/esclave : Déconnecter toute connexion de l'entrée DMX [8] de l'appareil maître (le premier appareil dans la...
  • Seite 27 VDPL310FC2 Couleur statique personnalisée Il est possible de créer une couleur personnalisée en ajustant l'intensité de la LED rouge (R), verte (G), bleue (B), ambrée (A), blanche (W) et pourpre (UV). Pour utiliser une couleur statique personnalisée : Pour ajuster l'intensité de la LED rouge, appuyer sur R et ensuite sur + ou – pour régler l'intensité...
  • Seite 28 VDPL310FC2  Pour le mode à 8 canaux, l’adresse de départ du premier appareil est 1 (CH1–8), du deuxième 9 (1 + 8) (CH9–16), du troisième 17 (9 + 8) (CH17–24), etc. La valeur de départ la plus élevée est de 505.
  • Seite 29: Nettoyage Et Entretien

    VDPL310FC2 Canal À Description Vitesse du programme de lent à rapide Vitesse variateur comme dans le menu Vitesse variateur désactivée Vitesse variateur 1 Vitesse variateur 2 Vitesse variateur 3 Nettoyage et entretien  Serrer les écrous et les vis et vérifier qu’ils ne rouillent pas.
  • Seite 30: Manual Del Usuario

    VDPL310FC2 MANUAL DEL USUARIO Introducción A los ciudadanos de la Unión Europea Importantes informaciones sobre el medio ambiente concerniente a este producto Este símbolo en este aparato o el embalaje indica que, si tira las muestras inservibles, podrían dañar el medio ambiente. No tire este aparato (ni las pilas, si las hubiera) en la basura doméstica;...
  • Seite 31: Normas Generales

    VDPL310FC2 Normas generales Véase la Garantía de servicio y calidad Velleman® al final de este manual del usuario. No exponga este equipo a polvo ni temperaturas extremas. Asegúrese de que los orificios de ventilación no estén bloqueados. Deje una distancia de mín. 2,5 cm entre el aparato y cualquier otro objeto para asegurar una ventilación suficiente.
  • Seite 32: Montaje Del Aparato

    VDPL310FC2 Instalación Seleccione un lugar de montaje adecuado. Instale el aparato en el ángulo deseado con el soporte incluido. Enchufe el aparato. Desconecte el aparato de la red eléctrica después del uso. Montaje del aparato  Respete la directiva EN 60598-2-17 y toda norma nacional antes de instalar el aparato. La instalación debe ser realizada por un técnico especializado.
  • Seite 33 VDPL310FC2 Navegar por el menú Acceda a las funciones con las 4 teclas [4,6] junto a la pantalla [5]. Botón Función MENU Para acceder al menú, salga de la función actual sin guardar el ajuste o salga del menú. Para desplazarse hacia arriba en una lista de funciones u opciones o para aumentar un valor.
  • Seite 34: Modo Maestro/Esclavo

    VDPL310FC2 Modo Stand-Alone con programa incorporado Para poner el aparato en el modo autónomo con un programa incorporado: Desconecte cualquier conexión de la entrada DMX [8] del aparato. Pulse MENU hasta que <P--> se visualice y pulse ENTER. Utilice UP y DOWN para seleccionar un programa incorporado: o <P1>: cambio de color: 6 colores...
  • Seite 35: Utilizar El Mando A Distancia

    VDPL310FC2 En cada aparato esclavo, proceda de la forma siguiente para poner la dirección DMX en 1: pulse MENU hasta que <12-CH> se visualice y pulse ENTER. Utilice UP y DOWN para ajustar la dirección inicial DMX <d--1> y pulse <ENTER.
  • Seite 36 VDPL310FC2 Transición de colores Para utilizar un programa automático con transición de colores, proceda de la forma siguiente: Pulse FADE y luego + o – para seleccionar el programa deseado (P2 o P4). Programa controlado por la música Para utilizar un programa controlado por la música, proceda de la forma siguiente: Pulse SOUND y luego + o –...
  • Seite 37: Limpieza Y Mantenimiento

    VDPL310FC2 Modo de 8 canales: Canal Descripción Dimmer maestro 0 – 100 % Rojo 0–100 % Verde 0–100 % Azul 0–100 % Ámbar 0–100 % Blanco 0–100 % Púrpura 0–100 % Sin función Estroboscopio de lento a rápido Modo de 12 canales: Canal Descripción...
  • Seite 38 VDPL310FC2 Reemplazar el fusible Reemplace el fusible fundido por uno del mismo tipo. Desconecte el aparato de la red antes de reemplazar el fusible. Desatornille el portafusibles con un destornillador con punta plana. Saque el fusible fundido y reemplácelo. Vuelva a poner el portafusibles en su lugar y conecte el aparato a la red eléctrica.
  • Seite 39: Bedienungsanleitung

    VDPL310FC2 BEDIENUNGSANLEITUNG Einführung An alle Einwohner der Europäischen Union Wichtige Umweltinformationen über dieses Produkt Dieses Symbol auf dem Produkt oder der Verpackung zeigt an, dass die Entsorgung dieses Produktes nach seinem Lebenszyklus der Umwelt Schaden zufügen kann. Entsorgen Sie die Einheit (oder verwendeten Batterien) nicht als unsortiertes Hausmüll;...
  • Seite 40: Allgemeine Richtlinien

    VDPL310FC2  Beachten Sie eine minimale Entfernung von 0,5 m zwischen der Lichtausbeute und irgendeiner beleuchteten Fläche.  Die max. Umgebungstemperatur ist 40 °C. Verwenden Sie das Gerät nicht bei höheren Temperaturen. Allgemeine Richtlinien Siehe Velleman® Service- und Qualitätsgarantie am Ende dieser Bedienungsanleitung.
  • Seite 41: Umschreibung

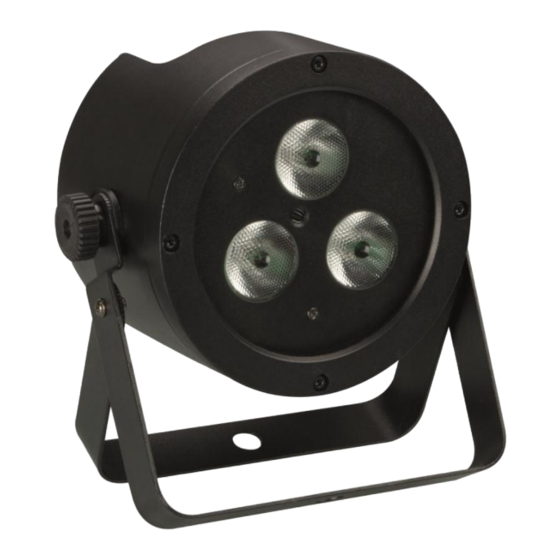
    VDPL310FC2 Umschreibung Siehe Abbildungen, Seite 2 dieser Bedienungsanleitung. doppeltes Halterungssystem Display Stromversorgungseingang + Sicherung Scharnier Bedientasten Netzausgang IR-Empfänger für Fernbedienung Sicherheitshaken DMX-Ausgang Bedientasten DMX-Eingang Installation Wählen Sie einen geeigneten Montageort. Montieren Sie das Gerät mit der Halterung in den geeigneten Winkel.
  • Seite 42: Anwendung

    VDPL310FC2  Ein DMX-Abschlusswiderstand ist empfehlenswert für Installationen, bei denen das DMX-Kabel lang ist oder in einer Umgebung mit vielem elektrischem Rauschen (z.B. Discos). Der Abschlusswiderstand verhindert Störung des digitalen Steuersignals durch elektrisches Rauschen. Der DMX- Abschlusswiderstand ist nur eine XLR-Buchse mit einem 120 Ω Widerstand zwischen 2 und 3, die den XLR-Ausgang [11] des letzten Geräts in der Kette angeschlossen wird.
  • Seite 43: Dimmgeschwindigkeit

    VDPL310FC2 Verwenden Sie UP und DOWN, um eine vorprogrammierte Farbe auszuwählen (C1–C63) und drücken Sie ENTER um zu bestätigen. Drücken Sie die Taste MENU, um diese Funktion zu verlassen. Stand-Alone-Modus mit eigener statischer Farbe Kreieren Sie eine personalisierte Farbe, indem Sie die Intensität der roten (r), grünen (g), blauen (b), weißen (W), amberfarbigen (A) und purpurfarbigen (P) LED einstellen.
  • Seite 44: Bedienung Über Fernbedienung

    VDPL310FC2 Um die Empfindlichkeit des internen Mikrofons zu verwenden, drücken Sie MENU bis <SenS> erscheint. Bemerkung: Drücken Sie die Taste ENTER nicht. Verwenden Sie UP und DOWN, um die Empfindlichkeit von niedrig (0) auf hoch (100) einzustellen und drücken Sie ENTER, um zu bestätigen.
  • Seite 45: Vorprogrammierte Statische Farbe

    VDPL310FC2 Vorprogrammierte statische Farbe Um eine der vorprogrammierten statischen Farben zu verwenden, drücken Sie eine der nummerierten Tasten (0–9) der Fernbedienung. Die Farbe der Taste stimmt mit der Farbe der Beleuchtung überein. Personalisierte statische Farbe Kreieren Sie eine personalisierte Farbe, indem Sie die Intensität der roten (R), grünen (G), blauen (B), weißen (W), amberfarbigen (A) und purpurfarbigen (UV) LED einstellen.
  • Seite 46 VDPL310FC2  Im Falle des 8-Kanal-Modus, werden Sie die Startadresse des ersten Gerätes auf 1 (CH1–8), der zweiten Einheit auf 9 (1 + 8) (CH9–16), der dritten Einheit auf 17 (9 + 8) (CH17–24) usw. einstellen müssen. Die höchste Startadresse ist 505.
  • Seite 47: Reinigung Und Wartung

    VDPL310FC2 Kanal Beschreibung Programmgeschwindigkeit langsam auf schnell Dimmgeschwindigkeit wie im Menü eingestellt Dimmgeschwindigkeit ausgeschaltet Dimmgeschwindigkeit 1 Dimmgeschwindigkeit 2 Dimmgeschwindigkeit 3 Reinigung und Wartung  Alle verwendeten Schrauben müssen fest angespannt werden und dürfen keine Rostspuren zeigen.  Das Gehäuse, die Linsen, die Montagebügel und der Montageort (z.B. Decke oder Gebinde) dürfen nicht angepasst werden, z.B.
  • Seite 48 levering, of een vervangend product tegen 50% van de kostprijs of terugbetaling van 50 % bij ontdekking na één jaar tot 2 jaar. Velleman® Service and Quality Warranty • Valt niet onder waarborg: Since its foundation in 1972, Velleman® acquired extensive experience in - alle rechtstreekse of onrechtstreekse schade na de levering veroorzaakt the electronics world and currently distributes its products in over 85 aan het toestel (bv.
  • Seite 49 - tout dommage à cause d’une utilisation commerciale, professionnelle ou • Consejo: Lea el manual del usuario y controle los cables, las pilas, etc. collective de l’appareil (la période de garantie sera réduite à 6 mois lors antes de devolver el aparato. Si no se encuentra un defecto en el artículo d’une utilisation professionnelle) ;...

Inhaltsverzeichnis