Inhaltsverzeichnis
Werbung
Verfügbare Sprachen
Verfügbare Sprachen
Quicklinks
I
-MANUALE DI ISTRUZIONE PER SALDATRICE A FILO
GB -INSTRUCTION MANUAL FOR WIRE WELDING MACHINE
D
-BETRIEBSANLEITUNG FÜR DRAHTSCHWEISSMASCHINE
F
-MANUEL D'INSTRUCTIONS POUR POSTE A SOUDER A FIL
E
-MANUAL DE INSTRUCCIONES PARA SOLDADORA DE HILO
P
-MANUAL DE INSTRUÇÕES PARA MAQUINA DE SOLDAR A FIO
Parti di ricambio e schemi elettrici
Spare parts and wiring diagrams
Ersatzteile und elektrische Schaltpläne
Pièces de rechange et schémas éléctriques
Piezas de repuesto y esquemas eléctricos
Partes sobressalentes e esquema eléctrico
3.300.174
: 49÷52
Pagg. Seiten
Pag. 2
Page 9
Seite.17
Page 25
Pag. 33
Pag. 41
25/07/07
Werbung
Inhaltsverzeichnis

Verwandte Anleitungen für Cebora JAGUAR DOUBLE PULSE MIG 2035/MD


Inhaltszusammenfassung für Cebora JAGUAR DOUBLE PULSE MIG 2035/MD
- Seite 1 -MANUALE DI ISTRUZIONE PER SALDATRICE A FILO Pag. 2 GB -INSTRUCTION MANUAL FOR WIRE WELDING MACHINE Page 9 -BETRIEBSANLEITUNG FÜR DRAHTSCHWEISSMASCHINE Seite.17 -MANUEL D’INSTRUCTIONS POUR POSTE A SOUDER A FIL Page 25 -MANUAL DE INSTRUCCIONES PARA SOLDADORA DE HILO Pag. 33 -MANUAL DE INSTRUÇÕES PARA MAQUINA DE SOLDAR A FIO Pag.
- Seite 2 MANUALE DI ISTRUZIONE PER SALDATRICE A FILO IMPORTANTE: PRIMA DELLA MESSA IN OPERA DEL- zioni contenute nella norma armonizzata EN50199 e L'APPARECCHIO LEGGERE IL CONTENUTO DI QUE- deve essere usato solo a scopo professionale in un STO MANUALE E CONSERVARLO, PER TUTTA LA VITA ambiente industriale.
-
Seite 3: Installazione
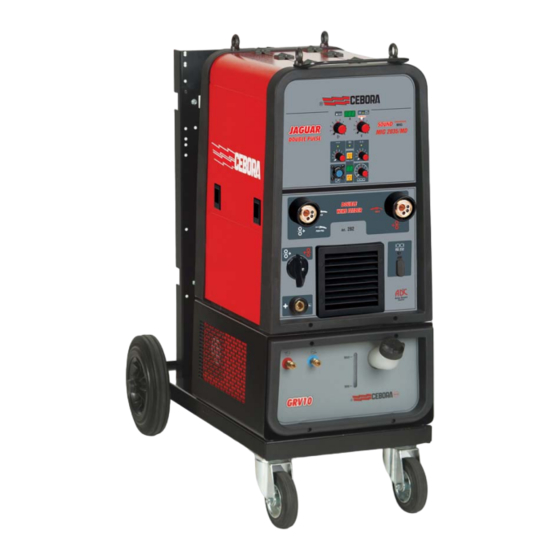
questo apparecchio è idoneo a lavorare • Quando si utilizzano i programmi sinergici, (pulsati o all’esterno sotto la pioggia. La lettera addi- convenzionali) il display G visualizza la corrente con cui zionale C significa che l’apparecchio è si realizzerà la saldatura. protetto contro l’accesso di un utensile (Ø2,5 •... - Seite 4 Fig. 1 L- LED colore verde. introduce la doppia pulsazione in modo Au; questo Segnala l'attivazione del modo di saldatura in continuo. viene visualizzato dal lampeggio del led H. Per disinseri- re la funzione ripetere la pressione lunga fino a quando il M- LED colore verde.
- Seite 5 La variazione viene visualizzata sul display G che dopo 2 T-Tubi gas. secondi dall'ultima correzione visualizzerà la grandezza U-Interruttore. precedente. Accende e spegne la macchina. X-Porta fusibile. Q- Display a 2 cifre. Y-Presa cavo rete. Questo display visualizza: Z-Presa pressostato. •...
- Seite 6 4.3 SALDATURA DEGLI ACCIAI AL CARBONIO dopo la saldatura il display G visualizzerà la corrente usata e il led A resterà acceso. Per la saldatura di questi materiali è necessario : • Utilizzare un gas di saldatura a composizione binaria, di •...
- Seite 7 Il display Q visualizza la sigla OF =OFF = Spento cità impostata per la saldatura, prima che lo stesso toc- Se si preme il tasto O il display Q visualizza la sigla On = chi il pezzo da saldare. Attivo. N.B: Questa regolazione è...
-
Seite 8: Manutenzione
• Per richiamare un programma memorizzato ripetere l'a- DdP= 0,1÷3 m/min zione di pressione descritta precedentemente (tasti R e O premuti fino alla comparsa della sigla PXX) Velocità di viene visualizzato l'ultimo programma memorizzato. riferimento Dopo 5 sec secondi dall'ultima pressione dei tasti R e O la macchina è... -
Seite 9: Specifications
INSTRUCTION MANUAL FOR WIRE WELDING MACHINE IMPORTANT: BEFORE STARTING THE EQUIPMENT, ELECTROMAGNETIC COMPATIBILITY READ THE CONTENTS OF THIS MANUAL, WHICH This machine is manufactured in compliance with the MUST BE STORED IN A PLACE FAMILIAR TO ALL instructions contained in the harmonized standard USERS FOR THE ENTIRE OPERATIVE LIFE-SPAN OF EN50199, and must be used solely for professional THE MACHINE. -
Seite 10: Installation
actually used in welding. Activated at the end of each a protection for the equipment. welding session. IP23 C. Protection rating for the housing. Grade 3 as the second digit means that this B- Wire speed adjustment knob. equipment is suitable for use outdoors in the By adjusting this knob: rain.The additional letter C means that the •... - Seite 11 Fig. 1 setting recommended by the manufacturer. Adjusting this O - Key. knob allows you to correct the arc length value. Changes Pressing and releasing this key increases the numerical to this figure, greater than or less than the "SYNERGIC" value of the display Q.
- Seite 12 value based on the program selected. The operator may Fig. 2 correct the set value: adjusting the potentiometer towards + will produce warmer, less penetrating welds, while vice-versa adjusting towards - will produce colder and more penetrating welds When welding with a synergic program, adjusting + or - from the central 0 may require corrections to the working voltage using the potentiometer I.
- Seite 13 in an envelope on the mobile side panel. 5 SERVICE FUNCTIONS • Display the number corresponding to the program on display Q using the keys O and R. The abbreviations of these functions are shown on the • If a pulsed synergic program is used, turn the knob B display G.
- Seite 14 viously displayed start current. trigger is pressed again. The next time the torch trig- Range 0.1-10 sec., manufacturer setting 0.7. ger is pressed, the welding current will switch to the Changed using keys O and R. third or "crater-filler" current, set with the function -Slo (Slope) CrC (in this specific instance, 6 = 60%), in the time Range 0.1-10 sec., manufacturer setting 0.5.
-
Seite 15: Maintenance
• Fdp (Double pulse) 15 seconds. If welding begins, the unit starts operating The display G shows the abbreviation Fdp (double pulse and shuts off 3 minutes after the torch trigger is frequency). released. The display Q reads OFF. If the coolant pressure is too low, the power source Press the O key to select the working frequency (adjust- delivers no current and on the display G will flash the ment from 0.5 to 5 Hz). - Seite 16 The tip must therefore be cleaned more often, and replaced if necessary. C) The contact tip must always be firmly screwed onto the torch body. The thermal cycles to which the torch is subjected can cause it to loosen, thus heating the torch body and tip and causing the wire to advance unevenly.
- Seite 17 BETRIEBSANLEITUNG FÜR DRAHTSCHWEISSMASCHINE WICHTIG: VOR DER INBETRIEBNAHME DES GERATS (Herzschrittmacher) müssen daher ihren Arzt befragen, DEN INHALT DER VORLIEGENDEN BETRIEBSANLEI- bevor sie sich in die Nähe von Lichtbogenschweiß-, TUNG AUFMERKSAM DURCHLESEN; DIE BETRIEBS- Schneid-, Brennputz- oder Punktschweißprozessen ANLEITUNG MUß FUR DIE GESAMTE LEBENSDAUER begeben.
-
Seite 18: Schutzeinrichtungen
Leerlaufspannung Sekundärseite . 3 INSTALLATION Relative Einschaltdauer. Die relative Einschaltdauer ist der auf eine Sicherstellen, dass die Netzspannung der auf dem Spieldauer von 10 Minuten bezogene Leistungsschild der Schweißmaschine angegebenen Prozentsatz der Zeit, die das Gerät bei einer Nennspannung entspricht. bestimmten Stromstärke arbeiten kann, ohne Das Netzkabel mit einem Stecker mit einem geeigneten sich zu überhitzen. - Seite 19 Fig. 1 • Bei den Dienstfunktionen (siehe Kapitel 5 für ausführli- Aluminium, SS = nichtrostender Stahl). che Erläuterungen) werden die folgenden Kürzel ange- • Bei den konventionellen Programmen: Vor dem zeigt: dSP, Job, PrF, PoF, Acc, bb, HSA, SC, Len, Slo, 3L, Schweißen wird die Drahtvorschubgeschwindigkeit und CrC, 2-4, Fdp, H nach dem Schweißen der Strom angezeigt.
-
Seite 20: Stellteile Auf Der Hinteren Platte
Programms an, auf das sich die Speicherung oder der schen Programmen für das Impulsschweißen muss der Speicheraufruf bezieht. Siehe Kapitel 6 für ausführliche Zeiger dieses Reglers auf das Symbol "SYNERGIC " in Informationen. der Mitte des Einstellbereichs positioniert werden. Dieses Symbol repräsentiert die vom Hersteller empfohlene R - Taste. - Seite 21 entspricht. 4 SCHWEISSEN • Die Gasdüse montieren. • Die Flasche öffnen. 4.1 INBETRIEBNAHME 4.3 SCHWEISSEN VON UNLEGIERTEN STÄHLEN Diese Schweißmaschine ist so konzipiert, dass gleichzei- tig 2 Schweißbrenner angeschlossen und 2 Drahtrollen Beim Schweißen dieser Werkstoffe ist folgendes zu mit Durchmesser 300 mm montiert werden können. Die beachten: Maschine kann nicht gleichzeitig mit beiden Brennern •...
-
Seite 22: Beschreibung Der Funktionen
5.1 BESCHREIBUNG DER FUNKTIONEN grammen eingestellten Schweißstrom fest. Funktionsweise: • dSp (Display) Das Schweißen erfolgt im Handbetrieb (2-Takt). Aktiv nur bei den Programmen zum synergetischen Man beginnt den Schweißprozess mit dem Strom, Impulsschweißen. der dem in SC eingestellten Prozentanteil der Das Display Q zeigt "A"... - Seite 23 Lösen des Brennertasters wird in der mit der Funktion Schweißnaht der Schweißnaht gleicht, die man beim Slo festgelegten Zeit (im speziellen Fall: 0,5 s) vom WIG-Schweißen erhält. ersten Stromwert zu dem mit Regler B eingestellten Standardeinstellung = OF = OFF = Ausgeschaltet Schweißstrom übergegangen, der beibehalten wird, Einstellungen: bis der Brennertaster erneut gedrückt wird.
-
Seite 24: Speichern Und Abrufen Der Speicher
Für die Regulierung der Bogenlänge des niedrigsten betreffenden Dienstfunktionen die Taste R gedrückt hal- Stroms (geringste Geschwindigkeit) die Bogenlänge der ten: Nach 2 s erscheint auf dem Display G das erste Referenzgeschwindigkeit regulieren. Kürzel dSP. Drückt man den Brennertaster, werden die Verändert man die Referenzgeschwindigkeit, müssen die Kürzel der verschiedenen Funktionen angezeigt und auf zuvor vorgenommenen Einstellungen auch bei der neuen... - Seite 25 MANUEL D’INSTRUCTIONS POUR POSTE A SOUDER A FIL IMPORTANT: AVANT LA MISE EN MARCHE DE LA EXPLOSIONS MACHINE, LIRE CE MANUEL ET LE GARDER, PENDANT • Ne pas souder à proximité de récipients sous TOUTE LA VIE OPERATIONNELLE, DANS UN ENDROIT pression ou en présence de poussières, gaz ou CONNU PAR LES DIFFERENTES PERSONNES INTE- vapeurs explosifs.
-
Seite 26: Commandes Sur Le Panneau Avant
souder peut opérer à un certain courant sans fusibles, en série à l'alimentation, doit être égale au cou- causer des surchauffes rant I1 absorbé par la machine. Courant de soudure Tension secondaire avec courant I2 3.1 Mise en oeuvre Tension nominale d’alimentation L'installation de la machine doit être exécutée par du per- 1~ 50/60Hz Alimentation monophasée 50 ou bien 60 Hz sonnel expert. - Seite 27 Fig. 1 ments voir chapitre 5), affiche les sigles: dSP, Job, PrF, possible de corriger la valeur de la longueur d'arc. La PoF, Acc, bb, HSA, SC, Len, Slo, 3L, CrC, 2-4, Fdp, H2o. variation de cette grandeur, en positif ou en négatif, par •...
-
Seite 28: Mise En Oeuvre
la position ( ) on active le raccord centralisé E ; par O - Touche. La pression et le relâchement de cette touche modifient, contre, en sélectionnant la position ( ) on active le en l'augmentant, la valeur numérique du display Q. raccord centralisé... - Seite 29 4.4 SOUDURE DES ACIERS INOXYDABLES 4.1.1 Raccordement du tuyau gaz La bouteille de gaz doit être équipée d'un détendeur de La soudure des aciers inoxydables de la série 300 doit pression et d'un débitmètre. être exécutée avec un gaz de protection ayant une haute Si la bouteille est placée sur la plate-forme porte-bou- teneur en Argon et un faible pourcentage (2% environ) teilles du chariot, la fixer à...
- Seite 30 affiche "2", le voyant M s'éteint et le voyant C reste correspondant au courant de soudure défini à l'aide allumé, ce qui indique que la machine est prédisposée du bouton B dans les programmes de soudure. pour le pointage. Réglage du fabricant 13 (130%). Peut être modifié à l'aide des touches O et R.
- Seite 31 de bons démarrages. Réglage du fabricant "Au" automatique. DdP= 0,1÷3 m/min Peut être modifié à l'aide des touches O et R. Si, après la modification, on désire revenir à la valeur du fabricant, appuyer en même temps sur les touches O et R jusqu'à VITESSE DE l'apparition du sigle "Au"...
-
Seite 32: Entretien
touche O jusqu'à quand le sigle du programme ne cli- • Groupe moto-réducteur. gnotera plus. Nettoyer périodiquement l'ensemble des galets d'entraî- - En relâchant la touche O on sort de la mémorisation. nement d'éventuelle rouille ou des résidus métalliques - Au cas où on veut réécrire un programme, en dus à... - Seite 33 MANUAL DE INSTRUCCIONES PARA SOLDADORA DE HILO IMPORTANTE: ANTES DE LA PUESTA EN FUNCIONA- EXPLOSIONES MIENTO DEL APARATO, LEER EL CONTENIDO DE ESTE • No soldar en proximidad de recipientes a pre- MANUAL Y CONSERVARLO, DURANTE TODA LA VIDA sión o en presencia de polvo, gas o vapores OPERATIVA, EN UN SITIO CONOCIDO POR LOS INTE- explosivos.
-
Seite 34: Instalación
1~ 50/60Hz Alimentación monofásica 50 o 60 Hz El interruptor magneto térmico o de los fusibles, en serie I 1 Max Corriente máx. absorbida a la correspon- con la alimentación, debe ser igual a la corriente I1 diente corriente I 2 y tensión U 2 . absorbida por la máquina. - Seite 35 Fig. 1 res aclaraciones) visualiza las siglas: dSP, Job, PrF, PoF, símbolo representa la regulación aconsejada por el Acc, bb, HSA, SC, Len, Slo, 3L, CrC, 2-4, Fdp, H2o. constructor. Con esta manecilla se podrá corregir el • En el menú de las memorias la letra P seguida de dos valor de la longitud de arco.
-
Seite 36: Puesta En Marcha
N- Manecilla de regulación. ción ( ) se activa la unión centralizada E, viceversa Esta manecilla regula el tiempo de pausa entre un trozo de soldadura y otro. seleccionando la posición ( ) se activa la unión cen- tralizada AA. O- Tecla. - Seite 37 Si la bombona estuviera colocada en la plataforma porta 4.4 SOLDADURA DE LOS ACEROS INOXIDABLES bombonas del carro, deberá estar sujeta con la correa correspondiente. La soldadura de los aceros inoxidables de la serie 300, Solo después de haber colocado la bombona, conectar debe ser efectuada con gas de protección de alto tenor el tubo de gas que sale de la parte posterior de la de Argón, con un pequeño porcentaje de oxígeno O2 o...
- Seite 38 que indica que la máquina se ha preparado para la sol- gramada con la manecilla B en los programas de dadura por puntos. soldadura. Regulación del constructor 13 (130%). Se modifica con las teclas O y R. • 2 – 4 (manual – automático) - Slo (Slope) El display Q visualiza el numero 2 = dos tiempos = sol- Regulación 0,1 –...
- Seite 39 NOTA: Esta regulación es importante para obtener siempre buenas salidas. DdP= 0,1÷3 m/min Regulación del constructor “Au” automático. Se modifica con las teclas O y R. Si una vez modifica- VELOCIDAD do, se quisiera volver a la programación del constructor, DE REFEREN- presionar contemporáneamente las teclas O y R hasta que aparezca la sigla “Au”...
-
Seite 40: Mantenimiento
al que se refiere aquel programa de soldadura cobre o delgadísimas virutas. Limpiarla periódicamente memorizado. junto a los pasos del gas, con aire comprimido seca. Mediante las teclas O y R elegir el numero de pro- Las envolturas están sometidas a un continuo desgaste, grama por memorizar, a continuación presionar la por lo que se convierte en necesario, pasado un cierto tecla O hasta cuando la sigla del programa deje de... - Seite 41 MANUAL DE INSTRUÇÕES PARA MAQUINA DE SOLDAR A FIO IMPORTANTE: ANTES DE UTILIZAR O APARELHO LER EXPLOSOES O CONTEUDO DO PRESENTE MANUAL E CONSERVAR • Não soldar nas proximidades de recipientes à pressão O MESMO DURANTE TODA A VIDA OPERATIVA DO ou na presença de pós, gases ou vapores explosivos.
- Seite 42 Tensão secundária com corrente I2 totérmico ou dos fusíveis em série na alimentação deve Tensão nominal de alimentação ser igual à corrente I1 absorvida pela máquina. 1~ 50/60Hz Alimentação monofásica 50 ou então 60 Hz 1 Max Corrente max. absorvida na corresponden- 3.1 FUNCIONAMENTO te corrente I 2 e tensão U 2 .
- Seite 43 Fig. 1 • Nas funções de serviço (consultar o capítulo 5 para símbolo “SYNERGIC “ no centro da regulação; este sím- mais informações) visualiza as siglas: dSP, Job, PrF, PoF, bolo representa a regulação recomendada pelo fabri- Acc, bb, HSA, SC, Len, Slo, 3L, CrC, 2-4, Fdp, H2o. cante.
- Seite 44 N- Manípulo de regulação. posição ( ), activa-se o adaptador central E, vice- Este manípulo regula o tempo de intervalo entre um trecho de soldadura e um outro. versa, seleccionando a posição ( ) activa-se o adaptador central AA. O- Tecla. Ao carregar ou liberar esta tecla modifica, aumentando-o, o AC- Ligador tipo DB9 (RS 232) valor numérico do display Q.
- Seite 45 4.1.1 Ligação do tubo de gás 4.4 SOLDADURA DE AÇOS INOXIDÁVEIS. A garrafa de gás deve estar equipada com um regulador de pressão e um fluxómetro. A soldadura de aços inoxidáveis da série 300 deve ser Se a garrafa for colocada na base porta- garrafas do efectuada com gás de protecção de alto teor de Árgon, carro, deve ser fixada com a respectiva correia.
- Seite 46 • 2 – 4 (manual – automático) - Slo (Slope) O display Q visualiza o número 2 = dois tempos = sol- regulação 0,1 – 10 seg, regulação do fabricante 0,5. dadura manual Modifica-se com as teclas O e R. Se a tecla O for carregada o display Q visualiza o núme- Define o tempo de acoplamento entre a primeira ro 4 = 4 tempos = Automático.
- Seite 47 Regulação do fabricante “Au” automático. Pode ser modificada com as teclas O e R. Uma vez DdP= 0,1÷3 m/min modificado, se desejar voltar para a definição do fabri- cante, carregar contemporaneamente nas teclas O e R VELOCIDAD até o aparecimento da sigla “Au” no display Q. DE REFEREN- •...
- Seite 48 Ao liberar a tecla O, o utilizador sai da memorização. um arco estável e uma óptima distribuição de corrente; •Caso queira memorizar novamente um programa, ao para tanto é preciso observar as seguintes regras: carregar na tecla O, por mais de 3 seg., o número A) O orifício do bico porta-corrente deve ser mantido passa de fixo para lampejante para retornar fixo de livre de sujeira e de oxidação.
- Seite 50 44 45 41 42 40 43 La richiesta di pezzi di ricambio deve indicare sempre: numero di arti- When ordering spare parts please always state the machine item and colo, matricola e data di acquisto della macchina, posizione e quantità serial number and its purchase data, the spare part position and the del ricambio.
- Seite 51 DESCRIZIONE DESCRIPTION DESCRIZIONE DESCRIPTION CHIUSURA CLOSING SUPPORTO SECONDARIO SECONDARY SUPPORT ROSETTA WASHER TRASFORMATORE DI POTENZA POWER TRANSFORMER IMPEDENZA CHOKE LATERALE FISSO SIN. ANT. FRONT FIXED LEFT SIDE PANEL LATERALE MOBILE HINGED SIDE PANEL FONDO BOTTOM CERNIERA HINGE DISSIPATORE RADIATOR LATERALE FISSO SIN. POST. BACK FIXED LEFT SIDE PANEL ISOLAMENTO INSULATION...
- Seite 52 pos DESCRIZIONE DESCRIPTION 411 MOTORIDUTTORE SINISTRO LEFT WIRE FEED MOTOR 412 ENCODER ENCODER 413 MOTORIDUTTORE SIN.COMPLETO COMPLETE LEFT WIRE FEED MOTOR 420 SUPPORTO PREMIRULLO ROLLER PRESSER SUPP. 421 BLOCCAGGIO GRADUATO ADJUSTMENT KNOB 422 GUIDAFILO WIRE DRIVE PIPE ASSY 423 CORPO TRAINAFILO WIRE FEED BODY 424 ISOLANTE COMPLETO INSULATION ASSY...