Sonoro QUBO SO-220 Bedienungsanleitung
Vorschau ausblenden
Andere Handbücher für QUBO SO-220:
- Bedienungsanleitung (196 Seiten) ,
- Bedienungsanleitung (196 Seiten)

Verwandte Anleitungen für Sonoro QUBO SO-220


Inhaltszusammenfassung für Sonoro QUBO SO-220
- Seite 1 QUBO SO-220 MUSIC SYSTEM WITH DIGITAL RADIO, ALARM FUNCTION, CD PLAYER & BLUETOOTH® Bedienungsanleitung Operating manual Mode d'emploi GERMAN AUDIO AND DESIGN...
- Seite 2 © sonoro audio GmbH 2018...
- Seite 3 QUBO SO-220 MUSIKSYSTEM MIT DIGITALRADIO, WECKFUNKTION, CD-PLAYER & BLUETOOTH® Bedienungsanleitung...
-
Seite 4: Inhaltsverzeichnis
8.2 Alarmquelle einstellen ................25 8.3 Wecklautstärke einstellen ................8.4 Weckwiederholung einstellen ..............8.5 Wecklicht programmieren (Sonnenaufgang) ........... 26 8.6 Wecker ein-und ausschalten ..............27 8.7 Wecker nach Ertönen des Alarms abstellen ..........27 8.8 Snooze einstellen ..................28 © sonoro audio GmbH 2018... - Seite 5 12.3 Musik über bluetooth abspielen ............. 38 AUX-Wiedergabe ..................... 38 USB-Wiedergabe ....................39 Relax- und Meditationsmusik ................ 40 Demo Musik-Wiedergabe ................44 Fehlerbehebung ....................45 Reinigung ......................47 Technische Daten ..................... 47 Garantie ......................48 © sonoro audio GmbH 2018...
-
Seite 6: Einführung
Die Abbildungen in dieser Anleitung dienen der Veranschaulichung von Handlungen. Wir wünschen Ihnen viel Freude mit dem Gerät! Kontaktdaten Adresse sonoro audio GmbH, Nordkanalallee 94, D-41464 Neuss, Deutschland Telefon +49 2131 8834-141 +49 2131 7517-599 E-Mail support@sonoro.de Internet www.sonoro.de © sonoro audio GmbH 2018... -
Seite 7: Bestimmungsgemäße Verwendung
Sie es mit einem trockenen, weichen Tuch ab. Lieferumfang QUBO Zum Lieferumfang des QUBO gehören zahlreiche Zusatzteile, die Sie zum Empfangen der Radiofrequenzen sowie zum Anschließen weiterer Geräte benötigen. • QUBO mit Schutzhülle • Fernbedienung • Zwei Knopfzellen (CR2032, 3 V) © sonoro audio GmbH 2018... -
Seite 8: Sonorolight (Optional Erhältlich)
QUBO gekoppelt werden und ist im Fachhandel erhältlich. sonoroLIGHT ist nicht Bestandteil des Lieferumfangs von QUBO. Unterstützte Formate Unterstützte CD-Formate • Compact Disc Digital Audio CD-DA • CD-R • CD-RW Unterstützte Audio-Formate • CD-DA • • © sonoro audio GmbH 2018... -
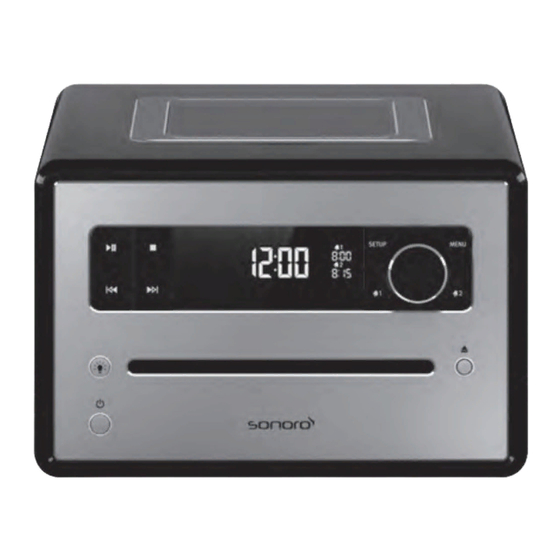
Seite 9: Bedienelemente Und Anschlüsse
Bedienelemente und anschlüsse Vorderseite Abb, 2: Vorderseite Play/Pause ( Eject ( ) Stop ( ) Alarm 1 ( 1) LCD-Display CD-Schlitz SETUP Vor ( Bedienknopf Licht ( MENU Standby ( ) Alarm 2 ( 2) Zurück ( © sonoro audio GmbH 2018... - Seite 10 Oberseite Abb, 3: Oberseite Speicher 1–6 SNOOZE MUTE Lautsprecher RELAX SLEEP © sonoro audio GmbH 2018...
- Seite 11 Rückseite Abb, 4: Rückseite DAB/FM Netzteilanschluss Batteriefach USB-Charge & Playback Bassreflexöffnung Kopfhörer Keylock AUX IN © sonoro audio GmbH 2018...
- Seite 12 Alarm 1 ( 1) Licht ( SLEEP MUTE/ SNOOZE Zurück ( ) VOL ( Bluetooth ( ) BASS TREBLE VOL( RELAX Vor ( ) OK, Play/Pause ( Alarm 2 ( 2) DAB ( Speicher 1–6 SETUP © sonoro audio GmbH 2018...
-
Seite 13: Anzeige
Punkt Für FM-Frequenzbereich (ohne RDS). Uhrzeit Zeigt die aktuelle Uhrzeit an. Resume CD: Wiedergabe fortsetzen. Repeat One CD: Wiederholung eines Titels. Preset Senderspeicher Untere Anzeige Anzeige für Datum, Menüs, Frequenzen etc. Bluetooth Bluetooth ist aktiv. © sonoro audio GmbH 2018... -
Seite 14: Gerät Auspacken Und In Betrieb Nehmen
3. Setzen Sie den Batteriefachdeckel ein und schließen Sie ihn mit einer kleinen Münze. Spannungsversorgung herstellen Die Stromversorgung des Geräts erfolgt über das mitgelieferte Netzteil. Beim Netzteil mit Universaladapter muss dieser vor dem Gebrauch zusammengesteckt werden. © sonoro audio GmbH 2018... -
Seite 15: Antenne Anschließen
Sie die Antenne so aus, dass Sie den bestmöglichen Empfang haben. Für noch besseren Empfang, befestigen Sie das Kabel an einer geeigneten Hausantenne. Fernbedienung vorbereiten Abb, 9: Batterie in Fernbedienung einlegen 1. Öffnen Sie das Batteriefach der Fernbedienung mit einer kleinen Münze. © sonoro audio GmbH 2018... -
Seite 16: Sonorolight Koppeln
In den einzelnen Menüs lassen sich Funktionen und Einstellungen des Geräts vornehmen. Gerät zum ersten Mal einschalten Nach dem ersten Einschalten zeigt das LC-Display die Uhranzeige und die Nachricht [Für Auto Zeit/Datum RDS Sender wählen]. © sonoro audio GmbH 2018... -
Seite 17: Standby-Modus
W Die Uhrzeit ist eingestellt. Mit der [Vor]- oder [Zurück]-Taste können Sie zwischen der Stunden- und Minutenanzeige wechseln. Nach 10 Sekunden Inaktivität geht das Gerät automatisch in den Standby-Modus über, ohne die Einstellungen zu speichern. © sonoro audio GmbH 2018... -
Seite 18: Grundeinstellungen Vornehmen
Grundeinstellungen vornehmen Bei eingeschaltetem Gerät lassen sich im Menü [Einstellwerte] folgende Konfigurationen vornehmen: • Uhrzeitformat einstellen. • Datumsformat einstellen. • Displaydimmer einstellen. • Wecklicht einstellen (nur mit sonoroLIGHT). • Automatische Uhrzeit/Datums-Aktualisierung einstellen. • Displaysprache einstellen. © sonoro audio GmbH 2018... - Seite 19 Sie können drei verschiedene Datumsformate (Abb. 13, A, B und C) sowie den aktuellen Tag einstellen. Die Einstellmöglichkeiten sind: A: Aktueller Tag, Tag, Monat, Jahr. • B: Aktueller Tag, Monat, Tag, Jahr. • C: Aktueller Tag, Monat (in Worten), Tag, Jahr. • © sonoro audio GmbH 2018...
- Seite 20 Abb, 16: Automatische Aktualisierung einstellen Im Untermenü [Uhr einstellen] (Abb. 16) können Sie die automatische Aktualisierung auswählen. Durch das Einschalten der Funktion werden die Uhrzeit sowie das Datum automatisch in den Betriebsmode FM-Radio und DAB-Radio synchronisiert. © sonoro audio GmbH 2018...
-
Seite 21: Klang Einstellen
Klang einstellen Sie können den Klang der Audio-Wiedergabe über die Einstellungen der Bässe und Höhen anpassen. Abb, 20: Klang einstellen 1. Gehen Sie in das entsprechende Untermenü oder drücken Sie die entsprechende Taste auf der Fernbedienung. © sonoro audio GmbH 2018... -
Seite 22: Sleeptimer Einstellen
Zeitintervall für Sleeptimer einstellen Abb, 22: Zeitintervall für Sleeptimer einstellen 1. Drücken Sie lange die [SLEEP]-Taste auf der Oberseite des Geräts oder der Fernbedienung. W Der Sleeptimer erscheint (Abb. 22) und das Sleep-Symbol blinkt (Abb. 22/1) © sonoro audio GmbH 2018... -
Seite 23: Licht Ein-Und Ausschalten
1. Stellen Sie sicher, dass sonoroLIGHT gekoppelt und dessen Dimmfunktion eingeschaltet ist. Abb, 23: Licht einschalten 2. Drücken Sie die [Licht]-Taste auf dem Gerät oder der Fernbedienung. W Das Licht wird eingeschaltet (Helligkeitsstufe 8), das Display zeigt den Text [sonoroLIGHT On] an. (Abb. 23) © sonoro audio GmbH 2018... -
Seite 24: Weckfunktion
[Alarm 1 einstellen] oder (Abb. 25) [Alarm 2 einstellen] an. 2. Drehen Sie den Bedienknopf, um die Stunden einzustellen. 3. Drücken Sie den Bedienknopf, um die Eingabe zu bestätigen. W Die Minutenanzeige blinkt. 4. Drehen Sie den Bedienknopf, um die Minuten einzustellen. © sonoro audio GmbH 2018... -
Seite 25: Alarmquelle Einstellen
2. Drücken Sie den Bedienknopf oder die [OK]- Taste auf der Fernbedienung, um die Eingabe zu bestätigen. W Die Alarmquelle ist eingestellt. Wecklautstärke einstellen Nachdem Sie die Alarmquelle eingestellt und bestätigt haben, können Sie die Wecklautstärke einstellen. © sonoro audio GmbH 2018... -
Seite 26: Weckwiederholung Einstellen
Wecklicht programmieren (Sonnenaufgang) Nachdem Sie die Weckwiederholung eingestellt und bestätigt haben, können Sie einstellen, ob Sie zusätzlich durch Wecklicht geweckt werden möchten (nur mit sonoroLIGHT). 1. Stellen Sie sicher, dass sonoroLIGHT gekoppelt und dessen Dimmfunktion eingeschaltet ist. © sonoro audio GmbH 2018... -
Seite 27: Wecker Ein-Und Ausschalten
2. Um den Wecker auszuschalten, drücken Sie erneut kurz die [Alarm 1]- oder [Alarm 2]-Taste. Wecker nach Ertönen des Alarms abstellen 1. Um den Alarm abzustellen, drücken Sie eine der folgenden Tasten: • [Alarm 1] • [Alarm 2] • Bedienknopf © sonoro audio GmbH 2018... -
Seite 28: Snooze Einstellen
W Das Display zeigt das [Snooze]-Symbol an. (Abb. 30) 2. Drehen Sie den Bedienknopf, um die Dauer einzustellen. 3. Drücken Sie den Bedienknopf, um die Eingabe zu bestätigen. Allgemeine Funktionen der Audio-Wiedergabe Lautstärke einstellen Abb, 31: Lautstärke einstellen © sonoro audio GmbH 2018... -
Seite 29: Wiedergabe Stummschalten
W Das Display zeigt den ausgewählten Modus an. (Abb. 33) Alternativ können Sie auch nach dem Drücken der [MENU]-Taste den Bedienknopf drehen, um durch die einzelnen Modi zu wechseln. Den Modus bestätigen Sie, indem Sie den Bedienknopf drücken. © sonoro audio GmbH 2018... -
Seite 30: Radiowiedergabe
W Das Display zeigt den Text [FM Senderliste] an. (Abb. 34) 2. Drücken Sie die Taste [Vor]. W Das Display zeigt den Text [auto FM Suchlauf] an. 3. Drücken Sie den Bedienknopf. W Das Display zeigt den Text [Suchlauf JA] an. © sonoro audio GmbH 2018... - Seite 31 2. Drehen Sie den Bedienknopf oder drücken Sie die Tasten [Vor] oder [Zurück], um den Frequenzbereich zu verändern. 3. Drücken Sie den Bedienknopf, um Ihre Auswahl zu bestätigen. FM-Sender als Favorit speichern Abb, 37: FM-Sender speichern 1. Stellen Sie den gewünschten Sender ein. © sonoro audio GmbH 2018...
-
Seite 32: Dab-Radio
W Das Gerät sucht nach verfügbaren Radiosendern und gibt den ersten verfügbaren Sender wieder. Manuelle Sendersuche Voraussetzung: • Die Antenne ist angeschlossen. Abb, 39: DAB-Sender manuell suchen 1. Drücken Sie im DAB-Wiedergabemodus die [SETUP]-Taste. 2. Drücken Sie die [Vor]-Taste. © sonoro audio GmbH 2018... - Seite 33 Sie können bis zu 6 DAB-Sender als Favorit speichern. DAB-Sender als Favorit speichern 1. Zum Aufrufen eines als Favorit gespeicherten DAB-Senders gehen Sie wie unter Kapitel 10.1 „FM-Radio“ auf Seite 30 beschrieben vor. W Der gewählte Sender wird wiedergegeben. © sonoro audio GmbH 2018...
- Seite 34 DRC HOCH: starke Kompression • DRC NIEDRIG: schwache Kompression • DRC AUS: keine Kompression Voraussetzung: • Das Gerät ist im DAB-Modus 1. Drücken Sie die [STOP]-Taste erneut. W Das Display zeigt den Text [DAB Suchlauf] an. © sonoro audio GmbH 2018...
-
Seite 35: Cd-Wiedergabe
Wenn sich das Gerät in einem anderen Modus befindet, schaltet es automatisch in den CD-Modus um. Im CD-Modus zeigt das Display folgende Informationen an: Abb, 43: Anzeige im CD-Modus 1. Abspielreihenfolge (Repeat, Shuffle, CD fortsetzen) 2. CD-Modus 3. Uhrzeit 4. Abgelaufene Spielzeit in Minuten © sonoro audio GmbH 2018... - Seite 36 1. Drücken Sie die [SETUP]-Taste, um das CD-Menü zu öffnen. Dieses enthält folgende Funktionen: • Wiederholung eines Titels • Wiederholung aller Titel auf der CD • Zufällige Wiedergabe • CD fortsetzen • Bass einstellen • Höhen einstellen • Einstellwerte © sonoro audio GmbH 2018...
-
Seite 37: Bluetooth-Wiedergabe
W Das Bluetooth-Symbol blinkt und das Display zeigt den Text [Suchen] an. (Abb. 44) 3. Schalten Sie die Bluetooth-Funktion Ihres Mobiltelefons bzw. Geräts ein und wählen Sie in der Liste der gefunden Bluetooth-Geräte “QUBO” aus. © sonoro audio GmbH 2018... -
Seite 38: Bluetooth Geräte Verbinden
Abb, 46: AUX-Wiedergabe aktivieren 1. Schalten Sie das Gerät ein. 2. Drücken Sie die [MENU]-Taste und wählen Sie den [AUX]-Modus oder drücken die [AUX]-Taste auf der Fernbedienung. W Das Display zeigt das [AUX]-Symbol an. (Abb. 46) © sonoro audio GmbH 2018... -
Seite 39: Usb-Wiedergabe
Um die Wiedergabe zu beenden, drücken Sie die [Stop]-Taste. • Um ID3-Zusatzdaten, sofern vorhanden, anzuzeigen, drücken Sie die [USB]-Taste auf der Fernbedienung. Die Reihenfolge hierbei ist: • Um zum vorherigen Titel zu wechseln, drücken Sie einmal die [Zurück]-Taste. © sonoro audio GmbH 2018... -
Seite 40: Relax- Und Meditationsmusik
Einleitung Meditative Atementspannung Meditative Achtsamkeitsentspannung 3 – Progressive Einleitung Muskelentspannung Progressive Muskelentspannung 4 – Fantasiereisen Einleitung Fantasiereise Strand & Wärme Fantasiereise Universum 5 – Entspannungsmusik Einleitung Musik Entspannungsmusik 1 Entspannungsmusik 2 Entspannungsmusik 3 Entspannungsmusik 4 © sonoro audio GmbH 2018... - Seite 41 Progressive Muscle Relaxation according to spannung Jacobson 5 – Entspannungsmusik Relax Music 1 Relax Music 2 Relax Music 3 Relax Music 4 Relax Music 5 6 – Naturklänge Ocean Surf Whales Birds Rain Wind Chimes Fireplace © sonoro audio GmbH 2018...
- Seite 42 La relaxation musculaire progressive selon Muskelentspannung Jacobson 5 – Entspannungsmusik Relax Music 1 Relax Music 2 Relax Music 3 Relax Music 4 Relax Music 5 6 – Naturklänge Surf Baleines Oiseaux Pluie Carillons Feu de cheminée © sonoro audio GmbH 2018...
- Seite 43 7. Drücken Sie den Bedienknopf, um Ihre Auswahl zu bestätigen. 8. Drücken Sie eine der Speichertasten 1–6, um den gewünschten Ordner auszuwählen. W Die Wiedergabe des ersten Titels in diesem Ordner startet. (Abb. 50) Abb, 50: Name des Titels © sonoro audio GmbH 2018...
-
Seite 44: Demo Musik-Wiedergabe
W Der Titel der Demo Musik erscheint im Display. Folgende Tasten sind aktiv: – Play/Pause. – Stummschalten. Demo Musik-Modus verlassen 3. Drücken Sie die Taste [Standby] oder drücken und halten Sie den Bedienknopf für ca. 3 Sekunden, um den Demo Musik-Modus zu verlassen. © sonoro audio GmbH 2018... -
Seite 45: Fehlerbehebung
Keine oder gestörte Störungen durch andere Erhöhen Sie den Abstand zwischen Bluetooth-Verbindung Funksender oder Geräte dem Radio und dem Fernseher. Software ist nicht aktuell Stellen Sie sicher, dass die aktuelle Software-Version auf Ihrem externen Bluetooth-Gerät installiert ist. © sonoro audio GmbH 2018... - Seite 46 (siehe bitte Kapitel 8.5 „Wecklicht programmieren (Sonnenaufgang)“ auf Seite 26). sonoroLIGHT ist gekoppelt, Schalten Sie die Dimmfunktion an Dimmfunktion aber sonoroLIGHT ein. ausgeschaltet. An sonoroLIGHT Schalten Sie die angeschlossene angeschlossene Lampe ist Lampe ein. ausgeschaltet. © sonoro audio GmbH 2018...
-
Seite 47: Reinigung
Version 4.1, Profile : AVRCP v1.0, A2DP 1.0 2,402GHz-2,480GHz Sendeleistung 5dBm AC-Adapter, Leistung Ten Pao Industrial Co., Ltd. Modell: S048CM1550290 Aufnahme: 100–240 V ~ 50/60 Hz 1,5 A Leistung: 15,5 V 2,9 A Batterie CR2032 Standby-Leistung < 1.0W © sonoro audio GmbH 2018... -
Seite 48: Garantie
Von der Garantie ausgenommen sind Batterien, Schäden durch unsachgemäßen Gebrauch, normaler Verschleiß und Verbrauch sowie Mängel, die den Wert oder die Gebrauchstauglichkeit des Geräts nur unerheblich beeinflussen. Bei Eingriffen, die nicht von der von uns autorisierten Serviceadresse vorgenommen wurden, erlischt die Garantie ebenfalls. © sonoro audio GmbH 2018... - Seite 49 © sonoro audio GmbH 2018...
- Seite 50 © sonoro audio GmbH 2018...
- Seite 51 QUBO SO-220 MUSIC SYSTEM WITH DIGITAL RADIO, ALARM FUNCTION, CD PLAYER & BLUETOOTH® Operating Manual...
- Seite 52 8.4 Setting the alarm repetition ............... 8.5 Programming the alarm light (sunrise) ............74 8.6 Switching the alarm clock on/off ............... 75 8.7 Switching off the alarm clock after the alrm sounds ....... 8.8 Setting the snooze function ................ 76 © sonoro audio GmbH 2018...
- Seite 53 12.3 Playing music via bluetooth ..............86 AUX playback ....................86 USB playback ....................86 Relaxation and meditation music ..............87 Demo sound playback ..................91 Troubleshooting ....................92 Cleaning ......................94 Technical data ....................Warranty ......................© sonoro audio GmbH 2018...
-
Seite 54: Introduction
The images in this manual are intended for illustration purposes. Enjoy your device! Contact data Address sonoro audio GmbH, Nordkanalallee 94, D-41464 Neuss, Deutschland Phone +49 2131 8834-141 +49 2131 7517-599 E-Mail support@sonoro.de Internet www.sonoro.de © sonoro audio GmbH 2018... -
Seite 55: Intended Use
Many additional components that you need to receive radio frequencies and connect additional devices are part of QUBO’s scope of delivery. • QUBO with protective cover • Remote control • Two button cells (CR2032, 3 V) © sonoro audio GmbH 2018... -
Seite 56: Sonorolight (Available As An Option)
QUBO and it is available from specialist shops. sonoroLIGHT is not part of the scope of supply of QUBO. Compatible formats Compatible CD formats • Compact Disc Digital Audio CD-DA • CD-R • CD-RW Compatible audio formats • CD-DA • • © sonoro audio GmbH 2018... -
Seite 57: Controls And Parts
Fig, 2: Front view Play/Pause ( Eject ( ) Stop ( ) Alarm 1 ( 1) LC Display CD-Slot SETUP Next ( Click Wheel Light ( MENU Standby ( ) Alarm 2 ( 2) Previous ( © sonoro audio GmbH 2018... - Seite 58 Top View Fig, 3: Top view Memory 1–6 SNOOZE MUTE Speaker RELAX SLEEP © sonoro audio GmbH 2018...
- Seite 59 Rear View Fig, 4: Rear view DAB/FM socket AC adapter port Battery compartment USB-Charge & Playback Bass Reflex Headphones Keylock AUX IN © sonoro audio GmbH 2018...
- Seite 60 Alarm 1 ( 1) Light ( SLEEP MUTE/ SNOOZE Previous ( ) VOL ( Bluetooth ( ) BASS TREBLE VOL( RELAX Next ( ) OK, Play/Pause ( Alarm 2 ( 2) DAB ( Memory 1–6 SETUP © sonoro audio GmbH 2018...
-
Seite 61: Display
For the FM frequency range (without RDS). Time Displays the current time. Resume CD: resume playback. Repeat One CD: repeat one track. Preset Station memory Lower display section Display for date, menus, frequencies, etc. Bluetooth Bluetooth is on. © sonoro audio GmbH 2018... -
Seite 62: Unpacking The Device And Commencing Operation
3. Insert the battery compartment cover and close with a small coin. Connecting the power supply Power is supplied to the device via the AC adapter (included). The AC adapter with universal adapter must be connected before use. © sonoro audio GmbH 2018... -
Seite 63: Connecting The Antenna
For even better reception, attach the cable to a suitable house antenna. Preparing the remote control Fig, 9: Inserting the battery into the remote control 1. Open the battery compartment on the remote control with a small coin. (Fig. 10) © sonoro audio GmbH 2018... -
Seite 64: Connecting Sonorolight
1. Turn the click wheel to the left to set the volume to minimum. 2. Insert the headset jack into the headset port at the back of the device. 3. Slowly turn the click wheel to the right to increase the volume. © sonoro audio GmbH 2018... -
Seite 65: Setting The Basic Functions
4. Press the click wheel to confirm the setting. W The minute display flashes. 5. Turn the click wheel to set the minutes. 6. Press the click wheel to confirm the setting W The time is set. © sonoro audio GmbH 2018... -
Seite 66: Making The Basic Settings
W You can now switch the date on or off. Making the basic settings When the device is switched on, you can make the following configurations in the [Settings] menu: • Set the time format. • Set the date format. © sonoro audio GmbH 2018... - Seite 67 Fig, 13: Setting the time format You can choose between the 24-hour and 12-hour formats. In the 12-hour format, the time of day is indicated by [AM] and [PM]. Setting the date format Fig, 14: Setting the date format © sonoro audio GmbH 2018...
- Seite 68 • Brightness: 01 to 32 (Fig. 16/A) • Alarm light: 0 to 60 min (Fig. 16/B) Setting the automatic time/date update function Fig, 17: Setting the automatic update function © sonoro audio GmbH 2018...
-
Seite 69: Setting The Sound
If necessary, you can reset all specified settings, such as language and time formats and saved stations, to the default factory settings (Fig 20). Setting the sound You can adjust the audio playback’s sound using the bass and treble settings. Fig, 21: Setting the sound © sonoro audio GmbH 2018... -
Seite 70: Setting The Sleeptimer
W The Sleep Timer appears (Fig. 23) and the Sleep symbol flashes. (Fig. 23/1) 2. Turn the click wheel to select the desired time interval length. (Fig. 23/2). The maximum time interval is 120 minutes. © sonoro audio GmbH 2018... -
Seite 71: Switching The Light On And Off
W The light is switched on (brightness level 8) and the display shows the text [sonoroLIGHT On] (Fig. 24). Fig, 25: Setting the brightness 3. Turn the click wheel within 4 seconds to set the brightness of the light (level 00 to 32). (Fig. 26). © sonoro audio GmbH 2018... -
Seite 72: Alarm Function
4. Turn the click wheel to set the minutes. 5. Press the click wheel to confirm the entry. Use the [Next ] or [Previous] button to switch between the hours and minutes display. W The alarm time is set. © sonoro audio GmbH 2018... -
Seite 73: Setting The Alarm Source
1. Turn the click wheel to set the desired volume. (Fig. 28) 2. Press the click wheel or the [OK] button on the remote control to confirm your setting. W The alarm volume is set. © sonoro audio GmbH 2018... -
Seite 74: Setting The Alarm Repetition
3. Press the click wheel or the [OK] button on the remote control to confirm your setting. W The alarm light is programmed. To set the alarm light please see ‘Setting alarm light’ on page 68. © sonoro audio GmbH 2018... -
Seite 75: Switching The Alarm Clock On/Off
Alternatively, you can turn the click wheel when the alarm sounds to set the snooze time. Press the click wheel to confirm. W The remaining snooze time is displayed. After the set time expires, the alarm will sound again. © sonoro audio GmbH 2018... -
Seite 76: Setting The Snooze Function
1.In playback mode, briefly press the [MUTE] button on the top of the device to turn off the sound during playback. Alternatively, you can also press the [MUTE] button on the remote control. W The [Volume Mute] text appears on the display. © sonoro audio GmbH 2018... -
Seite 77: Selecting A Playback Mode
RDS (“Radio Data System”) is only available for stations in the FM frequency range and only if the corresponding station transmits RDS data. If the station does not broadcast RDS information, then the frequency is displayed instead of the station name. © sonoro audio GmbH 2018... -
Seite 78: Fm-Radio
1. Press and hold the [Next] or [Previous] button in FM playback mode. W The display shows the [Auto Tuning] (Fig. 36) text. The device will search for available radio stations and play back the first available station. © sonoro audio GmbH 2018... -
Seite 79: Dab-Radio
1. Briefly press one of the station preset buttons 1–6 on top of the device or the remote control. W The selected station is played. 10.2 DAB radio Finding DAB stations Automatic tunning Prerequisite: • The antenna is connected. Fig, 39: Automatically finding DAB stations © sonoro audio GmbH 2018... - Seite 80 Fig, 41: Deleting inactive DAB stations 1. Press the [SETUP] button in DAB playback mode. W The display shows the [DAB Full Scan] text. 2. Turn the click wheel until the display shows [Prune list] (Fig. 41) © sonoro audio GmbH 2018...
- Seite 81 3. Proceed accordingly to retrieve the remaining DAB information. Setting the DRC DRC (“Dynamic Range Compression”) is used to compress the loudness level in pieces of music to allow for a uniform loudness level. Very loud and very quiet passages are equalised. © sonoro audio GmbH 2018...
-
Seite 82: Cd Playback
W The CD player will automatically pull in the CD and start playback. If the device is in a different mode, it will automatically switch to CD mode. In CD mode, the display shows the following information: Fig, 44: Display in CD mode © sonoro audio GmbH 2018... - Seite 83 ‘W Track W Artist W Album W Elapsed time’ • Press the [Memory 2] button (MP3 CD only) to select the next folder. • Press the [Memory 1] button (MP3 CD only) to select the previous folder. © sonoro audio GmbH 2018...
- Seite 84 The CD will resume playback from the last played position, even if you have switched modes or switch the device to Standby mode. This function is terminated when you eject the CD. This function is intended for audio books, for example. © sonoro audio GmbH 2018...
-
Seite 85: Bluetooth Playback
W The Bluetooth symbol flashes and the display shows the [Search] text. Fig, 46: Connecting Bluetooth devices 2. Switch on the Bluetooth function of your mobile phone or device. W After pairing, the display permanently shows the [Bluetooth] text. © sonoro audio GmbH 2018... -
Seite 86: Playing Music Via Bluetooth
The MP3 and WMA formats can be played. Fig, 48: Set USB playback 1. Switch on the device. 2. Press the [MENU] button and select [USB] mode or press the [USB] button on the remote control. © sonoro audio GmbH 2018... -
Seite 87: Relaxation And Meditation Music
1 – Kurzentspannung Einleitung Kurzentspannung Entspannung durch längeres Ausatmen Entspannung durch Spüren der Gegensätze Entspannung durch Da-Sein Entspannung durch Stressabgeben Entspannung durch Loslassen Entspannung durch Spüren Ihres Pulses 2 – Meditative Einleitung Entspannung Meditative Atementspannung Meditative Achtsamkeitsentspannung © sonoro audio GmbH 2018... - Seite 88 3 – Fantasising A journey of the imagination "Beach and Warmth" 4 – Progressive muscle Progressive Muscle Relaxation according relaxa- tion to Jacobson 5 – Relaxation music Relax Music 1 Relax Music 2 Relax Music 3 © sonoro audio GmbH 2018...
- Seite 89 Jacobson 5 – Musique de relaxation Relax Music 1 Relax Music 2 Relax Music 3 Relax Music 4 Relax Music 5 6 – Sons de la nature Surf Baleines Oiseaux Pluie Carillons Feu de cheminée © sonoro audio GmbH 2018...
- Seite 90 W Playback of the first track in this folder begins. Fig, 51: Track name 9. Press the [Next] or [Previous] button to select a track within the folder. W The display briefly shows the number and then the name of the track. © sonoro audio GmbH 2018...
-
Seite 91: Demo Sound Playback
Exiting Demo Sound mode 3. Press and hold the [Standby] button or press and hold the click wheel for approx. 3 seconds to exit Demo Sound mode. The following buttons are active: – Play/Pause. – Mute. © sonoro audio GmbH 2018... -
Seite 92: Troubleshooting
Device not responding Error in the device Switch the device off and on again. Poor FM/DAB FM/DAB antenna is not Change the position of the FM/DAB reception properly aligned antenna. © sonoro audio GmbH 2018... - Seite 93 ‘Pro- gramming the alarm light (sunrise)’ on page 74). sonoroLIGHT is connected Switch on the dimmer function on but the dimmer function is sonoroLIGHT. switched The lamp connected to Switch the connected lamp on. sonoro- LIGHT is switched off. © sonoro audio GmbH 2018...
-
Seite 94: Cleaning
Version 4.1, Profile : AVRCP v1.0, A2DP 1.0 2.402GHz-2.480GHz Transmitted power 5dBm AC/DC adapter Ten Pao Industrial Co., Ltd. Model: S048CM1550290 Input: 100–240 V ~ 50/60 Hz 1,5 A Output: 15,5 V 2,9 A Battery CR2032 Standby Power < 1.0W © sonoro audio GmbH 2018... -
Seite 95: Warranty
Warranty claims can only be asserted within a period of max. 2 years (1 year in North America and Australia), calculated from the date of purchase. • sonoro audio Gmbh shall, at its own discretion, repair or replace the device free of charge any defects caused by material or manufacturing defects within the warranty period. - Seite 96 © sonoro audio GmbH 2018...
- Seite 97 QUBO SO-220 SYSTÈME AUDIO AVEC RADIO NUMÉRIQUE, RÉVEIL, LECTEUR CD & BLUETOOTH® Mode d’emploi...
- Seite 98 8.5 Programmation du réveil lumineux (lever de soleil) ........ 121 8.6 Activation et désactivation du réveil ............8.7 Extinction du réveil après la sonnerie de l’alarme ........122 8.8 Réglage de la fonction snooze ..............© sonoro audio GmbH 2018...
- Seite 99 13. Lecture AUX ....................134 Lecture USB ......................134 Musique de relaxation et de méditation ............ 136 Lecture de musique de démonstration ............140 Dépannage ......................141 Nettoyage ......................143 Caractéristiques techniques ................143 Garantie ......................144 © sonoro audio GmbH 2018...
-
Seite 100: Introduction
Les illustrations de ce manuel servent à présenter de manière plus claire les actions à effectuer. Nous vous souhaitons une utilisation agréable de votre appareil! Coordonnées du fabricant Adresse sonoro audio GmbH, Nordkanalallee 94, D-41464 Neuss, Deutschland Téléphone +49 2131 8834-141 +49 2131 7517-599 E-mail support@sonoro.de Internet www.sonoro.de © sonoro audio GmbH 2018... -
Seite 101: Utilisation Conforme
De nombreuses pièces supplémentaires nécessaires à la réception des fréquences radio et au raccordement d’autres appareils sont livrées avec le QUBO. • QUBO avec enveloppe de protection • Télécommande • Deux piles bouton (CR2032, 3 V) © sonoro audio GmbH 2018... -
Seite 102: Sonorolight (Disponible En Option)
à la livraison de QUBO. Formats pris en charge Formats de CD pris en charge • Compact Disc Digital Audio CD-DA • CD-R • CD-RW Formats audio pris en charge • CD-DA • • © sonoro audio GmbH 2018... -
Seite 103: Éléments De Commande Et Raccordements
Eject ( ) Stop ( ) Alarm 1 ( 1) Écran LC Fente CD SETUP Avance rapide ( Bouton de commande Lumière ( MENU Mode veille ( ) Alarm 2 ( 2) Retour rapide ( © sonoro audio GmbH 2018... - Seite 104 Face supérieure Fig, 3: Face supérieure Emplacements mémoire 1–6 SNOOZE MUTE Haut-parleur RELAX SLEEP © sonoro audio GmbH 2018...
- Seite 105 Face arrière Fig, 4: Face arrière DAB/FM Chargement USB et play- back Compartiment des piles Casque Ouverture bass-reflex AUX IN Cadenas Raccordement du bloc d’alimentation © sonoro audio GmbH 2018...
- Seite 106 Lumière ( SLEEP MUTE/ SNOOZE Retour rapide ( ) VOL ( Bluetooth ( ) BASS TREBLE VOL ( RELAX Avance rapide ( ) OK, Play/Pause ( Alarme 2 ( 2) DAB ( Emplacements mémoire 1–6 SETUP © sonoro audio GmbH 2018...
-
Seite 107: Affichage
Affiche l'heure actuelle. Resume CD : reprise de la lecture. Repeat One CD : répétition d'un titre. Preset Stations mémorisées Affichage du bas Affichage de la date, des menus, des fréquences, etc. Bluetooth Bluetooth est activé. © sonoro audio GmbH 2018... -
Seite 108: Déballage Et Mise En Marche De L'appareil
3. Insérez le couvercle du compartiment des piles et fermez-le avec une petite pièce. Établissement de l’alimentation électrique L’alimentation électrique de l’appareil s’effectue grâce au bloc d’alimentation fourni. Le bloc d’alimentation à adaptateur universel doit être assemblé avant l’utilisation. © sonoro audio GmbH 2018... -
Seite 109: Raccordement De L'antenne
Pour une réception encore meilleure, fixez le câble à une antenne domestique appropriée. Préparation de la télécommande Fig, 9: Insertion de la pile dans la télécommande 1. À l’aide d’une petite pièce, ouvrez le compartiment des piles de la télécommande. © sonoro audio GmbH 2018... -
Seite 110: Couplage De Sonorolight
1. Tournez le bouton de commande vers la gauche pour réduire le volume sonore au minimum. 2. Enfilez la prise du casque audio au dos de l’appareil dans la sortie pour casque audio. 3. Tournez lentement le bouton de commande vers la droite pour augmenter le volume sonore. © sonoro audio GmbH 2018... -
Seite 111: Réglage Des Fonctions Principales
4. Appuyez sur le bouton de commande pour confirmer le réglage. W L’affichage des minutes clignote. 5. Tournez le bouton de commande pour régler les minutes. 6. Appuyez sur le bouton de commande pour confirmer le réglage. W L’heure est réglée. © sonoro audio GmbH 2018... - Seite 112 2. Appuyez 2 fois sur la touche [Avance rapide]. W L´écran affiche le menu [Affichage date], (Voir la Fig. 12). 3. Appuyez sur le bouton de commande. W Vous pouvez alors allumer ou éteindre la date. © sonoro audio GmbH 2018...
-
Seite 113: Procéder Aux Réglages De Base
Fig, 13: Réglage du format de l’heure Vous avez le choix entre le format 24 heures et le format 12 heures. En format 12 heures, le moment de la journée est indiqué par [AM] et [PM]. © sonoro audio GmbH 2018... - Seite 114 Réglage du réveil lumineux Fig, 16: Réglage du réveil lumineux Le matin, vous pouvez, en plus de l’alarme, vous faire réveiller en douceur par une lumière de plus en plus lumineuse (uniquement avec le module sonoroLIGHT). © sonoro audio GmbH 2018...
- Seite 115 • l’allemand • le français Activation/désactivation de la musique de démonstration Fig, 19: Activation/désactivation de la musique de démonstration Vous pouvez activer ou désactiver la fonction de musique de démonstration, (Voir la Fig. 19) © sonoro audio GmbH 2018...
-
Seite 116: Réglage Du Son
Activation de la fonction sleep timer Fig, 22: Activation/désactivation de la fonction sleep timer 1. Appuyez sur la touche [SLEEP] sur le dessus de l’appareil ou sur la télécommande. W Le symbole [SLEEP] s’affiche, (Voir la Fig. 22/1). © sonoro audio GmbH 2018... - Seite 117 2. Allumez la lumière 7.6 « Activation et désactivation de la lumière » à la page 118. 3. Programmez un sleep timer. W Après écoulement du sleep timer, la lumière est réduite progressivement et s’éteint au bout de 40 secondes. © sonoro audio GmbH 2018...
-
Seite 118: Activation Et Désactivation De La Lumière
Si l’appareil est éteint, vous disposez de plus de temps. 4. Appuyez de nouveau sur la touche [Lumière] pour éteindre la lumière. Si l’appareil est éteint, vous pouvez tourner directement le bouton de commande pour allumer la lumière et régler la luminosité. © sonoro audio GmbH 2018... -
Seite 119: Fonction Réveil
à celui des minutes W L’horaire de l’alarme est réglé. Réglage de la source d’alarme Une fois que vous avez réglé l’horaire de réveil et que vous l’avez confirmé, vous pouvez régler la source de l’alarme. © sonoro audio GmbH 2018... -
Seite 120: Réglage Du Volume Sonore Du Réveil
1. Tournez le bouton de commande pour sélectionner le volume sonore souhaité, (Voir la Fig. 28). 2. Appuyez sur le bouton de commande ou sur la touche [OK] de la télécommande pour confirmer le réglage. W Le volume sonore du réveil est réglé. © sonoro audio GmbH 2018... -
Seite 121: Réglage De La Répétition Du Réveil
2. Tournez le bouton de commande pour allumer ou éteindre le réveil lumineux, (Voir la Fig. 30). 3. Appuyez sur le bouton de commande ou sur la touche [OK] de la télécommande pour confirmer le réglage. W Le réveil lumineux est programmé. © sonoro audio GmbH 2018... -
Seite 122: Activation Et Désactivation Du Réveil
2. Pour éteindre le réveil lumineux, appuyez sur la touche [Lumière]. 3. Pour éteindre le réveil afin qu’il retentisse de nouveau après une durée déterminée (répétition du réveil/snooze), appuyez sur la touche [SNOOZE] de la télécommande. © sonoro audio GmbH 2018... -
Seite 123: Réglage De La Fonction Snooze
Fonctions générales de la lecture audio Réglage du volume sonore Fig, 31: Réglage du volume sonore 1. Tournez le bouton de commande (Voir la Fig. 31) pour augmenter ou réduire le volume sonore W Un régulateur de volume s’affiche. © sonoro audio GmbH 2018... -
Seite 124: Mise En Mode Muet De La Lecture
W Le mode sélectionné s’affiche. (Voir la Fig. 33). Après avoir appuyé sur la touche [MENU], vous pouvez également tourner le bouton de commande pour commuter entre les différents modes. Vous confirmez le mode en appuyant sur le bouton de commande. © sonoro audio GmbH 2018... -
Seite 125: Lecture Radio
Fig, 34: Liste de stations FM • • • 1. Appuyez sur la touche [SETUP]. W Le texte [Stations FM] (Voir la Fig. 34) s´affiche. 2. Appuyez sur la touche [Avance rapide]. W Le texte [Rche. auto FM] s’affiche. © sonoro audio GmbH 2018... - Seite 126 W Le texte [Rche. manuelle] s’affiche. (Voir la Fig. 36). 2. Tournez le bouton de commande ou appuyez sur les touches [Avance rapide] ou [Retour rapide] pour modifier la plage de fréquences. 3. Appuyez sur le bouton de commande pour confirmer votre sélection. © sonoro audio GmbH 2018...
-
Seite 127: Radio Dab
2. Pour confirmer, appuyez sur le bouton de commande de l’appareil ou sur la touche [OK] de la télécommande. W L’appareil recherche les stations radio disponibles et retransmet les premières stations disponibles. Recherche manuelle de stations Condition requise: • L´antenne est raccordée. © sonoro audio GmbH 2018... - Seite 128 [Pruning] s’affiche (Voir la Fig. 41). Mémorisation d’une station DAB dans les favoris 1. Pour mémoriser une station DAB dans les favoris, procédez comme décrit sous dans le chapître 10.1 « Radio FM » à la page 125. © sonoro audio GmbH 2018...
- Seite 129 RDC (« Dynamic Range Compression ») est utilisée pour comprimer le volume de morceaux de musique afin de donner un niveau de volume plus uniforme. Les passages au volume très élevé ou au volume très bas sont donc ajustés les uns par rapport aux autres. © sonoro audio GmbH 2018...
-
Seite 130: Lecture De Cd
2. Insérez le CD dans la fente pour CD en plaçant l’inscription vers le haut. W Le lecteur de CD fait rentrer le CD automatiquement et démarre la lecture. Si l’appareil se trouve dans un autre mode, il passe automatiquement en mode CD. © sonoro audio GmbH 2018... - Seite 131 Pour afficher des données ID3, si elles sont disponibles, appuyez sur la touche [CD] de la télécommande (uniquement CD MP3). L’ordre est dans ce cas : „ W Titre W Artiste W Album W Temps écoulé » © sonoro audio GmbH 2018...
- Seite 132 La lecture du CD se poursuit au dernier endroit écouté, même si vous avez changé le mode ou mis l’appareil en mode de veille. Vous mettez fin à cette fonction en éjectant le CD. La fonction est conçue p. ex. pour les livres audio. © sonoro audio GmbH 2018...
-
Seite 133: Lecture Bluetooth
W Le symbole Bluetooth clignote et le texte [Recherche] s’affiche Fig, 45: Couplage d’appareils Bluetooth 2. Activez la fonction Bluetooth de votre téléphone mobile ou périphérique. W Après la connexion, le texte [Bluetooth] s’affiche de manière permanente., (Voir la Fig. 45). © sonoro audio GmbH 2018... -
Seite 134: Lecture De Musique Par Bluetooth
Grâce à la prise de chargement USB et play-back au dos de l’appareil, vous pouvez raccorder d’autres appareils à la radio et lire de la musique. Il est possible de lire les formats MP3 et WMA. Fig, 47: Réglage de la lecture USB 1. Allumez l’appareil. © sonoro audio GmbH 2018... - Seite 135 W « Titre W Artiste W Album W Temps écoulé » • Pour sélectionner le dossier MP3 suivant, appuyez sur la touche [Emplacement mémoire 2]. • Pour sélectionner le dossier MP3 précédent, appuyez sur la touche [Emplacement mémoire 1]. © sonoro audio GmbH 2018...
-
Seite 136: Musique De Relaxation Et De Méditation
3 – Relaxation musculaire Einleitung progressive Progressive Muskelentspannung 4 – Voyages imaginaires Einleitung Fantasiereise Strand & Wärme Fantasiereise Universum 5 – Musique de relaxation Einleitung Musik Entspannungsmusik 1 Entspannungsmusik 2 Entspannungsmusik 3 Entspannungsmusik 4 Entspannungsmusik 5 © sonoro audio GmbH 2018... - Seite 137 Jacobson 5 – Musique de relaxation Relax Music 1 Relax Music 2 Relax Music 3 Relax Music 4 Relax Music 5 6 – Sons de la nature Ocean Surf Whales Birds Rain Wind Chimes Fireplace © sonoro audio GmbH 2018...
- Seite 138 Jacobson 5 – Musique de relaxation Relax Music 1 Relax Music 2 Relax Music 3 Relax Music 4 Relax Music 5 6 – Sons de la nature Surf Baleines Oiseaux Pluie Carillons Feu de cheminée © sonoro audio GmbH 2018...
- Seite 139 5. Appuyez sur le bouton de commande pour confirmer votre sélection. Fig, 49: Réglage de la langue 6. Tournez le bouton de commande pour sélectionner la langue souhaitée. 7. Appuyez sur le bouton de commande pour confirmer votre sélection. © sonoro audio GmbH 2018...
-
Seite 140: Lecture De Musique De Démonstration
Arrêt du mode de musique de démonstration 3. Appuyez sur la touche [Mode veille] ou appuyez sur le bouton de commande et maintenez-le enfoncé pendant env. 3 secondes pour quitter le mode musique de démonstration © sonoro audio GmbH 2018... -
Seite 141: Dépannage
Augmentez la distance entre la radio Bluetooth, ou la émetteurs d'ondes radio ou et le téléviseur. connexion est d'autres appareils perturbée Le logiciel n'est pas actuel Assurez-vous que la version actuelle du logiciel est installée sur votre appareil Bluetooth externe. © sonoro audio GmbH 2018... - Seite 142 Couplez sonoroLIGHT et réglez le mais la fonction variateur est réveil lumineux (voir le chapître 8.5 « éteinte. Programmation du réveil). La lampe raccordée à Allumez la lampe raccordée. sonoroLIGHT est éteinte. © sonoro audio GmbH 2018...
-
Seite 143: Nettoyage
2.402GHz-2.480GHz Puissance transmise 5dBm Puissance de l’adaptateur Ten Pao Industrial Co., Ltd. Modèle: S048CM1550290 Entrée: 100–240 V ~ 50/60 Hz 1,5 A Sortie : 15,5 V 2,9 A Batterie CR2032 Veille du réseau < 1.0W © sonoro audio GmbH 2018... -
Seite 144: Garantie
En cas de réclamations, veuillez vous adresser à notre service après-vente. Vous trouverez les coordonnées dans le chapître « Coordonnées du fabricant » à la page 100 ou sur www.sonoro.de. • Aucune nouvelle période de garantie ne commence avec la réparation ou le remplacement de l’appareil. - Seite 145 © sonoro audio GmbH 2018...
- Seite 146 © sonoro audio GmbH 2018...
- Seite 147 © sonoro audio GmbH 2018...
- Seite 148 At sonoro we are putting the utmost effort in to developing state-of-the-art products with impeccable quality standards. It is very important to us that you stay satisfied with your sonoro product for the lifetime of the unit. If for any reason you need assistance or have a warranty claim, please do not hesitate to get in touch with our Service Team.