Optika B-380ALC Bedienungsanleitung

Verwandte Anleitungen für Optika B-380ALC


Inhaltszusammenfassung für Optika B-380ALC
- Seite 1 Ver. 3.0.1 B-380 - B-380ALC OPERATION MANUAL GUIDA UTENTE MANUEL D’INSTRUCTIONS MANUAL DE INSTRUCCIONES BEDIENUNGSANLEITUNG OPTIKA MICROSCOPES - ITALY www.optikamicroscopes.com - info@optikamicroscopes.com...
- Seite 39 1.0 DESCRIPCIÓN SALIDA PHOTO / VIDEO ANILLO DE AJUSTE DE DIOPTRÍAS OCULARES TORNILLO DE BLOQUEO DEL CABEZAL (1) REVÓLVER PORTAOBJETIVOS OBJETIVOS PLATINA PORTAPREPARADOS MANDOS COAXIALES DE DESPLAZAMIENTO DE LA DIAFRAGMA IRIS (3) PLATINA CONDENSADOR TORNILLOS DE CENTRADO DEL CONDENSADOR (2) AJUSTE BRILLO (A LA IZQUIERDA)
- Seite 40 1.0 DESCRIPCIÓN DISTANCIA INTERPUPILAR PINZA DE SUJECIÓN DE MUESTRAS MANDO DE REGULACIÓN DE LA ALTURA DEL CON- DENSADOR (4) MANDO DE ENFOQUE MICROMÉTRICO MANDO DE ENFOQUE MACROMÉTRICO REGULACIÓN DE LA TENSIÓN (5) BLOQUEO DEL MANDO DE ENFOQUE Página 40...
- Seite 50 INHALT 1.0 BESCHREIBUNG Seite 51 2.0 EINLEITUNG Seite 53 3.0 AUSPACKEN UND MONTAGE Seite 54 4.0 VERWENDUNG DES MIKROSKOPS Seite 55 4.1 Kopfeinstellung für Objektbetrachtung 4.2 Objektträger auf den Tisch legen 4.3 Beleuchtungseinstellung 4.4 Einstellung des Augenabstandes 4.5 Fokusverstellung 4.6 Dioptrienverstellung 4.7 Einstellung des Kondensors 4.8 Einstellung der numerischen Apertur 4.9 Zentrierung der Phasenkontrastringe (B-380PH)
-
Seite 51: Beschreibung
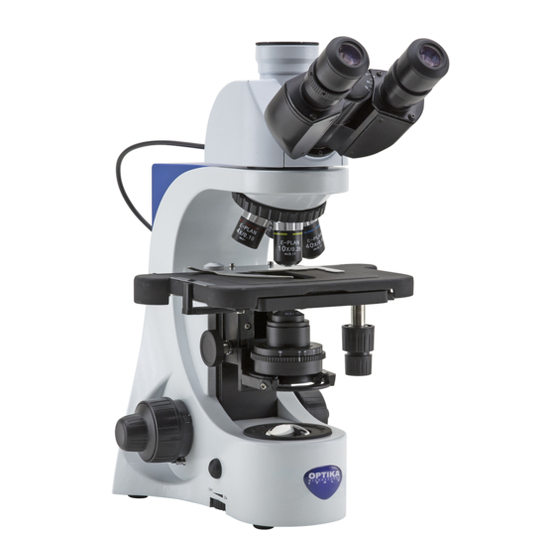
1.0 BESCHREIBUNG OUTPUT PHOTO / VIDEO EINSTELLRING DIOPTER OKULARE KOPFBEFESTIGUNGSCHRAUBE (1) REVOLVER OBJEKTIVE KREUZTISCH KNÖPFE IRISBLENDE (3) KREUZTISCHBEWEGUNG KONDENSOR SCHRAUBEN KONDENSOREINSTELLUNG (2) EINSTELLUNG HELLIGKEIT (LINKE SEITE) LED BELEUCHTUNG Seite 51... - Seite 52 1.0 BESCHREIBUNG PRÄPARATENKLEMMEN KONDENSOREINSTELLUNG (4) FEINTRIEB GROBTRIEB SPANNUNGSEINSTELLUNG FOKUSSPEICHER Seite 52...
-
Seite 53: Einleitung
Standards und zum täglichen Gebrauch hergestellt. Diese Bedienungsanleitung enthält wichtige Informationen zur korrekten und sicheren Benutzung des Geräts. Diese Anleitung soll allen Benutzern zur Verfügung stehen. Optika lehnt jede Verantwortung für eine fehlerhafte, in dieser Bedienungsanleitung nicht gezeigten Verwen- dung Ihrer Produkte ab. Sicherheitshinweise Diese Bedienungsanleitung enthält wichtige Sicherheitsinformationen bezüglich auf die Installation,... -
Seite 54: Auspacken Und Montage
3.0 AUSPACKEN UND MONTAGE Das Mikroskop wird in einer Verpackung aus Polyestere geliefert. Nehmen Sie das Klebeband von der Verpackung ab, dann heben Sie den oberen Teil der Verpackung. Achten Sie darauf, die optischen Komponenten (Objektive, Okulare) nicht zu beschädigen oder diese nicht fallen zu lassen. Ziehen Sie das Mikroskop aus der Verpackung mit beiden Händen heraus (einem rund um das Stativ und einem um den Fuß) und stellen es auf eine flache, stabile Oberfläche. -
Seite 55: Verwendung Des Mikroskops
4.0 VERWENDUNG DES MIKROSKOPS Dieses Mikroskop wurde für eine lange Verwendung entwickelt. Behandeln Sie es mit Vorsicht und gebrauchen Sie nicht zu viel Kraft. Entfernen Sie immer das Netzkabel vom Mikroskop als es für eine lange Zeit nicht verwendet wird, bei der Reinigung und der Wartung. -
Seite 56: Dioptrienverstellung
4.0 VERWENDUNG DES MIKROSKOPS Dioptrienverstellung Drehen Sie den Dioptrienverstellungring auf der linken Okular bis dem Position ‘null‘. Lockern Sie die Fokussperrschraube, suchen Sie durch den Grobtriebknopf den Fokus mit einem Objektiv mit niedri- ger Vergrößerung, dann die Schraube nochmals einschrauben. Stellen Sie den Feintriebknopf ein bis ein klares und scharfes Bild durch Betrachtung mit dem rechten Auge zu sehen ist. - Seite 57 4.0 VERWENDUNG DES MIKROSKOPS Bei den Geräten mit Phasenkontrast müssen die Phasenringe zentriert werden. Nehmen Sie ein Okular heraus und setzen das Zentrierungsokular in den Tubus hinein. Wählen Sie das 10x Objektiv aus. Drehen Sie die Kondensorscheibe auf die Position 10. Lockern Sie die Zentrierungsokularschraube und stellen den hellen Ring scharf, den Sie betrachten können.
-
Seite 58: Automatische Lichtkontrolle (B-382-Alc Modelle)
5.0 AUTOMATISCHE LICHTKONTROLLE (B-382-ALC MODELLE) Die Modelle B-382-ALC haben eine spezielle Funktion: die automatische Lichtkontrolle. Das Lichtsniveau wird durch das Mikroskop eingestellt, um das gleiche Niveau zu behalten, als das, das vom Benutzer ausgewählt wurde, egal ob die Öffnung der Blende ändert, ob ein anderes Objektiv eingesetzt ist, ob die Opazität der Probe ändert, u.s.w. -
Seite 59: Wartung
- Scheuern Sie keine Oberfläche der optischen Komponenten mit den Händen. Fingerabdrücke können die Optik beschädigen. - Bauen Sie nicht die Objektive oder die Okulare ab, um sie zu reinigen. Falls das Mikroskop aus Wartungszwecken an Optika zurückgeschickt werden muss, so verwenden Sie bitte die Originalverpackung. Seite 59... -
Seite 60: Wiederverwertung
7.0 WIEDERVERWERTUNG Gemäß dem Artikel 13 vom Dekret Nr. 151 vom 25.07.2005 “Umsetzung der Richtlinien 2002/95/EG, 2002/96/EG und 2003/108/EG in Bezug auf die Verwen- dung gefährlicher Stoffe in elektrischen und elektronischen Geräten sowie die Abfallentsorgung” Das Symbol vom Müllcontainer erscheint auf dem Gerät oder der Verpackung und weist darauf hin, dass das Produkt Ende des Lebens separat von anderen Abfällen entsorgt werden muss.