Werbung
Verfügbare Sprachen
Verfügbare Sprachen
Quicklinks
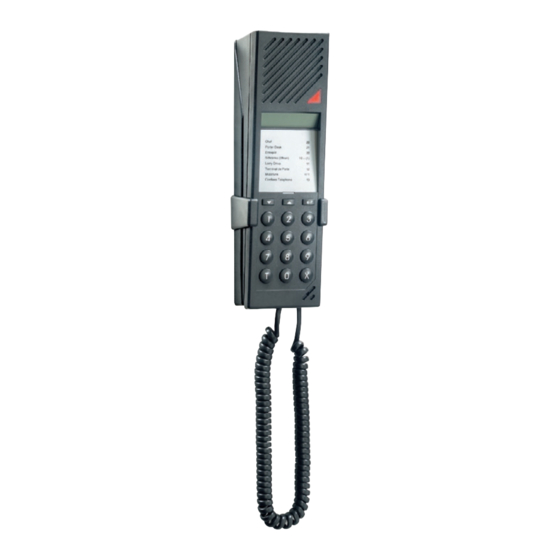
Operating instructions
Series EE 3xxA, EF 3xxA, EE 4xx & EF 4xx
Loudspeaker
Multifunction LED
(EE 4xx & EF 4xx: red LED only)
Display (not with EE 400,
EF 400 & EE 470)
Call number index
Volume buttons (not with
Intercom stations without display)
Enter button
Full keypad
Microphone
This equipment fulfils the requirements of the
directive 2014/30/EU (EMC).
Therefore, this station is CE-labelled.
Important precautions
Keep this description in safe custody.
The availability of the features is dependent on the server
configuration and the feature level licence. For Intercom stations
with restricted dialling possibilities (EF 3xxA & EF 4xx), certain
features are not available.
1. Range of application:
– As Intercom station of an Intercom Server.
2. Attention:
– Never insert objects of any kind through loudspeaker or
microphone holes.
– Ensure no liquids penetrate to the inside.
– Avoid dropping the Intercom station.
– Do not expose the Intercom station to extreme temperatures
(see respective datatsheet) or direct insolation.
– The Intercom station may be opened by authorised service
engineers only.
– This product must be disposed of pursuant the valid legal
provisions and separated from domestic waste.
3. Cleaning:
– For cleaning the Intercom station, a soft, lint-free cloth is
recommended.
– Never use strong solvents, abrasive cleaners or compressed
air for cleaning.
4. Connection:
– Connect the Intercom station to designated sockets only.
– Use the connector cable in extent of supply only.
– Do not plug other equipment to the Intercom station ports.
Call
1. Dial desired call number.
2. Talk after dial tone.
3. End call with
X
.
• During a call, the call number of the conversation partner is
displayed (not with EE 400, EF 400 & EE 470), in addition, the
multifunction LED lights.
Handset function
• Lift Intercom station and hold loudspeaker to your ear (only with
Ex 311A, Ex 320A, EE 411 & EE 420).
Manual control of speech direction
Noisy environments may require a manual control of the speech
direction ("simplex"):
• Press
T
to talk.
• Release
to listen.
T
• End manual control of speech direction with
77
.
Called subscriber busy
When the called subscriber is busy, there are three options:
• Wait for automatic re-call (switch off busy tone with
• Intrude with
T
(keep
T
pressed while talking).
• Leave call reminder with
.
4
Send re-call request
When the subscriber is busy, in privacy mode or does not
answer, it is possible to send a re-call request:
• Leave re-call request with
5
.
• Delete re-call request with subscriber's call number and
Receive re-call request
The number of the caller is indicated blinking at the display, in
addition, the multifunction LED blinks.
• Answer re-call request with
F
or dial call number; at Intercom
stations without function keys, answer with
5T
.
• Delete re-call request by pressing
for at least one second.
X
Minute tone
• Single minute tone: running call.
• Double minute tone: another call is waiting.
• Triple minute tone: conversation time expires in a few seconds
(extent conversation time with
77
).
Inquiry
1. Interrupt conversation with
0
(tone signal sounds).
2. Dial desired call number (talk after dial tone).
3. Start another inquiry with
and dial desired call number (talk
X
after dial tone). Otherwise, return to waiting subscriber with
XX
.
Transfer
1. Interrupt conversation with
0
(tone signal sounds).
2. Dial desired call number (talk after dial tone).
3. Transfer subscriber to waiting subscriber with
0
.
Microphone mute
1. Interrupt conversation with
7
(waiting subscriber receives
privacy tone signal and multifunction LED blinks).
2. Resume conversation with
7
.
All Call/group call with answer
It is possible to initiate an All Call or a group call:
1. Initiate All Call with
00
or, depending on configuration, group
call with
010
to
019
.
2. End announcement with
T
and wait for answer. Otherwise,
end announcement with
without waiting for answer.
X
It is possible to respond to an All Call or a group call:
• Respond to All Call or group call with
Secretary transfer
1. Activate transfer with
and call number of secretary's
02
Intercom station (acknowledgement tone sounds) or turn
Intercom station to the side (EE 311A, EF 311A & EE 411 only).
2. Deactivate transfer with
030
(continuous tone sounds) or
turn back Intercom station.
Door opener
0
).
• Open door with
1
during conversation.
Follow me
EE 311A, EF 311A & EE 411 only:
1. Turn Intercom station to the side.
2. On target Intercom station, activate follow me function with
02
and own calling number (acknowledgement tone sounds).
6
.
3. Turn back Intercom station to deactivate follow me function.
Conference
1. Invite further participants with
8
during conversation.
2. Dial desired call number (talk after dial tone).
3. Repeat steps "1. " and "2. " for each participant.
4. Start conference with
.
8T
5. Talk with
T
.
6. End conference with
X
.
Privacy
1. Activate privacy mode with
031
sounds) or turn Intercom station to the side (EE 311A, EF 311A
& EE 411 only).
2. Accept call with any button or turn back Intercom station.
3. Deactivate privacy mode with
030
turn back Intercom station.
Reconnect last call
• Reconnect last call with
0T
(talk after dial tone).
Background music
1. Switch on background music with
4T1
(depending on configuration).
2. Switch off background music with
Volume
• Adjust volume with arrow buttons during call.
Operation with gooseneck microphone
• At Intercom stations with gooseneck microphone, the optimum
speaking distance to the microphone is 3 to 10 cm (1 to 4 in).
Operation with additional loudspeaker
• When using Intercom station EE 311A, EF 311A or EE 380AB
with the external additional loudspeaker EG 872 (with gooseneck
microphone), it is not possible to connect an additional
microphone to the EG 872 (e.g. a headset).
• At the power supply socket of the additional loudspeakers
EG 811 and EG 872, use the power supply unit included in the
extent of supply only. The additional loudspeaker may also be
supplied via the Intercom station's connector cable. In this case,
the power supply socket has to be left free.
.
TT
There are different functions depending on Intercom Server and
configuration (not with EE 400, EF 400, EE 470), but in general:
• Idle mode: If no call is running, the own call
number is displayed – e.g.:
• Conversation: During a call, the call number
or name of the conversation partner is
displayed – e.g.:
• Waiting subscriber: A busy subscriber called by another
Intercom station receives the following indication:
– Double minute tone.
– The call number of the waiting subscriber blinks at the display.
– Afterwards, the conversation partner is displayed again.
• Privacy function: An activated privacy mode
is indicated at the display – e.g.:
• During an activated call transfer (e.g.
secretary transfer), the target call number is
indicated at the display – e.g.:
• Display texts can be configured for every
Intercom station individually – e.g.:
Direct dialling configuration
Series EE 311A & EE 411:
1. Start configuration with
be configured.
2. Confirm with
F
.
3. Dial desired button sequence and confirm with
EE 380A (direct dialling buttons):
1. Start configuration with
(acknowledgement tone
button to be configured (this button blinks).
2. Dial desired button sequence and confirm with
Delete direct dialling configuration:
1. Start configuration with
(continuous tone sounds) or
to be deleted (at EE 980: this button blinks).
2. Delete configuration with
• Dial tone:
Anrufton
• Busy tone:
B esetzt ton
• Privacy tone:
Diskret ton
to
4T40
• Error tone:
Fehler
• Acknow ledgement
Quittierungston
4T0
.
tone:
Zeit
Type: D-OI-EE311A, Version: 1.1/0916
Display information
9T1
and dial button (sequence) to
F
.
9T1
and press desired direct dialling
F
.
and press direct dialling button
9T1
and confirm with
.
X
F
Tone signals
1 sek
2 sek
3 sek
1 sec.
2 sec.
3 sec.
www.commend.com
Werbung

Verwandte Anleitungen für Commend EF 3xxA serie


Inhaltszusammenfassung für Commend EF 3xxA serie
- Seite 2 3. Teilnehmer mit mit wartendem Teilnehmer verbinden. Anschlussbuchsen an. • Lautstärke während des Gesprächs mit Pfeiltasten verändern. – Verwenden Sie nur das mitgelieferte Anschlusskabel. – Schließen Sie keinesfalls andere Geräte an die Anschluss- buchsen der Sprechstelle an. Type: D-OI-EE311A, Version: 1.1/0916 www.commend.com...