Herunterladen Inhalt Inhalt Diese Seite drucken
PowerWalker VFI 1000RT LCD Bedienungsanleitung

PowerWalker VFI 1000RT LCD Bedienungsanleitung

On-line ups
Vorschau ausblenden Andere Handbücher für VFI 1000RT LCD:
Inhaltsverzeichnis

Werbung

Verfügbare Sprachen
  • DE

Verfügbare Sprachen

  • DEUTSCH, seite 47
On-Line UPS
PowerWalker VFI 1000RT LCD
PowerWalker VFI 1500RT LCD
PowerWalker VFI 2000RT LCD
PowerWalker VFI 3000RT LCD
Manual
EN, DE, FR, RU, PL

Werbung

Inhaltsverzeichnis
loading

Inhaltszusammenfassung für PowerWalker VFI 1000RT LCD

  • Seite 1 On-Line UPS PowerWalker VFI 1000RT LCD PowerWalker VFI 1500RT LCD PowerWalker VFI 2000RT LCD PowerWalker VFI 3000RT LCD Manual EN, DE, FR, RU, PL...
  • Seite 2: Inhaltsverzeichnis

    CONTENT 1. Safety and EMC Instructions ..............1 1.1 Installation ....................1 1.2 Operation ....................9 1.3 Maintenance, servicing and faults ............10 1.4 Transport ....................13 1.5 Storage ....................13 1.6 Standards ....................14 2. Description of Commonly Used Symbols .......... 15 3.
  • Seite 3 9.1 Operation ....................33 9.2 Storage ....................33 9.3 Battery Replace ..................33 10. Technical Data ..................34 10.1 Electrical specifications ............... 34 10.2 Operating Environment ............... 34 10.3 Typical backup time (Typical values at 25°C in minutes:)....... 34 10.4 Dimensions and weights ............... 35 11.
  • Seite 5: Safety And Emc Instructions

    1. Safety and EMC Instructions SAVE THESE INSTRUCTIONS – This manual contains important instructions for models PowerWalker VFI 1000/1500/2000/3000RT LCD that should be followed during installation and maintenance of the UPS and batteries. Please read carefully the following user manual and the safety instructions before installing the unit or using the unit! 1.1 Installation...
  • Seite 6  The internal short circuiting of the UPS will lead to dangers such as electric shock or fire, therefore, no water containers (such as a water glass) shall be placed on the top of the UPS so as to avoid such dangers as electric shock.
  • Seite 7: Unpacking The Cabinet

    least 25cm of space on each side.  In case smoke is found coming out from the device, please cut off the power supply quickly and contact the distributor.  An appropriate disconnect device as short-circuit backup protection should be provided in the building wiring installation. Please see the disconnect device specification in chapter 5.2 ...
  • Seite 8: Tower Setup

    Tower Setup and Rack-Mount Setup.  Tower setup This series of UPS can be placed horizontally and vertically. As a tower configuration, it is provided with the optional UPS stands to stabilize the UPS when the UPS is positioned in vertical. The UPS stand must be attached to the bottom of the tower.
  • Seite 9: Ebm Installation (Optional)

    1.1.4 EBM Installation (Optional)  Connecting the EBM in Tower form: 1. Slide down the UPS and EBM vertically and place two UPS stands with the extend part at the end of the tower. 2. Tighten the screw on the metal sheet for stabilization 3.
  • Seite 11  Connecting the EBM in a rack form 1. Using the same method as assembling UPS in a rack form, assemble EBM into the rack-mounting on the top or bottom of the UPS. 2. Connect the earth line from UPS (port A ) to EBM (port B ) 3.
  • Seite 12 time. Follow the procedure to install multiple EBM as below.  Connecting multiple EBMs in Tower form 1. Connect Earth line between UPS and the first EBM, and then connect Earth Line between the first EBM and the second EBM. 2.
  • Seite 13: Operation

    Note: Three or more EBMs can be connected to the UPS in the same way as shown above. Note: After connect the EBMs, please do not forget to set the number of EBMs on LCD, please refer to chapter 7 “Setting by LCD module” for setting method.
  • Seite 14: Maintenance, Servicing And Faults

    ★ Use No. 12 AWG (for 3KS input wire), 90C copper wire and 4.4 lb-in Torque force when connecting to terminal block. ★ Use No. 10AWG (for all models battery wire), 90C copper wire and Anderson PP45 connectors for user’s external battery cabinet. 1.3 Maintenance, servicing and faults ★...
  • Seite 15: Ups And Battery Care

    1.3.1 UPS and Battery Care For the best preventive maintenance, keep the area around the UPS clean and dust-free. If the atmosphere is very dusty, clean the outside of the system with a vacuum cleaner. For long battery life, keep the UPS at an ambient temperature of 25°C (77°F) 1.3.2 Storing the UPS and Batteries When the UPS is intended to store for a long period, recharge the battery...
  • Seite 16  Do not open or mutilate the battery. Released toxic electrolyte is harmful to skin and eyes. Note: If you are not qualified service personnel to replace the battery, do not attempt to open the battery cabin. Please call local dealer or distributor immediately.
  • Seite 17: Recycling The Used Battery

    1.3.5 Testing New Batteries For a battery test, please check:  The batteries must be fully charged.  The UPS must be in Normal mode with no active alarms.  Don’t take on/off the load. To test batteries: 1. Connect the UPS to utility power for at least 48 hours to charge the batteries.
  • Seite 18: Standards

    1.6 Standards * Safety IEC/EN 62040-1 * EMI Conducted Emission......:IEC/EN 62040-2 Category C1 Radiated Emission......:IEC/EN 62040-2 Category C1 Harmonic Current.......:IEC/EN 61000-3-2 Voltage Fluctuation and Flicker..:IEC/EN 61000-3-3 *EMS ESD...........:IEC/EN 61000-4-2 Level 3 RS.............:IEC/EN 61000-4-3 Level 3 EFT............:IEC/EN 61000-4-4 Level 4 SURGE..........:IEC/EN 61000-4-5 Level 4 CS……………………………………...:IEC/EN 61000-4-6 Level 3...
  • Seite 19: Description Of Commonly Used Symbols

    2. Description of Commonly Used Symbols Some or all of the following symbols may be used in this manual. It is advisable to familiarize yourself with them and understand their meaning:...
  • Seite 20: Introduction

    3. Introduction This On-Line-Series is an uninterruptible power supply incorporating double-converter technology. It provides perfect protection specifically for Novell, Windows NT and UNIX servers. The double-converter principle eliminates all mains power disturbances. A rectifier converts the alternating current from the socket outlet to direct current.
  • Seite 21: Panel Description

    4. Panel Description LCD Screen ON Button/ OFF-Button Select-Button Enter-Button Alarm Silence The Display Panel Switch Function Turn on UPS system: By pressing the ON-Button “I” the UPS ON-Button system is turned on. Deactivate acoustic alarm: By pressing this Button an acoustic alarm can be deactivated in the battery mode.
  • Seite 22 The LCD Display Display Function Display Function Input Information Output Information It indicates input It indicates output voltage/frequency value, voltage/frequency value, which are displayed which are displayed alternately. alternately. It indicates the input is connected with mains, It indicates the Output and the input power is plug.
  • Seite 23: Connection And Operation

    5. Connection and Operation The system may be installed and wired only by qualified electricians in accordance with applicable safety regulations! When installing the electrical wiring, please note the nominal amperage of your incoming feeder. 5.1 Inspection Inspect the packaging carton and its contents for damage. Please inform the transport agency immediately should you find signs of damage.
  • Seite 24 (2) UPS Output Connection The output of the UPS is IEC socket-types. Simply plug the load power cord to the output sockets to complete connection. Use one cord for every 5A load. Model No. Output Socket (pcs) 1K(S)/1.5K(S)/ 2K(S) 8 * IEC320 C13 3K(S) 8 * IEC320 C13 + 1 * C19 The wiring configuration is shown as the...
  • Seite 25: Battery Charge

     NC Normally the EPO connector is closed with a wire on the rear panel. Once the connector is open, the UPS would stop the output until the EPO status is disabled. Enable the EPO status Disable the EPO status 5.3 Battery charge Fully charge the batteries of the UPS system by leaving the UPS system connected to the mains for 12 hours.
  • Seite 26: Turn Off The Ups

    UPS could do real-time detection when battery connected or disconnected. If the battery connection status is changed, in floating mode, UPS will detect the change within 30 seconds; in resting mode, UPS will detect the change within 3 minutes; (2) Manual test Test the function of the UPS system by pressing the On-Switch “I”...
  • Seite 27 (2) One hard wiring type battery terminal on the rear panel is used for connecting the battery pack. (3) The battery connection procedure very important. incompliance may result in the risk of electric shock. Therefore, the following steps must be strictly complied with. (4) Make sure the mains input is cut off, if there is a battery breaker then turn it off first.
  • Seite 28: Operating Mode For All Models

    6. Operating Mode for All Models The different string could be displayed on the LCD screen corresponding to their own operating modes, and they are illustrated as the following table. At any time, only one normal operating string or fault string is presented. But the warning, even several warnings could appear in a certain normal operating mode at one time.
  • Seite 29: Battery Mode

    Note: Please follow the following steps to connect the generator: ● Activate the generator and wait until the operation is stable before supplying power of the generator to the UPS (be sure that the UPS is in idle mode). Then turn on the UPS according to the start-up procedure. After the UPS is turned on, then the loads can be connected to the UPS one by one.
  • Seite 30: No Output Mode

    ■ The Bypass mode The UPS does not have the backup function when it is in bypass mode. The power used by the load is supplied from the utility power via internal filter. 6.4 NO output mode The LCD display in No output mode is shown in the following diagram. The information about the utility power, the battery level, the UPS output and the load level could be displayed.
  • Seite 31: Converter Mode

    utility power via internal filter while the utility power is in normal range, so the high efficiency could be gained in the ECO mode. Once the mains is loss or abnormal, the UPS would transfer to battery mode and the load is supplied continuously by the battery.
  • Seite 32: Setting By Lcd Module

    7. Setting by LCD Module The output voltage, frequency, Bypass status and operating mode in No output mode or Bypass mode, Two Load segments in output mode, The number of EBM in all mode could be set directly through LCD module. The output voltage could be set to 208V, 220V, 230V and 240V.
  • Seite 33 Bypass Enable),The UPS would turn to bypass mode in several seconds after “Bypass Enable” is selected, and turn to no output mode in several seconds after “Bypass Disable” is selected; Operating mode could be selected in “UPS”, “ECO”, “CVF”(Here “UPS” means the normal inverter mode, “ECO” means the high efficiency mode, and “CVF”...
  • Seite 34: Trouble Shooting

    8. Trouble Shooting If the UPS system does not operate correctly, check the operating status on the LCD display. Warning String Fault String Site fail SITE Inverter short SHOR Fan fail FANF Overload fault OVLD Battery over voltage (over HIGH Inverter soft start fail ISFT charged)
  • Seite 35 Battery over voltage Battery is over charged Stop charging to battery automatically, and after the battery voltage is normal and the mains is normal, charge automatically again. Battery low Battery voltage is low When audible alarm sounding every second, battery is almost empty.
  • Seite 36 Please have the following information at hand before calling the After-Sales Service Department: 1. Model number, serial number 2. Date on which the problem occurred 3. LCD display status, Buzzer alarm status 4. Utility power condition, load type and capacity, environment temperature, ventilation condition 5.
  • Seite 37: Maintenance

    9. Maintenance 9.1 Operation The UPS system contains no user-serviceable parts. If the battery service life (3~5 years at 25°C ambient temperature) has been exceeded, the batteries must be replaced. In this case please contact your dealer. 9.2 Storage If the batteries are stored in temperate climatic zones, they should be charged every three months for 1~2 hours.
  • Seite 38: Technical Data

    10. Technical Data 10.1 Electrical specifications INPUT Model No. 1K(S) 1.5K(S) 2K(S) 3K(S) Phase Frequency (45~55)/(54~66) Hz Max Current(A) 10.5 13.5 OUTPUT Model No. 1K(S) 1.5K(S) 2K(S) 3K(S) Power rating 1kVA/0.9kW 1.5k/1.35kW 2kVA/1.8kW 3kVA/2.7kW 208/220/230/240×(1 士 1%)VAC Voltage Frequency 50/60(±0.2)Hz (Battery mode) Wave form sinusoidal BATTERIES...
  • Seite 39: Dimensions And Weights

    10.4 Dimensions and weights Model 1000 1000S 1500 1500S 2000 2000S 3000 3000S Net weight (kg) 16.2 19.7 19.7 28.6 13.2 Dimension (mm) Case (W x H x D) 438X86.5x436 438X86.5x608 Dimension (mm) (W x H x D) Net weight (kg) 22.2 27.5 40.5...
  • Seite 40: Communication Port

    11. Communication Port 11.1 RS-232 and USB communication ports To establish communication between the UPS and a computer, connect a computer to one of the UPS communication ports by using an applicable communication cable. NOTE: Only one of the communication ports can be active at one time. The USB port has priority over the RS-232 port.
  • Seite 41: Usb Port

    11.3 USB port The UPS can communicate with a USB-compliant computer by using HID-compatible power management software. To establish communication between the UPS and a computer, connect the USB cable that comes with the UPS to the USB port on the UPS. Connect the other end of the USB cable to the USB port on a computer.
  • Seite 42 The following figures show schematic of the dry out/in contacts. Dry out contact schematic Dry in contact schematic The following table shows the options for the dry out/in contacts Dry out signal Description Summary Alarm Activated when any warning happens On Battery Activated when the UPS operates on battery Activated with the “bLOW”...
  • Seite 43: Software Installation

     Double-click the icon to use the monitor software (as above).  You can schedule UPS shutdown/start-up and monitor UPS status through  Detail instructions please refer to the e-manual in the software. Check www.powerwalker.com/winpower.html from time to time to get the latest version of monitoring software.
  • Seite 44: Appendix: Rear Panel

    Appendix: Rear panel The UPS rear panel description table and pictures are shown as below: Function(1000VA &1500VA&2000VA&3000VA) AC Output EPO / Dry in Communication Port USB Port AC Input Dry out SNMP slot RS232 Modem/Network Surge Protection Earth Line Port 1000VA /1500VA/2000VA Standard &...
  • Seite 45 DRY IN AC INPUT DRY OUT 3000VA Standard model rear panel USE COPPER CONDUCTOR ONLY .FOR SUPPLY CONNECTIONS, USE WIRES SUITABLE FORAT LEAST 75℃. REFERTO THE INSTRUCTION MANUAL FOR TIGHTMENING TORQUE DRY IN DRY OUT 3000VA Supper charger model rear panel The EBM rear panel description table and picture are shown as below: Function(36V &48V &...
  • Seite 46 On-Line USV PowerWalker VFI 1000RT LCD PowerWalker VFI 1500RT LCD PowerWalker VFI 2000RT LCD PowerWalker VFI 3000RT LCD Bedienungsanleitung...
  • Seite 47 INHALT 1. Sicherheits- und EMC-Anweisungen ........1 1.1 Installation ..................1 1.2 Betrieb ....................9 1.3 Wartung, Instandhaltung und Fehler ..........10 1.4 Transport ..................14 1.5 Lagerung ..................14 1.6 Normen ..................... 15 2. Beschreibung der häufig verwendeten Symbole ....16 3.
  • Seite 48 9.2 Lagerung ..................34 9.3 Batterieaustausch ................35 10. Technische Daten ..............36 10.1 Elektrische Spezifikationen ............36 10.2 Betriebskonfiguration ..............36 10.3 Typische Sicherungs zeit (Typische Werte bei 25°C in Minuten:) ..36 10.4 Maße und Gewichte ................. 37 11.
  • Seite 50: Sicherheits- Und Emc-Anweisungen

    1. Sicherheits- und EMC-Anweisungen BEWAHREN SIE DIESE ANLEITUNG GUT AUF – Dieses Handbuch enthält wichtige Anweisungen für die Modelle PowerWalker VFI 1000/1500/2000/3000 RT LCD, die während Installation und Wartung der USV-Geräte und Akkus eingehalten werden müssen. Bitte lesen folgende Benutzerhandbuch Sicherheitsanweisungen vor Installation oder Gebrauch des Geräts...
  • Seite 51  Die USV enthält Batterien mit großer Kapazität. Deshalb sollte das Gehäuse der USV nicht geöffnet werden, um Gefahren von elektrischen Schlägen zu vermeiden. Wenn die Batterie repariert oder ersetzt werden muss, kontaktieren Sie bitte den Händler.  Ein interner Kurzschluss in dem USV-Gerät führt zu Gefahren wie z.B. Stromschlag oder Feuer.
  • Seite 52: Überprüfung Des Geräts

     Kabel so platzieren, dass keiner darauf treten oder darüber stolpern kann.  Stellen Sie sicher, die USV und den externen Batteriesatz sicher mit der Erde zu verbinden  Blockieren Sie nicht die Lüftungsöffnungen im USV-Gehäuse. Stellen Sie sicher, dass die Lüftungsschlitze vorne und hinten an der USV nicht blockiert sind.
  • Seite 53: Auspacken Des Schranks

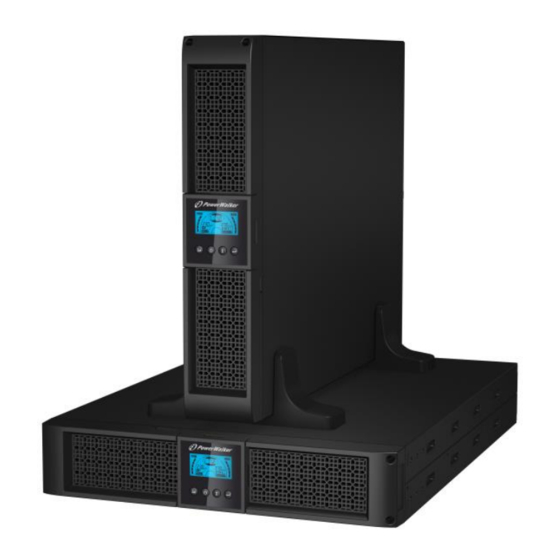
    1.1.2 Auspacken des Schranks Auspacken des Systems: 1. Öffnen Sie den äußeren Karton und entfernen Sie das Zubehör, das zusammen mit dem Schrank eingepackt ist. 2. Heben Sie den Schrank aus dem äußeren Karton und stellen Sie ihn auf eine ebenen, stabile Fläche. 3.
  • Seite 54  Rack-Montage Die Serie kann in Racks von 19 Zoll installiert werden. Sowohl die USV als auch externe Batteriegehäuse benötigen 2U Platz im Rack. Gehen Sie folgendermaßen vor, um die USV in einem Rack zu installieren. 1. Richten Sie die Montageösen an den Bohrungen an der Seite der USV aus und ziehen Sie die Schraube an.
  • Seite 55 4. Nehmen Sie die Frontplatte ab und schließen Sie die Batterieklemme (A) von der USV wie unten dargestellt am EBM-Terminal (B) an. Benutzer müssen die kleine Tür (C) an der Seite der Frontplatte entfernen, damit der Ausgangsdraht des EMB durch die Tür verlegt werden kann, dann muss die Frontplatte wieder angebracht werden.
  • Seite 56  Anschließen des EBM bei Rack-Montage 1. Verwenden Sie die gleiche Methode wie bei der Montage der USV in einem Rack und montieren Sie das EBM in der Rack-Halterung an der Ober- und Unterseite der USV. 2. Verbinden Sie die Erdungsleitung von der USV (Anschluss A) mit dem EBM (Anschluss B) 3.
  • Seite 57  Anschließen mehrerer EBMs Die USV mit 1000VA/1500VA/2000VA und 3000VA verfügen über einen externen Batterieanschluss, mit dem die Benutzer mehrere EBM anschließen kann, um zusätzliche Notstrom Versorgungszeit bieten zu können. Befolgen Sie die Anweisungen unten für den Anschluss mehrerer EBM . Anschließen mehrerer EBM bei Turm-Montage 1.
  • Seite 58: Betrieb

    2. Nehmen Sie die Frontplatte ab und schließen Sie die Batterieklemme (A) von der USV wie unten dargestellt am EBM-Terminal (B) an. Und verbinden Sie dann die Batterie klemme (D) vom ersten EBM mit der Batterieklemme (E) vom zweiten EBM. Benutzer müssen die kleine Tür (C) an der Seite der Frontplatte entfernen, damit der Ausgangsdraht des EMB durch die Tür verlegt werden kann, dann muss die Frontplatte wieder angebracht werden.
  • Seite 59: Wartung, Instandhaltung Und Fehler

    ★ Die USV verfügt über ihre eigene interne Stromquelle (Batterien). Sie können einen Stromschlag bekommen, wenn d ie USV-Ausgangssteckdosen oder den Ausgangsklemmenblock berühren, selbst wenn die USV nicht an die Gebäudeverkabelungssteckdose angeschlossen ist. ★ Um die USV vollständig zu trennen, drücken Sie die AUS Taste, um die USV abzuschalten, trennen Sie dann das Anschlusskabel.
  • Seite 60: Entfernen Sie Schmuck, Armbanduhren, Ringe Und Sonstige

    ★ Batterien haben einen hohen Kurzschlussstrom und stellen ein Stromschlagrisiko dar. Ergreifen Sie alle nachstehend spezifizierten Vorsichtsmaßnahmen und alle anderen notwendigen Maßnahmen, wenn Sie mit Batterien arbeiten. - Entfernen Sie Schmuck, Armbanduhren, Ringe und sonstige Metallgegenstände - Verwenden Sie nur Werkzeug mit isolierten Griffen. ★...
  • Seite 61: Zeitpunkt Zum Austauschen Der Batterien

    1.3.3 Zeitpunkt zum Austauschen der Batterien Wenn die Entladezeit weniger als 50% der spezifizierten vollen Ladung beträgt, muss die Batterie ausgetauscht werden. Bitte überprüfen Sie den Batterieanschluss oder kontaktieren Sie Ihren Händler vor Ort, um neue zu Batterie bestellen. WARNUNG: ...
  • Seite 62: Testen Neuer Batterien

    3. Trennen Sie das Kabel von der USV und der Batterie. 4. Entfernen Sie die Halterung der rechten inneren Batterie. 5. Ziehen Sie die Batterie auf eine ebene Fläche heraus. 6. Setzen Sie die neue Batterie in die USV ein. 7.
  • Seite 63: Transport

    Testen der Batterien: 1. Schließen Sie die USV für mindestens 48 Stunden an das Stromnetz an, um die Batterien aufzuladen. 2. Drücken und halten Sie die “I” Taste 1 Sekunde, um den Batterietest im Leitungsmodus oder HE-Modus zu starten. Die Statusanzeige zeigt die Zeichenfolge “TEST”...
  • Seite 64: Normen

    1.6 Normen * Sicherheit IEC/EN 62040-1 * EMI Durchgeführte Emission......:IEC/EN 62040-2 Kategorie C1 Ausgestrahlte Emission......:IEC/EN 62040-2 Kategorie C1 Harmonischer Strom.......:IEC/EN 61000-3-2 Spannungsschwankung und Flicker..:IEC/EN 61000-3-3 *EMS ESD.............:IEC/EN 61000-4-2 Stufe 3 RS.............:IEC/EN 61000-4-3 Stufe 3 EFT.............:IEC/EN 61000-4-4 Stufe 4 ÜBERSPANNUNG.............:IEC/E Stufe 4 N 61000-4-5 CS……………………………………...:IEC/EN 61000-4-6 Stufe 3...
  • Seite 65: Beschreibung Der Häufig Verwendeten Symbole

    2. Beschreibung der häufig verwendeten Symbole Einige oder alle der folgenden Symbole können in diesem Handbuch verwendet werden. Es wird empfohlen, dass Sie sich mit den Symbolen vertraut machen und ihre Bedeutung verstehen:...
  • Seite 66: Einführung

    3. Einführung Diese On-Line-Serie ist eine unterbrechungsfreie Stromversorgung, die die Doppelkonvertertechnologie integriert. Sie bietet perfekten Schutz speziell für Novell-, Windows-, NT- und UNIX-Server. Der Doppel-Konverter eliminiert im Prinzip alle Stromstörungen. Ein Gleichrichter konvertiert den Wechselstrom von der Steckdose in Gleichstrom. Dieser Gleichstrom lädt die Batterien und versorgt den Inverter mit Strom.
  • Seite 67: Displaybeschreibung

    4. Display Beschreibung LCD Screen ON Button/ OFF-Button Select-Button Enter-Button Alarm Silence Die Display-Platte Schalter Funktion Schalten Sie das USV-Sytem ein: Durch Drücken der EIN-Taste "I" EIN-Taste wird das USV-System eingeschaltet. Deaktivieren Sie den akustischen Alarm: Durch Drücken dieser Taste kann ein akustischer Alarm im Batteriemodus deaktiviert werden.
  • Seite 68: Der Lcd Display

    Der LCD Display Display Funktion Display Funktion Eingabeinformationen Ausgabeinformationen Er zeigt die Er zeigt die Eingangsspannung/Freque Ausgangsspannung/Freque nzwert an, die im Wechsel nzwert an, die im Wechsel angezeigt werden. angezeigt werden. Er zeigt an, dass der Eingang an das Stromnetz Er zeigtden angeschlossen ist und die Ausgangsstecker an.
  • Seite 69: Verbindung Und Betrieb

    5. Verbindung und Betrieb System darf qualifizierten Elektrikern Übereinstimmung mit den geltenden Sicherheitsbestimmungen installiert und verdrahtet werden! Beim Installieren elektrischen Verdrahtung bitte Nennamperezahl Ihrer Einspeisung beachten. 5.1 Inspektion Prüfen Sie den Verpackungskarton und dessen Inhalt auf Schäden. Bitte informieren Sie die Transportagentur sofort, wenn Sie Anzeichen von Schäden vorfinden.
  • Seite 70 Bei der Auswahl des NFB kann der Benutzer sich auf die nachstehende Tabelle beziehen. UPS EINGANG NFB & Elektrozuleitung & Steckdose Modell Nr. SPANNUNG STROM 1K(S) 300Vac 1,5K(S) 300Vac 2K(S) 300Vac 3K(S) 300Vac (2) USV-Ausgangsanschluss Der Ausgang der USV ist vom Steckdosentyp IEC . Stecken Sie die Lastverbindungsschnur in die Ausgangssteckdose, um den Anschluss zu komplettieren.
  • Seite 71: Batterie Ladung

    (3) EPO Anschluss: Benutzer können die Polarität von EPO auswählen, EPO offen ist im Auslieferzustand als Standardeinstellung gewählt.  NEIN Normalerweise ist der EPO-Stecker auf der Rückenplatte offen. Sobald der Stecker mit einem Draht geschlossen wird, stoppt die USV die Ausgabe, bis der EPO-Status deaktiviert ist.
  • Seite 72: Test Funktion

    (2) Ohne angeschlossenen Netzstrom: Wird die USV ohne Netzstrom kaltgestartet, muss der Benutzer die “I” Taste zweimal drücken, das erste Mal Drücken der “I” Taste dient dazu, dass die USV am Stromnetz angeschlossen wird, der LCD-Bildschirm zeigt ‘INIT’an. Ein zweites Mal dauerhaftes Drücken der “I”-Taste für länger als eine Sekunde dient dazu, dass die USV eingeschaltet wird, die USV schaltet in Tatsächlich dient das zweimalige Drücken der “I”...
  • Seite 73: Akustik Alarm Stumm Funktion

    auszuschalten, die USV wird komplett ausgeschaltet. 5.7 Akustik Alarm Stumm Funktion Wenn der Alarm im Batteriemodus zu störend ist, können Sie die "I"-Taste dauerhaft für mehr als 1 Sekunde drücken, um ihn zu löschen. Zudem wird der Alarm aktiviert, wenn der Batteriestand niedrig ist, um Sie daran zu erinnern, dass die Last bald abzuschalten.
  • Seite 74 Draht (6) Der schwarze Draht wird an die "+"-Klemme der Batterie angeschlossen. Der schwarze Draht wird an die "-"-Klemme der Batterie angeschlossen. (Hinweis: der grüne/gelbe Draht wird aus Schutzzwecken geerdet.) (7) Stellen Sie sicher, dass die Drähte befestigt werden, installieren Sie die Klemmenblockplatte der USV.
  • Seite 75: Betriebs Modus Für Alle Modelle

    6. Betriebs Modus für alle Modelle Die verschiedenen Strings können auf dem LCD-Display angezeigt werden entsprechend ihrer eigenen Betriebsmodi und sie werden als die folgende Tabelle dargestellt. Es kann immer nur ein normaler Betriebsstring oder Fehlerstring dargestellt werden. Aber die Warnung, selbst verschiedene Warnungen könnten in bestimmten Betriebsmodi gleichzeitig erscheinen.
  • Seite 76: Batterie-Modus

    Hinweis: Bitte befolgen Sie die folgenden Schritte, um den Generator anzuschließen: ● Aktivieren Sie den Generator und warten Sie, bis der Betrieb stabil ist, bevor die Leistung des Generators der USV zugeführt wird (stellen Sie sicher, dass die USV im Ruhemodus ist). Schalten Sie dann die USV entsprechend dem Startverfahren an.
  • Seite 77: Kein Ausgangs Modus

    Die USV hat keine Sicherungsfunktion, wenn sie im Bypass-Modus ist. Der von der Last verwendete Strom wird über einen internen Filter vom Elektrizitätswerk geliefert. 6.4 KEIN Ausgangs Modus Das LCD Display im Nicht-Ausgabe Modus wird im folgenden Diagramm dargestellt. Die Informationen über den Netzstrom, den Batteriestand, die USV-Ausgabe und die Last können angezeigt werden.
  • Seite 78: Konvertermodus

    6.7 Konvertermodus Im Konverter-Modus ist der Modus-String auf dem LCD-Display “CVCF”. Die USV würde mit einer festgelegten Ausgangsfrequenz (50Hz oder 60Hz) im Konvertermodus frei laufen. Sobald das Netz verloren oder abnormal ist, schaltet die USV in den Batteriemodus um und die Last wird dauerhaft von der Batterie betrieben.
  • Seite 79: Einstellung Durch Lcd-Modul

    7. Einstellung durch LCD-Modul Die Ausgangsspannung, Frequenz, Bypass Status und Betriebsmodus im Kein Ausgabe Modus oder Bypass-Modus, Zwei Lastsegmente im Ausgangsmodus, die Anzahl an EBM in allen Modi können direkt über das LCD-Modus eingestellt werden. Die Ausgangsspannung könnte auf 208V, 220V, 230V und 240V eingestellt werden. Die Ausgangsfrequenz könnte auf 50Hz und 60Hz eingestellt werden.
  • Seite 80 “220V”, “230V”, “240V” ausgewählt werden; Der einzige Frequenzwert könnte zu jeder Zeit in “50Hz”, “60Hz” ausgewählt werden; Bypass Status könnte in “000” oder “001”ausgewählt werden (Hier bedeutet 000 Bypass Deaktivierung,001 bedeutet Bypass Aktivierung),Die USV würde in ein paar Sekunden in den Bypass-Modus umschalten, nachdem “Bypass Enable”...
  • Seite 81: Problembehebung

    8. Problembehebung Wenn das USV-System nicht korrekt funktioniert, prüfen Sie den Betriebsstatus auf dem LCD-Display. Warnung String Fehler String Standort fehlgeschlagen SITE Inverterkurzschluss SHOR Lüfterausfall FANF Überlastfehler OVLD Batterie über Spannung HOCH Sanftanlauf des Inverters ISFT (überladen) fehlgeschlagen Batteriestand niedrig bLOW Sanftanlauf bSFT...
  • Seite 82 Notstromzeitraum kürzer Batterien nicht voll geladen/ Laden Batterien als der Nennwert Batterien defekt mindestens 5 - 8 Stunden und prüfen Sie dann die Kapazität. Hält das Problem an, wenden Sie sich an Ihren Händler. Lüfterausfall Lüfter abnormal Prüfen Sie, ob der Lüfer läuft Batterieüberspannung Batterie ist überladen Stoppen Sie das automatische...
  • Seite 83: Wartung

    Übertemperaturfehler Übertemperatur Prüfen Sie die Lüftung der USV, prüfen Sie die Umgebungstemperatur und Belüftung. NTC offen Interner UPS-Fehler Händler benachrichtigen Inverterkurzschluss Ausgangskurzschluss Alle Lasten entfernen. UPS unterbrechen. Prüfen Sie, ob der Ausgang der USV und die Lasten einen Kurzschluss haben. Stellen Sie sicher, dass der Kurzschluss beseitigt wird und die USV keine internen Fehler hat, bevor sie...
  • Seite 84: Batterieaustausch

    9.3 Batterieaustausch Wenn die Batterielebensdauer überschritten wird, müssen die Batterien ausgetauscht werden. Der Batterieaustausch darf nur von qualifiziertem Personal durchgeführt werden. Es empfiehlt sich, die USV vor dem Austausch komplett auszuschalten. Falls ein Batterietrennschalter vorhanden ist, dann zunächst diesen ausschalten. Trennen Sie das Batteriekabel vorsichtig und stellen Sie sicher, dass keine freigelegten Drähte berührt werden können.
  • Seite 85: Technische Daten

    10. Technische Daten 10.1 Elektrische Spezifikationen EINGANG Modell-Nr. 1K(S) 1,5K(S) 2K(S) 3K(S) Phase Frequenz (45~55)/(54~66) Hz Max Strom(A) 10,5 13,5 AUSGANG Modell-Nr. 1K(S) 1,5K(S) 2K(S) 3K(S) Nennleistung 1kVA/0,9kW 1,5k/1,35kW 2kVA/1,8kW 3kVA/2,7kW 208/220/230/240×(1 士 1%)VAC Spannung Frequenz 50/60(±0.2)Hz (Batteriemodus) Wellenform sinusförmig BATTERIEN Modell-Nr.
  • Seite 86: Maße Und Gewichte

    10.4 Maße und Gewichte Modell 1000 1000S 1500 1500S 2000 2000S 3000 3000S Nettogewicht (kg) 16,2 19,7 19,7 28,6 13,2 USV- Gehä Maß (mm) (W x H x D) 438X86.5x436 438X86.5x608 Maß (mm) (W x H x D) Gehä Nettogewicht (kg) 22,2 27,5 40,5...
  • Seite 87: Kommunikationsanschluss

    11. Kommunikationsanschluss 11.1 RS-232 und USB-Kommunikationsanschlüsse Um die Kommunikation zwischen der USV und einem Computer herzustellen, verbinden Sie einen Computer über ein geeignetes Kommunikationskabel mit einem Kommunikationsanschluss der USV. HINWEIS: Nur einer der Kommunikationsanschlüsse kann gleichzeitig aktiv sein. Der USB-Port hat Priorität über den RS-232 Port.
  • Seite 88: Usb-Anschluss

    11.3 USB-Anschluss Die USV kann mit einem USB-konformen Computer kommunizieren, indem eine HID-kompatible Energieverwaltungssoftware verwendet wird. Um eine Kommunikation zwischen der USV und einem Computer herzustellen, schließen Sie das USB-Kabel an, das mit der USV an den USB-Port auf der USV angeschlossen wird.
  • Seite 89 Der Relais-Ausgangskontakt darf nicht an Netzstromkreise Hinweis: angeschlossen werden. Es ist eine verstärkte Isolierung zum Netz erforderlich. Der Relais-Ausgangskontakt hat ein maximales Rating von 30Vac/1A und 60Vdc/2A Normalwerte. Die folgenden Abbildungen stellen das Schaltbild der potenzialfreien Eingangs-/Ausgangskontakte dar. Schaltbild zum potenzialfreien Ausgangskontakt Schaltbild zum potenzialfreien Eingangskontakt...
  • Seite 90 Die folgenden Abbildungen stellen das Schaltbild der potenzialfreien Eingangs-/Ausgangskontakte dar. Dry out Signal Beschreibung Summenalarm Aktiviert, wenn eine Warnung auftritt Auf Batterie Aktiviert, wenn die USV auf Batterie betrieben wird Niedriger Mit dem "bLOW"-Alarm aktiviert Batteriestand USV ok Aktiviert, wenn die USV keine Alarme und keinen Fehler aufweist Auf Bypass Aktiviert, wenn die USV auf Bypass-Ausgang hat...
  • Seite 91: Softwareinstallation

    12. Softwareinstallation WinPower ist die Überwachungssoftware der USV, mit benutzerfreundlicher Schnittstelle zur Überwachung und Steuerung Ihrer USV. Diese einzigartige Software bietet kompletten Leistungsschutz für Ihr Computer-System bei Stromausfall. Mit der Software können Benutzer jeden USV-Status auf dem gleichen LAN überwachen. Darüber hinaus kann eine USV Sicherheit für mehr als einen Computer auf dem gleichen LAN gleichzeitig liefern, zum Beispiel das sichere Herunterfahren des Systems, das Speichern von Anwendungsdaten und Abschalten der USV bei Stromausfall.
  • Seite 92: Anhang: Rückwand

    Stand zu sein Version der Überwachungssoftware. Anhang: Rückwand Die USV Rückenplatten beschreibungs tabelle und Bilder werden wie folgt dargestellt: Funktion(1000VA &1500VA&2000VA&3000VA) AC-Ausgang EPO / Potenzialfrei im Kommunikationsanschluss USB Schnittstelle AC-Eingang Potenzialfrei aus SNMP Steckplatz RS232 Überspannungsschutz Modem/Network...
  • Seite 93 DRY IN AC INPUT DRY OUT 3000VA Standard-Modell, Rückseite USE COPPER CONDUCTOR ONLY .FOR SUPPLY CONNECTIONS, USE WIRES SUITABLE FORAT LEAST 75℃. REFERTO THE INSTRUCTION MANUAL FOR TIGHTMENING TORQUE DRY IN DRY OUT 3000VA Supercharger-Modell, Rückseite Die Tabelle mit der Beschreibung der EBM Rückseite und Abbildungen werden wie unten dargestellt: Funktion(36V &48V &...
  • Seite 94 Onduleur en ligne PowerWalker VFI 1000RT LCD PowerWalker VFI 1500RT LCD PowerWalker VFI 2000RT LCD PowerWalker VFI 3000RT LCD Manuel...
  • Seite 95 TABLE DES MATIÈRES 1. CONSIGNES DE SECURITE ET CEM ........ 4 1.1 Installation ..................4 1.2 Utilisation ..................13 1.3 Maintenance, révision et pannes ............. 13 1.4 Transport ..................17 1.5 Stockage ................... 17 1.6 Normes ..................... 18 2. DESCRIPTION DES SYMBOLES D'USAGE COURANT . 19 3.
  • Seite 96 9. ENTRETIEN ............... 41 9.1 Utilisation ..................41 9.2 Stockage ................... 41 9.3 Remplacement de la batterie ............41 10. CARACTERISTIQUES TECHNIQUES ......42 10.1 Spécifications électriques ............... 42 10.2 Environnement d'utilisation ............42 10.3 Autonomie typique (valeur typiques à 25 °C en minutes) : ....43 10.4 Dimensions et poids .................
  • Seite 97: Consignes De Securite Et Cem

    1. Consignes de sécurité et CEM CONSERVEZ CES INSTRUCTIONS – Ce manuel contient des instructions importantes pour les modèles PowerWalker VFI 1000/1500/2000/3000RT LCD qui doivent être respectée durant l'installation et l'entretien de l'onduleur et des batteries. Veuillez lire attentivement le manuel utilisateur suivant et les consignes de sécurité...
  • Seite 98  L'onduleur contient des batteries de grande capacité. Il ne faut donc pas ouvrir le coffret, sachant que l'on risque sinon d'être exposé à des dangers tels qu'une électrocution. Si une révision ou un remplacement de la batterie sont nécessaires, veuillez contacter le distributeur ...
  • Seite 99: Inspection De L'appareil

     Assurez-vous de raccorder de manière fiable l'onduleur et le bloc batterie externe à la terre  N'obstruez pas les orifices de ventilation du boîtier de l'onduleur. Assurez-vous que les orifices de ventilation à l'avant et à l'arrière de l'onduleur ne sont pas obstrués. Laissez au moins 25 cm d'espace libre de chaque côté.
  • Seite 100: Installation De L'onduleur

    1.1.2 Déballage du module Pour déballer le système : 1. Ouvrez le carton extérieur et retirez les accessoires emballés avec le module. 2. Soulevez soigneusement le module hors du carton extérieur et placez-le sur une surface plane et stable. 3. Mettez au rebut ou recyclez l'emballage de manière responsable ou conservez-le pour une utilisation ultérieure.
  • Seite 101  Installation dans une baie La série peut être installée dans une baie de 19 pouces. L'onduleur et le boîtier de la batterie externe ont besoin de 2U d'espace. Utilisez la procédure suivante pour installer l'onduleur dans une baie. 1. Alignez les oreilles de montage avec les trous de vis sur le côté de l'onduleur et serrez les vis.
  • Seite 102 4. Retirez la façade et raccordez la borne de batterie (A) de l'onduleur à la borne de l'EBM (B) illustrée ci-dessous. Vous devez retirer la petite trappe (C) sur le côté de la façade pour permettre au fil de sortie de l'EBM de passer à...
  • Seite 103  Raccordement de l'EBM en mode baie 1. Utilisez la même méthode que pour le montage de l'onduleur dans une baie, puis assemblez l'EBM dans le support de la baie au-dessus ou au-dessous de l'onduleur. 2. Raccordez la ligne de terre provenant de l'onduleur (port A ) à l'EBM (port 3.
  • Seite 104  Connexion de plusieurs EBM Les onduleurs 1000VA/1500VA/2000VA et 3000VA incluent un port batterie externe qui vous permet de raccorder plusieurs EBM afin de fournir une autonomie supplémentaire. Suivez la procédure ci-dessous pour installer plusieurs EBM. Raccordement de plusieurs EBM en mode tour 1.
  • Seite 105 Raccordement de plusieurs EBM en mode baie 1. Raccordez la ligne de terre entre l'onduleur et le premier EBM, puis raccordez la ligne de terre entre le premier EBM et le deuxième EBM. 2. Retirez la façade et raccordez la borne de batterie (A) de l'onduleur à la borne de l'EBM (B) illustrée ci-dessous.
  • Seite 106: Utilisation

    1.2 Utilisation ★ Ne débranchez pas le câble secteur de l'onduleur ou de la prise de courant (prise de sûreté reliée à la terre) durant l'utilisation car cela déconnecterait la masse de l'onduleur et de toutes les charges connectées. ★ L'onduleur possède sa propre source de courant interne (batteries). Si vous touchez les prises de sortie de l'onduleur ou le bornier de sortie, vous risquez une électrocution même si l'onduleur n'est pas branché...
  • Seite 107 ★ Les batteries doivent être remplacées uniquement par du personnel qualifié. ★ Prudence - Risque d'électrocution. Le circuit de batterie n'est pas isolé de la tension d'entrée. Des tension dangereuses peuvent se former entre les bornes de la batterie et la masse. Vérifiez qu'aucune tension n'est présente avant la révision ! ★...
  • Seite 108 1.3.3 Fréquence de remplacement des batteries Lorsque le temps de décharge est inférieur à 50% du temps spécifié après une recharge complète, la batterie doit être remplacée. Veuillez contrôler la connexion de la batterie ou contacter votre revendeur local pour commander une nouvelle batterie.
  • Seite 109 3. Débranchez le câble de l'onduleur et du bloc batterie. 4. Retirez le support de batterie interne droit. 5. Sortez le bloc batterie et placez-le sur une surface plane. 6. Installez un nouveau bloc batterie dans l'onduleur. 7. Vissez le support de batterie et rebranchez les câbles de batterie A et B. 8.
  • Seite 110: Transport

    Pour tester les batteries : 1. Branchez l'onduleur au secteur pendant au moins 48 heures afin de charger les batteries. 2. Maintenez enfoncé le bouton « I » pendant 1 seconde pour lancer le test de batterie en mode ligne ou en mode HE. L'écran d'état affiche « TEST » 1.3.6 Recyclage de la batterie usée : Avertissement : ...
  • Seite 111: Normes

    1.6 Normes * Sécurité IEC/EN 62040-1 * EMI Perturbations conduites......:IEC/EN 62040-2 Catégorie C1 Perturbations rayonnées......:IEC/EN 62040-2 Catégorie C1 Courant harmonique.......:IEC/EN 61000-3-2 Fluctuation de tension et flicker....:IEC/EN 61000-3-3 * EMS ESD...........:IEC/EN 61000-4-2 Niveau 3 RS.............:IEC/EN 61000-4-3 Niveau 3 EFT............:IEC/EN 61000-4-4 Niveau 4 CRÊTE..........:IEC/EN 61000-4-5 Niveau 4 CS……………………………………...:IEC/EN 61000-4-6...
  • Seite 112: Description Des Symboles D'usage Courant

    2. Description des symboles d'usage courant Les symboles suivants peuvent être utilisés en partie ou dans leur intégralité dans ce manuel. Il est conseillé de vous familiariser avec ces derniers et de comprendre leur signification : Symbole Explication Symbole Explication Alerte à...
  • Seite 113: Introduction

    3. Introduction Cette série en ligne est un onduleur qui incorpore une technologie à double convertisseur. Il offre une protection idéale spécialement conçue pour les serveurs Novell, Windows NT et UNIX. Le principe de la double conversion élimine tous les parasites du secteur. Un redresseur convertit le courant alternatif de la prise de courant en courant continu.
  • Seite 114: Description Du Panneau

    4. Description du panneau LCD Screen Écran LCD ON Button/ OFF-Button Select-Button Enter-Button Bouton Bouton Bouton MARCHE/ Bouton désactiver l’alarme Alarm Silence ARRÊT Sélection Entrée Le panneau d'affichage Interrupteur Fonction Mettre en marche l'onduleur : L'onduleur est mis en marche en Bouton appuyant sur le bouton MARCHE «...
  • Seite 115: L'écran Lcd

    L'écran LCD Écran Fonction Écran Fonction Informations d'entrée Informations de sortie Indique les valeurs de Indique les valeurs de tension/fréquence d'entrée, tension/fréquence de sortie, affichées en alternance. affichées en alternance. Indique que l'entrée est connectée au secteur et que Indique la prise de sortie. l'alimentation d'entrée est fournie par le secteur.
  • Seite 116: Connexion Et Utilisation

    5. Connexion et utilisation Le système peut être installé et câblé uniquement par des électriciens qualifiés conformément aux réglementations de sécurité applicables ! Lors de l'installation du câblage électrique, veuillez noter l'ampérage nominale de l'alimentation en entrée. 5.1 Inspection Inspectez les dégâts sur le carton d'emballage et son contenu. Veuillez informer immédiatement le transporteur si vous constatez des signes de dégâts.
  • Seite 117 (2) Connexion de sortie de l'onduleur La sortie de l'onduleur est composé de prise de type IEC. Branchez simplement le câble d'alimentation de la charge aux prises de sortie pour terminer la connexion. Utilisez un câble tous les 5 A de charge. Nº...
  • Seite 118: Recharge De La Batterie

     NC Le connecteur EPO est normalement fermé avec un fil sur le panneau arrière. Lorsque le connecteur est ouvert, l'onduleur interrompt la sortir jusqu'à ce que l'état de l'EPO ait été désactivé. Activer l'état de l'EPO Désactiver l'état de l'EPO 5.3 Recharge de la batterie Chargez complètement les batteries de l'onduleur en laissant l'onduleur branché...
  • Seite 119: Fonction De Test

    5.5 Fonction de test (1) Détection en temps réel L'onduleur peut détecter en temps réel la connexion ou la déconnexion d'une batterie. Si l'état de connexion de la batterie a changé, en mode flottant l'onduleur détecte la modification dans les 30 secondes ; en mode repos l'onduleur détecte la modification dans les 3 minutes ;...
  • Seite 120: Procédure D'utilisation De La Batterie Externe Pour Le Modèle À Autonomie Prolongée (Modèle « S »)

    5.8 Procédure d'utilisation de la batterie externe pour le modèle à autonomie prolongée (modèle « S ») (1) Utilisez le bloc batterie avec une tension de : 36 VCC pour le modèle 1KS ( batteries de 12 V), 48 VCC pour le modèle 1.5KS/2KS ( batteries de 12 V), 72 VCC pour le modèle 3KS ( batteries de 12 V).
  • Seite 121 Attention : Un disjoncteur CC doit être raccordé entre l'onduleur et la batterie externe. Attention : Les prises de sortie de l'onduleur peuvent être encore alimentées, même si l'alimentation a été débranchée ou si l'interrupteur de dérivation est en position « OFF ».
  • Seite 122: Mode De Fonctionnement Pour Tous Les Modeles

    6. Mode de fonctionnement pour tous les modèles Les différentes inscriptions affichée sur l'écran LCD correspondent aux modes de fonctionnement et sont illustrées dans le tableau suivant. Une seule inscription de fonctionnement normal ou de panne est affichée. Toutefois, un ou plusieurs avertissements peuvent apparaître dans un certain mode de fonctionnement.
  • Seite 123: Mode Ligne

    6.1 Mode Ligne L'écran LCD en mode Ligne affiche le diagramme suivant. Les informations sur l'alimentation secteur, le niveau de batterie, la sortie de l'onduleur et le niveau de charge peuvent être affichés. L'inscription « LINE » indique que l'onduleur fonctionne en mode Ligne. ■...
  • Seite 124: Mode Batterie

    6.2 Mode Batterie L'écran LCD en mode Batterie affiche le diagramme suivant. Les informations sur l'alimentation secteur, le niveau de batterie, la sortie de l'onduleur et le niveau de charge peuvent être affichés. L'inscription « bATT » indique que l'onduleur fonctionne en mode Batterie. Lorsque l'onduleur est en mode batterie, le buzzer sonne une fois toutes les 4 secondes.
  • Seite 125: Mode Aucune Sortie

    6.4 Mode Aucune sortie L'écran LCD en mode Aucune sortie affiche le diagramme suivant. Les informations sur l'alimentation secteur, le niveau de batterie, la sortie de l'onduleur et le niveau de charge peuvent être affichés. L'inscription « STbY » indique que l'onduleur fonctionne en mode Aucune sortie. ■...
  • Seite 126: Mode Convertisseur

    6.7 Mode Convertisseur En mode Convertisseur, l'écran LCD affiche l'inscription de mode « CVCF ». L'onduleur fonctionne librement avec une fréquence de sortie fixe (50 Hz ou 60 Hz) en mode convertisseur. Lorsque l'alimentation secteur est perdue ou anormale, l'onduleur passe en mode batterie et la charge est alimentée en continue par la batterie.
  • Seite 127: Parametrage Avec Le Module Lcd

    7. Paramétrage avec le module LCD L'appui sur ce bouton permet de sélectionner la tension de sortie, la fréquence, l'état de dérivation et le mode de fonctionnement en mode Aucune sortie ou Dérivation, les Deux segments de charge en mode sortie. Le nombre d'EBM peut être paramétré...
  • Seite 128 L'inscription de la fréquence de sortie « OPF », l'inscription de l'état de dérivation « bYPA », l'inscription du mode de fonctionnement « MOdE », l'inscription de l'EBM « EbM », l'inscription du segment de charge « LS1 » et «...
  • Seite 129 ■ Voici un exemple de changement du mode de fonctionnement pour passer du mode normal au mode convertisseur à partir de l'écran LCD. Étape 1 : Appuyez sur le bouton « Entrée » pour afficher « OPV » ; Étape 2 : Appuyez sur le bouton « Sélection » pour afficher « OPF ». Étape 3 : Appuyez sur le bouton «...
  • Seite 130: Depannage

    8. Dépannage Si l'onduleur ne fonctionne pas correctement, vérifiez l'état de fonctionnement sur l'écran LCD. Avertissement Inscription Panne Inscription Panne du site SITE Court-circuit de SHOR l'inverseur Panne du ventilateur FANF Surcharge OVLD Surtension de la batterie HIGH Échec de ISFT (surcharge) démarrage...
  • Seite 131 Si l'onduleur ne fonctionne pas correctement, essayez de résoudre le problème à l'aide du tableau ci-dessous. Problème Cause possible Solution Aucune indication, aucun son Aucune tension Vérifiez la sortie de la prise de d'avertissement même si le système d'entrée courant et le câble d'entrée. est connecté...
  • Seite 132 Batterie en circuit ouvert Le bloc batterie Vérifiez que le bloc batterie est n'est pas raccordé connecté à l'onduleur. correctement Vérifiez que le disjoncteur de batterie est activé. Défaut de batterie Il peut être Avertissez le revendeur nécessaire de remplacer la batterie Surcharge Surcharge...
  • Seite 133 Veuillez préparer les informations suivantes avant d'appeler le service après-vente : 1. Numéro de modèle, numéro de série 2. Date à laquelle le problème s'est produit 3. État de l'écran LCD, état du buzzer d'alarme 4. Condition de l'alimentation secteur, type et capacité de charge, température ambiante, condition de ventilation 5.
  • Seite 134: Entretien

    9. Entretien 9.1 Utilisation L'onduleur ne contient aucune pièce pouvant être réparée par l'utilisateur. Si la durée de vie de la batterie (de 3 à 5 ans à une température ambiante de 25 °C) a été dépassée, les batteries doivent être remplacées. Dans ce cas, veuillez contacter votre revendeur.
  • Seite 135: Caracteristiques Techniques

    10. Caractéristiques techniques 10.1 Spécifications électriques ENTRÉE Nº de modèle 1K(S) 1.5K(S) 2K(S) 3K(S) Phase Fréquence (45~55)/(54~66) Hz Courant Max (A) 10,5 13,5 SORTIE Nº de modèle 1K(S) 1.5K(S) 2K(S) 3K(S) Puissance 1,5 kVA/1,35 1 kVA/0,9 kW 2 kVA/1,8 kW 3 kVA/2,7 kW nominale 208/220/230/240×(1 士...
  • Seite 136: Autonomie Typique (Valeur Typiques À 25 °C En Minutes)

    10.3 Autonomie typique (valeur typiques à 25 °C en minutes) : Nº de modèle 100 % de charge 50 % de charge 1.5K 10.4 Dimensions et poids Modèle 1000 1000S 1500 1500S 2000 2000S 3000 3000S Poids net (kg) 16,2 19,7 19,7 28,6...
  • Seite 137: Port De Communication

    11. Port de communication 11.1 Ports de communication RS-232 et USB Pour établir la communication entre l'onduleur et un ordinateur, raccordez un ordinateur à l'un des ports de communication de l'onduleur avec un câble de communication approprié. REMARQUE : Un seul port de communication peut être actif à la fois. Le port USB est prioritaire sur le port RS-232.
  • Seite 138: Port Usb

    11.3 Port USB L'onduleur peut communiquer avec un ordinateur compatible en utilisant un logiciel compatible HID. Pour établir la communication entre l'onduleur et un ordinateur, connectez le câble USB fourni avec l'onduleur au port USB de l'onduleur. Connectez l'autre extrémité du câble USB au port USB d'un ordinateur.
  • Seite 139 Le contact de la sortie relais ne doit pas être raccordé à des Remarque : circuits raccordés à l'alimentation. Une isolation renforcée pour le secteur est nécessaire. Le contact de sortie relais possède des valeurs nominales maximales de 30 Vca/1 A et normales de 60 Vcc/2 A. Les figures suivantes montrent le schéma des contacts sec de sortie/entrée.
  • Seite 140 Le tableau suivant montre les options pour les contacts sec de sortie/entrée Signal de sortie Description à contact sec Résumé alarme Activé uniquement lorsqu'un avertissement se produit Batterie active Activé uniquement lorsque l'onduleur fonctionne sur batterie Batterie faible Activé avec l'alarme « bLOW » Onduleur OK Activé...
  • Seite 141: Installation Du Logiciel

     Vous pouvez planifier l'arrêt/le démarrage de l'onduleur et surveiller son l'état à l'aide du PC.  Pour les instructions détaillées reportez-vous au manuel électronique dans le logiciel. Consultez régulièrement le site www.powerwalker.com/winpower.html pour obtenir la dernière version du logiciel de surveillance.
  • Seite 142: Annexe : Panneau Arriere

    Annexe : Panneau arrière Le tableau et les illustrations de description du panneau arrière de l'onduleur sont fournis ci-dessous : Nº Fonction (1000 VA, 1500 VA, 2000 VA et 3000 VA) Sortie CA EPO/port d'entrée de communication à contact sec USB Port Entrée CA Sortie à...
  • Seite 143 DRY IN AC INPUT DRY OUT Panneau arrière pour modèle 3000 VA standard USE COPPER CONDUCTOR ONLY .FOR SUPPLY CONNECTIONS, USE WIRES SUITABLE FORAT LEAST 75℃. REFERTO THE INSTRUCTION MANUAL FOR TIGHTMENING TORQUE DRY IN DRY OUT Panneau arrière pour modèle 3000 VA à autonomie prolongée...
  • Seite 144 Le tableau et l'illustration de description du panneau arrière de l'ECM sont fournis ci-dessous : Nº Fonction (EBM 36 V, 48 V et 72 V) Port de ligne de terre Panneau arrière EBM 36 V, 48 V et 72 V...
  • Seite 145 ИБП Он-Лайн (Непрерывного действия) PowerWalker VFI 1000RT LCD PowerWalker VFI 1500RT LCD PowerWalker VFI 2000RT LCD PowerWalker VFI 3000RT LCD Краткое руководство пользователя...
  • Seite 146 ОГЛАВЛЕНИЕ ИНСТРУКЦИИ ПО БЕЗОПАСНОСТИ И ЭЛЕКТРОМАГНИТНОЙ СОВМЕСТИМОСТИ ....... 1 1.1 Инсталляция ..................1 1.2 Операции ................... 9 1.3 Техническое обслуживание и неисправности ......10 1.4 Транспортировка ................14 1.5 Хранение ..................14 1.6 Стандарты ..................14 2. ОПИСАНИЕ ОБЩЕПРИНЯТЫХ СИМВОЛОВ ....14 3.
  • Seite 147 9. ТЕХНИЧЕСКОЕ ОБСЛУЖИВАНИЕ ........ 32 9.1 Рабочий режим ................32 9.2 Хранение ..................32 9.3 Замена батарей ................32 10. ТЕХНИЧЕСКАЯ ИНФОРМАЦИЯ ........33 10.1 Электрические характеристики ........... 33 10.2 Рабочее окружение ..............33 10.3 Типичное время работы от батарей (при 25°C в минутах): ..34 10.4 Размеры...
  • Seite 149: Инструкции По Безопасности Иэлектромагнитной Совместимости

    Инструкции по безопасности и электромагнитной совместимости Сохраняйте эту инструкцию – Данное руководство содержит важные инструкции для моделей PowerWalker VFI 1000/1500/2000/3000RT LCD, которые должны соблюдаться в процессе установки ИБП и подключения батарей к ИБП. Пожалуйста, внимательно прочитайте это руководство пользователя и инструкции по безопасности перед инсталляцией...
  • Seite 150 возгорание, поэтому никакие сосуды с жидкостью (напр. стакан воды) не должны размещаться сверху ИБП во избежание удара током.  Не бросайте батареи в огонь – они могут взорваться.  Не открывайте и не ломайте батареи. Вытекший электролит вреден для кожи и глаз, он может быть токсичен. ...
  • Seite 151 короткого замыкания должна быть предусмотрена в электропроводке здания. См. руководство по отключению устройства в главе 5.2  Не храните и не используйте устройство в таких условиях: На площадке с горючим газом, коррозийными веществами, повышенной запыленностью, стоячей или проточной водой. На площадке с чрезвычайно высокой или низкой температурой (выше...
  • Seite 152  Напольная установка Эта серия ИБП может быть установлена горизонтально и вертикально. Для напольной конфигурации есть дополнительные подставки для стабилизации ИБП в вертикальном положении. Подставки крепятся в нижней части ИБП согласно следующей процедуре. 1. Поставьте вертикально вниз ИБП и расположите внизу две подставки. 2.
  • Seite 153  Установка в шкаф Эта серия ИБП может быть установлена в 19-дюймовый шкаф. И ИБП и внешний батарейный блок занимают 2U пространства аппаратной стойки. Установка в шкаф производится в соответствии со следующей процедурой. 1. Совместите монтажные кронштейны с отверстиями для винтов на боковых частях...
  • Seite 154 открыть небольшую дверцу (C) на стороне передней панели, чтобы выходной провод ЕВМ прошел через это отверстие, а после этого восстановить на место переднюю панель.
  • Seite 155  Подключение EBM при установке в шкаф 1. Используйте тот же метод, что и установка ИБП в шкаф, расположите EBM в шкафу сверху или снизу ИБП. 2. Подсоедините линию заземления от ИБП (порт A) к EBM (порт B) 3. Вытащите блок ЖКД, и открутите внутренние винты. 4.
  • Seite 156 который позволяет подсоединить несколько EBM для обеспечения дополнительного времени автономной работы. Следуйте процедуре подключения нескольких EBM, указанной ниже. Подсоединение нескольких EBM при напольной установке 1. Соедините линию заземления между ИБП и первым EBM, далее соедините линию заземления между первым и вторым EBM. 2.
  • Seite 157: Операции

    Примечание: Три и более EBM подсоединяются к ИБП по тому же принципу, как описано выше. Примечание: После подсоединения EBM, не забудьте установить число подсоединенных модулей EBM на ЖКД, как описано в главе 7 “Установка модуля ЖКД”. Если используются не стандартные EBM, обратитесь к локальному...
  • Seite 158: Техническое Обслуживание И Неисправности

    ★ Убедитесь, что ни жидкости, ни другие посторонние вещества не попадут в ИБП. ★ Не открывайте устройства. Система должна обслуживаться только квалифицированным персоналом. ★ Снимайте защитную панель только после отсоединения всех терминальных подключений. ★ Используйте калибр провода №12 (для входной проводки модели 3KS), 90C медный...
  • Seite 159: Предупреждения

    ★ Не пытайтесь избавиться от батарей путем сжигания. Может последовать взрыв. ★ Не открывайте и не ломайте батареи. Вытекающий электролит может быть токсичен и вреден для кожи и глаз. ★ Пожалуйста, используйте для замены предохранитель того же типа и силы тока во избежание опасных последствий. ★...
  • Seite 160 При замене батарей меняйте их на тот же тип и количество  батарейных комплектов. Свяжитесь с сервисным представителем для заказа новых батарей. Не пытайтесь сжечь батареи. В пламени они могут взорваться.  Требуется надлежащая утилизация батарей. Обратитесь к местным  правилам...
  • Seite 161 1.3.5 Тестирование новых батарей Перед тестированием батарей проверьте: Батареи должны быть полностью заряжены.  ИБП должен находиться в нормальном режиме без  активированных аварийных сигналов. Не подключайте включенную или выключенную нагрузку.  Для проведения теста: 1. Включите ИБП в сеть питания и заряжайте батареи не менее 48 часов. 2.
  • Seite 162: Транспортировка

    1.4 Транспортировка ★ Просьба транспортировать ИБП только в оригинальной упаковке для защиты от встрясок и ударов. 1.5 Хранение ★ ИБП должны храниться в сухой вентилируемой комнате(помещении). 1.6 Стандарты * Безопасность IEC/EN 62040-1-1 * EMI – Электромагнитные помехи Кондуктивное излучение......IEC/EN 62040-2 Категория...
  • Seite 163: Введение

    Обратите особое Защитное внимание заземление Предупреждение о Сигнализация высоком напряжении отключена Включите ИБП ИБП перегружен Выключите ИБП Батарея ИБП выключен или в Утилизация холостом режиме Источник переменного Не выбрасывайте в тока простой мусор Источник постоянного тока 3. Введение Данная Он-лайн серия принадлежит к источникам бесперебойного питания...
  • Seite 164: Описание Панели

    работы “S” Модель – с Увеличенным временем автономной работы 4. Описание панели LCD Screen ON Button/ OFF-Button Select-Button Enter-Button Alarm Silence Панель дисплея Переключате Функция ль Включите ИБП нажатием кнопки ON- “I”. кнопка ON Деактивация звукового сигнала: Нажатием этой кнопки звуковой...
  • Seite 165 Деактивация звукового сигнала: нажатием этой кнопки звуковой сигнал может быть деактивирован в режиме Байпас. Выводит ИБП из режима сбоя и из статуса EPO. кнопка Select Выходное напряжение, частота, отключить/включить байпас, и режим работы в Нет выходного питания или Байпас-режим, Два Сегмента нагрузки в выходном режиме, число EBM во кнопка...
  • Seite 166: Подключение И Работа

    Показывает емкость Показывает уровень батареи. Каждое нагрузки. Каждое деление означает 20% деление означает 20% емкости. нагрузки. режим/сбой/предупреждение Больше информация Означает Рабочий ИБП находится в режиме режим или отказ типа настроек. Перегрева, несколько одновременных предупреждений о ИБП находится в режиме Отказа или...
  • Seite 167 Если питание к ИБП поступает по шнуру питания, просьба использовать розетку с соответствующей защитой против электрического тока, пользователь может использовать таблицу ниже. Если ИБП подсоединен по жесткому подключению, рекомендуется выбирать провод 2.5мм , и терминал “GND” сначала должен быть заземлен. Система...
  • Seite 168 d) Оденьте защитную крышку обратно на заднюю панель Connection diagram Предупреждение: Не подсоединяйте оборудование, которое может привести к перегрузке ИБП (например, лазерный принтер) (3) Конфигурирование Аварийного Мгновенного Отключения (ЕРО): Пользователь может выбирать полярность EPO, EPO в Нормальном режиме закрыт настройками по умолчанию. ...
  • Seite 169: Зарядка Батарей

    5.3 Зарядка батарей Зарядите полностью батареи системы ИБП, оставив ИБП подключенным к сети питания в течение 12 часов. Вы можете использовать систему ИБП сразу без предварительной зарядки, но тогда время автономной работы может быть короче, чем величина, заявленная в спецификации. 5.4 Включение...
  • Seite 170: Выключение Ибп

    5.6 Выключение ИБП (1) Режим Инвертора: Нажмите кнопку “ ”на протяжении более 1 секунды для выключения ИБП, ИБП перейдет в режим отсутствия питания на выходе или в режим байпаса. При этом ИБП будет предоставлять выходное питание, если байпас активирован. Для абсолютного отсутствия питания на выходе отсоедините...
  • Seite 171: Режимы Работы Для Всех Моделей

    (4)Убедитесь, что сеть питания отрезана, если есть батарейный предохранитель, сначала выверните его. переднюю панель, подсоедините батарею через (5)Снимите Anderson PP45 коннекторы. Подготовьте батарейный кабель, который может выдерживать силу тока >50A для всех моделей, площадь сечения провода должна быть более чем 4 мм для...
  • Seite 172: Режим Работы От Сети Питания

    Нормальный рабочий Код режим Нет питания на выходе STbY Обходной режим bYPA Режим от сети питания LINE Батарейный режим bATT Режим тестирования TEST батарей Режим энергосбережения Режим конвертера CVCF 6.1 Режим работы от сети питания Состояние ЖК дисплея в режиме работы от сети указано на диаграмме ниже.
  • Seite 173: Режим Работы От Батарей

    подключать к ИБП одна за одной. ● Мощность генератора переменного тока должна быть не меньше, чем удвоенная мощность ИБП. 6.2 Режим работы от батарей Состояние ЖК дисплея в режиме работы от батарей указано на диаграмме ниже. Информация о: состоянии подачи питания к ИБП, уровне...
  • Seite 174: Режим Без Выходного Питания

    режиме байпас. Питание к нагрузке поступает из сети питания через внутренний фильтр. 6.4 Режим БЕЗ выходного питания Состояние ЖК дисплея в режиме работы без выходного питания указано на диаграмме ниже Информация о: состоянии подачи питания к ИБП, уровне батарей, выходном питании от ИБП и уровне нагрузки будет “STbY”...
  • Seite 175: Режим Конвертора

    менее чем 10мс, что все же слишком много для некоторого оборудования с повышенной чувствительностью. 6.7 Режим конвертора На ЖК дисплее появляется строка “CVCF”. ИБП будет работать с фиксированной выходящей частотой (50-60Гц) в режиме конвертора. Как только питание в сети пропадает или не соответствует...
  • Seite 176 отключенным. Рабочий режим ИБП может выбираться между: от сети питания, ECO режим и режим конвертора. Число EBM может быть задано от 0 до 9. Два сегмента нагрузки могут быть запрограммированы на включение или выключение. В режимах байпас или без выходного питания нажимом и удерживанием более...
  • Seite 177 режим ИБП может быть выбран как “UPS”, “ECO”, “CVF”(“UPS” означает нормальный режим инвертора, “ECO” означает режим высокой эффективности, и “CVF” означает режим конвертора). Изменение режима будет активно только после включения ИБП. Число EBM может быть выбрано от “000” до “009”(“000” означает: нет подсоединенных EBM).
  • Seite 178: Поиск И Устранение Неисправностей

    8. Поиск и устранение неисправностей Если система ИБП не работает корректно, проверьте рабочий статус на ЖК дисплее. Предупреждение Строка Ошибка Строка Сбой сайта Инвертор закорочен SITE SHOR Сбой вентилятора Перегрузка FANF OVLD Перенапряжение на батарее Ошибка плавного HIGH ISFT запуска инвертора (перегружена) Низкий...
  • Seite 179 Период поддержки Батареи не заряжены Зарядите батареи как минимум нагрузки меньше полностью / дефект 5 - 8 часов и затем проверьте их заявленного значения батарей емкость. Если проблема остается, обратитесь к дилеру. Сбой вентиляции Вентилятор сломан Проверьте работу вентилятора Слишком высокое Перезарядка...
  • Seite 180: Техническое Обслуживание

    инвертора Проверьте: закорочен ли выход ИБП или сами нагрузки. Перед включением убедитесь в устранении короткого замыкания, и что у ИБП нет внутренних сбоев. Шина закорочена Внутренний сбой в ИБП Обратитесь к дилеру Пожалуйста, перед звонком в Послепродажную Службу Поддержки сделайте легкодоступной...
  • Seite 181: Техническая Информация

    выключатель – выключите его в первую очередь. Осторожно отсоедините батарейный кабель и убедитесь, что в зоне доступа нет оголенных проводов. Подсоедините новые батареи к ИБП, как указано в разделе 5.8. Затем включите батарейный выключатель и нажмите кнопку ON, чтобы ИБП произвел...
  • Seite 182: Типичное Время Работы От Батарей (При 25°C В Минутах)

    Температура хранения От 0°C до 45°C 10.3 Типичное время работы от батарей (при 25°C в минутах): 100 % загрузка 50 % загрузка Номер модели 1.5K 10.4 Размеры и вес Модель 1000 1000S 1500 1500S 2000 2000S 3000 3000S Нетто вес (кг) 16.2 19.7 19.7...
  • Seite 183: Rs-232 Порт

    11.2 RS-232 порт Порт RS-232 доступен для мониторинга ИБП, контроля, и для обновления прошивок. Для установления коммуникации между ИБП и компьютером подсоедините один конец коммуникационного кабеля (который идет в комплекте поставки с ИБП) к порту RS-232 ИБП. Подсоедините другой конец последовательного кабеля к порту RS-232 компьютера.
  • Seite 184: Порт Сухого Магнитоуправляемого Контакта

    можно подсоединять датчик мониторинга окружающей среды к ИБП. Примечание: Вам не нужно выключать ИБП перед инсталляцией коммуникационной карты Для установки SNMP карты выполните следующие действия: 1. Найдите коммуникационный слот. 2. Выкрутите 2 винта, закрепляющих крышку коммуникационного слота ИБП и не теряйте их. 3.
  • Seite 185 Сухой магнитоуправляемый выход Сухой магнитоуправляемый вход В таблице указаны возможные состояния сигналов на входе и выходе Выходной сигнал Описание Общая тревога Включается при появлении любого предостережения Работа от батареи Включается при работе от батарей Батареи разряжены Включается при “bLOW” тревоге ИБП...
  • Seite 186: Установка Программного Обеспечения

    12. Установка программного обеспечения WinPower – это ПО для ИБП, доступное пользователю из-за интуитивно понятного интерфейса для мониторинга и контроля за вашим ИБП. Это уникальное ПО предоставляет полную защиту питания для компьютерной системы при неполадках питания в сети. С помощью программного...
  • Seite 187: Приложение: Задняя Панель

    через ПК.  Детальные инструкции просьба искать в электронном руководстве ПО. Проверяйте на www.powerwalker.com/winpower.html время от времени для установок последней версии ПО мониторинга. Приложение: задняя панель Таблица и схемы ниже описывают заднюю панель ИБП: №. Функционал(1000VA &1500VA&2000VA&3000VA) Выходной разъем переменного тока...
  • Seite 188 2000ВA Super charger модели DRY IN AC INPUT DRY OUT 3000ВA Стандартная USE COPPER CONDUCTOR ONLY .FOR SUPPLY CONNECTIONS, USE WIRES SUITABLE FORAT LEAST 75℃. REFERTO THE INSTRUCTION MANUAL FOR TIGHTMENING TORQUE DRY IN DRY OUT 3000ВА Supper charger модель Задняя...
  • Seite 189 36В &48В&72В задняя панель EBM...
  • Seite 190 On-Line UPS PowerWalker VFI 1000RT LCD PowerWalker VFI 1500RT LCD PowerWalker VFI 2000RT LCD PowerWalker VFI 3000RT LCD Instrukcja...
  • Seite 191 KONTENT INSTRUKCJA OBSŁUGI ...... Fehler! Textmarke nicht definiert. 1. Bezpieczeństwo i instrukcje EMC ............ 1 1.1 Instalacja .................... 1 1.2 Operacje ..................... 9 1.3 Konserwacja, serwis i błędy ............. 10 1.4 Transport ..................13 1.5 Przechowywanie ................14 1.6 Standardy ..................14 2.
  • Seite 192 9.1 Operacje ................... 32 9.2 Przechowywanie ................32 9.3 Wymiana baterii ................32 10. Dane techniczne ................33 10.1 Parametry elektryczne ..............33 10.2 Środowisko działania ..............33 10.3 Typowy czas podtrzymania (Typowe wartości przy 25°C w min.:) ..34 10.4 Wymiary i waga ................
  • Seite 194: Bezpieczeństwo I Instrukcje Emc

    1. Bezpieczeństwo i instrukcje EMC ZACHOWAJ TĄ INSTRUKCJĘ – Ta instrukcja zawiera ważne kroki postępowania dla modeli PowerWalker VFI 1000/1500/2000/3000RT LCD, które powinny być przestrzegane podczas instalacji i konserwacji UPS i baterii. Please read carefully the following user manual and the safety instructions before installing the unit or using the unit! 1.1 Instalacja...
  • Seite 195 prosimy o kontakt z dytrybutorem. • Wewnętrzne zwarcie UPS może doprowadzić do zagrożenia takiego jak porażenie prądem lub pożar. Pojemniki z wodą (jak butle) nie powinny być umieszczonej górnej części zasilacza, uniknąć takich niebezpieczeństw jak porażenie prądem. • Nie wrzucaj baterii do ognia. Mogą one wybuchnąć. •...
  • Seite 196 że otwory wentylacyjne z przodu i z tyłu urządzenia nie są zablokowane. Pozostaw co najmniej 25cm wolnej przestrzeni z każdej strony. • Jeśli z urządzenia wydobywa się dym, jak najszybciej odłącz zasilanie i skontaktuj się z dystrybutorem. • Odpowiednie urządzenie odłączające zasilanie jak bezpiecznik przed zwarciem powinno być...
  • Seite 197 zachowaj je do wykorzystania w przyszłości. 1.1.3 Ustawienie UPS Wszystkie modele z serii przeznaczone są do użytku w wieżach (tower) i rack'ach. Mogą być instalowane w szafach rackowych 19". Należy postępować zgodnie z instrukcją instalacji i konfiguracji wieży (tower) do montażu w szafach.
  • Seite 198  Montowanie rackowe Ta seria może być umieszczona w rackach 19”. Zarówno UPS oraz zewnętrzna bateria wymagają 2U przestrzeni rackowej. Zastosuj się do poniższej procedury, aby umocować UPS w rackach. 1. Dostosuj uchwyty montażowe z otworami na wkręty na stronie UPS oraz dokręć...
  • Seite 199 EBM (B) jak przedstawiono poniżej. Użytkownicy muszą zdjąć małą bramkę (C) po stronie przedniego panelu, aby umożliwić przewodowi wylotowemu EBM przejść przez bramkę a następnie zamontuj przedni panel.
  • Seite 200  Podłączanie EBM w formie rackowej 1. Postępując w ten sam sposób, jak montaż UPS w rackowej formie, zamontuj EMB w szynach montażu rackowego szafy na górze lub dole UPS. 2. Podłącz linię uziemienia od UPS (port A) do EBM (port B) 3.
  • Seite 201  Podłączanie wiele EBM-ów 1000VA/1500VA/2000VA i 3000VA UPS zawierają port zewnętrznych baterii, który pozwala użytkownikom na łączenie wielu EBM w celu zapewnienia dodatkowego czasu podtrzymania. Postępuj zgodnie z procedurą, aby zainstalować wiele EBM-ów jak poniżej. Podłączanie wiele EBM-ów w formie wieży (tower) 1.
  • Seite 202: Operacje

    aby umożliwić przewodowi wylotowemu EBM przejść przez bramkę a następnie zamontować przedni panel. Info: Trzy lub więcej EBM-ów może być podłączone do UPS w taki sam sposób jak przedstawiono powyżej. Info: Po podłączeniu EMB-ów, nie zapomnij, aby ustawić liczbę EMB-ów na LCD.
  • Seite 203: Konserwacja, Serwis I Błędy

    wykwalifikowany personel. ★ Zdejmuj panel ochronny tylko po odłączeniu połączeń terminali. ★ Wykorzystuj nr. 12 AWG (dla 3KS kabli wejściowych), 90°C kabla miedzianego i 4.4 lb-in momentu siły (w znaczeniu podłączania przewodów, tak aby nie spowodować dodatkowych usterek na kablu lub innych jego elementów) podłączając blok terminala.
  • Seite 204 ★ Wymieniaj bezpiecznik tylko tego samego typu i amperażu w celu uniknięcia ryzyka pożaru. ★ Nie należy demontować UPS z wyłączeniem wykwalifikowanego personelu serwisowego. 1.3.1 UPS i eksploatacja baterii Dla najlepszej konserwacji prewencyjnej, utrzymuj czysty teren i wolny od kurzu wokół UPS. Jeśli otoczenie jest bardzo zakurzone, oczyść je za pomocą...
  • Seite 205 W czasie wymiany baterii, wymień je na ten sam rodzaj i ilość baterii lub  zestawu baterii. Skontaktuj się z przedstawicielem serwisu, aby zamówić nowe baterie. Nie wrzucaj baterii do ognia. Mogą one wybuchnąć pod wpływem ognia.  Wymagana jest właściwa utylizacja baterii. Zapoznaj się z lokalnymi ...
  • Seite 206: Recykling Zużytej Baterii

    1.3.5 Testowanie nowych baterii Dla testu baterii, proszę sprawdzić: Baterie muszą być w pełni naładowane.  UPS musi pracować w trybie normalnym bez żadnych alarmów.  Nie podłączaj/odłączaj obciążeń.  Aby przetestować baterie: 1. Podłącz zasilacz do sieci elektrycznej przez co najmniej 48 godziny, aby naładować...
  • Seite 207: Przechowywanie

    1.5 Przechowywanie ★ UPS musi być składowany w pomieszczeniu wentylowanym i suchym. 1.6 Standardy * Bezpieczeństwo IEC/EN 62040-1-1 * EMI Emisja przewodzenia........:IEC/EN 62040-2 Kategoria C1 Emisja promieniowania......:IEC/EN 62040-2 Kategoria C1 Natężenie harmoniczne......:IEC/EN 61000-3-2 Wahanie i migotanie napięcia....:IEC/EN 61000-3-3 *EMS ESD...........:IEC/EN 61000-4-2 Poziom 3 RS.............:IEC/EN 61000-4-3 Poziom 3...
  • Seite 208: Opis Najczęściej Używanych Symboli

    2. Opis najczęściej używanych symboli Niektóre lub wszystkie z następujących symbole mogą być użyte w niniejszej instrukcji. Wskazane jest, aby zapoznać się z nimi i zrozumieć ich znaczenie: Symbole i znaczenie Symbol Znaczenie Symbol Znaczenie Ostrzeżenie, Uziemienie ochronne szczególna uwaga Wysokie napięcie Wyciszony alarm Przeciążenie...
  • Seite 209: Opis Panelu

    Nr. modelu Nr. modelu Z przedłużonym 1.5K 1.5KS Standardowy czasem podtrzymania Model “S”: Z przedłużonym czasem podtrzymania 4. Opis panelu LCD Screen ON Button/ OFF-Button Select-Button Enter-Button Alarm Silence Panel wyświetlacza Przełącznik Funkcja Włącz system UPS: Naciskając przycisk ON “I” UPS zostanie Przycisk ON włączony.
  • Seite 210: Wyświetlacz Lcd

    zasilanie sieci jest dostępne. Wyłączanie alarmu: Naciskając ten przycisk alarm dźwiękowy może zostać wyłączony w trybie bypass. (Zmień tryb UPS z trybu błędu lub statusu EPO.) Napięcie wyjściowe, Bypass włączony/wyłączony, tryb pracy bez Przycisk podawania mocy na wyjściu lub tryb Bypass, 2 obciążenia wyboru segmentowe / w segmencie w trybie wyjściowym, ilość...
  • Seite 211: Połączenie Oraz Praca

    Informacja o obciążeniu Informacja baterii Wskazuje pojemność Wskazuje poziom baterii. Każdy przedział obciążenia. Każdy przedział reprezentuje reprezentuje pojemności. 20% obciążenia. Tryb/Błąd/Informacja o ostrzeżeniu Inne Wskazuje, że UPS jest Wskazuje tryb pracy, w trybie ustawień. błąd lub ostrzeżenie. Kilka ostrzeżeń może Wskazuje, że UPS jest być...
  • Seite 212 Użytkownik może odnieść się do poniższej tabeli. Jeśli UPS jest podłączony za pomocą przewodów, zaleca się wybór przewodu 2.5mm , a uziemienie “GND” uziemić jako pierwszy. System UPS nie posiada bezpiecznika wejściowego w standardowej szafie. Podczas instalacji, użytkownik musi podłączyć zewnętrzne wyłączniki oraz komponenty zabezpieczające w wejściowych terminalach.
  • Seite 213: Ładowanie Baterii

    Uwaga: Nie należy podłączać urządzenia, które przeciążą system UPS (np. drukarki laserowe) (3) Połączenie EPO: Użytkownik może wybrać polaryzację EPO, EPO jest normalnie zamkniete jako ustawienie domyślne.  NO Normalnie złącze EPO jest otwarte na tylnym panelu. Po zamknięciu połączenia kabla, UPS przerwie podawanie mocy na wyjściu, aż...
  • Seite 214: Włączanie Ups

    5.4 Włączanie UPS (1) Z podłączeniem zasilania sieciowego: Naciśnij przycisk “I” w sposób ciągły przez czas dłuższy niż 1 sekundę, aby włączyć UPS. Urządzenie przejdzie w tryb inwertera a ekran LCD będzie wskazywać stan UPS. (2) Bez podłączania zasilania sieciowego: Jeśli UPS startuje z „zimnego startu”...
  • Seite 215: Funkcja Wyciszania Alarmu

    zasilanie sieciowe, aby wyłączyć podawanie mocy na wyjściu. (2) W trybie bateryjnym: Naciskij przycisk “ ” nieprzerwanie dłużej niż 1 sekundę, aby wyłączć UPS. Urządzenie zostanie wyłączone całkowicie. 5.7 Funkcja wyciszania alarmu Jeśli alarm jest zbyt denerwujący w trybie bateryjnym, możesz nacisnąć przycisk “I”...
  • Seite 216: Tryb Pracy Dla Wszystkich Modeli

    + - Masa / GND Czerwony Czarny Zielony/Zółty przewód przewód przewód (6) Czerwony przewód jest podłączony do "+" terminalu baterii. Czarny przewód jest podłączony do "-" terminalu baterii. (Info: zielony/żółty przewód jest uziemiony dla celów ochronnych.) (7) Upewnij się, że przewody są przymocowane, zainstaluj blok terminala na tylnej obudowie UPS.
  • Seite 217: Tryb Linii

    Tryb bateryjny bATT Tryb testu baterii TEST Tryb ECO Tryb konwertera CVCF 6.1 Tryb linii Wyświetlacz LCD w trybie linii przedstawiono na poniższym rysunku. Mogą być wyświetlane informacje o sieci elektrycznej, poziomu baterii, wyjść UPS i poziomu obciążenia. Tekst “LINE” wskazuje, że UPS pracuje w trybie linii. ■...
  • Seite 218: Tryb Bypass

    co 4 sekundy. Jeśli przycisk “ON” na przednim panelu zostanie ponownie przyciśnięty dłużej niż 1 sekundę, urządzenie przestanie wydawać dźwięki (w trybie wyciszenia). Naciśnij przycisk “ON” ponownie przez dłużej niż 1 sekund, aby przywrócić funkcję alarmu. ■ Tryb bateryjny 6.3 Tryb Bypass Wyświetlacz w trybie bypass przedstawiono na poniższym rysunku.
  • Seite 219: Tryb Bez Podawania Mocy Na Wyjściu

    6.4 Tryb bez podawania mocy na wyjściu Wyświetlacz w trybie bez podawania mocy na wyjściu przedstawiono na poniższym rysunku Mogą być wyświetlane informacje o sieci elektrycznej, poziomu baterii, wyjść UPS i poziomu obciążenia . Tekst “STbY” wskazuje, że UPS pracuje w trybie bez podawania mocy na wyjściu. ■...
  • Seite 220: Tryb Konwertera

    6.7 Tryb konwertera W trybie konwertera, wyświetlacz LCD wskazuje ten tryb jako tekst “CVCF”. UPS będzie uruchomiony z poprawioną częstotliwością wyjściową (50Hz lub dy występują zaburzenia sieci lub nastąpi jej 60Hz) w trybie konwertera. G przejdzie w tryb bateryjny a obciążenia będą w sposób ciągły utrata , UPS zasilane przez baterię.
  • Seite 221 ustawić napięcie wyjściowe, naciśnij przycisk “Enter” dłużej niż 1 sekunda second, a migający tekst “208” będzie wyświetlony, jeśli przycisk “Enter” zostanie ponownie naciśnięty, tekst “208” przestanie migotać, napięcie wyjściowe zostanie zmienione na 208V; jeśli przycisk “Select” zostanie naciśnięty na dłużej niż 1 sekundę, pojawi się następny migający tekst “220”, kolejność...
  • Seite 222: Rozwiązywanie Problemów

    Oto przykład zmiany trybu pracy z normalnego trybu na tryb konwertera ■ poprzez Panel LCD. Krok 1: “OPV” po naciśnięciu przycisku “Enter”; Krok 2: “OPF” po naciśnięciu przycisku “Select”. Krok 3: “bYPA” po naciśnięciu przycisku “Select”; Krok 4: “MOdE” po naciśnięciu przycisku “Select”, naciśnij przycisk “Enter”, aby ustawić...
  • Seite 223 (przeładowana) Błąd soft startu Bus Niski poziom baterii bLOW bSFT Błąd ładowania Błąd, zbyt wysoka tmp. CHGF OVTP Niskie napięcie inwertera Zbyt wysoka tmp. inwertera TEPH INVL Wysokie napięcie inwertera Zbyt wysoka tmp. otoczenia AMbH INVH Wysokie napięcie Bus Otwarta bateri bOPN bUSH Przeładowanie...
  • Seite 224 Temperatura wewnątrz UPS Sprawdź wentylację UPS oraz Wysoka temperatura temperaturę otoczenia. inwertera jest zbyt wysoka Sprawdź wentylację środowiska. Wysoka temperatura Temperatura otoczenia jest otoczenia zbyt wysoka Sprawdź podłączenie baterii do UPS. Otwarta baterii Zestaw baterii nie jest prawidłowo podłączony Sprawdź czy wyłącznik baterii jest włączony.
  • Seite 225: Konserwacja

    9. Konserwacja 9.1 Operacje System zawiera części nie wymagających serwisowania przez użytkownika. Jeśli żywotność baterii (3~5 lat przy 25°C temperatury otoczenia) zostanie należy wymienić baterie. W trym przypadku należy przekroczona, skontaktować się ze sprzedawcą. 9.2 Przechowywanie Jeżeli baterie są przechowywanie w umiarkowanych strefach klimatycznych, powinny być...
  • Seite 226: Dane Techniczne

    10. Dane techniczne 10.1 Parametry elektryczne WEJŚCIE Nr. modelu 1K(S) 1.5K(S) 2K(S) 3K(S) Faza Częstotliwość (45~55)/(54~66) Hz Max natężenie(A) 10.5 13.5 WYJŚCIE Nr. modelu 1K(S) 1.5K(S) 2K(S) 3K(S) Moc znamionowa 1kVA/0.9kW 1.5k/1.35kW 2kVA/1.8kW 3kVA/2.7kW Napięcie 208/220/230/240×(1 士 1%)VAC Częstotliwość 50/60(±0.2)Hz (Tryb bateryjny) Forma fali sinusoidalna BATERIE...
  • Seite 227: Typowy Czas Podtrzymania (Typowe Wartości Przy 25°C W Min:)

    10.3 Typowy czas podtrzymania (Typowe wartości przy 25°C w min:) 100 % obciążenia 50 % obciążenia Nr. modelu 1.5K 10.4 Wymiary i waga Model 1000 1000S 1500 1500S 2000 2000S 3000 3000S Obud Waga netto (kg) 16.2 19.7 19.7 28.6 13.2 Wymiary (mm) (S x W x G)
  • Seite 228: Port Rs-232

    11.2 Port RS-232 Port RS-232 jest dostępny do monitorowania UPS, sterowania nim oraz aktualizacji firmware. W celu nawiązania komunikacji pomiędzy UPS komputerem, podłącz jeden koniec kabla komunikacji szeregowej kabla dołączonego z UPS do portu RS-232 na urządzeniu, a drugi koniec kabla do portu szeregowego RS-232 w komputerze.
  • Seite 229: Styk Beznapięciowy

    Info: Nie musisz wyłączać UPS, aby zainstalować kartę komunikacyjną. W celu zainstalowania karty zarządzania sieciowego, wykonaj następujące czynności: 1. Znajdź miejsce karty komunikacyjnej na UPS. 2. Odkręć dwie śruby (oraz zachowaj je) mocujące pokrywę wnęki dla karty komunikacyjnej. 3. Wprowadź szeregową kartę zarządzania sieciowego w slot na UPS. 4.
  • Seite 230: Instalacja Oprogramowania

    Schemat podłączenia wejściowego styku beznapięciowego Poniższa tabela przedstawia możliwości/opcje dla wyjścia/wejścia styku beznapięciowego Sygnał Opis beznapięciowy Aktywowane przy każdym ostrzeżeniu Zestawienie alamrów Na baterii Aktywowane, gdy UPS pracuje na baterii Niski poziom baterii Aktywowane wraz z alarmem “bLOW” Prawidłowa praca Aktywowane, gdy UPS nie ma żadnych alarmu oraz błędów Aktywowane gdy UPS podaje bypass na wyjściu...
  • Seite 231 • Kliknij dwukrotnie na ikonę, aby skorzystać z oprogramowania monitorującego (jak wyżej). • Możesz zaplanować wyłączenie/włączenie UPS oraz monitorowanie statusu urządzenia za pomocą komputera PC. • Szczegółowe instrukcje znajdują się w e-podręczniku w oprogramowaniu. Sprawdź www.powerwalker.com/winpower.html okresowo, aby pobrać najnowszą wersję oprogramowania monitorującego.
  • Seite 232: Dodatek: Tylny Panel

    Dodatek: Tylny panel Tabela z opisem tylnego panelu UPS oraz zdjęciami przedstawione są poniżej: Funkcja(1000VA &1500VA&2000VA&3000VA) Wyjście AC EPO / Wejście portu/styku komunikacyjnego beznapięciowego Port USB Wejście AC Wyjście styku beznapięciowego Slot SNMP RS232 Modem/Ochrona przepięciowa sieci Port lini uziemienia Tylny panel standardowych 1000VA /1500VA/2000VA &...
  • Seite 233 DRY IN AC INPUT DRY OUT 3000VA Tylny panel standardowego panelu USE COPPER CONDUCTOR ONLY .FOR SUPPLY CONNECTIONS, USE WIRES SUITABLE FORAT LEAST 75℃. REFERTO THE INSTRUCTION MANUAL FOR TIGHTMENING TORQUE DRY IN DRY OUT 3000VA Tylny panel super-ładownego modelu...
  • Seite 234 Tabela z opisem tylnego panelu EMB oraz zdjęciami przedstawione są poniżej: Funkcja(36V &48V & 72V EBM) Port linii uziemienia 36V &48V&72V Tylny panel EBM...

Diese Anleitung auch für:

Vfi 1500rt lcdVfi 2000rt lcdVfi 3000rt lcd

Inhaltsverzeichnis