Exsys EX-1376 Bedienungsanleitung
EX
EX-
EX
-
-
1376
1376
1376
DRIVER INSTALLATION
Windows 2000/ XP/ Vista/ 7/ 8
After starting Windows it recognizes a new "PCI Controller" and opens the hardware assis-
tant. Please choose manual installation and put the driver CD into your CD-ROM drive. Now
enter the Path "D:\IO\OXFORD2\" and then the directory of your operating system into the box
for the Path/Source and click at >next/continue<. Now Windows searches for the drivers in
the specified directory. Follow the hardware assistant and finish the installation. If Windows
recognizes other new devices repeat the above described steps. Attention! Restart Windows
in any case after installing the drivers.
CHECK THE INSTALLED DRIVER
Click at Start<>Run< then enter "compmgmt.msc" and click at >OK<. In the windows that
opens select >Device Manager<. Under „Ports (COM and LPT)" you should find a new „PCI
Port" as sample (LPT3). If you see this or similar entries the card is installed correctly.
CHANGE PORT NUMBER
If you like to change the port number for example LPT3 to LPT1, open the >Device Manager<
click at >LPT3<, >Settings< and then >Advance<. There you can change between LPT1 to
LPT3.
Windows Server 2000/ 2003/ 2008 R2
After starting Windows it recognizes a new "PCI Controller" and opens the hardware assis-
tant. Please choose manual installation and put the driver CD into your CD-ROM drive. Now
enter the Path "D:\IO\OXFORD2\" and then the directory of your operating system for Server
2000 "2000", for Server 2003 "XP32" or "XP64", for Server 2008 „Vista32" or „Vista64" and
for Server 2008 R2 „Win7_8_32bit" or „Win7_8_64bit" into the box for the Path/Source and
click at >next/continue<. Now Windows searches for the drivers in the specified directory.
Follow the hardware assistant and finish the installation. If Windows recognizes other new
devices repeat the above described steps. Attention! Restart Windows in any case after
installing the drivers.
CHECK THE INSTALLED DRIVER
Click at Start<>Run< then enter "compmgmt.msc" and click at >OK<. In the windows that
opens select >Device Manager<. Under „Ports (COM and LPT)" you should find a new „PCI
Port" as sample (LPT3). If you see this or similar entries the card is installed correctly.
CHANGE PORT NUMBER
If you like to change the port number for example LPT3 to LPT1, open the >Device Manager<
click at >LPT3<, >Settings< and then >Advance<. There you can change between LPT1 to
LPT3.
LINUX
The drivers are located in the following folder on our driver CD:
"D:\IO\OXFORD2\LINUX"
Because each individual distribution and kernel version of Linux is different, sadly we cant
provide a installation instruction. Please refer to the installation manual for standard I/O ports
from your Linux version! In some newer versions of Linux the card will even be installed auto-
matically after starting Linux.
5
English
English
English
EX-
EX
EX
-
-
1376
1376
1376
English
English
English
Die EX-1376 ist eine 34mm ExpressCard Parallel Karte mit einem Parallelen SPP/EPP/ECP Bi
-Direktionalen Ausgang für den Anschluss von Peripheriegeräten mit Enhanced Centronics
Interface (z.B. Drucker, Scanner, Laufwerke usw.). Es ist nicht möglich die I/O Adressen und
Interrupts manuell einzustellen, da die Einstellungen der Karte vom System (BIOS) und beim
installieren des Betriebssystems automatisch vorgenommen werden. Die EX-1376 ist Windows
2000/ XP/ Vista/ 7/ 8 und Server 2000, 2003 & 2008 WHQL zertifiziert.
Kompatibilität:
Betriebssysteme:
Anschlüsse:
Lieferumfang:
Zertifikate:
DB 25F:
Wenn Sie die ExpressCard Parallel Karten installieren, beachten Sie die folgenden Installations-
hinweise. Da es große Unterschiede bei Laptops gibt, können wir Ihnen nur eine generelle Anlei-
tung zum Einbau der ExpressCard Karten geben. Bei Unklarheiten halten Sie sich bitte an die
Bedienungsanleitung ihres Computerherstellers. Stecken sie die EX-1376 einfach während des
Betriebs in einen freien ExpressCard Slot. Bitte wenden sie beim einstecken der Karte keine
Gewalt an. Die Karte lässt sich mit leichtem druck in den Slot einstecken. Sollte die Karte nicht in
den Slot passen, überprüfen sie bitte ob es sich auch wirklich um einen ExpressCard Slot handelt.
Bitte stecken sie die EX-1376 nie in einen PCMCIA Slot!!! Dies kann zur Beschädigung
ihres Notebooks führen.
6
Bedienungsanleitung
Bedienungsanleitung
Vers. 1.3 / 26.06.13
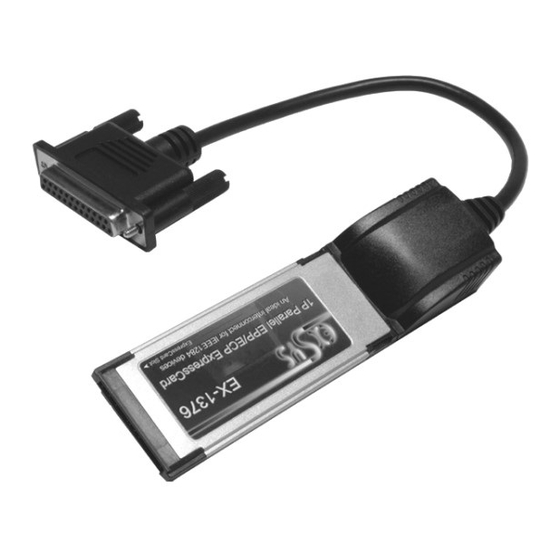
AUFBAU
P1: 25 Pin Buchse
Parallel Ausgang
Bi-Direktional
ExpressCard (34mm)
Laptop Anschluss
BESCHREIBUNG & TECHNISCHE DATEN
ExpressCard (34mm)
Windows 2000/ XP/ Vista/ 7/ 8/ Server 200x/ Linux
1x 25 Pin D-Sub Buchse
EX-1376, Treiber CD, Anleitung
CE CE CE CE / FCC / RoHS / WEEE
DE97424562 / WHQL
ANSCHLÜSSE
Parallel 25 Pin D-SUB Buchse (P1)
Pin
Signal
Pin
Signal
1
STROBE
10
ACKNOWLEDGE
2
DATA 0
11
BUSY
3
DATA 1
12
PAPER EMPTY
4
DATA 2
13
SELECT
5
DATA 3
14
AUTO FEED
6
DATA 4
15
ERROR
7
DATA 5
16
8
DATA 6
17
SELECT INPUT
9
DATA 7
18
GROUND
HARDWARE INSTALLATION
1
Pin
Signal
19
GROUND
20
GROUND
21
GROUND
22
GROUND
23
GROUND
24
GROUND
INIT
25
GROUND

Verwandte Anleitungen für Exsys EX-1376


Inhaltszusammenfassung für Exsys EX-1376
- Seite 1 Gewalt an. Die Karte lässt sich mit leichtem druck in den Slot einstecken. Sollte die Karte nicht in den Slot passen, überprüfen sie bitte ob es sich auch wirklich um einen ExpressCard Slot handelt. Bitte stecken sie die EX-1376 nie in einen PCMCIA Slot!!! Dies kann zur Beschädigung ihres Notebooks führen.
- Seite 2 Windows erkennt beim Start einen neuen “PCI Controller“ und öffnet automatisch den Win- The EX-1376 is a hot plug & play parallel expansion card for the ExpressCard Bus. The EX- dows Hardwareassistenten. Wählen Sie die manuelle Installation aus und legen Sie die Treiber 1376 is equipped with one bi-directional enhanced Centronics parallel interface.