Exsys EX-1060V Bedienungsanleitung
EX
EX-
EX
-
-
1060V
1060V
1060V
JUMPER SETTING & CONNECTORS
J3-J4:
USB 2.0 Pin's
Pin
Signal
1
VCC
2
DATA-
3
DATA+
4
GND
J1:
USB 2.0 - 10 pin connector (Default)
1
2
Pin
Signal
Pin
+5VCC
+5VCC
3
4
Data1-
Data2-
1
VCC1 +5V
5
Data1+
5
6
Data2+
GND
7
8
GND
2
VCC2 +5V
6
GND
9
10
3
DATA1-
7
4
DATA2-
8
Attention!!!
Please make sure that you connect the cable in the right
order like shown in the list above. If you connect the cable
wrong it can destroy your hardware! The labelling on the
cable must match with the ones on our card.
HARDWARE INSTALLATION
Because there are large differences between PC's, we can give you only a general installa-
tion guide for the EX-1060V. Please refer your computer's reference manual whenever in
doubt.
1. Connect the USB cable to the USB 10 pin Connector of the EX-1060V.
2. Plug the power supply into the AUX Connector J2 of the EX-1060V.
3. Now connect the other end from the USB cable to the Connector at your Mainboard
or USB-Hostcontroller.
DRIVER INSTALLATION
All OS
The EX-1060V requires no drivers. If the system does require drivers, this are the
drivers for your USB controller or motherboard chipset.
CHECK INSTALLED DRIVER
It is not possible to check installed driver of the EX-1060V. Please make sure that your
USB controller or motherboard connector is installed correctly!
CLEANING
For cleaning please use only a dry fluff less cloth and remove the dirt with gently pres-
sure. In the area of the connectors please make sure that no fibres from the cloth re-
main in the connectors. Attention! Never use a moist or wet cloth for cleaning!
5
English
English
English
EX
EX
EX-
-
-
1060V
1060V
1060V
Attention!
Never plug in with force
or in wrong direction.
Signal
Pin
Signal
DATA1+
9
NC
DATA2+
10
GND
GND
GND
English
English
English
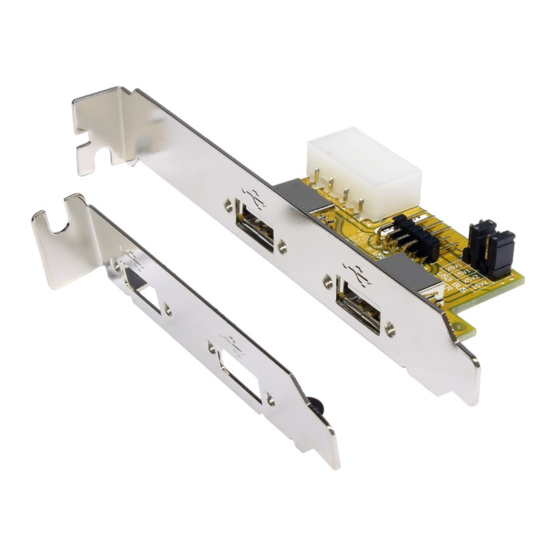
AUFBAU
J3-J4:
2 x externe USB 2.0
A-Buchse (verschraubbar)
BESCHREIBUNG & TECHNISCHE DATEN
Die EX-1060V ist eine USB 2.0 Slotblende. Sie ist mit 2 externen verschraubbaren
Ports und einem 10Pin Stecker zum Anschluss ans Mainboard ausgestattet. Sie unter-
stützt alle Mainboards und Host Controller. Es ist nicht möglich die I/O Adressen und
Interrupts einzustellen, da die EX-1060V keine Hardware Ressourcen verwendet! Sie
dient lediglich zum Anschluss von internen auf externe verschraubbare USB Anschlüs-
se.
Kompatibilität:
Betriebssysteme:
Anschlüsse:
Lieferumfang:
Zertifikate:
JUMPER EINSTELLUNG & ANSCHLÜSSE
JP1:
J2:
6
Bedienungsanleitung
Bedienungsanleitung
Vers. 1.1 / 10.04.13
USB 1.1 & USB 2.0
Alle Betriebssysteme
2x USB A-Buchse extern (verschraubbar), 1x 10 Pin Stecker
EX-1060V, Anleitung
CE / FCC / RoHS / WEEE
CE CE
CE
DE97424562 / WHQL
I5V = Strom vom USB BUS (Werkseinstellung)
X5V = Strom vom PC-Netzteil des Rechners
I5V=USB
(Zur Entlastung des Mainboards und zur stabilen Stromversorgung bei
X5V=AUX
Verwendung von Endgeräten mit hohem Stromverbrauch).
Anschluss J2 muss mit PC-Netzteil verbunden werden!
Wenn JP1 auf X5V gestellt ist, muss J2 mit dem Stroman-
schluss vom PC Netzteil verbunden werden!
Bitte auf die richtige Polarität achten!
Achtung! Stecker nie bei eingeschaltetem PC ein oder
ausstecken!
1 +12V 2 GND
3 GND
4 +5V
1
J2:
Anschluss für Stecker
vom PC-Netzteil
J1:
Interner 10Pin USB
Port für Anschluss am
Mainboard
JP1:
Stromquelle wählen
USB oder AUX

Verwandte Anleitungen für Exsys EX-1060V


Inhaltszusammenfassung für Exsys EX-1060V
- Seite 1 CHECK INSTALLED DRIVER Anschluss J2 muss mit PC-Netzteil verbunden werden! It is not possible to check installed driver of the EX-1060V. Please make sure that your USB controller or motherboard connector is installed correctly! Wenn JP1 auf X5V gestellt ist, muss J2 mit dem Stroman-...
- Seite 2 A-Port (screw lock) unserer Karte übereinstimmen. DESCRIPTION & TECNICAL INFORMATION The EX-1060V is a plug & play high-speed USB expansion card. The EX-1060V pro- HARDWARE INSTALLATION vides 2 external ports. It uses data transfer rates up to 480Mbit/s. It supports all main boards and Host controllers.