Herunterladen Diese Seite drucken

Werbung

Verfügbare Sprachen
  • DE

Verfügbare Sprachen

  • DEUTSCH, seite 21
INDICE
Introduzione.......................................................................................... 2
Descrizione comandi............................................................................ 3
Installazione.......................................................................................... 7
Collegamento elettrico ...................................................................... 7
Installazione dell'antenna .................................................................. 7
Uso dell'ALAN 48 EXCEL MULTI.......................................................... 8
Selezione bande di frequenza ........................................................... 8
Tabella bande di frequenza................................................................ 8
Caratteristiche tecniche ....................................................................... 9
1

Werbung

loading

Inhaltszusammenfassung für Midland ALAN 48 EXCEL MULTI

  • Seite 1: Inhaltsverzeichnis

    INDICE Introduzione..................2 Descrizione comandi................3 Installazione..................7 Collegamento elettrico ..............7 Installazione dell’antenna ..............7 Uso dell’ALAN 48 EXCEL MULTI............8 Selezione bande di frequenza ............8 Tabella bande di frequenza..............8 Caratteristiche tecniche ............... 9...
  • Seite 2 ALAN 48 EXCEL MULTI è un ricetrasmettitore veicolare la cui caratteristica principale è la possibilità di selezionare qualsiasi banda CB europea tramite una semplice ed immediata procedura. ALAN 48 EXCEL MULTI è inoltre dotato del dispositivo “ESP2” (soppressore dinamico dei disturbi) che permette di ridurre notevolmente i disturbi audio (fino al 95%) facilitando l’ascolto anche quando il segnale è...
  • Seite 3: Descrizione Comandi

    DESCRIZIONE COMANDI 5 7 9 30 3 5 10 POWER LOCK SCAN CB/PA RX AM FUNC M4/LCR N.K. SCAN AM/FM LOCK 1. Selettore canali: permette la selezione manuale dei canali. 2. Presa microfono: inserire lo spinotto microfonico in questa presa. 3.
  • Seite 4 5. Indicatore “AM/FM” Indica il modo operativo. FM: LED rosso; AM: LED verde. 6. Indicatore “RX/TX” Indicatore di ricezione / trasmissione. Posizione RX: LED verde; posizione TX: LED rosso. 7. Selettore “CB - PA” Posizione “CB” : in questa posizione, l’apparato é attivo come ricetrasmettitore. Posizione “PA”: questo modo di funzionamento é...
  • Seite 5 Premere nuovamente il tasto “DW” per 3 secondi circa: la radio emetterà un ‘BIP’, il display mostrerà la scritta “DW” permanente e visualizzerà alternativamente i due canali selezionati. 11. Pulsante “M3 - SCAN” Tramite questo tasto, si memorizza la memoria numero 3 e si attiva la funzione “SCAN”...
  • Seite 6: Pannello Posteriore

    PANNELLO POSTERIORE S-METER ANTENNA 19. Connettore antenna: è previsto il connettore SO 239. 20. Presa S.METER: permette il collegamento di uno strumento esterno. 21. Presa PA: tramite il collegamento ad un altoparlante esterno, permette di utilizzare l’apparato come amplificatore audio. 22.
  • Seite 7: Installazione

    INSTALLAZIONE Ricercare e localizzare, sul mezzo mobile, la posizione per installare l’apparato, utilizzando la staffa di supporto in dotazione. Tale posizionamento deve essere fatto in modo da non creare intralcio a chi guida, ma deve anche essere facilmente accessibile. Praticare i fori (diametro di circa 3 mm.) nella carrozzeria per il fissaggio con le viti.
  • Seite 8: Uso Dell'alan 48 Excel Multi

    USO DELL’ ALAN 48 EXCEL MULTI Dopo aver installato il vostro CB e la vostra antenna, seguire attentamente le istruzioni qui sotto riportate per ottenere un funzionamento soddisfacente del vostro apparato. 1) Avvitare la spina nella presa del microfono sul pannello.
  • Seite 9: Caratteristiche Tecniche

    CARATTERISTICHE TECNICHE Generali Canali ................... 40 FM (vedi tabella bande) Gamma di frequenza ............... 25.615-30.105 MHz Controllo di frequenza ...................a PLL Temperatura ....................-10° / +55°C Tensione di alimentazione ..............13.2/24 Vcc ±15% Dimensione................150(L) x 45(A) x 175(P)mm Peso ........................1 Kg. Ricevitore Sistema ricevente..........Supereterodina a doppia conversione Frequenza intermedia................
  • Seite 11 Introduction ..................2 Function and location of the controls........... 3 Installation .................... 7 Power supply..................7 Installing an antenna................7 How to use your ALAN 48 EXCEL MULTI ..........8 Frequency band selection ..............8 Frequency band chart ............... 8 Specifications..................9...
  • Seite 12 ALAN 48 EXCEL MULTI is a mobile transceiver whose main feature is the possibility to select any of the European CB bands with an easy and quick operation. ALAN 48 EXCEL MULTI is equipped with the “ESP2” (noise reducer device) that reduces considerably the audio noises up to 95%, allowing a clear communication even when the signal is disturbed.
  • Seite 13: Function And Location Of The Controls

    FUNCTION AND LOCATION OF THE CONTROLS FRONT PANEL 5 7 9 30 3 5 10 POWER LOCK SCAN CB/PA RX AM FUNC M4/LCR N.K. SCAN AM/FM LOCK 1. Channel selector: it permits the manual channel selection. 2. Microphone jack: insert the mic connector into this jack. 3.
  • Seite 14 5. “AM/FM” Indicator It indicates the operative mode. FM: red LED; AM: green LED. 6. “RX/TX” Indicator LED indicating receiving or trasmitting mode. RX: green LED; TX: red LED. 7. “CB/PA” Selector In the “CB” position, the unit operates as a transceiver. You can use the PA (public address) function only if you connect a speaker to the PA jack (“PA”...
  • Seite 15 memory and “SCAN” function activation. In this case, you can automatically seek for a busy channel: • turn the squelch clockwise until the background noise is no longer heard; • press the “M3 - SCAN” button: “SCAN” will be shown on the display and the transceiver will automatically scan all the channels until a carrier is being received.
  • Seite 16: Rear Panel

    REAR PANEL S-METER ANTENNA 19. Antenna connector (SO239 connector type). 20. S.Meter jack: it allows an external “s meter” connection. 21. “PA” jack: by connecting with an external loudspeaker, you can use the unit as an audio-amplifier. 22. ”EXT” jack: external loudspeaker jack (the internal loudspeaker is excluded). 23.
  • Seite 17: Installation

    INSTALLATION Safety and convenience are the primary consideration for mounting any piece of mobile equipment. All controls must be readily available to the operator without interfering with the movements necessary for safe operation of the vehicle. Set the proper position in the car to install the transceiver using the supplied supporting bracket or eventually the slide bracket.
  • Seite 18: Frequency Band Selection

    HOW TO OPERATE WITH YOUR ALAN 48 EXCEL MULTI 1. Screw the microphone plug into the microphone jack. 2. Make sure your antenna is securely connected to the antenna connector. 3. Make sure the SQUELCH control is turned fully conterclockwise.
  • Seite 19: Specifications

    SPECIFICATIONS GENERAL Channels ............40 FM (see the Frequency band chart) Frequency Range ................25.615-30.105 MHz Frequency Control ....................PLL Operating Temperature Range ..............-10°/+55° C DC input voltage ................13.2/24 Vdc ±15% Size..................150(L) x 45(H) x 175(D)mm Weight ........................1Kg RECEIVER Receiving system.............
  • Seite 21 Beschreibung der Bedienelemente ............3 Einbau im Kraftfahrzeug ............... 7 Anschluss an die Spannungsversorgung .......... 7 Montage der Antenne ................ 7 Bedienung des ALAN 48 EXCEL MULTI ..........8 Auswahl der Frequenzbänder .............. 8 Frequenzbandtabelle................8 Technische Daten ................. 9...
  • Seite 22 Das ALAN 48 EXCEL MULTI ist ein vielseitiges CB-Mobilfunkgerät, das sich insbesondere durch die Frequenzbandwahl und das integrierte aktive Rauschunterdrückungssystem ESP II hervorhebt. Durch eine einfache Tastenkombination kann das Gerät bei einer Auslandsreise auf die entsprechende Landesnorm umgeschaltet werden. Die Funktion des ESP II beruht auf einen optimierten Sprachfrequenzfilter, der sich...
  • Seite 23: Beschreibung Der Bedienelemente

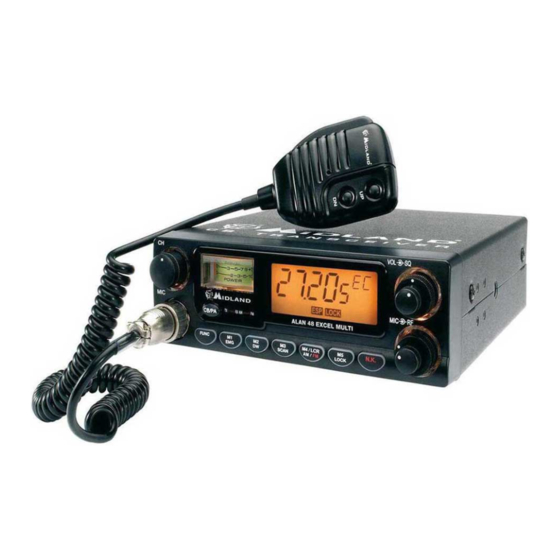
    Beschreibung der Bedienelemente 5 7 9 30 3 5 10 POWER LOCK SCAN CB/PA RX AM FUNC M4/LCR N.K. SCAN AM/FM LOCK 1. Kanalwahlschalter: mit diesem Schalter lassen sich alle Kanäle einstellen. 2. Mikrofonbuchse: hier wird das Mikrofon angeschlossen. 3. S-Meter-Anzeige: zeigt die Intensität der eingehenden Signale sowie die Sendeleistung an.
  • Seite 24 6. “RX/TX”-Anzeige Sende- und Empfangsanzeige. Position RX: grüne LED; Position TX: rote LED. 7. Schalter für CB- und Durchsagebetrieb, CB/PA Einstellung “CB” : In dieser Einstellung arbeitet das Gerät als CB-Funkgerät. Einstellung “PA”: In dieser Einstellung arbeitet das Gerät im Durchsagebetireb (Public Address), der nur aktiviert werden kann, wenn auf der Rückseite des Funkgerätes ein Aussen-Lautsprecher angeschlossen wird (Schriftzug „PA“...
  • Seite 25 hintereinander im Display angezeigt. 11. Taste “M3 - SCAN” Kanalspeicher Nummer 3 und Taste zum Aktivieren der Kanalsuchlauffunktion “SCAN” Durch Einschalten des Suchlaufbetriebs lassen sich belegte Kanäle automatisch finden. Aktivieren des Suchlaufs: 1. Wählen Sie einen freien Kanal und stellen Sie die Rauschsperre so ein, daß das Hintergrundrauschen gerade unterdrückt wird.
  • Seite 26: Rückseite

    Rückseite S-METER ANTENNA 19. Antennenbuchse (SO 239): Hier wird der Stecker des Antennenkabels mit dem Funkgerät verbunden. 20. S-Meter-Anschluß, S-Meter: An diese Buchse kann ein externes S-Meter angeschlossen werden. 21. PA-Buchse: wenn an dieser Buchse ein externer Durchsage-Lautsprecher ange- schlossen ist, läßt sich das Gerät als Verstärker für Durchsagen einsetzen. 22.
  • Seite 27: Einbau Im Kraftfahrzeug

    Einbau im Kraftfahrzeug Verkehrssicherheit einfache Bedienbarkeit ohne Beeinträchtigung Verkehrssicherheit sollten beim Fahrzeugeinbau im Vordergrund stehen. Suchen Sie eine geeignete Einbauposition in Ihrem Fahrzeug und bauen Sie Ihr ALAN 48 EXCEL MULTI mit Hilfe des Haltebügels allein oder unter Einsatz der Führungsschienen. Der Haltebügel sollte möglichst Verbindung mit Metallteilen der Karosserie haben.
  • Seite 28: Bedienung Des Alan 48 Excel Multi

    Bedienung des ALAN 48 EXCEL MULTI Nachdem Sie Ihr CB-Funkgerät an die Spannungsversorgung angeschlossen und die Antenne korrekt montiert haben, befolgen Sie nachfolgende Anweisungen: 1. Stecken Sie den Mikrofonstecker in die Mikrofonbuchse. 2. Stellen Sie sicher, daß Ihre Funkantenne über das Antennenkabel fest und sicher mit der Antennenanschlußbuchse verbunden ist.
  • Seite 29: Technische Daten

    ACHTUNG: In den meisten europäischen Ländern wird die Standardeinstellung 40 Kanäle FM, 4 W (EC) – akzeptiert. Einstellungen mit AM sind nur in bestimmten Ländern gestattet. Beachten Sie hierzu auch die “Nutzungshinweise” im Anhang. Technische Daten Allgemein Kanäle ............ 40 FM bzw. entspr. der Frequenzbandtabelle technisch möglicher Frequenzbereich ..........25.615-30.105 MHz Frequenzaufbereitung ............PLL, prozessorgesteuert Betriebstemperaturbereich..............-10°C bis +55°C...
  • Seite 31 INDICE Introducción ..................2 Funciones y posicion de los controles ..........3 Instalación .................... 7 Conexión eléctrica................7 Instalación de la antena..............7 Funcionamento del transceptor ............8 Selección bandas de frecuencia ............8 Tabla bandas de frecuencia............... 8 Especificaciones técnicas ..............9...
  • Seite 32: Introducción

    fiabilidad. Otras características que diferencian a la ALAN 48 EXCEL MULTI del resto de equipos del mercado son el dispositivo ESP 2 (supresor dinámico de ruido) y el disponer de un S-METER analógico en un equipo digital.
  • Seite 33: Funciones Y Posicion De Los Controles

    FUNCIONES Y POSICION DE LOS CONTROLES 5 7 9 30 3 5 10 POWER LOCK SCAN CB/PA RX AM M4/LCR N.K. FUNC SCAN AM/FM LOCK 1. Selector de canales: permite la selección manual del canal deseado. 2. Toma para el micrófono: Inserte el conector del micrófono en este jack. 3.
  • Seite 34 5. Indicador AM/FM: indica el modo operativo. FM: LED rojo; AM: LED verde. 6. Indicador RX/TX: indicador de recepción/transmisión. RX: LED verde; TX: LED rojo. 7. Selector CB-PA: situado en CB, el equipo actúa como transceptor. En posición PA, si se conecta un altavoz a la toma posterior PA, el equipo se convierte en un amplificador de BF, actuando el mando MIC como regulador de la amplificación.
  • Seite 35 que el ruido de fondo desaparezca. – Pulse SCAN: el display mostrará la palabra “SCAN” y el equipo iniciará la búsqueda automática que durará hasta que encuentre una señal o se desactive manualmente. Esta desactivación manual se puede efectuar de tres formas diferentes: pulsando el PTT, girando el selector de canales o pulsando cualquier tecla.
  • Seite 36: Panel Posterior

    PANEL POSTERIOR S-METER ANTENNA 19. CONECTOR ANTENA: conector del tipo SO239. 20. TOMA S-METER: permite la conexión de un medidor de señal externo. 21. TOMA PA: conectando un altavoz de exteriores a este jack, puede usar la unidad como amplificador de audio. 22.
  • Seite 37: Instalación

    INSTALACIÓN La seguridad y la facilidad son las consideraciones primordiales para efectuar el montaje de cualquier equipo móvil. Todos los controles deben ser fáciles de alcanzar por parte del operador, sin que ello interfiera en la correcta conducción del vehículo. Seleccione la posición adecuada del vehículo donde instalar el transceptor y use el soporte suministrado o eventualmente el soporte deslizante.
  • Seite 38: Funcionamento Del Transceptor

    FUNCIONAMIENTO DEL TRANSCEPTOR 1. Enchufe el micrófono en el jack correspondiente. 2. Asegúrese de que la antena está conectada al conector correspondiente. 3. Asegúrese de que el control del silenciador está girado completamente hacia la izquierda. 4. Encienda la unidad y ajuste el control de volumen y squelch. 5.
  • Seite 39: Especificaciones Técnicas

    ESPECIFICACIONES TÉCNICAS Generales Canales ..................40 FM (vea tabla bandas) Rango de frecuencias..............26.965 a 30.105 MHz Control de frecuencia ....................PLL Gama de temperaturas de operación ...........-10 ºC a +55 ºC Tensión de alimentación ..............13.8/24 Vcc ± 15% Dimensiones ..........150 (ancho) x 45 (alto) x 175 mm (profundo) Peso .........................1 Kg Receptor Sistema de recepción ........
  • Seite 41 Introduction ..................2 Description des commandes ............... 3 Installation .................... 7 Branchement électrique ..............7 Installation de l’antenne..............7 Comment utiliser l’ALAN 48 EXCEL MULTI.......... 8 Sélection des bandes de fréquence..........8 Tableau des bandes de fréquence ............ 8 Caractéristiques techniques..............9...
  • Seite 42 CB européenne avec une procédure simple et immédiate. ALAN 48 EXCEL MULTI est doué du dispositif “ESP2” (suppresseur dynamique des parasites) qui réduit les bruits indésirables sur l’audio jusqu’à 95% en facilitant l’écoute des signaux purs et en atténuant les signaux gênants.
  • Seite 43: Description Des Commandes

    DESCRIPTION DES COMMANDES PANNEAU FRONTAL 5 7 9 30 3 5 10 POWER LOCK SCAN CB/PA RX AM FUNC M4/LCR N.K. SCAN AM/FM LOCK 1. Sélecteur canaux: il permet la sélection manuelle des canaux. 2. Prise microphone: insérer la fiche microphone dans cette prise. 3.
  • Seite 44 5. Indicateur « AM/FM» : indique le mode opératif. FM LED: rouge – AM : LED verte. 6. Indicateur « RX/TX »: indicateur de réception/transmission. Position RX : LED verte – position TX : LED rouge. 7. Sélecteur « CB-PA» Position CB: dans cette position, l’appareil est activé...
  • Seite 45 canaux jusqu’à ce qu’il trouve le canal en service. La fonction « SCAN » peut être annulée de trois façons : en appuyant sur le bouton PTT en tournant le sélecteur canaux en appuyant sur n’importe quel bouton. 12. Touche “M4/LCR - AM/FM” Cette touche permet la mémorisation de la mémoire n°...
  • Seite 46: Panneau Posterieur

    PANNEAU POSTERIEUR S-METER ANTENNA 19. Connecteur antenne: il est prévu le connecteur SO 239 20. Prise S. METER: elle permet le branchement d’un instrument externe. 21. Prise PA: Avec un branchement à un haut-parleur externe, elle permet d’utiliser l’appareil comme amplificateur audio. 22.
  • Seite 47: Installation

    INSTALLATION Rechercher et localiser, sur le véhicule, la position pour installer l’appareil, en utilisant l’étrier de support fourni. Ce positionnement doit être fait de façon à ne pas gêner le conducteur, mais doit aussi être facilement accessible. Percer un trou (diamètre 3 mm environ) dans la carrosserie pour le fixage avec les vis.
  • Seite 48: Sélection Des Bandes De Fréquence

    UTILISATION DE L’ALAN 48 EXCEL MULTI Après avoir installer votre CB et votre antenne, suivre attentivement les instructions ci-après pour le bon fonctionnement de votre appareil. 1. Visser la fiche dans la prise du microphone sur le panneau. 2. S’assurer que l’antenne soit branchée au connecteur.
  • Seite 49: Caractéristiques Techniques

    CARACTERISTIQUES TECHNIQUES GENERALES Nombre de canaux ............40 FM (voir tableau bandes) Gamme de fréquence ..............25.615-30.105 MHz Contrôle de fréquence ..................à PLL Température ....................- 10°/+55° C Tension d’alimentation ..............13.2/24 Vcc ±15% Dimension ............... 150 (L) x 45 (H) x 175 (P) mm Poids ........................
  • Seite 51 Descrição dos comandos ..............3 Instalação ..................... 7 Conexão elétrica................7 Instalação da antena ................. 7 Uso do ALAN 48 EXCEL MULTI ............8 Selecção das bandas de frequência ..........8 Tabela das bandas de frequência............8 Características técnicas ............... 9...
  • Seite 52 ALAN 48 EXCEL MULTI é um radiotelefone veicular cuja característica principal consiste na possibilidade de seleccionar qualquer banda CB européia de modo simples e rápido. ALAN 48 EXCEL MULTI é dotado do dispositivo “ESP2” (supressor dinâmico de distúrbios) que permite reduzir consideravelmente os distúrbios sonoros (até 95%) facilitando a escuta mesmo com sinal disturbado.
  • Seite 53: Descrição Dos Comandos

    DESCRIÇÃO DOS COMANDOS 5 7 9 30 3 5 10 POWER LOCK SCAN CB/PA RX AM FUNC M4/LCR N.K. SCAN AM/FM LOCK 1. Selector de canais: permite seleccionar manualmente os canais. 2. Tomada para o microfone: inserir o pino do microfone nesta tomada. 3.
  • Seite 54 5. Indicador “AM/FM” Indica o modo operativo. FM: LED vermelha; AM: LED verde. 6. Indicador “RX/TX” Indicador de recepção / transmissão. Posição RX: LED verde; posição TX: LED vermelha. 7. Selector “CB - PA” Posição “CB” : nesta posição, o aparelho opera como radiotelefone. Posição “PA”...
  • Seite 55 Prima novamente a tecla “DW” por cerca de 3 segundos: o rádio emitirá um “BIP”, o display mostrará a escrita “DW” permanente e alternará a visualização dos dois canais seleccionados. 11. Botão “M3 - SCAN” Com este botão se memoriza a memória número 3 e se activa a função “SCAN” (busca automática de um canal ocupado).
  • Seite 56: Painel Posterior

    PAINEL POSTERIOR S-METER ANTENNA 19. Conector da antena: é fornecido o conector SO 239. 20. Tomada S.METER: permite conectar um instrumento externo. 21. Tomada PA: conectada a um altifalante externo, permite utilizar o aparelho como amplificador áudio. 22. Tomada EXT: tomada do altifalante externo (esta conexão exclude o uso do altifalante interno).
  • Seite 57: Instalação

    INSTALAÇÃO Procurar e localizar, no veículo, a posição para instalar o aparelho, utilizando a presilha de suporte fornecida. O posicionamento deve ser feito de modo a não criar obstáculos a quem dirige, mas ao mesmo tempo deve ser facil-mente acessível. Fazer os furos (diâmetro de cerca de 3 mm.) na carroceria para fixar com os parafusos.
  • Seite 58: Uso Do Alan 48 Excel Multi

    USO DO ALAN 48 EXCEL MULTI Após ter instalado o seu CB e a sua antena, siga atentamente as istruções abaixo para obter o melhor funcionamento do seu aparelho. 1) Atarraxe o pino na tomada do microfone, no painel. 2) Certifique-se que a antena esteja conectada.
  • Seite 59: Características Técnicas

    CARACTERÍSTICAS TÉCNICAS Gerais Canais ................40 FM (ver tabela de bandas) Gama de frequência ................25.615-30.105 MHz Controlo de frequência ..................a PLL Temperatura....................-10° / +55°C Tensão de corrente ................13.2/24 Vcc ±15% Medidas ................150(L) x 45(A) x 175(P)mm Peso ........................1 Kg. Receptor Sistema receptor...........Supereterodina de dupla conversão Frequência intermediária ..............
  • Seite 61 SPIS TRESCI Wprowadzenie..................Funkcje i elementy sterowania ............... Instalacja ....................Zasilanie....................Instalowanie anteny ................Uzywanie ALANA 48 EXCEL MULTI............Wybieranie zakresu czestotliwosci............Tabela czestotliwosci................Dane techniczne..................
  • Seite 62 CB z mozliwoscia latwej zmiany zakresu czestotliwosci na jeden z kilku europejskich stanardow CB. ALAN 48 EXCEL MULTI wyposazono w system dynamicznej redukcji szumow “ESP2” (noise reducer device), ktory wydatnie niweluje zaklocenia audio az do 95%, umozliwiajac zrozumiala komunikacje nawet przy silnie zaklocanym, badz slabym sygnale.
  • Seite 63: Panel Przedni

    FUNKCJE I ROZMIESZCZENIE ELEMENTOW STEROWANIA PANEL PRZEDNI 5 7 9 30 3 5 10 POWER LOCK SCAN CB/PA RX AM FUNC M4/LCR N.K. SCAN AM/FM LOCK 1. Przelacznik kanalow: pozwala wybrac odpowiedni kanal. 2. Gniazdo mikrofonowe: sluzy do podlaczenia mikrofonu. 3.
  • Seite 64 5. Wskaznik “AM/FM” Pokazuje uzywany rodzaj emisji. FM: czerwona dioda LED; AM: zielona dioda LED. 6. Wskaznik “RX/TX” Pokazuje aktualy tryb pracy RX-odbior, TX-nadawanie. RX: zielona dioda LED; TX: czerwona dioda LED. 7. Przelacznik “CB/PA” W pozycji CB urzadzenie dziala jak radiotelefon CB. Przelaczajac w pozycje PA staje sie wzmacniaczem akustycznym o sile wzmocnienia regulowanej pokretlem “MIC”.
  • Seite 65 bedzie szybko zmieniac kanaly do czasu odnalezienia fali nosnej o poziomie wyzszym od szumu. Te funkcje mozna wylaczyc w trojaki sposob: naciskajac przycisk nadawania PTT, obracajàc przelacznik kanalow lub naciskajac jakikolwiek inny przycisk. 12. Przycisk “M4/LCR - AM/FM” Zapisuje kanal pod czwartym adresem pamieci i wybiera rodzaj emisji AM/FM: AM zielona dida LED, FM Czerwona.
  • Seite 66: Tylny Panel

    TYLNY PANEL S-METER ANTENNA 19. Gniazdo antenowe( typ SO239 ). 20. Gniazdo S.Meter: pozwala podlaczyc zewnetrzny miernik sygnalu. 21. Gniazdo “PA” : umozliwia podlaczenie tubowego glosnika zewnetrznego. 22. Gniazdo”EXT” : sluzy do podlaczenia zewnetrznego glosnika 23. Kabel 13.2 Vdc: zasila radiotelefon. MIKROFON 1.
  • Seite 67 INSTALACJA Montujac urzadzenie w samochodzie nalezy zawsze kierowac si´ wzgl´dami bezpieczenstwa latwoscia oraz komfortem obslugi radiotelefonu. Czynnosci zwiazane z utrzymywaniem lacznosci nie moga krepowac ruchow wykonywanych przy prowadzeniu pojazdu. Informacje na wyswietlaczu powinny byc latwo zauwazalne , a elementy sterowania dostepne w zasiegu reki. Do mocowania radiotelefonu mozna uzyc dostarczanego w komplecie wspornika, badz skorzystac z jednego sposrod kilku typow kieszeni.
  • Seite 68: Tabela Czestotliwosci

    UZYWANIE RADIOTELEFONU • Polacz wtyk mikrofonu z gniazdem w przednim panelu • Sprawdz czy antena jest podlaczona poprawnie • Sprawdz czy pokretlo blokady szumow znajduje sie w skrajnym, lewym połozeniu • Wlacz radiotelefon i wyreguluj poziom dzwieku • Wybierz kanal •...
  • Seite 69: Dane Techniczne

    DANE TECHNICZNE Podstawowe Kanaly ..................40 FM (Patrz tabela) Zakres czestotliwosci ..............25.615-30.105 MHz Kontrola czestotliwosci ....................PLL Zakres temp. pracy..................-10°/+55° C Zasilanie ................... 13.2/24 Vdc ±15% Wymiary ................150(L) x 45(H) x 175(D)mm Waga .........................1Kg ODBIORNIK system odbioru ........superheterodyna z podwojna przemiana cz. czestotliwosci posrednie ..........
  • Seite 70 Circuito stampato - Printed circuit - Platinenlayout - Circuito impreso - Circuit imprimé - Circuito impresso - Plytka drukowana...
  • Seite 72 Schema elettrico - Electric diagram - Schaltplan - Circuito electrico - Schéma electrique - Diagrama electrico - Schemat ideowy...
  • Seite 74 Schema a blocchi - Block diagram - Blockschalfbild - Diagrama de bloques - Schéma a blocs - Diagrama de blocos - Schemat blokowy...

Diese Anleitung auch für:

Alan 48 excel multi