BRAND accu-jet Gebrauchsanleitung
Inhaltsverzeichnis
accu-jet
-Pipettierhelfer
®
accu-jet
Pipette Controller
®
Gebrauchsanleitung
Bitte Schritt für Schritt befolgen!
Operating Manual
Please follow step by step!
BRAND GMBH + CO KG
Postfach 11 55
97877 Wertheim
Germany
Tel.: +49 9342 808-0
Fax: +49 9342 808-236
E-Mail: info@brand.de
Internet: www.brand.de
Inhaltsverzeichnis

Verwandte Anleitungen für BRAND accu-jet


Inhaltszusammenfassung für BRAND accu-jet
- Seite 1 Pipette Controller ® Gebrauchsanleitung Bitte Schritt für Schritt befolgen! Operating Manual Please follow step by step! BRAND GMBH + CO KG Postfach 11 55 97877 Wertheim Germany Tel.: +49 9342 808-0 Fax: +49 9342 808-236 E-Mail: info@brand.de Internet: www.brand.de...
-
Seite 3: Inhaltsverzeichnis
Inhalt Contents Seite Page Sicherheitsbestimmungen Safety Instructions Einzelteile Components Lagerbedingungen Storage conditions Inbetriebnahme Starting operation Funktion Application Einsatzbeschränkungen Restrictions of use Temperaturbeschränkungen Restrictions of temperature Pipettieren Pipetting Pipette aufstecken Attach the pipette Füllen Filling Volumen einstellen Adjust the volume Entleeren Dispensing Gerät aufbewahren Storing the instrument... -
Seite 4: Sicherheitsbestimmungen
- 4 - Vor Benutzung sorgfältig lesen! Read carefully before use! Sicherheitsbestimmungen Safety Instructions Dieses Gerät kann in Kombination mit gefährlichen This instrument may be involved with hazardous Materialien verwendet werden. Die Gebrauchsan- materials. This Operating Manual does not purport leitung kann jedoch nicht alle Sicherheitsprobleme to address all of the safety problems associated with aufzeigen, die hierbei eventuell auftreten. - Seite 5 Ggf. an den Fachhändler oder Hersteller wenden. instructions before any further use of the instru- 9. Nur Original-Zubehör und Original-Ersatzteile ment ( pages 13-18) or contact an authorized verwenden. dealer or the manufacturer. 10. Zum Aufladen des NiCd-Akkus darf nur das 9.
-
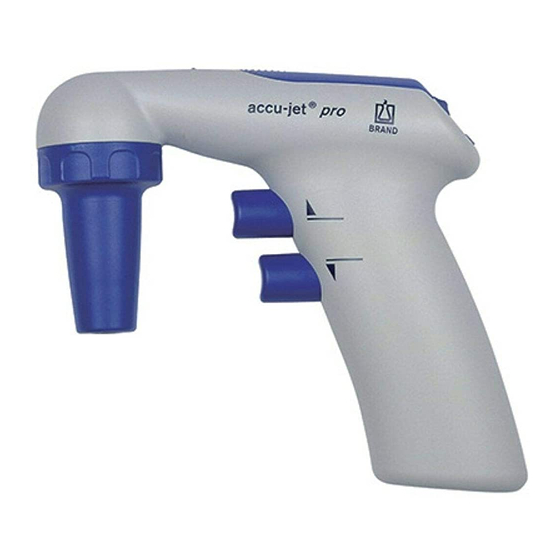
Seite 6: Einzelteile / Components
- 6 - Einzelteile / Components NiCd-Akku Gehäuse NiCd battery housing (PP) Druckausgleichsöffnung Wahlschalter für Betriebsart Air inlet/exhaust (PP) Dual-mode dispensing switch Aufsaugeknopf Membranfilter Filling button Abgabeknopf membrane filter (PP) Dispensing button (PP/PTFE) (PP) Adapter/Rückschlagventil adapter with check-valve (SI/PTFE) Ladebuchse Charging socket Adaptergehäuse adapter support... -
Seite 7: Lagerbedingungen
Lagerbedingungen Storage conditions Gerät und Zubehör kühl und trocken lagern. Store instrument and accessories in a cool, dry place. Lagertemperatur: Storage temperature: - 20 °C bis + 50 °C - 20 °C to + 50 °C Inbetriebnahme Starting operation Vor Inbetriebnahme sorgfältig prüfen, ob die Before starting to operate, confirm the changer volta- Spannungsangabe auf dem Ladegerät mit der ge conforms to the electrical supply in your area and... -
Seite 8: Funktion
- 8 - Funktion Application Das Gerät dient als Hilfe zum Pipettieren von The instrument is designed to assist the filling and Flüssigkeiten mit Mess- und Vollpipetten aus dispensing of graduated and volumetric pipettes of Glas und Kunststoff im Volumenbereich von glass or plastic used for measuring liquids in the 0,1 ml bis 100 ml. -
Seite 9: Temperaturbeschränkungen
Temperaturbeschränkungen Restrictions of temperature Arbeits- und Ladetemperatur: Working- and recharging temperature: + 10 °C bis + 35 °C + 10 °C to + 35 °C Pipettieren Pipetting Pipette aufstecken Attach the pipette Pipette stets möglichst dicht am oberen Hold the pipette as near to its upper end Ende halten und vorsichtig in den Adapter as possible, and carefully insert it into the einschieben, bis sie fest sitzt. -
Seite 10: Füllen
- 10 - Füllen Filling Pipettenspitze in die Flüssigkeit ein- Immerse the pipette tip into the liquid. tauchen. Oberen Pipettierknopf langsam Slowly press the upper pipetting button. eindrücken. Je weiter der Pipettierknopf The speed of aspiration is dependent on eingedrückt wird, desto schneller wird die the amount the pipetting button is de- Pipette gefüllt. -
Seite 11: Entleeren
Pipette entleeren Dispensing Betriebsart wählen Select mode Switch up: Schalter nach oben: Freier Ablauf Gravity-driven delivery Schalter nach unten: Switch down: Blow-out delivery Ausblasen mit with motor power Motorunterstützung Ausblasen und freier Ablauf Blow-out and gravity-driven delivery Unteren Pipettierknopf langsam ein- Slowly press the lower pipetting button. -
Seite 12: Gerät Aufbewahren
- 12 - Gerät aufbewahren Storing the instrument Gerät zur Aufbewahrung in den Wandhalter Attach the instrument to the wall support einhängen. for storage. Hinweis: Note: Zur Montage des Wandhalters die To mount the wall support remove the Schutzfolie der Haftbänder entfernen protective film from the snap tapes and und Wandhalter an gewünschter Stelle tightly press the wall support on the... -
Seite 13: Reinigung
Reinigung Cleaning Gehäuseteile (PP) gelegentlich mit einem feuchten Occasionally wipe the housing (PP) with a damp cloth. Tuch abwischen. Bei ordnungsgemäßer Benutzung When properly used, the instrument is maintenance- ist das Gerät wartungsfrei. free. Filter austauschen und Replacing the filter and Rückschlagventil reinigen cleaning the non-return valve Achtung! - Seite 14 - 14 - 4. Adapter nach oben aus dem 4. Remove the adapter from the adapter Adaptergehäuse herausdrücken. support by pushing it upwards. Nicht weiter zerlegen! Do not dismantle further! 5. Zur Reinigung Adapter mit einge- 5. For cleaning the adapter with built-in bautem Rückschlagventil sorgfältig non-return valve, carefully rinse it by mit einer Spritzflasche ausspülen.
- Seite 15 Hinweis: Note: Nicht jeder Membranfilter ist geeignet! Not every membrane filter is suitable. Only use ge- Nur Original-Zubehör verwenden. nuine manufacturer’s recommended accessories. Serienmäßig ist das Gerät mit 0,2 µm Membranfilter Each instrument will be supplied with a 0.2 µm (roter Farbcode) ausgestattet.
-
Seite 16: Dichtigkeit Prüfen
- 16 - Dichtigkeit prüfen Leak Test Nach dem Einstellen des Meniskus darf When the meniscus has been set, liquid ohne Betätigung der Ventile keine should not drip out of the pipette until the Flüssigkeit aus der Pipette tropfen. valves are activated. Sollte die Pipette tropfen, Adapter Should the pipette drip, disassemble the wieder auseinandernehmen und... - Seite 17 Ladevorgang Recharging procedure 1. Ladetemperatur: 1. Temperature range for recharging: + 10 °C bis + 35 °C + 10 °C to + 35 °C 2. Die LED-Anzeige leuchtet während des 2. A light-emitting diode (LED) will glow Ladens. during recharging. 3.
-
Seite 18: Akku Austauschen
- 18 - Akku austauschen Replacing the battery Hinweis: Note: Nur Original-Zubehör verwenden ( Seite 27). Only use original manufacturer's accessories Akkublock nicht gegen einen anderen Akku und ( page 27). The battery must not be replaced nicht gegen Primärzellen austauschen. by primary cells or other rechargeable batteries. - Seite 19 Siegellack durchstechen und Pierce through the sealing wax and Schrauben aufdrehen. remove the screws. Gehäuse aufklappen. Unfold the instrument. - 19 -...
- Seite 20 - 20 - Polstecker abziehen und Akku Pull off the pole plugs and remove entnehmen. the battery. Ersatzakku einsetzen und Polstecker Insert the new battery and push on vollständig aufschieben. Kabel auf the pole plugs as far as they will go. Gehäuseboden drücken.
- Seite 21 Gehäuseteile positionieren, dabei Align the parts of the housing; auf die Position der drei Zapfen am watch for correct position of the Gehäuserand achten. three pins on the edge. Schlauch beim Schließen der When closing the two housing Schalen hinter den Gehäuserand parts, push the hose inside, past schieben.
-
Seite 22: Entsorgung
- 22 - Zur Kontrolle der Motoreinschal- To check if the motor switches on, tung beide Pipettierknöpfe einmal operate both pipetting buttons once. betätigen. Schrauben eindrehen und Insert and tighten the screws and Adaptergehäuse aufschrauben. mount the adapter support. Entsorgung Disposal NiCd-Akku nur vollständig entladen und Dispose NiCd-battery only completely discharged and... -
Seite 23: Störung - Was Tun
Störung – was tun? Störung Mögliche Ursache Was tun? Saugleistung beeinträchtigt - Rückschlagventil geschlossen - Unteren Pipettierknopf drücken (ausblasen) ( S. 11) - Reinigen und ggf. Filter aus- - Filter oder Rückschlagventil wechseln ( S. 13-16) verschmutzt - Akku laden ( S. 16-17) - Akku entladen Saugt erst nach kurzem - Filter oder Rückschlagventil... -
Seite 24: Trouble Shooting
- 24 - Trouble Shooting Trouble Possible Cause Action to be taken Suction capacity impaired - Non-return valve closed - Press the lower button down (blow-out) ( page 11) - Clean and/or replace the mem- - Filter or non-return valve dirty brane filter (... -
Seite 25: Zur Reparatur Einsenden
(ask your supplier or manufacturer for forms. The zum Download bereit) und gemeinsam mit dem Gerät forms can also be downloaded on www.brand.de) and an Hersteller oder Händler senden unter Angabe von: send the instrument to the manufacturer or supplier and describe: - Art der Störung... -
Seite 26: Mängelhaftung
Zubehör- bzw. Ersatzteile beruhen, sind manufacturer’s accessory/spare parts. nach dem Gesetz keine Sachmängel. For conditions and extend of warranty refer to our Beachten Sie zur Verjährung und zum Umfang von General Conditions of Sale. Mängelansprüchen unsere aktuellen Allgemeinen (www.brand.de/english/agb/agb-e.pdf) Geschäftsbedingungen. (www.brand.de/deutsch/agb/agb-d.pdf) -
Seite 27: Bestelldaten
Bestelldaten Ordering Data accu-jet Pipettierhelfer accu-jet pipette controller ® ® mit Ladegerät, with charger, inkl. Wandhalter und incl. wall support and 2 Stück Ersatzmembranfilter (0,2 µm) 2 spare membrane filters (0.2 µm) accu-jet Pipettierhelfer accu-jet pipette controller ® ® grau... -
Seite 28: Ersatzteile
- 28 - Ersatzteile Spare Parts Silicone adapter Silikon-Adapter mit Rückschlagventil Best.-Nr. 265 08 with non-return valve Cat. No. 265 08 Adapter support Cat. No. 265 12 Adaptergehäuse Best.-Nr. 265 12 Ersatzmembranfilter 0,2 µm, steril Spare membrane filter 0.2 µm, sterile (roter Farbcode) (red color code) Best.-Nr. - Seite 29 Ladegerät, Typ: Charger, types: Europa 230 V/50 Hz Best.-Nr. 265 50 Europe 230 V/50 Hz Cat. No. 265 50 (Kontinent) (continental) UK/Irland 230 V/50 Hz Best.-Nr. 265 55 UK/Ireland 230 V/50 Hz Cat. No. 265 55 Best.-Nr. 265 60 Cat. No. 265 60 120 V/60 Hz 120 V/60 Hz Japan...