Bosch MIC7000 Handbuch
Vorschau ausblenden
Andere Handbücher für MIC7000:
- Kurzanleitung (172 Seiten) ,
- Schnellstartanleitung (128 Seiten)
Verfügbare Sprachen
Verfügbare Sprachen
Quicklinks
1 |
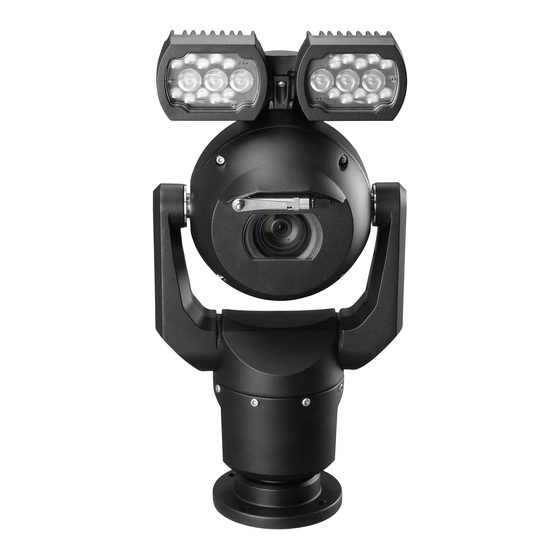
Install a MIC7000 Camera on a Hinged
DCA
The hinge feature allows installers to "hang" the
MIC7000 camera temporarily during installation
for easier connection of cables/wiring before fi-
nal bolts are installed.
Parts List
1 MIC Hinged DCA (MIC-DCA-Hx)
4 Stainless steel hex bolts, M8 x 20
4 Stainless steel plain washers, M8
1 O-ring, 80 mm x 3 mm
1 conduit adapter (male M25 to female 3/4"
NPT) (Available in specific regions only.)
1 blanking plug, M25 x 1.5, with O-ring
1 Quick Installation Guide
5 |
3. For inverted installation, apply a small amount
of grease to primary O-ring to hold it in place.
2 |
Additional Tools Required
1 Torx driver, T25, to loosen and tighten the
hook bolts
1 Wrench/driver to secure M8 bolts (supplied)
to mount the camera onto the DCA
1 Wrench/driver to secure user-supplied bolts
(maximum M8 or 5/16" diameter) to mount
the DCA to the mounting location
1 Phillips-head screwdriver to attach ground
wire
* * (Optional) MOLYKOTE® 111 grease [from
Dow Corning] for primary O-ring
Warning!
!
Ensure not to damage the paint on the
housing of the camera or the mount.
6 |
4.3 N m
(38 in. lb)
4. Place wires into DCA while positioning base
pin of camera under hook (item 1). Avoid pinch-
ing wires! (item 2). Slide hook down to secure
camera pin. Fully tighten hook bolts (item 3).
3 |
3/4" NPT
M25
1. Attach DCA to mounting location using user-
supplied hardware (item 1). (Bosch recom-
mends stainless steel bolts and washers.) At-
tach user-supplied conduit or glands to side or
bottom hole. If applicable, use the supplied con-
duit adapter (male M25 to female 3/4 in. NPT)
(item 2) if needed. Plug unused hole (item 3).
Route cables into DCA (item 4).
7 |
5. Carefully tilt camera to side with pin under
hook.
Note: Risk of damage to the camera! Ease cam-
era into position; do not allow it to fall unas-
sisted into rotated position or allow head to
slam into any surface or object!
Make appropriate electrical connections.
4 |
T25 Torx
2x
2. Insert O-ring (item 1). Loosen Torx bolts two
(2) turns (item 2). Slide hook up (item 3).
Tighten bolts to hold hook in place temporarily
(item 4).
8 |
6. Screw green GND wire from camera base to
ground hole on inside wall of DCA. If DCA is not
mounted to earth grounded surface, attach user-
supplied grounded wire (item 4 in step 1) to
same connection point.

Verwandte Anleitungen für Bosch MIC7000


Inhaltszusammenfassung für Bosch MIC7000
- Seite 3 1 | 2 | 3 | 4 | Befestigen Sie die kundenseitig bereitgestellt So installieren Sie eine MIC7000- Warnung! Kabelführungen oder Kabelverschraubungen an Stellen Sie sicher, dass Sie den Lack Kamera auf einem schwenkbaren DCA- der seitlichen oder an der unteren Öffnung. Falls am Gehäuse der Kamera oder am Adap- Adapter Zusätzlich benötigtes Werkzeug zutreffend, verwenden Sie den mitgelieferten ter nicht beschädigen. Das Scharnier ermöglicht das vorübergehende Kabelkanaladapter (Stecker M25 zu Buchse 1 Torx-Schraubendreher, T25, um die Schrau- Aufhängen der MIC7000 Kamera während Instal- 3/4 Zoll NPT) (Element 2), falls erforderlich. Ver- ben für den Hakenverschluss zu lockern bzw. lation, um den Anschluss von Kabel/Verkabelung schließen Sie die nicht genutzte Öffnung (Ele- festzuziehen vor Anbringung der endgültigen Schrauben zu ment 3). Führen Sie die Kabel in den DCA-Adap- erleichtern. 1 Sicherheitsschlüssel/Schraubendreher, um die ter ein (Element 4). (im Lieferumfang enthaltenen) M8-Schrauben Teileliste 3/4” NPT festzuziehen und die Kamera auf dem DCA-Ad- 1 MIC Klappbarer DCA-Adapter (MIC-DCA-Hx) apter zu montieren 4 Edelstahl-Sechskantschrauben, M8 x 20 1 Sicherheitsschlüssel/Schraubendreher, um die...
- Seite 4 9 | 10 | 11 | geposition fallen, und lassen Sie auch nicht zu, che montiert ist, dann bringen Sie ein kunden- dass der Kamerakopf auf den Boden oder ein an- seitig bereitgestellt geerdetes Kabel (Element 4 deres Objekt fällt! in Schritt 1) an der gleichen Verbindungspositi- on an. Verbinden Sie alle Kabel mit den entsprechen- den elektrischen Anschlüssen. 17 N m (12.5 ft lb) de Kurzbedienungsanleitung 6. Verbinden Sie den Kamerafuß mithilfe des 7. Bringen Sie die Kamera vorsichtig in ihre end- grünen Erdungskabels mit der Erdungsöffnung gültige Position. Gehen Sie dabei vorsichtig vor, an der Innenseite des DCA-Adapters. Wenn der damit Sie keine Kabel zwischen dem Kamerafuß DCA-Adapter nicht auf einer geerdeten Oberflä- 12 | 13 | 14 | und dem DCA-Adapter einklemmen! Bringen Sie vier (im Lieferumfang enthaltene) Unterlegschei- ben und Sechskantschrauben an. F.01U.298.100 | 1.0...