Herunterladen Inhalt Inhalt Diese Seite drucken
Beurer FT 100 Gebrauchsanweisung

Beurer FT 100 Gebrauchsanweisung

Kontaktloses thermometer
Vorschau ausblenden Andere Handbücher für FT 100:
Inhaltsverzeichnis

Werbung

Verfügbare Sprachen
  • DE

Verfügbare Sprachen

  • DEUTSCH, seite 1
FT 100
D Kontaktloses Thermometer
Gebrauchsanweisung .......................... 2-22
G Non-contact thermometer
Instructions for use ...........................23–43
F Thermomètre sans contact
Mode d'emploi ...................................44–65
E Termómetro sin contacto
Instrucciones de uso .........................66–86
I Termometro senza contatto
Istruzioni per l'uso ...........................87–107
T Temassız Termometre
Kullanım Kılavuzu ..........................108–127
r Бесконтактный термометр
Инструкция по применению .......128–150
Q Termometr bezdotykowy
Instrukcja obsługi ..........................151–171
ELECTROMAGNETIC COMPATIBILITY
INFORMATION
.......................................172–175

Werbung

Inhaltsverzeichnis
loading

Inhaltszusammenfassung für Beurer FT 100

  • Seite 1 FT 100 D Kontaktloses Thermometer Gebrauchsanweisung ......2-22 G Non-contact thermometer Instructions for use ......23–43 F Thermomètre sans contact Mode d’emploi ........44–65 E Termómetro sin contacto Instrucciones de uso ......66–86 I Termometro senza contatto Istruzioni per l’uso ......87–107 T Temassız Termometre Kullanım Kılavuzu ......108–127...
  • Seite 2: Inhaltsverzeichnis

    8. Messen an der Stirn ..........14 durch, und beachten Sie die Hinweise. 9. Messen der Objekttemperatur / Raumtemperatur..16 Mit freundlicher Empfehlung 10. Fehleranzeigen ...........17 Ihr Beurer-Team 11. Batterien ............18 12. Gerät reinigen ............19 Lieferumfang 13. Gerät lagern ............19 Überprüfen Sie den Lieferumfang auf äußere Unver- 14.
  • Seite 3: Zeichenerklärung

    • Fieberthermometer • 2x 1,5 V Batterien AAA (LR03) • Aufbewahrungstasche • Gebrauchsanweisung 1. Zeichenerklärung Folgende Symbole werden in dieser Gebrauchsanweisung und auf dem Gerät verwendet: WARNUNG Warnhinweis auf Verletzungsgefahren oder Gefahren für Ihre Gesundheit. ACHTUNG Sicherheitshinweis auf mögliche Schäden am Gerät/Zubehör. Hinweis Hinweis auf wichtige Informationen. Gebrauchsanweisung beachten Anwendungsteil Typ BF Entsorgung gemäß...
  • Seite 4: Bestimmungsgemäßer Gebrauch

    Hersteller Zulässige Aufbewahrungs- und Transporttemperatur und -luftfeuchtigkeit Storage Operating Zulässige Betriebstemperatur und -luftfeuchtigkeit Gerät geschützt gegen Fremdkörper ≥12,5 mm und gegen schräges Tropfwasser IP 22 Seriennummer Wichtige Information/Tipp Querverweis auf einen anderen Absatz. Zertifizierungszeichen für Produkte, die in die Russische Föderation und in die Länder der GUS exportiert werden.
  • Seite 5: Warn- Und Sicherheitshinweise

    • Warten Sie nach sportlicher Aktivität, nach einem Bad oder wenn Sie im Freien waren, ca. 30 Minuten bevor Sie eine Messung an der Stirn vornehmen. • Das FT 100-Thermometer ist nur für den in der Gebrauchsanweisung angegebenen Messort am menschlichen Körper konzipiert.
  • Seite 6: Gefahren Für Das Gerät

    Gefahren für das Gerät • Setzen Sie das Gerät keinen mechanischen Stößen aus und lassen Sie es nicht fallen. • Setzen Sie das Gerät nicht direkter Sonneneinstrahlung, extremen Temperaturen oder hoher Luftfeuchtigkeit aus. • Setzen Sie das Gerät keinen Flüssigkeiten aus. Das Gerät ist nicht wasserdicht. Vermeiden Sie jeden direkten Kontakt mit Wasser oder anderen Flüssigkeiten.
  • Seite 7: Informationen Zu Diesem Thermometer

    Thermometer Rektaltemperatur 36,3 °C bis 37,8 °C (97,3 °F bis 100,0 °F) konventionelles Thermometer Beurer-Tipp • Vergleichen Sie nie mit verschiedenen Thermometern gemessene Tempera turen miteinander. • Sagen Sie Ihrem Arzt, mit welchem Thermometer Sie die Körpertemperatur gemessen haben und an welcher Körperstelle.
  • Seite 8: Einflüsse Auf Die Körpertemperatur

    Aktivitäten • Körperlichen Aktivitäten und, mit geringerem Einfluss, mentale Aktivitäten erhöhen die Körper temperatur. Beurer-Tipp Die Körpertemperaturmessung liefert den aktuellen Messwert eines Menschen. Wenn Sie sich bei der Interpretation der Ergebnisse unsicher sind, oder wenn abnorme Werte (z.B. Fieber) auftreten, sollten Sie sich an Ihren Hausarzt wenden.
  • Seite 9: Gerätebeschreibung

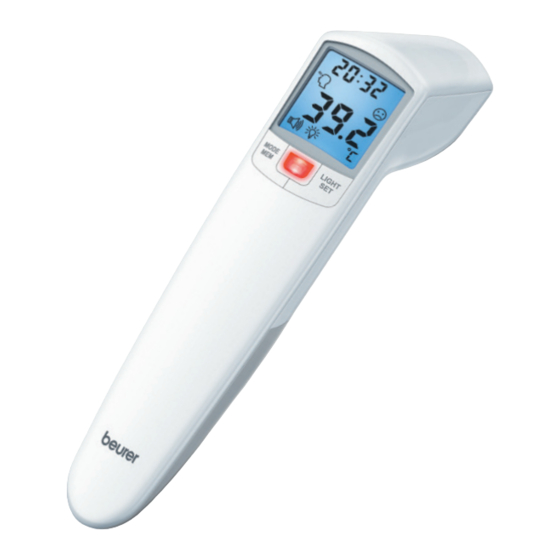
    5. Gerätebeschreibung 1 Display 2 MODE/MEM-Taste 3 Fieber-/ Abstandsindikator 4 LIGhT/sET-Taste 5 Messsensor 6 Abstandssensor / sCAN-Taste 8 Batteriefachdeckel Tasten Funktionen MODE Einstellung des Messmodus. MODE/MEM Anzeige der gespeicherten Messwerte. LIGhT Manuelles Zuschalten der LIGhT/sET Displaybeleuchtung. Einstellung der Grundfunktionen. Gerät einschalten. sCAN Temperaturmessung starten.
  • Seite 10: Displaybeschreibung

    Displaybeschreibung 1 Jahr-/Datum-/Uhrzeit-Anzeige YEAR 2 Modus Raumtemperatur DATE 3 Modus Stirntemperatur 4 Modus Objekt temperatur 5 Temperaturwert-/Speicher platz nummer-Anzeige 6 Signalton-Symbol 7 Displaybeleuchtungs-Symbol 8 Jahr 9 Speicherfunktion 10 Datum 11 Messergebnis ≥ 38,0°C (≥ 100,4°F) „Fieber“ 12 Messergebnis < 37,5°C (< 99,5°F) „kein Fieber“ 13 Batteriestandanzeige 14 Temperaturmesseinheit (Celsius/Fahrenheit) 6.
  • Seite 11: Thermometer Einschalten Und Einstellen

    7. Thermometer einschalten und einstellen / sCAN-Taste. Um das Thermometer einzuschalten, drücken Sie kurz auf die Nach einem kurzen Selbsttest und zwei kurzen Pieptönen ist das Thermometer zum Messen der Temperatur an der Stirn bereit. Das Gerät startet immer im Modus Stirntemperatur Grundfunktionen einstellen In diesem Menü...
  • Seite 12 Im Display blinkt die Stunde (Abb. 4). • Stellen Sie mit der MODE/MEM-Taste die Stunde ein und bestätigen Sie mit der LIGhT/sET-Taste. Im Display blinkt die Minute (Abb. 5). • Stellen Sie mit der MODE/MEM-Taste die Minute ein und bestätigen Sie mit der LIGhT/sET-Taste.
  • Seite 13 Im Display blinkt das Displaybeleuchtungs-Symbol (Abb. 8). Sie können die automatische Displaybeleuchtung (erscheint nach Messung der Stirntemperatur) ein- oder ausschalten. • Um die automatische Displaybeleuchtung einzu schalten, wählen Sie mit der MODE/MEM-Taste und bestätigen Sie mit der LIGhT/sET-Taste. Abb. 8 • Um die automatische Displaybeleuchtung auszu schalten, wählen Sie mit der MODE/MEM-Taste und bestätigen Sie mit der LIGhT/sET-Taste.
  • Seite 14: Messen An Der Stirn

    8. Messen an der stirn Beurer-Tipp Berücksichtigen Sie, dass • körperliche Betätigung, grundsätzlich erhöhte Schweißbildung auf der Stirn, Einnahme von gefäßveren- genden Medikamenten und Hautirritationen das Messergebnis verfälschen können, • die Stirn, beziehungsweise Schläfe, frei von Schweiß und Kosmetika sein muss. • Wir empfehlen Ihnen, drei Messungen an der Stirn vorzunehmen. Sollten sich die drei Messergebnisse unterscheiden, nehmen Sie den höchsten Messwert.
  • Seite 15 Messabstand beträgt Messabstand beträgt 4-6 cm NIChT 4-6 cm Sobald das Thermometer den kor- Wenn der Messabstand nicht 4 bis 6 cm rekten Messabstand von 4 bis 6 cm beträgt, blinkt der Fieber-/ Abstandsin- Abb. 11 erfasst hat, beginnt es automatisch mit dikator blau (bei eingeschaltetem Sig- der Messung.
  • Seite 16: Gespeicherte Messwerte Anzeigen

    Gespeicherte Messwerte anzeigen Das Gerät speichert ausschließlich Messwerte im Modus Stirntemperatur . Das Gerät speichert automatisch die Messwerte von den letzten 60 Messungen ab. Werden die 60 Speicherplätze überschritten, wird der jeweils älteste Wert gelöscht. • Der Speicher kann wie folgt abgerufen werden: • Halten Sie die MODE/MEM-Taste bei eingeschaltetem Thermometer 5 Sekunden gedrückt.
  • Seite 17: Fehleranzeigen

    Wenn Sie das Thermometer zum Messen der Raumtemperatur nutzen wollen, müssen Sie in den Modus Raumtemperatur wechseln. • Dazu drücken Sie kurz beim einge schal teten Thermometer zweimal die MODE/MEM-Taste. Das Gerät schaltet in den Modus Raumtemperatur • Die Raumtemperatur wird direkt angezeigt (Abb. 17). Abb.
  • Seite 18: Batterien

    Fehler­ Problem Lösung meldung Die Batterien sind verbraucht. Erneuern Sie die Batterien. 11. Batterien Batterien wechseln Das Gerät benötigt zwei Batterien, Typ AAA, LR03. • Öffnen Sie das Batteriefach. Schieben Sie dazu das Batteriefach nach unten. • Nehmen Sie die verbrauchten Batterien aus dem Batteriefach. • Setzen Sie neue Batterien ein.
  • Seite 19: Gerät Reinigen

    12. Gerät reinigen • Der Messsensor ist der empfindlichste Teil des Thermometers. Behandeln Sie den Messsensor mit größter Vorsicht bei der Reinigung. • Verwenden Sie keine aggressiven Reinigungsmittel. • Befolgen Sie stets alle Sicherheitshinweise für Anwender und Gerät. w 3. Warn- und Sicherheitshinweise Reinigen Sie nach jedem Gebrauch den Messsensor. Verwenden Sie dazu ein weiches Tuch oder ein Wattestäb- chen, welche mit Desinfektionsmittel oder 70 % Alkohol angefeuchtet werden können.
  • Seite 20: Technische Daten

    Bei Verwendung des Gerätes in der Heilkunde sind Messtechnische Kontrollen mit geeigneten Mitteln durchzu- führen. Genaue Angaben zur Überprüfung der Genauigkeit können unter der Service-Adresse angefragt werden. Technische Änderungen zur Verbesserung und Weiterentwicklung des Produktes behalten wir uns vor. FT 100 Messmethode Kontaktlose Infrarot Messung...
  • Seite 21: Richtlinien

    Speicherfunktion Speichert automatisch die letzten 60 Messwerte. Körpertemperaturmessung Signalton Beim Einschalten des Gerätes, während der Messung, beim Abschluss der Messung (einstellbar). Anzeige LCD-Display Energiesparfunktionen Gerät schaltet nach 1 Minute automatisch aus. Abmessungen ca. 40,9 mm x 68,2 mm x 199,0 mm Breite x Tiefe x Höhe Gewicht 82 g (ohne Batterien)
  • Seite 22: Garantie

    Die gesetzlichen Gewährleistungen des Kunden bleiben durch die Garantie unberührt. Für Geltendmachung eines Garantiefalles innerhalb der Garantiezeit ist durch den Kunden der Nachweis des Kaufes zu führen. Die Garantie ist innerhalb eines Zeitraumes von 3 Jahren ab Kaufdatum gegenüber der Beurer GmbH, Ulm (Germany) geltend zu machen.
  • Seite 23 7. Switching on and setting the thermometer ..32 observe the information they contain. 8. Forehead measurement ........36 9. Measuring object temperature/room temperature ..38 With kind regards, Your Beurer team 10. Error messages ..........39 11. Batteries ............40 Included in delivery 12. Cleaning the device ...........41 Check that the delivery has not been tampered with and 13.
  • Seite 24: Signs And Symbols

    • Clinical thermometer • 2x 1.5 V AAA batteries (LR03) • Storage bag • Instructions for use 1. signs and symbols The following symbols appear in these instructions for use and on the device: WARNING Warning notice indicating a risk of injury or damage to health. IMPORTANT Safety note indicating possible damage to the device/accessory.
  • Seite 25: Intended Use

    Manufacturer Permissible storage and transport temperature and humidity Storage Operating Permissible operating temperature and humidity Device protected against foreign objects ≥ 12.5 mm and against water dripping at an angle IP 22 Serial number Important information/tip Cross-reference with another section Certification symbol for products that are exported to the Russian Federation and CIS countries.
  • Seite 26: Warnings And Safety Notes

    • After physical activity, a bath or spending time outdoors, wait approx. 30 minutes before you take a measure- ment on your forehead. • The FT 100 thermometer is only designed for the measuring area on the human body stated in the instructions for use.
  • Seite 27: Risks To The Device

    Risks to the device • Do not drop the device or subject it to any mechanical impacts. • Do not expose the device to direct sunlight, extreme temperatures or high humidity. • Do not expose the device to liquids. The device is not waterproof. Avoid all direct contact with water or other liquids.
  • Seite 28: Information About This Thermometer

    36.3°C to 37.8°C (97.3°F to 100.0°F) Conventional thermometer Beurer tip • Temperatures measured with different thermometers should never be compared with one another. • Tell your doctor what type of thermometer you used to take your temperature and on what part of the body.
  • Seite 29 Activities • Physical and, to a lesser extent, mental activities increase body temperature. Beurer tip Taking the body temperature provides a current measurement of a person's temperature. If you are uncer- tain about interpreting the results or if the values are abnormal (e.g. fever), please consult your doctor.
  • Seite 30: Device Description

    5. Device description 1 Display 2 MODE/MEM button 3 Fever/distance indicator 4 LIGhT/sET button 5 Measuring sensor 6 Distance sensor / sCAN button 8 Battery compartment lid Buttons Functions MODE Sets the measurement mode. MODE/MEM Displays the saved measurements. LIGhT Manual activation of LIGhT/sET illuminated display.
  • Seite 31: Initial Use

    Display description 1 Year/date/time display YEAR 2 Room temperature mode 3 Forehead temperature mode DATE 4 Object temperature mode 5 Temperature/memory space number display 6 Acoustic signal symbol 7 Illuminated display symbol 8 Year 9 Memory function 10 Date 11 Measurement ≥ 38.0°C (≥ 100.4°F) “fever” 12 Measurement <...
  • Seite 32: Switching On And Setting The Thermometer

    7. switching on and setting the thermometer / sCAN button. To switch on the thermometer, briefly press the After a brief self-test and two short beeps the thermometer is ready for forehead measurement. The device always starts up in forehead temperature mode setting the basic functions Acoustic Temperature...
  • Seite 33 The year flashes on the display (Fig. 2). • Use the MODE/MEM button to set the year, and confirm with the LIGhT/ sET button. YEAR DATE The day/month flashes on the display (Fig. 3). • Use the MODE/MEM button to set the day and month, and confirm with the LIGhT/sET button.
  • Seite 34 The temperature measurement unit flashes on the display (Fig. 6). You can set the device to display the temperature in degrees Celsius (°C) or degrees Fahrenheit (°F). • To display the temperature in Celsius, select °C using the MODE/MEM but- ton and confirm with the LIGhT/sET button.
  • Seite 35 The illuminated display symbol flashes on the display (Fig. 8). You can activate or deactivate the automatic illuminated display (appears fol- lowing forehead temperature measurement). • To activate the automatic illuminated display, use the MODE/MEM button to select , and confirm with the LIGhT/sET button. Fig.
  • Seite 36: Forehead Measurement

    8. Forehead measurement Beurer tip Remember: • Physical activity, increased perspiration on the forehead, taking vasoconstrictive medication and skin irritations can distort the measurement. • The forehead, or the temples, must be free from perspiration and cosmetics. • We recommend that you take three measurements on the forehead. If the three measurements are different, use the highest value.
  • Seite 37 The measuring distance is The measuring distance is NOT 4-6 cm 4-6 cm Once the thermometer has detected If the measuring distance is not 4 to the correct measuring distance of 4 6  cm, the fever/distance indicator Fig. 11 to 6 cm, the measurement starts auto- flashes blue (the device also beeps if matically.
  • Seite 38: Displaying Stored Measurements

    Displaying stored measurements The device only stores measurements in forehead temperature mode . The device automatically stores the values from the last 60 measurements. When 60 memory spaces are exceeded, the oldest value is deleted. • The memory can be called up as follows: • With the thermometer switched on, press and hold the MODE/MEM button for 5 seconds.
  • Seite 39: Error Messages

    If you want to use the thermometer to measure the room temperature you need to switch to room temperature mode. • With the thermometer switched on, briefly press the MODE/MEM button twice. The device switches to room temperature mode • The room temperature is immediately displayed (Fig. 17). Fig.
  • Seite 40: Batteries

    Error Problem Solution message The batteries are empty. Replace the batteries. 11. Batteries Changing the batteries The device requires two AAA (LR03) batteries. • Open the battery compartment. To do this, push the battery compartment down. • Take the used batteries out of the battery compartment. • Insert new batteries.
  • Seite 41: Cleaning The Device

    12. Cleaning the device • The measuring sensor is the most sensitive part of the thermometer. Be very careful with the meas- uring sensor when cleaning the device. • Do not use any harsh cleaning products. • Always observe all safety notes for users and the device. w ...
  • Seite 42: Technical Data

    If using the device for commercial medical purposes, it must be regularly tested for accuracy by appropriate means. Precise instructions for checking accuracy may be requested from the service address. We reserve the right to make technical changes to improve and develop the product. Type FT 100 Measurement method Non-contact infrared measurement Basic functions...
  • Seite 43: Guidelines

    Measurement range and accuracy Object temperature measurement -22°C to 80°C (-7.6°F to 176°F) Object temperature measurement Measurement accuracy ± 4% or ± 2°C (± 4°F) Memory function Automatically stores the last 60 measurements. Body temperature measurement Acoustic signal With device activation, during measurement, when measurement is com- plete (can be set).
  • Seite 44 9. Mesure de la température d’objet/température instructions d’utilisation. ambiante ............59 Sincères salutations, 10. Affichage des erreurs ........60 Votre équipe Beurer 11. Piles ..............61 12. Nettoyer l’appareil ..........62 Contenu 13. Entreposer l’appareil ........62 Vérifiez si l’emballage carton extérieur du kit est intact 14.
  • Seite 45: Symboles Utilisés

    • Thermomètre médical • 2 piles AAA LR03 1,5 V • Pochette de rangement • Mode d’emploi 1. symboles utilisés Les symboles suivants sont employés dans ce mode d’emploi et sur l’appareil : AVERTISSEMENT Ce symbole vous avertit des risques de blessures ou des dangers pour votre santé. ATTENTION Ce symbole vous avertit des éventuels dommages au niveau de l’appareil ou d’un accessoire.
  • Seite 46: Utilisation Conforme Aux Recommandations

    Fabricant Température et taux d’humidité de conservation et de transport admissibles Storage Operating Température et taux d’humidité d’utilisation admissibles Appareil protégé contre les corps solides ≥ 12,5 mm et contre les chutes de gouttes d’eau en IP 22 biais Numéro de série Informations importantes/conseils Renvoi à...
  • Seite 47: Consignes D'avertissement Et De Mise En Garde

    • Après une activité physique, après un bain ou si vous étiez à l’extérieur, attendez environ 30 minutes avant de prendre votre température au niveau du front. • Le thermomètre FT 100 est conçu uniquement pour les points de mesure du corps humain décrits dans le mode d’emploi.
  • Seite 48: Risques Pour L'appareil

    • Pour toute question concernant l’utilisation de cet appareil, adressez-vous à votre revendeur ou à notre ser- vice clients. Risques pour l’appareil • Évitez de heurter ou de faire tomber l’appareil. • N’exposez pas l’appareil à la lumière directe du soleil, à des températures extrêmes ou à une forte humidité. • Ne soumettez l’appareil à...
  • Seite 49: Informations Concernant Ce Thermomètre

    Température rectale 36,3 °C à 37,8 °C (97,3 °F à 100,0 °F) thermomètre ordinaire Conseil Beurer • Ne comparez jamais des températures prises avec des thermomètres différents. • Indiquez à votre médecin avec quel thermomètre vous avez mesuré la température corporelle et à quel endroit du corps. Tenez-en également compte lors d’un auto-diagnostic.
  • Seite 50 • Les activités physiques et, dans une moindre mesure, les activités cérébrales augmentent la température cor- porelle. Conseil Beurer La mesure de la température corporelle donne une valeur de mesure actuelle pour une personne. Si vous n’êtes pas certain de l’interprétation des résultats ou obtenez des valeurs anormales (par ex. : fièvre), consultez votre médecin traitant.
  • Seite 51: Description De L'appareil

    5. Description de l’appareil 1 Écran 2 Touche MODE/MEM 3 Indicateur de fièvre/de distance 4 Touche LIGhT/sET 5 Capteur de mesure 6 Capteur de distance 7 Touche / sCAN 8 Couvercle du compartiment à piles Touches Fonctions MODE Réglage du mode de mesure. MODE/MEM Affichage des mesures enregistrées.
  • Seite 52: Mise En Service

    Description de l’affichage 1 Affichage de l’année/date/heure YEAR 2 Mode Température ambiante 3 Mode Température frontale DATE 4 Mode température d’objet 5 Affichage de la valeur de la température/du numéro de l’emplacement de sauvegarde 6 Symbole de signal sonore 7 Symbole d’éclairage de l’écran 8 Année 9 Fonction d’enregistrement 10 Date...
  • Seite 53: Allumer Et Régler Le Thermomètre

    7. Allumer et régler le thermomètre / sCAN. Pour allumer le thermomètre, appuyez brièvement sur la touche Après un bref auto-test et deux bips courts, le thermomètre est prêt à mesurer la température au niveau du front. L’appareil démarre en mode Température frontale Régler les fonctions de base Dans ce menu, vous avez la possibilité...
  • Seite 54 L’année clignote à l’écran (Fig. 2). • Avec la touche MODE/MEM, réglez l’année et confirmez avec la touche LIGhT/sET. YEAR DATE Le jour/mois clignote à l’écran (Fig. 3). • Avec la touche MODE/MEM, réglez le jour et le mois et confirmez avec la touche LIGhT/sET.
  • Seite 55 L’unité de mesure de la température clignote à l’écran (Fig. 6). Vous pouvez afficher vos résultats de mesure dans l’unité de mesure de la température degrés Celsius (°C) ou degrés Fahrenheit (°F). • Pour afficher les résultats de mesure en Celsius, choisissez °C avec la touche MODE/MEM et confirmez avec la touche LIGhT/sET.
  • Seite 56 Le symbole d’éclairage de l’écran clignote à l’écran (Fig. 8). Vous pouvez activer ou désactiver l’éclairage automatique de l’écran (s’affiche après la mesure de la température frontale). • Pour activer l’éclairage automatique de l’écran, choisissez avec la touche MODE/MEM et confirmez avec la touche LIGhT/sET. Fig. 8 • Pour désactiver l’éclairage automatique de l’écran, choisissez avec la...
  • Seite 57: Mesure Au Niveau Du Front

    8. Mesure au niveau du front Conseil Beurer Notez que • l’activité physique, une formation accrue de transpiration sur le front, la prise de médicaments vasoconstricteurs et les irritations cutanées peuvent fausser le résultat de la mesure, • le front ou les tempes doivent être exempts de transpiration et de cosmétiques.
  • Seite 58 La distance de mesure se trouve La distance de mesure ne se entre 4 et 6 cm trouve PAs entre 4 et 6 cm Dès que le thermomètre détecte la Lorsque la distance de mesure ne se distance de mesure correcte de 4 à trouve pas entre 4 et 6 cm, l’indicateur Fig.
  • Seite 59: Mesure De La Température D'objet/Température Ambiante

    Afficher les valeurs de mesure enregistrées L’appareil enregistre exclusivement les valeurs de mesure en mode Température frontale . L’appareil enregistre automatiquement les valeurs des 60 dernières mesures. Si les 60 emplacements de sauvegarde sont dépassés, la valeur la plus ancienne est supprimée. • La mémoire peut être appelée comme suit : • Maintenez la touche MODE/MEM enfoncée pendant 5 secondes lorsque le thermomètre est allumé.
  • Seite 60: Affichage Des Erreurs

    Si vous voulez utiliser le thermomètre pour mesurer la température ambiante, vous devez passer au mode Température ambiante. • Pour cela, appuyez brièvement deux fois sur la touche MODE/MEM sur le thermomètre allumé. L’appareil passe en mode Température ambiante • La température ambiante s’affiche directement (Fig. 17). En mode Température ambiante, les valeurs de mesure ne sont pas enre- Fig. 17 gistrées.
  • Seite 61: Piles

    Message Problème Solution d’erreur (1) Mode Température frontale : la tempéra- Utilisez le thermomètre uniquement dans les plages ture établie est supérieure à 34 °C (93,2 °F). de température indiquées. En cas d’affichages d’er- (2) Mode Température d’objet : la température reur répétés, consultez le revendeur ou le service établie est inférieure à...
  • Seite 62: Nettoyer L'appareil

    12. Nettoyer l’appareil • Le capteur de mesure est la partie la plus sensible du thermomètre. Manipulez-le avec le plus grand soin lors du nettoyage. • N’utilisez pas de produits nettoyants agressifs. • Suivez toujours toutes les consignes de sécurité pour l’utilisateur et l’appareil. w ...
  • Seite 63: Données Techniques

    Nous nous réservons le droit d’effectuer des modifications techniques pour améliorer et faire évoluer le produit. Type FT 100 Mode de mesure Mesure par infrarouge sans contact Fonctions de base Mesure de la température frontale...
  • Seite 64 Plages de mesure et précision Mesure de la température frontale de la mesure de la température 34 °C à 42,2 °C (93,2 °F à 108 °F) frontale Précision de mesure 34 °C à 42,2 °C : ± 0,2 °C (93,2 °F à 108 °F : ± 0,4 °F) Reproductibilité en usage Frontale: Enfants 1-5 ans ±...
  • Seite 65: Directives

    16. Directives L’appareil est conforme aux exigences de la directive européenne 93/42/EEC sur les produits médicaux, de la loi sur les produits médicaux, de la norme ASTM E 1965 - 98 et de la norme européenne EN60601-1-2 et répond aux exigences de sécurité spéciales relatives à la compatibilité électromagnétique.
  • Seite 66 9. Medición de la temperatura de objetos/tempera- en cuentas las indicaciones. tura ambiente ............81 Atentamente, 10. Visualización de errores ........82 El equipo de Beurer 11. Pilas ..............83 Artículos suministrados 12. Limpieza del aparato .........84 Compruebe que el envoltorio de los artículos suminis- 13.
  • Seite 67: Símbolos

    • Termómetro clínico • 2 pilas AAA de 1,5 V (LR03) • Bolsa • Instrucciones de uso 1. símbolos En estas instrucciones de uso y en el aparato se utilizan los siguientes símbolos: ADVERTENCIA Aviso sobre riesgos de lesiones u otros peligros para la salud. ATENCIÓN Indicación de seguridad sobre posibles desperfectos del aparato o de los accesorios.
  • Seite 68: Uso Correcto

    Fabricante Temperatura y humedad de almacenamiento y transporte admisibles Storage Operating Temperatura y humedad de funcionamiento admisibles Aparato protegido contra cuerpos extraños ≥12,5 mm y contra goteo oblicuo de agua IP 22 Número de serie Información importante/Sugerencia Referencia cruzada a otro párrafo. Símbolo de certificación para aquellos productos que se exportan a la Federación de Rusia y a los países de la CEI.
  • Seite 69: Indicaciones De Advertencia Y De Seguridad

    • Después de hacer deporte, de tomar un baño o si ha estado al aire libre, espere unos 30 minutos antes de realizar una medición en la frente. • El termómetro FT 100 solo está diseñado para usarse en el punto de medición del cuerpo humano indicado en las instrucciones de uso.
  • Seite 70: Peligros Para El Aparato

    • Si todavía tiene dudas sobre cómo usar el aparato, póngase en contacto con su distribuidor o con el servicio de atención al cliente. Peligros para el aparato • Impida que el aparato reciba golpes y no deje que se caiga. • No exponga el aparato a la luz directa del sol, a temperaturas extremas ni a una alta humedad ambiental. • No moje el aparato, no es impermeable.
  • Seite 71: Información Sobre Este Termómetro

    36,3 °C a 37,8 °C (de 97,3 °F a 100,0 °F) Termómetro convencional Sugerencia de Beurer • No compare nunca las temperaturas medidas con distintos termómetros. • Indique a su médico con qué termómetro ha medido la temperatura corporal y en qué parte del cuerpo.
  • Seite 72 Realizar actividades. • Las actividades corporales y, en menor medida, las actividades mentales aumentan la temperatura corporal. Sugerencia de Beurer La medición de la temperatura corporal proporciona el valor de medición actual de una persona. Si no está seguro de cómo interpretar el resultado de la medición o si los valores mostrados son anómalos (por ejemplo: fiebre), consulte a su médico de familia.
  • Seite 73: Descripción Del Aparato

    5. Descripción del aparato 1 Pantalla 2 Botón MODE/MEM 3 Indicador de fiebre y de distancia 4 Botón LIGhT/sET 5 Sensor de medición 6 Sensor de distancia 7 Botón /sCAN 8 Tapa del compartimento de las pilas Botones Funciones MODE Ajuste del modo de medición.
  • Seite 74: Puesta En Funcionamiento

    Descripción de la pantalla 1 Indicación del año/fecha/hora YEAR 2 Modo temperatura ambiente 3 Modo temperatura de la frente DATE 4 Modo temperatura objeto 5 Indicación del valor de la temperatura/número de posición de memoria 6 Símbolo de la señal acústica 7 Símbolo de iluminación de la pantalla 8 Año 9 Función de almacenamiento...
  • Seite 75: Encendido Y Ajuste Del Termómetro

    7. Encendido y ajuste del termómetro / sCAN. Para encender el termómetro, pulse brevemente el botón Tras una breve comprobación automática y dos pitidos cortos, el termómetro está listo para medir la temperatura en la frente. El aparato se enciende siempre en el modo temperatura de la frente Ajuste de las funciones básicas Desde este menú...
  • Seite 76 En la pantalla parpadeará el año (fig. 2). • Ajuste con el botón MODE/MEM el año y confírmelo con el botón LIGhT/ sET. YEAR DATE En la pantalla parpadeará el día/mes (fig. 3). • Ajuste con el botón MODE/MEM el día y el mes y confírmelos con el botón LIGhT/sET.
  • Seite 77 En la pantalla parpadeará la unidad de medición de la temperatura (fig. 6). Puede elegir que los resultados de la medición se muestren en grados Celsius (ºC) o en grados Fahrenheit (ºF). • Para que los resultados de la medición se muestren en grados Celsius, selec- cione con el botón MODE/MEM °C y confirme con el botón LIGhT/sET.
  • Seite 78 En la pantalla parpadeará el símbolo de iluminación de la pantalla (fig. 8). Puede encender o apagar la iluminación automática de la pantalla que aparece después de medir la temperatura en la frente. • Para encender la iluminación automática de la pantalla, seleccione con el botón MODE/MEM y confirme con el botón LIGhT/sET.
  • Seite 79: Medición En La Frente

    8. Medición en la frente Sugerencia de Beurer Tenga en cuenta lo siguiente: • La actividad física, una mayor sudoración en la frente, la ingesta de medicamentos vasoconstrictores y las irritaciones de la piel pueden alterar el resultado de las mediciones.
  • Seite 80 La distancia de medición La distancia de medición es 4-6 cm NO es 4-6 cm En cuanto el termómetro ha registrado Si la distancia de medición no es de 4 la distancia de medición correcta de 4 a 6 cm, el indicador de fiebre y de dis- a 6 cm, comienza automáticamente a tancia parpadea en azul (con la señal Fig.
  • Seite 81: Medición De La Temperatura De Objetos/Temperatura Ambiente

    Mostrar valores guardados El aparato guarda exclusivamente valores de medición en el modo temperatura de la frente . El aparato guarda automáticamente los valores de medición de las últimas 60 mediciones. Una vez sobrepasadas las 60 posiciones de memoria, se comenzarán a borrar valores empezando por el más antiguo.
  • Seite 82: Visualización De Errores

    Si desea utilizar el termómetro para medir la temperatura ambiente, debe cambiar al modo temperatura ambiente. • Para ello, pulse dos veces brevemente el botón MODE/MEM con el ter- mómetro encendido. El aparato cambia al modo temperatura ambiente • La temperatura ambiente se indica directamente (fig. 17). Fig.
  • Seite 83: Pilas

    Aviso de Problema Solución errores (1) Modo temperatura de la frente: la tempe- Use el termómetro solo dentro del rango de tem- ratura medida es inferior a 34°C (93,2°F). peraturas indicado. Si el aparato da error de forma (2) Modo temperatura de objeto: la tempera- continuada, póngase en contacto con un distribuidor tura medida es inferior a -22 °C (-7,6 °F).
  • Seite 84: Limpieza Del Aparato

    12. Limpieza del aparato • El sensor de medición es la pieza más sensible del termómetro. Trátelo con la máxima precaución a la hora de limpiarlo. • No utilice ningún producto de limpieza agresivo. • Siga siempre todas las indicaciones de seguridad para el usuario y el aparato. w ...
  • Seite 85: Datos Técnicos

    Puede solicitar más información sobre la comprobación de la precisión del aparato al servicio de asistencia técnica en la dirección indicada. Nos reservamos el derecho de efectuar modificaciones técnicas para mejorar y perfeccionar el producto. Tipo FT 100 Método de medición Medición infrarroja sin contacto Funciones básicas Medición de la temperatura de la frente...
  • Seite 86: Directrices

    Precisión clínica de repetición Frente: Niños 1-5 años ± 0,07°C (0,13°F) Adulto ± 0,08°C (0,14°F) Rangos de medición y precisión Medición de la temperatura de objetos de -22 °C a 80 °C (de -7,6 °F a Medición de la temperatura de 176 °F) objetos Precisión de la medición ±...
  • Seite 87 8. Misurazione sulla fronte ........99 zioni per l'uso e di attenersi alle indicazioni. 9. Misurazione della temperatura superficiale/tempe- Cordiali saluti ratura ambiente ..........101 Il team Beurer 10. Messaggi di errore ...........103 11. Batterie ............104 Fornitura 12. Pulizia dell'apparecchio ........104 Controllare l'integrità esterna della confezione e del 13.
  • Seite 88: Spiegazione Dei Simboli

    • Termometro per febbre • 2 batterie AAA da 1,5 V (LR03) • Custodia • Istruzioni per l'uso 1. spiegazione dei simboli I seguenti simboli sono utilizzati nelle Istruzioni per l'uso e sull'apparecchio: AVVERTENZA Segnalazione di rischio di lesioni o pericoli per la salute. ATTENZIONE Segnalazione di rischi di possibili danni all'apparecchio/agli accessori.
  • Seite 89: Uso Conforme

    Produttore Temperatura e umidità di trasporto e conservazione consentite Storage Operating Temperatura e umidità di esercizio consentite Apparecchio protetto contro la penetrazione di corpi solidi ≥ 12,5 mm e contro la caduta IP 22 inclinata di gocce d'acqua Numero di serie Informazione importante/Suggerimento Riferimento incrociato a un altro paragrafo.
  • Seite 90: Segnalazioni Di Rischi E Indicazioni Di Sicurezza

    • Dopo l'attività sportiva, un bagno o la permanenza all'aperto, attendere ca. 30 minuti prima di effettuare una misurazione sulla fronte. • Il termometro FT 100 è stato concepito solo per la zona di misurazione del corpo umano indicata nelle istru- zioni per l'uso.
  • Seite 91: Pericoli Per L'apparecchio

    Pericoli per l'apparecchio • Non esporre l'apparecchio a urti meccanici e non farlo cadere. • Non esporre l'apparecchio alla luce diretta del sole, alle alte temperature o a elevata umidità. • Evitare che l'apparecchio entri in contatto con dei liquidi. Il termometro non è impermeabile. Evitare qualunque contatto diretto con acqua o altri liquidi.
  • Seite 92: Informazioni Relative Al Termometro

    36,3 °C a 37,8 °C (da 97,3 °F a 100,0 °F) Termometro convenzionale Suggerimento Beurer • Non confrontare mai le temperature misurate con termometri diversi. • Informare il proprio medico sul tipo di termometro usato e sulla parte del corpo in cui si è misurata la temperatura.
  • Seite 93 Attività • Le attività fisiche e, in modo più limitato, le attività mentali aumentano la temperatura corporea. Suggerimento Beurer La misurazione della temperatura corporea fornisce il valore attuale di una persona. Se non si è sicuri dell'interpretazione dei risultati o se risultano dei valori anomali (ad es. febbre), è consigliabile rivolgersi al proprio medico curante.
  • Seite 94: Descrizione Dell'apparecchio

    5. Descrizione dell'apparecchio 1 Display 2 Pulsante MODE/MEM 3 Indicatore distanza/febbre 4 Pulsante LIGhT/sET 5 Sensore di misurazione 6 Sensore di distanza / sCAN 7 Pulsante 8 Coperchio vano batterie Pulsanti Funzioni MODE Impostazione della modalità di misurazione. MODE/MEM Visualizzazione dei valori misurati memorizzati. LIGhT Accensione manuale dell'illumina- LIGhT/sET...
  • Seite 95: Descrizione Del Display

    Descrizione del display 1 Indicatore anno/data/ora YEAR 2 Modalità di misurazione della temperatura ambiente 3 Modalità di misurazione della temperatura della fronte DATE 4 Modalità di misurazione superficiale 5 Indicatore del valore misurato/numero di posizione 6 Simbolo del segnale acustico 7 Simbolo illuminazione display 8 Anno 9 Funzione di memoria...
  • Seite 96: Accensione E Spegnimento Del Termometro

    7. Accensione e spegnimento del termometro / sCAN. Per accendere il termometro, premere brevemente il pulsante Dopo un breve autotest e un doppio segnale acustico il termometro è pronto per misurare la temperatura sulla fronte. L'apparecchio si avvia sempre in modalità Temperatura frontale Impostazione delle funzioni di base In questo menu è...
  • Seite 97 Nel display lampeggia l'ora (fig. 4). • Impostare l'ora con il pulsante MODE/MEM e confermare con il pulsante LIGhT/sET. Nel display lampeggiano i minuti (fig. 5). • Impostare i minuti con il pulsante MODE/MEM e confermare con il pulsante LIGhT/sET. Fig.
  • Seite 98 Nel display lampeggia il simbolo dell'illuminazione del display (fig. 8). L'illuminazione automatica del display (che appare dopo aver misurato la tem- peratura della fronte) può essere attivata o disattivata. • Per attivare l'illuminazione del display utilizzare il pulsante MODE/MEM per selezionare e confermare con il pulsante LIGhT/sET.
  • Seite 99: Misurazione Sulla Fronte

    8. Misurazione sulla fronte Suggerimento Beurer Tenere presente che • l'attività fisica, una sudorazione della fronte particolarmente elevata, l'assunzione di medicinali vaso- costrittori e le irritazioni della pelle possono alterare i risultati della misurazione, • la fronte e in particolare le tempie devono essere libere da sudore e cosmetici.
  • Seite 100 Distanza di misurazione 4-6 cm La distanza di misurazione NON è 4-6 cm Non appena il termometro rileva la Se la distanza non è compresa tra 4 e distanza di misurazione corretta tra 4 e 6 cm, l'indicatore distanza/febbre lam- Fig.
  • Seite 101: Misurazione Della Temperatura Superficiale/Temperatura Ambiente

    Visualizzazione dei valori memorizzati L'apparecchio memorizza esclusivamente valori misurati in modalità Temperatura frontale e ne memorizza automaticamente le ultime 60 misurazioni. Se le 60 posizioni di memoria sono tutte occupate, viene di volta in volta cancellato il valore più remoto. • Per richiamare la memoria: • A termometro acceso tenere premuto il pulsante MODE/MEM per 5 secondi.
  • Seite 102 Se si desidera usare il termometro per misurare la temperatura dell'ambiente, è necessario passare alla modalità della Temperatura ambiente. • A termometro acceso premere due volte il pulsante MODE/MEM. L'apparecchio passa alla modalità di Temperatura ambiente • La temperatura ambiente viene mostrata direttamente (fig. 17). I valori misurati in modalità...
  • Seite 103: Messaggi Di Errore

    10. Messaggi di errore Messag­ gio di Problema Soluzione errore Misurazione durante l'autotest, apparecchio Attendere finché il simbolo della fronte smette di lam- non ancora pronto. peggiare. Temperatura ambiente inferiore a 10 °C o La temperatura ambiente deve essere compresa tra superiore a 40 °C (<50 °F, >104 °F).
  • Seite 104: Batterie

    11. Batterie sostituzione delle batterie L'apparecchio necessita di due batterie, tipo AAA, LR03. • Aprire il vano batterie. Fare scorrere il vano batterie verso il basso. • Estrarre le batterie esauste dal vano batterie. • Inserire batterie nuove. Accertarsi che le batterie siano orientate correttamente in base alla polarità. • Chiudere il vano batterie.
  • Seite 105: Conservazione Dell'apparecchio

    Pulire il sensore di misurazione dopo ogni utilizzo. A tale scopo utilizzare un panno morbido o un cotton fioc imbe- vuto di disinfettante o di alcol al 70%. Per la pulizia dell'intero apparecchio utilizzare un panno morbido leggermente inumidito con acqua e sapone. Evitare assolutamente di lasciar penetrare acqua nell'apparecchio.
  • Seite 106 Richiedere informazioni dettagliate sulla verifica della precisione all'indirizzo indicato del servizio assi- stenza. Ci riserviamo il diritto di apportare modifiche tecniche al fine del miglioramento e del continuo sviluppo del prodotto. Tipo FT 100 Metodo di misurazione Misurazione a infrarossi senza contatto Funzioni di base...
  • Seite 107: Direttive

    Intervalli di misurazione e da -22 °C a 80 °C (da -7,6 °F a 176 °F) precisione Precisione di misurazione ± 4% o ± 2 °C (± 4 °F) Misurazione della temperatura superficiale Funzione di memoria Memorizza automaticamente gli ultimi 60 valori misurati. Misurazione della temperatura corporea Segnale acustico...
  • Seite 108 7. Termometrenin açılması ve ayarlanması ..117 ve içindeki açıklamalara uyun. 8. Alından ölçüm ..........120 9. Nesne sıcaklığının/oda sıcaklığının ölçülmesi ..122 Yeni cihazınızı iyi günlerde kullanmanızı dileriz Beurer Ekibiniz 10. Hataların gösterimi ..........123 11. Piller ..............124 Teslimat kapsamı 12. Cihazın temizlenmesi ........125 Teslimat kapsamını...
  • Seite 109: İşaretlerin Açıklaması

    • Termometre • 2x 1,5 V AAA pil (LR03) • Saklama çantası • Kullanım kılavuzu 1. İşaretlerin açıklaması Aşağıdaki semboller kullanım kılavuzunda ve cihaz üzerinde kullanılmıştır: UYARI Yaralanma tehlikelerine veya sağlığınızla ilgili tehlikelere yönelik uyarı. DİKKAT Cihaz ve aksesuarlarında olabilecek hasarlar için güvenlik uyarısı. Önemli bilgilere yönelik not.
  • Seite 110: Amacına Uygun Kullanım

    Üretici İzin verilen saklama ve taşıma sıcaklığı ve hava nemi Storage Operating İzin verilen çalışma sıcaklığı ve hava nemi Cihaz 12,5 mm ve daha büyük yabancı cisimlere ve eğimli bir şekilde damlayan suya karşı IP 22 korumalıdır Seri numarası Önemli bilgi/öneri Başka bir bölüme referans.
  • Seite 111: Uyarılar Ve Güvenlik Yönergeleri

    • Sportif bir aktiviteden, banyo yaptıktan veya dışarıdan geldikten sonra, alından ölçüm yapmak için yakl. 30 dakika kadar bekleyin. • FT 100 termometre, insan vücudunda yalnızca kullanım kılavuzunda belirtilen ölçüm yerinde kullanılmak üzere tasarlanmıştır. • Ateşten şüpheleniyorsanız, normal ortalama sıcaklığı, ölçtüğünüz sıcaklıkla karşılaştırın. Normal ortalama sıcak- lığınızı...
  • Seite 112: Cihaza Yönelik Tehlikeler

    Cihaza yönelik tehlikeler • Cihazı hiçbir şekilde mekanik darbelere maruz bırakmayın ve yere düşürmeyin. • Cihazı doğrudan güneş ışığına, yüksek sıcaklıklara veya yüksek hava nemine maruz bırakmayın. • Cihazı herhangi bir sıvıya maruz bırakmayın. Cihaz su geçirmez değildir. Su veya her türlü sıvıyla doğrudan temas ettirmekten kaçının.
  • Seite 113: Bu Termometre Hakkında Bilgiler

    Rektal sıcaklık 36,3 °C - 37,8 °C (97,3 °F - 100,0 °F) Geleneksel termometre Beurer önerisi • Farklı termometrelerle ölçülmüş sıcaklıkları asla birbiriyle karşılaştırmayın. • Doktorunuza vücut sıcaklığınızı hangi termometre ile ve vücudunuzun hangi bölgesinde ölçtüğünüzü söyleyin. Bunu kendi kendinize yaptığınız teşhiste de göz önünde bulundurun.
  • Seite 114 Aktiviteler • Vücut aktiviteleri ile etkisi daha düşük olan zihinsel aktiviteler vücut sıcaklığını arttırır. Beurer önerisi Vücut sıcaklığının ölçümü bir kimsenin güncel ölçüm değerini verir. Eğer sonuçları doğru yorumladığınızdan emin olamıyorsanız veya anormal değerler (örn. ateş) ortaya çıkarsa, doktorunuza başvurun. Bu durum huzursuzluk, yoğun terleme, ciltte kızarıklık, şiddetli kalp atışı, bayılma eğilimi gibi hastalık belirtilerinin...
  • Seite 115: Cihaz Açıklaması

    5. Cihaz açıklaması 1 Ekran 2 MODE/MEM düğmesi 3 Ateş/mesafe göstergesi 4 LIGhT/sET düğmesi 5 Ölçüm sensörü 6 Mesafe sensörü / sCAN düğmesi 8 Pil bölmesi kapağı Düğmeler Fonksiyonlar MODE Ölçme modu ayarı. MODE/MEM Kaydedilen ölçüm değerlerini gösterir. LIGhT Ekran aydınlatmasını manuel olarak açar. LIGhT/sET Temel fonksiyonların ayarlanması.
  • Seite 116: Çalıştırma

    Ekran açıklaması 1 Yıl, tarih, saat göstergesi YEAR 2 Oda sıcaklığı modu 3 Alın sıcaklığı modu DATE 4 Nesne sıcaklığı modu 5 Sıcaklık değeri ve kayıt yeri numarası göstergesi 6 Sinyal sesi sembolü 7 Ekran aydınlatma sembolü 8 Yıl 9 Kayıt fonksiyonu 10 Tarih 11 Ölçüm sonucu ≥...
  • Seite 117: Termometrenin Açılması Ve Ayarlanması

    7. Termometrenin açılması ve ayarlanması / sCAN düğmesine kısa süreyle basın. Termometreyi açmak için Termometre kendi kendine kısa bir test uygulayıp iki kısa bip sesi çıkardıktan sonra, alın bölgesinde sıcaklık ölçümü yapmaya hazırdır. Cihaz her zaman alın sıcaklığı modunda çalışmaya başlar Temel fonksiyonların ayarlanması...
  • Seite 118 Saat ekranda yanıp söner (Şek. 4). • MODE/MEM düğmesine basarak saati ayarlayın ve LIGhT/sET düğmesine basarak onaylayın. Dakika ekranda yanıp söner (Şek. 5). • MODE/MEM düğmesine basarak dakikayı ayarlayın ve LIGhT/sET düğ- mesine basarak onaylayın. Şek. 4 Şek. 5 12 saatlik formatta saat, AM/PM olarak gösterilir. Sıcaklık ölçüm birimi ekranda yanıp söner (Şek.
  • Seite 119 Ekran aydınlatması sembolü ekranda yanıp söner (Şek. 8). Otomatik ekran aydınlatmasını (alın sıcaklığını ölçtükten sonra görünür) açabilir veya kapatabilirsiniz. • Otomatik ekran aydınlatmasını açmak için MODE/MEM düğmesine basarak öğesini seçin ve LIGhT/sET düğmesine basarak onaylayın. Şek. 8 • Otomatik ekran aydınlatmasını kapatmak için MODE/MEM düğmesine basa- öğesini seçin ve LIGhT/sET düğmesine basarak onaylayın.
  • Seite 120: Alından Ölçüm

    8. Alından ölçüm Beurer önerisi Şunları göz önünde bulundurun: • Fiziksel aktivite, alın bölgesinde aşırı terleme, damar büzücü ilaçlar ve cilt kızarıklıkları ölçüm sonucunu etkileyebilir. • Alın bölgesinin veya şakakların terden ve kozmetik ürünlerden arındırılmış olması gerekmektedir. • Alından üç ölçüm yapmanızı tavsiye ederiz. Üç ölçümden farklı sonuçlar elde ederseniz, en yüksek ölçüm değerini dikkate alın.
  • Seite 121 Ölçüm mesafesi 4 - 6 cm Ölçüm mesafesi 4 - 6 cm DEĞİL Termometre, doğru ölçüm mesafesi Ölçüm mesafesi 4 - 6 cm değilse, ateş/ olan 4 - 6 cm konumuna geldiğinde, mesafe göstergesi mavi renkte yanıp ölçme işlemine otomatik olarak baş- söner (sinyal sesi açıksa bir bip sesi Şek.
  • Seite 122: Kaydedilen Ölçüm Değerlerinin Görüntülenmesi

    Kaydedilen ölçüm değerlerinin görüntülenmesi Cihaz, sadece alın sıcaklığı modunda elde edilen ölçüm değerlerini kaydeder. Cihaz, ölçülen son 60 değeri otomatik olarak kaydeder. 60 kayıt yeri aşıldığında, en eski değer silinir. • Kayıtlar şu şekilde görüntülenebilir: • Termometre çalışır durumdayken, 5 saniye boyunca MODE/MEM düğmesine basın. En yeni ölçüm değeri görünür.
  • Seite 123: Hataların Gösterimi

    Termometreyi oda sıcaklığı ölçmede kullanmak istiyorsanız, oda sıcaklığı moduna almanız gerekir. • Bunun için termometre açıkken MODE/MEM düğmesine iki kez kısa süreyle basın. Cihaz oda sıcaklığı moduna geçer. • Oda sıcaklığı doğrudan gösterilir (Şek. 17). Şek. 17 Oda sıcaklığı modundaki ölçüm değerleri kaydedilmez. 10.
  • Seite 124: Piller

    Hata Sorun Çözüm mesajı Piller bitmiş. Pilleri değiştirin. 11. Piller Pillerin değiştirilmesi Cihaz AAA, LR03 tipinde iki pille çalışır. • Pil bölmesini açın. Bunun için pil bölmesi kapağını aşağıya doğru kaydırın. • Bitmiş pilleri pil bölmesinden çıkarın. • Yeni pilleri yerleştirin. Pil kutuplarının doğru yönde yerleştirilmiş olmasına dikkat edin. • Pil bölmesini kapatın.
  • Seite 125: Cihazın Temizlenmesi

    12. Cihazın temizlenmesi • Ölçüm sensörü, termometrenin en hassas parçasıdır. Ölçüm sensörünü temizlerken çok dikkat edin. • Aşındırıcı temizlik maddesi kullanmayın. • Kullanıcıya ve cihaza yönelik güvenlik yönergelerine uyun. w  3. Uyarılar ve güvenlik yönergeleri Ölçüm sensörünü her kullanımdan sonra temizleyin. Bunun için dezenfektan veya %70 alkol ile nemlendirebile- ceğiniz yumuşak bir bez veya pamuklu çubuk kullanın.
  • Seite 126: Teknik Veriler

    Cihazın tedavi amacıyla kullanılması halinde, uygun araçlarla ölçüm kontrolleri yapılmalıdır. Doğruluk kontrolü ile ayrıntılı bilgileri servis adresinden talep edebilirsiniz. Ürünü iyileştirmek ve geliştirmek için teknik değişiklik yapma hakkımız saklıdır. FT 100 Ölçüm yöntemi Temassız kızılötesi ölçüm Temel fonksiyonlar Alın sıcaklığı ölçümü...
  • Seite 127: Direktifler

    Ölçüm aralığı ve doğruluğu Nesne sıcaklığı ölçümü -22 °C - 80 °C (-7,6 °F - 176 °F) Nesne sıcaklığı ölçümü Ölçüm doğruluğu ± %4 veya ± 2 °C (± 4 °F) Kayıt fonksiyonu Son 60 ölçüm değerini otomatik olarak kaydeder. Vücut sıcaklığı...
  • Seite 128 Внимательно прочтите эту инструкцию по примене- 8. Измерение температуры на лбу ....141 нию и следуйте ее указаниям. 9. Измерение температуры объекта/комнатной С наилучшими пожеланиями, температуры ..........143 компания Beurer 10. Индикация неисправностей ......144 комплект поставки 11. Батарейки ............145 Проверьте комплектность поставки и  убедитесь 12. Очистка прибора ...........146 в ...
  • Seite 129: Пояснения К Символам

    • Медицинский термометр • 2 батарейки AAA на 1,5 В (LR03) • Сумка для хранения • Инструкция по применению 1. Пояснения к символам В данной инструкции по применению и на приборе используются следующие символы. ПРЕДОСТЕРЕЖЕНИЕ Предупреждает об опасности травмирования или ущерба для здоровья. ВНИМАНИЕ Указывает на возможность повреждения прибора/деталей. Указание Отмечает...
  • Seite 130: Использование По Назначению

    Изготовитель. Допустимая температура и влажность воздуха при хранении и транспортировке. Storage Operating Допустимая рабочая температура и влажность воздуха. Прибор защищен от проникновения твердых тел размером ≥ 12,5 мм и капель воды, IP 22 падающих под углом. Серийный номер. Важная информация/совет. Перекрестная ссылка на другой абзац. Соответствие изделий стандартам Таможенного союза «ЕАС». 2.
  • Seite 131: Предостережения И Указания По Технике Безопасности

    3. Предостережения и указания по технике безопасности Опасности для пользователя • Используйте прибор только после того, как прочтете данную инструкцию по применению и усвоите содержащуюся в ней информацию. • Сохраните данную инструкцию. Инструкция по применению должна быть доступна для всех пользова- телей. Соблюдайте все указания. • Прибор перед измерением должен не менее 30 минут находиться в том помещении, в котором будет проводиться...
  • Seite 132: Опасности Для Прибора

    • Очищайте термометр после каждого использования (w  12. Очистка прибора). • Если у Вас есть какие-либо вопросы по применению прибора, обратитесь к своему поставщику или в сервисную службу. Опасности для прибора • Берегите прибор от механических ударов и падений. • Не подвергайте прибор воздействию прямого солнечного излучения, экстремальных температур или высокой...
  • Seite 133: Информация О Термометре

    Обычный термометр Ректальная температура От 36,3 до 37,8 °C (от 97,3 до 100,0 °F) Обычный термометр Совет от Beurer • Никогда не сравнивайте между собой температуры, измеренные разными термометрами. • Сообщите врачу, каким термометром Вы мерили температуру и в каком месте. Учитывайте это также при самодиагностике.
  • Seite 134 Активность • Физическая активность, а также умственная деятельность (в меньшей степени) повышают температуру тела. Совет от Beurer Измерение дает значение температуры тела человека в данный момент. Если возникли сомнения в толковании результатов измерения или имеют место необычные значения (например, жар), обра- титесь к лечащему врачу. Это относится также к незначительным изменениям температуры, когда...
  • Seite 135: Описание Прибора

    5. Описание прибора 1. Дисплей 2. Кнопка MODE/MEM Индикатор повышенной темпера- туры/расстояния 4. Кнопка LIGhT/sET 5. Измерительный датчик 6. Датчик расстояния / sCAN 7. Кнопка 8. Крышка отделения для батареек Кнопки Функции MODE MODE/MEM Настройка режима измерения. (режим/ память) Индикация сохраненных измеренных значений. LIGhT LIGhT/ Включение...
  • Seite 136 Описание дисплея 1. Индикация года/даты/времени YEAR 2. Режим измерения комнатной температуры 3. Режим измерения температуры лба DATE 4. Режим измерения температуры объекта 5. Индикация значения температуры/номера ячейки памяти 6. Символ звукового сигнала 7. Символ подсветки дисплея 8. Год 9. Функция памяти 10.
  • Seite 137: Ввод В Эксплуатацию

    6. Ввод в эксплуатацию Удалите изоляционный слой при его наличии на крышке для батареек или удалите защитную пленку с бата- реек и поставьте батарейки, соблюдая полярность. Термометр включается автоматически, на дисплее появляется меню настроек ( w 7. Включение и настройка термометра). • 7. Включение и настройка термометра / sCAN.
  • Seite 138 На дисплее мигает индикация года (рис. 2). • С помощью кнопки MODE/MEM установите год и подтвердите ввод нажатием кнопки LIGhT/sET. YEAR DATE На дисплее мигает индикация дня/месяца (рис. 3). • С помощью кнопки MODE/MEM установите день и месяц и подтвердите ввод нажатием кнопки LIGhT/sET. Если выбирается 12-часовой формат, последовательность отобра- Рис. 2 Рис. 3 жения...
  • Seite 139 На дисплее мигает индикация единицы измерения температуры (рис. 6). Отображение результатов измерения возможно в градусах Цельсия (°C) или градусах Фаренгейта (°F). • Для просмотра результатов измерения в градусах Цельсия с помо- щью кнопки MODE/MEM выберите °C и подтвердите выбор нажатием кнопки LIGhT/sET. • Для просмотра результатов измерения в градусах Фаренгейта с помо- Рис. 6 щью...
  • Seite 140 На дисплее мигает символ подсветки дисплея (рис. 8). Вы можете включить или выключить автоматическую подсветку дисплея (включается после измерения температуры на лбу). • Для включения автоматической подсветки дисплея с помощью кнопки MODE/MEM выберите и подтвердите выбор нажатием кнопки LIGhT/ sET. Рис. 8 • Для выключения автоматической подсветки дисплея с помощью кнопки MODE/MEM выберите...
  • Seite 141: Измерение Температуры На Лбу

    8. Измерение температуры на лбу Совет от Beurer Учитывайте, что • физическая активность, постоянное повышенное потоотделение на лбу, прием сосудосуживаю- щих медикаментов и кожные раздражения могут привести к искажению результатов измерения; • на лбу или висках не должно быть пота и косметики; • мы рекомендуем выполнить три измерения на лбу. Если результаты трех измерений различаются, ориентируйтесь...
  • Seite 142 Расстояние 4–6 см Расстояние НЕ 4–6 см Как только термометр распознает Если расстояние до точки измерения расстояние до точки измерения не лежит в диапазоне 4–6 см, инди- 4–6  см, автоматически начнется катор повышенной температуры/ процесс измерения. Индикатор расстояния мигает голубым светом Рис. 11 повышенной температуры/рассто- (если...
  • Seite 143: Измерение Температуры Объекта/Комнатной Температуры

    Индикация сохраненных измеренных значений Прибор сохраняет в памяти значения исключительно в режиме температуры лба . Прибор автоматиче- ски сохраняет значения 60 последних измерений. Когда все 60 ячеек памяти заполнятся, новое значение будет записано в ячейку с самым старым из пре- дыдущих значений. • Память можно вызвать следующим образом. • При...
  • Seite 144: Индикация Неисправностей

    Для использования термометра с целью измерения комнатной темпера- туры необходимо перейти в режим измерения комнатной температуры. • Для этого дважды коротко нажмите кнопку MODE/MEM при вклю- ченном термометре. Прибор переключится в режим измерения комнатной температуры • На дисплее отображается температура в помещении (рис. 17). Рис. 17 Значения, определенные в режиме измерения комнатной температуры, не...
  • Seite 145: Батарейки

    Сооб­ щение Проблема Решение об ошибке (1) Режим измерения температуры лба. Используйте термометр только для измерений Измеренная температура превышает в  пределах указанного диапазона температур. 42,2 °C (108 °F). При повторной индикации неисправности обрати- (2) Режим измерения температуры объекта. тесь к специализированному дилеру или в службу Измеренная...
  • Seite 146: Очистка Прибора

    утилизация батареек • Утилизируйте использованные и полностью разряженные батарейки в контейнеры со специальной мар- кировкой, сдавайте в пункты приема спецотходов или в магазины электрооборудования. Закон обязы- вает пользователей обеспечить утилизацию батареек. • Следующие знаки предупреждают о наличии в батарейках токсичных веществ. Pb = батарейка содержит свинец. Cd = батарейка содержит кадмий. Hg = батарейка...
  • Seite 147: Утилизация Прибора

    При запланированном длительном хранении прибора извлеките из него батарейки. 14. утилизация прибора В целях защиты окружающей среды по окончании срока службы следует утилизировать прибор отдельно от бытового мусора. Утилизация должна производиться через соответствующие пункты сбора в вашей стране. Прибор следует утилизировать согласно директиве ЕС по отходам электрического и электронного оборудования — WEEE (Waste Electrical and Electronic Equipment).
  • Seite 148 Единицы измерения Градусы Цельсия (°C) или Фаренгейта (°F) Условия эксплуатации От 10 до 40 °C (от 50 до 104 °F) при относительной влажности воздуха < 95 % Условия хранения От –20 до 50 °C (от –4 до 122 °F) и транспортировки при относительной влажности воздуха < 95 % Расстояние при измерении Расстояние...
  • Seite 149: Директивы

    Размеры Ок. 40,9 x 68,2 x 199 мм Ширина x глубина x высота Вес 82 г (без батареек) 2 батарейки AAA, LR03 Срок службы ок. 2 000 измерений Дополнительно активированные функции, такие как акустический сигнал или подсветка дисплея, могут приводить к уменьшению срока службы батареек Серийный номер находится на приборе или в отделении для батареек. 16.
  • Seite 150 Срок эксплуатации изделия: мин. 5 лет Фирма-изготовитель: Бойрер Гмбх, Софлингер штрассе 218, 89077-УЛМ, Германия Фирма-импортер: OOO БОЙРЕР, 109451 г. Москва, ул. Перерва 62, корп. 2, офис 3 Сервисный центр: 109451 г. Москва, ул. Перерва 62, корп. 2, Тел(факс) 495–658 54 90 bts-service@ctdz.ru Дата...
  • Seite 151 7. Włączanie i ustawianie termometru ....160 wać się do zawartych w niej wskazówek. 8. Pomiar temperatury na czole ......163 Z pozdrowieniami 9. Pomiar temperatury obiektu / temperatury w po- Zespół Beurer mieszczeniu .............165 Zawartość opakowania 10. Symbole błędów ..........166 Przesyłkę należy sprawdzić pod kątem zewnętrznych 11.
  • Seite 152: Objaśnienie Symboli

    korzystania z urządzenia oraz zwrócić się do przedstawiciela handlowego lub działu obsługi klienta na podany adres. • Termometr lekarski • 2 baterie 1,5 V AAA (LR03) • Pokrowiec • Instrukcja obsługi 1. Objaśnienie symboli W niniejszej instrukcji i na urządzeniu zastosowano następujące symbole: OSTRZEŻENIE Ostrzeżenie przed zagrożeniem obrażeniami ciała lub utratą zdrowia UWAGA Ostrzeżenie przed niebezpieczeństwem uszkodzenia urządzenia/akcesoriów Wskazówka...
  • Seite 153 Oznakowanie CE potwierdza zgodność z zasadniczymi wymogami dyrektywy 93/42/WE w sprawie wyrobów medycznych Producent Dopuszczalna temperatura przechowywania oraz temperatura i wilgotność powietrza podczas Storage transportu Operating Dopuszczalna temperatura i wilgotność powietrza podczas pracy Ochrona urządzenia przed ciałami obcymi o wielkości ≥12,5 mm i przed kroplami wody IP 22 spadającymi ukośnie Numer seryjny...
  • Seite 154: Użytkowanie Zgodne Z Przeznaczeniem

    • Pomiar temperatury ciała na czole należy przeprowadzać najwcześniej 30 min. po podjęciu aktywności rucho- wej, kąpieli lub przebywaniu na świeżym powietrzu. • Pomiar temperatury za pomocą termometru FT 100 należy przeprowadzać wyłącznie na tych częściach ciała, na które wskazuje instrukcja obsługi.
  • Seite 155: Zagrożenia Dla Urządzenia

    • Przed każdym użyciem należy sprawdzić, czy soczewka nie jest uszkodzona. W przypadku uszkodzenia soczewki należy się skontaktować ze sprzedawcą lub serwisem. • Nie należy dotykać soczewki palcem. • Wartości pomiaru określone za pomocą urządzenia mają wyłącznie charakter informacyjny i nie zastępują bada- nia lekarskiego! Przed rozpoczęciem leczenia skonsultuj się z lekarzem. • Termometr należy czyścić...
  • Seite 156: Informacje Na Temat Termometru

    Termometr tradycyjny Temperatura przy pomiarze rektalnym Od 36,3°C do 37,8°C (od 97,3°F do 100,0°F) Termometr tradycyjny Wskazówka firmy Beurer • Nie należy porównywać ze sobą temperatur mierzonych za pomocą różnych termometrów. • Lekarzowi należy udzielić informacji, jakim termometrem i w jakim miejscu na ciele mierzona była tem-...
  • Seite 157 Temperatura ciała rano jest niższa i wzrasta w ciągu dnia. Aktywność • Aktywność fizyczna oraz w mniejszym stopniu aktywność umysłowa podwyższają temperaturę ciała. Wskazówka firmy Beurer Pomiar temperatury ciała wskazuje aktualną wartość temperatury ciała człowieka. W przypadku nie- pewności podczas interpretacji wyniku lub nietypowej wartości (np. gorączka) należy skontaktować się...
  • Seite 158: Opis Urządzenia

    5. Opis urządzenia 1 Wyświetlacz 2 Przycisk MODE/MEM 3 Czujnik temperatury/odległości 4 Przycisk LIGhT/sET 5 Czujnik pomiarowy 6 Czujnik odległości / Przycisk sCAN 8 Osłona przegrody na baterie Przyciski Funkcje MODE Ustawianie trybu pomiaru. MODE/MEM Wskazanie zapisanych wartości pomiaru. LIGhT Ręczne włączanie podświetlenia wyświetlacza.
  • Seite 159: Uruchomienie

    Opis wyświetlacza 1 Wskaźnik rok/data/godzina YEAR 2 Tryb Temperatura w pomieszczeniu 3 Tryb Temperatura na czole DATE 4 Tryb Temperatura obiektu 5 Wskaźnik wartości temperatury/numeru miejsca w pamięci 6 Symbol sygnału dźwiękowego 7 Symbol podświetlenia wyświetlacza 8 Rok 9 Funkcja zapisywania 10 Data 11 Wynik pomiaru ≥38,0°C (≥100,4°F) „gorączka”...
  • Seite 160: Włączanie I Ustawianie Termometru

    7. Włączanie i ustawianie termometru / sCAN. Aby włączyć termometr, krótko naciśnij przycisk Po krótkim automatycznym teście i dwóch krótkich sygnałach dźwiękowych termometr jest gotowy do pomiaru temperatury na czole. Urządzenie uruchamia się zawsze w trybie Temperatura na czole ustawianie podstawowych funkcji W Menu można po kolei indywidualnie ustawić poniższe funkcje. Jednostka pomiaru Sygnał...
  • Seite 161 Na wyświetlaczu zacznie migać wskazanie godziny (rys. 4). • Za pomocą przycisku MODE/MEM ustaw godzinę i potwierdź przyciskiem LIGhT/sET. Na wyświetlaczu zacznie migać wskazanie minut (rys. 5). • Za pomocą przycisku MODE/MEM ustaw minuty i potwierdź przyciskiem LIGhT/sET. W formacie 12-godzinnym (12 h) godzina wyświetlana jest z oznaczeniem Rys.
  • Seite 162 Na wyświetlaczu zacznie migać symbol podświetlenia wyświetlacza (rys. 8). Automatyczne podświetlenie wyświetlacza (pojawia się po dokonaniu pomiaru temperatury na czole) można włączyć lub wyłączyć. • Aby włączyć automatyczne podświetlenie wyświetlacza, należy użyć przyci- sku MODE/MEM i potwierdzić za pomocą przycisku LIGhT/sET. Rys.
  • Seite 163: Pomiar Temperatury Na Czole

    8. Pomiar temperatury na czole Wskazówka firmy Beurer Należy pamiętać, że: • aktywność fizyczna, nadmierna potliwość na czole, przyjmowanie leków zwężających naczynia i podraż- nienie skóry może zafałszować wyniki pomiaru. • czoło lub skronie nie mogą być spocone i muszą być wolne od kosmetyków.
  • Seite 164 Odstęp pomiaru wynosi Odstęp pomiaru NIE wynosi 4–6 cm 4–6 cm Termometr rozpoczyna automatyczny Jeśli odstęp pomiaru nie wynosi pomiar natychmiast po zarejestro- 4–6 cm, wskaźnik temperatury/odległo- waniu odstępu 4–6 cm. Wskaźnik ści miga na niebiesko (przy włączonym Rys. 11 temperatury/odległości świeci się na sygnale dźwiękowym dodatkowo sły- niebiesko w sposób ciągły.
  • Seite 165: Pomiar Temperatury Obiektu / Temperatury W Pomieszczeniu

    Wyświetlanie zapisanych wartości pomiaru Urządzenie zapisuje wyłącznie wartości pomiaru w trybie Temperatura na czole . Urządzenie automatycznie zapisuje wartości pomiaru z ostatnich 60 pomiarów. Po przekroczeniu 60 miejsc w pamięci usuwana jest najstarsza wartość. • Pamięć można sprawdzić w następujący sposób: • Przytrzymaj przez 5 sekund przycisk MODE/MEM przy włączonym termometrze. Zostanie wyświetlona najnowsza wartość...
  • Seite 166: Symbole Błędów

    Jeśli termometr ma być wykorzystany do pomiaru temperatury w pomiesz- czeniu, należy go przełączyć na tryb Temperatura w pomieszczeniu. • W tym celu przy włączonym termometrze nacisnąć krótko dwa razy przy- cisk MODE/MEM. Urządzenie przełączy się na tryb Temperatura w pomieszczeniu • Bezpośrednio wyświetli się temperatura w pomieszczeniu (rys. 17). Rys.
  • Seite 167: Baterie

    Komu­ nikat Problem Rozwiązanie o błędzie (1) Tryb Temperatura na czole: Pomiar tempe- Używaj termometru wyłącznie w podanych zakresach ratury wynosi mniej niż 34°C (93,2°F). temperatur. Jeśli błąd pojawi się ponownie, należy (2) Tryb Temperatura obiektu: Pomiar tempera- skontaktować się ze sprzedawcą lub serwisem. tury wynosi mniej niż...
  • Seite 168: Czyszczenie Urządzenia

    12. Czyszczenie urządzenia • Czujnik pomiarowy to najbardziej wrażliwy element termometru. Podczas czyszczenia należy się z nim obchodzić z najwyższą ostrożnością. • Nie używać agresywnych środków czyszczących. • Zawsze przestrzegać wskazówek bezpieczeństwa dla użytkownika i urządzenia. w  3. Ostrzeżenia i wskazówki dotyczące bezpieczeństwa Po każdym użyciu należy wyczyścić czujnik pomiarowy. W tym celu należy użyć szmatki lub wacika nasączonego środkiem do dezynfekcji lub alkoholem (70%).
  • Seite 169: Dane Techniczne

    W przypadku korzystania z urządzenia w praktyce lekarskiej należy przeprowadzać kontrole pomiarowe za pomocą odpowiednich środków. Dokładne dane dotyczące sprawdzania dokładności można uzyskać, kontaktując się z działem obsługi klienta. Producent zastrzega sobie prawo do zmian technicznych, mających na celu ulepszenie konstrukcji urządzenia. FT 100 Metoda pomiaru Bezdotykowy pomiar z wykorzystaniem podczerwieni Funkcje podstawowe...
  • Seite 170 Zakresy pomiaru i dokładność Pomiar temperatury na czole pomiaru temperatury na czole Od 34°C do 42,2°C (od 93,2°F do 108°F) Dokładność pomiaru od 34°C do 42,2°C: ± 0,2°C (93,2°F do 108°F: ± 0,4°F) Kliniczna powtarzalność Czole: dzieci 1-5 yoku ± 0,07°C (0,13°F) pomiarów dorosły ± 0,08°C (0,14°F) Zakresy pomiaru i dokładność...
  • Seite 171: Przepisy

    16. Przepisy Urządzenie jest zgodne z dyrektywą Unii Europejskiej w sprawie produktów medycznych 93/42/EEC, ustawą o pro- duktach medycznych, standardem ASTM E 1965 - 98 oraz europejską normą EN60601-1-2 i wymaga zachowania szczególnych środków ostrożności w zakresie kompatybilności elektromagnetycznej.
  • Seite 172: Electromagnetic Compatibility Information

    Guidance and manufacturer’s declaration – electromagnetic emissions The FT 100 is intended for use in the electromagnetic environment specified below. The customer or the user of the FT 100 should assure that it is used in such an environment. Emissions test Compliance Electromagnetic environment –...
  • Seite 173 Guidance and manufacturer’s declaration – electromagnetic immunity The FT 100 is intended for use in the electromagnetic environment specified below. The customer or the user of the FT 100 should assure that it is used in such an environment. Immunity test...
  • Seite 174 TV broadcast cannot be predicted theoretically with accuracy. To assess the electromagnetic environment due to fixed RF transmit- ters, an electromagnetic site survey should be considered. If the measured field strength in the location in which the FT 100 is used exceeds the applicable RF compliance level above, the FT 100 should be observed to verify normal operation.
  • Seite 175 Recommended separation distances between portable and mobile RF communications equipment and the FT100 The FT 100 is intended for use in an electromagnetic environment in which radiated RF disturbances are controlled. The customer or the user of the FT 100 can help prevent electromagnetic interference by maintaining a minimum distance between portable and mobile RF communications equipment (transmitters) and the FT 100 as recommended below, according to the maximum output power of the communications equipment.
  • Seite 176 Beurer GmbH • Söflinger Straße 218 • 89077 Ulm, Germany • www.beurer.com www.beurer-gesundheitsratgeber.com • www.beurer-healthguide.com...

Inhaltsverzeichnis