Werbung
Verfügbare Sprachen
Verfügbare Sprachen
Quicklinks
Werbung
Fehlerbehebung

Verwandte Anleitungen für HomeMatic HmIP-eTRV-2


Inhaltszusammenfassung für HomeMatic HmIP-eTRV-2
- Seite 1 Heizkörperthermostat Radiator Thermostat HmIP-eTRV-2 Installations- und Manual de instalación Bedienungsanleitung y uso Installation and operating Istruzioni per l‘installazione manual e l‘uso Notice d‘installation et Installatie- en d‘emploi bedieningshandleiding...
-
Seite 2: Inhaltsverzeichnis
Installations- und Bedienungsanleitung Inhaltsverzeichnis Lieferumfang ....................3 Hinweise zur Anleitung ................3 Gefahrenhinweise ..................3 Funktion und Geräteübersicht ..............4 Allgemeine Systeminformationen .............5 Inbetriebnahme .....................5 Anlernen ....................... 5 Montage ........................ 6 6.2.1 Heizkörperthermostat anbringen ............6 6.2.2 Adapter für Danfoss ................7 6.2.3 Stützring ....................9 Adaptierfahrt ...................... -
Seite 3: Lieferumfang
Lassen Sie das Verpa- ckungsmaterial nicht achtlos lie- Lesen Sie diese Anleitung sorgfältig, gen. Plastikfolien/ -tüten, Styro- bevor Sie Ihre Homematic IP Geräte porteile etc. können für Kinder zu in Betrieb nehmen. Bewahren Sie die einem gefährlichen Spielzeug Anleitung zum späteren Nachschlagen werden. -
Seite 4: Funktion Und Geräteübersicht
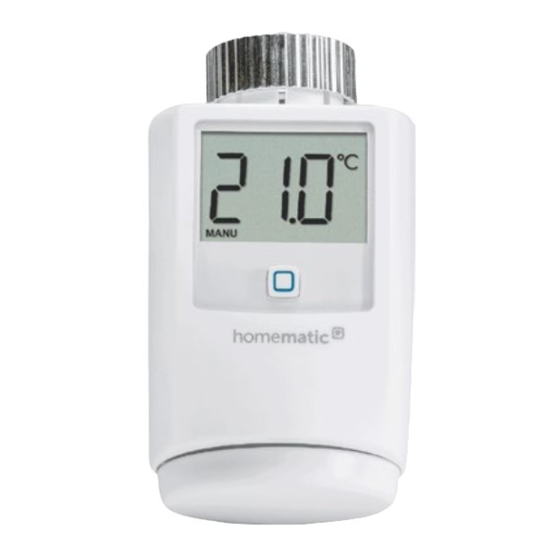
(B) Display Mit dem Homematic IP Heizkörper- (C) Systemtaste (Anlerntaste und LED) thermostat können Sie die Raumtem- (D) Batteriefachdeckel peratur über die Homematic IP Smart- (E) Stellrad/Boost-Taste phone App zeitgesteuert regulieren und Heizphasen auf Ihre individuellen Bedürfnisse anpassen. Nach Bedarf können Sie drei verschiedene Heizpro- file mit bis zu 6 Heizphasen pro Tag anlegen. -
Seite 5: Allgemeine Systeminformationen
Allgemeine Systeminformationen 5 Allgemeine Zum Anlernen des Heizkörperthermos- tats gehen Sie wie folgt vor: Systeminformationen • Öffnen Sie die Homematic IP App Dieses Gerät ist Teil der Raumkli- auf Ihrem Smartphone. ma-Lösung von Homematic IP und • Wählen Sie den Menüpunkt „Gerät kommuniziert über das HmIP Funk-... -
Seite 6: Montage
Bitte lesen Sie diesen Abschnitt erst vollständig, bevor Sie mit der 6.2.1 Heizkörperthermostat Montage beginnen. anbringen Die Montage des Homematic IP Heiz- Bei erkennbaren Schäden am körperthermostat ist einfach und kann vorhandenen Thermostat, am ohne Ablassen von Heizungswasser Ventil oder an den Heizungsroh-... -
Seite 7: Adapter Für Danfoss
Bereich der und nehmen Sie den Thermostat- Schraube leicht auf. kopf ab (P). Nach der Demontage des alten Thermostatkopfes können Sie den Homematic IP Heizkörperthermostat mit der Metallmutter (A) auf das Heiz- körperventil aufsetzen. Abbildung 5... - Seite 8 Inbetriebnahme Danfoss RA Danfoss RAV Die Ventilkörper von Danfoss weisen Die Ventilkörper von Danfoss weisen umlaufend längliche Einkerbungen (1) umlaufend längliche Einkerbungen (1) auf, die auch einen besseren Sitz des auf, die auch einen besseren Sitz des Adapters nach dem Aufrasten gewähr- Adapters nach dem Aufrasten gewähr- leisten.
-
Seite 9: Stützring
Inbetriebnahme Danfoss RAVL 6.2.3 Stützring Die Ventilkörper von Danfoss weisen Bei den Ventilen einiger Hersteller umlaufend längliche Einkerbungen (1) weist der in das Gerät hineinragen- auf, die auch einen besseren Sitz des de Teil des Ventils nur einen geringen Adapters nach dem Aufrasten gewähr- Durchmesser auf, was zu einem locke- leisten. -
Seite 10: Bedienung
Die Bediensperre des Heizkörper- Nach dem Anlernen und der Montage thermostaten kann über die stehen Ihnen einfache Bedienfunktio- Homematic IP App aktiviert bzw. nen direkt am Gerät zur Verfügung. deaktiviert werden. Tippen Sie auf das Menü-Symbol oben links im Befindet sich der Heizkörperther- Bildschirm in der App und wählen... -
Seite 11: Batterien Wechseln
Batterien wechseln 8 Batterien wechseln • Legen Sie zwei neue 1,5 V LR6/Mi- gnon/AA Batterien polungsrichtig Erscheint das Symbol für leere Batteri- gemäß Markierung in die Batterie- en ( ) im Display bzw. in der App, tau- fächer ein. schen Sie die verbrauchten Batterien gegen zwei neue Batterien des Typs LR6/Mignon/AA aus. -
Seite 12: Fehlerbehebung
Tauschen Sie in diesem Fall die leeren vorüber ist. Gemäß dieser Richtlinie, Batterien gegen zwei neue aus (s. „8 werden Homematic IP Geräte zu 100 % Batterien wechseln“ auf Seite 11). normenkonform entwickelt und pro- Sollte eine leere Batterie nicht bemerkt duziert. -
Seite 13: Fehlercodes Und Blinkfolgen
(s. „8 Bat- Batteriesymbol ( Batteriespannung gering terien wechseln“ auf Seite 11). Kommunikationsstörung Prüfen Sie die Verbindung Antennen-symbol ( ) zum Homematic IP Ac- zum Homematic IP Ac- blinkt cess Point cess Point. Deaktivieren Sie die Be- Schlosssymbol ( ) Bediensperre aktiv diensperre in der App. -
Seite 14: Wiederherstellung Der Werkseinstellungen
Wiederherstellung der Werkseinstellungen 1x oranges und 1x grünes Nachdem die Testanzeige Leuchten (nach dem Ein- Testanzeige erloschen ist, können Sie legen der Batterien) fortfahren. Langes und kurzes oran- Aktualisierung der Geräte- Warten Sie, bis das Update ges Blinken (im Wechsel) software (OTAU) beendet ist. -
Seite 15: Allgemeine Hinweise Zum Funkbetrieb
Str. 29, 26789 Leer, Deutschland, dass merksam, dass Sie als Endnutzer ei- der Funkanlagentyp Homematic IP genverantwortlich für die Löschung HmIP-eTRV-2 der Richtlinie 2014/53/ personenbezogener Daten auf dem zu EU entspricht. Der vollständige Text entsorgenden Elektro- und Elektronik- der EU-Konformitätserklärung ist unter Altgerät sind. -
Seite 16: Technische Daten
Technische Daten 14 Technische Daten Geräte-Kurzbezeichnung: HmIP-eTRV-2 Versorgungsspannung: 2x 1,5 V LR6/Mignon/AA Stromaufnahme: 120 mA max. Batterielebensdauer: 2 Jahre (typ.) Schutzart: IP20 Verschmutzungsgrad: Umgebungstemperatur: 0 bis 50 °C Abmessungen (B x H x T): 58 x 71 x 97 mm Gewicht: 205 g (inkl. - Seite 17 Installation and operating manual Table of contents Package contents..................18 Information about this manual ..............18 Hazard information ..................18 Function and device overview ..............19 General system information ..............20 Start-up ......................20 Pairing .........................20 Installation ......................21 6.2.1 Fitting the radiator thermostat ............21 6.2.2 Adapter for Danfoss ................22 6.2.3 Support ring ..................24 Adjustment run ....................
-
Seite 18: Package Contents
Please read this manual carefully be- the failure to observe the hazard fore operating your Homematic IP information. In such cases, all components. Keep the manual so you warranty claims are void. We ac-... -
Seite 19: Function And Device Overview
Function and device overview 4 Function and device Device overview: (A) Metal nut overview (B) Display With the Homematic IP Radiator Ther- (C) System button (pairing button and mostat you can conveniently regu- LED) late the room temperature with the (D) battery compartment cover Homematic IP smartphone app by... -
Seite 20: General System Information
General system information 5 General system information • Remove the insulation strip from the battery compartment (D) of the This device is part of the Homematic IP radiator thermostat. Pairing mode climate control solution and works is active for 3 minutes. -
Seite 21: Installation
The Homematic IP Radiator Thermo- Remove the old thermostatic head stat is easy to install, and requires no from your radiator valve. draining of heating water or interven- tion in the heating system. -
Seite 22: Adapter For Danfoss
The Danfoss valve bodies have elon- gated notches (1) around their cir- After removing the old thermostatic cumference, which also ensure that head you can install the Homematic IP the adapter is properly seated when it Radiator Thermostat with the metal snaps on. - Seite 23 Start-up Danfoss RAV Danfoss RAVL The Danfoss valve bodies have elon- The Danfoss valve bodies have elon- gated notches (1) around their cir- gated notches (1) around their cir- cumference, which also ensure that cumference, which also ensure that the adapter is properly seated when it the adapter is properly seated when it snaps on.
-
Seite 24: Support Ring
If the display backlight is off, you (E) to switch between manual and must press button (E) a second automatic mode. In automatic time to start the adjustment run. mode, the defined heating sched- ule of the Homematic IP App is... -
Seite 25: Changing The Batteries
The operating lock of the radiator device. thermostat can be activated and deactivated via the Homematic IP App. Tap on the menu symbol in the top left of the screen of your app and select the menu item “Device overview”. -
Seite 26: Troubleshooting
Troubleshooting • Insert two new 1.5 V LR6/Mignon/ Caution! Avoid contact with the AA batteries into the battery com- skin and eyes when handling leak- partment, making sure that you ing batteries. Wear suitable pro- insert them the right way round as tective gloves when removing shown. -
Seite 27: Command Not Confirmed
1% of an hour (i.e. 36 sec- onds in an hour). Devices must cease transmission when they reach the 1% limit until this time restriction ends. Homematic IP devices are designed and produced with 100% conformity to this regulation. During normal operation, the duty cycle is not usually reached. -
Seite 28: Error Codes And Flashing Sequences
(see „8 Changing the batteries“ on page 25). Connection to Please check the connec- Antenna symbol ( ) flash- Homematic IP Access tion to the Homematic IP Point lost Access Point. Deactivate the operating Lock symbol ( ) Operating lock activated lock via the app. -
Seite 29: Restoring Factory Settings
Restoring factory settings 10 Restoring factory settings 11 Maintenance and cleaning The factory settings of the device The device does not require you can be restored. If you do this, you to carry out any maintenance will lose all your settings. other than replacing the battery when necessary. -
Seite 30: General Information About Radio Operation
Leer, Germany hereby declares that the and electronic equipment before dis- radio equipment type Homematic IP posing of it. HmIP-eTRV-2 is compliant with Direc- tive 2014/53/EU. The full text of the EU declaration of conformity can be found Information about conformity www.homematic-ip.com... -
Seite 31: Technical Specifications
Technical specifications 14 Technical specifications Device short description: HmIP-eTRV-2 Supply voltage: 2x 1.5 V LR6/Mignon/AA Current consumption: 120 mA max. Battery life: 2 years (typical) Protection rating: IP20 Pollution degree: Ambient temperature: 0 to 50°C Dimensions (W x H x D):... - Seite 32 Notice d‘installation et d‘emploi Table des matières Contenu de la livraison ................33 Remarques sur le mode d’emploi ............33 Mises en garde .....................33 Fonction et aperçu de l’appareil ............. 34 Informations générales sur le système ...........35 Mise en service ....................35 Apprentissage ....................35 Montage ......................
-
Seite 33: Contenu De La Livraison
Les sachets/films en Lisez attentivement le présent mode plastique, éléments en d’emploi avant de mettre les appareils polystyrène, etc. peuvent consti- Homematic IP en service. Conser- tuer des jouets dangereux pour les vez ce mode d’emploi pour pouvoir enfants. le consulter ultérieurement ! Si vous laissez d’autres personnes utiliser l’ap-... -
Seite 34: Fonction Et Aperçu De L'appareil
La solution de climat ambiant offre la possibilité de programmer par appren- tissage le thermostat de radiateur sur le point d’accès Homematic IP et de Figure 1 baisser automatiquement la tempéra- ture lors de l’aération, par exemple en Aperçu de l’écran :... -
Seite 35: Informations Générales Sur Le Système
• Ouvrez l’application Homematic IP Cet appareil fait partie de la solution sur votre smartphone. de climat ambiant Homematic IP et • Sélectionnez l’option de communique par le biais du proto- menu « Procéder à l’apprentissage cole radio HmIP. Tous les appareils de l’appareil ». -
Seite 36: Montage
Merci de lire attentivement cette section avant de procéder au montage. Le montage du thermostat de radiateur Homematic IP est facile à réaliser et ne requiert pas de purger le radiateur ni d’intervenir sur le système de chauf- fage. Des outils spéciaux ou l’arrêt du chauffage ne sont pas nécessaires. -
Seite 37: Pose Du Thermostat De Radiateur
La tête thermosta- thermostatique, vous pouvez poser le tique n’exerce plus un contact sur thermostat de radiateur Homematic IP la tige de la vanne et peut ainsi se avec l’écrou en métal (A) sur la vanne démonter plus facilement. -
Seite 38: Adaptateur Pour Danfoss
Mise en service 6.2.2 Adaptateur pour Danfoss Danfoss RA L’un des adaptateurs joints est né- Les corps de vanne de Danfoss pré- cessaire pour le montage sur des sentent des encoches allongées sur la vannes Danfoss. L’attribution de l’adap- périphérie (1) qui garantissent égale- tateur adapté... - Seite 39 Mise en service Danfoss RAV Danfoss RAVL Les corps de vanne de Danfoss pré- Les corps de vanne de Danfoss pré- sentent des encoches allongées sur la sentent des encoches allongées sur la périphérie (1) qui garantissent égale- périphérie (1) qui garantissent égale- ment une meilleure assise de l’adapta- ment une meilleure assise de l’adapta- teur après l’enclenchement.
-
Seite 40: Bague D'appui
Utilisation 6.2.3 Bague d’appui Si le rétro-éclairage de l’écran est éteint, vous devez appuyer une Pour les vannes de certains fabricants, seconde fois sur la touche (E) afin la partie de la vanne engagée dans de démarrer la course d’adapta- l’appareil présente un diamètre moins tion. -
Seite 41: Remplacement Des Piles
• Dans un premier temps, tirez le Homematic IP est actif. En mode couvercle du compartiment à piles manuel, la température peut être (D) en arrière et ensuite vers le bas. -
Seite 42: Correction Des Erreurs
Correction des erreurs • Placez deux piles neuves de 1,5 V Attention ! Évitez le contact avec LR6/Mignon/AA dans le comparti- la peau et les yeux lorsque vous ment à piles en veillant à respecter manipulez des piles qui fuient ! la polarité et les repères. Portez des gants de protection appropriés lorsque vous retirez les piles qui fuient et les résidus d’un... -
Seite 43: Commande Non Confirmée
émettre lorsque la limite de 1 % est atteinte jusqu’à ce que cette limite temporelle soit dépassée. Conformément à cette directive, les appareils Homematic IP sont dévelop- pés et produits à 100 % en conformité avec les normes. En fonctionnement normal, le Duty Cycle n’est, en règle générale, pas... -
Seite 44: Codes D'erreur Et Séquences De Clignotement
Dérangement de la com- Vérifiez la connexion Le symbole d’antenne ( ) munication avec le point au point d’accès clignote d’accès Homematic IP Homematic IP. Désactivez le blocage de Verrouillage de la com- Symbole de verrou ( ) commande dans l’applica- mande actif tion. -
Seite 45: Restauration Des Réglages D'usine
Restauration des réglages d’usine Lorsque le test d’affichage Brille 1x en orange et 1x est terminé et que la LED en vert (après l’insertion Test d’affichage est éteinte, vous pouvez des piles) continuer. Clignote longuement et Mise à jour du logiciel de Attendez que la mise à... -
Seite 46: Remarques Générales Sur Le Fonctionnement Radio
Allemagne, déclare que l’équipe- de la suppression des données à ca- ment radioélectrique Homematic IP ractère personnel contenues dans les HmIP-eTRV-2 est conforme à la di- appareils électriques et électroniques à rective 2014/53/EU. L’intégralité de la éliminer. déclaration européenne de conformité... -
Seite 47: Caractéristiques Techniques
Caractéristiques techniques 14 Caractéristiques techniques Désignation abrégée de l’appareil : HmIP-eTRV-2 Tension d’alimentation : 2x 1,5 V LR6/Mignon/AA Courant absorbé : 120 mA max. Durée de vie des piles : 2 ans (typiquement) Type de protection : IP20 Degré de contamination : Température ambiante : de 0 à 50 °C Dimensions (l x H x P) :... - Seite 48 Manual de instalación y uso Índice Volumen de suministro ................49 Advertencias sobre estas instrucciones ..........49 Advertencias de peligro ................49 Funciones y esquema del dispositivo ............. 50 Información general del sistema .............51 Puesta en servicio ..................51 Conexión ......................51 Montaje .......................
-
Seite 49: Volumen De Suministro
Lea atentamente estas instrucciones pueden convertirse en un juguete antes de poner en servicio sus dispo- peligroso para los niños. sitivos Homematic IP. ¡Conserve estas instrucciones para consultas posterio- Se declina toda responsabilidad res! Si cede este dispositivo para que lo por las lesiones o los daños mate-... -
Seite 50: Funciones Y Esquema Del Dispositivo
4 Funciones y esquema del Vista general: (A) Tuerca de metal dispositivo (B) Pantalla Homematic IP Termostato de radia- (C) Botón del sistema (botón de cone- dor permite regular la temperatura xión y LED) ambiente y ajustar las fases de cale- (D) Tapa del compartimento de las pilas facción a sus necesidades particulares... -
Seite 51: Información General Del Sistema
Homematic IP Access Point. ceso de conexión se ha ejecutado Proceda del siguiente modo para co- correctamente se enciende el LED nectar el termostato de radiador: verde. Ahora el dispositivo ya está • Abra la app Homematic IP en su preparado para funcionar. -
Seite 52: Montaje
52). Lea íntegramente este apartado antes de comenzar el montaje. 6.2.1 Colocación del termostato de El montaje del Homematic IP Ter- radiador mostato de radiador es muy sencillo y Si detecta daños en el termostato puede hacerse sin vaciar el agua y sin instalado, la válvula o los tubos de... -
Seite 53: Adaptadores Para Danfoss
• Sujeción por tornillos prisioneros: Afloje el tornillo prisionero y retire el cabezal termostático (P). Tras desmontar el cabezal termos- tático antiguo, ya puede colocar el Homematic IP Termostato de radiador con la tuerca de metal (A) en la válvula del radiador. Figura 5... - Seite 54 Puesta en servicio Danfoss RA Danfoss RAV Los cuerpos de válvula de Danfoss Los cuerpos de válvula de Danfoss presentan en todo el contorno enta- presentan en todo el contorno enta- lladuras alargadas (1) que garantizan lladuras alargadas (1) que garantizan un mejor asiento del adaptador tras el un mejor asiento del adaptador tras el enclavamiento.
-
Seite 55: Anillo De Apoyo
Puesta en servicio Danfoss RAVL 6.2.3 Anillo de apoyo Los cuerpos de válvula de Danfoss El diámetro de la parte de la válvu- presentan en todo el contorno enta- la que sobresale en el dispositivo es lladuras alargadas (1) que garantizan muy pequeño en algunas marcas, de un mejor asiento del adaptador tras el modo que la fijación queda suelta. -
Seite 56: Manejo
Tras la correcta ejecución del de calefacción ajustado en la app movimiento de adaptación la pantalla Homematic IP. En el modo manual cambia a la indicación normal. se puede ajustar la temperatura directamente en el dispositivo o a Si el movimiento de adaptación se... -
Seite 57: Reparación De Fallos
Reparación de fallos Para colocar pilas nuevas en el termos- Tras la colocación de las pilas, el ter- tato de radiador, proceda del siguiente mostato de radiador ejecuta en primer modo: lugar una prueba automática durante unos 2 segundos. A continuación tiene •... -
Seite 58: Pilas Descargadas
(v. „8 Cambio de pilas“ en página 56). finaliza esa limitación temporal. Los dispositivos Homematic IP cumplen Si no se detecta una pila agotada, el esa directiva al 100 % en su desarrollo y termostato de radiador se desplaza fabricación. -
Seite 59: Códigos De Errores Y Secuencias Intermitentes
(v. „8 Cambio de pilas“ en página 56). Error en la comunicación Compruebe la conexión Símbolo de antena inter- con Homematic IP Access con Homematic IP Access mitente ( ) Point Point. Desactive el bloqueo de Símbolo de candado ( ) Bloqueo de uso activado uso en la app. -
Seite 60: Restablecimiento De La Configuración De Fábrica
Restablecimiento de la configuración de fábrica 1 vez luz naranja y 1 vez Cuando se apague la indi- luz verde (después de co- Indicación de prueba cación de prueba, podrá locar las pilas) continuar. Luz naranja intermitente Actualización del software Espere hasta que finalice larga y corta (alternas) del dispositivo (OTAU) -
Seite 61: Indicaciones Generales Sobre El Modo Inalámbrico
Leer, Alemania, declara que el tipo de Le advertimos expresamente sobre instalación por radio Homematic IP el hecho de que usted, como usuario HmIP-eTRV-2, cumple la Directiva final, es responsable de eliminar los 2014/53/UE. El texto de la declaración datos personales de los aparatos eléc- de conformidad CE está... -
Seite 62: Datos Técnicos
Datos técnicos 14 Datos técnicos Nombre abreviado del dispositivo: HmIP-eTRV-2 Tensión de alimentación: 2 pilas LR6/Mignon/AA, 1,5 V Consumo de corriente: máx. 120 mA Duración de las pilas: 2 años (típ.) Tipo de protección: IP20 Grado de suciedad: Temperatura ambiente: de 0 a 50 °C... - Seite 63 Istruzioni per l‘installazione e l‘uso Indice Fornitura ...................... 64 Indicazioni su queste istruzioni ............... 64 Indicazioni di pericolo................64 Funzioni e vista d’insieme dell’apparecchio Informazioni generali sul sistema ............66 Messa in funzione ..................66 Accoppiamento ....................66 Montaggio ......................67 6.2.1 Installazione del termostato per radiatori ........67 6.2.2 Adattatore per Danfoss ...............68...
-
Seite 64: Fornitura
Leggere attentamente queste istruzioni bini. prima di mettere in funzione i disposi- tivi Homematic IP. Conservare questo L’azienda declina qualsiasi respon- manuale per poterlo consultare anche sabilità per danni a cose o persone in futuro! Se l’utilizzo dell’apparecchio... -
Seite 65: Funzioni E Vista D'insieme Dell'apparecchio
(D) Coperchio del vano batterie bienti, tramite la app per smartphone (E) Manopola di regolazione/tasto Bo- Homematic IP, ed è possibile adattare le varie fasi di riscaldamento alle esi- genze personali. Se necessario, è pos- sibile creare tre diversi profili di riscal- damento con fino a massimo 6 fasi di riscaldamento al giorno. -
Seite 66: Informazioni Generali Sul Sistema
Informazioni generali sul sistema 5 Informazioni generali sul • Aprire l’app Homematic IP sullo smartphone. sistema • Nel menu selezionare la voce “Ini- Questo apparecchio fa parte del- zializzazione dell’apparecchio”. le soluzioni per il microclima di • Estrarre la linguetta d’isolamento Homematic IP e comunica mediante... -
Seite 67: Montaggio
Il montaggio del termostato per radia- Qualora sul termostato installato, tori Homematic IP è semplice e può sulla valvola o sui tubi di riscalda- essere eseguito senza scaricare l’acqua mento siano riconoscibili even- o intervenire sul sistema di riscalda- tuali danni consultare un tecnico mento. -
Seite 68: Adattatore Per Danfoss
(P). vite. Dopo aver smontato la vecchia te- sta del termostato è possibile posi- zionare il termostato per radiatori Homematic IP con il dado metallico (A) sulla valvola per radiatori. Figura 5... - Seite 69 Messa in funzione Danfoss RA Danfoss RAV I corpi delle valvole Danfoss presen- I corpi delle valvole Danfoss presen- tano incisioni allungate perimetrali (1), tano incisioni allungate perimetrali (1), che assicurano anche un migliore po- che assicurano anche un migliore po- sizionamento dell’adattatore dopo lo sizionamento dell’adattatore dopo lo scatto.
-
Seite 70: Anello Di Appoggio
Messa in funzione Danfoss RAVL 6.2.3 Anello di appoggio I corpi delle valvole Danfoss presen- Nelle valvole di alcuni produttori la tano incisioni allungate perimetrali (1), parte della valvola all’interno dell’ap- che assicurano anche un migliore po- parecchio ha solo un diametro limita- sizionamento dell’adattatore dopo lo to il che determina una sede lasca. -
Seite 71: Modalità D'uso
Nel funzionamento automatico il Completata la corsa di adattamento, il profilo di riscaldamento imposta- display torna alla visualizzazione nor- to tramite la app Homematic IP è male. attivo. Nel funzionamento manuale la temperatura può essere impo- Se il ciclo di adattamento è stato stata direttamente sull’apparecchio... -
Seite 72: Sostituzione Delle Batterie
Sostituzione delle batterie 8 Sostituzione delle batterie • Richiudere il coperchio del vano batterie (D) . Se sul display o nell’app compare l’i- • Dopo aver inserito le batterie, pre- cona di batterie scariche ( ), sostituire stare attenzione alle sequenze di le batterie esauste con due batterie lampeggio delle spie a LED (v. -
Seite 73: Risoluzione Dei Guasti
“posizione di malfunzio- Conformemente a questa direttiva, gli namento valvola” per evitare che l’ap- apparecchi Homematic IP sono svilup- parecchio non riesca più a mantenere pati e prodotti nell’assoluto rispetto la temperatura impostata nell’ambiente delle norme. -
Seite 74: Codici Di Errore E Sequenze Di Lampeggio
72). Malfunzionamento nella Verificare il collegamen- L’icona dell’antenna ( ) comunicazione con l'Ac- to con l'Access Point lampeggia cess Point Homematic IP Homematic IP. Disattivare il blocco co- Icona del lucchetto ( ) Blocco comandi attivo mandi nella app. Trasmissione radio/tenta- Luce arancione lampeg-... -
Seite 75: Ripristino Delle Impostazioni Di Fabbrica
Ripristino delle impostazioni di fabbrica Luce arancione 1 volta e Dopo che la visualizzazio- luce verde 1 volta (dopo Visualizzazione di prova ne di prova si è spenta, è l'inserimento delle batte- possibile proseguire. rie) Luce arancione che lam- Aggiornamento del Attendere fino al termine peggia a lungo e per bre- software dell’apparecchio... -
Seite 76: Informazioni Generali Sul Funzionamento Via Radio
Str. 29, 26789 Leer, Germania, dichiara negli apparecchi elettrici ed elettronici che l’apparecchio radio Homematic IP da smaltire. modello HmIP-eTRV-2 è conforme alla Direttiva 2014/53/UE. Il testo integrale della dichiarazione di conformità UE è Dichiarazione di conformità disponibile al seguente indirizzo inter- Il marchio CE è... -
Seite 77: Dati Tecnici
Dati Tecnici 14 Dati Tecnici Sigla dell’apparecchio: HmIP-eTRV-2 Tensione di alimentazione: 2 batterie LR6/mignon/AA da 1,5 V Corrente assorbita: 120 mA max. Durata batterie: 2 anni (tip.) Grado di protezione: IP20 Grado di contaminazione: Temperatura ambiente: tra 0 e 50 °C... - Seite 78 Installatie- en bedieningshandleiding Inhoudsopgave Leveringsomvang ..................79 Instructies bij deze handleiding ...............79 Gevarenaanduidingen ................79 Werking en overzicht van het apparaat ..........80 Algemene systeeminformatie ..............81 Inbedrijfstelling ....................81 Inleren ......................... 81 Montage ......................82 6.2.1 Radiatorthermostaat aanbrengen ............82 6.2.2 Adapters voor Danfoss ...............83 6.2.3 Steunring ....................85 Adapteerbeweging ...................
-
Seite 79: Leveringsomvang
Lees deze handleiding zorgvuldig door vaarlijk speelgoed worden. voordat u uw Homematic IP-apparaten in gebruik neemt. Bewaar de handlei- Bij materiële schade of lichamelijk ding om deze ook later nog te kunnen... -
Seite 80: Werking En Overzicht Van Het Apparaat
(B) Display Met de Homematic IP-radiatorther- (C) Systeemtoets (aanleertoets en led) mostaat kunt u de kamertemperatuur (D) Batterijvakdeksel via de Homematic IP Smartphone App (E) Instelwiel/boosttoets tijdgestuurd regelen en verwarmings- fases aan uw eigen behoeften aanpas- sen. Desgewenst kunt u via drie ver-... -
Seite 81: Algemene Systeeminformatie
Algemene systeeminformatie 5 Algemene Ga als volgt te werk om de radia- torthermostaat in te leren: systeeminformatie • Open de Homematic IP-app op uw Dit apparaat is een onderdeel van smartphone. de binnenklimaatoplossing van • Selecteer het menu-item ‘Apparaat Homematic IP en communiceert via inleren’. -
Seite 82: Montage
‘6.2.2 Adapters voor Danfoss’ op pagina 83). Lees dit hoofdstuk volledig door, voordat u met de montage begint. 6.2.1 Radiatorthermostaat De montage van de Homematic IP-ra- aanbrengen diatorthermostaat is eenvoudig en kan Bij zichtbare schade aan de voor- worden uitgevoerd zonder het verwar-... -
Seite 83: Adapters Voor Danfoss
Draai de borgbout los en ver- de schroef iets openbuigen. wijder de thermostaatkop (P). Na de demontage van de oude thermostaatkop kunt u de Homematic IP-radiatorthermostaat met de metalen moer (A) op de radia- torkraan plaatsen. Afbeelding 5... - Seite 84 Inbedrijfstelling Danfoss RA Danfoss RAV De kraanhuizen van Danfoss hebben De kraanhuizen van Danfoss hebben rondom langwerpige inkervingen (1) omlopend langwerpige inkervingen (1) die ook een betere zitting van de adap- die ook een betere zitting van de adap- ter na het vastklikken garanderen. ter na het vastklikken garanderen.
-
Seite 85: Steunring
Inbedrijfstelling Danfoss RAVL 6.2.3 Steunring De kraanhuizen van Danfoss hebben Bij kranen van bepaalde fabrikanten omlopend langwerpige inkervingen (1) heeft het deel van de kraan dat in het die ook een betere zitting van de adap- apparaat zit, een kleine diameter, zodat ter na het vastklikken garanderen. -
Seite 86: Bediening
In het automati- De radiatorthermostaat voert nu een sche bedrijf is het verwarmingspro- adapteerbeweging uit. Hierbij verschij- fiel actief dat met de Homematic IP nen ‘ ’ en het activiteitsymbool ( App is ingesteld. In het handmatige ) op het display. Ondertussen is geen bedrijf kan de temperatuur direct bediening mogelijk. -
Seite 87: Batterijen Vervangen
Batterijen vervangen 8 Batterijen vervangen • Plaats twee nieuwe 1,5V-batterij- en van het type LR6/mignon/AA in Als het symbool voor lege batterijen de batterijvakken. Let hierbij op de ( ) op het display of in de app ver- juiste polariteit aan de hand van de schijnt, dient u de verbruikte batterijen markering. -
Seite 88: Storingen Oplossen
Vervang in dat geval de lege batterijen is. In overeenstemming met deze richt- door twee nieuwe (zie ‘8 Batterijen ver- lijn worden Homematic IP apparaten vangen’ op pagina 87). 100% conform de norm ontwikkeld en Als een lege batterij niet wordt opge- geproduceerd. -
Seite 89: Foutcodes En Knipperreeksen
(zie ‘8 Batte- Batterijsymbool ( Batterijspanning laag rijen vervangen’ op pagina 87). Communicatiestoring met Controleer de verbinding Antennesymbool ( ) knip- het Homematic IP Access met het Homematic IP pert Point Access Point. Bedieningsvergrendeling Deactiveer de bedienings- Slotsymbool ( ) actief vergrendeling in de app. -
Seite 90: Herstellen Van De Fabrieksinstellingen
Herstellen van de fabrieksinstellingen 1x oranje en 1x groen Wanneer de testindicatie oplichten (na het plaatsen Testindicatie weer is gedoofd, kunt u van de batterijen) doorgaan. Lang en kort oranje knip- Actualisatie van de appa- Wacht totdat de update is peren (afwisselend) raatsoftware (OTAU) beëindigd. -
Seite 91: Algemene Instructies Voor De Draadloze Werking
Str. 29, 26789 Leer, Duitsland, dat het voor het verwijderen van persoonlijke draadloze apparaattype Homematic IP gegevens uit de afgedankte elektrische HmIP-eTRV-2 in overeenstemming is en elektronische apparatuur. met de richtlijn 2014/53/EU. De volle- dige tekst van de EU-conformiteitsver- klaring is beschikbaar op het volgende... -
Seite 92: Technische Gegevens
Technische gegevens 14 Technische gegevens Apparaatcode: HmIP-eTRV-2 Voedingsspanning: 2x 1,5 V LR6/mignon/AA Stroomopname: 120 mA max. Levensduur batterijen: 2 jaar (typ.) Beschermingsgraad: IP20 Verontreinigingsgraad: Omgevingstemperatuur: 0 tot 50 °C Afmetingen (b x h x d): 58 x 71 x 97 mm Gewicht: 205 g (incl. - Seite 93 Kostenloser Download der Homematic IP App! Free download of the Homematic IP app! Bevollmächtigter des Herstellers: Manufacturer’s authorised representative: eQ-3 AG Maiburger Straße 29 26789 Leer / GERMANY www.eQ-3.de...