Herunterladen Inhalt Inhalt Diese Seite drucken
AEG SANTO 75438 KG Gebrauchsanweisung

AEG SANTO 75438 KG Gebrauchsanweisung

Kühl-gefrierkombination
Inhaltsverzeichnis

Werbung

Verfügbare Sprachen

Verfügbare Sprachen

SANTO 75438 KG
User manual
Fridge-Freezer
Manual de instruções
Combinado
Gebrauchsanweisung
Kühl-Gefrierkombination
Downloaded from Fridge-Manual.com Manuals

Werbung

Inhaltsverzeichnis
loading

Inhaltszusammenfassung für AEG SANTO 75438 KG

  • Seite 1 SANTO 75438 KG User manual Fridge-Freezer Manual de instruções Combinado Gebrauchsanweisung Kühl-Gefrierkombination Downloaded from Fridge-Manual.com Manuals...
  • Seite 2 Dear Customer Thank you for choosing one of our high-quality products. With this appliance you will experience the perfect combination of functional design and cutting edge technology. Convince yourself that our appliances are engineered to deliver the best performance and control - indeed we are setting the highest standards of excellence.
  • Seite 3: Inhaltsverzeichnis

    Contents Safety ..........4 Disposal .
  • Seite 4: Safety

    Safety The safety aspects of our appliance comply with accepted technical standards and the German Appliance Safety Law. Nevertheless, we consider it our obligation to make you aware of the following safety information: Intended use • The appliance is intended for use in the home. It is suitable for the cooling, freezing and storing of frozen food, as well as for making ice.
  • Seite 5: Disposal

    concerning use of the appliance by a person responsible for their safety. Children should be supervised to ensure that they do not play with the appliance. Daily Operation • Containers with flammable gases or liquids can leak at low temperatures. There is a risk of an explosion! Do not store any containers with flammable materials such as, for example, spray cans, fire extinguisher refill cartridges etc in the refrigerator/freezer.
  • Seite 6: Disposal Of Old Appliances

    The carton parts are made from recycled paper and should be disposed of at a waste-paper recycling collection location. Disposal of old Appliances For environmental reasons, refrigeration appliances must be disposed of properly. This applies to your old appliance, and - at the end of its service life - for your new appliance as well.
  • Seite 7: Your Appliance Needs Air

    The climate classification can be found on the serial plate, which is located at the left on the inside of the appliance. The following table shows which ambient temperature is correct for each climate classification: each climate classification: If installation next to a source of heat is unavoidable, the following minimum clearances must be maintained at the sides of the appliance: Climate classification for an ambient temperature of...
  • Seite 8: Door Reversibility

    Door Reversibility The door reversibility is not possible. Electrical connection Before initial start-up, refer to the appliance rating plate to ascertain if supply voltage and current values correspond with those of the mains at the installation location. e.g.: 220 ... 240 V 50 Hz or 220 ...
  • Seite 9: Control Panel

    Control panel MODE RESET A Fridge section indicator B Temperature indicator for fridge section C Buttons for setting temperature for fridge section D Thermometer indicator for fridge section (with COOLMATIC) E MODE button for setting the operating mode F Text display G RESET button H Freezer section indicator I Temperature indicator for freezer section...
  • Seite 10: Temperature Displays

    DESIRED temperature means: The temperature that has been selected for inside the fridge or the freezer compartment. The DESIRED temperature is indicated by flashing numbers. ACTUAL temperature means: The temperature display indicates the current temperature inside the fridge or the freezer compartment. The ACTUAL temperature is indicated with illuminated numbers.
  • Seite 11: Text Display

    – FROSTMATIC and COOLMATIC: Cooling for freezer section runs for 52 hours in continuous operation, fridge temperature value 2 °C for 6 hours. – HOLIDAY: Fridge temperature value approx 14 °C. – : Normal operation according to the required temperatures set. 1.
  • Seite 12 Prior to Initial Start-Up Before connecting the appliance to the mains and putting it into ope-ration for the first time, leave the appliance to stand for 30 minutes if was transported upright. After transport on its side, the appliance must be left to stand for 2 hours before putting it into operation.
  • Seite 13: Temperature Adjustment

    Temperature Adjustment With the individual temperature setting buttons the desired temperatures in the refrigerator and in the freezer compartment can be adjusted independently of one another. 1. Press either the „+“ (WARMER) or „-“ (COLDER) button for the refriger- ator or freezer compartment . The temperature display switches over and the DESIRED temperature currently set flashes on the temperature display.
  • Seite 14: Operating Modes

    Operating modes Using the MODE button different operating modes can be selected. The operating modes are automatically switched off after a corresponding period, but can also be manualled ended each time. To do this, press the MODE button repeatedly until there are no longer any words appearing in the display.
  • Seite 15 The operating mode FROSTMATIC is automatically switched off depending on how the appliance is filled at the latest after approx. 52 hours. The FROSTMATIC indicator will go out. COOLMATIC The COOLMATIC operating mode is suitable for quickly cooling larger quantities of refrigerated foods in the fridge section, e. g. drinks, salads for a party or wedding.
  • Seite 16: Switching The Appliance Off

    After emptying and cleaning the appliance, proceed as follows: 1. To switch on the holiday setting, press the MODE button repeatedly until HOLIDAY is flashing in the display. After approx. 4 seconds the operating mode HOLIDAY is activated, HOLIDAY lights up. Important! Do not store any goods in the refrigerator when the holiday mode is in operation.
  • Seite 17: Temperature Warning

    Temperature warning For the freezer section: An alarm sounds and the TEMPERATURE indicator and red back light flash, as soon as the temperature in the freezer section rises above -11 °C. In addition the temperature display for the freezer section flashes. If the temperature in the freezer section falls back below -11 °C, the alarm automatically switches itself off.
  • Seite 18: Interior Accessories

    Interior Accessories Storage Shelves The glass shelf above the fruit and vegetable compartment should always remain in position, to ensure fruit and vegetables stay fresh longer. The remaining storage shelves can be adjusted to various heights: Pull the storage shelf forward until it can be tipped up or down and D338 removed.
  • Seite 19: Moisture Regulator

    Moisture regulator There is an adjustable air grille in front of the shelf above the fruit and vegetable compartments. The opening in the ventilation slots can be adjusted with the slider. Right slider: Ventilation slots opened. With the ventilation slots open, more air circulation results in a lower air moisture content in the fruit and vegetable compartments.
  • Seite 20: Air Recycling

    Air recycling The refrigerator compartment is equipped with a special D.A.C. (Dynamic Air Cooling) fan which can be turned on with the switch B (seefig.). The green light, when on, means that the fan is working. It is suggested that the device be used when the ambient temperature exceeds 25°C .
  • Seite 21: Freezing And Storing Frozen Food

    Freezing and storing frozen food You can use your freezer for freezing fresh food yourself. Important! • The temperature in the freezer compartment must be –18 °C or colder before freezing food. • Please observe the freezing capacity given on the rating plate. The freezing capacity is the maximum quantity of fresh food that can be frozen within a period of 24 hours.
  • Seite 22: Ice-Cube Production

    Ice-cube production This appliance is equipped with one or more trays for the production of ice-cubes. These are insert on the sides of the upper freezer drawer. Pull out the upper freezer drawer. Extract the ice-tray. Pull out the tap. Fill with water to the limit indicated.
  • Seite 23: Installation Of The Charcoal Filter

    Installation of the charcoal filter On delivery the charcoal filter is placed in a plastic bag to secure the length of life of the charcoal filter. The filter should be placed behind the flap before the appliance is turned on. •...
  • Seite 24: Defrosting

    Defrosting Refrigerator Frost is automatically eliminated during normal use. The defrost water drains out through a trough into a special container at the back of the appliance, where it evaporates. We recommend that you peridically clean the defrost-water drainage outlet with the cleaner provided, located in the center of the drainage D037 groove.
  • Seite 25: Cleaning And Care

    Cleaning and Care For hygienic reasons the appliance interior, including interior accessories, should be cleaned regularly. Warning! • The appliance may not be connected to the mains during cleaning. Danger of electrical shock! Before cleaning switch the appliance offand rem ve the plug from the mains, or switch off or turn out the circuit breaker or fuse.
  • Seite 26: Energy Saving Tips

    Energy Saving Tips • Do not install the appliance near cookers, radiators or other sources of warmth. High ambient temperatures cause longer, more frequent operation of the compressor. • Ensure sufficient air circulation and exhaust at the appliance base and at the back wall of the appliance.
  • Seite 27 Malfunction Possible Cause Remedy Appliance is not switched on Switch on the appliance. Mains plug is not plugged in Insert mains plug. or is loose. Appliance does not work. Check fuse, replace if Fuse has blown or is defective. necessary. Mains malfunctions are to be Socket is defective.
  • Seite 28: Changing The Light Bulb

    Changing the light bulb Warning! There is a risk of electric shocks! Before changing the light bulb, switch off the appliance and unplug it, or pull the fuse or the circuit breaker. Light bulb data: 220-240 V, max. 15 W To switch off the appliance, unplug the mains plug.
  • Seite 29 Caro cliente Desde já agradecemos por ter escolhido um dos nossos produtos de elevada qualidade. Com este electrodoméstico irá constatar a perfeita combinação entre funcionalidade do design e alta tecnologia Convença-se que os nossos electrodomésticos foram feitos de modo a oferecer-lhe a melhor performance e o maior controlo - estamos certamente próximos de estabelecer os mais elevados padrões de excelência.
  • Seite 30 Indice Segurança ..........31 Remoção de materiais .
  • Seite 31: Segurança

    Segurança A segurança dos nossos aparelhos frigoríficos corresponde aos regulamentos técnicos vigentes e à lei sobre a segurança de aparelhos. Contudo, sentimonos na obrigação de lhe dar a conhecer as seguintes indicações de segurança: Utilização conforme às disposições • O aparelho frigorífico destina-se ao uso doméstico. Ele serve para refrigerar e congelar alimentos e para guardar produtos congelados, bem como para preparar gelo.
  • Seite 32 Retirar a ficha de ligação à rede da tomada, desmontar o cabo de ligação à rede, retirar ou destruir eventuais fechaduras de mola ou de ferrolho. Evitará, assim, que quaisquer crianças se fechem por brincadeira no aparelho (perigo de asfixia!) ou que se exponham a quaisquer outras situações em que possam correr perigo de vida.
  • Seite 33: Remoção De Materiais

    Remoção de materiais Informações sobre a embalagem do aparelho Todos os materiais utilizados são compatíveis com o meio-ambiente! Eles podem ser depositados numa lixeira ou queimados numa instalação de incineração de lixo, sem perigo! Quanto aos materiais: os plásticos são recicláveis e estão marcados da seguinte forma: >PE<...
  • Seite 34: Remoção Da Proteção De Transporte

    Remoção da protecção de transporte Tanto o aparelho como algumas das peças do equipamento interior são protegidos para o transporte. • Remover todas as fitas adesivas, bem como as peças de almofadar, do interior do aparelho. Instalação Local de instalação O aparelho deverá...
  • Seite 35: Colocação

    Colocação Coloque o aparelho longe de qualquer fonte de calor (aquecimento, fogões, ou raios solares demasiado intensos).Verifique que nas parses posterior, superior e inferior o ar pode circular livremente. Para um melhor funcionamento verifique que a parse superior têm pelo NP008 menos 100 mm de distancia de algum móvel suspenso por cima do...
  • Seite 36: Ligação Elétrica

    Ligação eléctrica Para a ligação eléctrica é necessária uma tomada com contacto de segurança, devidamente instalada. A protecção eléctrica por fusível terá que perfazer, no mínimo, 10 amperes. Se, depois de instalado o aparelho, não se tiver mais acesso à tomada, terá que se tomar uma providência adequada na instalação eléctrica que permita desligar o aparelho da rede (p.
  • Seite 37: Painel De Comando

    Painel de comando MODE RESET A Indicador para frigorífico B Teclas para ajuste da temperatura para frigorífico C Tecla MODE para ajuste do tipo de funcionamento D Indicação de texto E Tecla RESET F Indicador para congelador G Teclas para ajuste da temperatura para congelador Teclas para a regulação da temperatura A regulação da temperatura efectua-se através dos teclas „+“...
  • Seite 38: Indicador Da Temperatura

    existente no frigorífico ou no congelador. A temperatura REAL é indicada através de números iluminados. Com a função COOLMATIC ou FROSTMATIC ligadas, não poderão ser efectuadas nenhumas alterações do ajuste da temperatura para o frigorífico e o congelador. Indicador da temperatura O indicador da temperatura pode mostrar várias informações.
  • Seite 39: Tecla Reset

    tecla MODE após cada 4 segundos tantas vezes até o modo de funcionamento pretendido surgir no display. Decorridos ca. de. 4 segundos a indicação pára de piscar, o modo de funcionamento está ajustado. Se a tecla MODE for novamente premida, surge no indicador o modo de funcionamento seguinte.
  • Seite 40: Colocação Em Funcionamento

    Antes de colocar o aparelho em funcionamento 1 Antes de conectar o aparelho à rede eléctrica e utilizá-lo pela primeira vez, caso o mesmo tenha sido transportado na posição vertical, deixe-o de pé por 30 minutos. Se ele, porém, tiver sido transportado na posição horizontal (deitado), deixe-o de pé, antes de utilizá-lo, por 4 horas, afim de que o óleo possa retornar ao compressor.
  • Seite 41: Regulação Da Temperatura

    Regulação da temperatura Com o respectivo regulador da temperatura, é possível regular separadamente a temperatura desejada para o frigorífico e para o congelador. 1. Prima uma dos teclas „+“ (MAIS QUENTE) ou „-“ (MAIS FRIO). A indicação da temperatura comuta e indica de forma intermitente a temperatura TEÓRICA actualmente regulada.
  • Seite 42 A função SHOPPING poderá ser desligada manualmente em qualquer altura. Para tal prima a tecla MODE tantas vezes até não aparecerem mais nenhumas palavras no visor. FROSTMATIC A função FROSTMATIC acelera a congelação de alimentos frescos e protege, simultaneamente, os alimentos já congelados contra um aquecimento indesejado.
  • Seite 43: Descrição Do Aparelho

    1. Prina a tecla MODE tantas vezes até no visor piscarem simultaneamente FROSTMATIC e COOLMATIC. Decorridos ca. de. 4 segundos o modo de funcionamento FROSTMATIC e COOLMATIC estão activados, as indicações FROSTMATIC e COOLMATIC acendem. Ambas as indicações de termómetro no visor representam um termómetro a descer.
  • Seite 44: Sistema De Controlo E De Informação

    3. Deixar, por fim, as portas abertas para evitar maus cheiros. Sistema de controlo e de informação O sistema de controlo e de informação é composto pelas indicações da temperatura, pela indicação óptica de alarme e por um dispositivo de alarme acústico.
  • Seite 45: Falhas De Funcionamento

    – a uma falha do aparelho. Falhas de funcionamento Se a parte electrónica do aparelho detectar um defeito técnico, que deverá ser resolvido pela Assistência Técnica, ouve-se um sinal acústico e a indicação SERVICE surge com uma luz de fundo vermelha a piscar. No indicador da temperatura aparece: –...
  • Seite 46: Controle De Umidade

    Controle de umidade Na prateleira de vidro està instalado dispositivo fendas (reguláveis através de uma alavanca corrediça), que permite de regular a temperatura no espaço da gaveta de verduras. Com as fendas fechadas será obtida uma temperatura mais quentefria e major umidade.
  • Seite 47: Compartimento Para Botellas

    Compartimiento para botellas Almacene las botellas con el cuello hacia adelante. Atención: Coloque echadas sólo las botellas sin abrir. Para guardar botellas ya abiertas puede usted alzar el compartimiento hasta dejarlo inclinado. Para ello tire del compartimiento hacia adelante hasta que sea posible virarlo hacia arriba e introduzca entonces la superficie delantera en el nivel inmediato superior.
  • Seite 48: Instalação Do Filtro De Carvão

    I I n n s s t t a a l l a a ç ç ã ã o o d d o o f f i i l l t t r r o o d d e e c c a a r r v v ã ã o o O filtro de carvão é...
  • Seite 49: Refrigeração Dos Alimentos

    Refrigeração dos alimentos Para obter um melhor rendimento do seu aparelho: reparta as provisões de maneira a que o ar possa circular, facilmente, à volta delas; • não introduza, na caixa, alimentos ainda quentes ou líquidos em evaporação; • cubra os alimentos, de especial modo se são aromáticos; Conselhos para a refrigeração Carne (de qualquer tipo): envolva esses alimentos em sacos plásticos e coloque-as na divisão imediatamente acima das caixas para legumes.
  • Seite 50: Calendàrio De Congelamento

    • Garrafas e latas não podem ser colocadas no congelador. Elas podem estalar quando o seu conteúdo congela - se o seu conteúdo incluir gás, elas podem até explodir! Nunca coloque laranjadas, sumos, cerveja, vinho, champanhe, etc., no congelador. Excepção: bebidas com elevado teor de álcool podem ser postas no congelador.
  • Seite 51: Preparação De Cubos De Gelo

    P P r r o o d d u u ç ç ã ã o o d d e e c c u u b b o o s s d d e e g g e e l l o o Este aparelho possui um ou mais tabuleiros...
  • Seite 52: Descongelar

    Descongelar O frigorífico Uma vez que a maior incidência de humidade tem lugar quando se abre a porta, a frequência das fases de descongelação é determinada pelo número de vezes que se abre a porta e pelo tempo que se mantém a porta aberta.
  • Seite 53: Descrição Do Aparelho

    Descrição do aparelho Se pretender pôr o aparelho fora de serviço por um período de tempo mais prolongado: Desligar o aparelho. Retirar a ficha de ligaçã o à rede da tomada ou desconectar o fusível. Descongelar o congelador e limpálo a fundo (ver capítulo "Limpeza e conservação").
  • Seite 54: Conselhos Pràticos Para Poupar Energia

    Desligar o aparelho e retirar a ficha da tomada ou desconectar o fusível. Limpar o aparelho e o seu equipamento interior com um pano e água morna. Juntar, eventualmente, um pouco de detergente da louça. Em seguida, limpar novamente com água limpa. Controlar o orifício de escoamento da água de descongelaçã...
  • Seite 55 Avaria Causa possível Solução O aparelho não está ligado. Ligar o aparelho. A ficha de ligação à rede não Encaixar a ficha de ligação à está encaixada ou está mal rede na tomada. encaixada. O aparelho não funciona O fusível disparou ou está Controlar o fusível, substida avariado.
  • Seite 56: Substituição Da Lâmpada

    Avaria Causa possível Solução Reajustar os pés reguláveis O aparelho não está direito frontais O aparelho está em tacto com Afastar o aparelho um pouco a parede ou com outros da parede. objectos. Ruídos estranhos. Um elemento, p. ex. um tubo, Curvar, eventualmente, o na parte de trás do aparelho, elemento em causa cuida-...
  • Seite 57: Serviço De Assistência Técnica

    Serviço de assistência técnica Se, em caso de avaria, não conseguir solucionar o problema com o auxílio destas instruções de utilização, é favor dirigirse à casa especializada mais próxima ou ao nosso serviço de assistência técnica. Uma listagem precisa das peças sobressalentes necessárias, poderá evitar perdas de tempo e custos desnecessários.
  • Seite 58 Verehrter Kunde! Vielen Dank, dass Sie sich für eines unserer Qualitätsprodukte entschieden haben. Dieses Gerät bietet Ihnen eine perfekte Synthese aus funktionellem Design und wegweisender Spitzentechnologie. Überzeugen Sie sich selbst von dem Entwicklungsvorsprung unserer Produkte, die bei Leistungsfähigkeit und Bedienung eine absolute Spitzenposition einnehmen.
  • Seite 59 Inhalt Sicherheit ..........60 Entsorgung .
  • Seite 60: Sicherheit

    Sicherheit Die Sicherheit unserer Kältegeräte entspricht den anerkannten Regeln der Technik und dem Gerätesicherheitsgesetz. Dennoch sehen wir uns veranlasst, Sie mit folgenden Sicherheitshinweisen vertraut zu machen: Bestimmungsgemäße Verwendung • Das Kältegerät ist für die Verwendung im Haushalt bestimmt. Es eignet sich zum Kühlen, Einfrieren und Tiefkühllagern von Lebensmitteln sowie zur Eisbereitung.
  • Seite 61: Entsorgung

    Kinder sind zu beaufsichtigen, sodass sie nicht am Gerät spielen können.! Im Alltagsbetrieb • Behälter mit brennbaren Gasen oder Flüssigkeiten können durch Kälte- einwirkung undicht werden. Explosionsgefahr! Lagern Sie keine Behälter brennbaren Stoffen, z.B. Spraydosen, Feuerzeug- Nachfüllkartuschen etc. im Kältegerät. •...
  • Seite 62: Entsorgung Von Altgeräten

    >PS< für geschäumtes Polystyrol, z. B. bei den Polsterteilen, grundsätzlich FCKW-frei. Die Kartonteile werden aus Altpapier hergestellt und sollten auch wieder zur Altpapiersammlung gegeben werden. Entsorgung von Altgeräten Aus Umweltschutzgründen müssen Kältegeräte fachgerecht entsorgt werden. Dies gilt für Ihr bisheriges Gerät und - nachdem es eines Tages ausgedient hat - auch für Ihr neues Gerät.
  • Seite 63: Aufstellen

    Aufstellen Aufstellort Das Gerät soll in einem gut belüfteten und trockenen Raum stehen. Die Umgebungstemperatur wirkt sich auf den Stromverbrauch aus. Daher sollte das Gerät – nicht direkter Sonneneinstrahlung ausgesetzt sein; – nicht an Heizkörpern, neben einem Herd oder sonstigen Wärmequellen stehen;...
  • Seite 64: Abstandsstücke

    Abstandsstücke Das Gerät ist mit 2 Abstandsstücken ausgestattet, die wie in der Abbildung gezeigt montiert werden müssen. Die Schrauben etwas lösen. Das Abstandsstück unter Schraubenkopf schieben und die Schraube wieder festziehen. Türanschlag wechseln Achtung! Der Türanschlagwechsel ist nicht möglich. Elektrischer Anschluss Für den elektrischen Anschluss ist eine vorschriftsmäßig installierte Schutzkontakt-Steckdose erforderlich.
  • Seite 65: Bedienungs- Und Kontrolleinrichtung

    Bedienungs- und Kontrolleinrichtung MODE RESET Kühlraum-Anzeige Temperaturanzeige für Kühlraum Tasten zur Temperatureinstellung für Kühlraum Thermometer-Anzeige für Kühlraum (bei COOLMATIC) MODE-Taste zur Einstellung der Betriebsart Textanzeige RESET-Taste Gefrierraum-Anzeige Temperaturanzeige für Gefrierraum Tasten zur Temperatureinstellung für Gefrierraum Thermometer-Anzeige für Gefrierraum (bei FROSTMATIC) Tasten zur Temperatureinstellung Die Temperatureinstellung erfolgt durch die Tasten „+“...
  • Seite 66: Temperaturanzeige

    Temperaturanzeige Die Temperaturanzeige kann mehrere Informationen anzeigen. • Bei normalem Betrieb wird im Kühlraum die Durchschnitts-Temperatur angezeigt (IST-Temperatur). Die Temperaturschwankungen sind im gesamten Kühlraum gering. • Im Gefrierraum wird die wärmste Temperatur angezeigt (IST-Tempe- ratur). Bei Vollbeladung befindet sich die wärmste Zone üblicherweise oben im vorderen Bereich des Gefrierraums.
  • Seite 67: Textanzeige

    – HOLIDAY: Kühlraumtemperatur höher den Regelungsbereich . – : Normalbetrieb entsprechend eingestellter SOLL-Temperaturen. 1. MODE-Taste 1x drücken. Im Display wird die Betriebsart SHOPPING blinkend angezeigt. 2. Nach ca. 4 Sekunden hört die Anzeige auf zu blinken, die Betriebsart SHOPPING ist eingestellt. 3.
  • Seite 68: Inbetriebnahme

    2. Das Gerät muss, bevor es das erste Mal in Betrieb genommen wird, anhand des Kapitels „Aufstellen“ korrekt aufgestellt werden. Insbesondere ist darauf zu achten, dass die vorhandene Netzspannung und Netzfrequenz mit den Daten des Gerätes übereinstimmen. 3. Den Kälteakku aus dem Gerät nehmen. 4.
  • Seite 69: Betriebsarten

    eingestellte SOLL-Temperatur an. 2. Gewünschte Temperatur durch Drücken der Tasten „+“ (WÄRMER) und „- “ (KÄLTER) für den Kühl- bzw. Gefrierraum einstellen (siehe Abschnitt "Tasten zur Temperatureinstellung"). Die Temperaturanzeige zeigt sofort die geänderte Einstellung an. Mit jedem Tastendruck wird die Temperatur um 1 °C weitergestellt. Einstellbarer Temperaturbereich: Kühlraum +2 °C bis +8 °C, (HOLIDAY) Gefrierraum: -15 °C bis -24 °C...
  • Seite 70 SHOPPING Die Funktion SHOPPING eignet sich zum schnellen Abkühlen größerer Kühlgutmengen im Kühlraum, sowie kleinerer Mengen Gefriergut im Gefrierraum, z. B. nach einem größeren Einkauf. Dabei wird für den Kühlraum für 6 Stunden automatisch eine SOLL- Temperatur von +2 °C vorgegeben. Die Kühlung im Gefrierraum läuft für 1 Stunde im Dauerbetrieb.
  • Seite 71: Frostmatic Und Coolmatic

    FROSTMATIC und COOLMATIC Bei der Kombination der Funktionen FROSTMATIC und COOLMATIC wird für den Kühlraum für 6 Stunden automatisch eine SOLL-Temperatur von +2 °C vorgegeben. Die Kühlung im Gefrierraum läuft für 52 Stunden im Dauerbetrieb. 1. Die Taste MODE so oft drücken, bis im Display gleichzeitig FROSTMATIC und COOLMATIC blinken.
  • Seite 72: Gerät Abschalten

    Gerät abschalten Soll das Gerät für längere Zeit außer Betrieb genommen werden: 1. Netzstecker ziehen oder Sicherung abschalten bzw. herausdrehen. 2. Gefrierraum abtauen und Gerät gründlich reinigen (siehe Abschnitt "Reinigung und Pflege"). 3. Türen anschließend geöffnet lassen, um Geruchsbildung zu vermeiden. Kontroll- und Informationssystem Das Kontroll- und Informationssystem besteht aus Temperaturanzeigen, optischer Warnanzeige und akustischer Warneinrichtung.
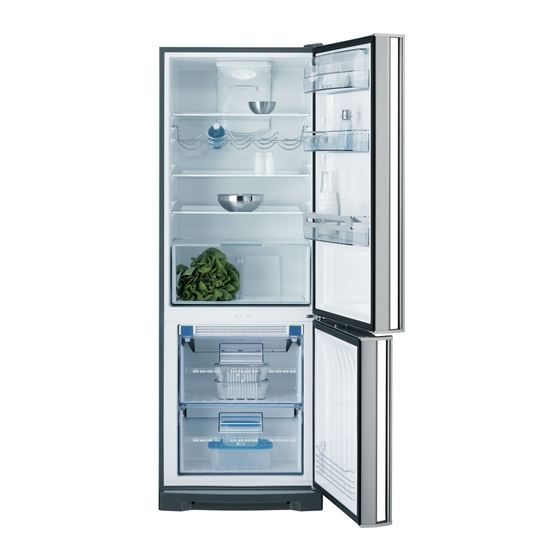
  • Seite 73: Innenausstattung

    Achtung! Bei An- oder Auftauverdacht sollten Sie, je nach erfolgter Erwärmung, die Qualität der Lebensmittel und deren weitere Verwendung prüfen. Ein Temperaturanstieg ist eventuell zurückzuführen auf: – häufiges oder langes Türöffnen; – Einlagern größerer Mengen warmer Lebensmittel; – hohe Umgebungstemperatur; –...
  • Seite 74: Feuchtregulierung

    Feuchteregulierung Vor der Abstellfläche über den Obst- und Gemüseschalen befindet sich bei einigen Modellen ein verstellbares Lüftungsgitter. Die Öffnung der Lüftungsschlitze kann mit einem Schieber stufenlos reguliert werden. Schieber rechts: Lüftungsschlitze geöffnet.Schieber links: Lüftungsschlitze geschlossen. Bei geöffneten Lüftungsschlitzen stellt sich infolge stärkerer Luftzirkulation...
  • Seite 75: Flaschenablage

    Flaschenablage Flaschen mit dem Flaschenhals nach vorne in die Ablage legen. Achtung: ungeöffnete Flaschen waagrecht lagern. Lagerung angebrochener Flaschen kann die Flaschenablage schräggestellt werden. Dazu die Flaschenablage soweit nach vorne ziehen, bis sie sich nach oben abschwenken läßt, und dann vordere Auflage nächsthöhere Ebene einschieben.
  • Seite 76: Einfrieren Und Tiefkühllagern

    Einfrieren und Tiefkühllagern Im Gefrierraum können Sie Tiefkühlkost lagern und frische Lebensmittel einfrieren. Achtung! • Vor dem Einfrieren von Lebensmitteln muss die Temperatur im Gefrierraum -18 °C oder kälter sein. • Bitte das auf dem Typschild angegebene Gefriervermögen beachten. Das Gefriervermögen ist die maximale Menge an frischer Ware, die innerhalb von 24 Stunden eingefroren werden kann.
  • Seite 77: Eiswürfelbereitung

    Eiswürfelbereitung Gerät zwei Eiswürfelschalen ausgestattet. Diese sind in den Seiten der oberen Gefrier-schublade eingesetzt. Öffen die obere Gefrierschublade. Die Eiswürfelschale entfernen. Den Pfropfen entfernen. Füllen Sie mit Wasser bis die Grenzeangabe “MAX”. Schliessen den Pfropfen und die Eiswürfelschale in ihrem Sitz wider einsetzen.
  • Seite 78: Installation Des Geruchsfilters

    IInstallation des Geruchsfilters Geruchsfilter Aktivkohlefilter, der schlechte Gerüche aufsaugt und den Geschmack und das Aroma der Lebensmittel ohne Risiko von Geruchsübertragung aufrecht erhält. Bei der Auslieferung befindet sich der Geruchsfilter in einem Kunststoffbeutel, vorgesehene Lebensdauer gewährleistet. Nehmen Sie den Filter aus dem Kunststoffbeutel und setzen Sie diesen in die Klappe ein, bevor Sie das Gerät in Betrieb nehmen.
  • Seite 79: Abtauen

    Abtauen Kühlraum Die Rückwand des Kühlraums bereift, während der Kompressor läuft, und taut vollautomatisch ab, wärend der Kompressor stillsteht. Das Tauwasser wird in der Ablaufrinne an der Rückwand des Kühlraumes aufgefangen, durch das Ablaufloch in die Auffangschale am Kompressor geleitet und dort verdunstet.. Gefrierraum Das Gefrierfach dieses Modelles gehört zum Typ "no frost";...
  • Seite 80: Reinigung Und Pflege

    Reinigung und Pflege Gerät von außen Achtung: Verwenden Sie kein Edelstahl-Reinigungsmittel und auch kein anderes aggressives oder scheuerndes Reinigungsmittel. Die schützende Lackschicht der Edelstahl-Oberfläche kann davon angegriffen werden. Die vorhandene Lackschicht bildet einen Schutz gegen Fingerabdrücke, zusätzliche Reinigungs- und Pflegemittel sind daher nicht mehr erforderlich.
  • Seite 81: Tipps Zur Energie-Einsparung

    Staubablagerungen Verflüssiger erhöhen Energieverbrauch. Deshalb einmal im Jahr den Verflüssiger an der Geräterückseite mit einer weichen Bürste oder mit dem Staubsauger vorsichtig reinigen. Die Ablauföffnung der Tropfrinne an der Rückwand des Kühlraumes kontrollieren. Bei Verstopfung diese mit Hilfe des grünen Stöpsels frei machen.
  • Seite 82 Störung Mögliche Ursache Abhilfe Gerät ist nicht eingeschaltet Gerät einschalten. Netzstecker ist nicht einge- Netzstecker einstecken. steckt oder lose. Gerät arbeitet nicht, die Sicherung hat ausgelöst oder Sicherung überprüfen, Temperaturanzeige ist dunkel ist defekt. gegebenenfalls erneuern. Störungen am Stromnetz Steckdose ist defekt. behebt Ihr Elektrofachmann.
  • Seite 83: Lampe Auswechseln

    Störung Mögliche Ursache Abhilfe Funktionsfehler liegt vor. Temperaturanzeige zeigt ein Quadrat oder einen Buchstaben. Im Display wird ein Quadrat oder einen „SERVICE“ angezeigt Bitte den Kundendienst Funktionsfehler liegt vor. benachrichtigen. Gerätetür Bitte den Kundendienst nicht mehr öffnen. benachrichtigen. Gerätetür nicht mehr öffnen. Warnton ertönt, eine rote Temperaturwarnung für Bitte im Abschnitt "Kontroll-...
  • Seite 84 2223 450-74-00-28012009 Subject to change without notice Sujeito a alterações sem aviso prévio Änderungen vorbehalten Downloaded from Fridge-Manual.com Manuals...

Inhaltsverzeichnis