Herunterladen Inhalt Inhalt Diese Seite drucken

Werbung

Verfügbare Sprachen

Verfügbare Sprachen

English/Deutsch/Français/Polski
Element 3
User Manual
Voice-Controlled 3 Channel Dash Cam
更新内容:
英文33页有文字修改
122mmX130mm
70g

Werbung

Inhaltsverzeichnis
loading

Inhaltszusammenfassung für VANTRUE Element 3

  • Seite 1 English/Deutsch/Français/Polski Element 3 User Manual Voice-Controlled 3 Channel Dash Cam 更新内容: 英文33页有文字修改 122mmX130mm...
  • Seite 3 Hey, find us here: www.vantrue.net/contact facebook.com/vantrue.live...
  • Seite 4: Inhaltsverzeichnis

    CONTENTS VERZEICHNIS CONTENU SPIS TREŚCI What's in the box? Basic Operation Was ist in der box? Funktion Opération de base Qu'y a-t-il dans la boîte? Co znajdziemy w pudełku? Podstawowe funkcje Camera Overview Specifications E3-Teile Produktspezifikationen Spécification Vue d'ensemble de la caméra Budowa kamery Dane techniczne Installation...
  • Seite 5: What's In The Box

    1. What’s in the Box? N E N N E N E VANTRUE RC05 Rear Type-C Rear ® GPS Adhesive Dash Cam Camera Camera Cable Mount (20ft) Car Charger with Type-C USB Data VANTRUE Wireless Electrostatic ® stickers *2 Built-in Type-C...
  • Seite 6: Camera Overview

    2. Camera Overview VTJE1210130 Name Description Speaker Delivers sound during video playback; Front Camera Front Facing Camera for video recording road Events; Power Port Connect to Type C cable or car charger for external power supply; Type-C USB / Type-C USB port for charging or transferring data; Video stream port for streaming rear camera's Rear Cam Port recording;...
  • Seite 7 Serial Number Serial Number for warranty registration. Button During video recording, long press to turn off the screen and short press to stop recording; In standby N E N N E N E state, short press to confirm the action; In playback mode, short press to stop/Start the video Recording;...
  • Seite 8 15 MicroSD Card Provides expandable storage (up to 512GB in FAT32, U3 or higher). Slot 16 Reset Button Press to force reset the device; LED Indicator LED Status Description Steady green light In standby status Blinking green light Camera is recording - 4 -...
  • Seite 9 5G Wi-Fi ON 2.4G Wi-Fi Connected 5G Wi-Fi Connected 3. Installation 3.1 Installing a Memory Card (Recommended: Vantrue U3 high-speed microSD card). Please insert a memory card (memory card capacity: 32GB-512GB, card speed: U3/Class10/A2). The dashcam has certain requirements on the card speed of the memory card.
  • Seite 10 Memory Card Installation: There is an icon indicating the insertion direction of the memory card. Please push the memory card into the card slot according to the direction indicated by this icon, until a "click" sound is heard in the card slot, indicating that the memory card is inserted properly. Before using this card, please follow the steps below to format it properly: If the camera is recording, please press the button to pause the...
  • Seite 11 Please do not use bad cards or low-speed cards on the dash cam, as it is easy to stop or lose the recording due to the failure of a memory card. Before formatting the memory card, please check the event video N E N N E N E folder in the SD card to see if there are any videos that need to be...
  • Seite 12 Thoroughly clean the windshield with water or alcohol, then wipe it with a dry cloth. Stick the electrostatic sticker behind the rear-view mirror, which is the recommended position to prevent blocking your view while driving. Electrostatic sticker Note: The electrostatic stickers with two-sided protective film. Please remove the protective film from No.
  • Seite 13 Take out the rear camera cable, connect the main camera and the rear camera, and take out the car charger to connect it. After the camera is powered on, choose a suitable location and install it. N E N N E N E (Correct wiring method) (Wrong wiring method) Rear Camera Installation: Please select the installation position on the...
  • Seite 14 Carefully store the car charger cable in the direction shown in the picture. The angle of the window glass of each model is different, please adjust the recording angle of the main camera and rear camera up and down according to actual needs. Note: Only the front camera can be rotated and adjusted, the cabin camera is fixed.
  • Seite 15: App Download

    3.3 APP Download Please scan the QR code for the relevant version below to download the app and install it. Search for the "Vantrue" app in App Store or Google N E N N E N E Play Store to find the app and then download and install it on your phone.
  • Seite 16: Wifi Connection

    3.4 WiFi Connection There are 3 ways to turn on the Wi-Fi of the camera. Long press the menu button Go to dash cam System Settings for 2 seconds. then turn on the Wi-Fi. System Setup 2/14 Language Wi-Fi VTJE1210130 Voice Control Voice Content 3.
  • Seite 17 After Turning on the WiFi function of the camera, enter the WiFi settings of the mobile phone, then find the WiFi name, such as E3_VANTRUE_XXXX, and enter the WiFi default password: 12345678 to connect to WiFi. N E N N E N E - 13 -...
  • Seite 18 3.5 APP Connection After the WiFi connection is successful, click "+" when opening the app for the first time, add the camera model, and then the app will automati- cally connect to the camera and display the current real-time recording situation of the camera.
  • Seite 19: App Operation

    The initial password for this device is only used for initial login. In order to prevent potential security risks, please be sure to change the initial password after the initial login to prevent others from logging into your device without authorization or other adverse consequences. N E N N E N E If you forget the WiFi password, you can restore the default setting of...
  • Seite 20 After entering the App’s real-time preview, you can perform the following operations: Video preview: After the app is successfully connected to the camera, enter the real-time preview page, click the full-screen icon or place the phone horizontally, and the real-time screen will automatically switch to the full-screen preview mode.
  • Seite 21: Basic Operation

    3.7 APP Upgrade Open the "Vantrue" App, connect to the Wi-Fi, and enter "Settings> About> Detect New Version". The App will automatically detect whether N E N N E N E its version is the latest version. If there is a new version of the app, follow the prompts and upgrade the version.
  • Seite 22 System Setup A.Record Setup -Resolution: The E3 camera has 4 resolution modes: Front+ Cabin+ Rear/ Front+ Cabin/ Front+ Rear/Single Front; Front+ Cabin+ Rear Recording: 1944P+1080P+1080P 30FPS; 1440P+1080P+1080P 30FPS; 1080P+1080P+1080P 30FPS; 1440P+1080P+720P 30FPS; 1440P+720P+720P 30FPS; 1080P+1080P+720P 30FPS; 1080P+720P+720P 30FPS; 720P+720P+720P 30FPS; Front+ Cabin Recording: 1944P+1080P 30FPS;...
  • Seite 23 -Stamp: Enable or disable the watermark stamp on video and photos. The watermark stamp includes time and date label, VANTRUE label, license plate number, GPS location information, and speed label. All enabled by default.
  • Seite 24 B. System Setup -Language: Available languages are Engish/Français/Español/Deutsch/I- taliano/简体中文/русский/日本語/Polski. -WiFi: The default is automatically to turn off wifi after 10 minutes without a connection. Under this function, you can set Wi-Fi to automatically turn on or off and turn off after 10 minutes, and view Wi-Fi information. -Voice Control: The default sensitivity is Standard.
  • Seite 25 50Hz or 60Hz frequency according to different regions. -System Info: Check the current model, firmware version, and the Vantrue official website. -Certifications: You can view the certification information of E3 camera. -Default Settings: Reset the device back to factory settings.
  • Seite 26: Loop Recording

    The file name format is 20300128_140633_0008_E_A.MP4 20300128_140633_0008_E_B.MP4 20300128_140633_0008_E_C.MP4 -Normal: Standard videos recorded. This folder saves loop recording video, parking mode video, and time-lapse video. The file name format of Loop Recording video is: 20300128_140633_0008_N_A.MP4; The file name format of Parking Mode video is: 20300128_140633_0007_P_A.MP4;...
  • Seite 27: Event Recording

    1440P+1080P+1080P 30FPS N E N N E N E 00:00:37 14:39:07 02-10-2023 MP/H Note: <1> The normal operation of the loop recording function is very depen- dent on the speed of the memory card, so please format the memory card regularly to avoid problems such as excessive memory card files and card aging that affect the normal loop recording.
  • Seite 28 1440P+1080P+1080P 30FPS 14:39:07 02-10-2023 MP/H 00:00:37 To manually lock the video, just press the button to lock the current video and capture it. During the lock video period, you can press the button to capture multiple times. After recording, the video will be automatically saved in the event video folder, and the photo will be saved in the photo folder.
  • Seite 29 Note: <1> The sensitivity of the automatic locking video trigger is determined by the sensitivity of the collision. The higher the sensitivity setting, the greater N E N N E N E the probability of being triggered. <2> The total capacity of the event video file accounts for 30% of the total capacity of the current memory card.
  • Seite 30: Low-Light Night Vision In Parking Mode

    4.2.4 Low-light Night Vision in Parking Mode In order to enhance the safety of parking at night, we make full use of the lens performance combined with low-light night vision technology to improve the night vision effect in parking mode. This function is in the open mode by default.
  • Seite 31 Parking Mode Collision Detection N E N N E N E Motion Detection Low Bitrate Mode Low Framerate Mode Note: To ensure the camera works properly in park mode, please use the hardwire kits or other stable and continuous power supply to power the dash cam.
  • Seite 32 5 levels. You can adjust according to your habits, as well as the surround- ings of the car. 1440P+1080P+1080P 30FPS 00:00:37 14:39:07 02-10-2023 MP/H When the Collision Detection is turned on, and no movement is detected after 5 minutes of recording (5-minute entry mechanism for short), then Collision Detection is activated with a Collision Detection icon at the bottom right corner of the screen, and the camera automatically turns off.
  • Seite 33 1440P+1080P+1080P 30FPS N E N N E N E 00:00:37 14:39:07 02-10-2023 MP/H When the motion Detection is turned on, and no movement is detected after 5 minutes of recording, then an orange icon will appear in the center of the screen, and the screen will turn off after 3 minutes. When the front camera detects the movement of an object, it will automatically start recording for 30 seconds and save the recording in the usual video folder.
  • Seite 34 1440P+1080P+1080P 30FPS 1440P+1080P+1080P 30FPS 00:00:37 14:39:07 02-10-2023 MP/H 00:00:37 14:39:07 02-10-2023 MP/H Note: Low Bitrate recording can only be engaged when the camera is turned on. Once the camera is turned off, the Low Bitrate recording will not work. Low Framerate mode When the low framerate mode is selected, the camera will record according to your selection among 1FPS/5FPS/10FPS/15FPS.
  • Seite 35: Time Lapse

    Note: The time unit of the calculation formula is seconds, so the final normal recording time calculated is also in seconds. If you need to convert it N E N N E N E into other time units, please check the units and convert by yourself. The low framerate mode is similar to the time-lapse recording function, but the difference is that there is no 5-minute entry mechanism for time-lapse recording, which will be directly turned on after setting.
  • Seite 36: Gps Function

    You can select GMT-08:00 by selecting your time zone, such as Los Angeles. If you do not know the time zone of your location, you can use WIFI to connect to the Vantrue App, and confirm that the automatic time adjustment function in the App is turned on.
  • Seite 37: Wireless Remote Control

    Time & Date GPS Automatic Update N E N N E N E Manually Set Date / Time Date Style Time Zone 4.2.9 Wireless Remote Control The camera is equipped with a remote control, which can be used to quickly control the camera to snapshot, take event video, set audio on/off and perform other functions.
  • Seite 38 suitable location on your car, then tear off the adhesive sticker from the remote control and stick it to your selected location. (Note: The remote control needs to be installed in a position that does not affect safe driving) Functions of the remote control: After the remote control is successfully connected, press the button to enable or disable audio.
  • Seite 39 After successful connection, short press the button to lock the current file and take a snapshot; continue to short press during the locked video, and continue to capture the photo. N E N N E N E 1440P+1080P+1080P 30FPS 00:00:37 14:39:07 02-10-2023 MP/H Replacing the remote control battery:...
  • Seite 40: Voice Assistant

    Note: When the power is low, the battery needs to be replaced(The battery model of the remote control is a CR2032 battery). It does not support charging. 4.2.10 Voice Assistant In addition to controlling the camera with the remote control, you can also control the camera with voice command.
  • Seite 41 4.2.11 Viewing and Deleting Video/Photos a.Viewing and Deleting files on the Camera N E N N E N E -Playback Files After clicking "Files", enter any folder, and after opening the video folder, you can press the button to select the next file, or press the button to delete the file during playback.
  • Seite 42 b.Viewing and Deleting files a Computer Connect the included TYPE-C USB data cable to the camera and the computer. After the connection is successful, the icon will appear on the display of the camera to transfer data, and then you can view the video files in the computer folder.
  • Seite 43 USB port on the back of the host computer. c.Viewing and Deleting on the ”Vantrue” App After the camera is successfully connected to the mobile phone through WiFi, it can play back, download and delete files in the mobile app.
  • Seite 44: Upgrading The Firmware

    The system will automatically update with the Micro SD card the firmware upgrade file. The camera will restart once the upgrade has been completed. The latest firmware version is always available at the official VANTRUE website (www.vantrue.net). We strongly recommend registering your product (www.vantrue.net/register) to receive a notification email when a new firmware update is available.
  • Seite 45: Specifications

    4.2.13 Working Temperature The camera is designed to operate in temperatures from -4 to 140°F (-20 to 60°C). Temperatures outside this range risk degrading the camera’s N E N N E N E performance work and causing damage. N E N E To avoid damage In hot weather, do not expose the camera directly to the sun when the car is parked.
  • Seite 46 Front + Inside + Rear Mode: Video Resolution 1944P+1080P+1080P 30FPS; 1440P+1080P+1080P 30FPS; 1080P+1080P+1080P 30FPS; 1440P+1080P+720P 30FPS; 1440P+720P+720P 30FPS; 1080P+1080P+720P 30FPS; 1080P+720P+720P 30FPS; 720P+720P+720P 30FPS; Front + Inside Mode: 1944P+1080P 30FPS; 1440P+1080P 30FPS; 1080P+1080P 30FPS; 1080P+720P 30FPS; 720P+1080P 30FPS; 720P+720P 30FPS; Front + Rear Mode: 1944P+1080P 30FPS;...
  • Seite 47 Warranty N E N N E N E The VANTRUE Element 3 Dash Cam comes with a full 12 months warranty. ® If you register your product on our official site (www.vantrue.net/register), you can extend the warranty to 18 months.
  • Seite 48: Was Ist In Der Box

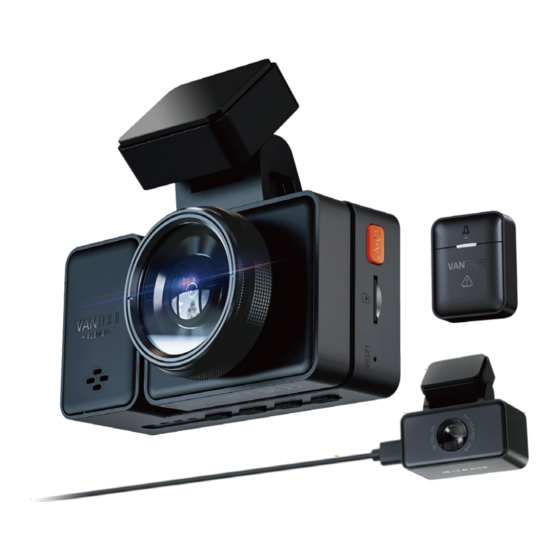
    1. Was ist in der box? VANTRUE E3 RC05 Rückkamera- GPS- Dashcam Rückkamera kabel(zwei USB-C- Klebehalterung Schnittstellen, 6 Meter) USB-C USB-C-Datenkabel VANTRUE Statische Aufkleber (1 Meter, nur für Drahtlose Autoladekabel (2 Blätter) (3,5 Meter) Datenübertragung) Fernbedienung Warnaufkleber Brechstange 3M-Ersatzkleber Sauberes Tuch (2 Blätter)
  • Seite 49 2. E3-Teile N D E N E N E VTJE1210130 Num. Name Funktion Lautsprecher Liefert Ton während der Videowiedergabe; Frontkamera Die Kamera nimmt die Front des Autos auf Stromschnittstelle Stromschnittstelle der Halterung Rückkamera- Das Verbindungskabel der Rückkamera und der Rückkamera; bei Anschluss an den Computer Schnittstelle wird der U-Disk-Modus angezeigt.
  • Seite 50 Seriennummer Zertifikat zur Rückverfolgbarkeit des Produkts nach dem Verkauf. Taste Während der Videoaufnahme können Sie lange drücken, um den Bildschirm auszuschalten, kurz drücken, um die Videoaufnahme zu stoppen und in den Standby-Modus zu wechseln; Sie können die ausgewählte Option im Menü bestätigen; während der Wiedergabe der Datei können Sie die Wiedergabedatei abspielen/anhalten.
  • Seite 51 dus kurz drücken, um das Menü aufzurufen/ zurückzukehren, lange drücken, um WLAN ein-/auszuschalten; Drücken Sie im WLAN-Modus eine beliebige Taste drücken, um WLAN zu beenden. Aufzeichnung von klarem Ton Mikrofon N D E N E N E Taste Im Videoaufnahmezustand wird durch kurzes Drücken die aktuelle Datei gesperrt und ein Bild aufgenommen, langes Drücken zum Herunter- fahren;...
  • Seite 52: Beschreibung Der Bildschirmsymbole

    3.1 Speicherkarte installieren Bitte legen Sie eine Speicherkarte ein (Speicherkartenkapazität: 32GB-512GB, Kartengeschwindigkeit: U3/Class10/A2), da Dashcam-Vid- eoaufnahmen bestimmte Anforderungen an die Kartengeschwindigkeit der Speicherkarte stellen, für Ihre reibungslose Nutzung empfehlen wir Ihnen VANTRUE Speicherkarte ( separat kaufen ). - 48 -...
  • Seite 53 Speicherkarten-Installationsmethode: An der Position des Kartensteck- platzes befindet sich ein Symbol für die Richtung des Speicherkartenein- schubs. Bitte schieben Sie die Speicherkarte entsprechend der durch das Symbol angezeigten Richtung in den Kartensteckplatz, bis ein „Klick“-Geräusch in der Karte zu hören ist Steckplatz, was anzeigt, dass die Speicherkarte eingesetzt ist.
  • Seite 54: Dashcam Installieren

    Notiz: Wenn Sie die Speicherkarte verwenden, wird empfohlen, sie einmal im Monat zu formatieren, um die normale Verwendung der Dashcam sicherzustellen. Bitte legen Sie während der Videoaufnahme die Speicherkarte nicht direkt ein oder entfernen Sie sie, um keine wichtigen Videoaufnahmen zu verlieren.
  • Seite 55 Bevor Sie den E3 installieren, schalten Sie ihn bitte ein und überprüfen Sie auf dem E3-Bildschirm, ob der Aufnahmewinkel der Frontkamera und des Kabinekamera geeignet ist. N D E N E N E Bitte bringen Sie vor dem Einbau des E3 den Elektrostatik-Aufkleber an, um nach der zweiten Demontage keine Spuren auf der Windschutzscheibe zu hinterlassen.
  • Seite 56 Nachdem der elektrostatische Aufkleber angebracht ist, reißen Sie den Aufkleber der E3-Halterung ab und kleben Sie ihn auf den elektro- statischen Aufkleber. Nehmen Sie das Kabel der Rückkamera heraus und schließen Sie das E3 an die Rückkamera. Achten Sie bei der Installation auf die Verdrahtung- smethode.
  • Seite 57 N D E N E N E Verstauen Sie das Autoladekabel in der Abbildung gezeigten Richtung. Da der Winkel des Fensterglases bei jedem Modell unterschiedlich ist, passen Sie bitte den Aufnahmewinkel des Objektivs an die tatsächli- chen Bedürfnisse an. - 53 -...
  • Seite 58: App Herunterladen

    3.3 APP Herunterladen Bitte scannen Sie den unten stehenden QR-Code mit Ihrem Mobiltelefon, laden Sie die VANTRUE APP herunter und installieren Sie sie und folgen Sie den Anweisungen, um die Installation abzuschließen. Hinweis: Nachdem dieses Produkt über WLAN mit einem Mobiltelefon verbunden wurde, kann es eine Echtzeit-Videovorschau realisieren, Dashcam-Einstellungen ändern, Dateien mit 0 Verkehr herunterladen und...
  • Seite 59: Wi-Fi-Verbindung

    gabe und die Video-Sharing-Funktionen hängen vom Internet ab (das Dashcam- WLAN muss ausgeschaltet sein). 3.4 WiFi Verbindung Es gibt 3 Möglichkeiten, das WLAN der Dashcam einzuschalten, auf das zugegriffen werden kann N D E N E N E ①Halten Sie 2 Sekunden lang.
  • Seite 60 Öffnen Sie dann die WLAN-Einstellungen des Handys, suchen Sie den WLAN-Namen, z. B.: E3_VANTRUE_XXXX, Geben Sie das Standard-WLAN-Passwort ein: 12345678, um eine Verbindung zu WLAN herzustellen. - 56 -...
  • Seite 61: App-Verbindung

    3.5 APP-Verbindung Nachdem die WLAN-Verbindung erfolgreich ist, öffnen Sie die APP zum ersten Mal und klicken Sie auf „+“, um das Dashcam-Modell hinzuzufügen, dann verbindet sich die APP automatisch mit der Dashcam und zeigt die aktuelle Echtzeit-Aufzeichnung der Dashcam an. N D E N E N E Notiz:...
  • Seite 62: App Verwendung

    Das Initialpasswort dieses Geräts wird nur für die Erstanmeldung verwendet. Um potenziellen Sicherheitsrisiken vorzubeugen, ändern Sie das Initialpasswort bitte rechtzeitig nach der ersten Anmeldung, um zu verhindern, dass sich andere unbefugt in Ihr Gerät einloggen oder andere nachteilige Folgen haben. Wenn Sie das WLAN-Passwort vergessen, können Sie die Werkseinstellun- gen der Dashcam wiederherstellen, und das WLAN-Passwort des Geräts wird ebenfalls auf das Standardpasswort 12345678 zurückgesetzt.
  • Seite 63 Nach dem Aufrufen der APP-Echtzeitvorschau können Sie die folgenden Vorgänge ausführen: Videovorschau: Nachdem die APP erfolgreich mit der Dashcam verbunden wurde, wechselt die Dashcam zur Echtzeit-Vorschauseite, klicken Sie auf die Vollbild-Schaltfläche oder das Mobiltelefon wird horizontal platziert, und der Echtzeit-Bildschirm wechselt automatisch N D E N E N E zum Vollbild.
  • Seite 64 3.7 APP-Upgrade Öffnen Sie die „Vantrue“-App, verbinden Sie sich mit dem WLAN der Dashcam, gehen Sie zu „Einstellungen > Über > Neue Version erkennen“, die App erkennt automatisch, ob die App-Version die neueste Version ist. Wenn es eine neue Version der App gibt, befolgen Sie die Anweisungen in der App, um die Version zu aktualisieren.
  • Seite 65: Funktion

    4. Funktion 4.1 E3 Hauptfunktion E3 dashcam verfügt über 3 Hauptfunktionsmenüs, nämlich Aufnahme- einstellungen, Systemeinstellungen und Dateisuche. Drücken Sie , halten Sie die Videoaufnahme an und drücken Sie N D E N E N E dann , um die Menüeinstellungen aufzurufen Aufnahmeeinstellungen: System Einstellung A.Auflösung: E3dashcam enthält 4 Kombinationen, nämlich: Auflösung vorne + innen + hinten:...
  • Seite 66 Rückspiegelbild: Es ist standardmäßig aktiviert.Nach der Aktivierung wird das Bild der Rückfahrkamera im Spiegelmodus angezeigt. m. Kennzeicheneinstellung: Es kann ein 9-stelliges Kennzeichen eingestellt werden, das im Wasserzeichen des Videos zu sehen ist. n. Tag-Stempel: Anzeige von Uhrzeit und Datum, VANTRUE-Markenname, - 62 -...
  • Seite 67 Kfz-Kennzeichen, GPS-Standortinformationen und Fahrzeuggeschwind- igkeit im Video, alles standardmäßig aktiviert. o. Zeitraffe: standardmäßig deaktiviert, Sie können wählen, ob Sie 1 FPS/5 FPS/10 FPS/15 FPS einschalten möchten. p. Parküberwachung: Hier können Sie den benötigten Parkmodus einstelle, einschließlich Kollisionserkennung/Bewegungserkennung/Niedriger Bitrate N D E N E N E Modus/Niedriger Bildrate Modus/Aus, die Standardeinstellung ist Aus.
  • Seite 68 d. Sprachinhalt: Spracherkennungsbefehle, Benutzer können verschiedene Befehle verwenden, um Dashcam fernzusteuern, damit er funktioniert. e. Formatieren: Alle Daten auf der Speicherkarte formatieren. f. Format Erinnerung einrichten: Standardmäßig deaktiviert, können Sie wählen, ob Sie nach 15 Tagen oder 1 Monat erinnert werden möchten, und es wird 15 Tage oder 1 Monat nach dem eingestellten Datum sein.
  • Seite 69 Systeminformationen: Zeigen Sie das Maschinenmodell, die Software-Ver- sionsnummer und die offizielle VANTRUE-Website an. m. Zertifizierungsinformationen: Sie können die Zertifizierungsinformationen von E3 anzeigen. n. Standardeinstellungen: Systemstandardeinstellungen wiederherstellen. C. Dateinen: N D E N E N E Sie können Videodateien und Fotodateien anzeigen, die von der Dashcam aufgenommen wurden.
  • Seite 70: Spezifikationen

    d. Alle: Alle Dateien können angezeigt werden. Hinweis: „A“ im Dateinamen bedeutet das von der Frontkamera aufgenommene Video, „B“ bedeutet das von der Kabinenkamera aufgenommene Video und „C“ bedeutet das von der Rückfahrkamera aufgenommene Video. 4.2 Spezifikationen 4.2.1 Daueraufnahme Die Dashcam wechselt nach dem Einschalten automatisch in den Loop-Aufnahmemodus.
  • Seite 71 Bitte überprüfen Sie regelmäßig das Loop-Aufzeichnungsvideo, um zu vermeiden, dass wichtige Videos durch Loops verdeckt werden. Wenn Sie die Loop-Aufnahme deaktivieren, funktioniert die Videosperr- funktion nicht mehr. Nachdem die Loop-Aufnahme ausgeschaltet wurde, beträgt die Dauer jedes Videos 20 Minuten. Nachdem die Aufnahme voll ist, stoppt die N D E N E N E Dashcam die Aufnahme und meldet „Die Karte ist voll!“.
  • Seite 72: Kamerabildschirm Wechseln

    1440P+1080P+1080P 30FPS 00:00:37 14:39:07 10-02-2023 MP/H Notiz: Die Empfindlichkeit des Auslösers der automatischen Verriegelung wird durch die Kollisionsempfindlichkeit bestimmt.Je höher die Empfindlich- keit, desto größer die Wahrscheinlichkeit des Auslösens. Die Gesamtkapazität der Notfallvideodatei macht 30% der Gesamt- kapazität der aktuellen Speicherkarte aus. Wenn die Notfallvideodatei die Obergrenze erreicht, überschreibt die neue Notfallvideodatei automatisch die ursprüngliche Notfallvideodatei.
  • Seite 73: Nachtsicht Bei Schwachem Licht Im Parkmodus

    1440P+1080P+1080P 30FPS 1440P+1080P+1080P 30FPS 1440P+1080P+1080P 30FPS 00:00:37 14:39:07 10-02-2023 MP/H 14:39:07 10-02-2023 00:00:37 MP/H 00:00:37 14:39:07 10-02-2023 MP/H Einzelnes Front Video Einzelnes Innen Video Einzelnes Rück Video N D E N E N E 4.2.4 Nachtsicht bei schwachem Licht im Parkmodus Um die Sicherheit beim Einparken bei Nacht zu erhöhen, nutzen wir die Linsenleistung in Kombination mit der Low-Light-Nachtsichttechnologie voll aus, um den Nachtsichteffekt im Parkmodus zu verbessern.
  • Seite 74 Parkmodus Kollisionserkennung Bewegungserkennung Niedriger Bitrate Modus Low-Frame-Rate-Modus Nachdem der Parkmodus aktiviert wurde, gibt es 3 Möglichkeiten zum Betreten: 1. Warten Sie nach dem Parken 5 Minuten, um automatisch einzutreten 2. Wählen Sie den manuellen Eintritt durch langes Drücken 3. Installieren Sie das ACC-Hardwire Kit und geben Sie ein direkt nach dem Parken und stellen Sie den Motor ab (ACC Hardwire Kit ist ein optionales Zubehör, das Sie selbst kaufen müssen).
  • Seite 75 und Modus mit niedriger Bildrate) werden im normalen Ordner gespeichert, um zu vermeiden, dass die Dateien im Parkmodus in einer Schleife überschrieben werden. Bitte überprüfen Sie diese regelmäßig. Kollisionserkennung Wenn die Kollisionserkennung eingeschaltet ist, wird auf der N D E N E N E Aufnahmeoberfläche angezeigt.
  • Seite 76 Bewegungserkennung Wenn die Bewegungserkennung eingeschaltet ist, wird auf der Aufnahmeoberfläche angezeigt. Es gibt 3 Arten der Bewegungserken- nung: niedrig/mittel/hoch, entsprechend der Erfassungsreichweite von 2 Meter/4 Meter/6 Meter. 1440P+1080P+1080P 30FPS 00:00:37 14:39:07 10-02-2023 MP/H Wenn die Dashcam nach dem Parken 5 Minuten lang keine Objekt- bewegung erkennt, die Bewegungserkennung tritt automatisch ein und wird in der Mitte des Bildschirms angezeigt.
  • Seite 77 Niedriger Bitrate Modus Nachdem der Niedriger Bitrate Modus eingeschaltet wurde, zeigt der Bildschirm das Symbol von oder 1440P+1080P+1080P 30FPS 1440P+1080P+1080P 30FPS N D E N E N E 00:00:37 14:39:07 10-02-2023 MP/H 00:00:37 14:39:07 02-10-2023 MP/H Wenn die Dashcam erkennt, dass sich das Auto nach dem Parken 5 Minuten lang nicht vibriert hat, ein Symbol wird in der Mitte des Bildschirms angezeigt und die Auflösung aller Objektive wird automatisch...
  • Seite 78 1440P+1080P+1080P 30FPS 00:00:37 14:39:07 10-02-2023 MP/H [Normale Aufnahmezeit = Zeitrafferaufnahmezeit (Sek.) x Aufnahmebil- drate FPS x Zeitrafferoption] (Die Zeit sollte in Sekunden umgerechnet werden) Notiz: Die Zeiteinheit der Berechnungsformel ist Sekunden, und die berech- nete normale Aufnahmezeit beträgt ebenfalls Sekunden. Niedriger Bildrate Modus ähnelt der Zeitraffer.Der Unterschied zwischen den beiden besteht darin, ob Sie 5 Minuten warten müssen, um einzutreten.
  • Seite 79 1440P+1080P+1080P 30FPS N D E N E N E 00:00:37 14:39:07 10-02-2023 MP/H Die Formel zur Berechnung der Videodauer lautet: [Normale Aufnahmezeit = Zeitrafferaufnahmezeit (Sek.) x Aufnahmebil- drate FPS x Zeitrafferoption] (Die Zeit sollte in Sekunden umgerechnet werden) 4.2.7.GPS GPS ist standardmäßig eingeschaltet und GPS-Signale werden über die GPS-Station empfangen.
  • Seite 80 Sie können Ihre Zeitzone auswählen, z. B. Los Angeles, Sie können GMT-08:00 auswählen. Wenn Sie die Zeitzone Ihres Standorts nicht kennen, können Sie sich über WLAN mit der Vantrue APP verbinden und bestäti- gen, dass die automatische Zeitanpassungsfunktion in der APP aktiviert ist.
  • Seite 81: Fernbedienung

    4.2.9.Fernbedienung Die dshcam ist mit einer Fernbedienung ausgestattet, mit der Funktionen wie Schnappschuss, Notfallaufnahme und Aufnahme ein/aus über die Fernbedienung schnell bedient werden können. Fernbedienungsanschluss: N D E N E N E Nehmen Sie die Fernbedienung heraus, entfernen Sie die Batterieisolierfo- lie auf der Fernbedienung, die Dashcam passt sich automatisch an die Fernbedienung an, Sie müssen sie nicht manuell mit der Dashcam koppeln.
  • Seite 82 Fernbedienungsfunktion: Nachdem die Fernbedienung erfolgreich verbunden wurde, verwen- den Sie , um das Mikrofon ein- oder auszuschalten. 1440P+1080P+1080P 30FPS 00:00:37 14:39:07 10-02-2023 MP/H - 78 -...
  • Seite 83 Drücken Sie nach erfolgreicher Verbindung kurz die , um die aktuelle Datei und den Snappschus zu sperren; drücken Sie sie während des gesperrten Videos weiter, wird der Schnappschuss fortgesetzt. N D E N E N E N D E N E N E 1440P+1080P+1080P 30FPS 00:00:37 14:39:07 10-02-2023...
  • Seite 84: Spracherkennung

    Hinweis: Bitte ersetzen Sie die Batterie, wenn die Leistung der Fernbedi- enung niedrig ist, die Fernbedienung unterstützt das Aufladen nicht. Das Modell der Fernbedienungsbatterie ist eine CR2032-Knopfbatterie. 4.2.10 Spracherkennung Neben der Steuerung der Dashcam mit der Fernbedienung können Sie der Dashcam auch Sprachbefehle über den Sprachassistenten erteilen, wie z.
  • Seite 85: Dateien Wiedergeben Und Löschen

    4.2.11 Dateien wiedergeben und löschen a.Dashcam-Betrieb ---Video abspielen Wählen Sie nach dem Aufrufen der Dateisuche einen beliebigen Ordner aus, um darauf zuzugreifen, nachdem Sie die Videodatei geöffnet haben, N D E N E N E können Sie die Taste drücken, um die nächste Datei auszuwählen, und Sie N D E N E N E können die Datei während der Wiedergabe löschen.
  • Seite 86 b. Wiedergabe und Löschen von Dateien auf dem Computer Schließen Sie die Dashcam über ein USB-C-Kabel an den Computer an. Nach erfolgreicher Verbindung erscheint das Symbol „ “ auf dem Dashcam-Display und Sie können die Videodateien im Computerordner sehen. (Dashcam zeigt diesen Bildschirm) Je nach Computersystem des Benutzers wird die Dashcam nach dem Anschließen an den Computer als Wechseldatenträger oder Wechsel- ordner auf dem Computer angezeigt.
  • Seite 87 Um die Datei auf dem Computer anzuzeigen, können Sie direkt mit der rechten Maustaste klicken, um das Menü zu öffnen und sie zu löschen. Sie können auch einen USB-Kartenleser verwenden, um die Speicherk- arteninformationen zu lesen. Um eine stabile Stromversorgung beim Anschluss an einen Computer zu gewährleisten, können Sie überprüfen, ob es sich bei der Computer- N D E N E N E...
  • Seite 88: Aktualisieren Sie Die Dashcam-Software

    Notiz: Die Wiedergabe und das Herunterladen von SD-Kartendateien in der APP verbraucht keinen Datenverkehr. Die Videodatei wird auf das lokale Gerät heruntergeladen und wiedergegeben, Sie können die GPS-Track-Informationen anzeigen, aber Sie müssen die DashcamWIFI trennen, da sonst die Karteninforma- tionen leer sind. 4.2.12 Aktualisieren Sie die Dashcam-Software Um ein besseres Benutzererlebnis zu erreichen, aktualisieren wir die Dashcam-Software von Zeit zu Zeit.
  • Seite 89: Dashcam-Arbeitsumgebung

    Hinweis: Schalten Sie die Dashcam während des Aktualisierungsvorgangs nicht aus, da dies sonst dazu führt, dass die Dashcam nicht erfolgreich aktualisiert wird oder die Dashcam beschädigt wird. Wenn das Upgrade aufgrund eines plötzlichen Stromausfalls fehlschlägt, können Sie sich an unsere Kundendienstmitarbeiter wenden, und es wird jemand da sein, der das Problem für Sie löst.
  • Seite 90: Produktspezifikationen

    5. Produktspezifikationen Für Ihr besseres Produkterlebnis werden wir das Produkt aktualisieren, und die Produktspezifikationen können sich ohne vorherige Ankündigung ändern. Modell Chip-Prozessor Novatek Hochleistungsprozessor Bildsensor Sony Sensor G-sensor Eingebauter Triaxialsensor WIFI 2.4GHz&5GHz Bildschirm 2,45" LCD-Display Weitwinkel Frontkamera 160° Kabinenkamera 165° Rückfahrkamera 160°...
  • Seite 91: Lagertemperatur

    1440P+1080P 30FPS 1080P+1080P 30FPS 1080P+720P 30FPS 720P+1080P 30FPS 720P+720P 30FPS Front+Rück: N D E N E N E 1944P+1080P 30FPS 1440P+1080P 30FPS N D E N E N E 1080P+1080P 30FPS 1080P+720P 30FPS 720P+1080P 30FPS 720P+720P 30FPS Front: 2592x1944P 30FPS 2560x1440P 30FPS 1920x1080P 30FPS 1280x720P 30FPS...
  • Seite 92: Kundendienst

    Die Garantiezeit der Marke VANTRUE beträgt 12 Monate. Wenn Sie Fragen zum Produkt haben, können Sie diese auf drei Arten lösen: ①Öffnen Sie die VANTRUE APP und finden Sie die Antwort unter Info > Häufig gestellte Fragen; ②Kontaktieren Sie den Kunden Servicemitarbeiter Ihres Einkaufskanals ;...
  • Seite 93: Qu'y A-T-Il Dans La Boîte

    1. Qu'y a-t-il dans la boîte? Dashcam Caméra Câble pour Support adhésif VANTRUE arrière RC05 caméra arrière ® N E N E N F R (6m) Chargeur de Câble de Télécommande Autocollants électrostatiques*2 voiture avec données USB C sans Fil câble USB C (3.5 m)
  • Seite 94: Vue D'ensemble De La Caméra

    2. Vue d'ensemble de la caméra VTJE1210130 Numéro Description Haut-parleur Délivre le son pendant la lecture vidéo. Caméra frontale Enregistrer une vidéo de la route devant la voiture. Connecteur Interface d'alimentation d'alimentation Connecteur de Port de connexion pour le câble de la caméra arrière caméra arrière Écrans...
  • Seite 95 Numéro de Série Numéro de série pour l'enregistrement de la garantie. Bouton Pendant l'enregistrement , Appui long pour éteindre l'écran, appui court pour arrêter l'enregistrement vidéo et passer en mode veille ;Vous pouvez confirmer l'option sélectionnée dans le menu et lire/mettre en pause des fichiers.
  • Seite 96 Microphone Enregistre un son clair avec les séquences vidéo. Bouton Mise sous/hors tension. Appui long pour allumer et éteindre, appui court pour verrouiller la vidéo et prendre des photos pendant l'enregis- trement d'un événement. Slot pour carte Prise en charge de la carte Micro SD jusqu'à 512 MicroSD Go en FAT32, classe 10 Bouton de...
  • Seite 97: Installation

    2.4G Wi-Fi connecté 5G Wi-Fi connecté 3. Installation 3.1 Installation d'une carte mémoire (Carte microSD VANTRUE recommandée) Veuillez insérer une carte mémoire (capacité de la carte mémoire : 32Go-512 Go, vitesse de la carte : U3/Class10/A2), car la dashcam a certaines exigences sur la vitesse de la carte mémoire.
  • Seite 98 Installation de la carte mémoire : Une icône indique le sens d'insertion de la carte mémoire. Veuillez pousser la carte mémoire dans la fente pour carte selon la direction indiquée par l'icône, jusqu'à ce qu'un "clic" se fasse entendre dans la fente pour carte, indiquant que la carte mémoire est correctement insérée Avant d'utiliser cette carte, veuillez suivre les étapes ci-dessous pour la formater correctement :...
  • Seite 99 Ne retirez pas ou n'insérez pas la carte mémoire pendant l'enregis- trement pour éviter de perdre des vidéos importantes. Veuillez ne pas utiliser de mauvaises cartes ou de cartes à faible vitesse sur la caméra de tableau de bord, car il est facile d'arrêter ou de perdre l'enregistrement en raison d'une défaillance de la carte mémoire.
  • Seite 100 Avant d'installer le E3, veuillez installer l'autocollant électrostatique pour éviter de laisser des traces sur le pare-brise après le deuxième démon- tage. Électrostatique autocollant Remarque : veuillez choisir une position appropriée sur le pare-brise et nettoyez-le. Veuillez d'abord retirer le film protecteur ①, le coller sur le pare-brise, puis déchirer le film protecteur ②.
  • Seite 101 Installez E3 : une fois l'autocollant électrostatique installé, retirez l'autocollant adhésif du support E3 et collez-le sur l'autocollant électro- statique. N E N E N F R Connectez les caméras avant et arrière et allumez-les via le câble de charge de la voiture, sélectionnez d'abord un emplacement approprié pour installer la caméra avant à...
  • Seite 102 Après avoir débranché le chargeur de voiture, rangez-le dans le sens indiqué sur la figure, puis allumez la dashcam. Veuillez ajuster l'angle d'enregistrement de la caméra frontale en fonction des besoins réels. - 98 -...
  • Seite 103 N F R 3.3 Téléchargement de l'APP Veuillez scanner le code QR de la version appropriée ci-dessous pour télécharger l'APP et l'installer.Recherchez l'application "Vantrue" dans l'App Store ou Google Play Store pour trouver l'application, puis téléchargez -la et installez-la sur votre téléphone.
  • Seite 104 de partage vidéo dépendront des services à valeur ajoutée Internet ou télécom (nécessite d'éteindre/déconnecter l'enregistreur WiFi). 3.4 Connexion Wi-Fi Il existe 3 façons d'activer le Wi-Fi de l'enregistreur : Appuyez longuement sur le Allez dans Paramètres système > bouton de menu pendant 2 Wi-Fi activé...
  • Seite 105 puis ouvrez les paramètres WiFi du téléphone mobile, recherchez le nom WiFi tel que :E3_VANTRUE_XXXX, entrez le mot de passe par défaut du WiFi : 12345678, et le téléphone mobile peut se connecter avec succès au WiFi. N E N E N F R - 101 -...
  • Seite 106 3.5 Connexion APP Une fois la connexion WiFi établie, cliquez sur "+" lors de la première ouverture de l'APP, ajoutez le modèle de caméra, puis l'APP se connect- era automatiquement à la caméra et affichera la situation d'enregis- trement en temps réel actuelle de la caméra. Noter: Si vous ne vous êtes pas connecté...
  • Seite 107 Le mot de passe initial de cet appareil est uniquement pour la connex- ion initiale. Afin d'éviter les risques de sécurité potentiels, assurez-vous de le changer initial à temps après la connexion initiale pour empêcher d'autres personnes de se connecter à votre appareil sans autorisation ou d'autres conséquences néfastes.
  • Seite 108 Après être entré dans l'aperçu en temps réel de l'APP, vous pouvez effectuer les opérations suivantes : Aperçu vidéo : Une fois l'appareil connecté avec succès à l'APP, l'enregistreur accède à la page d'aperçu en temps réel, cliquez sur le bouton plein écran ou placez le téléphone horizontalement, l'image en temps réel passera automatiquement mode aperçu plein écran.
  • Seite 109 3.7 Mise à niveau de l'application Ouvrez l'application "Vantrue", entrez "Paramètres> À propos> Détecter nouveau Version", l'App détectera automatiquement si la version de l'App est la dernière version. S'il existe une nouvelle version de l'application, suivez les invites de l'application et mettez-la à niveau.
  • Seite 110: Opération De Base

    4. Opération de base 4.1 Paramètres de Menu Dashcam E3 dispose de 3 menus de fonctions, qui sont les paramètres d'enregistrement, les paramètres système et la navigation dans les fichiers. Vous pouvez régler votre caméra de tableau de bord selon vos besoins dans ce paramètre de fonction.
  • Seite 111 Mode d'enregistrement Avant Mode d'enregistrement Avant + Arrière : 1944P+1080P 3OFPS 2592x1944P 3OFP S2560x1440P 3OFPS 1440P+1080P 3OFPS 1920x1080P 3OFPS 1080P+1080P 3OFPS 1280x720P 3OFPS 1080P+720P 3OFPS 720P+1080P 3OFPS 720P+720P 3OFPS N E N E N F R Enregistrement en Boucle: Par défaut 3 minutes. Sélectionner les options de la durée: 1,2,3,4,5, Désactive.
  • Seite 112 Date et heure, modèle et logo, numéro de plaque d'immatriculation, étiquette de vitesse, localisation GPS. Enregistrement en accéléré : Désactivé par défaut. Il existe actuellement 4 options : 1FPS/5FPS/10FPS/15FPS. Selon votre choix, la vidéo est enregis- trée à 1 image/5 images/10 images/ 15 images par seconde. Mode Parking: Désactive par défaut.
  • Seite 113 Heure & Date: Il existe deux méthodes de réglage ①Mise à jour automatique du GPS, ② Réglage manuel de la date/heure. Mise à jour automatique par défaut. La première méthode est basée sur votre fuseau horaire, vous devez donc choisir le bon ; vous pouvez également choisir de le désactiver et de corriger manuellement l'heure de la date vous-même.
  • Seite 114 C.Parcourir les Documents Passez en revue et supprimez les vidéos stockées dans des dossiers de fichiers. Fichier Vidéo Événement Vidéo Normale Photo Tous les fichiers Vidéo d’urgence: Les fichiers vidéo d'urgence sont enregistrés dans ce dossier. Le nom du fichier: 20300128_140633_0008_E_A.MP4 20300128_140633_0008_E_B.MP4 20300128_140633_0008_E_C.MP4...
  • Seite 115: Présentation Des Fonctions

    4.2 Présentation des fonctions 4.2.1 Enregistrement en Boucle Avec une carte mémoire insérée, la caméra démarre (par défaut) immédiatement l'enregistrement vidéo en boucle lorsqu'elle est connectée à une source d'alimentation. Selon la taille de la carte mémoire actuelle, une fois que l'enregistrement atteint le réglage (70 % de la capacité...
  • Seite 116 4.2.2 Vidéo d'urgence L'enregistrement d'urgence est déclenché par G-Sensor, qui peut être divisé en déclenchement automatique et verrouillage manuel. 1440P+1080P+1080P 30FPS 00:00:37 14:39:07 10-02-2023 MP/H Verrouillage manuel : Cliquez sur l'icône pour commencer à verrouiller l'enregistrement et la vidéo est enregistrée dans le dossier vidéo d'urgence.
  • Seite 117 Remarquer: La sensibilité du déclencheur vidéo à verrouillage automatique est déterminée par la sensibilité de la collision. Plus le réglage de sensibilité est élevé, plus la probabilité d'être déclenché est grande. La capacité totale du fichier vidéo d'événement représente 30 % de la capacité...
  • Seite 118 4.2.4 Mode Parking à Faible Luminosité Afin d'améliorer la sécurité du stationnement la nuit, nous utilisons pleinement les performances de l'objectif combinées à la technologie de vision nocturne à faible luminosité pour améliorer l'effet de vision nocturne en mode stationnement. Cette fonction est activée par défaut, elle ne sera déclenchée qu'après être entrée en mode parking et n'affectera pas l'enregistrement normal.
  • Seite 119 Une fois le mode de stationnement activé, il existe 3 façons d'entrer: Vous pouvez attendre 5 minutes pour entrer automatiquement Appuyer longuement sur le bouton pour entrer manuellement. Installez la ligne abaisseur ACC et entrez directement après l'arrêt du moteur (la ligne abaisseur ACC est un accessoire en option, vous pouvez choisir de l'acheter).
  • Seite 120 1440P+1080P+1080P 30FPS 00:00:37 14:39:07 10-02-2023 MP/H Si l'enregistreur de conduite ne détecte pas le mouvement ou la vibration de l'objet dans les 5 minutes, le mode de détection de collision se déclenche automatiquement. L'icône apparaît au centre de l'écran, puis la dashcam s'éteint automatiquement. Pendant cette période, si des vibrations ou un mouvement de la voiture sont détectés, la caméra sera allumé...
  • Seite 121 Processus d'enregistrement vidéo : lorsque l'enregistreur détecte le mouvement de l'objet ou ressent la vibration de la voiture, il déclenche automatiquement l'enregistrement vidéo. VANTRUE E1 a une fonction de pré-enregistrer 5 secondes, de sorte que la vidéo de détection de mouvement de stationnement sera de 35 secondes qui se compose de deux parties :...
  • Seite 122 C.Enregistrement à faible débit Lorsque Enregistrement à faible débit est activée, son icône s'affiche à l'écran, selon l'option que vous choisissez d'être 1080P 15FPS ou 720P 15FPS. 1440P+1080P+1080P 30FPS 1440P+1080P+1080P 30FPS 14:39:07 10-02-2023 MP/H 14:39:07 10-02-2023 MP/H 00:00:37 00:00:37 Si l'enregistreur de conduite ne détecte pas le mouvement ou la vibration de l'objet dans les 5 minutes, le mode de enregistrement à...
  • Seite 123 Après le stationnement, l'enregistreur activera le mécanisme d'entrée pendant 5 minutes, puis entrera automatiquement en mode de fréquence d'images faible. La vidéo accélérée peut grandement préserver l'intégrité de la vidéo et économiser de l'espace sur la carte mémoire. 1440P+1080P+1080P 30FPS N E N E N F R 00:00:37...
  • Seite 124: Fonction Gps

    4.2.6. Enregistrement en Accélérée Lorsque Mode à faible fréquence d'images est avtivé, la dashcam enregis- trera selon la sélection de 1FPS/5FPS/10FPS/15FPS. Par exemple, si vous sélectionnez 1FPS et que la résolution vidéo actuelle est de 30FPS, l'enreg- istreur générera une vidéo de 30FPS toutes les secondes. 1440P+1080P+1080P 30FPS 00:00:37 14:39:07 10-02-2023...
  • Seite 125 ) affectera également la réception du signal GPS. Les informations GPS sont enregistrées dans la vidéo que vous avez enregistrée. Pour le voir, veuillez télécharger et installer VANTRUE APP et VANTRUE GPS Player (disponibles en téléchargement sur www.vantrue. net.
  • Seite 126: Télécommande Sans Fil

    Heure & Date Mise à jour automatique du GPS Régler manuellement la date/l'heure Style de date Fuseau Horaire Remarque : la correction automatique de l'heure par le GPS doit définir le bon fuseau horaire. 4.2.9 Télécommande sans Fil La caméra est équipée d'une télécommande, qui peut être utilisée pour contrôler rapidement la caméra pour un instantané, une vidéo d'urgence, l'enregistrement marche/arrêt et d'autres fonctions.
  • Seite 127 Installation de la télécommande : Une fois la télécommande associée à l'appareil, veuillez sélectionner un emplacement approprié sur votre voiture, puis retirez l'autocollant adhésif de la télécommande et collez-le à l'emplacement sélectionné. (Remarque : la télécommande doit être installée dans une position qui n'affecte pas la sécurité...
  • Seite 128 Fonctions de la télécommande : Une fois la télécommande connectée avec succès, appuyez sur le bouton pour activer ou désactiver l'enregistrement. 1440P+1080P+1080P 30FPS 00:00:37 14:39:07 10-02-2023 MP/H Une fois la connexion établie, lorsque vous appuyez brièvement sur le bouton d'urgence , la caméra verrouille le fichier actuel et prend un instantané...
  • Seite 129 Remplacement de la pile de la télécommande : Il y a une marque "OPEN" au bas de la télécommande, veuillez ouvrir lentement l'espace environnant le long de la position de la rainure de cette marque pour l'ouvrir. N E N E N F R 2.
  • Seite 130: Assistant Vocal

    4.2.10 Assistant Vocal En plus de contrôler la caméra avec la télécommande, vous pouvez également contrôler la caméra avec la commande vocale. Comme capturer des images, démarrer l'enregistrement vidéo, activer/désactiver le WiFi, verrouiller la vidéo, etc. Les langues actuellement prises en charge sont l'anglais, le japonais, le russe et le chinois.
  • Seite 131 4.2.11. Lecture et Suppression de Fichiers a. Regarder sur la caméra Lire les vidéos Après avoir cliqué sur "Fichiers", entrez dans n'importe quel dossier, après avoir ouvert le dossier vidéo, vous pouvez appuyer sur le bouton Bas pour sélectionner le fichier suivant, et appuyez sur le bouton Bas pour supprim- er le fichier pendant la lecture.
  • Seite 132 b. Regarder sur l'ordinateur Connectez le câble de données USB C fourni à l'appareil et à l'ordinateur. Une fois la connexion réussie, l'icône apparaîtra sur l'écran de l'appareil pour transférer les données, puis vous pourrez visualiser les fichiers vidéo dans le dossier de l'ordinateur. Selon le système informatique des différents utilisateurs, une fois l'appareil connecté...
  • Seite 133 Pour afficher le fichier sur l'ordinateur, vous pouvez directement cliquer avec le bouton droit pour ouvrir le menu et le supprimer. Vous pouvez également utiliser un lecteur de carte USB pour lire les informations de la carte mémoire. Afin d'assurer une alimentation stable lors de la connexion à un ordina- teur, veuillez vérifier si l'interface de l'ordinateur est USB 3.0.
  • Seite 134: Mise À Niveau Du Logiciel

    4.2.12 Mise à niveau du logiciel La version du logiciel de la dashcam sera annoncée sur le site officiel de VANTRUE. Vous pouvez contacter le service client ou télécharger la dernière version du logiciel à partir du site officiel, et mettre à niveau selon les invites du site officiel.(www.vantrue.net)
  • Seite 135: Température De Fonctionnement

    Remarque : pendant le processus de mise à niveau, ne mettez pas hors tension, sinon la mise à niveau échouera ou la dashcam sera endom- magé. Si vous rencontrez une panne de courant soudaine qui entraîne l'échec de la mise à niveau, n'hésitez pas à contacter le service clientèle pour résoudre le problème pour vous.
  • Seite 136: Spécification

    5. Spécification Modèle Processeur de puce Processeur Novatek haute performance Capteur d'image Capteur CMOS Sony Écran Écran tactile IPS 2.45 pouces WiFi WiFi intégré 2.4GHz & 5GHz Lentille Avant: Objectif grand angle F1.8, 160 degrés Interne:Objectif grand angle F2.0, 165 degrés Arrière: Objectif grand angle F1.8, 160 degrés Langues English、简体中文、日本語、Deutsch、Italiano、...
  • Seite 137 Format de vidéo Format d’image JPEG Audio Microphone et haut-parleur intégrés Mode de stockage Carte micro SD (U3 ou supérieur, jusqu'à 512 Go) Interface USB USB-C (Type-C) Type de batterie Super condensateur Tension et courant de DC 5V 2.4A N E N E N F R l'alimentation Puissance...
  • Seite 138: Garantie & Support

    Si vous vous inscrivez en tant que membre sur le site officiel de VANTRUE, votre période de service de garantie peut être étendue à 18 mois.
  • Seite 139: Co Znajdziemy W Pudełku

    1. Co znajdziemy w pudełku? Wideorejestrator RC05 tylna Kabel do tylnej Uchwyt GPS VANTRUE kamera kamery ® N E N E N P L Ładowarka Kabel USBC VANTRUE pilot Naklejki ® elektrostatyczne samochodowa pod do transmisji bezprzewodowy gniazdo zapalniczki danych Naklejki Szpatułka*1...
  • Seite 140: Budowa Kamery

    2. Budowa kamery VTJE1210130 Nazwa Opis Głośnik Dostarcza dźwięk podczas odtwarzania nagrań Przednia Nagrywa wszsystko przed pojazdem kamera Port zasilania Podłącz do kabla typu C lub ładowarki samocho- dowej, aby uzyskać zewnętrzne zasilanie; Typ-C USB / Port USB typu C do ładowania lub przesyłania danych;...
  • Seite 141 Wewnętrzna Nagrywa wnętrze pojazdu kamera Numer seryjny Numery seryjny kamery samochodowej Przycisk Podczas nagrywania wideo długie naciśnięcie wyłącza ekran i krótkie naciśnięcie zatrzymuje nagrywanie; W stanie gotowości naciśnij krótko, aby potwierdzić akcję; W trybie odtwarzania krótkie naciśnięcie powoduje zatrzymanie/ rozpoczęcie nagrywania wideo; Przycisk Podczas nagrywania wideo i czuwania krótkie naciśnięcie powoduje przełączenie okna wideo;...
  • Seite 142 Przycisk W trybie nagrywania naciśnij i przytrzymaj, aby włączyć/wyłączyć WiFi; W stanie gotowości krótkie naciśnięcie powoduje wejście/wyjście z menu ustawień, a długie naciśnięcie włącza/ wyłącza WiFi; W trybie WiFi naciśnij dowolny klawisz, aby wyjść z WiFi; Mikrofon Nagrywa dźwięk Przycisk Podczas nagrywania wideo krótkie naciśnięcie zablokuje bieżący plik i zrobi zdjęcie, długie naciśnięcie spowoduje wyłączenie zasilania;...
  • Seite 143: Instalacja

    5G WiFi Połączono 3. Instalacja 3.1 Instalowanie karty pamięci (zalecane: szybka karta microSD Vantrue U3). Proszę włożyć kartę pamięci (pojemność karty pamięci: 32 GB-512 GB, szybkość karty: U3/Class10/A2). Kamera ma pewne wymagania dotyczące szybkości karty pamięci. Aby zapewnić niezawodne działanie, zalecamy korzystanie z karty SD VANTRUE (sprzedawanej oddzielnie).
  • Seite 144 Instalacja karty pamięci: Jest ikona wskazująca kierunek wkładania karty pamięci. Wsuń kartę pamięci do gniazda zgodnie z kierunkiem wskaza- nym przez tę ikonę, aż usłyszysz dźwięk „kliknięcia” w gnieździe karty, co oznacza, że karta pamięci jest włożona prawidłowo. Przed użyciem tej karty wykonaj poniższe czynności, aby ją prawidłowo sformatować: Jeśli kamera nagrywa wciśnij aby zatrzymać...
  • Seite 145 jest zatrzymać lub utracić nagranie z powodu awarii karty pamięci. Przed sformatowaniem karty pamięci sprawdź folder wideo wydarzenia na karcie SD, aby sprawdzić, czy nie ma filmów, które należy zapisać osobno, aby nie usunąć przez pomyłkę ważnych filmów. 3.2 Instalowanie kamery na przedniej szybie Wyrównaj uchwyt z interfejsem uchwytu, a następnie wciśnij, aż...
  • Seite 146 Dokładnie wyczyść przednią szybę wodą lub alkoholem, a następnie wytrzyj suchą szmatką. Przyklej naklejkę elektrostatyczną za lusterkiem wstecznym, co jest zalecanym miejscem. Naklejka elektrostatyczna Uwaga: Naklejki elektrostatyczne z dwustronną folią ochronną. Usuń folię ochronną z nr 1, wklej naklejkę elektrostatyczną na przednią szybę, a następnie usuń...
  • Seite 147 Wyjmij kabel kamery tylnej, podłącz kamerę główną i kamerę tylną i wyjmij ładowarkę samochodową, aby ją podłączyć. Po włączeniu kamery wybierz odpowiednią lokalizację i zainstaluj ją. N E N E N P L (Prawidłowa metoda (Niewłaściwa metoda okablowania) okablowania) Instalacja kamery tylnej: Wybierz pozycję instalacji na tylnej szybie. Zalecamy wybranie pozycji blisko środka tylnej szyby i unikanie linii odparowywania na tylnej szybie, aby nie wpływać...
  • Seite 148 Ostrożnie przeprowadź kabel ładowarki samochodowej w kierunku pokazanym na rysunku. Kąt szyby okiennej każdego modelu jest inny, należy dostosować kąt nagrywania kamery głównej i tylnej kamery w górę I w dół zgodnie z rzeczywistymi potrzebami. Uwaga: Tylko przednią kamerę można obracać i regulować, kamera kabinowa jest stała.
  • Seite 149 3.3 Pobieranie aplikacji Aby pobrać i zainstalować aplikację, zeskanuj poniższy kod QR odpow- iedniej wersji. Wyszukaj aplikację „Vantrue” w App Store lub Google Play Store, aby znaleźć aplikację, a następnie pobierz ją i zainstaluj na swoim telefonie. N E N E N P L Uwaga: Po pomyślnym podłączeniu E3 do telefonu komórkowego przez...
  • Seite 150 3.4 WiFi Łączenie Istnieją 3 sposoby włączenia Wi-Fi kamery. Długo naciśnij menu! przez Przejdź do ustawień systemowych 2 sekundy. kamery samochodowej, a następ- nie włącz Wi-Fi. Ustawnienia Systemu 2/14 Język Wi-Fi VTJE1210130 Rozpoznawanie mowy Treść głosowa Użyj polecenia głosowego „Turn on Wi-Fi”, aby je włączyć. Turn on WiFi - 146 -...
  • Seite 151 Po włączeniu funkcji Wi-Fi kamery wprowadź ustawienia Wi-Fi telefonu komórkowego, a następnie znajdź nazwę Wi-Fi, na przykład E3_VAN- TRUE_XXXX, i wprowadź domyślne hasło Wi-Fi: 12345678, aby połączyć się z Wi-Fi. N E N E N P L - 147 -...
  • Seite 152 3.5 APP Łączenie Po pomyślnym nawiązaniu połączenia Wi-Fi kliknij „+” podczas otwiera- nia aplikacji po raz pierwszy, dodaj model kamery, a następnie aplikacja automatycznie połączy się z kamerą i wyświetli aktualną sytuację nagrywania kamery w czasie rzeczywistym. Noter: Jeśli nie połączysz się z Wi-Fi przed otwarciem aplikacji, aplikacja wyświetli monit „Najpierw połącz się...
  • Seite 153 Początkowe hasło dla tego urządzenia jest używane tylko do pierwsze- go logowania. Aby zapobiec potencjalnym zagrożeniom bezpieczeńst- wa, pamiętaj o zmianie początkowego hasła po pierwszym zalogowa- niu, aby uniemożliwić innym zalogowanie się do Twojego urządzenia bez autoryzacji lub innych negatywnych konsekwencji. Jeśli zapomnisz hasła Wi-Fi, możesz przywrócić...
  • Seite 154 Po wejściu do podglądu aplikacji w czasie rzeczywistym możesz wykonać następujące operacje: Podgląd wideo: Po pomyślnym podłączeniu aplikacji do E3 wejdź na stronę podglądu w czasie rzeczywistym, kliknij ikonę pełnego ekranu lub umieść telefon poziomo, a ekran czasu rzeczywistego automatycznie przełączy się...
  • Seite 155 3.7 APP Aktualizacja Otwórz aplikację „Vantrue”, połącz się z Wi-Fi i wejdź w „Ustawienia > Informacje> Wykryj nową wersję”. Aplikacja automatycznie wykryje, czy jej wersja jest najnowszą wersją. Jeśli dostępna jest nowa wersja aplikacji, postępuj zgodnie z instrukcjami i uaktualnij wersję.
  • Seite 156: Podstawowe Funkcje

    4. Podstawowe funkcje 4.1 Menu ustawienia Kamera E3 posiada 3 menu funkcyjne, którymi są: ustawienia nagrywania, ustawienia systemowe i przeglądanie plików. Dzięki tym ustawieniom funkcji możesz ustawić kamerę samochodową zgodnie z własnymi wymaganiami. wciśnij , najpierw wstrzymaj wideo, a następnie naciśnij aby wejść...
  • Seite 157 FPS; 1080 P + 1080 P 30 FPS; 1080 P + 720 P 30 FPS; 720 P + 1080 P 30 FPS; 720P + 720P 30FPS; Nagrywanie z przodu: 2592x1944P 30FPS; 2560x1440P 30FPS; 1920x1080P 30FPS; 1280x720P 30FPS. -Nagrywanie w pętli: Ustawienie domyślne to 3 min. Możesz wybrać opcje pomiędzy 1/3/5 min i WYŁ.
  • Seite 158 -Dodaj do nagrania: Włącz lub wyłącz pieczęć znaku wodnego na wideo i zdjęciach. Znaczek znaku wodnego zawiera etykietę godziny i daty, etykietę VANTRUE, numer tablicy rejestracyjnej, informacje o lokalizacji GPS i etykietę prędkości. Wszystkie włączone domyślnie. -Tryb poklatkowy: Domyślna wartość jest wyłączona. Możesz włączyć...
  • Seite 159 poleceń, aby zdalnie sterować kamerą do pracy. -Formatuj kartę pamięci: Formatuj wszystkie dane na karcie pamięci. -Konfiguracja przypomnienia formatu: Wybierz opcje przypomnienia: 15 dni, 1 miesiąc i Wył. Domyślnie jest wyłączone. Aby zapobiec regularnemu zapominaniu o formatowaniu karty pamięci, dodaliśmy ustawienie czasu przypomnienia o formatowaniu. Możesz wybrać...
  • Seite 160 C. Pliki Przejrzyj pliki wideo i zdjęcia nagrane przez kamerę. Pliki Zdarzenia Normalne Zdjęcia Wszystkie pliki -Zdarzenia: Filmy o zdarzeniach krytycznych wykryte przez aktywność G-Sensor lub ręcznie zablokowane przez użytkownika. Format nazwy pliku to 20300128_140633_0008_E_A.MP4 20300128_140633_0008_E_B.MP4 20300128_140633_0008_E_C.MP4 -Normalny: Nagrane standardowe filmy. Ten folder zapisuje wideo nagrywania w pętli, wideo trybu parkowania i wideo poklatkowe.
  • Seite 161: Nagrywanie W Pętli

    4.2 Dane techniczne 4.2.1 Nagrywanie w pętli Po włożeniu karty pamięci i podłączeniu zasilania kamera E3 automaty- cznie włączy się i przejdzie do nagrywania w pętli. Czas trwania każdego nagranego wideo zostanie zapisany na podstawie ustawionego czasu nagrywania w pętli, zapisanego w normalnym folderze wideo. Gdy pojemność...
  • Seite 162 Po wyłączeniu nagrywania w pętli czas trwania każdego filmu będzie wynosił 20 minut, a nagrywanie zostanie zatrzymane po zapełnieniu karty pamięci. 4.2.2 Nagrywanie zdarzeń Wideo zdarzenia jest wyzwalane przez czujnik G (czujnik grawitacyjny), który może być uruchamiany automatycznie lub ręcznie blokowany. Podczas jazdy, w szczególnych okolicznościach, kamera zostanie automatycznie zablokowana w celu nagrywania zdarzenia lub można ją...
  • Seite 163 1440P+1080P+1080P 30FPS 00:00:37 14:39:07 10-02-2023 MP/H Notatka: Czułość wyzwalacza automatycznego blokowania wideo jest określo- na przez czułość kolizji. Im wyższe ustawienie czułości, tym większe prawdopodobieństwo wyzwolenia. N E N E N P L Całkowita pojemność pliku wideo zdarzenia stanowi 30% całkowitej pojemności bieżącej karty pamięci.
  • Seite 164 1440P+1080P+1080P 30FPS 1440P+1080P+1080P 30FPS 1440P+1080P+1080P 30FPS 00:00:37 14:39:07 10-02-2023 MP/H 00:00:37 14:39:07 10-02-2023 MP/H 00:00:37 14:39:07 10-02-2023 MP/H Obraz tylko z Obraz tylko z Obraz tylko z przedniej kamery wewnętrznej kamery Tylnej kamery 4.2.4 Low-light Night Vision - widzenie w nocy przy słabym oświetleniu w trybie parkowania Aby zwiększyć...
  • Seite 165 4.2.5 Tryb parkowania (gdy tryb parkowania jest włączony, nagrywanie poklatkowe nie będzie działać. Te dwie funkcje nie mogą działać jednocześnie) Tryb parkingowy działa jako funkcja strażnicza w różnych sytuacjach. Możesz przełączać się na różne tryby monitorowania parkowania w zależności od różnych sytuacji parkowania. Po włączeniu trybu parkowania dostępne są...
  • Seite 166 niską liczbą klatek na sekundę) można włączyć tylko pojedynczo. Gdy jeden jest włączony, drugi zostanie automatycznie wyłączony. Wszystkie filmy nagrane w trybie parkowania (wykrywanie kolizji, wykrywanie ruchu, nagrywanie z niską szybkością transmisji, tryb z niską szybkością klatek) zostaną zapisane w normalnym folderze wideo. Aby zapobiec zapętleniu nadpisywania wideo w trybie parkowania, sprawdź...
  • Seite 167 Notatka: Eśli kamera nadal będzie uderzać podczas nagrywania wykrywania kolizji, wyjdzie z trybu wykrywania kolizji i przejdzie do normalnego nagrywania, uruchamiając ponownie 5-minutowy mechanizm wprowadzania. B. Detekcja ruchu Gdy wykrywanie ruchu jest włączone, Ikona zostanie wyświetlona w interfejsie nagrywania, wskazując, że kamera jest aktualnie w trybie wykrywania ruchu.
  • Seite 168 C. Low Bitrate Kiedy Low Bitrate jest włączony to zostanie wyświetlony w prawym dolnym rogu ekranu, w zależności od tego, czy wybierzesz 1080P 15FPS czy 720P 15FPS. Jeśli po 5 minutach nagrywania nie zostanie wykryty żaden ruch, pojawi się ikona, która pojawia się na środku ekranu. Rozdzielczość wszystkich bieżących filmów zostanie automatycznie zmieniona na 1080P 15FPS lub 720P 15FPS do nagrywania, a czas nagrywania zostanie określony zgodnie z aktualnie ustawionym czasem nagrywania w pętli.
  • Seite 169 1440P+1080P+1080P 30FPS 00:00:37 14:39:07 10-02-2023 MP/H [Normalny czas nagrywania = Czas nagrywania poklatkowego (sek) x Szybkość nagrywania FPS x Opcja nagrywania poklatkowego] (Czas należy przeliczyć na sekundy) N E N E N P L Uwaga: Jednostką czasu we wzorze obliczeniowym są sekundy, więc ostatec- zny obliczony normalny czas nagrywania jest również...
  • Seite 170: Funkcja Gps

    1440P+1080P+1080P 30FPS 00:00:37 14:39:07 10-02-2023 MP/H Wzór na obliczanie czasu trwania wideo to: [Normalny czas nagrywania = Czas nagrywania poklatkowego (sek) x Szybkość nagrywania FPS x Opcja nagrywania poklatkowego] (Czas należy przeliczyć na sekundy) 4.2.7 Funkcja GPS Funkcja GPS jest jedną z ważnych funkcji kamery samochodowej. GPS jest domyślnie włączony, a E3 odbiera sygnały GPS przez uchwyt GPS.
  • Seite 171: Pilot Zdalnego Sterowania

    Ustawienie czasu automatycznej korekcji GPS dla kamery E3 jest domyśl- nie włączone. Możesz wybrać GMT-08:00, wybierając swoją strefę czasową, na przykład Los Angeles. Jeśli nie znasz strefy czasowej swojej lokalizacji, możesz użyć WIFI, aby połączyć się z aplikacją Vantrue i N E N E N P L potwierdzić, że funkcja automatycznej regulacji czasu w aplikacji jest...
  • Seite 172 1440P+1080P+1080P 30FPS 14:39:07 10-02-2023 00:00:37 MP/H Instalacja pilota zdalnego sterowania Po dopasowaniu pilota do kamery wybierz odpowiednie miejsce w samochodzie, a następnie oderwij naklejkę z pilota i przyklej ją w wybra- nym miejscu. (Uwaga: pilot musi być zainstalowany w pozycji, która nie wpływa na bezpieczną...
  • Seite 173 Funkcje pilota zdalnego sterowania: Po pomyślnym podłączeniu pilota naciśnij przycisk, aby włączyć lub wyłączyć dźwięk. 1440P+1080P+1080P 30FPS N E N E N P L 00:00:37 14:39:07 10-02-2023 MP/H Po pomyślnym nawiązaniu połączenia, po krótkim naciśnięciu przycisk, kamera zablokuje bieżący plik i zrobi migawkę wideo; kontyn- uuj krótkie naciśnięcie podczas zablokowanego wideo i kontynuuj robienie zdjęcia.
  • Seite 174 Wymiana baterii pilota: Na spodzie pilota znajduje się znak "OPEN", proszę powoli podważyć otaczającą szczelinę wzdłuż pozycji rowka tego znaku, aby otworzyć. 2. Po otwarciu delikatnie podważ baterię z rowka z przodu komory baterii, a następnie wyjmij starą baterię, włóż nową baterię i zakryj tylną pokrywę...
  • Seite 175: Asystent Głosowy

    4.2.10 Asystent głosowy Oprócz sterowania kamerą za pomocą pilota, możesz również sterować kamerą za pomocą poleceń głosowych. Obecnie obsługiwane języki to angielski, japoński, rosyjski i chiński. Aby uzyskać bardziej szczegółowe polecenia głosowe, sprawdź Ustawienia systemu > Treść głosowa. Domyślnym ustawieniem jest standardowa czułość. Rozpoznawanie głosu ma opcje takie jak niska czułość/standardowa/wysoka czułość/wyłąc- zone.
  • Seite 176 4.2.11 Przeglądanie I kasowanie plików oraz nagrań a. Przeglądanie i usuwanie plików w aparacie -Odtwarzanie plików Po kliknięciu „Pliki” wprowadź dowolny folder, a po otwarciu folderu wideo możesz nacisnąć , aby wybrać następny plik, lub naciśnij przycisk, aby usunąć plik podczas odtwarzania. 20230210_140633_0002_E_B.MP4 Zdarzenia Skasować...
  • Seite 177 b. Przeglądanie i usuwanie plików na komputerze Podłącz dołączony kabel USB TYPE-C do transmisji danych z E3 i komputerem. N E N E N P L Po pomyślnym podłączeniu Ikona pojawi się na wyświetlaczu E3 w celu przesłania danych, a następnie będzie można przeglądać pliki wideo w folderze komputera.
  • Seite 178 USB3.0. Podczas podłączania do komputera stacjonarne- go zaleca się użycie portu USB z tyłu komputera hosta. c. Przeglądanie i usuwanie w aplikacji „Vantrue” Po pomyślnym połączeniu E3 z telefonem komórkowym przez Wi-Fi, może odtwarzać, pobierać i usuwać pliki w aplikacji mobilnej.
  • Seite 179: Aktualizacja Oprogramowania

    System automatycznie zaktualizuje plik aktualizacji oprogramowania układowego za pomocą karty Micro SD. Kamera uruchomi się ponownie po zakończeniu aktualizacji. Najnowsza wersja oprogramowania jest zawsze dostępna na oficjalnej stronie internetowej VANTRUE (www.vantrue.pl/wsparcie). N E N E N P L - 175 -...
  • Seite 180: Dane Techniczne

    4.2.13 Temperatura pracy urządzenia Kamera została zaprojektowana do pracy w temperaturach od -4 do 140°F (od -20 do 60°C). Temperatury poza tym zakresem mogą obniżyć wydajność E3 i spowodować uszkodzenia. Aby uniknąć uszkodzeń W czasie upałów nie wystawiaj E3 bezpośrednio na słońce, gdy samo- chód jest zaparkowany.
  • Seite 181 Rozdzielczość Przód + wnętrze + tył: 1944P+1080P+1080P 30FPS; 1440P+1080P+1080P 30FPS; 1080P+1080P+1080P 30FPS; 1440P+1080P+720P 30FPS; 1440P+720P+720P 30FPS; 1080P+1080P+720P 30FPS; 1080P+720P+720P 30FPS; 720P+720P+720P 30FPS; Przód + wnętrze: 1944P+1080P 30FPS; 1440P+1080P 30FPS; 1080P+1080P 30FPS; 1080P+720P 30FPS; 720P+1080P 30FPS; 720P+720P 30FPS; Przód + tył: 1944P+1080P 30FPS; 1440P+1080P 30FPS;...
  • Seite 182: Gwarancja & Wsparcie

    ® produktów, usług i doświadczeń użytkowników. Jeśli masz jakieś przemyśle- nia na temat tego, jak możemy robić to jeszcze lepiej, czekamy na Twoje konstruktywne opinie i sugestie. Skontaktuj się z nami biuro@vantrue.pl DZIĘKUJEMY ZA WYBÓR Skontaktuj się z nami: www.vantrue.pl facebook.com/vantruePolska...

Inhaltsverzeichnis