Herunterladen Inhalt Inhalt Diese Seite drucken

Werbung

Verfügbare Sprachen

Verfügbare Sprachen

V3
SCHNELLSTARTANLEITUNG
GUIDE DE DÉMARRAGE RAPIDE
QUICK START GUIDE

Werbung

Inhaltsverzeichnis
loading

Inhaltszusammenfassung für Autel Robotics EVO II PRO V3

  • Seite 1 SCHNELLSTARTANLEITUNG GUIDE DE DÉMARRAGE RAPIDE QUICK START GUIDE...
  • Seite 2: Übersicht

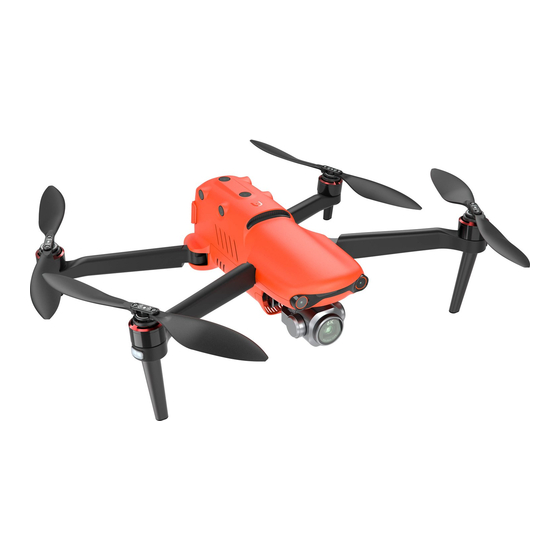
    1. Übersicht Der EVO II Pro V3 hat eine Höchstgeschwindigkeit von 20 m/s, eine maximale Flugzeit von 40 Minuten und eine Reichweite von 15 km (FCC). Der Controller besitzt ein 6,4"-Touchscreen mit einer Auflösung von 2340 x 1080 Pixel. HINWEIS: Lesen Sie bitte alle Dokumente vor der ersten Verwendung des Fluggeräts.
  • Seite 3 Ein-/Austaste Led-Anzeigen (hinten) Sichtsystem (hinten) Sichtsystem (linke Seite) Spalt für SD-Speicherkarte Sichtsystem (rechte Seite) USB-Anschluss Fluggerät-Batterie LED/Taste zur Verbindung Belüftungsöffnung...
  • Seite 4 Sichtsystem (oben) Ultraschallsensor Sichtsystem (unten) LED Fülllicht...
  • Seite 5: Statusanzeige

    3. Status-LEDs des Fluggeräts Die vordere LED-Statusanzeige wird verwendet, um die Richtung des Fluggeräts anzuzeigen. Nachdem das Fluggerät eingeschaltet wurde, wir das rote Licht angezeigt. Die hintere Statusanzeige des Fluggeräts zeigt den aktuellen Status des Flugsteuerungssystems. Farbe : Statusanzeige: Langsames Blinken: blinkt einmal alle 2 Sekunden R –...
  • Seite 6: Fernsteuerung

    4. Fernsteuerung Linker Steuerhebel USB-C-Port Abstimmdrehregler für die MicroSD-Kartenschacht HDMI-Port kardanische Aufhängung Benutzerdefinierbare Taste Aufzeichnung-/Auslöser-Taste Brustgurtöse Zoom-Steuerrad Luftaustrittsöffnung Rechter Steuerhebel USB-A-Port Ein/Aus-Taste Touchscreen Pause-Taste Antenne Autostart/ Akkuladezustandsanzeige RTH-Taste Mikrofon...
  • Seite 7: Aufladung

    Lautsprecheröffnung Tragegriff Steuerhebelaufbewahrungsfach Stativgewindeloch Akkufach Luftansaugöffnung 5. Aufladung Fluggerät-Batterie: Stecken Sie das Ladekabel in den entsprechenden Anschluss. F e r n s t e u e r u n g : V e r b i n d e n S i e d a s e i n e E n d e d e s U S B - C - K a b e l s m i t d e m U S B - C - Port auf der Vorderseite des...
  • Seite 8 6. AUTEL EXPLORER APP Sie können Autel Explorer von Google Play herunterladen. 7. PREPARING THE AIRCRAFT Vor dem Einschalten des Fluggeräts stellen Sie sicher, dass der Gimbal- Schutz entfernt ist (ie unten dargestellt). Klappen Sie die Arme und die Propeller auseinander. HINWEIS: Schalten Sie das Fluggerät aus, bevor Sie die Arme auseinanderklappen.
  • Seite 9: Beschreibung

    8. Propeller Die Propeller sind standardmäßig am Fluggerät befestigt. Folgen Sie diesen Anweisungen, wenn Sie die Propeller wieder einbauen müssen. Montieren Sie den Propeller mit weißer Markierung auf dem entsprechenden Motor mit weißer Markierung. Montieren Sie den Propeller ohne weiße Markierung auf dem entsprechenden Motor ohne weiße Markierung.
  • Seite 10: Vorbereitung Der Fernsteuerung

    9.Vorbereitung der Fernsteuerung Die Steuerhebelaufbewahrungsfächer befinden sich auf der Rückseite des Controllers. Bitte nehmen Sie die Steuerhebel heraus und schrauben Sie sie in die für sie vorgesehenen Sockel. Wenn sich die Antenne und die Controllerrückseite in einem Winkel von 180° oder 270° zueinander befinden und die Antenne auf das Fluggerät gerichtet ist, erreicht die Signalqualität zwischen Fluggerät und Controller ihr Optimum.
  • Seite 11 Halten Sie die Power-Taste für 3 Sekunde gedrückt, um das Fluggerät einzuschalten. Die Batterieanzeige wird den aktuellen Batteriestand des Fluggeräts anzeigen. 11. Start Bewegen Sie gleichzeitig die Steuerhebel nach innen oder außen und halten Sie diese für 2 Sekunden. oder Drücken Sie den linken Steuerknüppel (Modus 2).
  • Seite 12: Linker Steuerhebel

    12. Bedienung der Steuerknüppel (Modus 2) Linker Steuerhebel Ansicht von links Ansicht von links Aufsteigen Absteigen Nach oben drücken Nach unten drücken Ansicht von oben Ansicht von oben Die Nase dreht sich nach links Die Nase dreht sich nach rechts Nach links drücken Nach rechts drücken Rechter Steuerhebel...
  • Seite 13: Technische Daten

    13. Technische Daten Fluggerät 902 bis 928 MHz (FCC); 2,4 bis 2,4835 GHz; Betriebsfrequenz des RF-Empfängers 5,725 bis 5,850 GHz (Nicht-Japan); 5,650 bis 5,755GHz (Japan) 900MHz: FCC/ISED<=31dBm 2.4GHz: FCC/ISED<=32dBm; Sendeleistung (EIRP) CE/MIC/SRRC/RCM<=20dBm 5.8GHz/5.7GHz: FCC/ISED/SRRC/MIC<=33dBm; CE/RCM<=14dBm Fernsteuerung 902 bis 928 MHz (FCC); 2,4 bis 2,4835 GHz;...
  • Seite 14: Vue D'ensemble

    1. Vue d'ensemble L'EVO II Pro V3 a une vitesse de pointe de 20 m/s, un temps de vol maximum de 40 minutes et une distance de fonctionnement de 15 km. Le Radiocommande comporte un écran tactile de 6,4 pouces avec une résolution de 2340 x 1080 pixels.
  • Seite 15 Bouton d'alimentation Voyant LED arrière Système de vue arrière Système de vue gauche Emplacement pour carte SD Système de vue droite Port USB Batterie de l'aéronef Bouton d'appairage/ indicateur d'appairage Grille de ventilation...
  • Seite 16 Système de vue haut Capteur à ultrasons Système de vue bas Lumière de remplissage à LED...
  • Seite 17: Avertissements

    3. Voyants LED de vol Le voyant d'état LED du nez de l'aéronef est utilisé pour indiquer la direction du nez de l'aéronef. Après la mise sous tension de l'aéronef, le voyant rouge s'affiche. Le voyant d'état de l'aéronef sur la queue indique l'état actuel du système de commandes de vol.
  • Seite 18 4. Radiocommande Joystick de gauche Port USB-C Molette de réglage d'angle Logement pour carte SD Port HDMI de la nacelle Bouton personnalisable Bouton d'enregistrement/ obturateur Crochet pour harnais de poitrine Sortie d'air Molette de contrôle du zoom Port USB-A Joystick de droite Bouton Alimentation Écran tactile Bouton Pause...
  • Seite 19 Emplacement de rangement Trou du haut-parleur des joysticks Trou de montage pour trépied Étui de la batterie Entrée d'air Poignée 5. Chargement Batterie de l'aéronef: Insérez le câble de charge dans la fente de charge. Rad io co m m a n d e: C o n n ec t e z une extrémité...
  • Seite 20 6. AUTEL EXPLORER APP Vous pouvez télécharger Autel Explorer depuis Google Play. 7. Préparation de l'aéronef Retirez le couvercle de protection de la nacelle avant d'allumer l'interrupteur d'alimentation de l'aéronef, comme indiqué sur la figure ci-dessous. Dépliez les bras et les hélices. REMARQUE: Avant de replier les bras, éteignez l'interrupteur d'alimentation de l'aéronef.
  • Seite 21 8. Hélices Par défaut, les hélices sont déjà installées sur l'aéronef. Si vous devez les réinstaller, reportez-vous aux instructions suivantes. • Installation des hélices Vérifiez que l'aéronef est hors tension. Sélectionnez l'hélice qui correspond à chaque moteur. Appuyez fermement sur l'hélice, puis tournez-la dans le sens de verrouillage pour que l'hélice soit bien installée.
  • Seite 22: Mise Sous Tension

    9.Préparation de la radiocommande Les joysticks sont rangés dans des logements situés au dos du contrôleur. Sortez les joysticks et vissez-les dans les bases correspondantes. Positionnez les antennes selon un angle de 180° ou de 270° par rapport au dos du contrôleur et la surface des antennes face à l'aéronef. Vous obtiendrez ainsi une qualité...
  • Seite 23 Appuyez sur le bouton d'alimentation pendant 3 secondes pour allumer l'aéronef. L'indicateur de batterie s'allumera pour afficher le niveau actuel de la batterie de l'aéronef. 11. Décollage Déplacez simultanément la manette de commande vers l'intérieur ou vers l'extérieur et maintenez la position pendant 2 secondes. Poussez la manette de commande gauche (mode 2).
  • Seite 24 12. Contrôle de l'aéronef (mode 2) Joystick de gauche Vue de gauche Vue de gauche Prendre de Réduire l'altitude l'altitude Vers le haut Vers le haut Vue de dessus Vue de dessus Orienter le nez à gauche Orienter le nez à droite Vers la gauche Vers la droite Joystick de droite...
  • Seite 25 13. Spécifications Appareil 902~928 MHz (FCC); 2,4~2,4835 GHz ; Fréquence de fonctionnement 5,725~5,850 GHz (Hors Japon) ; 5,650~5,755 GHz (Japon) 900MHz: FCC/ISED<=31dBm 2.4GHz: FCC/ISED<=32dBm; Puissance de transmission (EIRP) CE/MIC/SRRC/RCM<=20dBm 5.8GHz/5.7GHz: FCC/ISED/SRRC/MIC<=33dBm; CE/RCM<=14dBm Radiocommande 902~928 MHz (FCC); 2,4~2,4835 GHz ; Fréquence de fonctionnement 5,725~5,850 GHz (Hors Japon) ; 5,650~5,755 GHz (Japon) FCC: ≤33dBm Puissance de transmission CE: ≤20dBm@2.4G, ≤14dBm@5.8G/5.7G...
  • Seite 26 1. OVERVIEW The EVO II Pro V3 brings excellent flight performance, achieving a top speed of 20m/s (45mph), 40-minute flight time, and an operating distance at 15km (9.32miles, FCC). The aircraft comes with a 6.4 inch touch-screen controller, which allows users to view the live feed at up to 1080p.
  • Seite 27 Power Button Rear LED Indicators Rear Vision System Left Side Vision System SD Card Slot Right Side Vision System USB-C Port Aircraft Battery Pairing Button / Pairing Indicator Air Vent...
  • Seite 28 Upward Vision System Ultrasonic Sensor Downward Vision System Downward Vision Lighting LED...
  • Seite 29 3. FLIGHT LED INDICATIONS A LED indicator is located on the end of each aircraft arm. The front LEDs will light up solid red to help you identify the direction of the aircraft's nose. The rear LEDs will display the current flight status of the aircraft. The chart below shows the meaning of each status indicator.
  • Seite 30: Remote Controller

    4. REMOTE CONTROLLER Left Control Stick Air Outlet HDMI Port Gimbal Pitch Dial USB-A Port Record/Shutter Button Customizable Button USB-C Port Zoom Control Wheel Chest Strap Hook Micro-SD Card Slot Right Control Stick Power Button Touch Screen Pause Button Antenna Auto-takeoff/ Battery Level RTH Button...
  • Seite 31 Speaker Hole Air Inlet Sticks Storage Slot Battery Case Tripod Mount Hole Handle 5. CHARGING Aircraft Battery: Plug the charging connector into the battery’s charge port, and connect the other end to power adapter. Plug the power adapter into a power outlet (100-240V).
  • Seite 32 6. AUTEL EXPLORER APP Search for ‘Autel Explorer’ from Google Play and install the app on your controller. 7. PREPARING THE AIRCRAFT Before powering on the aircraft, please remove the gimbal guard. Unfold the arms and propellers. NOTE: Power off the aircraft before folding the arms. Fold in the rear arms and propellers first, and then the front ones.
  • Seite 33 8. PROPELLERS Because the propellers come attached to the aircraft, the following instructions apply if you need to reinstall propellers. • Attaching the Propellers Power off the aircraft. Pair the propellers and corresponding motors according to the white mark . Press each propeller down firmly and rotate in the lock direction to securely attach the propeller.
  • Seite 34 9.PREPARING THE CONTROLLER The sticks storage slots are located on the back of the controller. Please take out the sticks and screw them into the corresponding bases. Unfold the antennas. When the antenna and the back of the controller are at an angle of 180° or 270°, and the antenna surface is facing the aircraft, the signal quality between aircraft and controller will reach the optimal condition.
  • Seite 35 Press and hold the power button 3 seconds to turn on the aircraft.The current battery level will be clearly displayed. 11. TAKE OFF Start the motors by holding both command sticks for two seconds as shown below. Push the left command stick slowly upward. NOTE: •...
  • Seite 36 12. COMMAND STICK CONTROLS(MODE 2) Left Command Stick Left Side View Left Side View Ascend Descend Upward Downward Top View Top View Nose Rotates Left Nose Rotates Right Move Left Move Right Right Command Stick Left Side View Left Side View Forward Backward Upward...
  • Seite 37 13. SPECIFICATIONS Aircraft 902~928MHz (FCC); 2.4~2.4835GHz; Operating Frequency 5.725~5.850GHz (Non-Japan); 5.650-5.755GHz (Japan) 900MHz: FCC/ISED<=31dBm 2.4GHz: FCC/ISED<=32dBm; Transmission Power (EIRP) CE/MIC/SRRC/RCM<=20dBm 5.8GHz/5.7GHz: FCC/ISED/SRRC/MIC<=33dBm; CE/RCM<=14dBm Remote Controller 902~928MHz (FCC); 2.4~2.4835GHz; Operating Frequency 5.725~5.850GHz (Non-Japan); 5.650-5.755GHz (Japan) FCC: ≤33dBm Transmission Power (EIRP) CE: ≤20dBm@2.4G, ≤14dBm@5.8G/5.7G SRRC: ≤20dBm@2.4G, ≤33dBm@5.8G/5.7G...
  • Seite 38 FCC and ISED Canada Compliance This device complies with part 15 of the FCC Rules and ISED Canada licence-exempt RSS standards. Operation is subject to the following two conditions: (1) This device may not cause harmful interference, and (2) this device must accept any interference received, including interference that may cause undesired operation.
  • Seite 39 Aircraft RF Exposure Information This equipment complies with RF radiation exposure limits set forth for an uncontrolled environment. This equipment should be operated with minimum distance 20cm between the radiator and your body. Remote Controller FCC Specific Absorption Rate (SAR) information SAR tests are conducted using standard operating positions accepted by the FCC with the device transmitting at its highest certified power level in all tested frequency bands, although the SAR is determined at the highest...
  • Seite 40 18th Floor, Block C1, Nanshan iPark, No. 1001 Xueyuan Avenue, Nanshan District, Shenzhen, Guangdong, 518055, China 22522 29th Dr SE, Ste 101 Bothell, WA 98021 United States Toll-free: (844) MY AUTEL or (844) 692-8835 www.autelrobotics.com ©2022 Autel Robotics Co., Ltd. All Rights Reserved...
  • Seite 41 ©2022 Autel Robotics Co., Ltd. All Rights Reserved...

Inhaltsverzeichnis