Autel Robotics EVO Nano-Serie Schnellstartanleitung
Vorschau ausblenden
Andere Handbücher für EVO Nano-Serie:
- Benutzerhandbuch (74 Seiten) ,
- Bedienungsanleitung (46 Seiten) ,
- Schnellstartanleitung (8 Seiten)

Verwandte Anleitungen für Autel Robotics EVO Nano-Serie


Inhaltszusammenfassung für Autel Robotics EVO Nano-Serie
- Seite 1 Schnellstartanleitung EVO Nano-Serie Guide de démarrage rapide Série EVO Nano Quick Start Guide EVO Nano series...
- Seite 2 Contents 1. DE ........1~11 2. FR ........12~20 3. EN ........21~28...
-
Seite 3: Inhaltsverzeichnis
Inhalt 1. Notizen lesen ....1 2. Flugzeuge ....1 3. Flugkontrollleuchte ....2 4. Fernbedienung ....4 5. Aufladen des Fluggeräts und der Fernbedienung ....5 6. Laden Sie die Autel Sky -Anwendung herunter ....5 7. Bereiten Sie das Flugzeug vor .... -
Seite 4: Notizen Lesen
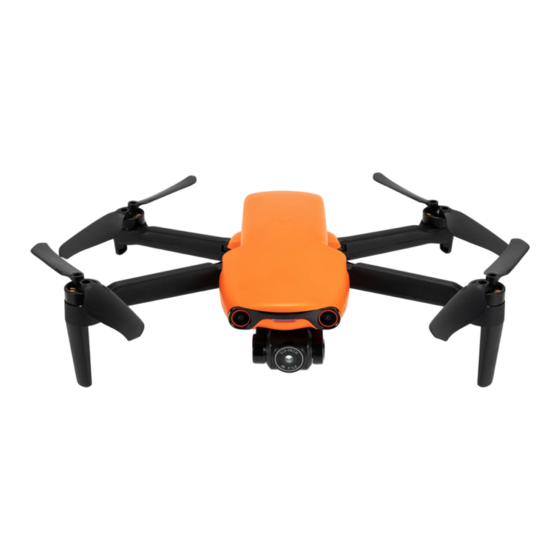
1. Notizen lesen • Lesen Lesen Sie alle Dokumente vor Ihrem ersten Flug. • Unsachgemäßer Betrieb der Drohne kann zu Verletzungen oder Verlusten und zum Erlöschen jeglicher anwendbarer Garantie führen. 2. Flugzeuge Propeller PTZ-Kamera Motor Vorwärtssichtsystem Front-LED-Anzeige Antenne Rücksichtsystem USB-C-Anschluss Netzschalter LED-Anzeige hinten Flugzeugbatterie... -
Seite 5: Flugkontrollleuchte
Abluftöffnung Ultraschallsensor Abwärtssichtsystem Lufteinlass 3. Flugkontrollleuchte An Bug und Heck des Flugzeugs befindet sich eine LED-Kontrollleuchte. Die folgende Tabelle zeigt die Bedeutung der einzelnen Statusanzeigen. -
Seite 6: Bedeutung Des Flugindikatorstatus
Bedeutung des Flugindikatorstatus Flugzeugscheinwerfer Rücklichter für Flugzeuge Bedeutung Normalzustand Weißes Licht Grünes Licht Flugzeug befindet sich atmen blinkt langsam im GPS-Zustand Weißes Licht Gelbes Licht Koppeln Sie das Flugzeug atmen blinkt schnell mit der Fernbedienung Kompasskalibrierung Ampeln blinken Weißes Licht Kompasskalibrierung abwechselnd und atmen... -
Seite 7: Fernbedienung
4. Fernbedienung Netzschalter Zurück zum Home-Button Pause-Taste Joystick Batterieanzeige Mobile Gerätehalterung Lade-/Anpassungsschnittstelle Antenne Fernbedienung zur Schnittstelle Gimbal-Neigungsregler Kamera/Video-Taste Lufteinlass Benutzerdefinierte Tasten Luftauslass... -
Seite 8: Aufladen Des Fluggeräts Und Der Fernbedienung
5. Aufladen des Fluggeräts und der Fernbedienung (�) Flugzeugakku: Stellen Sie sicher, dass das Flugzeug ausgeschaltet ist, und stecken Sie das Typ-C-Ladekabel in den Ladesteckplatz am Flugzeug. (�) Aufladen der Fernbedienung: Verbinden Sie das Typ-C-Ladekabel mit dem Typ-C-Anschluss der Fernbedienung. Anmerkung •... -
Seite 9: Laden Sie Die Autel Sky
6. Laden Sie die Autel Sky -Anwendung herunter Führen Sie die folgenden Schritte aus, um sich bei der Anwendung anzumelden. 1. Geben Sie im App Store oder bei Google Play das Stichwort "Autel Sky" ein, suchen Sie nach der Anwendung Autel Sky und laden Sie sie herunter. -
Seite 10: Installieren Sie Den Propeller
Wichtig Schalten Sie den Flugzeugschalter aus, bevor Sie Ihre Arme verschränken. Falten Sie zuerst die hinteren Arme und die Propeller und dann die Gabeln. 8. Installieren Sie den Propeller Der Propeller ist standardmäßig am Flugzeug installiert. Wenn Sie eine Neuinstallation durchführen müssen, beachten Sie bitte die folgenden Anweisungen. -
Seite 11: Bereiten Sie Die Fernbedienung Vor
Propeller Mit Punkten markieren Ohne Punktmarkierung Schematische Darstellung Passender Montiert am Arm der Montiert am Arm der Maschinenarm Maschine ohne Punkte Maschine ohne Punkte Warnung Bitte schalten Sie den Netzschalter des Flugzeugs aus, bevor Sie den Propeller installieren oder entfernen. Important Vor dem Ein- oder Ausbau des Propellers wird empfohlen, Schutzhandschuhe zu tragen. -
Seite 12: Schalten Sie Das Gerät Ein
(2) Wenn die Antenne dem Flugzeug zugewandt ist, können die Fernbedienung und die Signalqualität des Flugzeugs den besten Zustand erreichen. 10. Schalten Sie das Gerät ein (1) Halten Sie die Power-Taste 2 Sekunden lang gedrückt, um die Fernbedienung zu aktivieren. (2)... -
Seite 13: Abheben
11. Abheben (�) Stellen Sie das Flugzeug vor dem Start mit dem Heck zu Ihnen auf eine ebene Fläche. (�) Neigen Sie den Joystick nach innen oder außen und halten Sie ihn 1 Sekunden lang gedrückt, wie in der Abbildung unten gezeigt. -
Seite 14: Joystick-Steuerungsmethode (Modus 2)
12. Joystick-Steuerungsmethode (modus 2) Linke Stange Linke ansicht Linke ansicht Erhebt euch Ablehnen Runterdrücken Hochdrücken Ansicht von oben Ansicht von oben Biegen Sie links ab Biegen Sie rechts ab Nach links drücken Nach rechts drücken Rechter Stick Ansicht von oben Hochdrücken Fortfahren Zurück... - Seite 15 Table des matières 1. Utilisation de ce guide ......... 12 2. Appareil ......... 12 3. Indicateur du statut de l’appareil ......... 13 4. Radiocommande ......... 15 5. Charge ......... 16 6. Télécharger l’application Autel Sky ......... 16 7. Préparation de l’appareil .........
-
Seite 16: Utilisation De Ce Guide
1. Utilisation de ce guide • Veuillez lire tout le manuel avant la première utilisation. • Une utilisation incorrecte de l’appareil entraînera des blessures ou des dommages et la perte de tous les services de garantie applicables. 2. Appareil Hélices Nacelle et caméra Moteur Système optique frontale... -
Seite 17: Indicateur Du Statut De L'appareil
Sortie d'air Capteur ultrasonique Système optique inférieure Entrée d'air 3. Indicateur du statut de l’appareil Un indicateur LED se trouve dans le nez et la queue de l'appareil. Le tableau ci-dessous indique la signification des indicateurs pour chaque statut de l'appareil. - Seite 18 Descriptions des indicateurs du statut de l’appareil LED de nez LED de queue Signification Statuts normaux Clignote en Clignote lentement GPS activé blanc en vert Clignote en Clignote rapidement Appairage en cours entre le blanc en jaune drone et la radiocommande Étalonnage du compas Clignote lentement Clignote en...
-
Seite 19: Radiocommande
4. Radiocommande Bouton d’alimentation Bouton RTH (Return-To-Home) Bouton mise en pause Joysticks LED de niveau de batterie Support pour appareil mobile Port USB-C Antennes Adaptateur pour radiocommande Molette de nacelle Bouton Photo/Vidéo Entrée d'air Bouton personnalisable Sortie d'air... -
Seite 20: Charge
5. Charge (�) Batterie de l’appareil : Assurez-vous que l'appareil est hors tension et branchez le câble de charge au port de charge. (�) Charge de la radiocommande : Branchez le câble Type-C au port Type-C de la radiocommande. Remarque • Chargez toujours complètement la batterie de l'appareil et de la radiocommande avant utilisation. -
Seite 21: Préparation De L'appareil
l'application : 1. Veuillez télécharger l'application Autel Sky depuis l'App Store ou Google Play. 2. Lancez l'application sur votre appareil mobile. 3. Suivez les instructions à l'écran pour connecter votre appareil mobile à la radiocommande. 7. Préparation de l’appareil (1) Assurez-vous que la protection de nacelle est retirée avant de mettre l’appareil sous tension. -
Seite 22: Installation Des Hélices
8. Installation des hélices L'appareil est équipé des hélices, si vous voulez les réinstaller, veuillez vous référer aux instructions suivantes. Veillez à ce que les hélices soient en bon état et bien fixées sur l’appareil. Fixez les hélices avec marquages en cercle blancs aux moteurs avec marquages. ·... -
Seite 23: Préparation De La Radiocommande
Avertissement Mettez l’appareil hors tension avant de monter et de démonter les hélices Important Il est recommandé de porter des gants de protection avant de monter ou de démonter les hélices. 9. Préparation de la radiocommande (1) Retirez doucement le support pour appareil mobile. (2)... -
Seite 24: Mise Sous Tension De L'appareil
10. Mise sous tension de l’appareil (1) Maintenez le bouton d’alimentation enfoncé pendant 2 secondes pour allumer la radiocommande. (2) Maintenez le bouton d’alimentation enfoncé pendant 3 secondes pour allumer l’appareil. Les indicateurs du niveau de batterie s'allument alors pour indiquer le niveau de batterie actuel de l'appareil. 11. - Seite 25 (�) Après démarrage des moteurs, poussez lentement le joystick gauche vers le haut. (mode �) Attention : Faites toujours décoller l’ appareil depuis un sol plat en orientant l’ arrière de l’ appareil vers vous.
-
Seite 26: Mode De Joystick (Mode 2)
12. Mode de joystick (mode 2) Joystick gauche Vue de gauche Vue de gauche haut Pousser vers le bas Pousser vers le haut Vue en haut Vue en haut Nez vers la gauche Nez vers la droite Tourner à gauche Tourner à... - Seite 27 Contents 1. Reading notes ......... 23 2. Aircraft ......... 23 3. Flight LED indicator ......... 24 4. Remote control ......... 26 5. Charge the aircraft & remote control ......... 27 6. Install the Autel Sky ......... 27 7. Prepare the aircraft .........
-
Seite 28: Reading Notes
1. Reading notes • Please read all documentation before your first flight. • Failure to operate the aircraft responsibly could lead to injury or damages, and may void any applicable warranty coverage. 2. Aircraft Propeller Gimbal camera Motor Forward vision system Front LED indicator Antenna Rear vision system... -
Seite 29: Flight Led Indicator
Exhaust port Ultrasonic sensor Downward Vision System Air inlet 3. Flight LED indicator There is an LED indicator on the nose and tail of the aircraft. The following table shows the meaning of each status indicator. - Seite 30 Meaning of flight indicator status Headlight Taillight Meaning Normal status White light Green light Aircraft is in undulating flashes slowly GPS state White light Yellow light The aircraft and the remote undulating flashes quickly controller are pairing Compass calibration Red and green lights White light Starting compass flash alternately and...
-
Seite 31: Remote Control
4. Remote control Power button Home button Pause button Joystick Battery indicator Mobile device stand Charging Antenna Remote control adapter Gimbal pitch control dial Camera/Video button Air inlet Custom button Air outlet... -
Seite 32: Install The Autel Sky Tm App
5. Charge the aircraft & remote control (�) Aircraft battery: Make sure the aircraft is powered off, and plug the Type-C charging cable into the charging slot on the aircraft. (�) Charging the remote control: Insert the Type-C charging cable into the Type-C port of the remote control. -
Seite 33: Prepare The Aircraft
2. Launch the application on your mobile device. 3. Follow the on-screen instructions to connect the mobile device and the remote control. 7. Prepare the aircraft (1) Please always remove the gimbal protective cover before turning on the power switch of the aircraft. (2)... -
Seite 34: Install The Propellers
8. Install the propeller The propeller has been installed on the aircraft by default. If you need to re-install it, please refer to the following instructions. Note that the propeller must be intact and firmly installed on the aircraft, and the propeller marked with a dot must be correctly matched to the arm. -
Seite 35: Prepare The Remote Control
Warning Before installing or removing the propeller, turn off the power. Important While installing or removing the propeller, it is recommended to wear protective gloves. 9. Prepare the remote control (1) Slowly pull out the mobile device holder. (2) When the antenna plane is facing the aircraft, the signal quality of the remote control and the aircraft can reach the best condition. -
Seite 36: Take Off
10. Power on (1) Hold the power button for 2 seconds to turn on the remote control. (1) Press and hold the power button for 3 seconds to turn on the aircraft. The battery indicator will then light up to show the current battery level of the aircraft. - Seite 37 (�) After the motor starts, slowly push the left joystick upward (mode �). Note: Before taking off, place the aircraft on a level surface with the back side of the aircraft facing you.
-
Seite 38: Joystick Controls (Mode 2)
12. Joystick controls (Mode 2) Left stick Left view Left view Rise Descend Push down Push up Top view Top view Turn left Turn right Push left Push right Right stick Top view Top view Move forward Move back Tail Head Tail Head... - Seite 39 WWW.AUTELROBOTICS.COM ©����-���� AUTEL ROBOTICS CO., LTD. ALL RIGHTS RESERVED...