Herunterladen Inhalt Inhalt Diese Seite drucken
Autel Robotics EVO Lite Serie Schnellstartanleitung
Vorschau ausblenden Andere Handbücher für EVO Lite Serie:

Werbung

Verfügbare Sprachen

Verfügbare Sprachen

Schnellstartanleitung
EVO Lite-Serie
Guide de démarrage rapide
Série EVO Lite
Quick Start Guide
EVO Lite series

Werbung

Inhaltsverzeichnis
loading

Inhaltszusammenfassung für Autel Robotics EVO Lite Serie

  • Seite 1 Schnellstartanleitung EVO Lite-Serie Guide de démarrage rapide Série EVO Lite Quick Start Guide EVO Lite series...
  • Seite 2 Contents 1. DE ........1~11 2. FR ........12~20 3. EN ........21~28...
  • Seite 3: Inhaltsverzeichnis

    Inhalt ....1 1. Notizen lesen ....1 2. Flugzeuge ....2 3. Flugkontrollleuchte ....4 4. Fernbedienung ....5 5. Aufladen des Flugzeugakku und der Fernbedienung ....5 6. Laden Sie die Autel Sky -Anwendung herunter ....6 7. Bereiten Sie das Flugzeug vor ....
  • Seite 4: Notizen Lesen

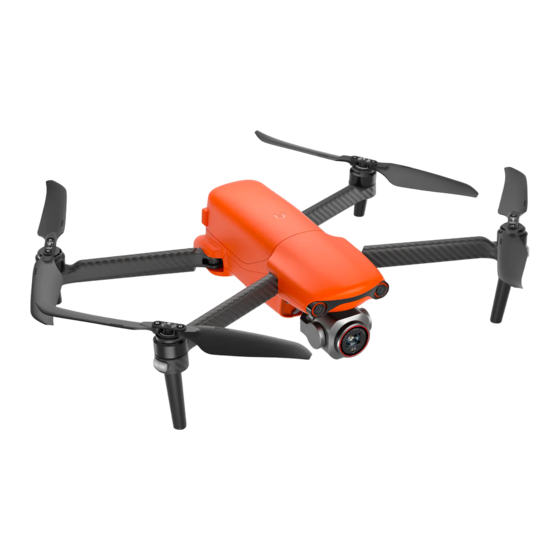
    1. Notizen lesen · Lesen Lesen Sie alle Dokumente vor Ihrem ersten Flug. · Unsachgemäßer Betrieb der Drohne kann zu Verletzungen oder Verlusten und zum Erlöschen jeglicher anwendbarer Garantie führen. 2. Flugzeuge Propeller PTZ-Kamera Fahrwerk Front-LED-Anzeige Vorwärtssichtsystem Motor Netzschalter Rücksichtsystem Abluftöffnung LED-Anzeige hinten...
  • Seite 5: Flugkontrollleuchte

    SD-Kartensteckplatz Flugzeugbatterie USB-C-Anschluss Ultraschallsensor Nach unten gerichtetes LED-Fülllicht Abwärtssichtsystem 3. Flugkontrollleuchte Am Ende jedes Flugzeugarms befindet sich eine LED. Die vordere LED ist immer rot, wenn sie leuchtet, was Ihnen hilft, die Richtung des Maschinenkopfes zu erkennen. Die hintere LED zeigt den aktuellen Flugstatus des Flugzeugs an.
  • Seite 6 Kontrollleuchte: Farbindikator: Langsames Blinken: blinkt alle 2 Sekunden einmal R Red Schnelles Blinken: blinkt zweimal pro Sekunde G Green Abwechselndes Blinken: verschiedene Farben Y Yellow blinken abwechselnd Statusdefinition der Flug-LED-Anzeige Normalzustand RGY-blinkt abwechselnd System-Selbsttest G-blinkt langsam Das Flugzeug befindet sich im GPS-Modus Warnung Y - blinkt langsam Das Flugzeug befindet sich im ATTI-Modus Es besteht keine Verbindung zwischen...
  • Seite 7: Fernbedienung

    4. Fernbedienung Netzschalter Zurück zum Home-Button Pause-Taste Joystick Batterieanzeige Mobile Gerätehalterung Lade-/Anpassungsschnittstelle Antenne Fernbedienung zur Schnittstelle Gimbal-Neigungsregler Kamera/Video-Taste Lufteinlass Benutzerdefinierte Tasten Luftauslass...
  • Seite 8: Aufladen Des Flugzeugakku Und Der Fernbedienung

    5. Aufladen des Flugzeugakku und der Fernbe- dienung (1) Flugzeugakku: Drücken und halten Sie die Auslösetasten auf beiden Seiten des Akkus, stecken Sie das Ladekabel in den Ladeschacht des Flugzeugakku. (2) Aufladen der Fernbedienung: Verbinden Sie das Typ-C-Ladekabel mit dem Typ-C-Anschluss der Fernbedienung. Anmerkung •Laden Laden Sie die Batterien des Fluggeräts und der Fernbedienung vor dem Flug vollständig auf.
  • Seite 9: Laden Sie Die Autel Sky

    6. Laden Sie die Autel Sky -Anwendung herunter Führen Sie die folgenden Schritte aus, um sich bei der Anwendung anzumelden. 1. Geben Sie im App Store oder bei Google Play das Stichwort "Autel Sky" ein, suchen Sie nach der Anwendung Autel Sky und laden Sie sie herunter.
  • Seite 10: Installieren Sie Den Propeller

    Wichtig Schalten Sie den Flugzeugschalter aus, bevor Sie Ihre Arme verschränken. Falten Sie zuerst die hinteren Arme und die Propeller und dann die Gabeln. 8. Installieren Sie den Propeller Der Propeller ist standardmäßig am Flugzeug installiert. Wenn Sie es erneut installieren müssen, lesen Sie die folgenden Anweisungen. Beachten Sie, dass der Propeller intakt und sicher am Flugzeug angebracht sein muss und der weiße Kreispropeller mit dem Motor verbunden sein muss.
  • Seite 11: Bereiten Sie Die Fernbedienung Vor

    Klären Sperrrichtung: In die angezeigte Richtung drehen, um den Propeller zu fixieren. Entriegelungsrichtung: Drehen Sie den Propeller wie angewiesen, um ihn zu lösen. Propeller mit schwarzem Code>Paarung>Schwarzcode-Motor Propeller mit weißem Code>Paarung> Weißcode-Motor Warnung Bitte schalten Sie den Netzschalter des Flugzeugs aus, bevor Sie den Propeller installieren oder entfernen.
  • Seite 12: Schalten Sie Das Gerät Ein

    (2) Wenn die Antenne dem Flugzeug zugewandt ist, können die Fernbedienung und die Signalqualität des Flugzeugs den besten Zustand erreichen. 10. Schalten Sie das Gerät ein (�) Halten Sie die Power-Taste � Sekunden lang gedrückt, um die Fernbedienung zu aktivieren. (�)...
  • Seite 13: Abheben

    11. Abheben (1)Stellen Sie das Flugzeug vor dem Start mit dem Heck zu Ihnen auf eine ebene Fläche. (2)Neigen Sie den Joystick nach innen oder außen und halten Sie ihn 1 Sekunden lang gedrückt, wie in der Abbildung unten gezeigt. (3)...
  • Seite 14: Joystick-Steuerungsmethode (Modus 2)

    12. Joystick-Steuerungsmethode (Modus 2) Linke Stange Linke ansicht Linke ansicht Erhebt euch Ablehnen Runterdrücken Hochdrücken Ansicht von oben Ansicht von oben Biegen Sie links ab Biegen Sie rechts ab Nach links drücken Nach rechts drücken Rechter Stick Ansicht von oben Ansicht von oben Fortfahren Zurück...
  • Seite 15 Table des matières ....1 1. Utilisation de ce guide ....1 2. Appareil ....2 3. Indicateur du statut de l’appareil ....4 4. Radiocommande ....5 5. Charge ....5 6. Télécharger l’application Autel Sky ....6 7. Préparation de l’appareil ....
  • Seite 16: Utilisation De Ce Guide

    1. Utilisation de ce guide · Veuillez lire tout le manuel avant la première utilisation. · Une utilisation incorrecte de l’appareil entraînera des blessures ou des dommages et la perte de tous les services de garantie applicables. 2. Appareil Hélices Nacelle et caméra Atterrisseur Indicateur LED frontal...
  • Seite 17: Indicateur Du Statut De L'appareil

    Emplacement pour carte SD Batterie Port USB-C Capteur ultrasonique Lumière LED pour vue inférieure Système optique inférieure 3. Indicateur du statut de l’appareil Un indicateur LED se trouve à l'extrémité de chaque bras de l'appareil. La LED avant s'allume en rouge fixe pour indiquer l’orientation de l’appareil.
  • Seite 18 Indicateurs: Couleurs: Clignote lentement : Clignote toutes les 2 secondes R Rouge Clignote rapidement : Clignote deux fois par seconde G Vert Clignote alternativement : Clignote alternativement en Y Jaune différentes couleurs Descriptions des indicateurs du statut de l’appareil Statuts normaux RVJ - Clignote alternativement Exécution des tests d’autodiagnostic V - Clignote lentement GPS activé...
  • Seite 19: Radiocommande

    4. Radiocommande Bouton d’alimentation Bouton RTH (Return-To-Home) Bouton mise en pause Joysticks LED de niveau de batterie Support pour appareil mobile Port USB-C Antennes Adaptateur pour radiocommande Molette de nacelle Bouton Photo/Vidéo Entrée d'air Bouton personnalisable Sortie d'air...
  • Seite 20: Charge

    5. Charge (1) Batterie de l’appareil: Appuyez sur les brides des deux côtés de la batterie, branchez le câble de charge dans la fente de charge de la batterie. (2) Charge de la radiocommande : Branchez le câble Type-C au port Type-C de la radiocommande.
  • Seite 21: Télécharger L'application Autel Sky Tm

    6. Télécharger l’application Autel Sky Suivez les étapes suivantes pour la connexion entre l’appareil et l'application : 1. Veuillez télécharger l'application Autel SkyTM depuis l'App Store ou Google Play. 2. Lancez l'application sur votre appareil mobile. 3. Suivez les instructions à l'écran pour connecter votre appareil mobile à...
  • Seite 22: Installation Des Hélices

    Important Mettez l’appareil hors tension avant de replier les bras. Repliez les bras arrière et les hélices en premier, puis les bras avant. 8. Installation des hélices L'appareil est équipé des hélices, si vous voulez les réinstaller, veuillez vous référer aux instructions suivantes. Veillez à ce que les hélices soient en bon état et bien fixées sur l’appareil.
  • Seite 23: Préparation De La Radiocommande

    Description Sens de verrouillage : tourner dans le sens indiqué pour fixer les hélices. Sens de déverrouillage : Tournez les hélices en suivant les instructions afin de les desserrer. Les hélices codées en noir apparient aux moteurs codés en noir Les hélices codées en blanc apparient aux moteurs codés en blanc Avertissement Mettez l’appareil hors tension avant de monter et de démonter les hélices...
  • Seite 24: Mise Sous Tension De L'appareil

    (2) La qualité du signal entre la radiocommande et l'appareil est optimale lorsque le plan de l'antenne fait face à l'appareil. 10. Mise sous tension de l’appareil (�) Maintenez le bouton d’ alimentation enfoncé pendant � secondes pour allumer la radiocommande. (�)...
  • Seite 25: Décollage

    11. Décollage (1)Faites toujours décoller l’appareil depuis un sol plat en orientant l’arrière de l’appareil vers vous. (2)Actionnez les joysticks vers leurs angles intérieurs ou extérieurs respectifs pendant 1 seconde, comme indiqué ci-dessous.(Mode 2) (3) Après démarrage des moteurs, poussez lentement le joystick gauche vers le haut.
  • Seite 26: Mode De Joystick (Mode 2)

    12. Mode de joystick (Mode 2) Joystick gauche Vue de gauche Vue de gauche haut Pousser vers le bas Pousser vers le haut Vue en haut Vue en haut Nez vers la gauche Nez vers la droite Tourner à gauche Tourner à...
  • Seite 27 Contents ....... 1 1. Reading notes ....... 1 2. Aircraft ....... 2 3. Flight LED indicator ....... 4 4. Remote control ....... 5 5. Charge the aircraft battery & remote control ....... 5 6. Install the Autel Sky ....... 6 7.
  • Seite 28: Reading Notes

    1. Reading notes · Please read all documentation before your first flight. · Failure to operate the aircraft responsibly could lead to injury or damages, and may void any applicable warranty coverage. 2. Aircraft Propeller Gimbal camera Landing gear Front LED indicator Forward vision system Motor Power button...
  • Seite 29: Flight Led Indicator

    SD card slot Aircraft battery USB-C port Ultrasonic sensor Downward vision lighting LED Downward vision system 3.Flight LED indicator A LED indicator is located on the end of each aircraft arm. The front LEDs will light up solid red to help you identify the direction of the aircraft's nose.
  • Seite 30 Light indicator: Color indicator: Slow flashing:flashes once every 2 seconds R Red Fast flashing:flashes twice per second G Green Alternate flashing:flashes alternately in different colors Y Yellow Definitions of Flight LED Indicator Status Normal status RGY - Alternate Flashing System self-test is activated G - Slow Flashing The aircraft is in GPS mode Warning...
  • Seite 31: Remote Control

    4. Remote control Power button Home button Pause button Joystick Battery indicator Mobile device stand Charging interface Antenna Remote control adapter Gimbal pitch control dial Camera/Video button Air inlet Custom button Air outlet...
  • Seite 32: Install The Autel Sky Tm App

    5. Charge the aircraft battery & remote control (1) Aircraft battery: Press and hold the release button on both sides of battery and plug the charging cable into the charging slot of battery. (2) Charging the remote control: Insert the Type-C charging cable into the Type-C port of the remote control.
  • Seite 33: Prepare The Aircraft Battery

    1. Enter the keyword "Autel Sky" in the App Store or Google Play, then search for and download the Autel Sky application. 2. Launch the application on your mobile device. 3. Follow the on-screen instructions to connect the mobile device and the remote control.
  • Seite 34: Install The Propellers

    8. Install the propellers The propeller is installed by default on the aircraft. If you need to re-install it, please refer to the following instructions. Note that the propeller must be intact and firmly installed on the aircraft, and the propeller with the white circle mark must be paired with the motor.
  • Seite 35: Prepare The Remote Control

    Warning Before installing or removing the propeller, turn off the power switch of the aircraft. Important While installing or removing the propeller, it is recommended to wear protective gloves. 9. Prepare the remote control (1) Slowly pull out the mobile device holder. (2)...
  • Seite 36: Take Off

    10. Power on (�) Hold the power button for � seconds to turn on the remote control. (�) Press and hold the power button for � seconds to turn on the aircraft. The battery indicator will then light up to show the current battery level of the aircraft.
  • Seite 37 (3) After the motor starts, slowly push the left joystick upward (mode 2). Note: Before taking off, place the aircraft on a level surface with the back side of the aircraft facing you.
  • Seite 38: Joystick Controls (Mode 2)

    12. Joystick controls (Mode 2) Left stick Left view Left view Rise Descend Push down Push up Top view Top view Turn left Turn right Push left Push right Right stick Top view Top view Move forward Move back Tail Tail Nose Nose...
  • Seite 39 WWW.AUTELROBOTICS.COM ©����-���� AUTEL ROBOTICS CO., LTD. ALL RIGHTS RESERVED...

Inhaltsverzeichnis