Pkm KF4-2KB G Bedienungsanleitung

Verwandte Anleitungen für Pkm KF4-2KB G


Inhaltszusammenfassung für Pkm KF4-2KB G
- Seite 1 TECHNOLOGIE FÜR DEN HAUSHALT TECHNOLOGY FOR DOMESTIC USE 14.03.2018 Bedienungsanleitung Instruction Manual LASKERAMIKKOCHFELD LASS CERAMIC KF4-2KB G Deutsch Seite English Page www.pkm-online.de...
-
Seite 2: Inhaltsverzeichnis
Sehr geehrter Kunde! Sehr geehrte Kundin! Wir möchten Ihnen herzlich danken, dass Sie sich zum Erwerb eines Produkts aus unserem reichhaltigen Angebot entschieden haben. Lesen Sie die gesamte Bedienungsanleitung, bevor Sie das Gerät zum ersten Mal benutzen. Verwahren Sie diese Bedienungsanleitung zur zukünftigen Verwendung an einem sicheren Ort. -
Seite 3: Eg-Konformitätserklärung
5. Reinigung und Pflege ....................28 6. Problembehandlung ....................30 7. Fehler Codes......................33 8. Technische Daten ......................33 9. Entsorgung ........................34 10. Garantiebedingungen ....................35 Entsorgen Sie dieses Gerät nicht zusammen mit ihrem Hausmüll. Das Gerät darf nur über eine Sammelstelle für wiederverwendbare elektrische und elektronische Geräte entsorgt werden. -
Seite 4: Sicherheitshinweise
1. Sicherheitshinweise LESEN SIE VOR DER ERSTEN BENUTZUNG DES GERÄTES DIE GESAMTEN SICHERHEITSHINWEISE UND SICHERHEITSANWEISUNGEN GRÜNDLICH DURCH. Die darin enthaltenen Informationen dienen dem Schutz Ihrer Gesundheit. Die Nichtbeachtung der Sicherheitshinweise und Sicherheitsanweisungen kann zu schweren Beeinträchtigungen Ihrer Gesundheit und im schlimmsten Fall zum Tod führen. -
Seite 5: Signalwörter
DIESE BEDIENUNGSANLEITUNG MUSS FÜR JEDE PERSON, WELCHE DAS GERÄT BETREIBT, STETS ZUGÄNGLICH SEIN; VERGEWISSERN SIE SICH, DASS DIE BEDIENUNGSANLEITUNG VOR DEM BETRIEB DES GERÄTES GELESEN UND VERSTANDEN WURDE. 1.1 Signalwörter GEFAHR! WARNUNG! verweist auf eine verweist eine Gefahrensituation, die, wenn sie nicht Gefahrensituation, die, wenn sie nicht abgewendet wird, eine unmittelbare abgewendet... - Seite 6 5. Versuchen Sie niemals selbst, das Gerät zu reparieren. Reparaturen, die von dazu nicht qualifizierten Personen durchgeführt werden, können zu ernsthaften Verletzungen und Schäden führen. Falls Ihr Gerät nicht ordnungsgemäß funktioniert, kontaktieren Sie das Geschäft, in dem Sie das Gerät erworben haben. Lassen Sie nur Original-Ersatzteile einbauen.
- Seite 7 7. Reparieren Sie das Gerät niemals selbst. Reparaturen, die von dazu nicht qualifizierten Personen durchgeführt werden, können zu ernsthaften Verletzungen und Schäden führen. Nehmen Sie stattdessen immer Verbindung zu Ihrem Kundendienst auf. Lassen Sie ausschließlich Original-Ersatzteile einbauen. 8. Verwenden Sie zum Anschluss des Gerätes keine Adapter, Steckdosenleisten oder Verlängerungskabel.
- Seite 8 22. Schließen Sie das Gerät nicht in der Nähe von Vorhängen oder Polstermöbeln an. BRANDGEFAHR. 23. Haushaltsausstattungen sowie elektrische Leitungen aller Art dürfen niemals das Gerät berühren, da deren Isolierungsmaterial durch hohe Temperaturen beschädigt oder zerstört wird. 24. Benutzen Sie niemals einen Dampfreiniger zum Reinigen des Gerätes.
- Seite 9 VORSICHT! 1. Benutzen Sie keine aggressiven oder ätzenden Reinigungsmittel und keine scharfkantigen Gegenstände zum Reinigen des Gerätes, da diese die Oberfläche verkratzen und somit Risse im Glas verursachen. 2. Schalten Sie das Kochfeld nicht an, bevor Sie ein Kochgeschirr darauf gestellt haben. 3.
-
Seite 10: Installation
5. Merken Sie sich die Positionen aller Teile des Gerätes, wenn Sie es auspacken, für den Fall, es noch einmal einpacken und transportieren zu müssen. 6. Benutzen Sie das Gerät nicht, bevor alle dazugehörigen Teile sich ordnungsgemäß an ihren dafür vorgesehenen Stellen befinden. 7. -
Seite 11: Entpacken Und Wahl Des Standorts
VORSICHT! Gerät darf nicht über Kühlgeräten, Geschirrspülmaschinen und Wäschetrocknern installiert werden. VORSICHT! Lassen Sie das Gerät so installieren, dass eine optimale Wärmeabstrahlung Aufrechterhaltung Betriebssicherheit ermöglicht wird. VORSICHT! Wand Einflussbereiche Wärmeabstrahlung oberhalb der Arbeitsplatte müssen hitzeresistent sein. VORSICHT! Vermeidung Schäden müssen Verbundschichten und Kleber hitzeresistent sein. -
Seite 12: Auswahl Der Installationsumgebung / Maßangaben
2.3 Auswahl der Installationsumgebung / Maßangaben Schneiden Sie die Einbauöffnung entsprechend der Angaben der Zeichnung in die Arbeitsplatte. Stellen Sie für die Installation und Benutzung einen Mindestfreiraum von 50 mm um die Öffnung herum bereit. Die Dicke der Arbeitsplatte muss mindestens 30 mm betragen. -
Seite 13: M Aße Der Einbauöffnung
AßE DER INBAUÖFFNUNG A 1 = B / B 1 = T REITE IEFE 560 mm 490 mm RFORDERLICHER INDESTFREIRAUM UM DIE INBAUÖFFNUNG HERUM mind. 50 mm mind. 50 mm... -
Seite 14: Einbau Des Kochfeldes
2.4 Einbau des Kochfeldes GEFAHR! Das Kochfeld muss von einer qualifizierten Fachkraft installiert werden. Führen Sie die Installation niemals eigenständig aus. STROMSCHLAGGEFAHR! Der Sicherheitsabstand zwischen der Kochoberfläche und einem sich darüber befindenden Schrank muss mindestens 450 mm betragen. Der Sicherheitsabstand zwischen der Kochoberfläche und einer sich darüber befindenden Dunstabzugshaube muss mindestens 650 mm betragen. - Seite 15 Schrank ➢ mind. 450 mm mind. 50 mm mind. 20 mm Lufteinlass mind. 5 mm Dunstabzugshaube ➢ mind. 650 mm ❖ Die obere Abschlusskante des Einbaumöbels (1) darf nicht direkt an die Einbauöffnung anschließen (2). Bringen Sie die Abschlusskante versetzt an (1) oder schrägen Sie die Abschlusskante ab (3).
-
Seite 16: Elektrischer Anschluss
3. Befestigen Sie das Kochfeld mit den Halteklammern auf der Unterseite der Arbeitsplatte (s. unten / B EFESTIGUNG DER ALTEKLAMMERN EFESTIGUNG DER ALTEKLAMMERN 1. Befestigen Sie die Halteklammern mit den dazugehörigen Schrauben an der Unterseite des Kochfeldes, indem Sie das eine Ende der Halteklammern in die vorgebohrten Löcher einschrauben (wie unten in Abbildung 1 oder 2 gezeigt). - Seite 17 GEFAHR! Führen Sie die Installation niemals eigenständig aus. STROMSCHLAGGEFAHR! INWEISE FÜR DIE QUALIFIZIERTE ACHKRAFT LEKTROTECHNIKER 1. Verwenden Sie zum Anschluss des Gerätes ausschließlich einen Schuko-Stecker und eine ordnungsgemäß geerdete Sicherheits-Netzanschlussdose. 2. Ihr Hausstromnetz muss für die Leistungsaufnahme des Gerätes geeignet sein. 3.
-
Seite 18: Bedienung
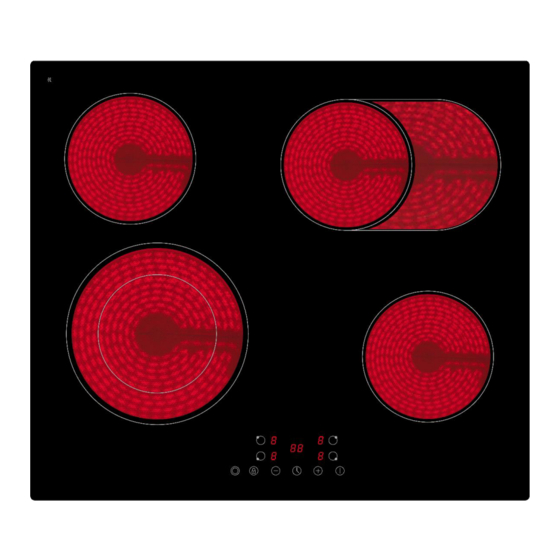
3. Bedienung Lesen Sie die komplette Bedienungsanleitung, bevor Sie das Gerät erstmalig in Betreib nehmen. Beachten Sie hierbei besonders die Sicherheits- und Warnhinweise! Entfernen Sie alle Schutzfolien, die sich noch an dem Gerät befinden können. 3.1 Kochfeld und Bedienfeld OCHFELD LASKERAMIKPLATTE / Ø... -
Seite 19: Bedienfeld
EDIENFELD Sensortaste: A ENSORTASTE ➢ Zur Auswahl der Leistungsstufen der Kochzonen (1 - 9) ➢ Zur Einstellung des Timers ENSORTASTE ➢ Zur Auswahl der Leistungsstufen der Kochzonen (1 - 9) ➢ Zur Einstellung des Timers Sensortasten zur A USWAHL DER OCHZONEN ASTENSPERRE INDERSICHERUNG... -
Seite 20: Vor Der Ersten Benutzung
➢ Halten Sie den Kontrollbereich immer sauber und trocken. Lassen Sie keine Gegenstände wie Kochutensilien oder Lappen den Kontrollbereich abdecken. Schon ein dünner Film aus Wasser kann die Benutzung der Sensortasten schwierig machen. 3.3 Vor der ersten Benutzung ❖ Reinigen Sie die Oberfläche des Gerätes (siehe Kapitel R EINIGUNG UND FLEGE 3.4 Geeignetes Kochgeschirr... -
Seite 21: Einen Kochvorgang Beginnen
❖ Heben Sie das Kochgeschirr immer an, wenn Sie es auf dem Kochfeld bewegen. Schieben Sie es nicht über die Glaskeramik, da Sie diese ansonsten verkratzen können. 3.5 Einen Kochvorgang beginnen WARNUNG! Berühren Sie niemals die Kochzonen / Kochplatten solange Restwärmeanzeige nicht erloschen... -
Seite 22: Nach Beendigung Eines Kochvorgangs
3.6 Nach Beendigung eines Kochvorgangs 1. Berühren Sie in der A USWAHL DER OCHZONEN Sensor der Kochzone, die Sie abschalten wollen. 2. Schalten Sie nun die aus, ENTSPRECHENDE OCHZONE indem Sie sie mit dem Sensor auf 0 stellen. 3. Überprüfen Sie, ob die Anzeige und dann anzeigt. -
Seite 23: Benutzung Des Timers
2. Berühren und halten Sie die T ASTENSPERRE für einige Zeit. INDERSICHERUNG 3. Das LO im Display erlischt. 4. Alle Tasten sind wieder freigegeben. 5. Sie können das Gerät nun wie gewohnt benutzen. HINWEIS! Wenn die Sensortasten gesperrt sind, sind alle Sensoren außer dem A außer Funktion gesetzt. -
Seite 24: Wenn Die Kochzeit Abgelaufen Ist, Ertönt Für 30 Sekunden
4. Stellen Sie die Zeit mit dem Sensor ein. ➢ Berühren Sie oder einmal, wird der Wert wird um 1 Minute erhöht / vermindert. 5. Berühren Sie den Sensor des T . Nun blinkt die Ziffer, IMERS die die Zehnerstelle darstellt. 6. -
Seite 25: Warnung Vor Restwärme
3.9 Warnung vor Restwärme Wenn das Gerät einige Zeit in Betrieb war, strahlen die verwendeten Kochzonen auch nach dem Abschalten Restwärme aus. Zur Warnung erscheint der Buchstabe "H". 3.10 Automatische Abschaltung Die automatische Abschaltung stellt eine Sicherheitsfunktion Ihres Gerätes dar. Die automatische Abschaltung findet immer dann statt, wenn Sie vergessen haben, eine Kochzone nach deren Benutzung abzuschalten. -
Seite 26: Kochtipps
4.1 Kochtipps ❖ Stellen Sie die Leistungsstärke niedriger, wenn ein Topf seine Kochtemperatur erreicht hat. ❖ Die Verwendung eines Deckels verkürzt die Kochzeit und spart Energie, da die Kochhitze zurückgehalten wird. ❖ Minimieren Sie die Menge an Flüssigkeiten oder Fett, um die Kochzeit zu verringern. -
Seite 27: Leistungsstärken
2. Bereiten Sie alle Zutaten vor und legen Sie die benötigten Kochutensilien bereit. Das Anschwenken sollte schnell von statten gehen. Falls Sie eine große Menge zubereiten wollen, teilen Sie das Kochgut in mehrere Teile auf. 3. Heißen Sie den Wok / die Pfanne kurz vor und geben Sie 2 Esslöffel Öl dazu. 4. -
Seite 28: Energie Sparen
4.3 Energie sparen ❖ Benutzen Sie geeignetes Kochgeschirr. ❖ Kochgeschirr mit einem dicken und geraden Boden kann bis zu einem Drittel an Energie sparen. Decken Sie ihr Kochgeschirr ab, wenn möglich; andernfalls verbrauchen Sie das 4-fache an Energie. ❖ Der Durchmesser des Kochgeschirrs sollte nicht kleiner als der Durchmesser des verwendeten Kochrings sein. -
Seite 29: Die Kochzonen Können Somit
EINIGUNG DES OCHFELDES ➢ Entfernen Sie Verunreinigungen wie Kochgutrückstände von der Glasoberfläche. Benutzen Sie dazu ein weiches Tuch. ➢ Scheuern Sie die Glaskeramik nicht. ➢ Benutzen Sie zur Reinigung heißes Wasser und einen Spezialschwamm für die Reinigung von Glaskeramik. Verwenden Sie an den verunreinigten Stellen ein spezielles Produkt zur Reinigung von Glaskeramik (erhältlich im Supermarkt) und wischen Sie diese dann mit einem weichen Tuch trocken. -
Seite 30: Problembehandlung
1. Trennen Sie das Gerät von der Glaskeramik-Oberfläche dauerhaft Stromversorgung (Haussicherung). beschädigen. 2. Halten Sie den Schaber in einem 30 ➢ Verwenden Sie den Glaskeramik- Winkel kratzen Schaber äußerst vorsichtig, damit Sie Verunreinigungen sich nicht an der Klinge schneiden, Glaskeramik zu einem nicht warmen besonders dann, wenn Sie die Bereich. -
Seite 31: Das Gerät Kann Nicht Eingeschaltet Werden
EHLER ÖGLICHE RSACHE AßNAHMEN ERÄT KANN NICHT EINGESCHALTET WERDEN ➢ Eine ➢ Kontrollieren Sie, ob das Gerät an Unterbrechung Stromzufuhr. die Stromversorgung angeschlossen ist. Kontrollieren Ihren Haushalts-Sicherungskasten. Liegt Stromausfall Ihrem Wohngebiet vor? ENSORTASTEN REAGIEREN NICHT ➢ Die Sensortasten sind gesperrt. ➢... -
Seite 32: Das Gerät Oder Einek
UMMENDES ERÄUSCH BEI HOHER EISTUNGSEINSTELLUNG ➢ Wird durch das Induktionskochen ➢ Normaler Betriebszustand, aber das verursacht. Summen sollte leiser werden oder aufhören, wenn Leistungsstärke verringern. ENTILATIONSGERÄUSCHE DRINGEN AUS DEM ERÄT ➢ Der eingebaute Ventilator schützt ➢ Normaler Betriebszustand. Trennen die Elektronik vor Überhitzung und Sie bei laufendem Ventilator das kann auch nach dem Abschalten des Gerät... -
Seite 33: Fehler Codes
7. Fehler Codes Anzeige Mögliches Problem Mögliche Lösung E0 & sich Hören Sie mit dem Kochen auf wiederholendes und warten Sie bis sich Überhitzungsschutz: Das Akustisches Kochfeld abgekühlt hat. Bitte Kochfeld überhitzt. Signal kontaktieren Sie den Kundendienst. Ausfall des Thermosensors Bitte kontaktieren Sie den Kundendienst. -
Seite 34: Entsorgung
9. Entsorgung 1. Achten Sie beim Entpacken unbedingt darauf, dass die Bestandteile der Verpackung ( Polyäthylentüten, Polystyrenstücke ) nicht in die Reichweite von Kindern und Tieren gelangen. ERSTICKUNGSGEFAHR! 2. Nicht mehr benutzte alte Geräte müssen zuständigen Wiederverwertungsstelle zugeführt werden. Keinesfalls offenen Flammen aussetzen. -
Seite 35: Garantiebedingungen
10. Garantiebedingungen für Elektro-Großgeräte der PKM GmbH & Co. KG, Neuer Wall 2, 47441 Moers. Der Hersteller leistet dem Verbraucher für die Dauer von 24 Monaten, gerechnet vom Tag des Kaufes Garantie für einwandfreies Material und fehlerfreie Fertigung. Dem Verbraucher stehen neben den Rechten aus der Garantie die gesetzlichen Gewährleistungsrechte zu, die der Verbraucher gegen den Verkäufer hat, bei dem er... -
Seite 68: Technologie Für Den Haushalt
Wenden Sie sich bitte an das Geschäft, in dem Sie das Gerät erworben haben. Please contact the shop you purchased the appliance at. Änderungen vorbehalten Subject to alterations TAND PDATED 01.12.2021 12/01/2021 © PKM GmbH & Co. KG, Neuer Wall 2, 47441 Moers...