
Verwandte Anleitungen für Genmitsu Jinkosu LC-40


Inhaltszusammenfassung für Genmitsu Jinkosu LC-40
- Seite 1 Genmitsu 取 扱 説 明 書 Jinsoku LC-40 Desktop Laser Engraver English 01 - 39 Jinsoku LC-40 卓上レーザー彫刻機 日 本 語 41 - 78 Jinkosu LC-40 Desktop Lasergravierer Deutsch 80 - 118 V1.0 Apr.2022...
-
Seite 2: Inhaltsverzeichnis
Contents 1 – Safety Guideline 2 – FCC compliance statement 3 – Product Structure and Accessories 4 – Assembly Guide 5 – Product Parameters 6 – Laser Focusing 7 – Resources Download and Software Setup 8 – Custom PC Engraving Software Introduction 9 –... -
Seite 3: Safety Guideline
Safety Guideline Always exercise safety and caution when working with laser marking systems. Consider the listed recommendations to minimize risk: ● You must be at least 13 years old to operate the laser engraver. ● Direct exposure to the laser beam can cause severe burns and eye damage. Ensure that you are wearing proper laser safety goggles when working in the vicinity of the laser equipment. -
Seite 4: Fcc Compliance Statement
FCC compliance statement This device complies with part 15 of the FCC Rules. Operation is subject to the following two conditions: (1) this device may not cause harmful interference, and (2) this device must accept any interference received, including interference that may cause undesired operation. -
Seite 5: Product Structure And Accessories
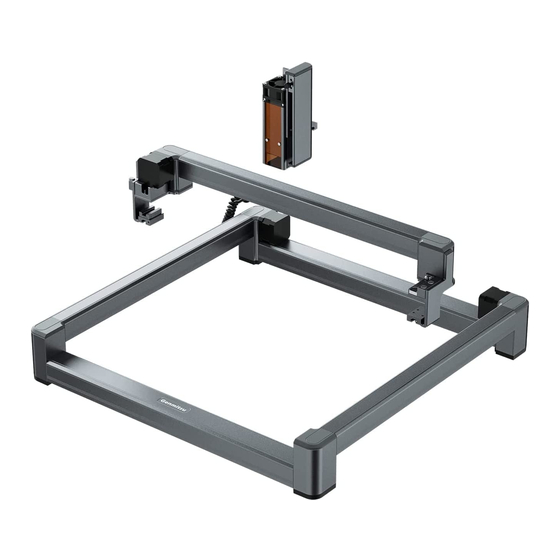
Product Structure and Accessories Front View Top View Rear Module X-axis Module Focusing Tool Right Module Laser Eye Protection Shield Laser Head Module Laser Head Module Front Module Left Module Rear View Right View USB Port for PC Spiral Cable 01 DC Power Jack Right Module Spiral Cable 02... - Seite 6 Product Structure and Accessories Rear Module, 1pcs Laser Head Module Laser Head Front Module, 1pcs 1pcs 1pcs X-axis Module, 1pcs Left & Right Module X-axis Connection Screw Cable Clip, Connection Screws Label: S7 6pcs Label: S5 4pcs 8pcs Laser Head Module Spring Washer X-axis Limit Switch Cable Left Module,...
- Seite 7 Product Structure and Accessories Accessories Details Power Supply*1 USB Data Cable*1 USB Flash Drive*1 Assembly Tool Set*1 Kraft Paper*4 User Manual*1 Laser Safety Glasses*1 Rotation Module Height Extension Unit (Optional) (Optional) (Optional) 1. Power Supply: Supply power for the engraving machine. 2.
-
Seite 8: Assembly Guide
Assembly Guide Rear Module Right Module (b) Left Module (a) Front Module Left & Right Module Connection Screws (S5) Assembly Step 01: 1. Connect Stepper Motor Cables for each Y axis Arm- Left (a) and Right (b) to Rear Module (Contains Mainboard, I/O Connections). 2. - Seite 9 Assembly Guide X-axis Module X-axis Limit Switch Cable X-axis Connection Screw (S7) Assembly Step 02: 1. Connect the stepper motor cable and the limit switch cable of the Left Module and X-axis Module. 2. Per the diagram place the cables into the cable channels. 3.
- Seite 10 Assembly Guide Assembly Step 03: 1. Push the sliders on both sides of the Y-axis (left module and right module) on the limit screws as illustrated to ensure that both sliders are aligned. 2. Insert four X-axis Connection Screw (S7) into X-axis Connection Screw (S7) the screw holes and tighten them with a 2.5mm X-axis Module...
- Seite 11 Assembly Guide Laser Head Module Spring Washer (N6) Laser Head Module Connection Screw (S10) Assembly Step 04: Align the X-axis module with the laser head module. Place the Spring Washers(N6) into the Laser Head Module Connection Screws (S10) and insert four screws (S10) into the laser module mounting holes. Then align them with the screw holes on the laser module and tighten them with the included 2.5mm hex wrench.
- Seite 12 Assembly Guide Spiral Cable 01 Spiral Cable 02 Spiral Cable 02 Cable Clip Cable Clip Cable Clip Spiral Cable 01 Assembly Step 05: 1. Connect the Front Module and X-axis Module with the Spiral Cable 01 and plug the type-c interface to the CON01 Port on the Right Module.
-
Seite 13: Product Parameters
Product Parameters Model LC-40 Material High-strength aluminium alloy profile + high-speed linear guide + ABS engineering plastics Laser Head 5MM Fixed Focus Max. Z-axis Material Height 0.1-76mm Focal Distance Power Supply DC005, DC12V/5A Data Interface USB Type-B (Square USB Interface) Cooling Passive+ Forced Air Cooling Machine Power... -
Seite 14: Laser Focusing
Laser Focusing Instructions to adjust laser focus: Lifting platform 1. Place the focusing tool on the engraving material, manually adjust the slider up and down to move the laser module close to the focusing tool. The laser module is now focused, and Turn the knob you can place the focusing tool back to the holder. -
Seite 15: Resources Download And Software Setup
Resources Download and Software Setup Resources Download: Driver Installation on Windows Method 1: Driver, software, sample picture and instructions can be found in the USB flash drive that comes with the machine. (Note: We recommend you to copy all files to your computer when you use it for the first time in case the flash drive get lost.) Method 2: Download it from SainSmart Resources Center All files included in the flash drive can also be... - Seite 16 Resources Download and Software Setup 2. Software Installation on Windows: 3. Machine Connection on Windows: File Location: USB Flash Drive/windows/software/ Connect the machine to the computer with the USB cable. Laser_2.0.4(211018)/ Open the engraving software — click the "connect device" Double-click the file icon to start the setup process, and icon —...
- Seite 17 Resources Download and Software Setup 4. Driver Installation on Mac OS: Click “Continue” Enter computer password Click “Continue Installation” Continue Installation Complete Installation File Location: USB Flash Drive/02_MAC/driver/ CH34x_Install_V1.5.pkg/ Double-click on the package(.pkg file) and an installation wizard for the application. The installation wizard then performs all the necessary tasks to install the driver correctly.
- Seite 18 Resources Download and Software Setup 5. Software Installation on Mac OS: 6. Machine Connection: Double click the software icon Click the “connect device” icon Drag and drop the software Double click the .dmg file to the Application folder Connect the Machine The machine is connected when the icon turns blue Connect the machine to the computer with the Type-C...
-
Seite 19: Custom Pc Engraving Software Introduction
Custom PC Engraving Software Introduction User Interface Open Load photos from computer. Save Save the edited texts and photos. Input Text Create/edit text, change font family, font style, font size and text rotation etc. QR code Create QR code Bar Code Create Bar code Graphics The graphics creation tool helps you quickly create... - Seite 20 Custom PC Engraving Software Introduction Engraving Settings Engraving Power Adjust the power level to engrave different materials. Engraving Speed Set the engraving speed. The engraving speed determines the engraving depth. Contrast Adjust the Contrast slider to increase or decrease the text/photo contrast. Contrast 16 Contrast 50 Contrast 80...
- Seite 21 Custom PC Engraving Software Introduction Engraving Settings Black and White Convert your image to black and white. Grayscale Convert your image to a grayscale version. Outline Convert your image to an outline drawing. Sketch Convert your image to a sketch drawing. Black and White Grayscale Outline...
- Seite 22 Custom PC Engraving Software Introduction Engraving Settings X Reversal Rotate your image horizontally. Y Reversal Rotate your image vertically. Reversal Invert your image colors Center Move your image to the center. Preview Location The laser head moves in a rectangle around where the engraving job goes to help you position your workpiece.
- Seite 23 Custom PC Engraving Software Introduction User Interface After loading your artwork, left-click the mouse to move the artwork position, right-click the mouse to move the drawing board. Scrolling the mouse wheel to zoom in or out from the mouse's location. X:71 Y:122 are the X Position and Y Position of your artwork.
-
Seite 24: Lasergrbl & Lightburn Software Introduction
LaserGrbl & LightBurn Software Introduction Laser GRBL LaserGRBL Offical Website: https://lasergrbl.com/ Note: The Jinsoku LC-40 Laser Engraver supports GRBL firmware and our self-developed firmware. You can switch between different firmware according to your needs. Our custom firmware enables you to use our desktop software and mobile phone applications (for iOS and Android) to perform your engraving and cutting... - Seite 25 LaserGrbl & LightBurn Software Introduction LaserGRBL User Interface (Source: https://lasergrbl.com/usage/user-interface/) Connection control You can select the serial port and proper baud rate for connection, according to grbl firmware configuration. File control This show loaded filename and engraving process progress. The green "Play" button will start program execution.
- Seite 26 LaserGrbl & LightBurn Software Introduction LaserGRBL User Interface (Source: https://lasergrbl.com/usage/user-interface/) Grbl reset/homing/unlock These buttons submit soft-reset, homing and unlock commands to the grbl board. On the right of unlock button, you can add some custom buttons. Move to the bottom left corner. Framing After the photo is loaded, click this icon to preview the engraving position.
- Seite 27 LaserGrbl & LightBurn Software Introduction Raster Image Import Tutorial on LaserGRBL (Source: https://lasergrbl.com/usage/raster-image-import/) Import Images Click the "Open File" icon or drag the file directly to the software interface; Parameters Adjust import parameters. Conversion tools Choose different conversion tools for various types of images.
- Seite 28 LaserGrbl & LightBurn Software Introduction LightBurn LightBurn Official Website: https://lightburnsoftware.com/...
- Seite 29 LaserGrbl & LightBurn Software Introduction Setup-LightBurn LightBurn You can use the laser engraving and cutting software Lightburn or LaserGBRL. Step 1: Install LightBurn and run the program. You can open this link or scan to get the LightBurn GCode License SCAN TO SHOP Key from SainSmart.
- Seite 30 LaserGrbl & LightBurn Software Introduction Step 5: Select the appropriate COM Port,With a successful connection you will see text in the console window that says “Grbl 1.1f [‘$’ for help] and show“Laser Ready”.
- Seite 31 LaserGrbl & LightBurn Software Introduction Step 6: Click “Edit”, select “Device Settings”, Check the Basic settings,”Working Size”, width=500mm, Height=400mm, “S-value Max”, S=10000.
- Seite 32 LaserGrbl & LightBurn Software Introduction Engraving the Test File-LightBurn Step 1: File→Open File: Open GCODE file or Image format file. Step 2: Set the Origin Zero Position (Starting Point).
- Seite 33 LaserGrbl & LightBurn Software Introduction Step 3: Double click the window“Spd/Pwr”,Set Laser Intensity (S value) and Travel Speed. The Max power should be set to 10%-100%, depending on materials they will require different Speeds and Percentage.Set the Power Scale to your lowest test power +10% to mimic what you want. make record and find that Power &...
-
Seite 34: App Download & Introduction
Open "Engraver" and click "Not Connected" in the upper right corner. The app will search for available devices for connection; Then click “Genmitsu LC-40”’; The machine will be connected to your phone in a few seconds. The upper right corner will show Method 2: Download from SainSmart Resources Center: "Connected". - Seite 35 APP Download & Introduction Introduction to Software Interface (Load Content) Roller Settings Standby laser power Menu Set the laser power New User Guide/ Feedback/ when the machine has User Agreement/Equipment/ no engraving job. Language Setting. Roller mode Picture Activate/inactive the Import photos from Gallery.
- Seite 36 APP Download & Introduction Introduction to Software Interface (Load Content) Crop Crop your image in different shapes. Photo or Text Add additional images, custom text to your images. Input Text Load Photos Shoot Add Photo from from Album via Camera Image Library Eraser Modify the photo with erase...
- Seite 37 APP Download & Introduction Introduction to Software Interface (Load Content) Contrast Adjust the Contrast slider to increase or decrease the text/photo contrast. Contrast 16 Contrast 50 Contrast 80 Black and White Convert your image to black and white. Grayscale Convert your image to a grayscale version. Outline Convert your image to an outline drawing.
- Seite 38 APP Download & Introduction Introduction to Software Interface (Load Content) Width Material Selection Customize the width The app has built-in and height of your engraving settings for image. common materials, including cork, bamboo, Height cloth, etc. Customize the width Add Material and height of your Add your custom image.
- Seite 39 APP Download & Introduction Introduction to Software Interface (Load Content) Engraving job Save 1 transferring Save the image Start engraving when you edited with the 100% is completed app to your phone. Engraving progress Engraving Display the Completed engraving progress Current engraving job is finished.
-
Seite 40: Faq
I. Unable to power on the machine. Ensure all outlets, switches, and power cables are plugged in and powered up properly. Try a different power source or cable if necessary. II. Unable to connect to computers. 1. USB cable not connected: Please make sure the data cable is correctly plugged. On some PCs, the front USB port is not receiving enough power for the engraving machine. - Seite 41 3. Image Quality: If the image you imported has very light colors and fine lines, it will also affect the engraving quality. 4. Workpiece Position: The laser module has a fixed focal length, which means the workpiece should be placed on a flat surface and make sure it is in parallel to the machine, or poor engraving result.
- Seite 42 コンテンツ 1 ‒ 安全ガイドライン 2 ‒ 製品の構造と部品 3 ‒ 組み立てガイド 4 ‒ 製品パラメータ 5 ‒ レーザーフォーカス 6 ‒ リソースのダウンロードとソフトウェアのセットアップ 7 ‒ カスタムPC彫刻ソフトウェアの紹介 8 ‒ ソフトウェアLaserGrbl & LightBurnの紹介 9 ‒ APP ダウンロード & 紹介 10 ‒ FAQ...
-
Seite 43: 安全ガイドライン
安全ガイドライン レーザー加工システムを使用する際は、常に安全かつ慎重に作業してください。リスクを最小限に抑える ために、以下の推奨事項をご参照ください。 本機の操作は13歳以上に限ります。 ● レーザー光を人体に直接暴露すると、重度のやけどや目の損傷を引き起こす可能性があります。レーザー彫刻機の近 ● くで作業する際は、適切なレーザー安全メガネを着用してください。 最低出力設定でのみレーザー焦点を合わせてください。 ● レーザー使用時は発炎や発煙を伴います。予期しない火災が発生する可能性があるため、正常に使用できる消火器を ● 近くに置いてください。 運転中はレーザー彫刻機から離れないでください。 ● 彫刻/切断加工時の煙は有毒である可能性があるため、煙を部屋から排出する必要があります。 加工部屋に換気システ ● ムが あることを確認してください。 レーザー加工領域の下面が金属製または不燃性であることを確認してください。 ● レーザーの加工部屋および作業領域に十分な注意喚起表示がされていることを確認し、レーザー装置稼働中の作業領 ● 域に作業者以外の人が立ち入らないようにしてください。 レーザー装置のクリーニング、メンテナンス、および修理を行う時は、必ず電源を切断してください。 ● 彫刻加工中のレーザー光と炎光を直接見ないでください。 眼の損傷や視力低下を引き起こす可能性があります。 ● レーザー彫刻機は特定の目的以外には使用しないでください。 ● SainSmartはレーザーの使用または誤用について、一切の責任を負わないことを明確に声明します。... -
Seite 44: 製品の構造と部品
製品の構造と部品 正面図 平面図 リアモジュー ル X軸モジュール フォ̶カス工具 右モジュール レーザー保護シールド レーザーヘッドモジュール レーザーヘッドモジュール フロントモジュール 左モジュール 背面図 右側面図 PC用USBポート スパイラルケーブル 01 DC電源ジャック 右モジュール スパイラルケーブル 02 内部制御基板 ロータリー・アタッチメント用USBポート オフライン彫刻ボタン 電源ボタン... - Seite 45 製品の構造と部品 リアモジュー ル、1本 レーザーヘッドモジュ フロントモジュール 、1本 レーザーヘッド、1個 ール、1セット X-軸モジュール、1本 左&右モジュール接 X軸接続ネジ ケーブルクリップ、 続ネジ ラベル: S7 6個 ラベル: S5 4個 8個 レーザーヘッドモジュ スプリングワッシャ− X軸 リミットスイッチケ 左モジュール、 右モジュール、 スパイラルケーブル 01、 スパイラルケーブル 02、 ール接続ネジ ラベル: N6 ーブル 1本 1本 1本 1本 1本 ラベル: S10 4個...
- Seite 46 製品の構造と部品 部品詳細 電源*1 USBデータケー USB フラッシュ ブル*1 ドライブ*1 組み立て工具セット*1 クラフト紙*4 ユーザーマニュアル*1 レーザー安全メガネ*1 ロータリーモジュール 高さ拡張ユニット (別売り) (別売り) (別売り) 1. 電源:彫刻マシン用電源。 2. データケーブル:パソコンとマシンを接続します。 3. USBフラッシュドライブ: ドライバー、PC用彫刻ソフトウェア、ユーザーマニュアル、ビデオ説明が含まれています。 4. 組み立て工具セット: 六角レンチ* 1、プラスドライバー* 1、マイナスドライバー* 1が含まれています。 5. クラフト紙: レーザー彫刻機テスト用サンプル素材。 6. ユーザーマニュアル: 彫刻機と操作の紹介。 7. レーザー安全メガネ (別売り): 危険なレーザー照射から目を保護します。 8.
-
Seite 47: 組み立てガイド
組み立てガイド リアモジュー ル 右モジュール (b) 左モジュール (a) フロントモジュール 左&右モジュール接続 ネジ (S5) 組み立てステップ 01: 各Y軸アームのステッピングモーターケーブル- 左 (a) と 右 (b)をリアモジュ ール(メインボード、I/O接続が含まれている)に接続します。 リアモジュールのカバーを取り外してケーブルを接続します。 付属各2本の左&右モジュール接続ネジで左 (a) と 右 (b) のモジュールをネ ジ穴に合わせ、付属の4mm六角レンチで締めます。 上記の手順を繰り返して、残りのフロントモジュールを組み立てます。 (X軸モジュールを除く)... - Seite 48 組み立てガイド X軸モジュール X軸リミットスイッチケーブル X軸接続ネジ (S7) 組み立てステップ 02: 1. 左モジュールとX軸モジュールのステッピングモータケーブルとリミットスイッチケー ブルを接続します。 2. 図表に従ってケーブルをケーブルチャネルに配置します。 3. X軸モジュールを左モジュールと右モジュールの上に置き、X軸モジュールと左モジュ ールの位置決めピンが揃うようにします。 4. 本機を裏返し、卓上に置いてから次の手順に進みます。...
- Seite 49 組み立てガイド 組み立てステップ 03: 1. 図表に従って、Y軸両側(左モジュールと右モ ジ ュール)のスライダーをリミットネジに移 動して、2つのスライダーが揃うようにしま す。 X軸モジュール接続ネジ(S7) 2. 4つのX軸接続ネジ(S7)をネジ穴に挿入し、 X軸モジュール リミットネジ 2.5mmの六角レンチで締め付けます。 3. 4つのX軸接続ネジ(S7)がすべて正しく締め 付けられたら、リミットネジを取り外します。 リミットネジ X軸モジュール接続ネジ(S7) X軸モジュール リミットネジ...
- Seite 50 組み立てガイド レーザーヘッドモジュール スプリングワッシャー (N6) レーザーヘッドモジュール 接続ネジ (S10) 組み立てステップ 04: X軸モジュールとレーザーヘッドモジュールの位置を合わせます。スプリングワッシャー(N6)をレーザーヘッドモジュール 接続ネジ(S10)に入れ、4つのネジ(S10)をレーザーモジュール取り付け穴に挿入します。その後、レーザーモジュールの ネジ穴と合わせ、付属の2.5mm六角レンチで締め付けます。...
- Seite 51 組み立てガイド スパイラルケーブル 01 スパイラルケーブル 02 スパイラルケーブル 02 ケーブルクリップ ケーブルクリップ ケーブルクリップ スパイラルケーブル 01 組み立てステップ 05: 1. フロントモジュールとX軸モジュールをスパイラルケーブル01で接続し、type-cインターフェースを右モジュールのCON01 ポートに差し込みます。スパイラルケーブルの直線側をフロントモジュールに接続します。 2. スパイラルケーブル01を右モジュールに固定し、ケーブルクリップ01でX軸モジュールを固定します。 3. 右モジュールとX軸モジュールをスパイラルケーブル02で接続します。type-cインターフェースを右モジュールのCON02ポ ーに挿入します。もう片方の3ピンコネクターは、レーザーモジュールのコネクターに接続する必要があります。 4. ケーブルクリップ02でスパイラルケーブルをX軸モジュールに固定します。...
-
Seite 52: 製品パラメータ
製品パラメータ モデル LC-40 素材 高強度アルミニウム押出材 + 高速度リニアガイド + ABS工学プラスチック レーザーヘッド 5MM 固定距離 最大Z-軸高さ 0.1-76mm 焦点距離 電源 DC005, DC12V/5A データインターフェース USB Type-B (Square USB インターフェース) 冷却 強制空冷 マシンパワー <60W レーザー電力 10~20W (標準); 20~40W (アップグレード可能) レーザー光パワー >4.5W (標準); >8W (アップグレード可能) レーザー波長 455nm >10000H レーザー寿命... -
Seite 53: レーザーフォーカス
レーザーフォーカス レーザーフォーカスを調整する手順 : 昇降プラットフォーム 1. フォーカス工具を彫刻材料の上に置き、手動でスライダーを 上下に調節して、レーザーモジュールをフォーカス工具に近づ けます。 レーザーモジュールの焦点を合わせた後、フォーカス ノブを反時計回りに 工具をホルダーに戻してください。 回し、レーザーモジ ュールを彫刻材料の 5mm上に移動して から、時計回りに回 してレーザーモジュ ールをロックしま レーザー す。 フォーカス工具 Focusing Tool モジュール フォーカス工具5mm 彫刻材料 フォーカス調整ノブ... -
Seite 54: リソースのダウンロードとソフトウェアのセットアップ
リソースのダウンロードとソフトウェアのセットアップ リソースのダウンロード: Windowsでのドライバーのインストール 方法1:ドライバー、ソフトウェア、サンプル画 像、および説明は、マシンに付属のUSBフラッシ ュドライブにあります。 (注:フラッシュドライ ブが紛失した場合に備えて、初めて使用する時に すべてのファイルをパソコンにコピーすることを お勧めします。) 方法2:SainSmartリソースセンターからダウンロ ードします。 フラッシュドライブに含まれるすべ てのファイルは、SainSmartリソースセンターか らダウンロードすることができます: https://docs.sainsmart.com/lc-40 または次のQRコードをスキャンしてください。 「インストール」 「確認」をクリックしてイン をクリックします ストールを完了します QRコードをスキャンしてソフトウェアとユーザーマニ ュアルをダウンロードしてください。↓↓↓ 1. Windowsでのドライバーのインストール: ファイルの場所:USB Flash Drive/01-windows/driver/driver.exe .exeファイルを見つけてダブルクリックし、インストールプログ ラムを開始し、[インストール]をクリックしてドライバをインス トールし始めます。 「ドライバが事前にプリインストールされ ている」というダイアログボックスが表示されたら、「OK」を クリックしてインストールを終了します。... - Seite 55 リソースのダウンロードとソフトウェアのセットアップ 2. Windowsでのドライバーのインストール: 3. Windowsでのマシン接続 : ファイルの場所: USB Flash Drive/windows/software/ USBケーブルでマシンとパソコンを接続します。 Laser̲2.0.4(211018)/ 彫刻ソフトウェアを開きます̶「デバイス接続」アイコ ファイルアイコンをダブルクリックしてセットアッププ ンをクリックします̶アイコンが青色に変わると、マシ ロセスを開始し、プログレスバーが最後まで到達したら ンとパソコンの接続は完了です。 ソフトウェアのインストールは完了です。 「デバイス接続」アイ ファイルアイコンをダ コンをクリックします ブルクリックします マシンに接続します プログレスバーが最後まで 到達したらソフトウェアの アイコンが青色に変わると、マ インストールは完了です シンとパソコンの接続は完了です 注: 彫刻ソフトウェアをインストール時にウイルス対策ソフトウェアからアラートを受け取った場合は、一旦ウイルス対 策ソフトウェアを停止してから彫刻ソフトウェアをインストール後、操作できるようにしてください。 実行可能プログラ ムとして、彫刻ソフトウェアは、一部のウイルス対策ソフトウェアから誤認アラートを受信することがあります。...
- Seite 56 リソースのダウンロードとソフトウェアのセットアップ 4. Mac OSでのドライバーのインストール: 「継続」をクリックします パソコンパスワー ドを入力します 「インストールを継続」 インストールを継続します インストール完了 をクリックします。 ファイルの場所: USB Flash Drive/02̲MAC/driver/ CH34x̲Install̲V1.5.pkg/ パッケージ(.pkgファイル)とアプリケーションのインストールウィザードをダブルクリックします。その後、インストー ルウィザードは必要なすべてのタスクを実行して、ドライバを正しくインストールします。...
- Seite 57 リソースのダウンロードとソフトウェアのセットアップ 5. Mac OSでのソフトウェアインストール: 6. Mac OSでのマシン接続: ソフトウェアアイコンをダ 「デバイス接続」アイコン をクリックします ブルクリックします アプリケーションフォルダ .dmg ファイルをダブ ーにソフトをドラッグ&ド ルクリックします ロップします マシンに接続します アイコンが青色に変わると、 マシンとパソコンの接続は 完了です インストール完了 USB Type-Cケーブルでマシンとパソコンを接続します。 ファイルの場所: USB Flash Drive/02_MAC/software/Engraver/ 彫刻ソフトウェアを開きます̶「デバイス接続」アイコンを ディスクイメージ(.dmgファイル)を開き、ソフトウェアを クリックします̶アイコンが青色に変わると、マシンとパソ アプリケーションフォルダにドラッグ&ドロップしてから、 コンの接続は完了です。 ソフトウェアがインストール完了します。...
-
Seite 58: カスタムPc彫刻ソフトウェアの紹介
カスタムPC彫刻ソフトウェアの紹介 ユーザーインターフェース オープン パソコンから写真をロードします。 保存 編集したテキストや写真を保存します。 テキストの入力 テキストの作成/編集、フォントファミリ、フォントス タイル、フォントサイズ、文字回転などの変更します。 QR コード QR codeを作成します。 バーコード バーコードを作成します。 画像 画像作成ツールを使うと、手軽に丸、四角、ハート、 星などの画像が作成できます。 設定 ここでは、レーザーのパワーを設定して、プロジェクトの発射とフレーミングをテストすることができます。また、ロータリーモジュール の有効/無効もここで設定できます。 Rotary Roller デバイスの接続 クリックして、マシンとパソコンを接続します。接続が成功すると、アイコンが青くなります。 ヘルプ SainSmart リソースセンターへのリンクです。本機のソフトウェア、ユーザーマニュアル、動画チュートリアルが掲載されています。... - Seite 59 カスタムPC彫刻ソフトウェアの紹介 彫刻設定 彫刻パワー パワーレベルを調整して異なる素材を彫刻しま す。 彫刻速度 彫刻速度を設定します。彫刻の深さは速度によっ て決まります。 コントラスト コントラストスライダーを調節して、文字や画像 のコントラストを上げたり下げたりすることがで きます。 コントラスト 16 コントラスト 50 コントラスト 80 充填密度; 充填 充填効果はベクターグラフィックスにのみ有効で、ベクター化を選択します。「充填」をクリックして効果を適用し、充填スラ イダーを移動して充填濃度を調整します。 彫刻回数 彫刻周回を何回実行するかを設定します。 幅; 高さ テキスト/写真の幅と高さをカスタマイズすることができます。 縦横比ロック 画像やテキストのサイズを変更する同時に、相対的な幅と高さを維持します。...
- Seite 60 カスタムPC彫刻ソフトウェアの紹介 彫刻設定 黒白 画像を白黒に変換します。 グレースケール 画像をグレースケールに変換する。 輪郭 画像を輪郭図に変換します。 スケッチ 画像をスケッチ画に変換します。 黒白 グレースケール 輪郭 スケッチ...
- Seite 61 カスタムPC彫刻ソフトウェアの紹介 彫刻設定 X 鏡像 画像を水平方向に回 転させます。 Y 鏡像 画像を縦に回転させ ます。 色反転 画像の色を反転させ ます。 センター 画像をセンターに移 動します。 位置プレビュー レーザーヘッドが彫 刻エリアを中心に矩 形に動き、加工位置 を明確し、彫刻素材 の位置を調整しま す。 スタート 彫刻を開始します。 ストップ 彫刻を停止します。...
- Seite 62 カスタムPC彫刻ソフトウェアの紹介 ユーザーインターフェース 作品をロードした後、マ ウスを左クリックすると 作品の位置が移動でき、 マウスを右クリックする と図板が移動できます。 マウスのホイールをスク ロールすると、マウスの 位置からズームインまた はズームアウトできま す。 X:71 Y:122は、作品のX位 置とY位置です。これらの 数値は、作品の位置によ って変化します。 図板から作品を削除し ます。 マウスでアイコンを左 クリックして、作品を回 転させることができま す。 マウスでアイコンを左 クリックして、作品をズ ームインまたはズームア ウトします。...
-
Seite 63: ソフトウェアLasergrbl & Lightburnの紹介
ソフトウェアLaserGrbl & LightBurnの紹介 Laser GRBL LaserGRBL公式サイト: https://lasergrbl.com/ 注意: Jinsoku LC-40 レーザー彫刻機は、 GRBLファームウェアと当社開発のフ ァームウェアに対応しています。用 途に応じてファームウェアを切り替 えて使用することができます。当社 のカスタムファームウェアにより、 当社のデスクトップソフトウェアお よびスマホアプリケーション(iOSお よびAndroid用)を使用して、彫刻 および切断加工を実行することがで きます。GRBLベースのファームウェ アに切り替えた場合、LaserGRBLと LightBurnは彫刻加工に使用できますが、スマホとロータリーモジュールによる制御と彫刻はサポートされなくなりま す。 GRBLベースのファームウェアに切り替えた場合、原点は右下隅になり、マシンは自動的に原点に戻しません。なお、移 動検知センサーは無効になります。 GRBLベースのファームウェアをインストールする動画説明は、本機に付属するUSBフラッシュドライブに含まれていま す。 ファイル場所: /LC-40 Engraver/LC-40 firmware update guide/... - Seite 64 ソフトウェアLaserGrbl & LightBurnの紹介 LaserGRBL ユーザーインターフェース (ソース: https://lasergrbl.com/usage/user-interface/) コネクション制御 grblファームウェアの設定に従って、シリア ルポートと適切なボーレートを選択して接 続することができます。 ファイル制御 ロードしたファイル名と彫刻の進行状況が 表示されます。緑色の「Play」ボタンを押す と、プログラムの実行が開始されます。 手動コマンド ここに任意のGコードを入力し、「Enter」 キーを押してから、コマンドがコマンドキ ューにエンキューされます。 コマンド・ログとコマンドリターンコード 待機中のコマンドとその実行状況、エラー を表示します。 ジョギング制御 手動でレーザーの位置が調整できます。左の縦スライダーで移動速度を制御でき、右のスライダーでステップサイズを制御できま す。 ラインカウントとタイムプロジェクション LaserGRBLは、実際の速度や作業の進捗状況に従って、加工の実行時間を予測することができます。 彫刻プレビュー このエリアは、最終的な作品のプレビューを表示します。小さな青い十字は、彫刻中のレーザー位置をリアルタイムで表示します。...
- Seite 65 ソフトウェアLaserGrbl & LightBurnの紹介 LaserGRBL ユーザーインターフェース (ソース: https://lasergrbl.com/usage/user-interface/) Grbl リセット/原点復帰/アンロック ソフトリセット、原点復帰、アンロッ クコマンドをGrblボードに送信するボタ ンです。 アンロックボタンの右側には、いくつ かのカスタムボタンを追加することが できます。 左下隅に移動する プレビュー 画像をロードした後、このアイコンを クリックすると、彫刻位置のプレビュ ーが表示されます。 レーザーをオンにして焦点を合わせる レーザーを3%の出力でオンにして、焦 点を合わせます。 点滅 短パルスで10%の出力でレーザーをオ 2 3 4 5 ンにして、レーザースポットが視覚的 に定位できます。 オーバーライド状況と制御 実際のスピードとパワーオーバーライドを表示して変更します。オーバーライドはgrbl v1.1の新機能であり、旧バージョンではサ ポートされていません。 Feed HoldとResume grblボードにFeed HoldまたはResumeコマンドを送信することにより、プログラムの実行を中断、再開することができるボタン です。...
- Seite 66 ソフトウェアLaserGrbl & LightBurnの紹介 LaserGRBLでのラスター画像読み込むチュートリアル (ソース: https://lasergrbl.com/usage/raster-image-import/) 画像のインポート 「ファイルを開く」アイコンをクリックす るか、ファイルを直接ソフトウェアのイン ターフェースにドラッグします。 パラメータ インポートパラメーターを調整します。 変換ツール 画像の種類によって、変換ツールを使い分 けます。 目標画像のサイズとオプション : このダイアロ グから、最終的な画像サイズとオフセット、 レーザースピード、パワー、レーザーモードを 設定することができます。 彫刻速度 レーザーで画像が塗りつぶされる速度です。 レーザーオプション 2つのレーザーモードを切り替え、S-MIN "と 画像のサイズと位置 "S-MAX "でレーザーの出力を調整します。 画像サイズと彫刻位置を調整します。 作成 すべての設定を調整後、[作成]ボタンをクリックします。 注意: プレビュー LaserGRBLの使用方法の詳細について 「プレビュー」ボタンをクリックして、彫刻作品をプレビューします。 は、以下をご覧ください: 彫刻 Usage ‒ LaserGRBL 緑色の[再生]ボタンをクリックして、彫刻を始めます。...
- Seite 67 ソフトウェアLaserGrbl & LightBurnの紹介 LightBurn LightBurn Official Website: https://lightburnsoftware.com/...
- Seite 68 ソフトウェアLaserGrbl & LightBurnの紹介 セットアップ-LightBurn LightBurn レーザー彫刻および切断ソフトウェアLightburnと LaserGRBLが使用できます。 ステップ 1: LightBurnをインストールし、 プログラ ムを実行します。 このリンクを開くかスキャンして、 SainSmartからLightBurn GCode SCAN TO SHOP ライセンスキーを取得できます。 https://www.sainsmart.com/prod ucts/lightburn-gcode-license-key ステップ 2: 付属のUSBケーブルでPCとコントロ ールボードを接続します。 ステップ 3: Lightburnは30日間の無料トライア ルがあり、 その後下記のリンクでSainSmartから ライセンスキーを購入することができます。 https//www.sainsmart.com/products/lightbu rn-gcode-license-key ステップ 4: 「Find My Laser」 をクリックし、 「 Device Discovery Wizard」...
- Seite 69 ソフトウェアLaserGrbl & LightBurnの紹介 ステップ 5: 適切なCOMポートを選択し、 接続に成功すると、 コンソールウィンドウに 「Grbl 1.1f ['$' for help]」 と 「 Laser Ready」 というテキストが表示されます。...
- Seite 70 ソフトウェアLaserGrbl & LightBurnの紹介 ステップ 6: 「編集」 をクリックし、 「 デバイス設定」 を選択し、 基本設定の 「作業サイズ」 、 幅=500mm、 高さ=400mm、 「S値最大」 、 S=10000をチェックします。...
- Seite 71 ソフトウェアLaserGrbl & LightBurnの紹介 テストファイルを彫刻します-LightBurn ステップ 1: File→Open File: GCODEファイルまたは画像形式を開きます。 ステップ 2: 原点ゼロ位置 (スタートポイント) を設定します。...
- Seite 72 ソフトウェアLaserGrbl & LightBurnの紹介 ステップ 3: Spd/Pwr "ウィンドウをダブルクリックし、 レーザーの強度 (S値) と移動速度を設定します。 最大出力は10%〜100%に設定します。 素材によって必要な速度とパーセンテージは異なります。 パワースケールを 最低のテストパワー+10%に設定して、 ご希望の設定を模倣します。 それらのパワーとスピードを記録してください。 ステップ 4: 「スタート」 をクリックして彫刻を開始します。 詳しくは、 ドキュメント 「LightBurnDocs」 を参照してください。 保護メガネをかけてく ださい! レーザーをオンにしたまま、 このように置かないでく ださい。...
-
Seite 73: App ダウンロード & 紹介
APP ダウンロード & 紹介 1. APPダウンロード&インストール: 2. マシンに接続します: 本機を電源に接続し、電源を入れます。 方法 1: 次のQRコードをスキャンしてダウンロード します。 スマホのBluetooth通信機能をオンにします。 「Engraver」を開き、右上の「未接続」をクリックしま す。そして、アプリは接続可能なデバイスを検索しま す。 「Genmitsu LC-40」をクリックします。 数秒後に機械とスマホが接続されて、右上に「接続し ている」と表示されます。これで、アプリで彫刻作業 を始めることができます。 方法 2: SainSmartリソースセンターからダウンロー ドします。 https://docs.sainsmart.com/lc-40 ユーザーマニュアルや動画説明などのリソースもそ のページでダウンロードできます。 注意: インストールに成功したら、対応する権限を付与す る必要があります。... - Seite 74 APP ダウンロード & 紹介 ソフトインターフェース紹介 (コンテンツをロードします) ローラー設定 待機レーザーパワー メニュー 本機が彫刻作業しない 新人指導/質問のフィードバ ときに、レーザー出力 ック/利用規約/プライバシー を設定します ポリシー/デバイス/言語設定 ローラーモード 画像 ローラーモードを有効 ギャラリーから画像をイン /無効にします。有効 ポートします。 にすると、円柱状のオ カメラ ブジェクトを彫刻する カメラで撮影します。 ことができます。 素材 内蔵グラフィックスライブ ラリ 落書き 自分の作品を作成します。 文字 文字を追加します。 QR コード バーコードとQRコードを作 成します。...
- Seite 75 APP ダウンロード & 紹介 ソフトインターフェース紹介 (コンテンツをロードします) トリミング 画像をさまざまな形に切り取ることができ ます。 画像/文字 画像やカスタムテキストを追加できます。 文字入力 アルバムから カメラで 素材から写真を 画像を読み 撮影します 追加します 込みます 消しゴム 消しゴムで画像を調整します。 2 3...
- Seite 76 APP ダウンロード & 紹介 ソフトインターフェース紹介 (コンテンツをロードします) コントラスト コントラストスライダーを調節して、文字や画像のコントラストを上げたり下げたりす ることができます。 コントラスト16 コントラスト 50 コントラスト 80 白黒 画像を白黒に変換します。 中間調 画像をグレースケールバージョンに変換する。 輪郭 画像を輪郭図に変換します。 スケッチ 画像をスケッチ画に変換します。 1 グレースケール スケッチ 白黒 輪郭 回転 画像を90°、180°、360°回転させます。 反転 画像の色を反転させます。 2 3 4 5 6 7 ミラー 画像を水平または垂直に回転させます。...
- Seite 77 APP ダウンロード & 紹介 ソフトインターフェース紹介 (コンテンツをロードします) 幅 素材選択 画像の幅を調整しま アプリには、コルク、 す。 竹、布などの一般的な素 材の彫刻設定が組み込ま 高さ れています。 画像の高さを調整しま す。 材質を追加する カスタム素材とその彫刻 横縦比を固定する 設定(レーザー出力/彫 画像やテキストのサイ 刻速度)を追加します。 ズを変更する同時に、 相対的な幅と高さを保 レーザーパワー 持します。 パワーレベルを調整し て、異なる素材を彫刻す ゾーンロケーション ることができます。 2 レーザーヘッドが彫刻 エリアを中心に矩形に 彫刻の速度 動き、加工位置を明確 彫刻速度を設定します。 3 し、彫刻素材の位置を 彫刻の深さは彫刻速度に 2...
- Seite 78 APP ダウンロード & 紹介 ソフトインターフェース紹介 (コンテンツをロードします) 彫刻作業転送 保存 100%完了後、彫刻 アプリで編集した 1 を開始します。 画像をスマホに保 存します。 彫刻進度 彫刻の進行状況を表 彫刻完了 示します。 彫刻作業は完了し ています。 一時停止 彫刻を一時停止しま す。 停止 彫刻作業を停止しま す。 2 2 3 4...
-
Seite 79: Faq
I. 電源を入れることができません。 すべてのコンセント、スイッチ、電源ケーブルが正しく接続され、電源が入っていることを確認してください。必要 であれば、別の電源やケーブルを試してみてください。 II. パソコンに接続できません。 1. USBケーブルが接続されていません。データケーブルが正しく接続されていることを確認してください。一部のPC では、フロントUSBポートが彫刻機に十分な電力を供給していないことがあります。安定した接続のために、バック USBポートを使用することをお勧めします。 2.ドライバが正しくインストールされていません。説明書に従って、再度ドライバをインストールしてください。イン ストールが完了すると、パソコンんのOSが本機をシリアルポートとして認識できるようになります。パソコンのデバ イスマネージャでシリアルCOMポートを見つけることができます。 3. 上記の二つの方法で解決できない場合は、USBケーブルと電源コードを抜き、本機の電源を5秒以上切ってから、電 源を入れて、再度接続してみてください。 III. スマホのアプリで操作したとき、マシンが応答しません。 1. 間違ったマシンが接続されています。作業スペースに複数のマシンがある場合、正しいマシンに接続されているこ とを確認してください。 2. 互換性の問題です。 スマホのシステムを新しいバージョンに更新した際に、互換性の問題が発生する可能性があり ます。その場合は、遠慮なく弊社にご相談ください。お客様のシステム情報を確認のうえ、迅速にサポートします。 IV. 彫刻完成品がぼやけて、または影付きて見えます。 1. フォーカス:最も多い事例です。作業開始前にレーザーの焦点を正しく合わせてください。 2. 彫刻速度:彫刻速度が速過ぎると、レーザーが素材を十分に彫刻できません。彫刻の設定を調整し、再度彫刻して ください。... - Seite 80 3. 画質:インポートした画像の色が非常に薄い、または線が非常に細い場合、彫刻の品質に影響します。 4. 素材の位置:レーザーモジュールの焦点距離は固定されており、素材とマシンは平行になっている必要がありま す。素材の凹凸や傾斜は、彫刻の品質に影響します。 V. オフライン彫刻時に予期せぬ停止が発生します。 彫刻作業が完全に転送されていません。マシンを再接続し、再度彫刻作業を転送してください。 VI. 焦点がうまく合いません。 取扱説明書の「フォーカス」部分をよくお読みください。本機に付属のフォーカス工具を使用して焦点を合わせてく ださい。フォーカス工具がない場合は、厚さ5mmの白い厚紙で代用することができます。必要であれば、当社のサポ ートチームに連絡してください。詳しいサポートを受けることができます。...
- Seite 81 Inhaltsverzeichnis 1 – Warnhinweise 2 – Bestandeteile und Zubehör 3 – Aufbau des Geräts 4 – Technische Daten 5 – Fokussierung des Lasers 6 – Download sowie Installation von Treibern und Programmen 7 – Einführung in die Software für benutzerdefinierte PC-Gravuren 8 –...
-
Seite 82: Warnhinweise
1 - Warnhinweise Gehen Sie bei der Arbeit mit Lasergraviersystemen stets mit Bedacht und Vorsicht vor. Beachten Sie die aufgeführten Empfehlungen, um mögliche Risiken zu minimieren : ● Sie müssen mindestens 13 Jahre alt sein, um den Lasergravierer zu bedienen. ●... -
Seite 83: Bestandeteile Und Zubehör
2 - Bestandeteile und Zubehör Ansicht von vorne Ansicht von oben Rückwärtiges Modul X-Achsen Modul Fokussierungswerkzeug Rechtes Modul Laser-Augenschutzschild Laserkopf Laserkopf-Modul Vorderes Modul Linkes Modul Ansicht von hinten Ansicht von Rechts USB-Port für PC Spiralkabel 01 DC-Stromanschluss Rechtes Modul Spiralkabel 02 Interne Steuerbaugruppe USB-Anschluss für Rotationswalzen-Modul Offline-Gravur-Taste... - Seite 84 2 - Bestandeteile und Zubehör Rückwärtiges Modul, 1 stück Laserkopf-Modul, Laserkopf, Vorderes Modul, 1 stück 1 stück 1 stück X-Achsen Modul, 1 stück Verbindungsschrauben X-Achse Kabelschellen, für linkes und Verbindungsschraube, 6 stück rechtes Modul, 4 stück 8 stück Verbindungsschraube Federscheibe, X-Achsen Linkes Modul, Rechtes Modul,...
-
Seite 85: Aufbau Des Geräts
3 - Aufbau des Geräts Zubehör Netzteil * 1 USB-Datenkabel * 1 USB-Speicherstick * 1 Werkzeugsatz für die Bastelpapier * 4 Benutzerhandbuch * 1 Montage * 1 Laser-Schutzbrille * 1 Rotationswalzen- Modul für erhöhten (Optional) Modul (Optional) Stand (Optional) 1. Netzteil: Stromversorgung für die Graviermaschine. 2. - Seite 86 3 - Aufbau des Geräts Rückwärtiges Modul Rechtes Modul LinkesModul Vorderes Modul Verbindungsschrauben für linkes und rechtes Modul(S5) Montageschritt 01: 1. Verbinden Sie die Schrittmotorkabel für jeden Arm der Y-Achse - links (a) und rechts (b) - mit der hinteren Strebe (diese enthält die Steuerbaugruppe und die E/A-Anschlüsse);...
- Seite 87 3 - Aufbau des Geräts X-Achsen-Modul Kabel für Endschalter der X-Achse X-Achsen Verbindungsschraube(S7) Montageschritt 02-1: 1. Schließen Sie das Schrittmotorkabel und das Endschalterkabel des linken Moduls und des X-Achsen-Moduls an. 2. Legen Sie die Kabel gemäß der Skizze in die Kabelkanäle. 3.
- Seite 88 3 - Aufbau des Geräts Montageschritt 02-2: 1. Drücken Sie die Schieber auf beiden Seiten der Y-Achse (linkes Modul und rechtes Modul) wie abgebildet auf die Begrenzungsschrauben, um sicherzustellen, dass beide Schieber zueinander X-Achsen Verbindungsschraube(S7) ausgerichtet sind. X-Achsen Modul Begrenzung- 2.
- Seite 89 3 - Aufbau des Geräts Laserkopf-Modul Federscheibe(N6) Verbindungsschraube für Laserkopf-Modul(S10) Montageschritt 03: Richten Sie das X-Achsenmodul mit dem Laserkopf-Modul aus, setzen Sie die Sechskantverbindungsschrauben (02) ein und ziehen Sie die Schrauben mit einem 3 mm Sechskantschlüssel fest.
- Seite 90 3 - Aufbau des Geräts Kabelschelle 01 Kabelschelle 02 Kabelschelle 02 Kabelschelle Kabelschelle Kabelschelle Spiralkabel 01 Montageschritt 04: 1. Verbinden Sie das vordere Modul und das X-Achsenmodul mit dem Spiralkabel 01 und stecken Sie die Typ-C-Schnittstelle an jedes Modul. 2. Befestigen Sie das Spiralkabel 01 am rechten Modul. 3.
-
Seite 91: Technische Daten
4 - Technische Daten Model LC-40 Material Profil aus hochfester Aluminiumlegierung + Hochgeschwindigkeits-Linearführung + ABS-Kunststoff Laser-Kopf 5mm; Feste Entfernung Max. Z-Achse Materialhöhe 0.1-76mm Brennweite Stromversorgung DC005, DC12V/5A Datenschnittstelle USB Typ-B (quadratische USB-Schnittstelle) Kühlung Passiv+ Zwangsluftkühlung Maschinenleistung <60W Elektrische Laserleistung 10~20W (Standard); 20~40W (Erweiterungsfähig) Optische Laserleistung >4.5W (Standard);... -
Seite 92: Fokussierung Des Lasers
5 - Fokussierung des Lasers Anleitung zur Einstellung des Laserfokus: Hebeplattform Legen Sie das Fokussierwerkzeug auf das Graviermaterial und bewegen Sie den Schieber manuell nach oben und unten, um das Lasermodul bis an das Fokussierwerkzeug Drehen Sie den heranzuführen. Das Lasermodul ist nun fokussiert, und Sie Knopf gegen den können das Fokussierwerkzeug wieder in die Halterung Uhrzeigersinn,... -
Seite 93: Download Sowie Installation Von Treibern Und Programmen
6 - Download sowie Installation von Treibern und Programmen Download benötigter Ressourcen: Treiberinstallation unter Windows Methode 1: Treiber, Software, Beispielbild und Anweisungen befinden sich auf dem mitgelieferten USB-Stick (Hinweis: Wir empfehlen Ihnen, alle Dateien auf Ihren Computer zu kopieren, wenn Sie das Gerät zum ersten Mal benutzen, falls der USB-Stick verloren geht). - Seite 94 6 - Download sowie Installation von Treibern und Programmen 2. Software-Installation unter Windows : 3. Maschinenverbindung unter Windows : Speicherort der Datei : Verbinden Sie das Gerät über das USB-Kabel mit dem USB-Stick/windows/software/Laser_2.0.4(211018)/ Computer. Öffnen Sie die Gravursoftware - klicken Sie auf das Doppelklicken Sie auf das Dateisymbol, um den Installationsprozess zu starten.
- Seite 95 6 - Download sowie Installation von Treibern und Programmen 4. Treiberinstallation unter Mac OS: Klicken Sie auf “Continue” Computer-Passwort eingeben Klicken Sie auf Installation fortsetzen Installation abgeschlossen “Continue Installation” Speicherort der Datei : USB-Stick/02_MAC/driver/ CH34x_Install_V1.5.pkg/ Doppelklicken Sie auf das Paket (.pkg-Datei), um den Installationsassistenten für die Anwendung zu starten. Der Installationsassistent führt dann alle notwendigen Aufgaben aus, um den Treiber korrekt zu installieren.
-
Seite 96: Software-Installation Unter Mac Os
6 - Download sowie Installation von Treibern und Programmen 5. Software-Installation unter Mac OS: 6. Anschluss des Geräts: Doppelklicken Sie auf das Klicken Sie auf das Symbol Software-Symbol “connect device” Drag and drop the software Double click the .dmg file to the Application folder Anschließen des Geräts Das Gerät ist verbunden,... -
Seite 97: Einführung In Die Software Für Benutzerdefinierte Pc-Gravuren
7 - Einführung in die Software für benutzerdefinierte PC-Gravuren Benutzeroberfläche Open Fotos vom Computer laden. Save Speichern Sie die bearbeiteten Texte und Fotos. Input Text Erstellen/Bearbeiten von Text, Ändern der Schriftfamilie, des Schriftstils, der Schriftgröße und der Textdrehung usw. QR code QR-Code erstellen Bar Code Barcode erstellen... -
Seite 98: Gravur-Einstellungen
7 - Einführung in die Software für benutzerdefinierte PC-Gravuren Gravur-Einstellungen Engraving Power Passen Sie die Leistungsstufe an, um verschiedene Materialien zu gravieren. Engraving Speed Stellen Sie die Graviergeschwindigkeit ein. Diese bestimmt zugleich die Graviertiefe.. Contrast Stellen Sie den Konstrastregler ein, um den Text-/Fotokontrast zu erhöhen oder zu verringern. - Seite 99 7 - Einführung in die Software für benutzerdefinierte PC-Gravuren Gravur-Einstellungen Black and White Konvertieren Sie Ihr Bild in Schwarz-Weiß. Grayscale Wandeln Sie Ihr Bild in eine Graustufenversion um. Outline Wandeln Sie Ihr Bild in eine Umrisszeichnung um. Sketch Wandeln Sie Ihr Bild in eine Skizzenzeichnung um.
- Seite 100 7 - Einführung in die Software für benutzerdefinierte PC-Gravuren Gravur-Einstellungen X Reversal Drehen Sie Ihr Bild horizontal. Y Reversal Drehen Sie Ihr Bild vertikal. Reversal Invertieren Sie die Bildfarben Center Verschieben Sie Ihr Bild in die Mitte. Preview Location Der Laserkopf bewegt sich in einem Rechteck um die zu gravierende Stelle, um Ihnen bei der...
- Seite 101 7 - Einführung in die Software für benutzerdefinierte PC-Gravuren Benutzeroberfläche Nach dem Laden der Vorlage können Sie die Position der Vorlage mit der linken Maustaste verschieben, mit der rechten Maustaste können Sie die Zeichenfläche verschieben. Scrollen Sie mit dem Mausrad, um von der Mausposition aus zu vergrößern oder zu verkleinern.
-
Seite 102: Einführung In Die Lasergrbl & Lightburn Software
8 - Einführung in die LaserGrbl & LightBurn Software Laser GRBL Offizielle LaserGRBL-Website: https://lasergrbl.com/ Hinweis: Der Jinsoku LC-40 Lasergravierer unterstützt GRBL-Firmware und unsere selbstentwickelte Firmware. Sie können je nach Bedarf zwischen den verschiedenen Firmwares wechseln. Mit unserer benutzerdefinierten Firmware können Sie unsere Desktop-Software und Mobiltelefonanwendungen (für iOS und Android) verwenden,... - Seite 103 8 - Einführung in die LaserGrbl & LightBurn Software LaserGRBL Benutzeroberfläche (Source: https://lasergrbl.com/usage/user-interface/) Connection control Sie können den seriellen Anschluss und die richtige Baudrate für die Verbindung entsprechend der grbl-Firmware-Konfiguration auswählen. File control Hier werden der geladene Dateiname und der Fortschritt des Gravurvorgangs angezeigt.
- Seite 104 8 - Einführung in die LaserGrbl & LightBurn Software LaserGRBL Benutzeroberfläche (Source: https://lasergrbl.com/usage/user-interface/) Grbl reset/homing/unlock Diese Tasten senden Soft-Reset-, Homing- und Unlock-Befehle an das grbl-Board. Auf der rechten Seite der Entriegelungstaste können Sie einige benutzerdefinierte Tasten hinzufügen. In die linke untere Ecke gehen Einrahmung Nachdem das Foto geladen wurde, klicken Sie auf dieses Symbol, um eine...
- Seite 105 8 - Einführung in die LaserGrbl & LightBurn Software Raster Image Import Tutorial on LaserGRBL (Source: https://lasergrbl.com/usage/raster-image-import/) Bilder importieren Klicken Sie auf das Symbol "Datei öffnen" oder ziehen Sie die Datei direkt auf die Softwareoberfläche; Parameter Passen Sie die Importparameter an Konvertierungswerkzeuge Wählen Sie verschiedene Konvertierungswerkzeuge für verschiedene Bildtypen...
- Seite 106 8 - Einführung in die LaserGrbl & LightBurn Software LightBurn Offizielle LightBurn Website : https://lightburnsoftware.com/...
- Seite 107 8 - Einführung in die LaserGrbl & LightBurn Software Installation von LightBurn LightBurn Sie können die Lasergravier- und Schneidesoftware Lightburn oder LaserGBRL verwenden. Schritt 1: Installieren Sie LightBurn und führen Sie das Programm aus. Öffnen Sie den nachfolgenden Link oder scannen Sie den Barcode, um SCAN TO SHOP von SainSmart den LightBurn GCode-Lizenzschlüssel zu erhalten.
- Seite 108 8 - Einführung in die LaserGrbl & LightBurn Software Schritt 5: Wählen Sie den entsprechenden COM-Port aus. Bei erfolgreicher Verbindung sehen Sie im Konsolenfenster den Text "Grbl 1.1f ['$' for help] sowie die Anzeige "Laser Ready".
- Seite 109 8 - Einführung in die LaserGrbl & LightBurn Software Schritt 6 : Klicken Sie auf „Edit", wählen Sie " Device Settings ", überprüfen Sie die Grundeinstellungen, " Working Size ", Breite=500mm, Höhe=400mm, "S-Wert Max", S=10000.
- Seite 110 8 - Einführung in die LaserGrbl & LightBurn Software Gravieren der Testdatei mit LightBurn Schritt 1: „Datei“ → „Öffnen“: GCODE-Datei oder Datei im Bildformat öffnen Schritt 2: Setzen der Nullposition des Ursprungs (Ausgangspunkt)
- Seite 111 8 - Einführung in die LaserGrbl & LightBurn Software Schritt 3: Doppelklicken Sie auf das Fenster "Spd/Pwr", stellen Sie die Laserintensität (S-Wert) und die Fahrgeschwindigkeit ein. Die maximale Leistung sollte auf 10%-100% eingestellt werden. Je nach Material sind unterschiedliche Geschwindigkeiten und Prozentangaben erforderlich. Stellen Sie die Leistung auf die niedrigste Testleistung ein und erhöhen Sie diese in +10%-Schritten, bis Sie das gewünschte Ergebnis erzielen.
-
Seite 112: App-Download & Einführung
Öffnen Sie "Engraver" und klicken Sie auf "Keine Verbindung" in der oberen rechten Ecke. Die App sucht dann nach verfügbaren Geräten für die Verbindung. Klicken Sie dann auf "Genmitsu LC-40„‘ Das Gerät wird in wenigen Sekunden mit Ihrem Mobiltelefon verbunden. In der oberen rechten Ecke wird Methode 2: Download vom SainSmart Resources "Verbunden"... -
Seite 113: Einführung In Die Benutzeroberfläche Der Software (Inhalt Laden)
9 - APP-Download & Einführung Einführung in die Benutzeroberfläche der Software (Inhalt laden) Standby-Laserleistung Menü Stellen Sie die Leitfaden für Einsteiger, Laserleistung ein, wenn Feedback, Nutzungsvertrag, das Gerät keinen Datenschutzbestimmungen, Gravurauftrag hat. Gerät, Spracheinstellungen. Rotationswalzen-Betrieb Fotos Aktivieren/inaktivieren Sie Fotos aus der Galerie den Rotationswalzen- importieren. - Seite 114 9 - APP-Download & Einführung Einführung in die Benutzeroberfläche der Software (Inhalt laden) beschneiden Schneiden Sie Ihr Bild in verschiedenen Formen zu. Bild oder Text Fügen Sie zusätzliche Bilder und benutzerdefinierten Text zu Ihren Bildern hinzu. Text eingeben Fotos aus Aufnahme über Add Photo from Album laden...
- Seite 115 9 - APP-Download & Einführung Introduction to Software Interface (Load Content) Kontrast Stellen Sie den Kontrastregler ein, um den Text-/Fotokontrast zu erhöhen oder zu verringern. Kontrast 16 Kontrast 50 Kontrast 80 Schwarz/Weiß Konvertieren Sie Ihr Bild in Schwarz-Weiß Graustufen Ihr Bild in eine Graustufenversion umwandeln. Umriss Ihr Bild in eine Umrisszeichnung umwandeln.
- Seite 116 9 - APP-Download & Einführung Einführung in die Benutzeroberfläche der Software (Inhalt laden) Materialauswahl Breite Die App verfügt über Anpassen der Breite vorgegebene Ihres Bildes. Gravureinstellungen für Höhe gängige Materialien, Anpassen der Höhe wie Kork, Bambus, Stoff Ihres Bildes. usw. Seitenverhältnis Material hinzufügen sperren...
- Seite 117 9 - APP-Download & Einführung Einführung in die Benutzeroberfläche der Software (Inhalt laden) Gravurauftrag Speichern übertragen Speichern Sie das Beginnen Sie mit der Bild, das Sie mit Gravur, wenn 100% der App bearbeitet erreicht sind haben, auf Ihrem Mobiltelefon. Gravur-Fortschritt Gravur Anzeige des Gravurfortschritts...
-
Seite 118: Faq
10 - FAQ I. Das Gerät kann nicht eingeschaltet werden. Vergewissern Sie sich, dass alle Steckdosen, Schalter und Stromkabel richtig angeschlossen und eingeschaltet sind. Versuchen Sie ggf. eine andere Spannungsquelle oder ein anderes Kabel. II. Keine Verbindung zumComputer möglich. 1. USB-Kabel nicht angeschlossen: Vergewissern Sie sich, dass das USB-Kabel richtig eingesteckt ist. Bei einigen PCs erhält der vordere USB-Anschluss nicht genügend Strom für das Gravurgerät. - Seite 119 10 - FAQ 2. Graviergeschwindigkeit: Wenn Sie die Graviergeschwindigkeit zu hoch eingestellt haben, hat der Laser nicht genügend Zeit, um Ihr Werkstück zu bearbeiten. Passen Sie die Gravureinstellungen an und führen Sie die Gravur erneut durch. 3. Bildqualität: Wenn das Bild, das Sie importiert haben, sehr helle Farben und feine Linien hat, beeinträchtigt dies auch die Gravurqualität.
-
Seite 120: Ce-Konformitätszertifikat
11 - CE-Konformitätszertifikat... - Seite 121 Genmitsu Desktop CNC & Laser www.sainsmart.com support@sainsmart.com Vastmind LLC, 5892 Losee Rd Ste. 132, N. Las Vegas, NV 89081...