Herunterladen Inhalt Inhalt Diese Seite drucken
Klarstein SAINT HELENS STUDIO LOFT 2 Bedienungsanleitung

Klarstein SAINT HELENS STUDIO LOFT 2 Bedienungsanleitung

Elektrischer kamin
Inhaltsverzeichnis

Werbung

Verfügbare Sprachen
  • DE

Verfügbare Sprachen

  • DEUTSCH, seite 1
SAINT HELENS
STUDIO LOFT 2
Elektrischer Kamin
Fireplace Heater
Cheminée électrique
Camino elettrico
Chimenea eléctrica
10038007 10038615 10038616 10038617
10038618
www.klarstein.com
Hinweis: Dieses Produkt ist nur für gut isolierte Räume
oder für den gelegentlichen Gebrauch geeignet.
Note: This product is only suitable for well insulated
spaces or occasional use.
Advertencia: Este producto está indicado únicamente en
lugares abrigados o para una utilización punctual.
Remarque : Ce produit ne peut être utilisé que dans
des locaux bien isolés ou de manière occasionnelle.
Nota: Questo prodotto è adatto solo per spazi
ben isolati o uso occasionale.

Werbung

Inhaltsverzeichnis
loading

Inhaltszusammenfassung für Klarstein SAINT HELENS STUDIO LOFT 2

  • Seite 1 Cheminée électrique Camino elettrico Chimenea eléctrica 10038007 10038615 10038616 10038617 10038618 www.klarstein.com Hinweis: Dieses Produkt ist nur für gut isolierte Räume oder für den gelegentlichen Gebrauch geeignet. Note: This product is only suitable for well insulated spaces or occasional use.
  • Seite 3: Inhaltsverzeichnis

    Sehr geehrter Kunde, wir gratulieren Ihnen zum Erwerb Ihres Gerätes. Lesen Sie die folgenden Hinweise sorgfältig durch und befolgen Sie diese, um möglichen Schäden vorzubeugen. Für Schäden, die durch Missachtung der Hinweise und unsachgemäßen Gebrauch entstehen, übernehmen wir keine Haftung. Scannen Sie den folgenden QR-Code, um Zugriff auf die aktuellste Bedienungsanleitung und weitere Informationen rund um das Produkt zu erhalten.
  • Seite 4: Produktdatenblatt

    PRODUKTDATENBLATT Modellkennung(en) 10038007, 10038615, 10038616, 10038617, 10038618 Angabe Symbol Wert Einheit Angabe Einheit Wärmeleistung Nur bei elektrischen Speicher-Einzelraumheizgeräten: Art der Regelung der Wärmezufuhr Nennwärmeleistung 1,902 Manuelle Regelung der Wärmezufuhr mit k.A. integriertem Thermostat Mindestwärmeleistung 1,778 Manuelle Regelung der Wärmezufuhr k.A. (Richtwert) mit Rückmeldung der Raum- und/oder Außentemperatur...
  • Seite 5: Sicherheitshinweise

    SICHERHEITSHINWEISE • Prüfen Sie vor der Benutzung die Angabe zur Spannung auf dem Typenschild und schließen Sie das Gerät nur an Steckdosen an, die der Nennspannung des Geräts entsprechen. • Falls das Netzkabel beschädigt ist, lassen Sie es von einer ausgebildeten Fachkraft ersetzen. •...
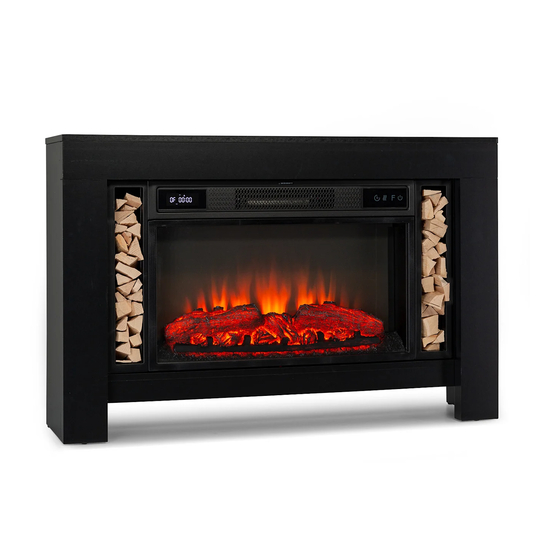
  • Seite 6: Geräteübersicht

    GERÄTEÜBERSICHT Vorderansicht Display Bedienfeld Hinweis: • Das Gerät kann sowohl mit der im Lieferumfang enthaltenen Fernbedienung als auch mit dem Bedienfeld, welches sich auf der rechten oberen Seite des Gerät befindet, verwendet werden. • Das Gerät verfügt über einen Netzschalter, über welchen die Stromzufuhr reguliert wird.
  • Seite 7: Displayanzeigen

    Rückansicht Hauptschalter DISPLAYANZEIGEN Timeranzeige F°/ C° Flammenanzeige Temperatur Heizanzeige Hintergrundeleuchtung Holz-Knistern Zeit Timermodus Auto-Modus Timer-Endzeit Wochentag Timer-Startzeit...
  • Seite 8: Inbetriebnahme Und Bedienung

    Hinweis: Wenn Sie den Kamin einschalten, leuchtet die Zeit auf. Nach 60 Sekunden geht der Kamin automatisch aus. Sie können ihn mit einer beliebigen Taste wieder einschalten. Die Hintergrundbeleuchtung und die Funktion „Holz-Knistern“ sind bei diesem Modell nicht verfügbar. INBETRIEBNAHME UND BEDIENUNG Manuelle Bedienung Timer Heizfunktion...
  • Seite 9: Beschreibung

    Verwendung der Fernbedienung Stellen Sie vor der Verwendung der Fernbedienung sicher, dass der Netzstecker des Geräts eingesteckt ist und dass sich der Netzschalter in der Position „ON“ befindet. Hinweis: Stellen Sie bei der Verwendung der Fernbedienung sicher, dass Sie die Fernbedienung auf den Bildschirm des Geräts ausrichten, wenn Sie eine der Tasten drücken.
  • Seite 10: Funktion

    Funktion Beschreibung Einstellung Wenn das Gerät eingeschaltet ist oder sich im Standby-Zustand befindet, halten Sie das Einstellungssymbol auf der Fernbedienung 3 Sekunden lang gedrückt oder drücken Sie die Timer-Taste auf dem Bedienfeld im Standby-Zustand 3 Sekunden lang. Die Anzeige [00:00] blinkt. Stellen Sie zuerst die aktuelle Uhrzeit ein.
  • Seite 11 Wichtige Hinweise zum Batteriewechsel • Alte und neue Batterien dürfen nicht gemischt werden. • Verwenden Sie nur Standard AAA-Batterien. Achten Sie darauf, dass Kinder die Batterien nicht verschlucken. • Nicht-aufladbare Batterien dürfen nicht wieder aufgeladen werden. • Setzen Sie die Batterien mit korrekter Polarität ein (siehe Abbildung).
  • Seite 12: Einzelteile-Übersicht (10038007)

    EINZELTEILE-ÜBERSICHT (10038007) Teileliste Beschreibung Stk. Linke Box Rechte Box Elektrischer Kamin Kleinteile Beschreibung Stk. Schraube (M4x8)
  • Seite 13: Zusammenbau (10038007)

    ZUSAMMENBAU (10038007)
  • Seite 14: Einzelteile-Übersicht (10038615 &10038616)

    EINZELTEILE-ÜBERSICHT (10038615 &10038616)
  • Seite 15 Teileliste Beschreibung Stk. Obere Platte Untere Platte Linke Seitebplatte Vordere Platte Linke vordere Platte Rechte vordere Platte Linke Blende Rechte Blende Linke Box Rechte Box Elektrischer Kamin Rechte Seitenplatte Kleinteile Beschreibung Stk. Metallbolzen 17+1 Metallnocke 17+1 Dübel 18+1 Lange Schraube 10+1 Schraube 16+1...
  • Seite 16: Vor Dem Zusammenbau (10038615 &10038616)

    VOR DEM ZUSAMMENBAU (10038615 &10038616)
  • Seite 17: Zusammenbau (10038615 &10038616)

    ZUSAMMENBAU (10038615 &10038616)
  • Seite 21 Setzen Sie den Elektrischen Kamin in den Mantel. Befestigen Sie den Elektrischen Kamin mit 6 Schrauben ST4x10.
  • Seite 22: Einzelteile-Übersicht (10038617 & 10038618)

    EINZELTEILE-ÜBERSICHT (10038617 & 10038618)
  • Seite 23 Teileliste Beschreibung Stk. Obere Platte Untere Platte Linke Seitenplatte Rechte Seitenplatte Bodenplatten Obere Platte Linke Platte Rechte Platte Linke Box Rechte Box Elektrischer Kamin Kleinteile Beschreibung Stk. Metallbolzen 32+1 Metallnocke 32+1 Dübel 23+1 Gewindeschraube ST4x10 16+1...
  • Seite 24: Vor Dem Zusammenbau (10038617 & 10038618)

    VOR DEM ZUSAMMENBAU (10038617 & 10038618)
  • Seite 25: Zusammenbau (10038617 & 10038618)

    ZUSAMMENBAU (10038617 & 10038618)
  • Seite 30 Setzen Sie den Elektrischen Kamin in den Mantel. Befestigen Sie den Elektrischen Kamin mit 6 Schrauben ST4x10.
  • Seite 31: Fehlerbehebung

    FEHLERBEHEBUNG Problem Mögliche Ursache Lösungsansatz Auf dem Bildschirm wird Kurzschluss. Kontaktieren Sie den „EE“ angezeigt. Kundendienst, damit der Thermostatsensor ausgetauscht wird Auf dem Bildschirm wird Es wird keine warme Luft Bringen Sie den „88“ angezeigt. ausgeblasen und der Netzschalter in die Ventilator funktioniert Position „off“...
  • Seite 32 Problem Mögliche Ursache Lösungsansatz Es wird keine warme Luft Abkühlzyklus Der normale Betrieb wird ausgeblasen. vor dem Ausschalten für einige Minuten fortgesetzt. Die Zeit hängt von der aktuellen Temperatur ab. Während dieser Zeit wird kalte Luft ausgeblasen. Die Thermostateinstellung Passen Sie die verhindert, dass die Temperatureinstellung so Heizfunktion aktiviert...
  • Seite 33 Problem Mögliche Ursache Lösungsansatz Die Fernbedienung Keine Batterien. Ersetzen Sie die Batterien funktioniert nicht, wenn Schlechte Achten Sie darauf, dass Tasten gedrückt werden. Signalübertragung. die Entfernung zwischen Transmitter und Receiver nicht zu groß ist. Drücken Sie die Tasten der Fernbedienung mit einer gleichmäßigen Bewegung und sanftem Druck.
  • Seite 34: Spezielle Entsorgungshinweise Für Verbraucher In Deutschland

    SPEZIELLE ENTSORGUNGSHINWEISE FÜR VERBRAUCHER IN DEUTSCHLAND Entsorgen Sie Ihre Altgeräte fachgerecht. Dadurch wird gewährleistet, dass die Altgeräte umweltgerecht verwertet und negative Auswirkungen auf die Umwelt und menschliche Gesundheit vermieden werden. Bei der Entsorgung sind folgende Regeln zu beachten: • Jeder Verbraucher ist gesetzlich verpflichtet, Elektro- und Elektro- nikaltgeräte (Altgeräte) sowie Batterien und Akkus getrennt vom Hausmüll zu entsorgen.
  • Seite 35 • Bei einem Vertrieb unter Verwendung von Fernkommunikationsmitteln ist die unentgeltliche Abholung am Ort der Abgabe auf Elektro- und Elektronikgeräte der Kategorien 1, 2 und 4 gemäß § 2 Abs. 1 ElektroG, nämlich „Wärmeüberträger“, „Bildschirmgeräte“ (Oberfläche von mehr als 100 cm²) oder „Großgeräte“ (letztere mit mindestens einer äußeren Abmessung über 50 Zentimeter) beschränkt.
  • Seite 36: Hinweise Zur Entsorgung

    HINWEISE ZUR ENTSORGUNG Wenn es in Ihrem Land eine gesetzliche Regelung zur Entsorgung von elektrischen und elektronischen Geräten gibt, weist dieses Symbol auf dem Produkt oder auf der Verpackung darauf hin, dass dieses Produkt nicht im Hausmüll entsorgt werden darf. Stattdessen muss es zu einer Sammelstelle für das Recycling von elektrischen und elektronischen Geräten gebracht werden.
  • Seite 37: Technical Data

    Dear customer, Congratulations on the purchase of your device. Please read the following instructions carefully and follow them to prevent potential damage. We accept no liability for damage caused by disregarding the instructions and improper use. Please scan the QR code to access the latest operating instructions and further information about the product.
  • Seite 38: Product Data Sheet

    PRODUCT DATA SHEET Model identifier(s) 10038007, 10038615, 10038616, 10038617, 10038618 Specification Symbol Value Unit Specification Unit Heat output Only for electric storage room heaters: Type of heat supply control Nominal heat output 1.902 Manual control of the heat supply with integrated thermostat Minimum heat output (guide 1.778...
  • Seite 39: Safety Instructions

    SAFETY INSTRUCTIONS • Before use, check the voltage information on the rating plate and only connect the device to sockets that correspond to the nominal voltage of the device. • If the power cord is damaged, have it replaced by a trained professional. •...
  • Seite 40: Device Overview

    DEVICE OVERVIEW Front view Display Control panel Note: • The unit can be used with the remote control included with delivery as well as with the control panel, which is located on the upper right side of the unit. • The unit has a mains switch that regulates the power supply. The power switch must be in the "On"...
  • Seite 41: Display Indications

    Rear view Main switch DISPLAY INDICATIONS Timer display F°/ C° Flame indicator Temperature Heating display Background lighting Wood crackle Time Timer mode Auto mode Timer end time Day of the week Timer start time...
  • Seite 42: Setup And Operation

    Note: When you switch on the fireplace, the time lights up. After 60 seconds, the fireplace switches off automatically. You can switch it on again with any button. The backlight and the "wood crackle" function are not available on this model. SETUP AND OPERATION Manual operation Heating...
  • Seite 43 Using the remote control Before using the remote control, make sure that the mains plug of the unit is plugged in and that the mains switch is in the "ON" position. Note: When using the remote control, make sure that you point the remote control at the screen of the unit when pressing any of the buttons.
  • Seite 44 Function Description Setting When the unit is on or in standby, press and hold the settings icon on the remote control for 3 seconds or press and hold the timer button on the control panel for 3 seconds in standby. The display flashes [00:00].
  • Seite 45 Important information about changing the batteries • Old and new batteries must not be mixed. • Only use standard AAA batteries. Make sure that children do not swallow the batteries. • Non-rechargeable batteries must not be recharged. • Insert the batteries with correct polarity (see illustration).
  • Seite 46: Individual Parts Overview (10038007)

    INDIVIDUAL PARTS OVERVIEW (10038007) Parts list Description Left box Right box Electric fireplace Small parts Description Screw (M4x8)
  • Seite 47: Assembly (10038007)

    ASSEMBLY (10038007)
  • Seite 48: Individual Parts Overview (10038615 &10038616)

    INDIVIDUAL PARTS OVERVIEW (10038615 &10038616)
  • Seite 49 Parts list Description Upper plate Lower plate Left side plate Front plate Left front plate Right front panel Left panel Right panel Left box Right box Electric fireplace Right side panel Small parts Description Metal stud 17+1 Metal stud 17+1 Dowel 18+1 Long screw...
  • Seite 50: Before Assembly (10038615 &10038616)

    BEFORE ASSEMBLY (10038615 &10038616)
  • Seite 51: Assembly (10038615 &10038616)

    ASSEMBLY (10038615 &10038616)
  • Seite 55 Place the electric fireplace in the mantle. Fasten the electric fireplace with 6 screws ST4x10.
  • Seite 56: Individual Parts Overview (10038617 & 10038618)

    INDIVIDUAL PARTS OVERVIEW (10038617 & 10038618)
  • Seite 57 Parts list Description Upper plate Lower plate Left side plate Right side plate Bottom plate Upper plate Left plate Right plate Left box Right box Electric fireplace Small parts Description Metal bolts 32+1 Metal pins 32+1 Dowel 23+1 Threaded bolt ST4x10 16+1...
  • Seite 58: Before Assembly (10038617 & 10038618)

    BEFORE ASSEMBLY (10038617 & 10038618)
  • Seite 59: Assembly (10038617 & 10038618)

    ASSEMBLY (10038617 & 10038618)
  • Seite 64 Place the electric fireplace in the jacket. Fasten the electric fireplace with 6 screws ST4x10.
  • Seite 65: Troubleshooting

    TROUBLESHOOTING Problem Possible cause Solution "EE" is displayed on the Short circuit Contact customer service screen. to have the thermostat sensor replaced "88" is displayed on the No warm air is blowing Set the power switch to screen. out and the fan is not the "off"...
  • Seite 66 Problem Possible cause Solution No warm air is blowing Cooling cycle Normal operation out. continues for a few minutes before switching off. The time depends on the current temperature. During this time, cold air is blown out. The thermostat setting Adjust the temperature prevents the heating setting so that the...
  • Seite 67 Problem Possible cause Solution The remote control does No batteries. Replace the batteries. not work when buttons are Poor signal transmission. Make sure that the pressed. distance between transmitter and receiver is not too great. Press the buttons on the remote control with a smooth movement and gentle pressure.
  • Seite 68: Disposal Considerations

    DISPOSAL CONSIDERATIONS If there is a legal regulation in your country regarding the disposal of electrical and electronic equipment, this symbol on the product or on the packaging indicates that this product must not be disposed of with household waste. Instead, it must be taken to a collection point for the recycling of electrical and electronic equipment.
  • Seite 69: Datos Técnicos

    Estimado cliente: Le felicitamos por la adquisición de este producto. Lea atentamente el siguiente manual y siga cuidadosamente las instrucciones de uso con el fin de evitar posibles daños. La empresa no se responsabiliza de los daños ocasionados por un uso indebido del producto o por haber desatendido las indicaciones de seguridad.
  • Seite 70: Ficha Del Producto

    FICHA DEL PRODUCTO Denominación(es) del 10038615, 10038616, 10038617, 10038618 modelo Datos Símbolo Valor Unidad Datos Unidad Potencia calorífica Solo en calefactores eléctricos para habitaciones individuales: tipo de regulación del suministro de calor Potencia calorífica nominal 1,902 Regulación manual del suministro calorífico con n /A termostato integrado Potencia calorífica mínima...
  • Seite 71: Indicaciones De Seguridad

    INDICACIONES DE SEGURIDAD • Antes de su utilización, compruebe la tensión indicada en la placa técnica del aparato y conéctelo solamente a tomas de corriente con la misma tensión. • Si el cable de alimentación está dañado, contacte con un servicio técnico cualifi cado para su sustitución.
  • Seite 72: Vista General Del Aparato

    VISTA GENERAL DEL APARATO Vista frontal Pantalla Panel de control Nota: • La unidad puede utilizarse con el mando a distancia incluido en el envío, así como con el panel de control, que se encuentra en la parte superior derecha de la unidad.
  • Seite 73: Indicadores De Visualización

    Vista trasera Interruptor principal INDICADORES DE VISUALIZACIÓN Indicador del temporizador F°/ C° Indicador de llama Temperatura Indicador de Iluminación de fondo calefacción Crujido de la madera Tiempo Modo temporizador Modo auto Día de la semana Fin del temporizador Comienzo del temporizador...
  • Seite 74: Puesta En Marcha Y Funcionamiento

    Nota: Al encender la chimenea, la hora se ilumina. Después de 60 segundos, la chimenea se apaga automáticamente. Puedes volver a encenderlo con cualquier tecla. La luz de fondo y la función de "crujido de madera" no están disponibles en este modelo.
  • Seite 75 Funcionamiento del mando a distancia Antes de utilizar el mando a distancia, asegúrese de que la clavija de red del aparato está enchufada y que el interruptor de red está en la posición "ON". Nota: Cuando utilice el mando a distancia, asegúrese de que apunta a la pantalla de la unidad cuando pulse cualquiera de los botones.
  • Seite 76 Función Descripción Ajustes Cuando la unidad esté encendida o en espera, mantenga pulsado el icono de ajustes del mando a distancia durante 3 segundos o pulse el botón del temporizador en el panel de control durante 3 segundos en espera. El indicador [00:00] parpadea.
  • Seite 77 Indicaciones importantes sobre el cambio de las baterías • Las pilas viejas y las nuevas no deben mezclarse. • Utiliza sólo pilas AAA estándar. Asegúrese de que los niños no se traguen las pilas . • Las pilas no recargables no deben ser recargadas.
  • Seite 78: Resumen De Piezas Individuales (10038007)

    RESUMEN DE PIEZAS INDIVIDUALES (10038007) Lista de piezas Núm. Descripción Uds. Compartimento izquierdo Compartimento derecho Chimenea eléctrica Piezas pequeñas Descripción Uds. Tornillo (M4x8)
  • Seite 79: Montaje (10038007)

    MONTAJE (10038007)
  • Seite 80: Resumen De Piezas Individuales (10038615 &10038616)

    RESUMEN DE PIEZAS INDIVIDUALES (10038615 &10038616)
  • Seite 81 Lista de piezas Núm. Descripción Uds. Bandeja superior Bandeja inferior Panel lateral izquierdo Placa frontal Placa frontal izquierda Placa frontal derecha Apertura izquierda Apertura derecha Compartimento izquierdo Compartimento derecho Chimenea eléctrica Repisa derecha Piezas pequeñas Núm. Descripción Uds. Perno metálico 17+1 Cámara metálica 17+1...
  • Seite 82: Antes Del Montaje (10038615 &10038616)

    ANTES DEL MONTAJE (10038615 &10038616)
  • Seite 83: Montaje (10038615 &10038616)

    MONTAJE (10038615 &10038616)
  • Seite 87 Coloca la chimenea eléctrica en el manto. Fije la chimenea eléctrica con 6 tornillos ST4x10.
  • Seite 88: Resumen De Piezas Individuales (10038617 & 10038618)

    RESUMEN DE PIEZAS INDIVIDUALES (10038617 & 10038618)
  • Seite 89 Lista de piezas Núm. Descripción Uds. Bandeja superior Bandeja inferior Repisa izquierda Repisa derecha Placa base Bandeja superior Placa izquierda Placa derecha Compartimento izquierdo Compartimento derecho Chimenea eléctrica Piezas pequeñas Núm. Descripción Uds. Perno metálico 32+1 Cámara metálica 32+1 Taco 23+1 Perno roscado ST4x10 16+1...
  • Seite 90: Antes Del Montaje (10038617 & 10038618)

    ANTES DEL MONTAJE (10038617 & 10038618)
  • Seite 91: Montaje (10038617 & 10038618)

    MONTAJE (10038617 & 10038618)
  • Seite 96 Coloca la chimenea eléctrica en el manto. Fije la chimenea eléctrica con 6 tornillos ST4x10.
  • Seite 97: Reparación De Anomalías

    REPARACIÓN DE ANOMALÍAS Anomalía Posible causa Posible solución En pantalla aparece "EE". Cortocircuito Póngase en contacto con el servicio de atención al cliente para que le sustituyan el sensor del termostato En la pantalla aparece No sale aire caliente y el Coloque el interruptor de «88».
  • Seite 98 Anomalía Posible causa Posible solución No se expulsa aire Ciclo de enfriamiento El funcionamiento caliente. normal continúa durante unos minutos antes de apagarse. El tiempo depende de la temperatura a la que esté. Durante ese tiempo se expulsa aire frío. El ajuste del termostato Ajuste la temperatura para impide que se active la...
  • Seite 99 Anomalía Posible causa Posible solución El mando a distancia Sin pilas. Cambie las pilas. no funciona cuando se Mala transmisión de la Asegúrate de que pulsan los botones. señal. la distancia entre el transmisor y el receptor no es demasiado grande. Pulsa los botones del mando a distancia con un movimiento suave y con...
  • Seite 100: Indicaciones Sobre La Retirada Del Aparato

    INDICACIONES SOBRE LA RETIRADA DEL APARATO Si en su país existe una disposición legal relativa a la eliminación de aparatos eléctricos y electrónicos, este símbolo estampado en el producto o en el embalaje advierte de que no debe eliminarse como residuo doméstico. En lugar de ello, debe depositarse en un punto de recogida de reciclaje de aparatos eléctricos y electrónicos.
  • Seite 101: Fiche Technique

    Cher client, chère cliente, Toutes nos félicitations pour l’acquisition de ce nouvel appareil. Lisez attentivement les indications suivantes et suivez-les pour éviter d'éventuels dommages. Nous ne saurions être tenus pour responsables des dommages dus au non-respect des consignes et à la mauvaise utilisation de l’appareil. Scannez le QR-Code pour obtenir la dernière version du mode d'emploi ainsi que d'autres informations concernant le produit.
  • Seite 102: Fiche De Données Produit

    FICHE DE DONNÉES PRODUIT Référence(s) du modèle 10038007, 10038615, 10038616, 10038617, 10038618 Donnée Symbole Valeur Unité Donnée Unité Puissance thermique Uniquement pour les radiateurs électriques à accumulation : type de contrôle de l'apport de chaleur Puissance thermique nominale 1,902 Contrôle manuel de l'apport de chaleur avec un n.c.
  • Seite 103: Consignes De Sécurité

    CONSIGNES DE SÉCURITÉ • Avant utilisation, vérifi ez la tension sur l'étiquette de l'appareil et connectez l'appareil uniquement à des prises qui correspondent à sa tension. • Si le cordon d'alimentation est endommagé, faites-le remplacer par un spécialiste qualifi é. •...
  • Seite 104: Descriptif De L'appareil

    DESCRIPTIF DE L'APPAREIL Vue de face Écran Panneau de commande Remarque : • L'appareil peut s'utiliser aussi bien avec la télécommande fournie avec l'appareil qu'avec le panneau de commande situé en haut à droite de l'appareil. • L'appareil dispose d'un interrupteur pour régler l'alimentation électrique. L'interrupteur d'alimentation doit être en position «...
  • Seite 105: Voyants À L'écran

    Vue arrière Interrupteur principal VOYANTS À L'ÉCRAN Affichage de la minuterie F°/ C° Indicateur de flamme Indicateur de Température Rétro-éclairage chauffage Crépitement du bois Heure Mode minuterie Heure de fin de la Mode auto Jour de semaine minuterie Heure de début de la minuterie...
  • Seite 106: Mise En Marche Et Utilisation

    Remarque : Lorsque vous allumez la cheminée, l'heure s'allume. Après 60 secondes, la cheminée s'éteint automatiquement. Vous pouvez la rallumer en appuyant sur n'importe quelle touche. Le rétroéclairage et la fonction « crépitement du bois » ne sont pas disponibles sur ce modèle. MISE EN MARCHE ET UTILISATION Fonctionnement manuel Minuterie...
  • Seite 107 Utilisation de la télécommande Avant d'utiliser la télécommande, assurez-vous que la fiche d'alimentation de l'appareil est branchée et que l'interrupteur d'alimentation est en position « ON ». Remarque : Lorsque vous utilisez la télécommande, dirigez-la vers l'écran de l'appareil avant d'appuyer sur une touche. Un bip retentit. Il peut y avoir un léger retard dans la transmission du signal de l'émetteur au récepteur.
  • Seite 108 Fonction Description Paramétrage Lorsque l'appareil est allumé ou en mode veille, maintenez l'icône de réglage de la télécommande pendant 3 secondes ou appuyez sur la touche de minuterie du panneau de commande pendant 3 secondes en mode veille. L'affichage [00:00] clignote.
  • Seite 109 Remarques importantes sur le remplacement des piles • Ne mélangez pas des piles usagées et neuves. • N'utilisez que des piles AAA standard. Veillez à ce que les enfants n'avalent pas les piles. • Les piles non rechargeables ne doivent pas être rechargées.
  • Seite 110: Aperçu Des Pièces Détachées (10038007)

    APERÇU DES PIÈCES DÉTACHÉES (10038007) Liste des pièces N° Description Qté Boîte de gauche Boîte de droite Cheminée électrique Petites pièces N° Description Qté Vis (M4x8)
  • Seite 111: Assemblage (10038007) 1

    ASSEMBLAGE (10038007)
  • Seite 112: Aperçu Des Pièces Détachées (10038615 &10038616)

    APERÇU DES PIÈCES DÉTACHÉES (10038615 &10038616)
  • Seite 113 Liste des pièces N° Description Qté Plaque supérieure Plaque inférieure Plaque latérale gauche Plaque avant Plaque avant gauche Plaque avant droite Panneau gauche Panneau droit Boîte de gauche Boîte de droite Cheminée électrique Plaque latérale droite Petites pièces N° Description Qté...
  • Seite 114 AVANT L'ASSEMBLAGE (10038615 &10038616)
  • Seite 115: Assemblage (10038615 &10038616)

    ASSEMBLAGE (10038615 &10038616)
  • Seite 119 Placez la cheminée électrique dans le manteau. Fixez la cheminée électrique avec 6 vis ST4x10.
  • Seite 120: Aperçu Des Pièces Détachées (10038617 & 10038618)

    APERÇU DES PIÈCES DÉTACHÉES (10038617 & 10038618)
  • Seite 121 Liste des pièces N° Description Qté Plaque supérieure Plaque inférieure Plaque latérale gauche Plaque latérale droite Plaque de fond Plaque supérieure Plaque gauche Plaque droite Boîte de gauche Boîte de droite Cheminée électrique Petites pièces N° Description Qté Boulons métalliques 32+1 Came métallique 32+1...
  • Seite 122: Avant L'assemblage (10038617 & 10038618)

    AVANT L'ASSEMBLAGE (10038617 & 10038618)
  • Seite 123: Assemblage (10038617 & 10038618)

    ASSEMBLAGE (10038617 & 10038618)
  • Seite 128 Placez la cheminée électrique dans le manteau. Fixez la cheminée électrique avec 6 vis ST4x10.
  • Seite 129: Résolution Des Problèmes

    RÉSOLUTION DES PROBLÈMES Problème Cause possible Solution L'écran affiche « EE ». Court-circuit. Contactez le service clientèle pour faire remplacer le capteur de thermostat L'écran affiche « 88 ». Aucun air chaud n'est Placez l'interrupteur expulsé et le ventilateur ne d'alimentation sur la fonctionne pas.
  • Seite 130 Problème Cause possible Solution Aucun air chaud n'est Cycle de refroidissement Le fonctionnement normal expulsé. se poursuit pendant quelques minutes avant l'extinction. La durée dépend de la température actuelle. Pendant ce temps, de l'air froid est expulsé. Le réglage du thermostat Ajustez le réglage de la empêche l'activation de la température pour que le...
  • Seite 131 Problème Cause possible Solution La télécommande ne Pas de piles. Remplacez les piles. fonctionne pas lorsque l'on Mauvaise transmission du Veillez à ce que la appuie sur les touches. signal. distance entre l'émetteur et le récepteur ne soit pas trop grande. Appuyez sur les touches de la télécommande d'un mouvement régulier et...
  • Seite 132: Informations Sur Le Recyclage

    INFORMATIONS SUR LE RECYCLAGE Si l'élimination des appareils électriques et électroniques est réglementée dans votre pays, ce symbole sur le produit ou sur l'emballage indique qu'il ne doit pas être mis au rebut avec les ordures ménagères. Vous devez l'acheminer vers un point de collecte pour le recyclage des appareils électriques et électroniques.
  • Seite 133 Gentile cliente, La ringraziamo per l'acquisto del dispositivo. La preghiamo di leggere attentamente le seguenti indicazioni e di seguirle per prevenire eventuali danni. Non ci assumiamo alcuna responsabilità per danni scaturiti da una mancata osservanza delle avvertenze di sicurezza e da un uso improprio del dispositivo.
  • Seite 134: Scheda Informativa Del Prodotto

    SCHEDA INFORMATIVA DEL PRODOTTO Contrassegno/i del modello 10038007, 10038615, 10038616, 10038617, 10038618 Indicazione Simbolo Valore Unità Indicazione Unità Potenza termica Solo per dispositivi elettrici di accumulo di calore per locali singoli: tipo di regolazione dell'afflusso di calore Potenza termica nominale 1,902 Controllo manuale dell'apporto termico con n.d.
  • Seite 135: Avvertenze Di Sicurezza

    AVVERTENZE DI SICUREZZA • Prima dell'utilizzo verifi care la tensione sulla targhetta del dispositivo e collegarlo solo a prese che abbiano la stessa tensione. • Se il cavo d'alimentazione è danneggiato, farlo sostituire da un tecnico qualifi cato. • Non posizionare il camino direttamente sotto la presa elettrica. •...
  • Seite 136: Descrizione Del Prodotto

    DESCRIZIONE DEL PRODOTTO Lato anteriore Display Pannello di controllo Nota: • Il dispositivo può essere controllato con il telecomando in dotazione e con l'apposito pannello situato in alto a destra. • Il dispositivo è dotato di un interruttore di rete con cui regolare l'afflusso di corrente. Per poter utilizzare il dispositivo, l'interruttore deve trovarsi in posizione "On"...
  • Seite 137: Indicazioni Del Display

    Lato posteriore Interruttore principale INDICAZIONI DEL DISPLAY Indicazione del timer F°/C° Indicazione della fiamma Indicazione del Temperatura Retroilluminazione riscaldamento Scoppiettio del legno Tempo Modalità timer Timer di spegnimento Giorno settimanale Modalità automatica automatico Timer di avvio automatico...
  • Seite 138: Messa In Funzione E Utilizzo

    Nota: quando si accende il camino, si illumina l'ora. Dopo 60 secondi il camino si spegne automaticamente. Può essere riacceso con un tasto a piacere. La retroilluminazione e la funzione "Scoppiettio del legno" non sono disponibili per questo modello. MESSA IN FUNZIONE E UTILIZZO Utilizzo manuale Timer Fiamma...
  • Seite 139 Utilizzo del telecomando Prima di utilizzare il telecomando, assicurarsi che la spina del dispositivo sia inserita e che l'interruttore si trovi in posizione "ON". Nota: quando si utilizza il telecomando, assicurarsi di puntarlo direttamente verso lo schermo del dispositivo quando si preme un tasto. Viene emesso un segnale acustico.
  • Seite 140 Funzione Descrizione Impostazioni Se il dispositivo è acceso o in standby, tenere premuta per tre secondi l'icona delle impostazioni sul telecomando o premere il tasto del timer sul pannello di controllo a dispositivo in standby per 3 secondi. L'indicazione [00:00] lampeggia. Impostare l'ora corrente.
  • Seite 141 Note importanti per cambiare le batterie • Non mischiare batterie vecchie e nuove. • Usare solo batterie AAA standard. Assicurarsi che i bambini non ingeriscano le batterie. • Le batterie non ricaricabili non devono essere ricaricate. • Rispettare sempre la corretta polarità (v. immagine).
  • Seite 142: Descrizione Delle Singole Parti (10038007)

    DESCRIZIONE DELLE SINGOLE PARTI (10038007) Lista delle parti Descrizione Box sinistra Box destra Camino elettrico Componenti di piccole dimensioni Descrizione Vite (M4x8)
  • Seite 143: Montaggio (10038007)

    MONTAGGIO (10038007)
  • Seite 144: Descrizione Delle Singole Parti (10038615 &10038616)

    DESCRIZIONE DELLE SINGOLE PARTI (10038615 &10038616)
  • Seite 145 Lista delle parti Descrizione Pannello superiore Pannello inferiore Pannello laterale sinistro Pannello anteriore Pannello anteriore sinistro Pannello anteriore destro Copertura sinistra Copertura destra Box sinistra Box destra Camino elettrico Pannello laterale destro Componenti di piccole dimensioni Descrizione Bulloni di metallo 17+1 Camme di metallo 17+1...
  • Seite 146: Prima Del Montaggio (10038615 &10038616)

    PRIMA DEL MONTAGGIO (10038615 &10038616)
  • Seite 147: Montaggio (10038615 &10038616)

    MONTAGGIO (10038615 &10038616)
  • Seite 151 Posizionare il camino nel rivestimento. Fissare il camino elettrico con 6 viti ST4x10.
  • Seite 152: Descrizione Delle Singole Parti (10038617 & 10038618)

    DESCRIZIONE DELLE SINGOLE PARTI (10038617 & 10038618)
  • Seite 153 Lista delle parti Descrizione Pannello superiore Pannello inferiore Pannello laterale sinistro Pannello laterale destro Pannello di base Pannello superiore Pannello sinistro Pannello destro Box sinistra Box destra Camino elettrico Componenti di piccole dimensioni Descrizione Bulloni di metallo 32+1 Camme di metallo 32+1 Tasselli 23+1...
  • Seite 154: Prima Del Montaggio (10038617 & 10038618)

    PRIMA DEL MONTAGGIO (10038617 & 10038618)
  • Seite 155: Montaggio (10038617 & 10038618)

    MONTAGGIO (10038617 & 10038618)
  • Seite 160 Posizionare il camino nel rivestimento. Fissare il camino elettrico con 6 viti ST4x10.
  • Seite 161: Risoluzione Dei Problemi

    RISOLUZIONE DEI PROBLEMI Problema Possibile causa Soluzione Sullo schermo compare Corto circuito. Contattare il servizio di "EE". assistenza ai clienti, in modo da far sostituire il sensore del termostato. Sullo schermo compare Non viene emessa aria Mettere l'interruttore in "88". calda e la ventola non posizione "off"...
  • Seite 162 Problema Possibile causa Soluzione Non viene emessa aria Ciclo di raffreddamento. Il normale funzionamento calda. viene continuato per alcuni minuti dopo lo spegnimento. La durata dipende dalla temperatura attuale. Durante questo lasso di tempo viene emessa aria fredda. L'impostazione del Regolare la temperatura termostato impedisce in modo che il termostato...
  • Seite 163 Problema Possibile causa Soluzione Il telecomando non Batterie scariche. Sostituire le batterie. funziona quando si Cattiva trasmissione del Assicurarsi che premono i tasti. segnale. trasmettitore e ricevitore non siano troppo lontani. Premere i tasti con movimenti omogenei e una leggera pressione. Premendo i tasti più...
  • Seite 164: Avviso Di Smaltimento

    AVVISO DI SMALTIMENTO Se nel vostro Paese sono vigenti regolamenti legislativi relativi allo smaltimento di dispositivi elettrici ed elettronici, questo simbolo sul prodotto o sull'imballaggio indica che non è consentito smaltire questo prodotto insieme ai rifiuti domestici. Il dispositivo deve invece essere portato in un centro di raccolta per il riciclaggio di dispositivi elettrici ed elettronici.

Diese Anleitung auch für:

1003800710038615100386161003861710038618

Inhaltsverzeichnis