All manuals and user guides at all-guides.com 13. Entsorgung ................25 a) Allgemein ............... 25 b) Batterien und Akkus ............26 14. Konformitätserklärung (DOC) ..........26 15. Technische Daten ..............27 1. Einführung Sehr geehrte Kundin, sehr geehrter Kunde, wir bedanken uns für den Kauf dieses Produkts. Dieses Produkt entspricht den gesetzlichen, nationalen und euro- päischen Anforderungen.
All manuals and user guides at all-guides.com 2. Symbol-Erklärung Das Symbol mit dem Ausrufezeichen im Dreieck weist auf wichtige Hinweise in dieser Bedienungsanleitung hin, die unbedingt zu beachten sind. Das Pfeil-Symbol ist zu finden, wenn Ihnen besondere Tipps und Hinweise zur Bedienung gegeben werden sollen. 3.
All manuals and user guides at all-guides.com 4. Lieferumfang • Thermo Logger • 2 Batterien vom Typ AAA/Micro • Bedienungsanleitung Aktuelle Bedienungsanleitungen Laden Sie aktuelle Bedienungsanleitungen über den Link www.conrad.com/downloads herunter oder scannen Sie den abgebildeten QR-Code. Befolgen Sie die Anweisungen auf der Webseite. 5.
Seite 7
All manuals and user guides at all-guides.com bene Vorgehensweise beim Einlegen/ Wechseln der Batterien. • Das Produkt ist kein Spielzeug, es gehört nicht in Kinderhände. • Das Produkt darf keinen extremen Temperaturen, starken Vibrationen oder starken mechanischen Beanspruchungen ausgesetzt werden. •...
All manuals and user guides at all-guides.com • Lassen Sie das Verpackungsmaterial nicht achtlos liegen. Dieses könnte für Kinder zu einem gefährli- chen Spielzeug werden! • Sollten Sie sich über den korrekten Betrieb nicht im Klaren sein oder sollten sich Fragen ergeben, die nicht im Laufe der Bedienungsanleitung abgeklärt werden, so setzen Sie sich bitte mit unserer tech- nischen Auskunft oder einem anderen Fachmann in...
Seite 10
All manuals and user guides at all-guides.com • Herkömmliche nicht wiederaufladbare Batterien dürfen nicht aufgeladen werden. Es besteht Explo- sionsgefahr! Laden Sie ausschließlich dafür vorge- sehene wiederaufladbare Akkus, verwenden Sie ein geeignetes Ladegerät. • Bei längerem Nichtgebrauch (z.B. bei Lagerung) entnehmen Sie die eingelegten Batterien/ Akkus. Bei Überalterung besteht andernfalls die Gefahr, dass Batterien/Akkus auslaufen, was Schäden am Produkt verursacht, Verlust von Gewährleistung/...
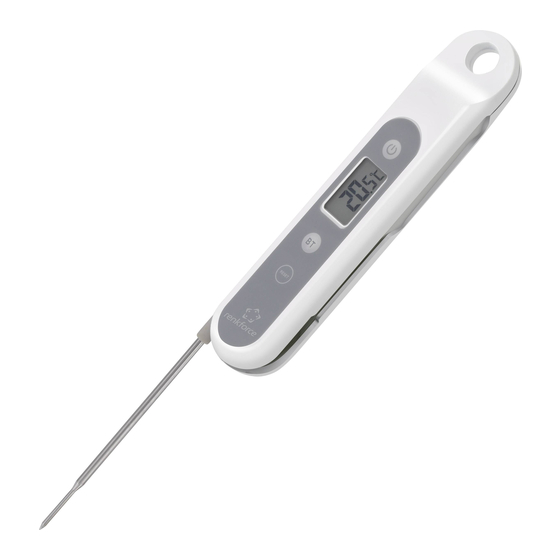
All manuals and user guides at all-guides.com 7. Bedienelemente Taste Ein / Aus Taste Bluetooth ® Taste Reset Einstichsensor Batteriefach Batteriefachdeckel Schraube Temperaturanzeige Symbol für Bluetooth -Anbindung ®...
All manuals and user guides at all-guides.com 8. Batterien einlegen und wechseln • Öffnen Sie das Batteriefach (Bild 1, Pos. 5) auf der Unterseite, indem Sie zunächst die Schraube (Bild 1, Pos. 7) des Batterie- fachdeckels herausdrehen und den Batteriefachdeckel (Bild 1, Pos.
All manuals and user guides at all-guides.com b) Messung über den Einstichsensor vornehmen Klappen Sie den Einstichsensor (Bild 1, Pos. 4) um 180° heraus. Die Mechanik des Einstichsensors ist absichtlich etwas schwer- gängig, damit Sie die Metallspitze des Einstichsensors auch opti- mal in festeres Messgut einstechen können.
All manuals and user guides at all-guides.com Zu dem gibt es bei einzelnen Bebilderungen gering- fügige Abweichungen zwischen der „iOS-App“ und der „Android-App“. Die in dieser Bedienungsanleitung gezeigten Bilder sind für das Betriebssystem Android erstellt. Grundsätzlich ist eine Software immer im Wandel und kann durch Updates sich optisch verändern.
All manuals and user guides at all-guides.com b) Messung anzeigen mit Bluetooth ® Die App „BTLogger“ erlaubt die einfache Anzeige der gemessenen Temperatur auf einem mobilen Endgerät, Langzeitmessungen inklu- sive diverser Überwachungsfunktionen und eine Datenaufzeichnung der Messwerte. Um den Thermo Logger mit einem mobilen Endgerät zu verbinden, gehen Sie wie folgt vor: •...
Seite 17
All manuals and user guides at all-guides.com Die Bluetooth -Verbindung bleibt so lange bestehen, bis ® entweder die Geräte außer Reichweite sind (Reichweite max. 30 Meter im Freifeld; in Gebäuden deutlich gerin- ger), die Bluetooth -Funktion und/oder die App in Ihrem ®...
All manuals and user guides at all-guides.com c) Grundeinstellungen Das soeben neu an die App gekoppelte Gerät (Thermo Logger) ist jetzt in der App unter „verbundenes Gerät“ zu sehen. Bei der Anzeige zum Gerät handelt es sich um eine Typenbezeichnung, die wie folgt individuell geändert werden kann: •...
All manuals and user guides at all-guides.com 11. Weitere Einstellmöglichkeiten der App a) Werte für Messungen festlegen Sobald Sie das neu gekoppelte Gerät auf dem Display des mo- bilen Endgerätes anwählen, schaltet die App auf einen neuen Bildschirminhalt um. Hierbei werden Sie per Einblendung darauf aufmerksam gemacht, Parameter fest zu legen.
All manuals and user guides at all-guides.com b) Temperatur-Alarm Unter „Temperatur-Alarm“ stellen Sie die Grenzwerte („Maximal“ und „Minimum“) ein, die später bei der Messung zu einem Alarm führen sollen. Der Einstellbereich ist hierbei analog zum Mess- bereich des Gerätes (-40 °C bis +250 °C) möglich. Achten Sie bei der Einstellung darauf, dass unter „Maximal“...
All manuals and user guides at all-guides.com d) Testen der Intervalleinstellung Unter dieser Funktion können Sie bis zu fünf Messbereiche ak- tivieren, die in der nachfolgend aufgezeigten Funktion „Abschnitt / Testbereich“ angesehen und auch individuell eingestellt werden können. Wählen Sie „1“, können Sie nur einen Temperaturbereich (bei Einstellung „Time“...
Seite 24
All manuals and user guides at all-guides.com Tippen Sie jetzt links im Display unter „Abschnitt“ auf die ange- zeigten Temperaturwerte (bei „Time“ auf die Zeitwerte). Ein neues Fenster wird geöffnet. Stellen Sie den oberen Wert (Maximal; z.B. 22 für die Temperatur oder einen Zeitwert) und den unteren Wert (Minimum;...
Seite 25
All manuals and user guides at all-guides.com Ist nur ein „Abschnitt“ als „Temp“ angelegt, wird sich auch bei Unter- als auch Überschreitung des Tempe- raturabschnitts (hier: 20 °C bis 22 °C) die eingestellte Abtastrate nicht ändern und z.B. (hier: eine Minute) bei einer Minute bleiben.
Seite 27
All manuals and user guides at all-guides.com Die Funktion mit mehreren „Abschnitten“ ist z.B. hilfreich, um einen Schaltpunkt von einer Heizung möglichst genau einstellen zu können. Hierbei wird die zusätzliche Intervalleinstellung mit einer kürzeren Abtastrate eingestellt, um den Temperaturanstieg zum geplanten Abschaltpunkt möglichst detailliert angezeigt zu bekommen.
Seite 28
All manuals and user guides at all-guides.com Haben Sie alle Parameter nach Wunsch eingestellt, so können Sie die Messung starten. Bestätigen Sie hierzu mit „Fertig“. Das Display wechselt nun auf eine neue Displayanzeige. Rechts unten können Sie die Messung starten („Start“ antippen) oder eine lau- fende Messung unterbrechen („Stopp“...
All manuals and user guides at all-guides.com f) Aufgezeichnete Liste Unter „aufgezeichnete Liste“ sehen Sie alle Messwerterfassungen der App. Tippen Sie die Funktion an. Es öffnet sich die Auflistung aller Aufzeichnungen. Diese Aufzeichnungen werden in chronolo- gischer Reihenfolge angezeigt und können nachträglich bearbeitet werden. Tippen Sie auf „Foto“, so wird Ihnen ein kleines Untermenü ange- zeigt.
All manuals and user guides at all-guides.com 12. Wartung und Reinigung Das Produkt ist für Sie bis auf einen gelegentlichen Batteriewech- sel wartungsfrei, zerlegen Sie es nicht. Reinigen Sie das Produkt sorgfältig z.B. mit einem weichen, sau- beren Tuch. Drücken Sie nicht zu stark auf das Display, dies führt nicht nur zu Kratzspuren, sondern das Display könnte beschädigt werden.
All manuals and user guides at all-guides.com b) Batterien und Akkus Sie als Endverbraucher sind gesetzlich (Batterieverordnung) zur Rückgabe aller gebrauchten Batterien und Akkus verpflichtet; eine Entsorgung über den Hausmüll ist untersagt. Schadstoffhaltige Batterien/Akkus sind mit nebenste- hendem Symbol gekennzeichnet, das auf das Verbot der Entsorgung über den Hausmüll hinweist. Ihre verbrauchten Batterien/Akkus können Sie unentgeltlich bei den Sammelstellen Ihrer Gemeinde, unseren Filialen oder überall dort abgeben, wo Batterien/Akkus verkauft werden!
All manuals and user guides at all-guides.com 15. Technische Daten Stromversorgung ..... 2 Batterien vom Typ AAA/Micro Messbereich ......-40 °C bis +250 °C Auflösung ......... 0,1 °C Messtoleranz ......-40 °C bis -30,1 °C // +/- 3 °C ..........-30 °C bis -18,1 °C // +/- 2 °C ..........
Seite 34
All manuals and user guides at all-guides.com Table of Contents Page 1. Introduction ................29 2. Explanation of Symbols ............30 3. Intended Use ............... 30 4. Scope of Delivery ..............31 5. Safety Information ............... 31 6. Information on Batteries and Rechargeable Batteries ..33 7.
All manuals and user guides at all-guides.com 12. Maintenance and Cleaning ..........50 13. Disposal ................51 a) General Information ............51 b) Batteries and Rechargeable Batteries ......51 14. Declaration of Conformity (DOC)......... 52 15. Technical Data ..............53 1.
All manuals and user guides at all-guides.com 2. Explanation of Symbols The exclamation mark in a triangle indicates important notes in these operating instructions that must be ob- served strictly. The arrow symbol indicates that special advice and no- tes on operation are provided. 3.
All manuals and user guides at all-guides.com 4. Scope of Delivery • Bluetooth thermometer • 2x AAA batteries • Operating Instructions Up-to-date operating instructions Download the latest operating instructions via the link www.conrad.com/downloads or scan the QR code. Follow the instructions on the website.
Seite 39
All manuals and user guides at all-guides.com • This product is not a toy and not suitable for children. • The product must not be exposed to extreme tem- peratures, strong vibration or strong mechanical strain. • The manufacturer assumes no responsibility for wrong or inaccurate displays or for the effects that may arise from such displays.
All manuals and user guides at all-guides.com 6. Information on Batteries and Rechargeable Batteries • Keep batteries/rechargeable batteries out of the reach of children. • Ensure that the polarity is correct when inserting the batteries/rechargeable batteries (observe plus/+ and minus/-). •...
Seite 41
All manuals and user guides at all-guides.com • Always replace the entire set of batteries/rechargea- ble batteries, only use batteries/rechargeable batter- ies of the same type and by the same manufacturer with the same charge status (do not mix charged with partially charged or empty batteries/recharge- able batteries).
All manuals and user guides at all-guides.com 7. Operating Elements On/Off button Bluetooth button ® Reset button Penetration sensor Battery compartment Battery compartment lid Screw Temperature display Symbol for Bluetooth connection ®...
All manuals and user guides at all-guides.com 8. Inserting and Replacing Batteries • Open the battery compartment (figure 1, item 5) on the bot- tom by first turning the screw (figure 1, item 7) of the battery compartment lid out and taking off the battery compartment lid (figure 1, item 6). • Insert two type AAA/micro batteries with correct polarity into the battery compartment (observe plus/+ and minus/-), see notes in the battery compartment.
All manuals and user guides at all-guides.com b) Performing measurement via the penetration sensor Fold out the penetration sensor (figure 1, item 4) by 180°. The mechanics of the penetration sensor are deliberately a little stiff- moving so that you can insert the metal tip of the penetration sen- sor optimally into firmer material to be measured as well. However, do not apply any force for insertion since this may damage the sensor.
All manuals and user guides at all-guides.com There also are slight deviations in individual illustrations between the “iOS-app” and the “Android-app”. The fig- ures shown in these operating instructions have been generated for the Android operating system. Generally, software is changing continually and can change visually due to updates. The respective handling is not affected, however.
All manuals and user guides at all-guides.com b) Display Measurement with Bluetooth ® The app “BTLogger” permits simple display of the measured tem- perature on a mobile end device, long-term measurement includ- ing various monitoring functions and data recording of the meas- ured values.
Seite 48
All manuals and user guides at all-guides.com The Bluetooth connection is retained until the devices ® are either out of range (range max. 30 metres in the free field; much less inside buildings), the Bluetooth function ® and/or the app in your mobile end device is switched off or the thermo logger is deleted from the directory of the app.
All manuals and user guides at all-guides.com c) Basic Settings The device that has just been newly coupled with the app (thermo logger) is now indicated in the app under “Connected Device”. The display for the device is a type designation that can be changed individually as follows: •...
All manuals and user guides at all-guides.com 11. Further Setting Options of the App a) Specifying Values for Measurements Once you select the newly coupled device on the display of the mobile end device, the app switches to new screen content. You will be informed by display that you need to specify parameters.
Seite 52
All manuals and user guides at all-guides.com BTL_94A4 Figure 5...
All manuals and user guides at all-guides.com b) Temperature Alarm In “Temperature alarm”, you can set the limits (“Maximum” and “Minimum”) that will trip an alarm later during the measurement. The range can be set according to the device’s measurement range (-40 °C to +250 °C).
All manuals and user guides at all-guides.com ranges with different values. Confirm your input with “Done”. Also observe the information in the following chapters on this. e) Section / test area In “Section”, specify the measuring settings that you desire for recording of the measurement. First, choose the measuring unit (temperature or time) that is to be used (see “c) Test Range”...
Seite 55
All manuals and user guides at all-guides.com Additionally select a scan rate in “Test range” that controls the frequency of the measured value recording (e.g. 1 minute = one measured value is saved every minute). The values named as examples here will cause your recording to record all values for the range between 20 °C and 22 °C at a scan rate (repetition of saving of the measured values) of one minute (= 60 measured values per hour) for the setting “Temp”.
Seite 57
All manuals and user guides at all-guides.com Now additionally generate a second section, e.g. with “Temp” and the temperature range of 22 °C to 30 °C with a scan rate of ten hours. If the measured temperature rises to above 22 °C now (and thus into the temperature range of 22.1 °C to 30.0 °C) as set in the second section, a measured value will be saved every ten seconds.
Seite 58
All manuals and user guides at all-guides.com A short interval in “Test range” means a high number of recorded data. If you select a long recording time for the measurement as well, the remaining energy in the batteries may become too low. In that case, the app will display a corresponding note (see figure 8).
All manuals and user guides at all-guides.com The upper right also shows a battery icon that will display the charge condition of the batteries inserted in the thermo logger to you. There also is a gear at the right at the very top. If you tap this when the measurement has stopped, the display will switch back to the already-familiar setting screen.
All manuals and user guides at all-guides.com g) Sleep mode The function “Sleep mode” controls deactivation of the display in your mobile end device. If sleep mode is off, the display will switch off according to the settings in your mobile end device. If sleep mode is on, the display of the mobile end device is not switched off.
All manuals and user guides at all-guides.com 13. Disposal a) General Information Electronic devices are recyclable and should not be dis- posed of in household waste. At the end of its service life, dispose of the product according to the relevant statutory regulations.
All manuals and user guides at all-guides.com 14. Declaration of Conformity (DOC) Conrad Electronic SE, Klaus-Conrad-Straße 1, D-92240 Hirschau, hereby declares that this product complies with directive 2014/53/ The complete text of the EU declaration of conformity is available under the following web address: www.conrad.com/downloads Choose a language by clicking a flag symbol and enter the order number of the product into the search field;...
All manuals and user guides at all-guides.com 15. Technical Data Power supply ........2 type AAA/Micro batteries Measurement range ......-40 °C to +250 °C Resolution ........0.1 °C Measuring Tolerances .....-40 °C to -30,1 °C // +/- 3 °C ............-30 °C to -18,1 °C // +/- 2 °C ............-18 °C to 100 °C // +/- 1 °C ............100 °C to 200 °C // +/- 2°C ............200,1 °C to 250 °C // +/- 3 °C...
Seite 65
All manuals and user guides at all-guides.com Sommaire Page 1. Introduction ................55 2. Explication des symboles ............56 3. Utilisation conforme .............56 4. Contenu ................57 5. Consignes de sécurité ............57 6. Instructions pour les piles et les batteries ......59 7. Éléments de commande .............61 8.
All manuals and user guides at all-guides.com 12. Maintenance et nettoyage ........... 77 13. Élimination ................77 a) Généralités ..............77 b) Piles et batteries............. 78 14. Déclaration de conformité (DOC) ........78 15. Données techniques ............79 1. Introduction Cher client, chère cliente, nous vous remercions d’avoir acheté...
All manuals and user guides at all-guides.com 2. Explication des symboles Le symbole avec le point d’exclamation dans le triangle indique des informations importantes dans ce mode d’em- ploi, qui doivent être impérativement observées. Le symbole de la flèche précède les astuces et indications particulières particulières sur le fonctionnement. 3.
All manuals and user guides at all-guides.com 4. Contenu • Thermomètre Bluetooth • 2 piles AAA • Mode d’emploi Modes d‘emploi actuels Téléchargez les modes d‘emplois actuels sur le lien www.conrad.com/downloads ou bien scan- nez le code QR représenté. Suivez les indications du site internet.
Seite 70
All manuals and user guides at all-guides.com • Ce produit n’est pas un jouet, tenir hors de portée des enfants. • Le produit ne doit pas être exposé à des tem- pératures extrêmes, de fortes vibrations ou des contraintes mécaniques importantes. •...
All manuals and user guides at all-guides.com 6. Instructions pour les piles et les batteries • Tenir les piles et batteries hors de portée des enfants. • En insérant les piles ou les batteries respectez la polarité (respecter Plus/+ et Moins/-). •...
Seite 72
All manuals and user guides at all-guides.com • Changez toujours le jeu complet de piles ou de bat- teries, utilisez uniquement des piles ou des batteries de même type ou fabricant et de même niveau de charge (ne pas mélanger une pleine avec une à moitié...
All manuals and user guides at all-guides.com 7. Éléments de commande Touche Marche/Arrêt Touche Bluetooth ® Touche Reset Sonde de perforation Compartiments à piles Couvercle du compartiment à piles A Affichage de la température Symbole de liaison Bluetooth ®...
All manuals and user guides at all-guides.com 8. Insérer et changer les piles • Ouvrez le compartiment à piles (fig. 1 n 5) sur le côté inférieur en dévissant d’abord la vis (fig. 1 n 7) du couvercle du compar- timent à piles et retirez le couvercle (fig. 1 n • Insérez deux piles de type AAA/Micro dans la polarité correcte dans le compartiment (Plus/+ et Moins/- ; voir les instructions dans le compartiment à...
All manuals and user guides at all-guides.com b) Procéder à une mesure avec la sonde de perforation Dépliez la sonde de perforation (fig. 1 n 4) à 180°. La mécanique de la sonde de perforation est volontairement un peu raide, de sorte que vous pouvez pénétrer la pointe métallique de la sonde de perforation de manière optimale dans un matériau à...
All manuals and user guides at all-guides.com De plus, il y a de légères variations dans les images individuelles entre l’« appli iOS » et l’« appli Android ». Les images dans ce mode d'emploi sont établies pour le système d’exploitation Android. Fondamentalement, le logiciel est toujours en évolution et des mises à jour peuvent le modifier visuellement. La manipulation appropriée n’a pas été modifiée ici.
Seite 78
All manuals and user guides at all-guides.com • Activez votre terminal mobile (tablette ou smartphone) et activez la fonction « Bluetooth » (voir « Paramètres » sur votre mobile). ® • Activez l’appli « BTLogger » en la touchant sur votre terminal mobile.
Seite 79
All manuals and user guides at all-guides.com Lorsque la liaison Bluetooth est interrompue, vous ne ® voyez plus aucune valeur de mesure en cours. Le sym- L Pr o bole Bluetooth à l’écran du Thermo Logger ne s’éclaire ® plus. Si les appareils sont de nouveau à portée ou si l’appli est redémarrée (les appareils doivent être à...
All manuals and user guides at all-guides.com c) Réglages initiaux L ‘appareil (Thermo Logger) récemment couplé à l’appli est main- tenant visible dans l’appli sous « appareil connecté ». L’affichage de l’appareil est une désignation type qui peut être modifiée indivi- duellement comme suit : • Choisissez l’engrenage en haut à droite sur l’écran. Un nou- veau contenu d’écran apparaît. •...
All manuals and user guides at all-guides.com 11. Autres possibilités de paramétrages de l’appli a) Fixer les valeurs pour les mesures Dès que vous sélectionnez sur l’écran du terminal mobile l’appa- reil récemment couplé, l’appli bascule sur un nouveau contenu d’écran.
Seite 83
All manuals and user guides at all-guides.com BTL_94A4 Figure 5...
All manuals and user guides at all-guides.com b) Alarme température Sous « Alarme température » vous réglez les valeurs limites (« Maximum » et « Minimum ») qui produiront une alarme ulté- rieurement pendant la mesure. La plage de configuration est ici semblable à...
All manuals and user guides at all-guides.com d) Tester le paramètre d’intervalle Sous cette fonction vous pouvez activer jusqu’à cinq plages de mesure, qui sont visibles et peuvent être également paramétrées individuellement dans la fonction montrée ensuite « section/zone de test ». Si vous choisissez « 1 » vous pouvez uniquement pa- ramétrer une plage de température avec une fréquence d’échan- tillonnage (pour le paramétrage «...
Seite 87
All manuals and user guides at all-guides.com Touchez maintenant l’écran à gauche sous « section » sur les va- leurs de température affichées (sur « Time » pour les valeurs de temps). Une nouvelle fenêtre s’ouvre. Paramétrez la valeur supé- rieure (Maximum ; p. ex. 22 pour la température ou une valeur de temps) et la valeur inférieure (Minimum ;...
Seite 88
All manuals and user guides at all-guides.com Si une seule « section » ou « Temp » n’est programmée, la fréquence d’échantillonnage paramétrée n’est pas mo- difiée même pour le dépassement des valeurs inférieures et supérieures de la section de température (ici : 20 °C à 22 °C) et reste une minute (ici : une minute). Pour une «...
Seite 89
All manuals and user guides at all-guides.com La fonction avec plusieurs « sections » est utile pour pouvoir régler au plus précis un point de commutation d’un chauffage. En faisant cela, le paramètre d’inter- valle supplémentaire est paramétré avec une fréquence d’échantillonnage plus courte pour arriver à afficher avec le plus de détails possible la hausse de tempéra- ture pour le point de coupure programmé.
All manuals and user guides at all-guides.com Si vous avez configuré tous les paramètres vous pouvez démarrer la mesure. Confirmez avec « Terminer ». L’écran passe à un nou- vel affichage de l’écran. En bas à droite vous pouvez démarrer la mesure (toucher « Marche ») ou interrompre une mesure en cours (toucher « Arrêt »). À gauche du « bouton Marche/Arrêt » vous pouvez voir le nom de la mesure en cours p. ex. « Enregistrement 5 »...
All manuals and user guides at all-guides.com Si vous voulez voir les enregistrements, tapez à droite sur la flèche. Un nouvel affichage s’ouvre avec les valeurs de mesures enregistrées. Tout en haut sont mentionnées l’heure et la date de début de l’enregistrement. En dessous se trouve un champ texte dans lequel vous pouvez rentrer des remarques.
All manuals and user guides at all-guides.com 12. Maintenance et nettoyage L’appareil est sans entretien à l’exception du changement de piles. Ne le démontez pas. Nettoyez le produit avec soin, p. ex. avec un chiffon doux et propre. N’appuyez pas trop fort sur l’écran, cela cause non seu- lement des rayures mais l’écran peut également être endommagé.
All manuals and user guides at all-guides.com b) Piles et batteries En tant qu’utilisateur final vous êtes légalement tenu (Ordonnance sur les piles) de retourner toutes les piles ou batteries usées ; une élimination dans les déchets ménagers est interdite. Les piles ou batteries polluantes sont identifiées par le sym- bole ci-contre qui se réfère à l’interdiction de l’élimination avec les déchets ménagers.
All manuals and user guides at all-guides.com 15. Données techniques Alimentation électrique ....2 piles de type AAA/Micro Plage de mesure ......-40 °C à +250 °C Résolution ........0,1 °C Tolérances de mesure ....-40 °C à -30,1 °C // +/- 3 °C .............
Seite 96
All manuals and user guides at all-guides.com Inhoudsopgave Pagina 1. Inleiding ................81 2. Verklaring van symbolen ............. 82 3. Voorgeschreven gebruik ............82 4. Leveringsomvang ..............83 5. Veiligheidsvoorschriften ............84 6. Batterij- en accuvoorschriften ..........85 7. Bedieningselementen ............87 8.
All manuals and user guides at all-guides.com 13. Afvoer ................103 a) Algemeen ..............103 b) Batterijen en accu´s ............. 104 14. Verklaring van overeenstemming (DOC) ......104 15. Technische gegevens ............105 1. Inleiding Geachte klant, hartelijk dank voor de aanschaf van dit product. Dit product voldoet aan de wettelijke nationale en Europese voor- schriften.
All manuals and user guides at all-guides.com 2. Verklaring van symbolen Het symbool met het uitroepteken in een driehoek wijst op belangrijke aanwijzingen in deze gebruiksaanwijzing die in ieder geval moeten worden opgevolgd. Het pijlsymbool ziet u, wanneer u bijzondere tips en aan- wijzingen voor de bediening zult verkrijgen.
All manuals and user guides at all-guides.com 4. Leveringsomvang • Thermologger • 2 batterijen van het type AAA/micro • Gebruiksaanwijzing Actuele gebruiksaanwijzingen Download de actuele gebruiksaanwijzingen via de link www.conrad.com/downloads of scan ze met behulp van de afgebeelde QR-code. Volg de aanwijzingen op de website...
All manuals and user guides at all-guides.com 5. Veiligheidsvoorschriften Lees voor ingebruikneming de volledige gebruiks- aanwijzing door; deze bevat belangrijke aanwijzin- gen voor het juiste gebruik. Bij schade veroorzaakt door het niet opvolgen van deze gebruiksaanwijzing, vervalt het recht op ga- rantie! Voor gevolgschade die hieruit ontstaat, zijn wij niet aansprakelijk! Voor materiële schade of persoonlijk letsel, veroor-...
All manuals and user guides at all-guides.com • Meet nooit in elektrische apparaten en/of steek de insteeksensor niet in zulke apparaten. Elektrische schokken zijn levensgevaarlijk! • Behandel het product voorzichtig. Door stoten, schokken of een val - zelfs van geringe hoogte - kan het beschadigd raken.
Seite 103
All manuals and user guides at all-guides.com Uit batterijen/accu’s lopende vloeistoffen zijn che- misch zeer agressief. Voorwerpen of oppervlaktes die daarmee in aanraken komen, kunnen deels ernstig beschadigd raken. Bewaar batterijen/accu’s daarom op een geschikte plaats. • Zorg dat batterijen of accu´s niet worden kortgeslo- ten, gedemonteerd of in vuur worden geworpen.
All manuals and user guides at all-guides.com 7. Bedieningselementen Aan / Uit-knop Knop Bluetooth ® Knop Reset Insteeksensor Batterijvak Batterijvakdeksel Schroef Temperatuurweergave Symbool voor Bluetooth -koppeling ®...
All manuals and user guides at all-guides.com 8. Batterijen installeren en vervangen • Open het batterijvak (afbeelding 1, pos. 5) aan de onderkant door eerst de schroef (afbeelding 1, pos. 7) van het batterijvak- deksel uit te draaien en het batterijvakdeksel (afbeelding 1, pos. 6) te verwijderen.
All manuals and user guides at all-guides.com b) Meting via de insteeksensor uitvoeren Klap de insteeksensor (afbeelding 1, pos. 4) 180° uit. De mecha- niek van de insteeksensor is opzettelijk een beetje stug zodat u de metalen punt van de insteeksensor ook optimaal in vaster meet- goed kunt inbrengen.
All manuals and user guides at all-guides.com Bovendien bestaan er bij bepaalde opschriften kleine afwijkingen tussen de “iOS-app” en de “Android-app”. De in deze gebruiksaanwijzing weergegeven foto’s zijn opgemaakt voor het besturingssysteem Android. In principe verandert de software altijd en kan deze door updates ook optisch veranderen.
All manuals and user guides at all-guides.com b) Meting met Bluetooth weergeven ® De app “BTLogger” laat toe om de gemeten temperatuur eenvou- dig op een mobiel eindapparaat weer te geven, langdurige me- tingen inclusief diverse bewakingsfuncties en het opslaan van de meetwaarden.
Seite 111
All manuals and user guides at all-guides.com De Bluetooth -verbinding blijft bestaan tot ofwel de ap- ® paraten buiten bereik zijn (bereik max. 30 meter in open veld; in gebouwen duidelijk minder), de Bluetooth -func- ® tie en/of de app op uw mobiel eindapparaat wordt uit- geschakeld of de Thermologger uit de map van de app wordt gewist.
All manuals and user guides at all-guides.com c) Basisinstellingen Het zopas nieuw aan de app gekoppelde apparaat (Thermologger) is nu in de app zichtbaar onder “gekoppelde apparaten”. Bij de weergave van het apparaat gaat het om een typeomschrijving die als volgt individueel kan worden gewijzigd: •...
All manuals and user guides at all-guides.com 11. Verdere instelmogelijkheden van de a) Waarden voor metingen opslaan Van zodra u het nieuw gekoppelde apparaat op het scherm van het mobiele eindapparaat selecteert, schakelt de app naar een nieuwe beeldscherminhoud om. Hierbij wordt u er via een schermweergave op gewezen om parameters vast te leggen.
Seite 114
All manuals and user guides at all-guides.com BTL_94A4 Afbeelding 5...
All manuals and user guides at all-guides.com b) Temperatuur-alarm Onder “Temperatuuralarm” stelt u de grenswaarden (“Maximum” en “Minimum”) in die later bij het meten tot een alarm moeten lei- den. Het instelbereik is hierbij analoog t.o.v. het meetbereik van het apparaat (-40 °C tot +250 °C) mogelijk. Let bij de instelling op dat onder “Maximum”...
All manuals and user guides at all-guides.com d) Testen van de intervalinstelling Onder deze functie kunt u tot vijf meetbereiken activeren die in de hierna weergegeven functie “Deel / Testbereik” kunnen worden bekeken en individueel ingesteld. Als u “1” kiest, kunt u slechts een temperatuurbereik (bij instelling “Time”...
Seite 118
All manuals and user guides at all-guides.com Tip nu links op het scherm onder ‘Deel” op de weergegeven tem- peratuurwaarden (bij “Time” op de tijdwaarde). Er wordt een nieuw venster geopend. Stel de bovenste waarde (maximum, bv. 22 voor de temperatuur of een tijdswaarde) en de onderste waarde (mi- nimum;...
Seite 119
All manuals and user guides at all-guides.com Als er slechts een “Deel” als “Temp” is aangemaakt, zal ook bij het onder- en overschrijden van het temperatuur- bereik (hier: 20 °C tot 22 °C) het ingestelde aftastrate niet veranderen en bv. (hier: een minuut) op een minuut blijven.
Seite 120
All manuals and user guides at all-guides.com De functie met meerdere “delen” is bv. nuttig om een schakelpunt van een verwarming zo nauwkeurig mo- gelijk te kunnen instellen. Hierbij wordt de bijkomende intervalinstelling met een kortere aftastrate ingesteld om de temperatuurstijging tot het geplande uitschakelpunt zo gedetailleerd mogelijk te kunnen laten weergeven.
Seite 121
All manuals and user guides at all-guides.com Als u alle parameters naar wens hebt ingesteld, kunt u de me- ting starten. Bevestig met “Gereed”. Het scherm gaat nu naar een nieuwe schermweergave. Rechtsonder kunt u de meting starten (“Start” aanklikken) of de lopende meting onderbreken (“Stop” aanklikken).
All manuals and user guides at all-guides.com f) Opgeslagen lijst Onder “opgeslagen lijst” ziet u alle meetwaardebepalingen van de app. Klik op de functie. Er wordt een lijst met alle opnames geo- pend. Deze opnames worden in chronologische volgorde weerge- geven en kunnen later worden bewerkt.
All manuals and user guides at all-guides.com 12. Onderhoud en reiniging Het product is op het vervangen van de batterijen na onderhouds- vrij, demonteer het niet. Reinig het product zorgvuldig, bv. met een droge, schone en zachte doek. Druk niet te hard op het display. Dit kan niet alleen krassporen veroorzaken, maar het scherm kan ook beschadigd worden.
All manuals and user guides at all-guides.com b) Batterijen en accu´s U bent als eindverbruiker volgens de KCA-voorschriften wettelijk verplicht alle lege batterijen en accu’s in te leveren; verwijdering via het huisvuil is niet toegestaan. Batterijen, accu´s die schadelijke stoffen bevatten, zijn gemarkeerd met nevenstaand symbool.
All manuals and user guides at all-guides.com 15. Technische gegevens Stroomverzorging ......2 batterijen van het type AAA/ micro Meetbereik ........-40 °C tot +250 °C Resolutie .........0,1 °C Meettoleranties .......-40 °C tot -30,1 °C // +/- 3 °C ............-30 °C tot -18,1 °C // +/- 2 °C ............-18 °C tot 100 °C // +/- 1 °C ............100 °C tot 200 °C // +/- 2 °C ............200,1 °C tot 250 °C // +/- 3 °C...
Seite 127
All manuals and user guides at all-guides.com Dies ist eine Publikation der Conrad Electronic SE, Klaus-Conrad- Str. 1, D-92240 Hirschau (www.conrad.com). Alle Rechte einschließlich Übersetzung vorbehalten. Reproduktionen jeder Art, z.B. Fotokopie, Mikroverfilmung, oder die Erfassung in elektronischen Daten-verarbeitungsanlagen, bedürfen der schriftlichen Genehmigung des Herausgebers. Nachdruck, auch auszugsweise, verboten. Die Publikation entspricht dem technischen Stand bei Drucklegung.