Herunterladen Inhalt Inhalt Diese Seite drucken
Inhaltsverzeichnis

Werbung

Verfügbare Sprachen
  • DE

Verfügbare Sprachen

  • DEUTSCH, seite 1
KREUZLINIENLASER / SELF-LEVELLING
CROSS LINE LASER LEVEL / NIVEAU
LASER EN CROIX PKLL 10 B3
KREUZLINIENLASER
Originalbetriebsanleitung
NIVEAU LASER EN CROIX
Traduction des instructions d'origine
LASER KRZYŻOWY
Tłumaczenie oryginalnej instrukcji obsługi
KRÍŽOVÝ LÍNIOVÝ LASER
Preklad originálneho návodu
na obsluhu
IAN 338152_2001
SELF-LEVELLING CROSS
LINE LASER LEVEL
Translation of the original instructions
KRUISLIJNLASER
Vertaling van de originele
gebruiksaanwijzing
KŘÍŽOVÝ LINIOVÝ LASER
Překlad originálního provozního návodu

Werbung

Inhaltsverzeichnis
loading

Inhaltszusammenfassung für Parkside PKLL 10 B3

  • Seite 1 KREUZLINIENLASER / SELF-LEVELLING CROSS LINE LASER LEVEL / NIVEAU LASER EN CROIX PKLL 10 B3 KREUZLINIENLASER SELF-LEVELLING CROSS LINE LASER LEVEL Originalbetriebsanleitung Translation of the original instructions NIVEAU LASER EN CROIX KRUISLIJNLASER Traduction des instructions d‘origine Vertaling van de originele gebruiksaanwijzing LASER KRZYŻOWY...
  • Seite 2 DE / AT / CH Originalbetriebsanleitung Seite GB / IE Translation of the original instructions Page FR / BE Traduction des instructions d‘origine Page NL / BE Vertaling van de originele gebruiksaanwijzing Pagina 44 Tłumaczenie oryginalnej instrukcji obsługi Strona Překlad originálního provozního návodu Strana 69 Preklad originálneho návodu...
  • Seite 3 1 1 a...
  • Seite 5: Inhaltsverzeichnis

    Legende der verwendeten Piktogramme ..............Seite Einleitung ................Seite Bestimmungsgemäßer Gebrauch ........... Seite Teilebeschreibung ..............Seite Lieferumfang ................Seite Technische Daten ..............Seite Sicherheitshinweise ............ Seite Sicherheitshinweise für Batterien / Akkus ....... Seite 10 Inbetriebnahme ............. Seite 11 Batterien einsetzen / wechseln ..........Seite 11 Ein- / Ausschalten..............
  • Seite 6: Legende Der Verwendeten Piktogramme

    Legende der verwendeten Piktogramme Lesen Sie die Bedienungsanleitung. Explosionsgefahr! Schutzhandschuhe tragen! Achtung! Schützen Sie sich vor Laserstrahlung! Nicht in den Laserstrahl blicken! Gleichstrom / -spannung Batterien inklusive Kreuzlinienlaser Einleitung Wir beglückwünschen Sie zum Kauf Ihres neuen Produkts. Sie haben sich damit für ein hochwertiges Produkt entschieden. Die Bedienungsanleitung ist Teil dieses Produkts.
  • Seite 7: Teilebeschreibung

    an geschlossenen Einsatzorten geeignet. Jede andere Verwendung oder Veränderung des Produkts gilt als nicht bestimmungsgemäß und birgt erhebliche Unfallgefahren. Für aus bestimmungswidriger Verwendung entstandene Schäden übernimmt der Hersteller keine Haftung. Nicht für den gewerblichen Einsatz bestimmt. Teilebeschreibung H-Taste (zum Ein- / Ausschalten der horizontalen Linie) LED-Kontrollleuchte (rot: Nivellierung aus, grün: Nivellierung ein) V-Taste (zum Ein- / Ausschalten der vertikalen Linie) LOCK-Schalter...
  • Seite 8: Technische Daten

    Technische Daten Betriebsspannung: (Gleichstrom) Arbeitsbereich mindestens 10 m Nivelliergenauigkeit: +/- 0,5 mm / m Selbstnivellierbereich typisch: ± 4 ° Nivellierzeit typisch: ca. 4 Sekunden Betriebstemperatur: +5 °C–35 °C Relative Luftfeuchte max.: ≤ 90 % Laserklasse: Wellenlänge (λ): 635 nm Maximale Leistung P max: 1 mW Stativaufnahme: Batterien:...
  • Seite 9 Schützen Sie das Produkt vor Nässe und direkter Sonneneinstrahlung. Setzen Sie das Produkt keinen extremen Temperaturen oder Tem- peraturschwankungen aus. Lassen Sie es z. B. nicht längere Zeit im Auto liegen. Lassen Sie das Produkt bei größeren Temperatur- schwankungen erst austemperieren, bevor Sie es in Betrieb nehmen. Bei extremen Temperaturen oder Temperaturschwankungen kann die Präzision des Produkts beeinträchtigt werden.
  • Seite 10: Sicherheitshinweise Für Batterien / Akkus

    Sicherheitshinweise für Batterien / Akkus LEBENSGEFAHR! Halten Sie Batterien / Akkus außer Reichweite von Kindern. Suchen Sie im Falle eines Verschluckens sofort einen Arzt auf! Verschlucken kann zu Verbrennungen, Perforation von Weichgewebe und Tod führen. Schwere Verbrennungen können innerhalb von 2 Stunden nach dem Verschlucken auftreten.
  • Seite 11: Inbetriebnahme

    Inbetriebnahme Prüfen Sie die Lieferung auf Vollständigkeit und auf sichtbare Schäden. Entfernen Sie das gesamte Verpackungsmaterial vom Produkt. Batterien einsetzen / wechseln Öffnen Sie den Batteriefachdeckel (siehe Abb. B). Legen Sie die Batterien in das Batteriefach ein (siehe Abb. C). Vergewissern Sie sich, dass die Batterien richtig herum eingelegt sind (siehe Abb.
  • Seite 12: Einzellinie Und Gekreuzte Linien Verwenden

    leuchtet die LED-Kontrollleuchte rot und die horizontalen und vertikalen Laserlinien werden ausgeschaltet. Hinweis: Das Arbeiten ohne Nivellierautomatik wird immer durch die rote LED-Kontrollleuchte angezeigt. Hinweis: Bei Erschütterungen oder Lageänderungen während des Betriebs wird das Produkt automatisch wieder einnivelliert. Überprüfen Sie nach einer erneuten Nivellierung die Position der waagrechten bzw.
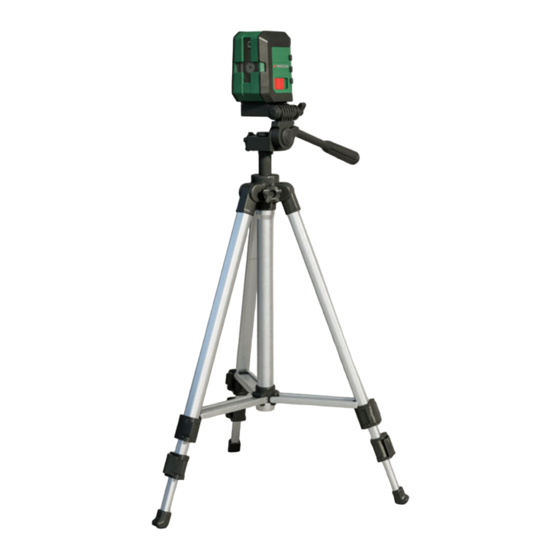
  • Seite 13: Arbeitshinweise

    Arbeiten ohne Nivellierautomatik wird immer durch die rote LED-Kontrollleuchte angezeigt. Arbeitshinweise Verwenden Sie immer nur die Mitte der Laserlinie zum Markieren. Die Breite der Laserlinie ändert sich mit der Entfernung. Mit dem Stativ arbeiten Aufbau und Ausrichtung 1. Ziehen Sie die drei Beine des Stativs auseinander.
  • Seite 14: Schnellwechselplatte Vom Stativ Entfernen

    dass die Schraube festgezogen ist, indem Sie die Metallhalterung im Uhrzeigersinn drehen. Die Metallhalterung befindet sich auf der Unterseite der Schnellwechselplatte Schnellwechselplatte vom Stativ entfernen Sie können den Kreuzlinienlaser einfach zusammen mit der Schnell- wechselplatte vom Stativ durch die folgenden Schritte entfernen: 1.
  • Seite 15: Entsorgung

    Entsorgung Die Verpackung besteht aus umweltfreundlichen Materialien, die Sie über die örtlichen Recyclingstellen entsorgen können. Beachten Sie die Kennzeichnung der Verpackungsmateria- lien bei der Abfalltrennung, diese sind gekennzeichnet mit Abkürzungen (a) und Nummern (b) mit folgender Bedeutung: 1–7: Kunststoffe / 20–22: Papier und Pappe / 80–98: Verbundstoffe.
  • Seite 16: Abwicklung Im Garantiefall

    Rechte zu. Diese gesetzlichen Rechte werden durch unsere im Folgen- den dargestellte Garantie nicht eingeschränkt. Sie erhalten auf dieses Produkt 3 Jahre Garantie ab Kaufdatum. Die Garantiefrist beginnt mit dem Kaufdatum. Bitte bewahren Sie den Original-Kassenbon gut auf. Diese Unterlage wird als Nachweis für den Kauf benötigt.
  • Seite 17: Service Österreich

    Service Österreich Tel.: 0800 292726 E-Mail: owim@lidl.at Service Schweiz Tel.: 0800562153 E-Mail: owim@lidl.ch DE/AT/CH...
  • Seite 18 List of pictograms used ..........Page 19 Introduction ............... Page 19 Intended use ................Page 19 Description of parts ..............Page 20 Scope of delivery ..............Page 20 Technical data ................. Page 21 Safety notes ..............Page 21 Safety instructions for batteries / rechargeable batteries ..Page 23 Initial use ................
  • Seite 19: List Of Pictograms Used

    List of pictograms used Please read the instructions for use. Danger of explosion! Wear safety gloves! Attention! Protect yourself from laser radiation! Do not stare into the laser beam! Direct current / voltage Including batteries Self-levelling cross line laser level Introduction We congratulate you on the purchase of your new product.
  • Seite 20: Description Of Parts

    in enclosed operating sites. Any other use or modification of the product shall be considered improper use and may result in serious accidents. The manufacturer assumes no liability for damages due to improper use. Not intended for commercial purposes. Description of parts H-button to switch on / off horizontal line LED indicator (red: levelling off, green levelling on) V-button to switch on / off vertical line...
  • Seite 21: Technical Data

    Technical data Operating voltage: (direct current) Working area at least 10 m Levelling accuracy: +/- 0.5 mm / m Typical self-levelling range: ± 4° Typical levelling time: approx. 4 seconds Operating temperature: +5 °C–35 °C Max. relative humidity: ≤ 90 % Laser class: Wave length (λ): 635 nm...
  • Seite 22 Do not expose the product to extremely high temperatures or tem- perature fluctuations. For example, do not leave it in your car for a long time. In the case of large temperature fluctuations, let the product acclimatise before using it. In extreme temperatures or temperature fluctuations, the precision of the product can be impaired.
  • Seite 23: Safety Instructions For Batteries / Rechargeable Batteries

    Safety instructions for batteries / rechargeable batteries DANGER TO LIFE! Keep batteries / rechargeable batteries out of reach of children. If accidentally swallowed seek immediate medical attention. Swallowing may lead to burns, perforation of soft tissue, and death. Severe burns can occur within 2 hours of ingestion. DANGER OF EXPLOSION! Never recharge non-re- chargeable batteries.
  • Seite 24: Initial Use

    Initial use Check that the delivery is complete and that there is no visible damage. Remove the packaging material from the product. Inserting / Changing batteries Open the battery compartment cover (see fig. B). Insert batteries into the battery compartment (see fig.
  • Seite 25: Using Individual Lines And Crossed Lines

    Note: if the product is agitated or its position is changed during operation, the product will automatically re-level. After re-levelling check the positions of the horizontal and vertical laser lines against reference points to avoid errors. Using individual lines and crossed lines When the product is performing automatic levelling and the base of the measurement device deviates from the horizontal by less than 4°...
  • Seite 26: Working With The Tripod

    Working with the tripod Setup and alignment 1. Pull all the three legs of the tripod apart. The plastic ring which is connecting all the three cross hinges will be moved to the end of the middle column. 2. Release the blocking levers and extend the legs until you get your desired height.
  • Seite 27: Maintenance And Cleaning

    4. Check the tight fitting of the quick shoe within the tripod flat head Maintenance and cleaning The product requires no maintenance. ATTENTION! Never submerge the product in water or other liquids. Do not allow water to enter into the product during cleaning. Keep the product clean to ensure good, secure work.
  • Seite 28: Warranty

    To help protect the environment, please dispose of the product properly when it has reached the end of its useful life and not in the household waste. Information on collection points and their opening hours can be obtained from your local authority. Faulty or used batteries / rechargeable batteries must be recycled in accordance with Directive 2006/66/EC and its amendments.
  • Seite 29: Warranty Claim Procedure

    Warranty claim procedure To ensure quick processing of your case, please observe the following instructions: Please have the till receipt and the item number (e.g. IAN 123456_7890) available as proof of purchase. You will find the item number on the rating plate, an engraving on the front page of the instructions for use (bottom left), or as a sticker on the rear or bottom of the product.
  • Seite 30 Légende des pictogrammes utilisés ....Page 31 Introduction ............... Page 31 Utilisation conforme ..............Page 31 Descriptif des pièces ............... Page 32 Contenu de la livraison ............Page 32 Caractéristiques techniques ............ Page 33 Consignes de sécurité ..........Page 33 Consignes de sécurité...
  • Seite 31: Légende Des Pictogrammes Utilisés

    Légende des pictogrammes utilisés Veuillez lire le mode d'emploi. Risque d'explosion ! Porter des gants de protection ! Attention ! Protégez-vous contre les rayons laser ! Ne regardez pas le rayon laser ! Courant continu / Tension continue Piles fournies Niveau laser en croix Introduction Nous vous félicitons pour l‘achat de votre nouveau produit.
  • Seite 32: Descriptif Des Pièces

    considérée comme non conforme et peut être source de graves dangers. Le fabricant décline toute responsabilité pour les dommages résultant d’une utilisation non conforme. Non conçu pour une utilisation commerciale. Descriptif des pièces Bouton H (marche / arrêt de la ligne horizontale) Voyant lumineux LED de contrôle (rouge : nivellement désactivé, vert nivellement activé) Touche V (pour allumer / éteindre la ligne verticale)
  • Seite 33: Caractéristiques Techniques

    Caractéristiques techniques Tension de service : (courant continu) Zone de travail au moins  : 10 m Précision du nivellement : +/- 0,5 mm/m Zone de nivellement autonome typique : ± 4° Temps de nivellement typique : env. 4 secondes Température de fonctionnement : +5 °C–35 °C Humidité...
  • Seite 34 Ne pas exposer le produit à des variations de température ou tem- pératures extrêmes. Par exemple, ne le laissez pas dans la voiture en été pendant une longue durée. Avant d’utiliser le produit, laissez-le d’abord se remettre à température ambiante s’il a été exposé à de fortes variations de température.
  • Seite 35: Consignes De Sécurité Relatives Aux Piles / Aux Piles Rechargeables

    Consignes de sécurité relatives aux piles / aux piles rechargeables DANGER DE MORT ! Rangez les piles / piles rechargeables hors de la portée des enfants. En cas d’ingestion, consultez immé- diatement un médecin ! Une ingestion peut entraîner des brûlures, une perforation des tissus mous et la mort.
  • Seite 36: Mise En Service

    Avant l‘insertion de la pile, nettoyez les contacts de la pile / de la pile rechargeable ainsi que ceux présents dans le compartiment à piles en vous servant d‘un chiffon sec et non pelucheux ou d‘un coton-tige ! Retirez immédiatement les piles / piles rechargeables usées du produit.
  • Seite 37: Utilisation Du Nivellement Automatique

    Utilisation du nivellement automatique Pour travailler avec le système de nivellement automatique, placez le produit sur un support horizontal et stable, ou attachez-le au tré- pied avec le fil du trépied Une fois allumé, le système de nivellement automatique compense automatiquement les inégalités dans la plage autonivelante de ±...
  • Seite 38: Travailler Sans Nivellement Automatique

    Les lignes croisées sont éteintes dès que la partie inférieure de l’outil de mesure diffère de plus de 4 ° par rapport à l’horizontale, et le témoin lumineux LED devient de nouveau rouge. Travailler sans nivellement automatique Basculez le bouton de verrouillage LOCK en position .
  • Seite 39: Entretien Et Nettoyage

    et atteindre la position souhaitée. Serrez la vis de fermeture dès que la position souhaitée est atteinte. 8. Desserrez le cas échéant la vis de fermeture pour ajuster l‘angle de tête plate de trépied jusqu‘à 90 degrés à la verticale et at- teindre l‘angle souhaité.
  • Seite 40: Rangement

    Faites uniquement appel à des spécialistes qualifiés utilisant uni- quement des pièces de rechange d’origine. Cette mesure permet d’assurer le maintien de la sécurité de l’outil de mesure. Rangement Si vous n’utilisez plus le produit pendant une longue période, enle- vez les piles et stockez-le dans un endroit propre, sec et protégé...
  • Seite 41: Garantie

    Les piles / piles rechargeables ne doivent pas être mises au rebut avec les ordures ménagères. Elles peuvent contenir des métaux lourds toxiques et doivent être considérées comme des déchets spéciaux. Les symboles chimiques des métaux lourds sont les suivants : Cd = cadmium, Hg = mercure, Pb = plomb.
  • Seite 42: Article L217-12 Du Code De La Consommation

    2° Ou s‘il présente les caractéristiques définies d‘un commun accord par les parties ou être propre à tout usage spécial recherché par l‘acheteur, porté à la connaissance du vendeur et que ce dernier a accepté. Article L217-12 du Code de la consommation L‘action résultant du défaut de conformité...
  • Seite 43: Faire Valoir Sa Garantie

    Faire valoir sa garantie Pour garantir la rapidité d’exécution de la procédure de garantie, veuillez respecter les indications suivantes : Veuillez conserver le ticket de caisse et la référence du produit (par ex. IAN 123456_7890) à titre de preuve d’achat pour toute demande. Le numéro de référence de l’article est indiqué...
  • Seite 44 Legenda van de gebruikte pictogrammen ..............Pagina 45 Inleiding ................Pagina 45 Correct gebruik ..............Pagina 45 Beschrijving van de onderdelen ..........Pagina 46 Omvang van de levering .............Pagina 46 Technische gegevens ............Pagina 46 Veiligheidsinstructies ..........Pagina 47 Veiligheidsinstructies voor batterijen / accu‘s .....Pagina 48 Ingebruikname ............Pagina 49 Batterijen plaatsen / vervangen ...........Pagina 50...
  • Seite 45: Legenda Van De Gebruikte Pictogrammen

    Legenda van de gebruikte pictogrammen Lees a.u.b. de gebruiksaanwijzing. Explosiegevaar! Veiligheidshandschoenen dragen! Opgelet! Bescherm u tegen laserstraling! Niet in de laserstraal kijken! Gelijkstroom / -spanning Inclusief batterijen Kruislijnlaser Inleiding Hartelijk gefeliciteerd met de aankoop van uw nieuwe pro- duct. U heeft voor een hoogwaardig product gekozen. De gebruiksaanwijzing is een deel van het product.
  • Seite 46: Beschrijving Van De Onderdelen

    niet doelmatig en houdt een aanzienlijk ongevalrisico in. De fabrikant is niet aansprakelijk voor schade die terug te voeren is op ondoelmatig gebruik. Niet bedoeld voor commercieel gebruik. Beschrijving van de onderdelen H-knop (voor het in- / uitschakelen van de horizontale lijn) Led-controlelampje (rood: nivellering uit, groen: nivellering aan) V-knop (voor het in- / uitschakelen van de verticale lijn) LOCK-schakelaar...
  • Seite 47: Veiligheidsinstructies

    Werkbereik minstens 10 m Nivellerings-nauwkeurigheid: +/- 0,5 mm / m Zelfnivelleringsbereik typisch: ± 4° Nivelleringstijd typisch: ca. 4 seconden Bedrijfstemperatuur: +5 °C–35 °C Relatieve luchtvochtigheid max.: ≤ 90 % Laserklasse: Golflengte (λ): 635 nm Maximaal vermogen P max: 1 mW Aansluiting statief: Batterijen: 2 x 1,5 V-batterijen, type AA...
  • Seite 48: Veiligheidsinstructies Voor Batterijen / Accu's

    temperaturen of temperatuurschommelingen kan de nauwkeurig- heid van het product beïnvloed worden. Vermijd heftige schokken of het omvallen van het meetapparaat. Door beschadigingen aan het meetapparaat kan de nauwkeurig- heid worden beïnvloed. Vergelijk na een heftige schok of val de laserlijn ter controle met een bekende horizontale of verticale refe- rentie-lijn.
  • Seite 49: Ingebruikname

    Inslikken kan leiden tot inwendige verbrandingen, perforatie van zacht weefsel en tot de dood. Ernstige inwendige verbrandingen kunnen binnen 2 uur na het inslikken optreden. EXPLOSIEGEVAAR! Laad niet oplaadbare batterijen nooit op. Sluit de batterijen / accu‘s niet kort en / of open deze niet.
  • Seite 50: Batterijen Plaatsen / Vervangen

    Batterijen plaatsen / vervangen Open het batterijvak-deksel (zie afb. B). Plaats de batterijen in het batterijvak (zie afb. C). Controleer of de batterijen goed zijn geplaatst (zie afb. C) voordat u het batterij- vak-deksel weer sluit. Opmerking: bij sterk ontladen batterijen knippert het led-contro- lelampje Vervang altijd alle batterijen gelijktijdig.
  • Seite 51: Enkele Lijn En Gekruiste Lijnen Gebruiken

    of verticale laserlijn ten opzichte van referentiepunten om fouten te voorkomen. Enkele lijn en gekruiste lijnen gebruiken Als het product zich in de automatische nivellering bevindt en de onderkant van het meetapparaat minder dan 4 ° van waterpas af- wijkt (groene led aan), drukt u voorzichtig op de H-knop om de horizontale lijn in- of uit te schakelen.
  • Seite 52: Met Het Statief Werken

    Met het statief werken Opbouw en afstelling 1. Klap de drie poten van het statief uit elkaar. De kunststof ring die de drie dwarsstangen verbindt, wordt naar het uiteinde van de middenkolom geschoven. 2. Maak de vergrendeling los en verleng de poten tot op de gewenste hoogte.
  • Seite 53: Onderhoud En Reiniging

    3. Als u de kruislijnlaser weer op het statief wilt bevestigen, trekt u aan de hendel van de statief-kop en bevestigt u de snelwisselplaat weer op de statief-kop . Laat daarna de hendel los om deze weer in de uitgangspositie te brengen en de snelwisselplaat te fixeren (afb.
  • Seite 54: Garantie

    Het product en de verpakkingsmaterialen zijn recyclebaar; verwijder deze afzonderlijk voor een betere afvalbehande- ling. Het Triman-logo geldt alleen voor Frankrijk. Informatie over de mogelijkheden om het uitgediende pro- duct na gebruik te verwijderen, verstrekt uw gemeentelijke overheid. Gooi het afgedankte product omwille van het milieu niet weg via het huisvuil, maar geef het af bij het daarvoor bestemde depot of het gemeentelijke milieupark.
  • Seite 55: Afwikkeling In Geval Van Garantie

    garantie komt te vervallen als het product beschadigd wordt, niet cor- rect gebruikt of onderhouden wordt. De garantie geldt voor materiaal- en productiefouten. Deze garantie is niet van toepassing op productonderdelen, die onderhevig zijn aan normale slijtage en hierdoor als aan slijtage onderhevige onderdelen gelden (bijv.
  • Seite 56 Legenda zastosowanych piktogramów ..............Strona 57 Wstęp .................. Strona 57 Przeznaczenie produktu ............Strona 57 Opis części ................Strona 58 Zawartość ................Strona 58 Dane techniczne ..............Strona 59 Wskazówki bezpieczeństwa ......Strona 59 Wskazówki bezpieczeństwa dla baterii / akumulatorów . Strona 61 Uruchomienie ..............
  • Seite 57: Legenda Zastosowanych Piktogramów

    Legenda zastosowanych piktogramów Proszę przeczytać instrukcję obsługi. Niebezpieczeństwo wybuchu! Zakładać rękawice ochronne! Uwaga! Należy chronić się przed promieniowaniem laserowym! Nie wpatrywać się w promień lasera! Prąd stały / napięcie stałe Z bateriami w zestawie Laser krzyżowy Wstęp Gratulujemy Państwu zakupu nowego produktu. Tym samym zdecydowali się...
  • Seite 58: Opis Części

    miejscach zastosowania. Jakiekolwiek inne użycie lub zmiany produktu uważane są za niezgodne z przeznaczeniem i kryją w sobie poważne niebezpieczeństwo wypadku. Producent nie ponosi odpowiedzialności za szkody powstałe wskutek użycia produktu niezgodnego z jego prze- znaczeniem. Nie jest on przeznaczony do celów zarobkowych. Opis części Przycisk H (do włączania / wyłączania linii poziomej) Lampka kontrolna LED (czerwona: niwelacja wyłączona,...
  • Seite 59: Dane Techniczne

    Dane techniczne Napięcie robocze: (prąd stały) Zakres pracy przynajmniej 10 m Dokładność niwelacji: +/- 0,5 mm/m Zakres samoniwelacji typowy: ± 4° Czas niwelacji typowy: ok. 4 sekundy Temperatura robocza: +5 °C–35 °C Względna wilgotność powietrza maks.: ≤ 90 % Klasa lasera: Długość...
  • Seite 60 Chronić produkt przed wilgocią i bezpośrednim promieniowaniem słonecznym. Nie narażać produktu na działanie ekstremalnych temperatur lub wahań temperatury. Nie pozostawiać go leżącego np. przez dłuższy czas w aucie. W przypadku większych wahań temperatury najpierw odczekać, aż produkt się zaadaptuje, zanim zostanie użyty. W przypadku ekstremalnych temperatur lub wahań...
  • Seite 61: Wskazówki Bezpieczeństwa Dla Baterii / Akumulatorów

    Wskazówki bezpieczeństwa dla baterii / akumulatorów ZAGROŻENIE ŻYCIA! Baterie / akumulatory należy trzymać poza zasięgiem dzieci. W przypadku połknięcia należy natych- miast udać się do lekarza! Połknięcie może prowadzić do oparzeń, perforacji tkanki miękkiej i śmierci. Ciężkie poparzenia mogą wystąpić w ciągu 2 godzin po połknięciu.
  • Seite 62: Uruchomienie

    Uruchomienie Sprawdzić zawartość pod kątem kompletności i widocznych uszkodzeń. Należy całkowicie usunąć materiał opakowania z produktu. Wkładanie / Wymiana baterii Otworzyć pokrywę komory na baterie (patrz rys. B). Włożyć baterie do komory baterii (patrz rys. C). Upewnić się, że baterie są poprawnie włożone (patrz rys. C) przed ponownym zamknięciem pokrywy komory baterii Wskazówka: przy niskim stanie baterii lampka kontrolna LED miga.
  • Seite 63: Używanie Linii Pojedynczej I Linii Skrzyżowanych

    Wskazówka: Praca bez niwelacji automatycznej wskazywana jest zawsze przez czerwoną lampkę kontrolną LED Wskazówka: W przypadku wstrząsów lub zmian położenia podczas pracy produkt ponownie jest niwelowany automatycznie. Po ponownej niwelacji należy sprawdzić pozycję poziomej lub pionowej linii lasera w odniesieniu do punktów referencyjnych, aby uniknąć...
  • Seite 64: Wskazówki Dotyczące Pracy

    niwelacji automatycznej wskazywana jest zawsze przez czer- woną lampkę kontrolną LED Wskazówki dotyczące pracy Do zaznaczania należy zawsze używać tylko środka linii laserowej. Szerokość linii lasera zmienia się wraz z odległością. Praca ze statywem Montaż i ustawienie 1. Rozsunąć nóżki statywu.
  • Seite 65: Konserwacja I Czyszczenie

    dokręcona, w tym celu należy przekręcić metalowy uchwyt w kie- runku zgodny z ruchem wskazówek zegara. Metalowy uchwyt znajduje się u dołu płytki szybkiej wymiany Zdejmowanie ze statywu płytki szybkiej wymiany Laser krzyżowy można łatwo zdjąć ze statywu z płytką szybkiej wymiany wykonując następujące kroki: 1.
  • Seite 66: Utylizacja

    Utylizacja Opakowanie wykonane jest z materiałów przyjaznych dla środowiska, które można przekazać do utylizacji w lokalnym punkcie przetwarzania surowców wtórnych. Przy segregowaniu odpadów prosimy zwrócić uwagę na oznakowanie materiałów opakowaniowych, oznaczone są one skrótami (a) i numerami (b) o następującym znaczeniu: 1-7: Tworzywa sztuczne/20-22: Papier i tektura/80-98: Materiały kompozytowe.
  • Seite 67: Gwarancja

    Gwarancja Produkt wyprodukowano według wysokich standardów jakości i pod- dano skrupulatnej kontroli przed wysyłką. W przypadku wad produktu nabywcy przysługują ustawowe prawa. Gwarancja nie ogranicza usta- wowych praw nabywcy produktu. Produkt objęte jest 3 gwarancją, licząc od daty zakupu. Gwarancja wygasa w razie zawinionego przez użytkownika uszkodzenia produktu, niewłaściwego użycia lub konserwacji.
  • Seite 68: Serwis

    Serwis Serwis Polska Tel.: 008004911946 E-Mail: owim@lidl.pl 68 PL...
  • Seite 69 Legenda použitých piktogramů ....Strana 70 Úvod ..................Strana 70 Použití ke stanovenému účelu..........Strana 70 Popis dílů ................Strana 71 Obsah dodávky ..............Strana 71 Technické údaje ..............Strana 71 Bezpečnostní upozornění ........Strana 72 Bezpečnostní pokyny pro baterie a akumulátory ....Strana 73 Uvedení...
  • Seite 70: Legenda Použitých Piktogramů

    Legenda použitých piktogramů Přečtěte si návod k obsluze. Nebezpečí výbuchu! Noste ochranné rukavice! Pozor! Chraňte se před laserovým zářením! Nedívat se do laserového paprsku! Stejnosměrný proud / stejnosměrné napětí Včetně baterií Křížový liniový laser Úvod Blahopřejeme Vám ke koupi nového výrobku. Rozhodli jste se pro kvalitní...
  • Seite 71: Popis Dílů

    vzniklé jiným použitím než použitím k určenému účelu. Výrobek není určen k využití k výdělečné činnosti. Popis dílů Tlačítko H (na zapnutí a vypnutí vodorovné linie) LED kontrolka (červená: nivelace vypnutá, zelená: nivelace zapnutá) Tlačítko V (k zapnutí a vypnutí svislé linie) Spínač LOCK Přihrádka na baterie Víčko přihrádky na baterie Stativový...
  • Seite 72: Bezpečnostní Upozornění

    Rozsah samočinné nivelace typický: ± 4° Doba nivelace typická: cca 4 vteřiny Provozní teplota: +5 °C–35 °C Relativní vlhkost maximálně: ≤ 90 % Třída laseru: Vlnová délka (λ): 635 nm Maximální výkon P max.: 1 mW Závit stativu: Baterie: 2 x baterie 1,5 V, typ AA Váha výrobku: 260 g (bez baterií) Váha stativu:...
  • Seite 73: Bezpečnostní Pokyny Pro Baterie A Akumulátory

    Před transportem výrobek vypněte. Po vypnutí se zablokuje kyvadlová jednotka, která by se mohla pohyby při transportu poškodit. Nepřibližujte výrobek do blízkosti kardiostimulátorů. Magnet uvnitř výrobku vytváří magnetické pole, které může negativně ovlivnit funkci kardiostimulátorů. Držte výrobek v odstupu od magnetických nosičů dat a přístrojů citlivých na magnetické...
  • Seite 74: Uvedení Do Provozu

    Nebezpečí vytečení baterií / akumulátorů Zabraňte extrémním podmínkám a teplotám, např. na topení anebo na slunci, které mohou negativně ovlivnit funkci baterií nebo akumulátorů. V případě vytečení baterií / akumulátorů zabraňte kontaktu chemi- kálií s pokožkou, očima a sliznicemi! Omyjte ihned postižená místa dostatečným množstvím čisté...
  • Seite 75: Zapínání A Vypínání

    Zapínání a vypínání K zapnutí výrobku posuňte spínač LOCK do polohy . Ihned po zapnutí vysílá výrobek z výstupního otvoru dvě laserové linie. K vypnutí výrobku posuňte spínač LOCK do polohy . Po vypnutí se zablokuje kyvadlová jednotka. Použití automatické nivelace Pro práci s nivelační...
  • Seite 76: Práce Bez Automatické Nivelace

    Překřížené linie se vypnou, jakmile se spodní strana výrobku odchýlí od vodorovné polohy o více než 4°, LED kontrolka potom svítí zase červeně. Práce bez automatické nivelace Nastavte spínač LOCK do polohy . Přidržte tlačítko H stisknuté, až se rozsvítí LED kontrolka červeně.
  • Seite 77: Údržba A Čištění

    8. Ke svislému nastavení ploché hlavy stativu až o 90 stupňů, k dosažení požadovaného úhlu povolte nejdříve jistící šroub . Po nastavení požadovaného úhlu utáhněte pevně jistící šroub Připevnění křížového laseru Nasměrujte závit křížového laseru na upevňovací šroub rychlovýměnné desky a utáhněte pevně šroub otáčením kovového dr- žáku ve směru hodinových ručiček.
  • Seite 78: Zlikvidování

    Zlikvidování Obal se skládá z ekologických materiálů, které můžete zlikvidovat prostřednictvím místních sběren recyklovatelných materiálů. Při třídění odpadu se řiďte podle označení obalových mate- riálů zkratkami (a) a čísly (b), s následujícím významem: 1–7: umělé hmoty / 20–22: papír a lepenka / 80–98: složené látky. Výrobek a obalové...
  • Seite 79: Postup V Případě Uplatňování Záruky

    Pokud se do 3 let od data zakoupení tohoto výrobku vyskytne vada ma- teriálu nebo výrobní vada, výrobek Vám – dle našeho rozhodnutí – bez- platně opravíme nebo vyměníme. Tato záruka zaniká, jestliže se výrobek poškodí, neodborně použil nebo neobdržel pravidelnou údržbu. Záruka platí...
  • Seite 80 Legenda použitých piktogramov ....Strana 81 Úvod ..................Strana 81 Používanie v súlade s určeným účelom ......Strana 81 Popis častí ................Strana 82 Obsah dodávky ..............Strana 82 Technické údaje ..............Strana 83 Bezpečnostné upozornenia ......Strana 83 Bezpečnostné upozornenia týkajúce sa batérií...
  • Seite 81: Legenda Použitých Piktogramov

    Legenda použitých piktogramov Prečítajte si návod na obsluhu. Nebezpečenstvo explózie! Noste ochranné rukavice! Pozor! Chráňte sa pred laserovým žiarením! Nepozerajte do laserového lúča! Jednosmerný prúd / napätie Vrátane batérií Krížový líniový laser Úvod Blahoželáme Vám ku kúpe Vášho nového výrobku. Rozhodli ste sa pre veľmi kvalitný...
  • Seite 82: Popis Častí

    určeným účelom a predstavuje značné nebezpečenstvá úrazu. Výrobca nezodpovedá za škody vzniknuté používaním výrobku, ktoré je v roz- pore s jeho určeným účelom. Nevhodné na priemyselné používanie. Popis častí Tlačidlo H (pre za- / vypnutie horizontálnej línie) LED-kontrolka (červená: nivelácia vypnutá, zelená: nivelácia zapnutá) Tlačidlo V (pre za- / vypnutie vertikálnej línie) Spínač...
  • Seite 83: Technické Údaje

    Technické údaje Prevádzkové napätie: (jednosmerný prúd) Pracovná oblasť minimálne 10 m Presnosť nivelácie: +/- 0,5 mm/m Samonivelačná oblasť typicky: ± 4° Čas nivelácie typicky: cca. 4 sekundy Prevádzková teplota: +5 °C–35 °C Relatívna vlhkosť vzduchu max.: ≤ 90 % Laserová trieda: Vlnová...
  • Seite 84 Nevystavujte výrobok extrémnym teplotám alebo teplotným výkyvom. Nenechávajte ho napr. ležať dlhší čas v aute. Pri väčších teplotných výkyvoch nechajte výrobok pred uvedením do prevádzky prispô- sobiť sa teplote okolia. Pri extrémnych teplotách alebo teplotných výkyvoch môže byť ovplyvnená precíznosť výrobku. Zabráňte silným nárazom alebo pádom meracieho nástroja.
  • Seite 85: Bezpečnostné Upozornenia Týkajúce Sa Batérií / Akumulátorových Batérií

    Bezpečnostné upozornenia týkajúce sa batérií / akumulátorových batérií NEBEZPEČENSTVO OHROZENIA ŽIVOTA! Batérie / aku- mulátorové batérie držte mimo dosahu detí. V prípade prehltnutia okamžite vyhľadajte lekára! Prehltnutie môže mať za následok popáleniny, perforáciu mäkkých tkanív a smrť. Ťažké popáleniny môžu nastať do 2 hodín po prehltnutí. NEBEZPEČENSTVO EXPLÓZIE! Nenabíjateľné...
  • Seite 86: Uvedenie Do Prevádzky

    Uvedenie do prevádzky Skontrolujte obsah dodávky ohľadom úplnosti a viditeľných poškodení. Odstráňte celý obalový materiál z výrobku. Výmena / vkladanie batérií Otvorte kryt priečinka pre batérie (pozri obr. B). Do priečinka pre batérie vložte batérie (pozri obr. C). Uistite sa, že sú...
  • Seite 87: Používanie Jednotlivých Línií A Skrížených Línií

    Poznámka: Pri otrasoch alebo zmene polohy počas prevádzky je výrobok automaticky znovu vyrovnaný. Po novej nivelácii skon- trolujte pozíciu vodorovných resp. zvislých laserových línií vzhľadom k referenčným bodom, aby ste predišli chybám. Používanie jednotlivých línií a skrížených línií Keď sa výrobok nachádza v automatickej nivelácii a spodná strana meracieho nástroja sa odchyľuje menej ako 4°...
  • Seite 88: Práca So Statívom

    Práca so statívom Montáž a nastavenie 1. Rozložte tri nohy statívu od seba. Plastový krúžok , ktorý spája všetky tri priečne kĺby, sa posunie na koniec strednej priečky. 2. Uvoľnite aretačné páky a predĺžte nohy na želanú dĺžku. 3. Potom všetky tieto aretačné páky sklopte naspäť 4.
  • Seite 89: Údržba A Čistenie

    4. Skontrolujte, či je rýchlovýmenná platňa dostatočne upevnená na plochej hlave statívu Údržba a čistenie Výrobok si nevyžaduje údržbu. POZOR! Výrobok nikdy neponárajte do vody alebo iných kvapalín. Pri čistení do výrobku nesmie preniknúť vlhkosť. Udržiavajte výrobok čistý, aby ste mohli dobre a bezpečne pracovať. Na čistenie schránky používajte suchú...
  • Seite 90: Záruka

    Ak výrobok doslúžil, v záujme ochrany životného prostredia ho neodhoďte do domového odpadu, ale odovzdajte na odbornú likvidáciu. Informácie o zberných miestach a ich otváracích hodinách získate na Vašej príslušnej správe. Defektné alebo použité batérie / akumulátorové batérie musia byť odovzdané...
  • Seite 91: Postup V Prípade Poškodenia V Záruke

    Postup v prípade poškodenia v záruke Pre zaručenie rýchleho spracovania Vašej požiadavky dodržte prosím nasledujúce pokyny: Pre všetky otázky majte pripravený pokladničný doklad a číslo výrobku (napr. IAN 123456_7890) ako dôkaz o kúpe. Číslo výrobku nájdete na typovom štítku, gravúre, na prednej strane Vášho návodu (dole vľavo) alebo ako nálepku na zadnej alebo spodnej strane.
  • Seite 92 OWIM GmbH & Co. KG Stiftsbergstraße 1 74167 Neckarsulm GERMANY Model-No.: HG05420 Version: 06 / 2020 Stand der Informationen · Last Information Update · Version des informations · Stand van de informatie · Stan informacji · Stav informací · Stav informácií: 05 / 2020 Ident.-No.: HG05420052020-8 IAN 338152_2001...

Diese Anleitung auch für:

Ian 338152 2001

Inhaltsverzeichnis