Inhaltsverzeichnis
Werbung
Verfügbare Sprachen
Verfügbare Sprachen
Quicklinks
uni
I, II, III
®
econom
®
Gebrauchsanweisung
Diagnostische Instrumente
Instructions
Diagnostic Instruments
Mode d' emploi
Instruments de diagnostiques
Instrucciones para el uso
Instrumentos diagnósticoss
Инструкция по эксплуатации
Диагностические инструменты
Istruzioni per I' uso
Presidi diagnostici
Werbung
Kapitel
Inhaltsverzeichnis

Verwandte Anleitungen für Riester uni I


Inhaltszusammenfassung für Riester uni I
- Seite 1 I, II, III ® econom ® Gebrauchsanweisung Diagnostische Instrumente Instructions Diagnostic Instruments Mode d’ emploi Instruments de diagnostiques Instrucciones para el uso Instrumentos diagnósticoss Инструкция по эксплуатации Диагностические инструменты Istruzioni per I’ uso Presidi diagnostici...
-
Seite 2: Inhaltsverzeichnis
Bitte lesen Sie die Gebrauchsanweisung vor Inbetriebnahme sorgfältig durch und bewahren Sie sie gut auf. Sollten Sie Fragen haben, stehen wir, oder der für Sie zuständige Vertreter für Riester Produkte, Ihnen jederzeit gerne zur Verfügung. Unsere Adresse finden Sie auf der letzten Seite dieser Gebrauchsanweisung. -
Seite 3: Sicherheitssymbole
1.2 Sicherheitssymbole Symbol Hinweis Befolgen Sie die Anweisungen in der Bedienungsanleitung. Type B Anwendungsteil Medizinisches Gerät Schutzgeräte der Klasse II Warnung! Das allgemeine Warnzeichen weist auf eine möglicherweise gefährliche Situation hin, die zu schweren Verletzungen führen kann. Achtung! Wichtiger Hinweis in dieser Anleitung. Das Achtungssymbol weist auf eine potenziell gefährliche Situation hin, die zu leichten oder mittelschweren Verletzungen führen kann. -
Seite 4: Verpackungssymbole
Das Nasalspekulm wurde zur Beleuchtung und somit zur Untersuchung des Naseninneren hergestellt. May- Ophthalmoskop: Das Riester May- Ophthalmoskope wurden zur Untersuchung des Auges und des Augen- hintergrundes hergestellt. Lampenträger und Zubehör: Der Lampenträger wurde zur Beleuchtung der Mundhöhle und des Rachenraumes her- gestellt. -
Seite 5: Kontraindikation
Riester Lampenträger hergestellt. -Zubehör: Kehlkopfspiegel Der Kehlkopfspiegel wurde zur Spiegelung und somit zur Untersuchung des Mund- Ra- chenraumes auf Entzündungen, Verletzungen hin in Kombination mit dem Riester Lampen- träger hergestellt. 1.4.2 Kontraindikation Überschreiten Sie die empfohlene maximale Expositionsdauer nicht 1.4.3 Bestimmungsgemäße Patientenpopulation... - Seite 6 Komponenten, die gewartet werden können. Die Batterie nicht öffnen, kurzschließen oder in einem Feuer entsorgen Nur Original von Riester freigegebene Teile und Ersatzteile verwenden, sonst können Gerä- tesicherheit und -leistung beeinträchtigt sein. Weil längere intensive Lichteinwirkung die Netzhaut beschädigen kann, sollte die Ver- wendung des Geräts für die Augenuntersuchung nicht unnötig verlängert werden und die...
-
Seite 7: Erste Anwendung
betragen kann! Defekte Lampen müssen umgehend ersetzt werden. Die Entsorgung des gebrauchten Medizinprodukts muss gemäß den geltenden medizini- schen Praktiken oder örtlichen Vorschriften zur Entsorgung infektiöser biologischer medi- zinischer Abfälle erfolgen. Batterien und elektrische / elektronische Geräte müssen gemäß den örtlichen Vorschriften entsorgt werden, nicht mit Hausmüll. - Seite 8 Steckdosengriff Typ C mit Rheostat inkl. ri-accu® Art.-Nr.: 2031-200 Vakuum 2,7 V / XL 2,5 V / 230 V Art.-Nr.: 2032-200 Vakuum 2,7 V / XL 2,5 V / 120 V Art.-Nr.: 2031-201 XL 2,5 V / 230 V Art.-Nr.: 2032-201 XL 2,5 V / 120 V Art.-Nr.: 2031-202 XL 3,5 V / 230 V...
-
Seite 9: Gerätefunktion
2.3.2 Batteriegriff Typ C mit Rheostat 3,5 V (für ri-charger® L) Um diesen Batteriegriff zu betreiben benötigen Sie: - 1 Akku von RIESTER mit 3,5 V (Art.Nr. 10691 ri-accu® L). - 1 Ladegerät ri-charger® L (Art.Nr. 10705, Art.Nr. 10706) 2.3.3 Batteriegriff Typ C mit Rheostat 3,5 V zum Laden in der Steckdose 230 V oder 120 V Um diesen Steckdosengriff zu betreiben benötigen Sie:... -
Seite 10: Einlegen Der Akkus
3.3 Laden der Batteriegriffe mit Akkus: 3.3.1 Batteriegriff (2.3.1) Typ C mit Rheostat 2,5 V (für ri-charger®). − Er kann kann nur im Ladegerät ri-charger® L (Art.Nr. 10700, Art.Nr. 10701) von RIESTER geladen werden. − Dem Ladegerät ri-charger® liegt eine extra Gebrauchsanweisung bei, die beachtet wer-... -
Seite 11: Ein- Und Ausschalten
3.3.1.1 Batteriegriff (2.3.2) Typ C mit Rheostat 3,5 V (für ri-charger® L). − Er kann kann nur im Ladegerät ri-charger® L (Art.Nr. 10705, Art.Nr. 10706) von RIESTER geladen werden. − Dem Ladegerät ri-charger® L liegt eine extra Gebrauchsanweisung bei, die beachtet werden muss. -
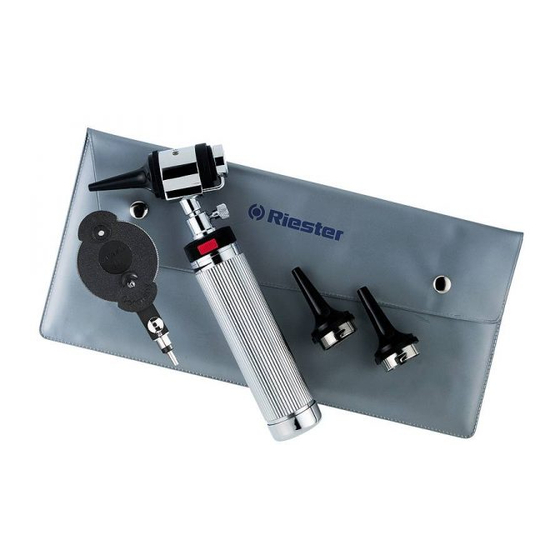
Seite 12: Otoskop
der “0” weg drehen. Schalten Sie das Instrument aus, indem Sie den roten Ein-/Aus-Schal- ter gedrückt nach rechts auf Position “0” drehen. 3.3.6 Rheostat zur Regulierung der Lichtintensitat Anhand des Rheostates ist es möglich, die Lichtintensität einzustellen. Je nach dem, wie weit Sie den Schalter mit dem schwarz gerändelten Ring entgegen dem oder in Richtung Uhrzeigersinn drehen, ist die Lichtintensität schwächer oder stärker. -
Seite 13: Ophthalmoskop
3.5 Ophthalmoskop 1. Linsenrad mit Korrekturlinsen 2. Einsatz mit Lampe 3.5.1 Linsenrad mit Korrekturlinsen Die Korrekturlinsen können am Linsenrad eingestellt werden. Es stehen folgende Korrek- turlinsen zur Auswahl: 0 bis + 20 und 0 bis - 20 Dioptrien. Die Werte können im beleuchteten Sichtfeld abgelesen werden. -
Seite 14: Nasenspekulum
3.6.1 Auswechseln der Lampe Drehen Sie die Lampe vorne am Lampenträger entgegen dem Uhrzeigersinn herunter und drehen Sie eine neue Lampe in Richtung Uhrzeigersinn wieder auf den Lampenträger auf. Defekte Lampen müssen umgehend ersetzt werden. Bitte beachten Sie, das die Temperatur beim bestimmungsgemässen Gebrauch über 41°C betragen kann! 3.7 Nasenspekulum 3.7.1 Inbetriebnahme und Funktion... -
Seite 15: Pflegehinweise
4. Pflegehinweise 4.1 Allgemeine Information Die Reinigung und Desinfektion der Medizinprodukte dient zum Schutz des Patienten, des Anwenders und Dritter und zum Werterhalt der Medizinprodukte. Aufgrund des Produktdesigns und der verwendeten Materialien kann kein definiertes Limit von max. durchführbaren Aufbereitungszyklen festgelegt werden. Die Lebensdauer der Me- dizinprodukte wird durch deren Funktion und den schonenden Umgang bestimmt. -
Seite 16: Technische Daten
Desinfektion: Manuell Ausstattung: Desinfektionsmittel (z.B. CIDEX OPA, Johnson & Johnson 20391 wurde vali- diert ), demineralisiertes Wasser ( demineralisiertes Wasser, gemäß KRINK/BfArM Emp- fehlung frei von fakultativ pathogenen Mikroorganismen ) 20±2°C, sterile fusselfreie Tücher. 1. Die Desinfektionsmittellösung nach Herstellerangaben zubereiten ( CIDEX OPA ist eine gebrauchsfertige Lösung, die Konzentration muss mit Teststreifen überprüft werden, sie- he Herstellerangaben ) ( CIDEX OPA wurde validiert ). -
Seite 17: Wartung / Genauigkeitsprüfung / Kalibrierung / Angewandte Normen
Die Instrumente und deren Zubehör bedürfen keiner spezieller Wartung. Sollte ein Instrument aus irgendwelchen Gründen überprüft werden müssen, schicken Sie es bitte an uns oder an einen autorisierten Riester Fachhändler in Ihrer Nähe, den wir Ihnen auf Anfrage gerne benennen. - Seite 18 9. Elektromagnetische Verträglichkeit Medizinische elektrische Geräte unterliegen hinsichtlich der elektromagnetischen Verträg- lichkeit (EMV) besonderen Vorsichtsmaßnahmen. Tragbare und mobile Hochfrequenz-Kommunikations-Einrichtungen können medizinische elektrische Geräte beeinflussen. Das ME-Gerät ist für den Betrieb in einer elektromagne- tischen Umgebung der häuslichen Gesundheitsführsorge und für professionellen Einrich- tungen wie industrielle Bereiche und Krankenhäuser bestimmt.
- Seite 19 Leitlinien und Herstellererklärung – elektromagnetische Immunität Die Diagnostische Instrumente uni® I, II, III /econom® mit Zubehör sind für den Betrieb in einer wie unten angegebenen elektromagnetischen Umgebung bestimmt. Der Kunde oder der Anwender der Diagnostische Instrumente uni® I, II, III / econom® mit Zubehör sollte sicherstellen, dass es in einer solche Umgebung benutzt wird.
- Seite 20 Leitlinien und Herstellererklärung – elektromagnetische Immunität Die Diagnostische Instrumente uni® I, II, III /econom® mit Zubehör sind für den Betrieb in einer wie unten angegebenen elektromagnetischen Umgebung bestimmt. Der Kunde oder der Anwender der Diagnostische Instrumente uni® I, II, III / econom® mit Zubehör sollte sicherstellen, dass es in einer solche Umgebung benutzt wird.
- Seite 21 ANMERKUNG 1 Bei 80 MHz und 800 MHz gilt der höhere Frequenzbereich. ANMERKUNG 2 Diese Richtlinien gelten möglicherweise nicht in allen Situationen. Die elektromagnetische Ausbreitung wird durch Absorption und Reflexion von Strukturen, Objekten und Menschen beeinflusst. Feldstärken von festen Sendern, wie z. B. Basisstationen für Funk- (Mobil- / Schnurlos-) Telefone und Landmobilfunkgeräte, Amateurfunk, AM- und FM-Rundfunk und Fernsehüber- tragung können theoretisch nicht genau vorhergesagt werden.
-
Seite 22: Garantie
Berechnung vor. Unverbindliche Kostenvoranschläge können Sie ebenfalls gerne kostenlos bei uns einholen. Im Fall einer Garantieleistung oder Reparatur bitten wir Sie, das Riester Produkt mit kom- plett ausgefüllter Garantiekarte an folgende Adresse zurück zusenden: Rudolf Riester GmbH Dept. - Seite 24 Directive (EU) 2017/75 and is always subject to the strictest quality controls. The outstanding quality will ensure reliable diagnoses. This user manual describes the use of the Riester instruments uni® I, II, III and econom® and their accessories.
-
Seite 25: Safety Symbols
1.2 Safety symbols Symbol Note on symbol Follow the instructions in the operation manual. The symbol is printed in black colour on the probe cover box. Application part type B Medical device Protection class II Warning! The general warning symbol indicates a potentially dangerous situation that can lead to serious injuries. -
Seite 26: Packaging Symbols
-Accessories: Tongue Depressor Holder The tongue depressor holder was manufactured to examine the mouth and throat area and can be used with standard wooden or plastic depressors, and the Riester bent arm illu- minator. -Accessories: laryngeal mirror The laryngeal mirror was made for mirroring and thus for examining the oropharynx in combination with the Riester bent arm illuminator. -
Seite 27: Contraindications
-Accessories: tongue blade holder: The tongue blade holder was manufactured to examine the mouth and throat in combination with standard wooden and plastic tongue depressors in conjunction with the Riester bent arm illuminator. -Accessories: laryngeal mirror The laryngeal mirror was made for mirroring and thus for examining the oropharynx in combination with the Riester bent arm illuminator. - Seite 28 Do not open, short circuit, or dispose of the battery in a fire. Only use original parts and spare parts approved by Riester, otherwise device safety and performance may be impaired. Because prolonged intense exposure to light can damage the retina, the use of the eye exam device should not be unnecessarily prolonged, and the brightness setting should not be set higher than needed for a clear representation of the target structures.
-
Seite 29: First Use
Batteries and electrical/electronic devices may not be treated as domestic waste and must be disposed of in accordance with local regulations. All serious incidents related to the product must be reported to the manufacturer and the competent authority of the Member State in which the user and/or the patient is resident. 2. -
Seite 30: Device Function
Battery handle type C with rheostat incl. ri-accu® and ri-charger® Art. no.: 2033-200 Vacuum 2.7 V / XL 2.5 V / 230 V Art. no.: 2034-200 Vacuum 2.7 V / XL 2.5 V / 120 V Art. no.: 2033-201 XL 2.5 V / 230 V Art. -
Seite 31: Battery Handles Product Range
2.3.2 Battery handle type C with rheostat 3.5 V (for ri-charger® L) To operate this battery handle, you will need: - 1 rechargeable battery from RIESTER with 3.5 V (art.no. 10691 ri-accu® L). - 1 ri-charger® L charger (part no. 10705, part no. 10706) 2.3.3 Battery handle type C with rheotronic®... -
Seite 32: Inserting The Rechargeable Batteries:
3.3.1.1 Battery handle (2.3.2) type C with rheostat 3.5 V (for ri-charger® L) − Can only be used in the ri-charger® L charger (art.no. 10705, part no. 10706) by RIESTER. − The ri-charger® L charger comes with an additional user manual that must be observed. -
Seite 33: Switching On And Off
the rechargeable battery at the opening in the battery handle cover (part no. 10694 ri-ac- cu® L). Now connect the power plug of the plug-in charger to the power supply. The charge status of the battery is indicated via the LED on the plug-in charger. Red light means charging, green light means the battery is fully charged. -
Seite 34: Ophthalmoscope
3.4.1 Attaching and removing ear specula Place the desired ear speculum on the otoscope head so that the recess on the metal part of the ear speculum fits into the guide pin of the head. Fasten the speculum firmly by turning it clockwise. -
Seite 35: Bent Arm Illuminator
higher than needed for a clear representation of the target structures. The irradiation dose of the photochemical exposure to the retina is the product of irradiance and duration of irradiation. If the irradiance is reduced by half, the irradiation time can be twice as long to reach the maximum limit. -
Seite 36: Laryngeal Mirror
the depressor. Take the tongue blade holder and place it on the front of the bent arm illuminator. Take standard wooden or plastic depressors and push them into the opening provided in the tongue blade holder. Please note that the temperature can exceed 41 °C (105,8°F) during intended use! 3.9 Laryngeal mirror 3.9.1. -
Seite 37: Technical Specifications
cleaning agent, lint-free cloths (Braun Wipes Eco 19726 have been validated). 1. The cleaning solution is prepared according to the manufacturer‘s instructions for the cleaning agent (neodisher Mediclean 0.5% has been validated). 2. Completely immerse the medical devices in the cleaning solution. 3. -
Seite 38: Nasal Speculum
No. 10460 2 mm No. 10461 3 mm No. 10462 4 mm No. 10463 4 mm No. 10464 9 mm (Nasal speculum) No. 10960 Bulb for pneumatic otoscopy BATTERY HANDLE No. 10426 Upper part of the handle with rheostat and plug cap No. -
Seite 39: Maintenance / Accuracy Check / Calibration / Applied Standards
The instruments and their accessories require no special maintenance. If an instrument needs to be tested for any reason, please send it to us or an authorized Riester dealer in your area, the details of which we will provide you with upon request. 8. Disposal... - Seite 40 Directives and manufacturer‘s declaration - Electromagnetic emissions The diagnostic instruments uni® I, II, III /econom® are intended for use in the elec- tromagnetic environment specified below. The customer or user of the diagnostic inst- ruments uni® I, II, III / econom® with accessories should ensure that they are used in such an environment.
- Seite 41 Guidelines and manufacturer‘s declaration - electromagnetic emissions The diagnostic instruments uni® I, II, III / econom® with accessories are intended for use in an electromagnetic environment as specified below. The customer or user of the diagnostic instruments uni® I, II, III / econom® with accessories should ensure that these are used in such an environment.
- Seite 42 Guidelines and manufacturer's declaration – electromagnetic immunity The diagnostic instruments uni® I, II, III / econom® with accessories are intended for use in an electromagnetic environment as specified below. The customer or user of the diagnostic instruments uni® I, II, III / econom® with accessories should ensure that these are used in such an environment.
- Seite 43 Note 1 At 80 MHz and 800 MHz, the higher frequency range applies. NOTE 2 These guidelines may not apply in all situations. The electromagnetic propaga- tion is affected by absorption and reflection by structures, objects and people. a) Field strengths of fixed transmitters, e.g. base stations for radio (cellular/wireless) telephones and land mobile radios, amateur radio, AM and FM broadcast and television transmissions, cannot be theoretically predicted with accuracy.
-
Seite 44: Warranty
We are of course happy to charge for checks or repairs after the expiry of the warranty period. We also offer free, no-obligation quotes. In case of warranty coverage or repair, we ask you to return the RIESTER product with the completed warranty card to the following address: Rudolf Riester GmbH Dept. - Seite 46 Sa qualité exceptionnelle garantit des diagnostics fiables. Ce manuel d‘utilisation décrit l‘utilisation des instruments Riester uni® I, II, III et econom® et de leurs accessoires. Lisez attentivement ce mode d‘emploi avant de mettre l‘appareil en service et conservez-le en lieu sûr.
-
Seite 47: Symboles De Sécurité
1.2 Symboles de sécurité Symbole Remarque sur le symbole Suivez les instructions du mode d‘emploi. Ce symbole est imprimé en noir sur la boîte de protège-sondes. Pièce appliquée de type B Appareil médical Appareil à protection de classe II Avertissement ! Le signe d'avertissement général indique une situation potentiellement dangereuse pouvant entraîner des blessures graves. -
Seite 48: Symboles De L'emballage
« Point vert » (spécifique au pays) 1.4 Usage Otoscope et accessoires : Cet otoscope Riester a été conçu pour éclairer et examiner le conduit auditif et la memb- rane tympanique. - Accessoires : manches à piles Les manches à piles servent à alimenter les têtes d‘instruments en énergie (les ampoules sont contenues dans les têtes d‘instruments correspondantes). -
Seite 49: Contre-Indications
- Accessoires : miroir laryngé Le miroir laryngé a été conçu pour la mise en miroir et donc pour l‘examen de l‘oropharynx en combinaison avec l‘illuminateur à bras articulé Riester. 1.4.2 Contre-indications Ne dépassez pas le temps d‘exposition maximal recommandé... - Seite 50 N‘ouvrez pas, ne court-circuitez pas et ne jetez pas la batterie au feu. N‘utilisez que des pièces d‘origine et des pièces de rechange approuvées par Riester, au risque d‘altérer la sécurité et les performances de l‘appareil. Étant donné qu‘une exposition prolongée à une lumière intense peut endommager la rétine, l‘utilisation de l‘appareil pour un examen oculaire ne doit pas être inutilement prolongée,...
-
Seite 51: Première Utilisation
Veuillez noter que la température peut dépasser 41 °C (105,8 °F) pendant l‘utilisation pré- vue ! Les ampoules défectueuses doivent être remplacées immédiatement. Les dispositifs médicaux usagés doivent être jetés conformément aux pratiques médicales actuelles ou à la réglementation locale concernant l‘élimination des déchets médicaux in- fectieux et biologiques. - Seite 52 Manche enfichable type C avec rhéostat ri-accu® compris N° d‘art. 2031-200 À vide 2,7 V / XL 2,5 V / 230 V N° d‘art. 2032-200 À vide 2,7 V / XL 2,5 V / 120 V N° d‘art. 2031-201 XL 2,5 V / 230 V N°...
-
Seite 53: Fonctionnement De L'appareil
2.3.2 Manche à piles de type C avec rhéostat 3,5 V (pour ri-charger® L) Pour utiliser ce manche à piles, vous aurez besoin de : - 1 batterie rechargeable 3,5 V de RIESTER de (n° d‘art. 10691 ri-accu® L). - 1 chargeur ri-charger® L (n° d‘art. 10705, n° d‘art. 10706) 2.3.3 Manche à... -
Seite 54: Démarrage
3.2 Démarrage 3.2.1 Insertion et retrait des piles et des batteries rechargeables Utiliser uniquement les combinaisons indiquées de 2.3 à 2.3.4 3.2.2 Insertion des piles : Manche à piles (2.3.1) type C avec rhéostat 2,5 V : − Dévissez le cache du manche à piles sur sa partie inférieure dans le sens inverse des aiguilles d‘une montre. - Seite 55 3.3.2 Manche à piles (2.3.4) de type C avec rhéostat 3,5 V (pour chargeur enfichable) − Il ne peut être utilisé qu‘avec le chargeur enfichable (n° d‘art. 10707) de RIESTER. Pour cela, la petite fiche ronde au bas du manche à piles est branchée dans la batterie rechargeable au niveau de l‘ouverture du couvercle du manche à...
-
Seite 56: Otoscope
Si vous soupçonnez que du liquide ou de la condensation a pénétré dans le manche, celui-ci ne doit en aucun cas être chargé. Cela pourrait provoquer une décharge électrique poten- tiellement mortelle, en particulier avec les manches enfichables. 3.3.4 Mise en place des têtes d‘instruments Assurez-vous que la vis moletée du manche à... -
Seite 57: Remplacement De L'ampoule
dessus. Remettez ensuite le verre. Assurez-vous que l‘encoche de l‘anneau en plastique noir s‘in- sère dans la rainure de guidage de la tête de l‘otoscope. Fixez le spéculum en le tournant dans le sens des aiguilles d‘une montre. 3.4.5 Remplacement de l‘ampoule Retirez le spéculum auriculaire de l‘otoscope (voir 3.4.1). -
Seite 58: Illuminateur À Bras Articulé
3.6 Illuminateur à bras articulé 1. Ampoule 3.6.1 Remplacement de l‘ampoule Dévissez l‘ampoule à l‘avant du support de lampe dans le sens antihoraire et revissez une nouvelle ampoule sur le support de lampe dans le sens horaire. Les ampoules défectueuses doivent être remplacées immédiatement. Veuillez noter que la température peut dépasser 41 °C (105,8 °F) pendant l‘utilisation prévue 3.7 Spéculum nasal 3.7.1 Démarrage et fonctionnement... -
Seite 59: Conseils D'entretien
1. Placez le miroir laryngé sur le support de lampe. Les miroirs laryngés ne peuvent être utilisés qu‘en combinaison avec l‘illuminateur à bras articulé. Cela garantit un éclairage optimal. Prenez l‘un des 2 miroirs laryngés et fixez-le à l‘avant de l‘illuminateur à bras articulé. Veuillez noter que la température peut dépasser 41 °C (105,8 °F) pendant l‘utilisation prévue 4.Conseils d‘entretien 4.1 Informations générales... -
Seite 60: Spécifications Techniques
2. Immergez complètement les dispositifs médicaux dans la solution de nettoyage. 3. Assurez-vous que toutes les surfaces soient complètement mouillées par la solution de nettoyage. 4. Effectuez toutes les étapes suivantes en dessous du niveau de liquide pour éviter les éclaboussures de liquide contaminé. -
Seite 61: Spéculum Nasal
N° d‘art. 10448 Lentille pivotante pour otoscope Spéculums pour otoscope N° d‘art. 10460 2 mm N° d‘art. 10461 3 mm N° d‘art. 10462 4 mm N° d‘art. 10463 5 mm N° d‘art. 10464 9 mm (spéculum nasal) N° d‘art. 10960 Ampoule pour otoscopie pneumatique MANCHE À... -
Seite 62: Maintenance / Contrôle De Précision / Étalonnage / Normes Appliquées
Les instruments et leurs accessoires ne nécessitent aucun entretien particulier. Si un instrument doit être testé pour une raison quelconque, veuillez nous l‘envoyer ou le faire parvenir à un revendeur Riester autorisé dans votre région, dont nous vous fournirons les coordonnées sur simple demande. - Seite 63 Directives et déclaration du fabricant - émissions électromagnétiques Les instruments de diagnostic uni® I, II, III / econom® sont destinés à être utilisés dans l‘environnement électromagnétique spécifié ci-dessous. Le client ou l‘utilisateur des instruments de diagnostic uni® I, II, III / econom® avec accessoires doit s‘assurer qu‘ils sont utilisés dans un tel environnement.
- Seite 64 Directives et déclaration du fabricant - immunité électromagnétique Les instruments de diagnostic uni® I, II, III / econom® et leurs accessoires sont destinés à être utilisés dans un environnement électromagnétique tel que spécifié ci-dessous. Le client ou l‘utilisateur des instruments de diagnostic uni® I, II, III / econom®...
- Seite 65 Directives et déclaration du fabricant - immunité électromagnétique Les instruments de diagnostic uni® I, II, III / econom® et leurs accessoires sont destinés à être utilisés dans un environnement électromagnétique tel que spécifié ci-dessous. Le client ou l‘utilisateur des instruments de diagnostic uni® I, II, III / econom®...
- Seite 66 REMARQUE 1 : À 80 MHz et à 800 MHz, la plage de fréquence la plus élevée s‘applique. REMARQUE 2 : Ces consignes pourraient ne pas s‘appliquer à toutes les situations. La propagation électromagnétique est affectée par l‘absorption et la réflexion des structures, des objets et des personnes.
-
Seite 67: Garantie
Nous proposons éga- lement des devis gratuits et sans engagement. En cas de demande de garantie ou de réparation, veuillez renvoyer le produit Riester avec la carte de garantie dûment remplie à l‘adresse suivante : Rudolf Riester GmbH Service des réparations RR... - Seite 68 La excelente calidad garantiza diagnósticos fiables. Este manual de usuario describe el uso de los instrumentos de Riester uni® I, II, III y eco- nom® y sus accesorios. Lea detenidamente estas instrucciones de uso (IDU) antes de usar el dispositivo y guárdelas en un lugar seguro.
-
Seite 69: Símbolos De Seguridad
1.2 Símbolos de seguridad Simbolo Nota sul simbolo Siga las instrucciones del manual de funcionamiento. El símbolo está impreso en color negro en la caja de capuchones de la sonda. Componente de aplicación tipo B Dispositivo medico Clase de protección II Advertencias El símbolo general de advertencia indica una situación potencialmente peligrosa que podría provocar lesiones graves. - Seite 70 „Punto verde“ (específico del país). 1.4 Objetivo Otoscopio y accesorios: El otoscopio de Riester se fabricó para iluminar y examinar el canal auditivo y la membrana timpánica. -Accesorios: mangos de batería Los mangos de batería se utilizan para suministrar energía a los cabezales de los instru- mentos (las bombillas se encuentran en los cabezales de los instrumentos correspon- dientes).
-
Seite 71: Condiciones Ambientales
Riester. -Accesorios: espejo laríngeo El espejo laríngeo se hizo para reflejar y, por lo tanto, examinar la orofaringe en combinaci- ón con el iluminador de brazo doblado de Riester. 1.4.2 Contraindicaciones No exceda el tiempo máximo de exposición recomendado. - Seite 72 No abra, cortocircuite ni arroje la batería al fuego. Utilice únicamente piezas y repuestos originales aprobados por Riester; de lo contrario, la seguridad y el rendimiento del dispositivo pueden verse afectados. Debido a que la exposición prolongada a luz intensa puede dañar la retina, el uso del dis- positivo para la exploración de ojos no debe prolongarse más de lo necesario y el ajuste de...
- Seite 73 ¡Tenga en cuenta que la temperatura puede superar los 41 °C (105,8 °F) durante el uso previsto! Las bombillas defectuosas deben reemplazarse inmediatamente. El desecho del dispositivo médico utilizado se debe hacer siguiendo las prácticas médicas vigentes o las normativas locales referentes a la eliminación de desechos contagiosos y biológicos.
- Seite 74 Mango enchufable tipo C con reóstato incl. ri-accu® Nº 2031-200 Vacío 2,7 V / XL 2,5 V / 230 V Nº 2032-200 Vacío 2,7 V / XL 2,5 V / 120 V Nº 2031-201 XL 2,5 V / 230 V Nº...
-
Seite 75: Funcionamiento Del Dispositivo
2.3.2 Mango de batería tipo C con reóstato de 3,5 V (para ri-charger® L) Para usar este mango de batería, necesitará: - 1 pila recargable de RIESTER con 3,5 V (nº de art. 10691 ri-accu® L). - 1 cargador ri-charger® L (pieza nº 10705, pieza nº 10706) 2.3.3 Mango de batería tipo C con rheotronic®... -
Seite 76: Insertar Las Pilas
3.2.2 Insertar las pilas: Mango de batería (2.3.1) tipo C con reóstato de 2,5 V: − Desatornille la tapa del mango de la batería en la parte inferior del mango en sentido antihorario. − Introduzca las pilas alcalinas estándar designadas para este mango de batería con el lado positivo en la dirección de la parte superior del mango dentro del mango de la batería. - Seite 77 3.3.2 Mango de batería (2.3.4) tipo C con reóstato de 3,5 V (para cargador enchufable). − Solo se puede cargar con el cargador enchufable (nº de art. 10707) de RIESTER. Para este propósito, el pequeño enchufe redondo de la parte inferior del mango de la bate- ría se conecta a la pila recargable en la abertura de la tapa del mango de la batería (nº...
- Seite 78 3.3.4 Colocación de cabezales de instrumentos Asegúrese de que el tornillo moleteado del mango de la batería esté tan arriba que la punta del tornillo ya no se pueda ver dentro del soporte. Coloque el cabezal del instrumento deseado en el soporte del mango de la batería de modo que la muesca apunte en la dirección del tornillo moleteado.
-
Seite 79: Reemplazo De La Bombilla
3.4.5 Reemplazo de la bombilla Retire el espéculo auricular del cabezal del otoscopio (consulte 3.4.1) Desatornille la bom- billa en sentido antihorario. Atornille la nueva bombilla firmemente en el sentido de las agujas del reloj y vuelva a colo- car el espéculo auricular deseado (consulte 3.4.1). Las bombillas defectuosas deben reem- plazarse inmediatamente. -
Seite 80: Espéculo Nasal
3.6 Iluminador de brazo doblado 1. Bombilla 3.6.1 Reemplazo de la bombilla Desatornille la bombilla en la parte delantera del portalámparas en sentido antihorario y atornille una nueva bombilla en el sentido de las agujas del reloj en el portalámparas. Las bombillas defectuosas deben reemplazarse inmediatamente. -
Seite 81: Información General
3.9 Espejo laríngeo 3.9.1. Puesta en marcha y función 1. Coloque el espejo laríngeo en el portalámparas. Los espejos laríngeos solo se pueden utilizar en combinación con el iluminador de brazo doblado. Esto garantiza una iluminación óptima. Tome uno de los 2 espejos laríngeos y fíjelo a la parte delantera del iluminador de brazo doblado. - Seite 82 2. Sumerja completamente los dispositivos médicos en la solución limpiadora. 3. Asegúrese de que todas las superficies estén completamente humedecidas con la so- lución limpiadora. 4. Realice todos los pasos siguientes por debajo del nivel de líquido para evitar que el líquido contaminado salpique.
- Seite 83 6. Repuestos y accesorios OTOSCOPIO Nº 11504 Tapa de vidrio para otoscopio Nº 10448 Lente giratoria para otoscopio Espéculos para otoscopio Nº 10460 2 mm Nº 10461 3 mm Nº 10462 4 mm Nº 10463 5 mm Nº 10464 9 mm (espéculo nasal) Nº...
- Seite 84 Los instrumentos y sus accesorios no requieren un mantenimiento especial. Si un instrumento necesita ser probado por cualquier motivo, envíenoslo a nosotros o a un distribuidor autorizado de Riester en su área, cuyos detalles le proporcionaremos cuando lo solicite. 8. Eliminación ¡Precaución!
- Seite 85 Guía y declaración del fabricante: emisiones electromagnéticas Los instrumentos de diagnóstico uni® I, II, III / econom® están diseñados para su uso en el entorno electromagnético especificado a continuación. El cliente o usuario de los instrumentos de diagnóstico uni® I, II, III / econom® junto con sus accesorios debe asegurarse de que se utilicen en dicho entorno.
- Seite 86 Guía y declaración del fabricante: inmunidad electromagnética Los instrumentos de diagnóstico uni® I, II, III / econom® están diseñados para su uso en el entorno electromagnético especificado a continuación. El cliente o usuario de los instrumentos de diagnóstico uni® I, II, III / econom® junto con sus accesorios debe asegurarse de que se utilicen en dicho entorno.
- Seite 87 Guía y declaración del fabricante: inmunidad electromagnética Los instrumentos de diagnóstico uni® I, II, III / econom® están diseñados para su uso en el entorno electromagnético especificado a continuación. El cliente o usuario de los instrumentos de diagnóstico uni® I, II, III / econom® junto con sus accesorios debe asegurarse de que se utilicen en dicho entorno.
- Seite 88 NOTA 1: A 80 MHz y 800 MHz, se aplica el rango de frecuencia más alto. NOTA 2 Estas directrices pueden no ser aplicables en todas las situaciones. La propa- gación electromagnética se ve afectada por la absorción y la reflexión de estructuras, objetos y personas.
- Seite 89 También ofrecemos presupuestos gratuitos y sin compromiso. En caso de una reclamación de garantía o reparación, devuelva el producto de RIESTER con la tarjeta de garantía cumplimentada a la siguiente dirección: Rudolf Riester GmbH Dept.
- Seite 90 1.1Vi invitiamo a leggere attentamente le seguenti informazioni importanti prima della messa in funzione Il dispositivo acquistato è un prodotto Riester di alta qualità, fabbricato in conformità alla Direttiva (UE) 2017/75 e sempre soggetto a severissimi controlli di qualità. L‘eccezionale qualità garantirà diagnosi affidabili.
-
Seite 91: Simboli Di Sicurezza
1.2 Simboli di sicurezza Símbolo Nota sobre el símbolo Seguire le istruzioni riportate nel manuale d‘uso. Il simbolo è stampato in nero sulla confezione dei coprisonda. Parte applicata di tipo B Dispositivo medico Classe di protezione II Avvertenze Il simbolo di avvertenza generale indica una situazione potenzialmente pericolosa che può... -
Seite 92: Simboli Presenti Sull'imballaggio
-Accessori: specula nasali: Lo speculum nasale è stato fabbricato per illuminare e quindi esaminare l‘interno del naso. Oftalmoscopio May: Gli oftalmoscopi May di Riester sono stati fabbricati per esaminare l‘occhio e il fondo ocu- lare. Illuminatore a squadra e accessori: L‘illuminatore a squadra è... -
Seite 93: Controindicazioni
Riester. -Accessori: specchio laringeo Lo specchio laringeo è stato realizzato per riflettere e quindi per esaminare l‘orofaringe in combinazione con l‘illuminatore a squadra Riester. 1.4.2 Controindicazioni Non superare il tempo massimo di esposizione consigliato 1.4.3 Popolazione di pazienti prevista Gli strumenti manuali sono destinati a pazienti adulti e pediatrici. - Seite 94 Non aprire, cortocircuitare o gettare la batteria nel fuoco. Utilizzare solo componenti e ricambi originali approvati da Riester, in caso contrario potreb- bero essere compromesse la sicurezza e le prestazioni del dispositivo. Dal momento che un‘esposizione prolungata alla luce intensa può danneggiare la retina, l‘uso del dispositivo per l‘esame dell‘occhio non deve essere inutilmente prolungato e l‘in-...
-
Seite 95: Primo Utilizzo
Le lampadine difettose devono essere sostituite immediatamente. Lo smaltimento del dispositivo medico usato deve essere effettuato in conformità alle vi- genti pratiche mediche o alle normative locali in materia di smaltimento di rifiuti sanitari infettivi e biologici. Le batterie e i dispositivi elettrici o elettronici non possono essere trattati come rifiuti do- mestici e devono essere smaltiti secondo le normative vigenti. - Seite 96 Manico plug-in tipo C con reostato incl. ri-accu® Cod. 2031-200 Vacuum 2,7 V / XL 2,5 V / 230 V Cod. 2032-200 Vacuum 2,7 V / XL 2,5 V / 120 V Cod. 2031-201 XL 2,5 V / 230 V Cod.
-
Seite 97: Funzione Del Dispositivo
2.3.2 Manico a batteria tipo C con reostato 3,5 V (per ri-charger® L) Per utilizzare questo manico a batteria, saranno necessari: - 1 batteria ricaricabile RIESTER da 3,5 V (Cod. 10691 ri-accu® L). - 1 caricatore ri-charger® L (cod. 10705, cod. 10706) 2.3.3 Manico a batteria tipo C con rheotronic®... -
Seite 98: Rimozione Delle Batterie:
3.2.2 Inserimento delle batterie: Manico a batteria tipo C con reostato da 2,5 V − Svitare il coperchio del manico a batteria sulla parte inferiore del manico in senso an- tiorario. − Inserire le batterie alcaline standard designate per questo manico a batteria, con il polo positivo rivolto verso la parte superiore del manico, nel manico a batteria. -
Seite 99: Ricarica Dei Manici A Batteria Con Batterie Ricaricabili
3.3.2 Manico a batteria (2.3.4) tipo C con reostato 3,5 V (per caricatore plug-in) − Può essere ricaricato solo con il caricabatterie (Cod. 10707) di RIESTER. A tale scopo, la piccola spina rotonda nella parte inferiore del manico a batteria viene inse- rita nella batteria ricaricabile all‘apertura nel coperchio del manico a batteria (Cod. -
Seite 100: Otoscopio
3.3.4 Applicazione delle teste degli strumenti Assicurarsi che la vite zigrinata sul manico della batteria sia rivolta verso l‘alto fino a che la punta della vite non sia più visibile all‘interno del manico. Posizionare la testa dello strumento desiderata sul supporto sul manico a batteria in modo che la rientranza punti nella direzione della vite zigrinata. -
Seite 101: Oftalmoscopio
senso antiorario. Avvitare saldamente la nuova lampadina in senso orario e rimontare lo speculum auricolare desiderato (vedere 3.4.1) Le lampadine difettose devono essere sostituite immediatamente. Si prega di considerare che la temperatura potrebbe superare i 41° C (105,8° F) durante l‘uso previsto! 3.5 Oftalmoscopio 1. -
Seite 102: Speculum Nasale
1. Lampadina 3.6.1 Sostituzione della lampadina Svitare la lampadina nella parte anteriore del portalampada in senso antiorario e riavvitare una nuova lampadina in senso orario sul portalampada. Le lampadine difettose devono essere sostituite immediatamente. Si prega di considerare che la temperatura potrebbe superare i 41° C durante l‘uso previsto! 3.7 Speculum nasale 3.7.1 Avvio e funzionamento 1.Speculum nasale chiuso... -
Seite 103: Istruzioni Per La Manutenzione
1. Posizionare lo specchio laringeo sul porta abbassalingua. Gli specchi laringei possono essere utilizzati solo in combinazione con l‘illuminatore a squadra. Ciò garantisce un‘illuminazione ottimale. Prendi uno dei 2 specchi laringei e fissalo alla parte anteriore dell‘illuminatore a squadra. Si prega di considerare che la temperatura potrebbe superare i 41° C (105,8° F) durante l‘uso previsto! 4. -
Seite 104: Dati Tecnici
gente. 4. Eseguire tutti i passaggi successivi al di sotto del livello del liquido per evitare che il liquido contaminato schizzi. 5. Spazzolare le aree difficili da raggiungere degli specula auricolari immersi con una spaz- zola morbida durante il tempo di esposizione. Prestare attenzione ai punti critici e difficili da raggiungere nei quali non è... - Seite 105 Cod. 10461 3 mm Cod. 10462 4 mm Cod. 10463 5 mm Cod. 10464 9 mm (speculum nasale) Cod. 10960 Lampadina per otoscopia pneumatica MANICO A BATTERIA Cod. 10426 Parte superiore del manico con reostato e tappo Cod. 10440 SPECULUM NASALE ILLUMINATORE A SQUADRA Cod.
-
Seite 106: Manutenzione / Controllo Dell'accuratezza / Calibrazione / Standard Applicati
Gli strumenti e i loro accessori non necessitano di manutenzione speciale. Se uno strumento dev‘essere testato per qualsiasi motivo, inviarlo a noi o a un rivenditore autorizzato Riester nella propria zona, del quale vi forniremo i dettagli su richiesta. 8. Smaltimento Attenzione! Lo smaltimento del dispositivo medico usato deve essere effettuato in conformità... - Seite 107 Linee guida e dichiarazione del produttore - emissioni elettromagnetiche Gli strumenti diagnostici uni® I, II, III / econom® sono destinati all‘uso nell‘ambiente elettromagnetico specificato di seguito. Il cliente o l‘utente degli strumenti diagnostici uni® I, II, III / econom® con accessori deve assicurarsi che vengano utilizzati in tale ambiente.
- Seite 108 Linee guida e dichiarazione del fabbricante – immunità elettromagnetica Gli strumenti diagnostici uni® I, II, III / econom® con accessori sono destinati all‘uso in un ambiente elettromagnetico come specificato di seguito. Il cliente o l‘utente degli strumenti diagnostici uni® I, II, III / econom® con accessori deve assicurarsi che questi vengano utilizzati in tale ambiente.
- Seite 109 Linee guida e dichiarazione del fabbricante – immunità elettromagnetica Gli strumenti diagnostici uni® I, II, III / econom® con accessori sono destinati all‘uso in un ambiente elettromagnetico come specificato di seguito. Il cliente o l‘utente degli strumenti diagnostici uni® I, II, III / econom® con accessori deve assicurarsi che questi vengano utilizzati in tale ambiente.
- Seite 110 Nota 1 A 80 MHz e 800 MHz si applica la gamma di frequenza superiore. NOTA 2 Queste linee guida potrebbero non essere applicabili in tutte le situazioni. La propagazione elettromagnetica è influenzata dall‘assorbimento e dalla riflessione di strutture, oggetti e persone. a) Le intensità...
-
Seite 111: Garanzia
Naturalmente saremo lieti di fornire controlli o riparazioni a pagamento dopo la scadenza del periodo di garanzia. Offriamo anche preventivi gratuiti e senza impegno. In caso di richiesta o riparazione in garanzia, si prega di restituire il prodotto RIESTER insie- me alla scheda di garanzia compilata al seguente indirizzo: Rudolf Riester GmbH Dept. - Seite 112 ЭМС Гарантия 1. Вступление 1.1 Ознакомьтесь со следующей важной информацией перед началом работы. Вы приобрели высококачественный продукт от компании Riester, изготовленный в соответствии с Директивой (ЕС) 2017/75. Продукт подвергается постоянному строжайшему контролю качества. Превосходное качество гарантирует надежную диагностику. В этой инструкции по эксплуатации описано использование инструментов uni® I, II, III и...
-
Seite 113: Предупреждающие Символы
1.1. Предупреждающие символы Символ Примечание к символу Следуйте инструкциям в руководстве по эксплуатации. Символ напечатан черным цветом на коробке колпачков к датчику. Рабочая часть типа B Медицинское устройство Класс защиты II Внимание! Общий символ «Внимание!» указывает на потенциально опасную ситуацию, которая может привести к серьезным травмам. Осторожно! Символ... -
Seite 114: Упаковочные Символы
освещения и последующего медицинского обследования внутренней части носовой полости. Офтальмоскоп May Офтальмоскопы May от Riester предназначается для медицинского обследования глаз и глазного дна. Ларингеальный осветитель и комплектующие Ларингеальный осветитель предназначается для дополнительного освещения ротовой полости и глотки. - Комплектующие: держатель шпателя... -
Seite 115: Противопоказания
- Комплектующие: держатель шпателя Держатель шпателя предназначается для медицинского обследования полости рта и горла и может использоваться со стандартными деревянными или пластиковыми шпателями, а также с изогнутым устройством подсветки от Riester. - Комплектующие: гортанное зеркало Гортанное зеркало предназначается для зеркального отражения и последующего... -
Seite 116: Знаки «Внимание!»/«Осторожно
которых предусматривается обслуживание со стороны пользователя. Не вскрывайте, не замыкайте накоротко и не бросайте аккумуляторы в огонь. Используйте только оригинальные детали и запасные части, одобренные Riester. В противном случае безопасность и производительность устройства могут быть снижены. Поскольку длительное интенсивное воздействие света может повредить сетчатку, не... -
Seite 117: Первое Использование
Для оптимальной светоотдачи мы рекомендуем при замене всегда использовать новые высококачественные батареи. Следуйте инструкциям по чистке и регулярному обслуживанию, чтобы избежать травм или повреждения устройства. Перед очисткой или осмотром выключайте устройство и отключайте его от электросети. Не используйте автоклав и не погружайте устройство в чистящие жидкости. Избегайте... - Seite 118 Рукоятка типа C с сетевым зарядным устройством, реостатом и аккумулятором ri-accu® / ri-accu® L № 2021-200 Ксеноновое освещение, 2,5 В/ 230 В № 2022-200 Ксеноновое освещение, 2,5 В/ 120 В № 2021-202 Ксеноновое освещение, 3,5 В/ 230 В № 2022-202 Ксеноновое...
-
Seite 119: Функциональные Элементы Устройства
2.3.2 Рукоятка типа C с реостатом, 3,5 В (заряжается с помощью ri-charger® L) Для эксплуатации этой рукоятки вам понадобятся: - 1 аккумуляторная батарея от RIESTER на 3,5 В (арт. № 10691 ri-accu® L). - 1 зарядное устройство ri-charger® L (арт. № 10705, арт. № 10706) 2.3.3 Рукоятка... -
Seite 120: Рабочие Режимы И Функции
2.3.4 Рукоятка типа С с реостатом, 3,5 В (заряжается с помощью сетевого зарядного устройства) Для эксплуатации этой рукоятки вам понадобятся: - 1 перезаряжаемый аккумулятор от RIESTER на 3,5 В (арт. № 10694 ri-accu® L). -1 сетевое зарядное устройство (арт. № 10707). 3. Рабочие режимы и функции... - Seite 121 3.3.1 Рукоятка аккумуляторного (2.3.1) типа C с реостатом, 2,5 В (заряжается с помощью зарядного устройства ri-charger®). − Заряжается только с помощью зарядного устройства ri-charger® L (арт. № 10700, арт. № 10701) от RIESTER. − Зарядное устройство ri-charger® L поставляется с дополнительной инструкцией по эксплуатации, которую необходимо соблюдать.
-
Seite 122: Включение И Выключение
3.3.3 Рукоятка штекерная аккумуляторного (2.3.3) типа C с реостатом, 3,5 В (заряжается от сети с напряжением 230 или 120 В). - Снимите нижнюю часть рукоятки cо штекерной зарядкой, повернув его против часовой стрелки. Вы увидите контакты вилки. Круглые контакты предназначены для подключения... -
Seite 123: Отоскоп
3.4 Отоскоп 1. Ушные воронки 2. Разъем для пневматической отоскопии 3. Поворотная линза 4. Съемное стекло 5. Замена лампочки 3.4.1 Присоединение и отсоединение ушных воронок Поместите необходимую ушную воронку на головку отоскопа таким образом, чтобы выемка на металлической части ушной воронки сошлась с направляющим штифтом головки. -
Seite 124: Замена Лампочки
3.5.1 Колесико с корректирующими линзами Корректирующие линзы можно отрегулировать с помощью колесика с линзами. Доступны следующие корректирующие линзы: от 0 до +20 и от 0 до -20 диоптрий. Значения считываются в освещенном поле зрения. Положительные значения отображены на черном фоне, отрицательные значения — на красном. -
Seite 125: Назальный Расширитель
Обратите внимание, что при обычной работе температура устройства может превышать 41 °C! 3.7 Назальный расширитель 3.7.1 Начало работы и особенности эксплуатации 1. Установка назального расширителя Назальный расширитель предназначен только для использования с головкой отоскопа, чтобы обеспечить оптимальное освещение. Снимите ушную воронку с головки отоскопа... -
Seite 126: Чистка И Дезинфекция
Чистка и дезинфекция устройств медицинского назначения служат для защиты пациента, пользователя и третьих лиц, а также для поддержки общей целостности устройств. Ввиду конструкции продукта и используемых материалов невозможно определить четкий предел максимально возможного количества циклов обработки. Срок службы изделий медицинского назначения зависит от выполняемой функции и бережного обращения. -
Seite 127: Технические Характеристики
Необходимое оборудование: дезинфицирующее средство (утверждено: CIDEX OPA, Johnson & Johnson 20391), деминерализованная вода (деминерализованная вода без факультативных патогенных микроорганизмов в соответствии с рекомендациями KRIN- KO/BfArM), 20±2 °C, стерильные безворсовые салфетки. 1. Приготовьте дезинфицирующий раствор в соответствии с инструкциями производителя (CIDEX OPA — это готовый к использованию раствор; концентрацию необходимо... -
Seite 128: Техническое Обслуживание/ Проверка Точности/ Калибровка Применяемые Стандарты
7. Техническое обслуживание/ проверка точности/ калибровка/ применяемые стандарты Инструменты и комплектующие не требуют специального обслуживания. Если по какой-либо причине инструмент нуждается в тестировании, отправьте его нам или уполномоченному дилеру Riester в вашем регионе, подробности о котором мы предоставим вам по запросу. 8. Утилизация Осторожно! Утилизировать... - Seite 129 Батареи и электрические/электронные устройства не должны рассматриваться в качестве обычных бытовых отходов и должны утилизироваться в соответствии с местными предписаниями. Если у вас есть какие-либо вопросы об утилизации изделий, свяжитесь с производителем или его представителями. 9. Электромагнитная совместимость При использовании медицинского электрооборудования необходимо соблюдать особые меры...
- Seite 130 Руководство и декларация производителя: электромагнитное излучение Диагностические инструменты uni® I, II, III/ econom® предназначены для использования в электромагнитной среде, указанной ниже. Покупатель или пользователь диагностических приборов uni® I, II, III/ econom® и их комплектующих должен обеспечить их использование в такой среде. Испытания...
- Seite 131 Руководство и декларация производителя: электромагнитная устойчивость Диагностические инструменты uni® I, II, III/ econom® предназначены для использования в электромагнитной среде, указанной ниже. Покупатель или пользователь диагностических приборов uni® I, II, III/ econom® и их комплектующих должен обеспечить их использование в такой среде. Испытате- Электро- Испытание...
- Seite 132 Магнитное 30 A/м 30 A/м Магнитные поля поле с промышленной частоты энергосбе- 50/60 Гц 50/60 Гц должны быть на уровне, регающими характерном для номинальными стандартного использования частотами в коммерческом помещении или лечебном учреждении. IEC 61000-4-8 ПРИМЕЧАНИЕ. Напряжение в сети до испытательного уровня является источником переменного...
- Seite 133 Руководство и декларация производителя: электромагнитная устойчивость Диагностические инструменты uni® I, II, III/ econom® предназначены для использования в электромагнитной среде, указанной ниже. Покупатель или пользователь диагностических приборов uni® I, II, III/ econom® и их комплектующих должен обеспечить их использование в такой среде. Испытате- Испытание...
- Seite 134 Радиоча- 3 В/м 10 В/м Стотное От 80 МГц излучение 27 В/м до 2,7 ГГц 380–390 МГц IEC 61000-4-3 28 В/м Зоны 27 В/м; PM 50 Расположения 9 В/м %; 18 Гц Вблизи 430–470 МГц оборудования 28 В/м; (FM ± беспроводной...
- Seite 135 Рекомендуемые расстояния между портативным и мобильным оборудованием радиочастотной связи и ri-scope® L Диагностические инструменты uni® I, II, III/ econom® и их комплектующие предназначены для использования в электромагнитной среде с контролируемым излучением радиочастотных помех. Покупатель или пользователь диагностических инструментов uni® I, II, III/ econom® может избежать электромагнитных помех, соблюдая...
-
Seite 136: Гарантия
гарантии за дополнительную плату. Вы также можете бесплатно запросить у нас ценовые предложения без обязательств. В случае претензии по гарантии или необходимости проведения ремонта верните изделие RIESTER с заполненным гарантийным талоном по следующему адресу: Rudolf Riester GmbH Dept. Департамент Rudolf Riester Bruckstr. - Seite 140 Rudolf Riester GmbH Bruckstraße 31 | 72417Jungingen | Germany Tel.: (+49) 7477-9270-0 | Fax.: (+49) 7477-9270-70 info@riester.de | www.riester.de...