
Verwandte Anleitungen für Klarstein DOLCE BACIO


Inhaltszusammenfassung für Klarstein DOLCE BACIO
- Seite 1 DOLCE BACIO Eiscrememaschine Ice Cream Maker Máquina de helado Machine à crème glacée Gelatiera 10032322 www.klarstein.com...
-
Seite 3: Inhaltsverzeichnis
Sehr geehrter Kunde, wir gratulieren Ihnen zum Erwerb Ihres Gerätes. Lesen Sie die folgenden Hinweise sorgfältig durch und befolgen Sie diese, um möglichen Schäden vorzubeugen. Für Schäden, die durch Missachtung der Hinweise und unsachgemäßen Gebrauch entstehen, übernehmen wir keine Haftung. Scannen Sie den folgenden QR-Code, um Zugriff auf die aktuellste Bedienungsanleitung und weitere Informationen rund um das Produkt zu erhalten:... -
Seite 4: Sicherheitshinweise
SICHERHEITSHINWEISE • Schließen Sie das Gerät nur an geerdete Steckdosen an, die der Spannung des Geräts entsprechen. • Wenn Sie das Gerät bewegen benutzen Sie die Griffe. • Stellen Sie das Gerät auf einen ebenen Untergrund. • Benutzen Sie das Gerät nur in Innenräumen. • Benutzen Sie das Gerät nicht in der Nähe einer Badewanne oder eines Swimmingpools. - Seite 5 WARNUNG Gefahr durch Feuer/brennbare Materialien. Bitte beachten Sie die örtlichen Vorschriften zur Entsorgung von Geräten mit brennbaren Kältemitteln und Gasen. • Halten Sie Lüftungsöffnungen im Gerätegehäuse frei von Hindernissen. • Beschädigen Sie nicht den Kältemittelkreislauf. • Verwenden Sie keine mechanischen Vorrichtungen oder anderen Mittel, um den Auftauprozess oder den Eisgewinnungsprozess zu beschleunigen. • Verwenden Sie keine anderen Arten von Elektrogeräten im Inneren der Eiswürfelmaschine. Besondere Hinweise •...
-
Seite 6: Geräteübersicht
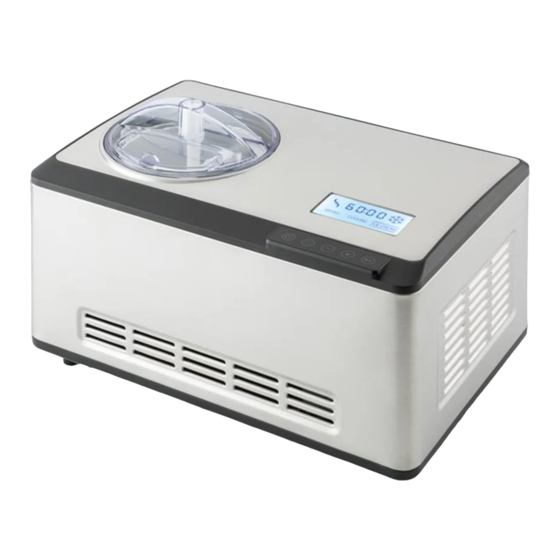
GERÄTEÜBERSICHT Einfülldeckel transparenter Deckel Herausnehmebarer LCD-Anzeige Behälter Rührschaufel Obere Platte Obere Platte Gehäuse Lüftungsöffnungen Bodenplatte Funktionstasten Einstellungen Start/Pause Ein/Aus Timer - Timer + Taste Funktionsbeschreibung Nach dem Einschalten geht das Gerät in den Bereitschaftsmodus. Einstellung des Timers. (Siehe Plus- und Minustaste) Nach der Einstellung des Timers diese Taste drücken, um den Betrieb zu starten. -
Seite 7: Eisherstellung
EISHERSTELLUNG Sauberkeit Waschen Sie vor der Benutzung alle Teile, die mit dem Speiseeis in Berührung kommen, gründlich (einschließlich dem festen Behälter, dem herausnehmbaren Behälter, der Rühr- schaufel, dem transparenten Deckel, dem Einfülldeckel und dem Löffel). Hinweis: Stellen Sie die Eismaschine immer auf einen flache, ebene Oberfläche, damit der Kompressor die beste Leistung bringt. Schritt 1: Zubereitung der Zutaten für das Rezept Bereiten Sie die Zutaten nach Ihrem Rezept oder einem Rezept in dieser Bedienungsanleitung zu. - Seite 8 Schritt 7 Geben Sie nun die Zutaten Ihrer Wahl durch die Einfüllöffnung. Einfüllöffnung Schritt 8 Nach der Zubereitung schalten Sie die Maschine aus und nehmen dann das abnehmbare Rührgefäß heraus. Rührgeföß herausnehmen Einfüllöffnung...
-
Seite 9: Betrieb
BETRIEB Eisherstellung 1. Schließen Sie die Stromversorgung an und schalten Sie das Gerät ein. In der Anzeige erscheint 60:00. Der voreingestellte Modus ist "Eisherstellung". In der Anzeige erscheint . Mit in den Standby-Modus zurückkehren. , um zwischen den Modi Eisherstellung, nur kühlen und 2. Drücken Sie die Taste Nur rühren zu wählen. Wenn einer der Modi gewählt wurde, erscheint in der Anzeige . Wenn 15 Sekunden lang keine Tasten gedrückt wurden, geht das Licht aus. -
Seite 10: Pflege
Die Füllmenge der Zutaten im Auge behalten Um ein Überlaufen und Abfälle zu vermeiden, überschreiten Sie beim Befüllen des Rührgefäßes nicht 60 %. Speiseeis dehnt sich beim Bearbeiten aus. PFLEGE WARNUNG: Stromschlaggefahr Achten Sie darauf, dass während der Reinigung der Netzstecker gezogen ist. 1. Nehmen die Rührschaufel heraus und wischen Sie die Schaufel mit einem feuchten Tuch. -
Seite 11: Rezepte
REZEPTE Vanilleeiscreme Ergibt 8 Tassenportionen Zutaten 1 Tasse Vollmilch 1/2 Tasse Kristallzucker 3/2 Tassen Sahne, gut gekühlt 1 - 2 Teelöffel reiner Vanilleextrakt, je nach Geschmack Zubereitung 1. Geben Sie die Milch und den Kristallzucker in eine mittelgroße Schüssel. 2. Vermischen Sie Milch und Kristallzucker mit einem Handmixer oder einem Schneebesen. Rühren Sie, bis der Zucker sich vollständig aufgelöst hat, etwa 1-2 Minuten bei niedriger Geschwindigkeit. 3. Heben Sie die Sahne unter und fügen Sie, je nach Geschmack, Vanille hinzu. 4. Schalten Sie die Maschine ein und gießen Sie die Mischung in den Eisbehälter. 5. ... - Seite 12 Schokoladeneiscreme Ergibt 8 Tassenportionen Zutaten 1 Tasse Vollmilch 1/2 Tasse Kristallzucker 240 g Zartbitter- oder halbsüße Schokolade (je nach Geschmack), in 1-1,5 cm große Stücke zerbrochen 1 Tasse Sahne, gut gekühlt 1 Teelöffel reiner Vanilleextrakt Zubereitung 1. Erhitzen Sie die gesamte Milch, bis diese an den Rändern zu schäumen beginnt (dies kann auf dem Kochfeld oder in der Mikrowelle geschehen). 2. In einem Mixer oder einer Küchenmaschine, die mit der Metallklinge ausgestattet ist, die Schokolade mit dem Zucker vermischen und so lange rühren, bis die Schokolade fein gemahlen ist.
- Seite 13 Frische Erdbeereiscreme Ergibt acht 1/2 Tassenportionen Zutaten 250 g oder eine Schale frische reife Erdbeeren, in Scheiben geschnitten 3/2 Esslöffel frisch gepresster Zitronensaft 1/2 Tasse Zucker (wird aufgeteilt) 1 Tasse Vollmilch 1 Tassen Sahne 1 Teelöffel reiner Vanilleextrakt Zubereitung 1. In einer kleinen Schüssel die Erdbeeren mit dem Zitronensaft und der Hälfte des Zuckers vorsichtig vermischen. 2. Lassen Sie die Erdbeeren ca. 2 Stunden in den Säften mazerieren. 3. Vermischen Sie Milch und Kristallzucker mit einem Handmixer oder einem Schneebesen. Rühren Sie, bis der Zucker sich vollständig aufgelöst hat, etwa 1-2 Minuten, bei niedriger Geschwindigkeit. 4. Heben Sie die Sahne unter und fügen Sie den Saft aus den Erdbeeren und die Vanille hinzu. ...
- Seite 14 Frisches Zitronensorbet Ergibt acht 1/2 Tassenportionen Zutaten 3/2 Tassen Zucker 3/2 Tassen Wasser 1 Tasse frisch gepresster Zitronensaft 1 Esslöffel fein geriebene Zitronenschale Zubereitung 1. Vermischen Sie den Zucker und das Wasser in einem mittelgroßen Topf und bringen Sie das Wasser bei mittlerer Hitze zum Kochen. 2. Reduzieren Sie die Hitze und lassen Sie das Wasser so lange köcheln, bis sich der Zucker aufgelöst hat, nach ca. 3-5 Minuten. Lassen Sie die Mischung vollständig abkühlen. Dies wird als einfacher Sirup bezeichnet. Sie können, wenn Sie möchten, bereits vorab größere Mengen davon herstellen, um frisches Zitronensorbet zuzubereiten. Bewahren Sie den Sirup bis zur Verwendung im Kühlschrank auf. 3. Wenn der Sirup abgekühlt ist, fügen Sie den Zitronensaft und die geriebene Schale hinzu. Rühren Sie zum Vermischen. 4.
-
Seite 15: Gefrorener Joghurt Mit Schokoladengeschmack
Gefrorener Joghurt mit Schokoladengeschmack Ergibt 8 1/2 Tassenportionen Zutaten 1 Tasse Vollmilch 180g Zartbitter- oder halbsüße Schokolade, zerkleinert 2 Tassen fettarmer Vanillejoghurt ¼ Tasse Zucker Zubereitung 1. Vermischen Sie Milch und Schokolade in einem Mixer oder einer Küchenmaschine mit Metallmesser und vermischen Sie beides für 20-30 Sekunden. 2. Fügen Sie Joghurt und Zucker hinzu. 3. Vermischen Sie alles, bis die Masse gleichmäßig ist, für ca. 15 Sekunden. 4. Schalten Sie die Maschine ein und gießen Sie die Mischung in den Eisbehälter. 5. Mischen Sie so lange, bis die Mischung angedickt ist, ca. 50-60 Minuten. ... -
Seite 16: Hinweise Zur Entsorgung
HINWEISE ZUR ENTSORGUNG Wenn es in Ihrem Land eine gesetzliche Regelung zur Entsorgung von elektrischen und elektronischen Geräten gibt, weist dieses Symbol auf dem Produkt oder auf der Verpackung darauf hin, dass dieses Produkt nicht im Hausmüll entsorgt werden darf. Stattdessen muss es zu einer Sammelstelle für das Recycling von elektrischen und elektronischen Geräten gebracht werden. Durch regelkonforme Entsorgung schützen Sie die Umwelt und die Gesundheit Ihrer Mitmenschen vor negativen Konsequenzen. Informationen zum Recycling und zur Entsorgung dieses ... -
Seite 17: Technical Data
Dear Customer, Congratulations on purchasing this device. Please read the following instructions carefully and follow them to prevent possible damages. We assume no liability for damage caused by disregard of the instructions and improper use. Scan the QR code to get access to the latest user manual and more product information. CONTENT Safety Instructions 18 Device Description 20 Making Ice Cream 21 Operation 23 Care 24 Recipes 25 Disposal Considerations 30 Manufacturer & Importer (UK) 30 TECHNICAL DATA... -
Seite 18: Safety Instructions
SAFETY INSTRUCTIONS • Check that the mains voltage corresponds to the rating of the appliance before operating. • Use handles or knobs when moving. Place on a flat stable surface for use. Do not use outdoors. • Do not use near or in the immediate vicinity of a bath or swimming pool or any source of liquid. • Unplug from socket outlet when not in use. • To protect against electric shock, do not immerse cord or plug in water or any other liquid. • The use of accessory attachments not recommended by the appliance manufacturer, may cause injury. •... - Seite 19 WARNING Danger from fi re/fl ammable materials. Please observe the local regulations for the disposal of units with fl ammable refrigerants and gases. • Keep ventilation openings in the unit housing free of obstacles. • Do not damage the refrigerant circuit. • Do not use any mechanical devices or other means to accelerate the defrosting process or the ice recovery process. • Do not use other types of electrical appliances inside the ice cube machine. Special Notes • When positioning the unit, make sure that the power cord is not pinched or damaged. • Make sure that there are no multiple sockets or power supplies on the back of the unit.
-
Seite 20: Device Description
DEVICE DESCRIPTION Filling lid Transparent lid Removable bowl LCD display Mixing blade Top plate Top lid Housing Ventilation Bottom plate Function buttons Start/Pause Mode Power Timer - Timer + Function After power up, the machine enters standby mode. Press button to enter the setting mode, prompting you to input the working time. After setting the working time, press this button to start the working mode. During operation, by pressing this button, the mixing will pause ... -
Seite 21: Making Ice Cream
MAKING ICE CREAM Cleanliness Before use, thoroughly wash all parts that will come into contact with the ice cream (including the fixed bowl, removable bowl, mixing blade, transparent lid, refill lid, measuring cup and spoon). Warning: Please be sure the power cord is unplugged while cleaning. Step 1: Prepare recipe ingredients Prepare recipe ingredients from your own recipe or from the recipe booklet here. Note: You do not need to freeze the bowl for hours in a freezer in advance, as this machine has a BUILT-IN COMPRESSOR that freezes the recipe ingredients in operation thus ensures the output of ice cream. - Seite 22 Step 7 You can add the favourite ingredients by opening the refill cover (see picture below). Filling opening Step 8 After operation is over, turn off the machine first, and then pull out the removable bowl. Pull out the removable bowl Turn off the machine...
-
Seite 23: Operation
OPERATION Ice Cream Making 1. To turn on the power, press the button , the LCD display will show 60:00 , and the default mode is “Ice cream making”, will show up. Press the button to get back to the standby mode. Connect the power supply and switch on the device. 2. Press the button to select the mode of “Ice cream ” “Cooling only ” “Mixing only”. If one of the modes is selected , the will show up. If you have not done any operation for 15s , the light will disappear . Press the button to return to the selection mode while working. -
Seite 24: Care
Controlling the Volume of the Ingredients To avoid overfl ow and waste, please make sure that the ingredients do not exceed 60% of capacity of the removable bowl (ice cream expands when being formed). CARE Warning: Danger of electrical shock The plug must be removed before cleaning to avoid electric shock. 1. Take out the mixing blade, wipe it with a dampened cloth 2. Take out the removable bowl, clean it with a dampened soft cloth 3. ... -
Seite 25: Recipes
RECIPES VANILLA ICE CREAM Makes eight one-cup servings Ingredients 1 cup whole milk 1/2 cup granulated sugar 3/2 cups heavy cream, well chilled 1 – 2 teaspoons pure vanilla extract, to taste Preparation In a medium bowl, use a hand mixer or a whisk to combine the milk and granulated sugar until the sugar is dissolved, about 1 – 2 minutes on low speed. Stir in the heavy cream and vanilla to taste. Turn machine on, pour mixture into freezer bowl through ingredient spout and let mix until thickened, about 30 – 40 minutes. ... - Seite 26 BASIC CHOCOLATE ICE CREAM Makes eight one-cup servings Ingredients 1 cup whole milk 1/2 cup granulated sugar 240g or 8 ounces bittersweet or semi-sweet chocolate (your favorite) Preparation Heat the whole milk until it is just bubbling around the edges (this may be done on the stovetop or in a microwave). In a blender or food processor fitted with the metal blade, pulse to process the sugar with the chocolate until the chocolate is very finely chopped. Add the hot milk, process until well blended and smooth. Transfer to a medium bowl and let the chocolate mixture cool completely. Stir in the heavy cream and vanilla to taste. Turn the machine on, pour mixture into freezer bowl through ingredient spout and let mix until thickened, about 30 – 40 minutes. ...
- Seite 27 FRESH STRAWBERRY ICE CREAM Makes eight half-cup servings. Ingredients 250 g or 1 pint fresh ripe strawberries, stemmed and sliced 3/2 tablespoons freshly squeezed lemon juice 1/2 cup sugar, divided 1 cup whole milk 1 cups heavy cream 1 teaspoon pure vanilla extract Preparation In a small bowl, combine the strawberries with the lemon juice and 1/2 cup of the sugar; stir gently and allow to the strawberries to macerate in the juices for 2 hours. In a medium bowl, use a hand mixer or a whisk to combine the milk,and granulated sugar until the sugar is dissolved, about 1 – 2 minutes on low speed. Stir in the heavy cream plus any accumulated juices from the strawberries and vanilla. Turn the machine on, pour mixture into freezer bowl through ingredient spout and let mix until thickened, about 30 – 40 minutes. Add the sliced strawberries during the last 5 minutes of freezing. ...
- Seite 28 FRESH LEMON SORBET Makes eight half-cup servings. Ingredients 3/2 cups sugar 3/2 cups water 1 cup freshly squeezed lemon juice 1 tablespoon finely chopped lemon zest Preparation Combine the sugar and water in a medium saucepan and bring to a boil over medium- high heat. Reduce heat to low and simmer without stirring until the sugar dissolves, about 3 – 5 minutes. Cool completely. This is called a simple syrup, and may be made ahead ...
- Seite 29 CHOCOLATE FROZEN YOGURT Makes eight half-cup servings Ingredients 1 cup whole milk 180 g or 6 ounces bittersweet or semisweet chocolate, chopped 2 cups low-fat vanilla yogurt 1/4 cup sugar Preparation Combine the milk and chocolate in a blender or food processor fitted with a metal blade and process until well blended and smooth, 20 – 30 seconds. Add the yogurt and sugar; process until smooth, about 15 seconds. Turn the machine ON, pour mixture into freezer bowl through ingredient spout and let mix until thickened, about 50 – 60 minutes.
-
Seite 30: Disposal Considerations
DISPOSAL CONSIDERATIONS If there is a legal regulation for the disposal of electrical and electronic devices in your country, this symbol on the product or on the packaging indicates that this product must not be disposed of with household waste. Instead, it must be taken to a collection point for the recycling of electrical and electronic equipment. By disposing of it in accordance with the rules, you are protecting the environment and the health of your fellow human beings from negative consequences. For information about the recycling and disposal of this product, please contact your local authority or your household waste ... -
Seite 31: Datos Técnicos
Estimado cliente: Le felicitamos por la adquisición de este producto. Lea atentamente el siguiente manual y siga cuidadosamente las instrucciones de uso con el fin de evitar posibles daños. La empresa no se responsabiliza de los daños ocasionados por un uso indebido del producto o por haber desatendido las indicaciones de seguridad. -
Seite 32: Indicaciones De Seguridad
INDICACIONES DE SEGURIDAD • Conecte el aparato solamente a tomas de corriente con toma de tierra que se adecuen a la tensión del mismo. • Si desea desplazar el aparato, utilice las asas. • Coloque el aparato en una superficie plana y estable. • Utilice este aparato solamente en espacios interiores. •... - Seite 33 ADVERTENCIA Peligro por fuego/materiales infl amables. Tenga en cuenta las normas locales para la eliminación de aparatos que contengan refrigerantes y gases infl amables. • Mantenga las aberturas de ventilación de la carcasa del aparato libres de obstáculos. • No dañar el circuito de refrigeración. • No utilice dispositivos mecánicos u otros medios para acelerar el proceso de descongelación o recuperación de hielo. •...
-
Seite 34: Vista General Del Aparato
VISTA GENERAL DEL APARATO Tapa de llenado Tapa transparente Recipiente Pantalla LCD extraíble Removedor Placa superior Tapa Carcasa Ranuras de ventilación Placa inferior Teclas de control Configuraciones Inicio/Pausa Encendido/Apagado Temporizador - Temporizador + Botón Función Tras encender el aparato, la heladora se pone en modo de espera. Configuración del temporizador. (Ver botones más y menos) Tras configurar el temporizador, apriete este botón para iniciar la ... -
Seite 35: Preparadión De Helado
PREPARADIÓN DE HELADO Limpieza Antes de utilizar el aparto, lave a conciencia todas las piezas que entrarán en contacto con los alimentos (incluidos el recipiente fijo, recipiente extraíble, removedor, tapa transparente, tapa de llenado y cuchara). Atención: Coloque el aparato en una superficie plana para que el compresor pueda trabajar de manera eficiente. Paso 1: Preparación de los ingre- dientes para la receta Prepare los ingredientes siguiendo su receta o una de las recetas que aparecen en este manual de uso. - Seite 36 Paso 7 Añada los ingredientes que desee a través de la abertura de llenado. Abertura de llenado Paso 8 Después de finalizarse la preparación, apague el aparato y retire el recipiente extraíble. Retirar el recipiente extraíble Abertura de llenado...
-
Seite 37: Puesta En Funcionamento
PUESTA EN FUNCIONAMENTO Preparación de helado 1. C onecte el enchufe a la toma de corriente y encienda el aparato. La pantalla indicará 60:00. El modo preestablecido es «Preparación de helado». La pantalla indicará . Pulse el botón para volver al modo Standby. 2. Pulse el botón para elegir entre los modos Preparación de hielo, Solo enfriar y Solo mezclar. Tras elegir uno de los modos, aparecerá en la pantalla . Si no pulsa ningún botón transcurridos 15 segundos, la luz se apagará. Al pulsar el botón , volverá, durante el funcionamiento, a la selección de modos. 3. ... -
Seite 38: Limpieza Y Cuidado
Cantidad correcta de ingredientes Para evitar que los ingredientes rebosen, no supere el 60% de la capacidad del recipiente. Es importante, ya que la crema de helado aumenta su volumen durante la preparación. LIMPIEZA Y CUIDADO ATENCIÓN: Riesgo de descarga eléctrica Achten Sie darauf, dass während der Reinigung der Netzstecker gezogen ist. 1. E xtraiga el removedor y límpielo con un paño húmedo. 2. E xtraiga el recipiente para el helado y límpielo con un paño húmedo y suave. 3. L impie la tapa transparente con un paño húmedo. 4. R etire la suciedad de la parte inferior o de otros sitios con un paño húmedo. Asegúrese de que el cable de alimentación no entre en contacto con el agua y ... -
Seite 39: Recetas
RECETAS Helado de vainilla Para 8 tazas Ingredientes 1 taza de leche entera 1 taza de azúcar granulado 3/2 taza de nata fría 1 - 2 cucharaditas de extracto de vainilla puro, según las preferencias Preparación 1. M ezcle la leche y el azúcar con un removedor o varilla en un recipiente mediano durante 1-2 minutos a velocidad baja hasta que el azúcar se haya disuelto. 2. A ñada a continuación la nata y tanta vainilla como desee. 3. E ncienda el aparato y vierta la mezcla en el recipiente para el helado. 4. M ezcle el helado durante aprox. 30-40 minutos hasta que el helado se espese. Variantes Chips de menta: Deje la vainilla a un lado y sustitúyala por 1-1 1/2 cucharaditas de extracto de menta (según los gustos). Pique 1 15 g de chocolate amargo o semidulce en trozos pequeños desiguales. Añada los trozos de chocolate en los últimos 5 minutos de la preparación del helado. Mantequilla de pecana: Derrita un poco de mantequilla sin sal en una sartén pequeña. Añada 1 taza de pecanas picadas y 1 cucharadita de sal. Tueste todo ... - Seite 40 Helado de chocolate Para 8 tazas Ingredientes 1 1 taza de leche entera 1 taza de azúcar granulado 240 g de chocolate amargo o semidulce (según las preferencias), picado en trocitos de 1-1,5 cm de grosor 1 taza de nata fría 1 cucharadita de extracto de vainilla puro Preparación 1. Caliente leche hasta que comience a burbujear por las esquinas (en el microondas o fogones). 2. Utilice una batidora o de un robot de cocina con cuchillas de metal para mezclar bien el azúcar y el chocolate, hasta que el chocolate está bien molido. ...
- Seite 41 Helado de fresas frescas Para 1/2 tazas Ingredientes 250 g o una bandeja de fresas frescas, cortadas en rodajas 3/2 cuchara de zumo de limón recién exprimido 1/2 taza de azúcar (dividida) 1 taza de leche entera 1 taza de nata 1 cucharadita de extracto de vainilla puro Preparación 1. A ñada y mezcle las fresas junto con el azúcar y el zumo de limón en un recipiente. 2. M acere las fresas en el zumo durante aprox. 2 horas. 3. M ezcle la leche y el azúcar con un removedor o varilla durante 1-2 minutos a velocidad baja hasta que el azúcar se haya disuelto. 4. A ñada la nata, el zumo de fresa y vainilla. 5. E ncienda el aparato y vierta la mezcla en el recipiente para el helado. 6. M ezcle el helado durante aprox. 30-40 minutos hasta que el helado se espese. A ñada las fresas en los últimos 5 minutos de la preparación del helado. Atención: El helado tendrá un color rosa claro. Si desea un tono rosa más fuerte, añada ...
- Seite 42 Sorbete de limón Para 8 1/2/2 tazas Ingredientes 3/2 taza de azúcar 3/2 taza de agua 1 taza de zumo de limón recién exprimido 1 cuchara de cáscara de limón Preparación 1. Añada el azúcar y el agua en una olla de tamaño medio y lleve el agua a ebullición a fuego medio. 2. Reduzca el fuego y deje que el agua hierva durante 3-5 minutos hasta que el azúcar se haya disuelto por completo. Deje que la mezcla se enfríe. La mezcla es un jarabe sencillo. Si desea, puede preparar una cantidad mayor de jarabe para tener un sorbete de limón fresco. Guarde el jarabe en el refrigerador antes de utilizarlo. 3. Cuando el jarabe se haya enfriado, añada el zumo de limón y la cáscara cortada. Remuévalo todo bien. 4.
- Seite 43 Helado de yogur de chocolate Para 8 1/2 tazas Ingredientes 1 taza de leche entera 180 g de chocolate amargo o semidulce picado 2 tazas de yogur de vainilla bajo en grasa ¼ tazas de azúcar Preparación 1. A ñada la leche y el chocolate en una batidora o un robot de cocina con cuchillas de metal y mézclelo todo durante 20-30 segundos. 2. A ñada el yogur y el azúcar, y mézclelo todo durante aprox. 15 segundos. 3. E ncienda el aparato y vierta la mezcla en el recipiente para helado. 4. M ezcle el helado durante aprox. 50-60 minutos hasta que el helado se espese. ...
-
Seite 44: Indicaciones Sobre La Retirada Del Aparato
INDICACIONES SOBRE LA RETIRADA DEL APARATO Si en su país existe una disposición legal relativa a la eliminación de aparatos eléctricos y electrónicos, este símbolo estampado en el producto o en el embalaje advierte que no debe eliminarse como residuo doméstico. En lugar de ello, debe depositarse en un punto de recogida de reciclaje de aparatos eléctricos y electrónicos. Una ... -
Seite 45: Fiche Technique
Cher client, Toutes nos félicitations pour l’acquisition de ce nouvel appareil. Veuillez lire attentivement les instructions suivantes de branchement et d’utilisation afin d’éviter d’éventuels dommages. Le fabricant ne saurait être tenu pour responsable des dommages dus au non-respect des consignes de sécurité et à la mauvaise utilisation de l’appareil. -
Seite 46: Consignes De Sécurité
CONSIGNES DE SÉCURITÉ • Brancher uniquement l’appareil à une prise de terre dont la tension correspond à celle de l’appareil. • Utiliser les poignées pour déplacer l’appareil. • Placer l’appareil sur une surface plane. • Utiliser l’appareil uniquement en intérieur. •... - Seite 47 MISE EN GARDE Danger d‘incendie/de matières infl ammables. Veuillez respecter les réglementations locales concernant l‘élimination des appareils contenant des fl uides frigorigènes et des gaz infl ammables. • Veillez à ce que les ouvertures de ventilation dans le boîtier de l‘appareil soient libres d‘obstacles. • Ne pas endommager le circuit frigorifi que. • N‘utilisez pas de dispositifs mécaniques ou d‘autres moyens pour accélérer le processus de dégivrage ou de récupération de la glace. • N‘utilisez pas d‘autres types d‘appareils électriques à l‘intérieur de la machine à glaçons. Remarques particulières •...
-
Seite 48: Aperçu De L'appareil
APERÇU DE L'APPAREIL Couvercle d’alimentation Couvercle transparent Récipient Ecran LCD amovible Pale d’agitation Plaque supérieure Couvercle Châssis Ouvertures d’aération Plaque inférieure Description de la fonction Paramètres Démarrage/Pause Marche/arrêt Minuterie + Minuterie - Touche Description de la fonction Au démarrage, l’appareil passe en mode veille. Réglage de la minuterie. -
Seite 49: Fabrication De Crème Glacée
FABRICATION DE CRÈME GLACÉE Propreté Avant l’utilisation, nettoyez correctement tous les éléments qui seront au contact de la crème glacée, y compris le récipient fixe, le récipient amovible, la pale d’agitation, le couvercle transparent, le couvercle d’alimentation et la cuillère). Remarque : Placez toujours la sorbetière sur une surface plane, horizontale pour que le compresseur fournisse sa pleine puissance. Étape 1 : préparation des ingrédients pour la recette Préparez les ingrédients en fonction de votre recette ou de l’une des recettes de ce mode d’emploi. - Seite 50 Étape 7 Versez maintenant les ingrédients de votre choix par l’ouverture de remplissage. Ouverture de remplissage Étape 8 Après la préparation, éteignez la machine et retirez le bol mélangeur amovible. Retirez le bol mélangeur Ouverture de remplissage...
-
Seite 51: Fonctionnement
FONCTIONNEMENT Fabrication de la crème glacée 1. Branchez l’alimentation électrique et allume l’appareil. L’écran affiche 60:00. Le mode préréglé est „fabrication de crème glacée“. L’écran affiche . Avec la touche retournez en mode veille. 2. Appuyez sur la touche pour choisir entre les modes fabrication de crème glacée, refroidissement seul ou mélange seul. Lorsque vous avez choisi l’un des modes, l’écran affiche . Si vous n’appuyez sur aucune touche pendant 15 secondes, l’éclairage s’éteint. -
Seite 52: Entretien
Gardez sous les yeux la quantité des ingrédients Pour éviter le débordement et le renversement d’ingrédients, ne dépassez pas 60 % lors du remplissage du bol. La crème glacée prend du volume lorsqu’elle est travaillée. ENTRETIEN AVERTISSEMENT : danger d’électrocution Veillez à ce que la fi che soit débranchée pendant le nettoyage. 1. Retirez la pale d’agitation et essuyez la pale avec un chiffon humide. 2. R etirez le bol mélangeur amovible. Nettoyez-le avec un chiffon humide. 3. E ssuyez le couvercle transparent avec un chiffon humide. 4. -
Seite 53: Recettes
RECETTES Crème glacée vanille Pour 8 portions d’une tasse Ingrédients 1 tasse de lait entier 1/2 tasse de sucre cristallisé 3/2 tasse de crème bien refroidie 1 - 2 cuillères à café, de l’extrait de vanille pur, selon vos goûts Préparation 1. V ersez le lait entier et le sucre cristallisé dans une grande jatte. 2. Mélangez le lait et le sucre cristallisé au mixeur à main ou avec des fouets à neige. Mélangez jusqu’à ce que le sucre ait complètement fondu, environ 1-2 minutes à basse vitesse. 3. S oulevez la crème chantilly et ajoutez de la vanille selon vos goûts. 4. - Seite 54 Crème glacée au chocolat Pour 8 portions d’une tasse Ingrédients 1 tasse de lait entier 1/2 tasse de sucre cristallisé 240 g de chocolat noir ou demi-doux (selon vos goûts), haché en morceaux de 1-1,5 1 tasse de crème bien refroidie 1 cuillère à café d’extrait de vanille pur Préparation 1. Chauffez le lait entier jusqu’à ce qu’il se mette à mousser au bord (vous pouvez le faire sur la cuisinière ou au four à micro-ondes). 2. Mélangez le sucre et le chocolat dans un mixeur ou un robot culinaire équipé de couteaux métalliques jusqu’à ce que le chocolat soit moulu finement.
- Seite 55 Crème glacée aux fraises fraîches Pour 8 portions d’une 1/2 tasse Ingrédients 250 g oder eine Schale frische reife Erdbeeren, in Scheiben geschnitten 3/2 Esslöffel frisch gepresster Zitronensaft 1/2 Tasse Zucker (wird aufgeteilt) 1 Tasse Vollmilch 1 Tassen Sahne 1 Teelöffel reiner Vanilleextrakt Préparation 1. Mélangez délicatement les fraises et le jus de citron avec la moitié du sucre dans un petit bol. 2. F aites macérer les fraises dans les jus pendant environ 2 heures. 3. Mélanger le lait et le sucre cristallisé avec un mixeur à main ou des fouets à neige. Mélangez jusqu’à ce que le sucre soit complètement dissous, environ 1-2 minutes à ...
- Seite 56 Sorbet de citron frais Pour huit portions d'1/2 tasse. Zutaten 3/2 tasses de sucre 3/2 tasses d’eau 1 tasse de jus de citron pressé 1 cuillère à café de zeste de citron finement râpé Préparation 1. Mélangez le sucre et l’eau dans une casserole de taille moyenne et faites bouillir l’eau à feu moyen. 2. Réduisez le feu et laissez l’eau mijoter jusqu’à ce que le sucre soit entièrement dissous en 3-5 minutes environ. Laissez la préparation refroidir complètement. C’est ce que l’on appelle un sirop simple. Si vous le souhaitez, vous pouvez en fabriquer une plus grande quantité...
- Seite 57 Yaourt glacé au goût chocolat Pour 8 portions d’1/2 tasse Ingrédients 1 tasse de lait entier 180 g de chocolat noir ou demi-doux émincé 2 tasses de yaourt vanille maigre ¼ tasse de sucre Préparation 1. Mélangez le lait et le chocolat dans un mixeur ou un robot culinaire équipé de couteaux métalliques pendant 20-30 secondes. 2. Ajoutez le yaourt et le sucre. 3. Mélangez le tout jusqu’à ce que la pâte soit homogène, pendant environ 15 secondes. 4.
-
Seite 58: Informations Sur Le Recyclage
INFORMATIONS SUR LE RECYCLAGE S‘il existe une réglementation pour l‘élimination ou le recyclage des appareils électriques et électroniques dans votre pays, ce symbole sur le produit ou sur l‘emballage indique que cet appareil ne doit pas être jeté avec les ordures ménagères. Vous devez le déposer dans un point de collecte pour le recyclage des équipements électriques et électroniques. La mise au rebut conforme aux règles protège l‘environnement et la santé de vos semblables des conséquences négatives. -
Seite 59: Dati Tecnici
Gentile cliente, La ringraziamo per aver acquistato il dispositivo. La preghiamo di leggere attentamente le seguenti istruzioni per l’uso e di seguirle per evitare possibili danni tecnici. Non ci assumiamo alcuna responsabilità per danni scaturiti da una mancata osservazione delle avvertenze di sicurezza e da un uso improprio del dispositivo. -
Seite 60: Avvertenze Di Sicurezza
AVVERTENZE DI SICUREZZA • Leggere attentamente tutte le istruzioni e conservare il presente libretto per consultazioni future. • Per garantire il corretto funzionamento, il dispositivo deve essere collegato ad una presa dotata di messa a terra. Consultare un elettricista se non si è sicuri che la presa a disposizione corrisponda ai requisiti richiesti. - Seite 61 AVVERTENZA Pericolo di incendio/materiali infi ammabili. Osservare le norme locali per lo smaltimento di apparecchi contenenti refrigeranti e gas infi ammabili. • Mantenere libere da ostacoli le aperture di ventilazione nell‘alloggiamento dell‘apparecchio. • Non danneggiare il circuito frigorifero. • Non utilizzare dispositivi meccanici o altri mezzi per accelerare lo sbrinamento o il recupero del ghiaccio.
-
Seite 62: Descrizione Del Prodotto
DESCRIZIONE DEL PRODOTTO Coperchio per lo riempimento Coperchio trasparente Contenitore Display LCD estraibile Pala di miscelazione Pannello superiore Pannello superiore Alloggiamento Aperture di ventilazione Pannello di fondo Tasti funzione Impostazioni Start/Pausa On/Off Timer - Timer + Tasto Tasto Dopo l’avvio, il dispositivo entra in modalità pronta all’uso. Impostazione del timer (v. -
Seite 63: Preparazione Del Gelato
PREPARAZIONE DEL GELATO Igiene Prima dell’utilizzo, lavare accuratamente tutte le parti che entrano in contatto con gli alimenti (inclusi contenitore fisso, contenitore estraibile, pala di miscelazione, coperchio per lo riempimento e cucchiaio). Avvertenza: posizionare sempre la gelatiera su una superficie piana, in modo che il compressore possa offrire le migliori prestazioni. 1° passaggio: preparazione degli ingredienti per la ricetta Preparare gli ingredienti per la vostra ricetta o seguendo una di quelle presentate in questo manuale. - Seite 64 7° passaggio Inserire gli ingredienti nell’apertura di riempimento. Apertura di riempimento 8° passaggio Dopo la preparazione, spegnere il dispositivo e togliere il contenitore di miscelazione. Estrarre il contenitore di miscelazione Apertura di riempimento...
- Seite 65 UTILIZZO Preparazione del gelato 1. Collegare il dispositivo alla linea di corrente elettrica. Il display mostra 60:00. La modalità preimpostata è “Preparazione del gelato” . ) Con il tasto si torna alla modalità standby. 2. Premere il tasto per selezionare tra le modalità di preparazione del gelato, solo raffreddamento o solo miscelazione. Una volta selezionata una modalità, sul display compare . Se non si premono tasti per 15 secondi, la luce si spegne. ...
- Seite 66 Tenere sotto controllo il livello di riempimento degli ingredienti Per evitare traboccamenti, non riempire il contenitore di miscelazione oltre il 60%. Il gelato aumenta di volume durante la lavorazione. CURA AVVERTIMENTO: Rischio di folgorazione Assicurarsi che la spina sia scollegata durante la pulizia. 1. Togliere la pala di miscelazione e pulirla con un panno umido. 2. ...
-
Seite 67: Gelato Alla Vaniglia
RICETTE Gelato alla vaniglia Per 8 porzioni Ingredienti 1 Tasse Vollmilch 1/2 Tasse Kristallzucker 3/2 Tassen Sahne, gut gekühlt 1 - 2 Teelöffel reiner Vanilleextrakt, je nach Geschmack Preparazione 1. Mettere latte e cristalli di zucchero in una ciotola abbastanza grande. 2. Miscelare latte e zucchero in cristalli con un mixer o con una frusta. Mescolare fino a completo scioglimento dello zucchero, circa 1-2 minuti a bassa velocità. 3. Incorporare la panna e aggiungere vaniglia a piacere. 4. Accendere il dispositivo e versare la miscela nel contenitore per il gelato. 5. ... - Seite 68 Gelato al cioccolato Per 8 porzioni Ingredienti 1 tazza di latte intero 1/2 tazza di zucchero in cristalli 240 g di cioccolato fondente o semi-fondente (in base al gusto), in pezzi da 1-1,5 cm 1 tazza di panna, ben fredda 1 cucchiaino di estratto puro di vaniglia Preparazione 1. Riscaldare tutto il latte, fino a quando sui bordi comincia a formarsi della schiuma (questo passaggio può essere fatto sui fornelli o in microonde). 2. In un mixer o in un robot da cucina dotato di lame metalliche, miscelare il cioccolato con lo zucchero e mescolare fino a quando il cioccolato è tritato finemente.
- Seite 69 Gelato di fragole fresche Per otto 1/2 porzioni Ingredienti 250 g o una confezione di fragole fresche, tagliate a fette 3/2 cucchiai di succo di limone appena spremuto 1/2 tazza di zucchero (da suddividere) 1 tazza di latte intero 1 tazza di panna 1 cucchiaino di estratto puro di vaniglia Preparazione 1. Mescolare in una piccola ciotola le fragole, il succo di limone e metà dello zucchero. 2. Far marinare le fragole per circa 2 ore. 3. Miscelare latte e zucchero con un mixer o con una frusta. Mescolare fino a completo scioglimento dello zucchero, circa 1-2 minuti a bassa velocità. 4. Incorporare la panna e aggiungere il succo delle fragole e la vaniglia. 5. ...
- Seite 70 Sorbetto fresco al limone Per otto 1/2 porzioni Ingredienti 3/2 tazze di zucchero 3/2 tazze di acqua 1 tazza di succo di limone appena spremuto 1 cucchiaio di scorza di limone grattugiata finemente Preparazione 1. Miscelare zucchero e acqua in una pentola medio-grande e portare a ebollizione a fuoco medio. 2. Abbassare il fuoco e lasciare sobbollire fino a completo scioglimento dello zucchero, dopo 3-5 minuti. Far raffreddare completamente la miscela. Il risultato ottenuto è chiamato sciroppo semplice. È possibile realizzare in anticipo maggiori quantità...
- Seite 71 Yogurt gelato al cioccolato Per otto 8 1/2 porzioni Ingredienti 1 tazza di latte intero 180 g di cioccolato fondente o semi-fondente, sminuzzato 2 tazze di yogurt magro alla vaniglia 1/4 di tazza di zucchero Preparazione 1. In un mixer o in un robot da cucina dotato di lame metalliche, miscelare cioccolato e latte per 20-30 secondi. 2. Aggiungere yogurt e zucchero. 3. Miscelare il tutto fino ad ottenere un composto omogeneo, per circa 15 secondi. 4. Accendere il dispositivo e versare la miscela nel contenitore per il gelato. 5. ...
- Seite 72 AVVISO DI SMALTIMENTO Se nel proprio paese si applicano le regolamentazioni inerenti lo smaltimento di dispositivi elettrici ed elettronici, questo simbolo sul prodotto o sulla confezione segnala che questi prodotti non possono essere smaltiti con i rifiuti normali e devono essere portati a un punto di raccolta di dispositivi elettrici ed elettronici.