Herunterladen Inhalt Inhalt Diese Seite drucken

Werbung

Verfügbare Sprachen
  • DE

Verfügbare Sprachen

  • DEUTSCH, seite 1
Sweet Sundae
Eiscrememaschine
Ice Cream Maker
Máquina de helado
Machine à crème glacée
Gelatiera
1003491 1 10034912

Werbung

Inhaltsverzeichnis
loading

Inhaltszusammenfassung für Klarstein Sweet Sundae

  • Seite 1 Sweet Sundae Eiscrememaschine Ice Cream Maker Máquina de helado Machine à crème glacée Gelatiera 1003491 1 10034912...
  • Seite 3: Inhaltsverzeichnis

    Sehr geehrter Kunde, wir gratulieren Ihnen zum Erwerb Ihres Gerätes. Lesen Sie die folgenden Hinweise sorgfältig durch und befolgen Sie diese, um möglichen Schäden vorzubeugen. Für Schäden, die durch Missachtung der Hinweise und unsachgemäßen Gebrauch entstehen, übernehmen wir keine Haftung. Scannen Sie den folgenden QR-Code, um Zugriff auf die aktuellste Bedienungsanleitung und weitere Informationen rund um das Produkt zu erhalten.
  • Seite 4: Sicherheitshinweise

    SICHERHEITSHINWEISE • Lesen Sie sich alle Hinweise sorgfältig durch und bewahren Sie die Bedienungsanleitung zum Nachschlagen gut auf. • Prüfen Sie vor der Benutzung die Spannung auf dem Typenschild und schließen Sie das Gerät nur an Steckdosen an, die der Spannung des Geräts entsprechen. •...
  • Seite 5 Besondere Hinweise • Achten Sie bei der Positionierung des Gerätes darauf, dass das Netzkabel nicht eingeklemmt oder beschädigt ist. • Achten Sie darauf, dass sich keine Mehrfachsteckdosen oder Netzteile auf der Rückseite des Geräts befi nden. Um eine Kontamination von Lebensmitteln zu vermeiden, beachten Sie bitte die folgenden Anweisungen: •...
  • Seite 6: Geräteübersicht

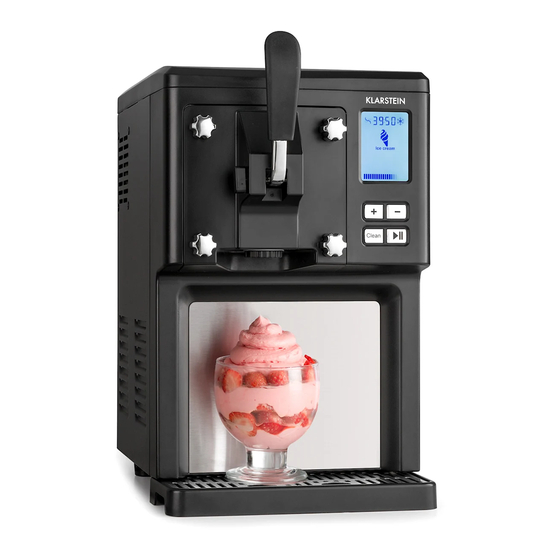
    GERÄTEÜBERSICHT Trichter Oberer Deckel Griffeinheit Display Tasten Belüftungsschlitze Verschlussschraube Seitliche Abdeckung Vordere Abdeckung Belüftungsschlitze Auffangschale EIN/AUS START/PAUSE Cleaning (Reinigung)
  • Seite 7: Inbetriebnahme Und Allgemeine Bedienung

    INBETRIEBNAHME UND ALLGEMEINE BEDIENUNG Hinweis: Reinigen Sie alle Teile, die mit Eiscreme in Berührung kommen, vor dem Gebrauch gründlich, einschließlich Kühleimer, Mischventilatorflügel, Auslaufdichtring, Auslaufinnenhaube, Trichter usw. Vergewissern Sie sich vor der Reinigung, dass der Stecker aus der Steckdose gezogen wurde. Wenn Sie Eiscreme herstellen, stellen Sie das Gerät auf eine ebene Fläche, um sicherzustellen, dass der Kompressor der Maschine richtig funktioniert.
  • Seite 8 5. Drücken Sie auf den EIN/AUS-Schalter an der Rückseite des Geräts. 6. Die Maschine beginnt mit der Eiszubereitung. Sie können während des Produktionsprozesses noch weitere Gewürze hinzufügen, wobei Sie die Zugabe von körnigen Materialien vermeiden sollten, um die Öffnungen nicht zu verstopfen. Entfernen Sie den Stöpsel und setzen Sie den Trichter ein, um während...
  • Seite 9: Bedienung Und Funktionen

    BEDIENUNG UND FUNKTIONEN Hinweis: Vor und nach der Zubereitung des Eises muss das Gerät mit der Reinigungsfunktion gereinigt werden (siehe Kapitel „Reinigung und Pflege“). Stromanschluss Stecken Sie den Stecker in die Steckdose. Gerät einschalten Drücken Sie auf den EIN/AUS-Schalter an der Rückseite des Geräts. Funktion wählen Zeit erhöhen Zeit verringern...
  • Seite 10: Reinigung Und Pflege

    Motorschutzfunktion Wenn die Produktionszeit länger ist, wird das Eis immer härter und der Rührmotor kann unter Umständen blockieren. Das Gerät überwacht automatisch die Temperatur des Rührmotors und schaltet ihn im Notfall automatisch ab, um ihn vor einer Überhitzung zu schützen. REINIGUNG UND PFLEGE Reinigungsfunktion Hinweis: Vor und nach der Zubereitung des Eises muss das Gerät mit der...
  • Seite 11 Bauteile der Griffeinheit:...
  • Seite 12 Zusammenbau der Griffeinheit: Hinweis: Um das Gerät auseinander zu bauen, gehen Sie in umgekehrter Reihenfolge vor. Der Schlitz zeigt nach oben Bei der Befestigung Drücken Bauteil 3 Befestigen Sie Befestigen Sie von Bauteil 3 muss mit der Hand in Bauteil 1 an Bauteil 4 an der Schlitz nach Bauteil 1.
  • Seite 13: Fehlerbehebung

    FEHLERBEHEBUNG Problem Mögliche Ursache Lösungsansatz Das Eis lässt sich nach Das Eis ist zu hart. Warten Sie bis das der Eiszubereitung nicht Eis angetaut ist und entfernen. entnehmen Sie es dann. Der Griff lässt sich beim Der Mischventilatorflügel Installieren Sie den Zusammenbau nicht richtig ist nicht richtig montiert.
  • Seite 14: Hinweise Zur Entsorgung

    HINWEISE ZUR ENTSORGUNG Befindet sich die linke Abbildung (durchgestrichene Mülltonne auf Rädern) auf dem Produkt, gilt die Europäische Richtlinie 2012/19/EU. Diese Produkte dürfen nicht mit dem normalen Hausmüll entsorgt werden. Informieren Sie sich über die örtlichen Regelungen zur getrennten Sammlung elektrischer und elektronischer Gerätschaften.
  • Seite 15 Dear Customer, Congratulations on purchasing this device. Please read the following instructions carefully and follow them to prevent possible damages. We assume no liability for damage caused by disregard of the instructions and improper use. Scan the QR code to get access to the latest user manual and more product information.
  • Seite 16: Safety Instructions

    SAFETY INSTRUCTIONS • Read all the safety and operating instructions carefully and retain them for future reference. • Ensure the voltage is compliant with the voltage range stated on the rating label, and ensure the earthing of the socket is in good condition. •...
  • Seite 17 Special Notes • When positioning the unit, make sure that the power cord is not pinched or damaged. • Make sure that there are no multiple sockets or power supplies on the back of the unit. To avoid contamination of food, please follow the instructions below: •...
  • Seite 18: Product Overview

    PRODUCT OVERVIEW Funnel Upper cover Handle unit Display Keys Ventilation slots Locking screw Side cover Front cover Ventilation slots Collecting tray ON/OFF START/PAUSE Cleaning...
  • Seite 19: Commissioning And General Operation

    COMMISSIONING AND GENERAL OPERATION Note: Thoroughly clean all parts that come into contact with ice cream before use, including the cooling bucket, mixing fan blades, outlet sealing ring, inner outlet hood, funnel, etc. Make sure that the plug is unplugged from the outlet before cleaning. When making ice cream, place the machine on a flat surface to ensure that the machine‘s compressor is working properly.
  • Seite 20 5. Press the ON/OFF switch on the back of the unit. 6. The machine starts to prepare ice cream. You can add more spices during the production process, but you should avoid adding granular materials to avoid clogging the openings. Remove the stopper and insert the funnel to add more ingredients or ice...
  • Seite 21: Operation And Functions

    OPERATION AND FUNCTIONS Note: Before and after preparing the ice cream, the appliance must be cleaned using the cleaning function (see chapter „Cleaning and Care“). Power connection Insert the plug into the socket. Switch on the device Press the ON/OFF switch on the back of the unit. Select function Increase time Reduce time...
  • Seite 22: Cleaning And Maintenance

    Motor protection function If the production time is longer, the ice cream becomes harder and harder and the stirrer motor may block under certain circumstances. The appliance automatically monitors the temperature of the stirring motor and switches it off automatically in an emergency to protect it from overheating.
  • Seite 23 Components of the handle unit:...
  • Seite 24 Assembly of the handle unit: Note: To disassemble the unit, proceed in reverse order. The slot has to point upwards When fixing Press component 3 Fasten Fasten component 3, the into component 1 component 1 to component 4 to slot must point by hand.
  • Seite 25: Troubleshooting

    TROUBLESHOOTING Problem Possible cause Approach The ice cannot be removed The ice is too hard. Wait until the ice has after the ice cream melted and then remove it. preparation. The handle cannot be The mixing fan blade is not Install the fan blade on the inserted properly during mounted correctly.
  • Seite 26: Hints On Disposal

    HINTS ON DISPOSAL According to the European waste regulation 2012/19/EU this symbol on the product or on its packaging indicates that this product may not be treated as household waste. Instead it should be taken to the appropriate collection point for the recycling of electrical and electronic equipment.
  • Seite 27: Datos Técnicos

    Estimado cliente: Le felicitamos por la adquisición de este producto. Lea atentamente el siguiente manual y siga cuidadosamente las instrucciones de uso con el fin de evitar posibles daños. La empresa no se responsabiliza de los daños ocasionados por un uso indebido del producto o por haber desatendido las indicaciones de seguridad.
  • Seite 28: Indicaciones De Seguridad

    INDICACIONES DE SEGURIDAD • Lea atentamente estas indicaciones y conserve el manual de instrucciones para consultas posteriores. • Antes de utilizar el aparato, compruebe la tensión del mismo en la placa técnica y conéctelo a tomas de corriente que se adecuen a esos valores. •...
  • Seite 29 Notas especiales • Cuando coloque la unidad, asegúrese de que el cable de alimentación no esté pellizcado ni dañado. • Asegúrese de que no haya varias tomas o fuentes de alimentación en la parte posterior de la unidad. Para evitar la contaminación de los alimentos, siga las siguientes instrucciones: •...
  • Seite 30: Visión General Del Aparato

    VISIÓN GENERAL DEL APARATO Embudo Tapa superior Mango Pantalla Teclas Ranuras de ventilación Tornillo de bloqueo Cubierta lateral Cubierta delantera Ranuras de ventilación Bandeja antigoteo ON/OFF INICIO/PAUSA Cleaning (Limpieza)
  • Seite 31: Puesta En Funcionamiento Y Manejo General

    PUESTA EN FUNCIONAMIENTO Y MANEJO GENERAL Nota: Limpie todas las piezas que entran en contacto con el helado antes de su uso, incluido el recipiente de refrigeración, las aspas del ventilador de mezcla, la junta selladora de salida, la campana interior de salida, el embudo etc. Antes de la limpieza, asegúrese de que el enchufe se haya desconectado.
  • Seite 32 5. Pulse el interruptor on/off situado en la parte trasera del aparato. 6. La máquina comienza a preparar helado. Durante el proceso de producción, todavía puede añadir más ingredientes, si bien debe evitar la adición de materiales de grano para no obstaculizar los orificios. Retire el tapón y coloque el embudo para añadir más ingredientes o siropes...
  • Seite 33: Uso Y Funciones

    USO Y FUNCIONES Nota: Antes y después de la preparación de helado, el aparato debe limpiarse con su función de limpieza (consulte el capítulo „Limpieza y cuidado“). Toma para suministro eléctrico Conecte el enchufe a la toma de corriente. Encender el aparato Pulse el interruptor on/off situado en la parte trasera del aparato.
  • Seite 34: Limpieza Y Cuidado

    Función de protección del motor Si el tiempo de producción es más largo, el helado se endurecerá cada vez más y el motor mezclador podría bloquearse. El aparato controla automáticamente la temperatura del motor removedor y se apaga automáticamente en caso de emergencia para protegerlo de un sobrecalentamiento.
  • Seite 35 Componentes del mango:...
  • Seite 36 Montaje del mango: Nota: Para desmontar el aparato, proceda del modo inverso. La ranura está apuntando hacia arriba Con la fijación Con la mano, Fije el componente Fije el componente del componente presione el 1 en el 4 en el 3, la ranura debe componente 3 en componente 2.
  • Seite 37: Resolución De Problemas

    RESOLUCIÓN DE PROBLEMAS Problema Posible causa Solución propuesta El helado no se puede El helado está muy duro. Espere a que el helado se retirar tras su preparación. descongele y retírelo. El mango no se puede El aspa del ventilador de Instale el aspa del colocar correctamente mezcla no está...
  • Seite 38: Retirada Del Aparato

    RETIRADA DEL APARATO Si el aparato lleva adherida la ilustración de la izquierda (el contenedor de basura tachado) entonces rige la normativa europea, directiva 2012/19/UE. Este producto no debe arrojarse a un contenedor de basura común. Infórmese sobre las leyes territoriales que regulan la recogida separada de aparatos eléctricos y electrónicos.
  • Seite 39: Fiche Technique

    Cher client, Toutes nos félicitations pour l’acquisition de ce nouvel appareil. Veuillez lire attentivement les instructions suivantes de branchement et d’utilisation afin d’éviter d’éventuels dommages. Le fabricant ne saurait être tenu pour responsable des dommages dus au non-respect des consignes de sécurité et à la mauvaise utilisation de l’appareil.
  • Seite 40: Consignes De Sécurité

    CONSIGNES DE SÉCURITÉ • Veuillez lire attentivement toutes les indications et conservez ce mode d’emploi soigneusement pour pouvoir le consulter à tout moment. • Brancher l’appareil à une prise dont la tension correspond à celle indiquée sur la plaque signalétique de l’appareil. •...
  • Seite 41 Remarques particulières • Lors du positionnement de l‘appareil, assurez-vous que le cordon d‘alimentation n‘est pas pincé ou endommagé. • Assurez-vous qu‘il n‘y a pas de prises multiples ou d‘alimentations multiples à l‘arrière de l‘appareil. Pour éviter la contamination des aliments, veuillez suivre les instructions ci-dessous : •...
  • Seite 42: Aperçu De L'appareil

    APERÇU DE L‘APPAREIL Entonnoir Couvercle supérieur Poignée Ecran Touches Fente d'aération Bouchon à vis Cache latéral Cache frontal Fente d'aération Bac d'égouttement MARCHE/ARRÊT START/PAUSE Cleaning (nettoyage)
  • Seite 43: Mise En Marche Et Fonctionnement Général

    MISE EN MARCHE ET FONCTIONNEMENT GÉNÉRAL Remarque : Avant utilisation, nettoyez soigneusement toutes les pièces qui entrent en contact avec la crème glacée, y compris le seau de refroidissement, les pales du ventilateur de mélange, la bague d‘étanchéité du bec, le capot intérieur du bec, l‘entonnoir, etc.
  • Seite 44 5. Appuyez sur l‘interrupteur MARCHE/ARRÊT à l‘arrière de l‘appareil. 6. La machine commence à préparer de la glace. Vous pouvez ajouter plus d‘épices pendant le processus de production, en évitant l‘ajout de matériaux granulaires pour éviter de boucher les ouvertures. Retirez le bouchon et insérez l‘entonnoir pour ajouter plus d‘ingrédients...
  • Seite 45: Utilisation Et Fonctions

    UTILISATION ET FONCTIONS Remarque : Avant et après la préparation de la glace, nettoyez l‘appareil avec la fonction de nettoyage (voir chapitre „Nettoyage et entretien“). Prise d'alimentation Branchez la fiche dans la prise. Pour allumer l'appareil Appuyez sur l'interrupteur de MARCHE/ARRÊT au dos de l'appareil. Choix d'une fonction Pour augmenter la durée Pour réduire la durée...
  • Seite 46: Nettoyage Et Entretien

    Fonction de protection du moteur Si le temps de production est plus long, la glace devient plus dure et le moteur de l‘agitateur peut se bloquer. L‘appareil surveille automatiquement la température du moteur d‘agitation et l‘arrête automatiquement en cas d‘urgence pour le protéger de la surchauffe.
  • Seite 47 Eléments de l‘unité de poignée :...
  • Seite 48 Assemblage de l‘unité de poignée : Remarque : Pour démonter l‘appareil, procédez dans l‘ordre inverse. La fente est dirigée vers le haut Lors de la fixation Enfoncez à la main Fixez l'élément 1 Fixez l'élément 4 de l'élément 3, la l'élément 3 dans sur l'élément 2.
  • Seite 49: Résolution Des Problèmes

    RÉSOLUTION DES PROBLÈMES Problème Cause possible Solution Impossible de récupérer La glace est trop dure. Laissez la glace dégeler la crème glacée après la puis retirez-la. préparation. Impossible de monter la La pale du ventilateur de Installez la pale de poignée correctement.
  • Seite 50: Conseils Pour Le Recyclage

    CONSEILS POUR LE RECYCLAGE Le pictogramme ci-contre apposé sur le produit signifie que la directive européenne 2012/19/UE s‘applique (poubelle à roues barrée d’une croix). Ces produits ne peuvent être jetés dans les poubelles domestiques courantes. Renseignez- vous concernant les règles appliquées pour la collecte d’appareils électriques et électroniques.
  • Seite 51: Dati Tecnici

    Gentile cliente, La ringraziamo per aver acquistato il dispositivo. La preghiamo di leggere attentamente le seguenti istruzioni per l’uso e di seguirle per evitare possibili danni tecnici. Non ci assumiamo alcuna responsabilità per danni scaturiti da una mancata osservazione delle avvertenze di sicurezza e da un uso improprio del dispositivo.
  • Seite 52: Avvertenze Di Sicurezza

    AVVERTENZE DI SICUREZZA • Leggere attentamente tutte le indicazioni di sicurezza e conservare il presente libretto d’istruzioni per consultazioni future. • Prima di accendere il dispositivo, controllare la tensione sulla targhetta identificativa e collegare il dispositivo solo a prese con tensione corrispondente a quella indicata.
  • Seite 53 Note speciali • Quando si posiziona l‘unità, assicurarsi che il cavo di alimentazione non sia schiacciato o danneggiato. • Assicurarsi che non vi siano prese multiple o alimentatori sul retro dell‘unità. Per evitare la contaminazione degli alimenti, seguire le seguenti istruzioni: •...
  • Seite 54: Descrizione Del Dispositivo

    DESCRIZIONE DEL DISPOSITIVO Imbuto Coperchio superiore Impugnatura Display Tasti Fessure di ventilazione Vite di bloccaggio Copertura laterale Copertura anteriore Fessure di ventilazione Vaschetta di raccolta ON/OFF START/PAUSA Cleaning (pulizia)
  • Seite 55: Messa In Funzione E Utilizzo Generico

    MESSA IN FUNZIONE E UTILIZZO GENERICO Nota: pulire a fondo tutti i componenti che entrano in contatto con il gelato prima dell’uso, inclusi cestello di raffreddamento, miscelatore, guarnizione ad anello del punto di uscita, copertura interna del punto di uscita, imbuto, ecc. Prima della pulizia, assicurarsi che la spina sia staccata dalla presa.
  • Seite 56 5. Premere ON/OFF sul retro del dispositivo. 6. Il dispositivo inizia la preparazione del gelato. Durante il processo di preparazione è possibile aggiungere altre spezie e aromi, evitando però materiali granulari, in modo da evitare che si otturino le aperture. Togliere il pestello e inserire l’imbuto per aggiungere ingredienti...
  • Seite 57: Utilizzo E Funzioni

    UTILIZZO E FUNZIONI Nota: prima e dopo la preparazione del gelato, è necessario pulire il dispositivo utilizzando l’apposita funzione (v. capitolo Pulizia e manutenzione). Connessione di alimentazione Inserire la spina nella presa elettrica. Accendere il dispositivo Premere ON/OFF sul retro del dispositivo. Selezionare la funzione Aumentare il tempo.
  • Seite 58: Pulizia E Manutenzione

    Funzione di protezione del motore Se il tempo di produzione è più lungo, il gelato diventa sempre più duro e il motore di miscela può bloccarsi in determinate condizioni. Il dispositivo controlla automaticamente la temperatura del motore di miscela e, in caso di emergenza, lo spegne per proteggerlo dal surriscaldamento.
  • Seite 59 Componenti strutturali dell’unità dell’impugnatura:...
  • Seite 60 Assemblaggio dell’unità dell’impugnatura: Nota: per disassemblare il dispositivo, procedere in ordine inverso. La fessura è rivolta verso l’alto Durante il fissaggio Premere Fissare Fissare del componente componente 3 in componente 1 a componente 4 a 3, la fessura deve componente 1 con componente 2.
  • Seite 61: Correzione Degli Errori

    CORREZIONE DEGLI ERRORI Problema Possibile causa Soluzioni Il gelato non può essere Il gelato è troppo duro. Attendere fino a quando il tolto dal dispositivo a gelato si è ammorbidito e preparazione conclusa. procedere a toglierlo. L’impugnatura non Il miscelatore non è Inserire il miscelatore può...
  • Seite 62: Smaltimento

    SMALTIMENTO Se sul prodotto è presente la figura a sinistra (il cassonetto dei rifiuti mobile sbarrato), si applica la direttiva europea 2012/19/UE. Questi prodotti non possono essere smaltiti con i rifiuti normali. Informarsi sulle disposizioni vigenti in merito alla raccolta separata di dispositivi elettrici ed elettronici. Non smaltire i vecchi dispositivi con i rifiuti domestici.

Inhaltsverzeichnis