Herunterladen Inhalt Inhalt Diese Seite drucken

Werbung

Verfügbare Sprachen
  • DE

Verfügbare Sprachen

All manuals and user guides at all-guides.com

Werbung

Inhaltsverzeichnis
loading

Inhaltszusammenfassung für Ricatech RMC430

  • Seite 1 All manuals and user guides at all-guides.com...
  • Seite 2 All manuals and user guides at all-guides.com IMPORTANT SAFEGUARDS FOR AUDIO PRODUCTS PLEASE READ CAREFULLY THE FOLLOWING IMPORTANT SAFEGUARDS THAT ARE APPLICABLE TO YOUR EQUIPMENT. 1. Read Instructions - All the safety and operating instructions should be read before th e appliance is operated. 2.
  • Seite 3 All manuals and user guides at all-guides.com CONTROL LOCATORS...
  • Seite 4 All manuals and user guides at all-guides.com UNPACKING 1. Remove the box and all packing materials from around the unit. NOTE: Save all packing materials until you are completely satisfied all parts of the unit are operating satisfactorily and just in case the unit should need service in the future. 2.
  • Seite 5: Playing A Cassette

    All manuals and user guides at all-guides.com TURNTABLE OPERATION 1. Press the FUNCTION button / to select Phono mode. 2. Set the SPEED CONTROL SWITCH at the correct speed (331/3, 45 or 78 rpm) for the record to be played. 3.
  • Seite 6: Repeat Playback

    All manuals and user guides at all-guides.com CD OPERATION Playing a CD via the CD Recorder/Player NOTE: This CD Player can also be operated by Remote control. 1. Press the FUNCTION button / until “ CD LOAD “ shows on the display for a few seconds and then “ NO DISC “ if no CD has been detected in the tray.
  • Seite 7: Random Play

    All manuals and user guides at all-guides.com RANDOM PLAY 1. While playing a CD, press the RANDOM button / on the remote control. “RANDOM” will show on the LCD display. The unit will randomly select songs from the CD and play them in any order. To cancel Random Playback, press the Stop button.
  • Seite 8 All manuals and user guides at all-guides.com 3. Press the PROGRAM BUTTON again to store the selected track number. 4. Repeat steps 2 and 3 above to program other tracks into memory. Press the PLAY BUTTON to start playback in the programmed order.
  • Seite 9 All manuals and user guides at all-guides.com MP3 CD Search by Folder / Album Title 1. While the CD is stopped, press the FIND / button twice to start to browse the album. The search icon, ALBUM 001 and its name will be shown on the display. 2.
  • Seite 10 All manuals and user guides at all-guides.com CD-RW into the CD Recorder/Player drawer. 2. Press the FUNCTION button / to set the unit to CD/AUX MODE. 3. Turn the CD Player on by pressing the CD Power button and press the EJECT button to open the drawer. 4.
  • Seite 11 All manuals and user guides at all-guides.com 8. Once you have finished the recording, press the FINALIZE / button. The display will read "Finalize". 9. Once the CD has been finalized, the unit will return to Tuner mode and the display will show "TUNER". The CD is ready for use.
  • Seite 12: Audio Connections

    All manuals and user guides at all-guides.com sequential track number. This can be done by pressing the TRACK SPLIT button / While recording your record, etc., listen for the end of each song. There will usually be a brief silence between songs. When you are at the end of the song, press the Track Split button.
  • Seite 13 All manuals and user guides at all-guides.com Aux Input Using the Aux Input allows you to connect additional external audio components and listen to them through your unit. Any component with an audio output, such as a Radio, MP3 Player, etc. can be connected by using the correct cables (included). This unit uses standard RCA cables.
  • Seite 14 All manuals and user guides at all-guides.com Q Turntable – the arm slides across the record A Make sure the protective needle cover is removed. A Make sure the stylus is not damaged. A Your record may be one of the newer types with micro grooves and may need a different stylus to play successfully. Any of the older style records should not have this problem.
  • Seite 15: Specifications

    All manuals and user guides at all-guides.com WARNING: TO PREVENT FIRE OR SHOCK HAZARD, DO NOT EXPOSE THIS APPLIANCE TO RAIN OR MOISTURE. DO NOT REMOVE COVER. PILOT LAMPS SOLDERED IN PLACE. NO USER SERVICEABLE PARTS INSIDE. REFER SERVICING TO QUALIFIED SERVICE PERSONNEL. CAUTION RISK OF ELECTRIC SHOCK...
  • Seite 16 All manuals and user guides at all-guides.com Customer support You can contact the Ricatech customer service when you have a question or a problem with your Ricatech product. You can contact us by telephone and email. Email For customer support by email, please sent a email to support@ricatech.com Please make sure that you mention the model number and serial number of the product, mention...
  • Seite 17 All manuals and user guides at all-guides.com Gebruikers handleiding BELANGRIJKE VOORZORGSMAATREGELEN VOOR AUDIOPRODUCTEN LEES AANDACHTIG DE VOLGENDE BELANGRIJKE VOORZORGSMAATREGELEN DIE VAN TOEPASSING ZIJN OP UW APPARATUUR. 1. Instructies lezen - Alle veiligheids- en bedieningsinstructies moeten worden gelezen voordat het apparaat wordt gebruikt. 2.
  • Seite 18: Plaats Van Onderdelen

    All manuals and user guides at all-guides.com PLAATS VAN ONDERDELEN AFSTEMSC Stand-by lampje Stereo-indicator HAAL Afstandsbediening Sub LCD-display LCD-scherm ssensor Luidsprekers Luidsprekers Volumeknop Afstemknop Functieknop Programmeren-knop Wissen-knop Map - Knop Map + Knop Bandknop Uitwerpen-knop Afronden-knop Zoeken-knop Splits Track-knop Hoofdtelefoonaansluiting Lijningang CD Voeding-knop Stand-by lampje...
  • Seite 19 All manuals and user guides at all-guides.com UITPAKKEN 1. Verwijder de doos en alle verpakkingsmaterialen van het apparaat. OPMERKING: Bewaar al het verpakkingsmateriaal tot u volledig tevreden bent over de goede werking van het apparaat en voor het geval dat het apparaat in de toekomst onderhoud vereist. 2.
  • Seite 20: Een Cassette Afspelen

    All manuals and user guides at all-guides.com ANTENNE Voor FM-ontvangst is het apparaat uitgerust met DRAADANTENNE. Verplaats de draad tot de radio-ontvangst zuiver en zonder storingen is. OPMERKING: Als de FM-Stereo-ontvangst niet goed is, kan het beter zijn om te schakelen naar Monogeluid: Druk op de Mono/Stereo-knop/ op de afstandsbediening om Mono-ontvangst te selecteren.
  • Seite 21: Herhaalde Weergave

    All manuals and user guides at all-guides.com OPMERKINGEN: Als u de cassette strak aanvoelt terwijl u deze handeling uitvoert (zie afb. 2), kan de band bekneld zijn door de vorming van ribbels in de wikkeling van de band (zichtbaar door het venster in het midden). In de meeste gevallen kunnen deze worden verwijderd door snel terugspoelen van de cassette van het ene uiteinde naar de andere en weer terug.
  • Seite 22: Geprogrammeerde Weergave

    All manuals and user guides at all-guides.com WILLEKEURIG AFSPELEN 1. Druk tijdens het afspelen van een CD op de WILLEKEURIG-knop/ op de afstandsbediening. “RANDOM” zal op het LCD-display getoond worden. Het apparaat zal willekeurig nummers selecteren van de CD en ze in willekeurige volgorde afspelen.
  • Seite 23 All manuals and user guides at all-guides.com Vooruit en Achteruit skippen 1. Druk op de AFSPELEN/PAUZEREN-KNOP om het afspelen van de geselecteerde track te starten. 2. Druk op de VOORUIT SKIP + KNOP of de ACHTERUIT SKIP - KNOP om een track te selecteren. Vooruit en achteruit zoeken tijdens het afspelen 1.
  • Seite 24 All manuals and user guides at all-guides.com MP3-CD Zoeken op bestandsnaam 1. Druk in de stop- of afspeelmodus op de ZOEKEN-knop/ om te starten met het alfabetisch en numeriek zoeken. 2. Druk op de MAP +/ of de MAP -/ knoppen om de corresponderende letter of het corresponderende nummer van de track die u zoekt te selecteren.
  • Seite 25 All manuals and user guides at all-guides.com GEPROGRAMMEERDE WEERGAVE 1. Druk op de PROGRAMMEREN-KNOP. “MEMORY”, “P - 01” zal getoond worden op het display, en “MEMORY” zal knipperen. 2. Druk op de MAP + of MAP - knoppen om een Album te selecteren. 3.
  • Seite 26 All manuals and user guides at all-guides.com Opnemen van cassettes naar CD 1. Plaats een compatibele blanco CD-R of CD-RW in de CD-recorder/speler. 2. Druk op de FUNCTIE-knop/ om het apparaat in te stellen op de PHONO-modus. 3. Plaats een vooraf opgenomen cassette via de CASSETTEDEUR in het cassettedeck. De cassetteband zal beginnen met afspelen.
  • Seite 27 All manuals and user guides at all-guides.com 7. Nadat de eerste zijde van de plaat is voltooid, drukt u op de STOP/ knop. Het display zal gedurende enkele seconden ―CLOSE TK‖ weergeven en daarna veranderen naar ―PHONO‖. 8. Draai de plaat om en herhaal de stappen 4-6 om de andere zijde op te nemen. knop.
  • Seite 28 All manuals and user guides at all-guides.com Opnemen van nummers van verschillende bronnen op één CD Het is mogelijk om nummers van verschillende bronnen op één CD op te nemen. Bijvoorbeeld: · Selecteer de “PHONO” modus, speel geselecteerde tracks op een plaat af en neem ze op. ·...
  • Seite 29 All manuals and user guides at all-guides.com Audio-uitgang Met behulp van de audio-uitvoer kunt u de audio van uw apparaat naar een andere stereo-installatie, televisie, versterker of andere stereobron sturen. Om deze verbinding te maken heeft u standaard RCA-kabels nodig. 1.
  • Seite 30 All manuals and user guides at all-guides.com Q De CD-speler speelt mijn MP3-CD’s niet af A MP3-CD’s kunnen alleen afgespeeld worden via de CD-recorder/speler. Q De CD-speler speelt niet af als op de afstandsbediening gedrukt wordt A De CD-speler kan niet bediend worden via de afstandsbediening, die werkt alleen met de CD-recorder/speler. Q Het lukt niet om de CD-recorder/speler mijn CD’s af te laten spelen A Controleer dat de juiste functie is geselecteerd.
  • Seite 31 All manuals and user guides at all-guides.com SPECIFICATIES Frequentiebereik AM 530 - 1.600 KHz (AM = MW) FM 88 - 108 MHz Voedingsbron Wisselstroom 230 V ~ 50 Hz Stroomverbruik 55 W Antennes Externe antenne voor FM Ingebouwde ferrietstaaf voor AM 33 1 / 3 -, 45-, 78-toeren Snelheid draaitafel : Luidsprekers...
  • Seite 32 All manuals and user guides at all-guides.com Klantenservice Heeft u een vraag of probleem met uw Ricatech-product, neem dan contact op met de Ricatech-klantendienst. U kunt telefonisch of per e-mail contact opnemen. E-mail Voor klantenondersteuning per e-mail, stuur een e-mail naar support@ricatech.com .
  • Seite 33 All manuals and user guides at all-guides.com MODE D’EMPLOI IMPORTANTES INSTRUCTIONS DE SECURITE POURPRODUITS AUDIO VEUILLEZ LIRE ATTENTIVEMENT LES INSTRUCTIONS DE SECURITE SUIVANTES CONCERNANT VOTRE EQUIPEMENT . 1. Lisez les instructions – Lisez toutes les instructions de sécurité et d’utilisation avant de vous servir de l’appareil.
  • Seite 34: Emplacements Des Commandes

    All manuals and user guides at all-guides.com EMPLACEMENTS DES COMMANDES Indicateur de mode de Cadran veille Gradué Indicateur stéréo Capteur de télécommande Écran LCD secondaire Écran LCD Haut-parleurs Haut-parleurs Molette de réglage du volume Molette de syntonisation Bouton Function (Fonction) Bouton de programmation Bouton Folder - (aller au dossier précédent) Bouton Erase (Effacer)
  • Seite 35 All manuals and user guides at all-guides.com DÉBALLAGE 1. Retirez le boîtier et tous les matériaux d'emballage autour de l'appareil. REMARQUE : Conservez tous les matériaux d'emballage jusqu'à ce que vous vous soyez assuré que tous les éléments d fonctionnent de façon satisfaisante et juste au cas où l'appareil devrait être réparé ultérieurement. 2.
  • Seite 36: Lecture D'une Cassette

    All manuals and user guides at all-guides.com 1. Appuyez sur le bouton FUNCTION/ pour sélectionner le mode Phono. 2. Réglez le SÉLECTEUR DE COMMANDE DE LA VITESSE sur la vitesse appropriée (33 1/3, 45 ou 78 tours) à la lecture du disque sélectionné. 3.
  • Seite 37 All manuals and user guides at all-guides.com ENTRETIEN DE LA CASSETTE Les deux problâmes courants lors de l'utilisation de cassettes sont :1. Le coincement de la bande, causant une vitesse inãgale de la lecture. 2. L'entremälement de la bande dans les parties essentielles du mãcanisme de lecture. Pour ãviter ces problâmes pouvant survenir, prenez les prãcautions suivantes : ·...
  • Seite 38: Répétition De La Lecture

    All manuals and user guides at all-guides.com RÉPÉTITION DE LA LECTURE Pour rãpãter une seule piste 1. Sãlectionnez le numãro de piste souhaitã et appuyez sur une fois sur le bouton REPEAT / . Puis appuyez sur le bouton PLAY/PAUSE / «...
  • Seite 39 All manuals and user guides at all-guides.com Lecture d'un CD via le lecteur de CD REMARQUE : Ce lecteur de CD ne peut pas ätre utilisã avec la tãlãcommande. 1. Appuyez sur le bouton FUNCTION / pour sãlectionner le mode CD/AUX. 2.
  • Seite 40 All manuals and user guides at all-guides.com Informations sur le CD MP3 Si le CD MP3 contient des pistes d'informations, par exemple relatives à l'artiste ou au titre, ces informations sont affich ães sur l'ãcran LCD pendant la lecture du CD. 1.
  • Seite 41 All manuals and user guides at all-guides.com RÉPÉTITION DE LA LECTURE Pour rãpãter une seule piste 1. Sãlectionnez le numãro de piste souhaitã et appuyez sur une fois sur le bouton REPEAT. Puis appuyez sur le bouton PLAY/PAUSE. « RÉPÉTER » s'affiche sur l'ãcran. Aprâs avoir terminã la lecture, la piste sãlectionnãe sera lue à nouveau. Pour rãpãter la lecture d'un CD MP3 complet 1.
  • Seite 42 All manuals and user guides at all-guides.com Finalisation ». 9. Dâs que le CD a ãtã finalisã, l'appareil revient en mode CD/AUX, puis l'ãcran indique « CD/AUX ». Le CD est maintenant prät pour la lecture. REMARQUES :Si le CD n'est pas finalisã, il ne pourra pas ätre lu dans un autre lecteur de CD. Les lecteurs CD ne sont pas tous compatibles avec les disques CD-R et CD-RW.
  • Seite 43 All manuals and user guides at all-guides.com Enregistrement depuis le phonographe (disques vinyle) vers un CD 1. Chargez un disque CD-R ou CD-RW vierge compatible dans le lecteur/enregistreur de CD. 2. Appuyez sur le bouton FUNCTION/ pour sélectionner PHONO MODE. 3.
  • Seite 44: Connexions Audio

    All manuals and user guides at all-guides.com DIVISION MANUELLE DES PISTES Lorsque vous faites un enregistrement depuis n'importe quelle fonction (exceptã la radio) les piste musicales sont, en temps normal, enregistrães sur une seule piste. Avec cet appareil, il est possible de diviser votre enregistrement en plusieurs pistes si vous le souhaitez, afin que chaque chanson dispose de son propre numãro sãquentiel de piste.
  • Seite 45 All manuals and user guides at all-guides.com utile pour connecter des composants audio plus petits, par exemple un lecteur MP3. La prise Line-in est situãe à l'avant de votre appareil. Cette prise doit disposer d'un câble audio à la prise mini jack 3,5 mm de diamâtre pour la connexion (fourni).
  • Seite 46 All manuals and user guides at all-guides.com Q Le tourne-disque ne fonctionne pas A Veillez à ce que l'appareil soit en mode « Phono » en appuyant sur le bouton de fonction. R Assurez-vous que la vis de suspension du tourne-disque en chrome est bien vissée à fond. A Vérifiez que le lecteur de cassette n'est pas activé, du fait que le phonographe et la cassette fonctionnent tous deux en mode «...
  • Seite 47: Caractéristiques Techniques

    All manuals and user guides at all-guides.com AVERTISSEMENT : POUR ÉVITER TOUT RISQUE D'INCENDIE OU D'ÉLECTROCUTION, N'EXPOSEZ PAS CET APPAREIL À LA PLUIE OU À L'HUMIDITÉ. NE PAS RETIRER LE COUVERCLE. LES LAMPES PILOTES SONT SOUDÉES À LEUR EMPLACEMENT. NE CONTIENT AUCUNE PIÈCE RÉPARABLE PAR L'UTILISATEUR.
  • Seite 48 Téléphone Pour contacter le service clients par téléphone, veuillez composer le +31(0)10-4626733. Un membre de notre équipe technique sera prêt à vous servir. Pour toutes les procédures, rendez-vous sur le site web de Ricatech : www.ricatech.com Ricatech B.V.
  • Seite 49 All manuals and user guides at all-guides.com BEDIENUNGSANLEITUNG WICHTIGE SICHERHEITSHINWEISE FÜR AUDIOGERÄTE BITTE LESEN SIE SORGFÄLTIG DIE FOLGENDEN WICHTIGEN SICHERHEITSHINWEISE, DIE FÜR IHRE GERÄTE GELTEN. 1 Lesen Sie die Anleitungen - Alle Sicherheits- und Bedienungsanleitungen sollten gelesen werden, bevor das Gerät betrieben wird. 2 Bewahren Sie die Anleitungen auf - Die Sicherheits-und Bedienungsanleitungen sollten für zukünftige Fragen aufbewahrt werden.
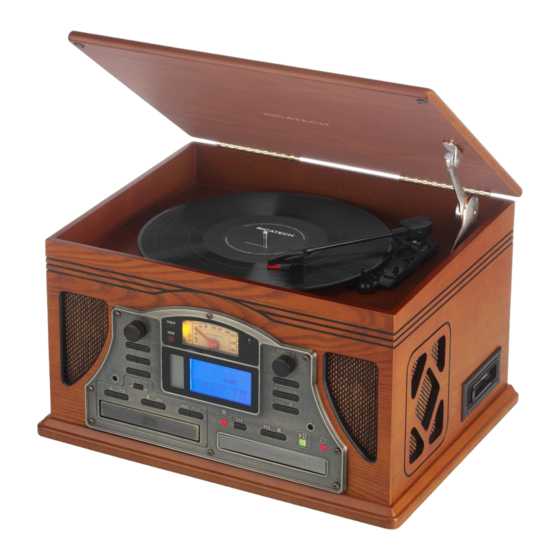
  • Seite 50 All manuals and user guides at all-guides.com BEDIENELEMENTE Standby-Anzeige Skalascheibe Stereo-Anzeige Fernbedienungssensor SUB-LCD-Anzeige LCD-Anzeige Lautsprecher Lautsprecher Lautstärkeregler Einstellknopf Funktionstaste Programmieren-Taste Löschen-Taste Ordner - Taste Frequenzwahl-T Taste Ordner + aste Finalisieren-Taste Auswurftaste Taste Track teilen Suchen-Taste Kopfhörerbuchse Line-In-Buchse CD-Ein-/Aus-Schalter Standby-Anzeige CD-Aufnahme-Fach Programmi eren-Taste CD-Fach...
  • Seite 51 All manuals and user guides at all-guides.com AUSPACKEN 1. Entfernen Sie den Karton und sämtliches Verpackungsmaterial um das Gerät. HINWEIS: Bewahren Sie alle Verpackungsmaterialien auf, bis Sie völlig sicher sind, dass alle Teile des Geräts zufriedenstellend funktionieren, und ebenso für den Fall, dass Sie den Reparaturservice in Zukunft benötigen.
  • Seite 52: Plattenspielerbetrieb

    All manuals and user guides at all-guides.com das Gerät, um die Position zu finden, in der der beste Empfang erzielt wird. VORSICHT: Schließen Sie die EXTERNE UKW-DRAHTANTENNE nicht an Außenantennen an. PLATTENSPIELERBETRIEB 1. Drücken Sie die Taste FUNKTION /, um den Phono-Modus auszuwählen. 2.
  • Seite 53: Wiederholte Wiedergabe

    All manuals and user guides at all-guides.com · Vergewissern Sie sich, dass keine lockeren Lagen des Kassettenbandes durch das Fenster in der Mitte des Kassettenfachs (siehe Abb. 1) zu sehen sind. · Wickeln Sie vor dem Einlegen der Kassette in den Abspielmechanismus eventuell vorhandene durchhängende Bandabschnitte mit einem Bleistift oder einem Kugelschreiber in Sechskantform (siehe Abb.
  • Seite 54: Zufallswiedergabe

    All manuals and user guides at all-guides.com Zum Wiederholen einer vollständigen CD 1. Drücken Sie die REPEAT-Taste / zweimal. In der Anzeige erscheint „REPEAT ALL“. Wenn die Disc zu Ende ist, wird die gesamte Disc noch einmal von vorn abgespielt. 2.
  • Seite 55 All manuals and user guides at all-guides.com lang „- - “ an, dann wird die Gesamtanzahl der Titel auf der Disc angezeigt. „00“ wird angezeigt, wenn sich keine Disc im Fach befindet. 6. Drücken Sie die WIEDERGABE/PAUSE-Taste, um die Wiedergabe zu starten. Der aktuell abgespielte Titel wird auf der SUB-LCD-Anzeige angezeigt.
  • Seite 56 All manuals and user guides at all-guides.com 2. Informationen zur CD beginnen daraufhin über die LCD-Anzeige zu scrollen. 3. Drücken Sie die BAND / -Taste erneut, um die Informationen auszublenden. HINWEIS: Sind auf der CD keine Titelinformationen vorhanden, wird „UNKNOWN“ angezeigt, wenn die BAND-Taste gedrückt wird.
  • Seite 57: Cd-Aufnahmebetrieb

    All manuals and user guides at all-guides.com WIEDERHOLTE WIEDERGABE Zur Wiederholung eines einzelnen Titels 1. Wählen Sie die gewünschte Titelnummer und drücken Sie einmal die Taste REPEAT. Drücken Sie dann die WIEDERGABE/PAUSE-Taste. In der Anzeige erscheint „REPEAT“. Nach Beendigung der Wiedergabe wird der gewählte Titel wiederholt. Zum Wiederholen einer vollständigen MP3-CD 1.
  • Seite 58 All manuals and user guides at all-guides.com 8. Sobald die Aufnahme abgeschlossen ist, drücken Sie die FINALISIEREN / -Taste. Auf dem Display erscheint „Finalize“. 9. Sobald die CD finalisiert ist, kehrt das Gerät in den CD/AUX-Modus zurück und in der Anzeige erscheint „CD/AUX“. Die CD ist jetzt für die Wiedergabe bereit.
  • Seite 59: Manuelle Teilung In Titel

    All manuals and user guides at all-guides.com Von Phono (Vinyl-Schallplatten) auf CD aufnehmen 1. Legen Sie eine geeignete unbeschriebene CD-R oder CD-RW in das CD-Aufnahme-/Abspielgerät ein. 2. Drücken Sie die Taste FUNKTION / , um den PHONO-MODUS auszuwählen. 3. Stellen Sie den DREHZAHLREGLER-SCHALTER auf die richtige Drehzahl (33 , 45 oder 78 U/min) für die ausgewählte Schallplatte.
  • Seite 60 All manuals and user guides at all-guides.com fortlaufende Titelnummer erhält. Dies ist möglich durch Drücken der Taste TITEL TEILEN / Passen Sie beim Überspielen Ihrer Schallplatte usw. das Ende eines jeden Songs ab. Normalerweise gibt es eine kurze Pause zwischen den Titeln. Wenn das Ende eines Titels erreicht wird, drücken Sie die Taste „Titel teilen“. Bei der Fortsetzung der Aufnahme wird die Titelnummer jeweils um eins erhöht.
  • Seite 61 All manuals and user guides at all-guides.com AUX-Eingang Mit dem AUX-Eingang können Sie zusätzliche externe Audiokomponenten an Ihr Gerät anschließen und über dieses anhören. Jede beliebige Komponente mit Audioausgang, wie z. B. ein Radio, MP3-Player usw., kann mit den richtigen Kabeln (mitgeliefert) angeschlossen werden.
  • Seite 62 All manuals and user guides at all-guides.com heruntergeschraubt wurde. A Vergewissern Sie sich, dass der Kassettenspieler nicht eingeschaltet ist, da Platten- und Kassettenspieler beide im „Phono―-Modus betrieben werden. Falls noch eine Kassette im Kassettendeck eingelegt ist, nehmen Sie diese im Zweifelsfall heraus.
  • Seite 63: Spezifikationen

    All manuals and user guides at all-guides.com WARNUNG: UM BRAND ODER STROMSCHLAG ZU VERMEIDEN, SETZEN SIE DIESES GERÄT NIE REGEN ODER FEUCHTIGKEIT AUS. ENTFERNEN SIE NICHT DIE ABDECKUNG. DIE KONTROLLLEUCHTEN SIND VERLÖTET. IM GERÄT BEFINDEN SICH KEINE VOM BENUTZER ZU WARTENDEN TEILE. ÜBERLASSEN SIE DIE WARTUNG QUALIFIZIERTEM KUNDENDIENSTPERSONAL.
  • Seite 64 All manuals and user guides at all-guides.com KUNDENDIENST Wenden Sie sich bei Fragen oder Problemen mit Ihrem Ricatech-Gerät an den Ricatech-Kundendienst. Sie können uns telefonisch oder per E-Mail erreichen. E-Mail Für E-Mail-Anfragen an den Kundendienst senden Sie bitte eine E-Mail an die Adresse support@ricatech.com. Geben Sie bitte unbedingt Modellnummer und Seriennummer des Produktes sowie Ihren Namen &...
  • Seite 65 All manuals and user guides at all-guides.com MANUAL DE USUARIO INSTRUCCIONES DE SEGURIDAD IMPORTANTES PARA PRODUCTOS DE AUDIO POR FAVOR LEA CON ATENCIÓN LAS SIGUIENTES INSTRUCCIONES DE SEGURIDAD APLICABLES A SU EQUIPO. 1. Lea las instrucciones – Lea todas las instrucciones de seguridad y uso antes de utilizar el aparato. 2.
  • Seite 66 All manuals and user guides at all-guides.com LOCALIZADORES DE CONTROLES Indicador de modo de Escala Indicador espera dial estéreo Sensor de mando Pantalla secundaria Pantalla LCD a distancia Altavoces Altavoces Perilla Perilla volumen sintonización Botón Función Botón Programa Botón Borrar Botón Carpeta - Botón Banda Botón Carpeta +...
  • Seite 67: Fuente De Alimentación

    All manuals and user guides at all-guides.com DESEMBALAJE 1. Extraiga la caja y todo el material de embalaje alrededor de la unidad. NOTA: Guarde todo el material de embalaje hasta que esté completamente seguro de que todas las piezas de la unidad e funcionando satisfactoriamente y en caso de que la unidad requiera servicio en el futuro.
  • Seite 68: Funcionamiento De La Radio

    All manuals and user guides at all-guides.com FUNCIONAMIENTO DE LA RADIO 1. Pulse el botón de FUNCIÓN / para seleccionar el MODO SINTONIZADOR. El dial se encenderá. 2. Pulse el botón BANDA / para seleccionar la banda de sintonización deseada: AM (= MW) o FM. 3.
  • Seite 69: Funcionamiento Del Cd

    All manuals and user guides at all-guides.com REPRODUCCIÓN DE UN CASETE 1. En el modo de Audio inserte una cinta grabada previamente a travãs de la PLETINA DE CASETE. 2. La cinta se deslizará en el mecanismo del casete y se iniciará la reproducción. 3.
  • Seite 70: Repetir Reproducción

    All manuals and user guides at all-guides.com Salto hacia adelante y hacia atrás en el panel de control y en el mando a distancia 1. Para saltar hacia delante o hacia atrás a travãs de las pistas en un CD, pulse o los botones 2.
  • Seite 71: Avisos Importantes

    All manuals and user guides at all-guides.com 6. Cuando se hayan programado todas las pistas seleccionadas en la memoria, pulse el botón Reproducir/Pausar CD/ para reproducir el disco en el orden designado. NOTA: Se pueden programar hasta un máximo de 35 pistas en la memoria. AVISOS IMPORTANTES: ·...
  • Seite 72 All manuals and user guides at all-guides.com Reproducción de carpeta/álbum de CD MP3 Si su CD MP3 está separado por carpetas, sigas los pasos siguientes para tener acceso a las carpetas: 1. Teniendo el CD detenido, pulse los botones CARPETA+ / o CARPETA - / para avanzar hacia delante o hacia atrás las carpetas de su disco.
  • Seite 73 All manuals and user guides at all-guides.com 2. Pulse el botón CARPETA+ / o CARPETA- / repetidamente para seleccionar el álbum deseado. 3. Pulse los botones SALTO HACIA DELANTE / o SALTO HACIA ATRÁS / para seleccionar la carpeta/álbum deseados. AVISOS: ·...
  • Seite 74 All manuals and user guides at all-guides.com blanco compatible en la bandeja del grabador/reproductor de CD. 2. Pulse el botón FUNCIÓN / para ajustar la unidad en MODO CD/AUX. 3. Encienda el reproductor de CD pulsando el botón de alimentación de CD y, a continuación, pulse el botón EXPULSAR para abrir la bandeja.
  • Seite 75 All manuals and user guides at all-guides.com . Se visualizará ―CLOSE TK‖ en la pantalla durante 7. Después de finalizar la grabación, pulse el botón DETENER / unos segundos y a continuación, cambiará a ―Tuner‖. En la pantalla se visualizará ―Finalize‖. 8.
  • Seite 76: Conexiones De Audio

    All manuals and user guides at all-guides.com No todos los reproductores de CD son compatibles con discos CD-R y CD-RW. Compruebe el manual del usuario para comprobar su compatibilidad. DIVISIÓN MANUAL DE PISTA Al grabar en todas las funciones (excepto radio) las pistas de música se graban normalmente como una pista. Con esta unidad es posible dividir su grabación en pistas distintas si así...
  • Seite 77 All manuals and user guides at all-guides.com para la conexión (suministrado). 1. Conecte un extremo del cable en la toma de entrada de línea en la parte delantera de su unidad. 2. El otro extremo se debe conectar en la salida de audio o en la toma de audífonos del reproductor externo seleccionado.
  • Seite 78 All manuals and user guides at all-guides.com modo ―Phono‖. Si tiene dudas, extraiga cualquier casete que se encuentre en el reproductor de casetes. R Asegúrese de que la correa de transmisión del plato no se haya salido. Para sustituir la correa, consulte las instrucciones y los diagramas de línea que vienen por separado.
  • Seite 79: Especificaciones

    All manuals and user guides at all-guides.com ADVERTENCIA: PARA PREVENIR INCENDIOS O DESCARGAS, NO EXPONGA EL APARATO A LA LLUVIA O LA HUMEDAD. NO RETIRE LA CUBIERTA. TESTIGOS DE PILOTOS SOLDADOS EN LA UNIDAD. NO CONTIENE PIEZAS SUSTITUIBLES POR EL USUARIO. LAS TAREAS DE SERVICIO DEBERÁN SER REALIZADAS POR EL PERSONAL DE SERVICIO CUALIFICADO.
  • Seite 80 Servicio de atención al cliente Puede ponerse en contacto con el servicio de atención al cliente de Ricatech en caso de que tenga una pregunta o un problema con su producto Ricatech. Puede ponerse en contacto con nosotros por teléfono o por correo electrónico.

Inhaltsverzeichnis