Inhaltsverzeichnis
Werbung
Verfügbare Sprachen
Verfügbare Sprachen
Quicklinks
Schnurloses DECT−/GAP−Verstärker−Telefon mit XL−Tasten und
Anrufbeantworter
Téléphone sans fil DECT/GAP avec amplificateur, touches XL
et répondeur
Telefono cordless DECT/GAP con amplificatore integrato, tasti
XL e segreteria telefonica
Cordless DECT/GAP Amplified Telephone with XL Buttons and
Answering Machine
DCT627x
Bedienungsanleitung
Mode d'emploi
Istruzioni per l'uso
Operating Instructions
Werbung
Kapitel
Inhaltsverzeichnis

Verwandte Anleitungen für switel DCT627-Serie


Inhaltszusammenfassung für switel DCT627-Serie
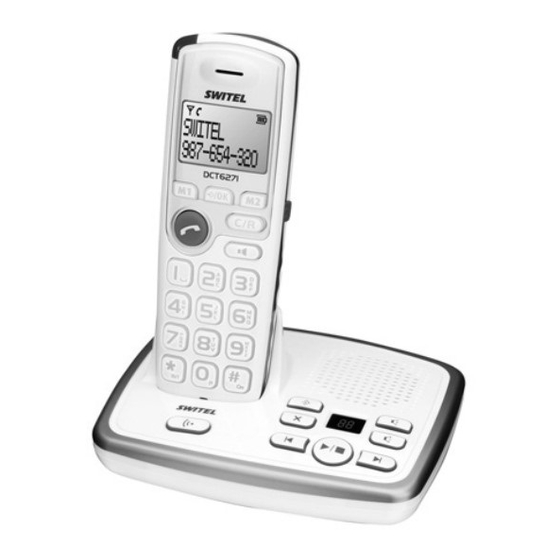
- Seite 1 Schnurloses DECT−/GAP−Verstärker−Telefon mit XL−Tasten und Anrufbeantworter Téléphone sans fil DECT/GAP avec amplificateur, touches XL et répondeur Telefono cordless DECT/GAP con amplificatore integrato, tasti XL e segreteria telefonica Cordless DECT/GAP Amplified Telephone with XL Buttons and Answering Machine DCT627x Bedienungsanleitung Mode d’emploi Istruzioni per l’uso Operating Instructions...
- Seite 2 Bedienungsanleitung ..Mode d’emploi ... . Istruzioni per l’uso ..Operating Instructions ..Declaration of Conformity .
-
Seite 3: Inhaltsverzeichnis
Inhaltsverzeichnis Sicherheitshinweise ....Telefon in Betrieb nehmen ... . Bedienelemente ....Einführende Informationen . -
Seite 4: Sicherheitshinweise
Sicherheitshinweise Sicherheitshinweise Lesen Sie diese Bedienungsanleitung sorgfältig durch. Bestimmungsgemäße Verwendung Dieses Telefon ist geeignet zum Telefonieren innerhalb eines Telefonnetzes. Jede an- dere Verwendung gilt als nicht bestimmungsgemäß. Eigenmächtige Veränderungen oder Umbauten sind nicht zulässig. Öffnen Sie das Gerät in keinem Fall selbst und füh- ren Sie keine eigenen Reparaturversuche durch. -
Seite 5: Telefon In Betrieb Nehmen
Telefonanschlusskabel Akkus Bedienungsanleitung Basisstation anschließen Achtung: Stellen Sie die Basisstation mit einem Mindestabstand von 1 m zu anderen elektronischen Geräten auf, da es sonst zu gegenseitigen Stö- rungen kommen kann. Unter www.switel.com erfahren Sie, ob dieses Telefon/Telefonset bereits erhältlich ist. -
Seite 6: Telefon In Betrieb Nehmen
Telefon in Betrieb nehmen Schließen Sie die Basisstation wie auf der Skizze abgebildet an. Verwenden Sie aus Si- cherheitsgründen nur das mitgelieferte Netzteil sowie das beigefügte Telefonanschluss- kabel. Telefonanschlussdose Netzsteckdose Verwenden Sie für die Basisstation das Netzteil mit der Nr. KG2B−075−0320D und den Ausgangsdaten 7,5 V, 320 mA. Ladestation anschließen Schließen Sie die Ladestation wie auf der Skizze abgebildet an. - Seite 7 Telefon in Betrieb nehmen ßen Sie das Akkufach. Akkus aufladen Stellen Sie das Mobilteil bei der ersten Inbetriebnahme für mindestens 16 Stunden in die Basisstation / Ladestation. [Haben Sie das Mobilteil richtig in die Basisstation / Ladestation gestellt, ertönt ein Hin- weissignal.] [Haben Sie das Mobilteil richtig in die Basisstation / Ladestation gestellt, leuchtet die Ladekontrollleuchte.] Das Mobilteil erwärmt sich beim Laden.
-
Seite 8: Bedienelemente
Bedienelemente Bedienelemente Die Tasten Ihres Telefons werden in dieser Bedienungsanleitung nachfolgend mit ver- einheitlichten umrandeten Symbolen dargestellt. Leichte Abweichungen der Tastensym- bole Ihres Telefons gegenüber den hier verwendeten Tastensymbolen sind daher mög- lich. Mobilteil Lautsprecher LCD−Display Menü−/OK−Taste Schnellwahltaste M2 Headsetanschluss Lösch−/R−Taste Freisprechtaste Zifferntastenblock... -
Seite 9: Einführende Informationen
Einführende Informationen Basisstation Ladekontakte Lautsprecher LC−Display Lautstärke + Lautstärke − Menü vor / nächste Nachricht Abspielen / Stopp / Einstellung bestätigen/beenden Menü zurück / vorherige Nachricht Nachricht/Ansage löschen Menü / Einstellung ändern Paging−Taste Einführende Informationen In diesem Kapitel finden Sie grundlegende Informationen zur Handhabung der Bedie- nungsanleitung und des Telefons. - Seite 10 Einführende Informationen Darstellung von Display−Texten Darstellung von Display−Symbolen Symbole und Texte im Display des Mobilteils Symbol Beschreibung Konstant: Anzeige der Batteriekapazität. Blinkend: Laden Sie die Akkus. Durchlaufende Segmente: Die Akkus werden geladen . Seite 7. Interne Rufnummer des Mobilteils . Seite 23. 12−−59 Anzeige der Uhrzeit .
- Seite 11 Einführende Informationen Navigation im Menü Alle Funktionen sind über unterschiedliche Menüs zu erreichen. Den Weg zur ge- wünschten Funktion entnehmen Sie der Menüstruktur . Seite 12. ” Hauptmenü öffnen + oder , Gewünschtes Untermenü auswählen ” Untermenü öffnen + oder , Gewünschte Funktion auswählen ”...
-
Seite 12: Menüstruktur
Menüstruktur Menüstruktur Hauptmenü In das Hauptmenü gelangen Sie, wenn Sie die Taste ” drücken. Danach wählen Sie mit den Tasten + oder , einen Eintrag aus und bestätigen Sie Ihre Auswahl mit der Taste ”. Weitere Informationen zum Menü und zur Bedienung . Kapitel 4. TELEFONBUCH, +/, Eintrag auswählen, ”... - Seite 13 Menüstruktur WAHLWIEDERH., +/, Eintrag auswählen, ” überspringen NAME ë NUMMER ë SPEICHERN LÖSCHEN BESTÄTIGEN? ALLE LÖSCH. BESTÄTIGEN? ALARM ALARM 1 UHRZEIT ë BESTÄTIGEN? ALARM 2 UHRZEIT ë BESTÄTIGEN? MOBILTEIL RUFTÖNE RUFTON EXT. MELODIE 1−10 RUFTON INT. MELODIE 1−10 LAUTSTÄRKE LAUTSTÄRKE 1−5, AUS DATUM ë...
- Seite 14 Menüstruktur UHRZEIT ë ' ' 12 STD. ' 24 STD. HÖRVERSTÄRK. LEISE MITTEL LAUT AUTOMATISCH TASTENTON AN/AUS DISPLAY KONTRAST STUFE 1−8 ë MT−NAME BELEUCHTUNGS EIN- 5−30 SEKUNDEN STELLUNG AUTO ANNAHME AN/AUS SPRACHE RÜCKSETZEN BESTÄTIGEN? Welche Sprachen zur Verfügung stehen siehe . Kapitel 2.
- Seite 15 Menüstruktur BASIS, PIN EINGEBEN ë RUFTÖNE MELODIE 1−5 LAUTSTÄRKE LAUTSTÄRKE 1−5, AUS NEUER PIN ë PIN BESTÄT. ë PIN ÄNDERN WAHLVERFAHR. TONWAHL PULSWAHL FLASH−ZEIT KURZ MITTEL LANG VMWI VMWI OFF? RESET BESTÄTIGEN? AN−/ABMELDEN PIN EINGEBEN ë ANMELDEN BASIS WÄHLEN BASIS 1−4 PIN EINGEBEN ë...
-
Seite 16: Telefonbuch
Telefonbuch Telefonbuch Im Telefonbuch können Sie 100 Rufnummern mit den dazugehörigen Namen spei- chern. Geben Sie bei allen Rufnummern immer die Vorwahl mit ein, damit auch eingehende Ortsgespräche einem Telefonbucheintrag zugeordnet werden können. Ist die Speicherkapazität erschöpft, zeigt das Display beim nächsten Speichern die Meldung SPEICH. - Seite 17 Telefonbuch Telefonbucheinträge ändern ” Hauptmenü öffnen TELEFONBUCH ” Telefonbuch öffnen + oder ,, ” Eintrag auswählen, bestätigen + oder ,, ÄNDERN ” Untermenü auswählen und bestätigen ë, ” Namen ändern und bestätigen ë, ” Rufnummer ändern und bestätigen Telefonbucheinträge löschen Einen Eintrag löschen ”...
-
Seite 18: Anrufliste
Anrufliste Direktwahl Sie können jeweils 1 Rufnummer als Direktwahl auf den Tasten ^ und _ spei- chern. Rufnummern als Direktwahl speichern Geben Sie eine Nummer ein oder wählen Sie einen Eintrag aus dem Telefonbuch, der Wahlwiederholung oder der Anrufliste. 3 Sek. ^ oder _ Auswahl auf entsprechender Direktwahl−Taste gespeichert Einträge auf Direktwahltasten können nicht gelöscht, sondern nur über-... - Seite 19 Anrufliste Rufnummer aus der Anrufliste im Telefonbuch speichern Eine Rufnummer kann direkt aus der Anrufliste im Telefonbuch gespeichert werden. «, + oder , Anrufliste öffnen und Eintrag auswählen ” Menü öffnen + oder , SPEICHERN , ” Untermenü auswählen und bestätigen ë, ”...
-
Seite 20: Telefonieren
Telefonieren Telefonieren Anruf annehmen {í}, ƒ oder ™ Anruf annehmen Gespräch beenden ƒ Gespräch beenden Anrufen ë Rufnummer eingeben (max. 24 Ziffern) Bei Falscheingabe letzte Ziffer löschen ƒ oder ™ Rufnummer wählen Sie können auch zuerst die Taste ƒ drücken und erhalten damit das Freizeichen. - Seite 21 Telefonieren Direktwahl Sie müssen Rufnummern als Direktwahlnummer gespeichert haben . Kapitel 5. 3 Sek. ^ oder _ Direktwahl durchführen Intern telefonieren Interne Gespräche führen Sie müssen zwei oder mehr Mobilteile (MT1, MT2, ...) an Ihrer Basisstation angemeldet haben, um interne kostenlose Gespräche führen zu können. MT1: 3 Sek.
- Seite 22 Telefonieren Einstellen der Basis−Klingellautstärke Die folgende Einstellung nehmen Sie an der Basis vor. ”, n / m BASE RINGER IS 0, 1, 2, 3, 4, 5 ” Einstellung ändern Einstellen der Hörerlautstärke Sie können während eines Gesprächs die Lautstärke in 5 Stufen anpassen. + oder , Gewünschte Lautstärke auswählen Hörverstärker...
-
Seite 23: Erweitern Des Telefonsystems
Suchton beenden Erweitern des Telefonsystems Über den international genormten GAP −Standard ist die Kompatibilität von Mobilteilen SWITEL und Basisstationen unterschiedlicher Hersteller geregelt. So ist es möglich, − Geräte und Geräte anderer Hersteller zusammen in ein Telefonsystem zu integrieren. Es ist jedoch möglich, dass einige Funktionen nicht zur Verfügung stehen. -
Seite 24: Besondere Funktionen
Besondere Funktionen Mehrere Basisstationen Sie können die Reichweite Ihres Mobilteils vergrößern, wenn Sie es an mehrere Basis- stationen anmelden. Es kann gleichzeitig an 4 verschiedenen Basisstationen angemel- det sein. Jede Basisstation benötigt eine eigene Telefonsteckdose. Es können An- schlüsse mit derselben und auch mit unterschiedlichen Rufnummern sein. Laufende Gespräche können nicht von einer zur anderen Basisstation übertragen werden. -
Seite 25: Anrufbeantworter
Anrufbeantworter R−Taste und Zusatzdienste Ihr Telefon unterstützt Zusatzdienste Ihres Netzbetreibers, wie z. B. Makeln, Anklopfen und Konferenz. Über die R−Taste können Sie diese Zusatzdienste nutzen. Bitte fragen Sie Ihren Netzbetreiber, welche Flash−Zeit Sie zur Nutzung von Zusatzdiensten einstel- len müssen. Zur Freischaltung von Zusatzdiensten wenden Sie sich bitte an Ihren Netzbetreiber. - Seite 26 Anrufbeantworter Maximale Aufnahmezeit Die maximale Aufnahmezeit beträgt 19 Minuten. Ist die Speicherkapazität für neue Nachrichten erschöpft, wird kein Anruf mehr aufgezeichnet. Ist der Speicher voll, er- scheint im Display ein F". Lautstärke einstellen Sie können die Lautstärke in 8 Stufen einstellen. š...
- Seite 27 Anrufbeantworter Ansage einstellen Ihr Anrufbeantworter stellt Ihnen einen voreingestellten Ansagetext zur Verfügung. Sie können den Ansagetext durch eigene Texte ersetzen. Ist der Speicher des Anrufbeant- worters voll, wird automatisch der Ansagetext ANNOUNCE ONLY IS ON wiedergege- ben. Mit den folgenden Einstellungen ändern Sie den Ansagetext der Antwortmodi. Ansagen abspielen ”, n / m ANNOUNCEMENT IS...
- Seite 28 Anrufbeantworter Zu löschende Nachricht abhören ¬ Während der Wiedergabe löschen Gelöschte Nachrichten können nicht wiederhergestellt werden! Memo aufzeichnen Ein Memo ist eine Mitteilung, die wie eine eingegangene Nachricht abgehört werden kann. ”, n / m MESSAGE RECORDING ” Memo aufzeichnen Sprechen Sie nun den von Ihnen gewünschten Text klar und deutlich in das Mikrofon.
- Seite 29 Anrufbeantworter ë Während der Ansage PIN−Code eingeben Anrufbeantworter einschalten Jetzt haben Sie die Möglichkeit, weitere Funktionen durchzuführen. Tastenfunktionen der Fernabfrage Die Fernabfrage wird automatisch abgebrochen, wenn innerhalb von 10 Sekunden keine Eingabe erfolgt. Die folgende Tabelle verschafft Ihnen eine Übersicht über die jeweiligen Funktionen der einzelnen Tasten.
-
Seite 30: Falls Es Probleme Gibt
Falls es Probleme gibt Falls es Probleme gibt Service−Hotline Haben Sie Probleme mit Ihrem Telefon, kontrollieren Sie zuerst die folgenden Hinweise. Bei technischen Problemen können Sie sich an unsere Service−Hotline unter Tel. 0900 00 1675 innerhalb der Schweiz (Kosten Swisscom bei Drucklegung: CHF 2.60/min) wenden. -
Seite 31: Technische Eigenschaften
Technische Eigenschaften Die Akkus sind in − Die Akkus sind leer oder defekt. kürzester Zeit leer − Stellen Sie das Mobilteil richtig auf die Basis- station. Reinigen Sie die Kontaktflächen am Mobilteil und an der Basisstation mit einem weichen trockenen Tuch. −... - Seite 32 Technische Eigenschaften Reichweite Außen: ca. 300 m Innen: ca. 50 m Stand−by−Zeit Bis zu 100 h Max. Gesprächsdauer Bis zu 10 h Aufladbare Akkus 2 x AAA NiMH 1.2 V Wahlverfahren Ton−Wahlverfahren Impuls−Wahlverfahren Zulässige Umgebungstemperatur 10 °C bis 30 °C Zulässige relative Luftfeuchtigkeit 20 % bis 75 % Flash−Funktion...
-
Seite 33: Pflegehinweise / Garantie
Sollte Ihr Gerät dennoch einen Defekt innerhalb der Garantiezeit aufweisen, wenden Sie sich bitte unter Vorlage Ihrer Kaufquittung ausschließlich an das Geschäft, in dem Sie Ihr SWITEL − Gerät gekauft haben. Alle Gewährleistungsansprüche nach diesen Bestimmungen sind ausschließlich gegenüber Ihrem Fachhändler geltend zu machen. -
Seite 34: Stichwortverzeichnis
Stichwortverzeichnis Stichwortverzeichnis Abhören, 27 Datum, 7 Abmelden, 15, 23 Direktwahl, 18, 21 Abspielen, 27 Display, 10, 29 Akkuladezustand, 7 Displaymeldungen, 18 Akkus einlegen, 6 Displaysprache, 7 Alarm, 27 Displaysymbole, 10 Ändern, 17 Anmelden, 15, 23 ECO−Mode, 7 Anrufannahme, 7, 20 Einschalten, 25 Anrufbeantworter, 25 Erstellen, 11, 16... - Seite 35 Stichwortverzeichnis Impuls−Wahlverfahren, 15, 24 R−Taste, 24, 25 Inbetriebnahme, 5 Rückruf, 20 Interngespräche, 21 Rufnummernanzeige, 18, 25 Klingellautstärke, 22 Schreibweisen, 9 Konferenzgespräche, 21 Service−Hotline, 30 Konformitätserklärung, 33 Sicherheitshinweise, 4 Speichern, 11, 16, 19 Sprache, 25 Ladestation, 6 Stand−by−Modus, 10 Lautstärke, 26 Strahlungsreduzierung, 7 Löschen, 17, 19, 27 Stummschaltung, 22...
- Seite 36 Stichwortverzeichnis Verpackungsinhalt, 5 Verzögerung, 26 VMWI, 25 Wählen, 20 Wahlpause, 24 Wahlverfahren, 15, 24 Wahlwiederholung, 13, 20 Wecker, 13 Weiterleitung, 21 Werkseinstellungen, 14, 15, 32 Zusatzdienste, 24...
- Seite 37 Table des matières Consignes de sécurité ....Mettre le téléphone en service ..Éléments de manipulation ... . Introduction .
-
Seite 38: Consignes De Sécurité
Consignes de sécurité Consignes de sécurité Lisez très attentivement ce mode d’emploi. Utilisation conforme aux prescriptions Ce téléphone convient pour téléphoner à l’intérieur d’un réseau téléphonique. Tout autre utilisation est considérée comme non conforme à l’usage. Des modifications ou chan- gements effectués d’un propre gré... -
Seite 39: Mettre Le Téléphone En Service
Modèle DCT627x Contenu 6271 6272 6273 6274 Base avec bloc secteur Chargeur avec bloc secteur − Combiné Câble de raccordement téléphonique Piles rechargeables Mode d’emploi À l’adresse www.switel.com, vous apprendrez si ce téléphone/kit téléphonique est déjà disponible à la vente. -
Seite 40: Mettre Le Téléphone En Service
Mettre le téléphone en service Raccorder la base Attention : Posez la base à une distance minimum d’1 m par rapport à d’au- tres appareils électroniques, une distance inférieure pouvant provoquer des interactions. Raccordez la base comme représenté sur le croquis. Pour des raisons de sécurité, n’utilisez que le bloc secteur fourni avec l’appareil ainsi que le câble de raccordement téléphonique ci−joint. - Seite 41 Mettre le téléphone en service Mettre en place les piles rechargeables Insérez les piles rechargeables dans le compartiment à piles ouvert. N’utilisez que des piles rechargeables de type AAA NiMH 1,2 V. Observez une po- larisation correcte ! Fermez le compartiment à...
-
Seite 42: Éléments De Manipulation
Éléments de manipulation Réduction du rayonnement (mode ÉCO) Le rayonnement est, comparé aux téléphones sans fil DECT standard, considérablement réduit en mode veille quand le combiné repose sur la base. En mode de communication, le rayonnement est réduit en fonction de l’éloignement du combiné... -
Seite 43: Introduction
Introduction Raccord du casque Sur le côté droit du combiné, vous trouverez une possibilité de raccorder un casque. Utilisez un casque avec une fiche à jack stéréo de 2,5 mm. Nous ne pouvons pas ga- rantir un fonctionnement parfait. Base Contacts de chargement Haut−parleur Écran LC... - Seite 44 Introduction {í} Le combiné sonne è Prendre le combiné de la base é Poser le combiné sur la base Visualisation des textes de l’écran Visualisation des icônes de l’écran Icônes et textes à l’écran du combiné Icône Description Constant : affichage de la capacité des piles. Clignotant : rechargez les piles rechargeables.
- Seite 45 Introduction Mode veille Toutes les descriptions dans ce mode d’emploi partent du principe que le combiné se trouve en mode veille. Le combiné se trouve en mode veille quand aucune communica- tion n’a lieu et qu’aucun menu n’est ouvert. Appuyez, le cas échéant, plusieurs fois sur la touche C pour accéder au mode veille.
-
Seite 46: Structure Du Menu
Structure du menu Structure du menu Menu principal Vous parvenez au menu principal en appuyant sur la touche ”. Ensuite, sélection- nez un enregistrement à l’aide des touches + ou , et confirmez votre sélection avec la touche ”. Pour d’autres informations relatives au menu et à la manipulation . chapitre 4. RÉPERTOIRE, +/, Sélectionner l’enregistrement, ”... -
Seite 47: Structure Du Menu
Structure du menu RECOMPOSER, +/, Sélectionner l’enregistrement, ” Sauter NOM ë NUMÉRO ë ENREGISTRER RÉPER- TOIRE SUPPRIMER MÉMOIRE CONFIRMER? SUPPR. TOUT CONFIRMER? ALARMES ALARME 1 EFFACER HEURE ë RÉGLER CONFIRMER? ALARME 2 EFFACER HEURE ë RÉGLER CONFIRMER? RÉGL. TÉL. MÉLODIE APPEL MÉLODIE EXTERNE MÉLODIE 1−10 MÉLODIE INTERNE... - Seite 48 Structure du menu HEURE ë ' ' 12 HEURES ' 24 HEURES MODE BOOST MOYEN ÉLEVÉ AUTO TON. TOUCHES ON/OFF CONTRASTE ÉCRAN NIVEAU 1−8 ë NOM DE COMBINÉ RÉGLER RÉTROÉCL. 5−30 SECONDES AUTO TALK ON/OFF LANGUE DÉFAUT CONFIRMER? Pour savoir quelles langues sont disponibles, voir . chapitre 2.
- Seite 49 Structure du menu RÉGL. BASE, PIN ENTRÉE ë MÉLODIE BASE MÉLODIE 1−5 VOLUME SONNERIE VOLUME 1−5, OFF CONFIRM. PIN ë CHANGER PIN NOUVEAU PINë MODE NUM TONALITÉ IMPULSION TPS CLIGNTMT COURT MOYEN LONG MESSAGE VOC. MSG VOC OFF? DÉFAUT CONFIRMER? ENREGISTREMT PIN ENTRÉE ë...
-
Seite 50: Répertoire
Répertoire Répertoire Vous pouvez enregistrer 100 numéros d’appel et le nom y afférant dans votre réper- toire. Saisissez toujours les numéros d’appel avec l’indicatif afin que le téléphone puisse aussi attribuer les communications locales entrantes à un enregistrement du répertoire. Si la capacité... - Seite 51 Répertoire Modifier des enregistrements du répertoire ” Ouvrir le menu principal ” RÉPERTOIRE Ouvrir le répertoire + ou ,, ” Sélectionner l’enregistrement, confirmer + ou ,, MODIFIER ” Sélectionner le sous−menu et confirmer ë, ” Modifier le nom et confirmer ë, ”...
-
Seite 52: Liste D'appels
Liste d’appels Sélection directe Vous pouvez enregistrer 1 numéro d’appel comme sélection directe sur chacune des touches ^ et _. Enregistrer des numéros d’appel comme sélection directe Saisissez un numéro ou sélectionnez un enregistrement à partir du répertoire, de la liste de répétition automatique des derniers numéros ou de la liste d’appels. - Seite 53 Liste d’appels Sauvegarder dans le répertoire des numéros d’appel de la liste d’appels Vous pouvez enregistrer un numéro d’appel dans le répertoire directement à partir de la liste d’appels. «, + ou , Ouvrir la liste d’appel et sélectionner l’enregistrement ”...
-
Seite 54: Téléphoner
Téléphoner Téléphoner Prendre un appel {í}, ƒ ou ™ Prendre l’appel Terminer la communication ƒ Terminer la communication Appeler ë Composer le numéro d’appel (max. 24 chiffres) En cas de saisie erronée, effacer le dernier chiffre ƒ ou ™ Composer le numéro d’appel Vous pouvez aussi appuyer d’abord sur la touche ƒ... - Seite 55 Téléphoner Sélection directe Vous devez avoir enregistré des numéros d’appel comme numéros de sélection directe . chapitre 5. 3 sec. ^ ou _ Procéder à la sélection directe Téléphoner en interne Téléphoner en interne Vous devez avoir déclaré deux ou plusieurs combinés (CB1, CB2, ...) sur votre base afin de pouvoir téléphoner gratuitement en interne.
- Seite 56 Téléphoner Réglage du volume sonore de la sonnerie de la base Veuillez effectuer le réglage suivant sur la base. ”, n / m BASE RINGER IS 0, 1, 2, 3, 4, 5 ” Modifier le réglage Régler le volume sonore de l’écouteur Vous pouvez régler le volume sonore sur 5 sensibilités pendant une communication.
-
Seite 57: Élargissement Du Système Téléphonique
Il est ainsi possible d’intégrer ensemble des appa- reils SWITEL et des appareils d’autres fabricants dans un système téléphonique. Il est toutefois possible que certaines fonctions ne soient pas disponibles. -
Seite 58: Fonctions Particulières
Fonctions particulières Annulation de combinés Vous ne pouvez annuler un combiné d’une base que par un autre combiné déclaré sur cette base. Les combinés s’annulent via le menu. Vous trouverez la position dans le menu au cha- pitre 5. Plusieurs bases Vous pouvez élargir la portée de votre combiné... -
Seite 59: Répondeur
Répondeur La pause peut également être enregistrée lors de la saisie de numéros d’ap- pel dans le répertoire. Touche R et services confort Votre téléphone supporte des services confort de votre opérateur tels que le va−et− vient, la signalisation d’appel en instance et la conférence. Vous pouvez les utiliser via la touche R. - Seite 60 Répondeur Activer / Désactiver le répondeur ” ANSWER ON / ANSWER OFF ” Modifier le réglage Durée d’enregistrement maximale La durée d’enregistrement maximale est de 19 minutes. Si la capacité de la mémoire est saturée et ne permet plus de recevoir de nouveaux messages, plus aucun appel ne sera enregistré.
- Seite 61 Répondeur Sélectionner le mode de réponse ”, n / m ANNOUNCE ONLY IS OFF / ANNOUNCE ONLY IS ON ” Modifier le réglage Régler l’annonce Votre répondeur met à votre disposition un texte d’annonce réglé au préalable. Vous pouvez remplacer le texte d’annonce par vos propres textes. Si la mémoire du répon- deur est pleine, c’est le texte d’annonce ANNOUNCE ONLY IS ON qui sera automati- quement reproduit.
- Seite 62 Répondeur Arrêter l’écoute Faire répéter le message 2x n Message précédent Message suivant Effacer un message Écouter le message à effacer ¬ Effacer pendant la reproduction Les messages effacés ne peuvent pas être restaurés ! Enregistrer un mémo Un mémo est une information qui peut être écoutée comme un message entré. ”, n / m MESSAGE RECORDING ”...
- Seite 63 Répondeur Vous avez maintenant la possibilité d’opérer d’autres fonctions . Tableau de fonctions des touches de la consultation à distance. Activer la consultation à distance du répondeur ë Composer le numéro d’appel personnel Si vous avez oublié de brancher votre répondeur, votre appel ne sera récep- tionné...
-
Seite 64: En Cas De Problèmes
En cas de problèmes Mémoire pleine Consultation à distance En cas de problèmes Hotline de service Si vous avez des problèmes avec votre téléphone, contrôlez d’abord les indications sui- vantes. S’il s’agit de problèmes techniques, vous pouvez vous adresser à notre hotline de service en Suisse au numéro de tel. -
Seite 65: Caractéristiques Techniques
Caractéristiques techniques Les piles rechargeables se − Les piles rechargeables sont vides ou défec- vident très rapidement tueuses. − Placez le combiné correctement sur la base. Nettoyez les surfaces de contact du combiné et de la base avec un chiffon doux et sec . −... - Seite 66 Caractéristiques techniques Portée À l’extérieur : env. 300 m À l’intérieur : env. 50 m Autonomie en veille Jusqu’à 100 h Durée max. de communication Jusqu’à 10 h Piles rechargeables 2 x AAA NiMH 1.2 V Système de numérotation Numérotation par tonalité Numérotation par impulsions Température ambiante autorisée 10°C à...
-
Seite 67: Remarques D'entretien / Garantie
Si votre appareil devait malgré tout présenter une défectuosité pendant la période de garantie, veuillez vous adresser, muni de la quittance d’achat, exclusivement au maga- sin où vous avez acheté votre appareil SWITEL. Vous ne pouvez faire valoir vos droits à la garantie selon ces dispositions qu’auprès de votre revendeur exclusivement. Deux ans après l’achat et la remise de nos produits, il n’est plus possible de faire valoir les... -
Seite 68: Index
Index Index Activer, 60 Date, 41 Activer la consultation à distance, 63 Déclaration, 57 Affichage des numéros d’appel, 52 Déclaration de conformité, 67 Affichage du numéro d’appel, 59 Déclarer, 49 Alarme, 47, 61 Désactiver, 60 Amplificateur sonore, 56 Durée d’enregistrement maximale, 60 Annonce, 61 Durée de la communication, 56 Annonces, 61... - Seite 69 Index Icônes, 44 Paging, 57 Icônes à l’écran, 44 Pause de numérotation, 58 Installations PABX, 58 Prise d’appel, 41, 54 Interception d’appel, 60 Problèmes, 64 Langue, 59 Questions et réponses, 64 Langue de l’écran, 41 Liste d’appels, 46, 52 Raccord du casque, 43 Raccrocher, 54 Manipulations sur la base, 59 Rappel, 54...
- Seite 70 Index Saisie de nom, 50 Saisie de texte, 50 Sauvegarder, 45, 53 Sélection directe, 52, 55 Sélectionner le mode de réponse, 60, 61 Services confort, 58 Structure du menu, 46 Suppression d’erreurs, 64 Système de numérotation, 49, 58 Téléphoner, 54 Terminer la communication, 54 Touche de répétition automatique des derniers numéros, 54...
- Seite 71 Contenuto Indicazioni di sicurezza ....Mettere in funzione il telefono ..Elementi di comando ....Informazioni introduttive .
-
Seite 72: Indicazioni Di Sicurezza
Indicazioni di sicurezza Indicazioni di sicurezza Leggere attentamente le presenti istruzioni per l’uso. Impiego conforme agli usi previsti Il presente telefono consente di svolgere telefonate all’interno di una rete telefonica. Qualsiasi altro impiego è considerato come non conforme agli usi previsti. Non sono consentite modifiche o trasformazioni non autorizzate. -
Seite 73: Mettere In Funzione Il Telefono
Stazione base con alimentatore di rete Stazione di carica con alimentatore di rete − Unità portatile Cavo di collegamento telefonico Accumulatori Istruzioni per l’uso Per ulteriori informazioni riguardo la disponibilità di questo telefono/set telefonico si prega di visitare il sito www.switel.com. -
Seite 74: Mettere In Funzione Il Telefono
Mettere in funzione il telefono Collegare la stazione base Attenzione: Montare la stazione base con una distanza minima di 1 m da altri apparecchi elettronici in modo da evitare interferenze reciproche. Procedere al collegamento della stazione base seguendo quanto raffigurato nella fi- gura. - Seite 75 Mettere in funzione il telefono Inserire gli accumulatori Inserire le batterie ricaricabili nel vano accumulatori prece- dentemente aperto. Utilizzare esclusivamente batterie ricari- cabili di tipo AAA NiMH 1,2 V. Osservare la corretta polarità! Chiudere infine il vano accu- mulatori. Caricare gli accumulatori Riporre l’unità...
-
Seite 76: Elementi Di Comando
Elementi di comando Impianti telefonici interni A pagina 92 sono riportate ulteriori informazioni nel caso in cui si volesse collegare il te- lefono ad un impianto telefonico interno. Riduzione delle radiazioni (modalità ECO) La radiazione in modalità di stand−by è stata considerevolmente ridotta se paragonata a quella emessa da telefoni cordless a standard DECT, con unità... -
Seite 77: Informazioni Introduttive
Informazioni introduttive Presa di collegamento per auricolare Sul lato destro dell’unità portatile si trova una presa per l’allacciamento di una cuffia au- ricolare. Si consiglia di utilizzare un auricolare con una presa jack stereo da 2,5 mm. Non si assume alcuna garanzia riguardo il rispettivo funzionamento. Stazione base Contatti di carica Altoparlante... - Seite 78 Informazioni introduttive Rappresentazione di testi sul display Rappresentazione di simboli sul display Simboli e testi sul display dell’unità portatile Simbolo Descrizione Costante: Indicazione dello stato di carica delle batterie. Lampeggiante: Caricare gli accumulatori. Segmenti che scorrono: Gli accumulatori sono in fase di ricarica .
-
Seite 79: Struttura Dei Menu
Struttura dei menu seguire per giungere alla funzione desiderata è indicata dalla struttura di menu . pagina 79. ” Aprire il menu principale + o , Selezionare il sottomenu desiderato ” Aprire il sottomenu + o , Selezionare la funzione desiderata ”... - Seite 80 Struttura dei menu con i tasti + o , e confermare la scelta con il tasto ”. Maggiori informazioni su menu ed esercizio . capitolo 4. RUBRICA, selezionare +/,, saltare una voce ” NOME ë NUMERO ë AGGIUNGI NOME ë MODIFICA NUMEROë...
- Seite 81 Struttura dei menu RIPETI, selezionare +/,, saltare una voce ” NOME ë NUMERO ë SALVA IN RUBRICA CANCELLA CONFERMA? CANCELLA TUTTO CONFERMA? SVEGLIA SVEGLIA 1 ANNULLA ORA ë IMPOSTA CONFERMA? SVEGLIA 2 ANNULLA ORA ë IMPOSTA CONFERMA? PORTATILE MELODIA MELODIA EST MELODIA 1−10 MELODIA INT MELODIA 1−10...
- Seite 82 Struttura dei menu ORA ë ' ' 12 H ' 24 H AMPLIFICATO BASSO MEDIO ALTO AUTO TONI ON/OFF CONTRASTO LIVELLO 1−8 ë NOME DEL TELEFONO ILLUMINAZ. 5−30 SECONDI RISPOSTA AUTO ON/OFF LINGUA RESET CONFERMA? Le lingue disponibili sono riportate nel . capitolo 2.
- Seite 83 Struttura dei menu IMPOSTA BASE, PIN: ë MELODIA BASE MELODIA 1−5 VOL.SUONERIA VOLUME 1−5, OFF CONFERMA PIN ë MODIFICA PIN NUOVO PINë SELEZIONE TONI IMPULSI FLASH BREVE MEDIO LUNGO VMWI VMWI SPENTO? RESET CONFERMA? AFFILIAZIONE REGISTRA PIN:ë BASE 1−4 SELEZIONA BASE PIN: ë...
-
Seite 84: Rubrica Telefonica
Rubrica telefonica Rubrica telefonica Nella rubrica telefonica è possibile memorizzare 100 numeri di chiamata con rispettivi nomi. Assegnare a tutti i numeri di chiamata sempre un prefisso in modo da poter riconoscere anche una chiamata urbana in arrivo ed abbinarla ad una voce presente nella rubrica telefonica. -
Seite 85: Rubrica Telefonica
Rubrica telefonica Modificare voci nella rubrica telefonica ” Aprire il menu principale ” RUBRICA Aprire la rubrica telefonica + o ,, ” Selezionare la voce e confermare + o ,, MODIFICA ” Selezionare un sottomenu e confermare ë, ” Modificare il nome e confermare ë, ”... -
Seite 86: Elenco Chiamate
Elenco chiamate Selezione diretta È possibile memorizzare 1 numero di chiamata come numero di selezione diretta ri- spettivamente sui tasti ^ e _. Memorizzare numeri di chiamata come numeri di selezione diretta Immettere un numero o selezionare una voce dalla rubrica telefonica, dall’elenco di ri- petizione di chiamata o dall’elenco chiamate. - Seite 87 Elenco chiamate Memorizzare nella rubrica un numero di chiamata dall’elenco chiamate È possibile memorizzare un numero di chiamata direttamente dall’elenco chiamate nella rubrica telefonica. «, + o , Aprire l’elenco chiamate e selezionare una voce ” Aprire il menu SALVA IN + o , , ”...
-
Seite 88: Compiere Telefonate
Compiere telefonate Compiere telefonate Accettare una chiamata {í}, ƒ o ™ Ricevere una chiamata Concludere una chiamata ƒ Concludere una chiamata Compiere telefonate ë Immettere un numero di chiamata (max. 24 cifre) In caso di immissione errata, cancellare l’ultima cifra ƒ... - Seite 89 Compiere telefonate ” RUBRICA Aprire la rubrica telefonica + o ,, ƒ Selezionare una voce, instaurare un collegamento Selezione diretta I numeri di chiamata devono risultare memorizzati come numeri di chiamata di- retta . capitolo 5. 3 sec. ^ o _ Eseguire la selezione diretta Compiere chiamate interne Condurre chiamate interne...
- Seite 90 Compiere telefonate UP2: ƒ Accettare una telefonata interna presso l’altra unità portatile UP1: 3 sec. I Avviare la chiamata in conferenza UP1 / UP2: ƒ Concludere la chiamata in conferenza Impostare il volume di squillo base Le seguenti impostazioni vanno eseguite sulla base. ”, n / m BASE RINGER IS 0, 1, 2, 3, 4, 5 ”...
-
Seite 91: Ampliamento Del Sistema Telefonico
Ampliamento del sistema telefonico Lo standard internazionale GAP regola la compatibilità di unità portatili e stazioni base SWITEL di costruttori differenti. In tal modo è possibile adoperare apparecchi in com- binazione con apparecchi di altri costruttori all’interno di un unico sistema telefonico. -
Seite 92: Funzioni Speciali
Funzioni speciali Per registrare unità portatili di altri costruttori, leggere prima le rispettive istruzioni per l’uso. Deregistrazione di unità portatili La deregistrazione di un’unità portatile da una stazione base è possibile solo attraverso un’altra unità portatile registrata a sua volta alla stazione base in questione. - Seite 93 Impianti telefonici interni / Servizi addi- inserire una pausa di selezione dopo il numero di accesso alla linea esterna in modo da zionali poter proseguire con la selezione del numero senza dover attendere il segnale di libero. La pausa di selezione è inserita premendo il tasto P e tenendolo premuto per 3 sec.
-
Seite 94: Segreteria Telefonica
Segreteria telefonica Segreteria telefonica Esercizio sulla base La segreteria telefonica è dotata di guida parlata. Si consiglia di osservare le rispettive istruzioni e indicazioni. Uscita voce L’uscita voce della segreteria telefonica è inglese. Attivare / Disattivare la segreteria telefonica ” ANSWER ON / ANSWER OFF ”... - Seite 95 Segreteria telefonica ƒ Rispondere ad una chiamata Modalità di risposta La segreteria telefonica prevede due modalità di risposta. Alla fine dell’annuncio AN- NOUNCE ONLY IS OFF è possibile lasciare un messaggio. L’annuncio ANNOUNCE ONLY IS ON è una modalità di solo testo che non prevede la possibilità di lasciare un messaggio.
- Seite 96 Segreteria telefonica Riprodurre / Cancellare messaggi registrati Riprodurre un messaggio I messaggi registrati sono riprodotti nell’ordine in cui sono registrati. Messaggi nuovi sono riprodotti per primi. Ogni volta che viene riprodotto un messaggio, l’apparecchio indica il giorno della settimana e l’ora di chiamata. Riprodurre i messaggi Interrompere la riproduzione Ripetere il messaggio...
- Seite 97 Segreteria telefonica n / m Scegliere la cifra ” Confermare Per l’impostazione della seconda, terza e quarta posizione si procede allo stesso modo. Avviare l’interrogazione a distanza ë Selezionare il proprio numero di chiamata ë Inserire il codice PIN durante la riproduzione del messaggio A questo punto è...
-
Seite 98: In Presenza Di Problemi
In presenza di problemi Display della segreteria telefonica Il display della segreteria telefonica indica lo stato dell’apparecchio. Segreteria telefonica disattivata 00−xx Costante: segreteria telefonica attivata, numero di messaggi memorizzati Lampeggia: nuovi messaggi Visualizzato con messaggio/annuncio in corso di registrazione Memoria piena Interrogazione a distanza In presenza di problemi Hotline di assistenza tecnica... - Seite 99 In presenza di problemi Non è possibile instaurare un − Verificare se la registrazione alla stazione base è stata eseguita con il codice PIN corretto . collegamento con la stazione base pagina 83. Collegamento disturbato, interrotto − La distanza dalla stazione base è troppo grande.
-
Seite 100: Specifiche Tecniche
Specifiche tecniche Specifiche tecniche Specifiche tecniche Caratteristica Valore Standard DECT −GAP Alimentazione elettrica (stazione base) Ingresso: 220/230 V, 50 Hz Uscita: 7.5 V, 320 mA Alimentazione elettrica (stazione di carica) Ingresso: 220/230 V, 50 Hz Uscita: 6 V, 150 mA Portata Esterno: ca. -
Seite 101: Specifiche Tecniche
La conformità con la Direttiva di cui sopra viene confermata dal mar- chio CE applicato sull’apparecchio. Per la dichiarazione di conformità completa si prega di voler usufruire del servizio gratuito di download dal nostro sito Internet www.switel.com. -
Seite 102: Consigli Per La Cura / Garanzia
Non utilizzare mai detergenti o solventi. Garanzia Gli apparecchi SWITEL sono costruiti e collaudati in osservanza dei processi di produ- zione più moderni. L’impiego di materiali selezionati e tecnologie altamente sviluppate sono garanti di una perfetta funzionalità e lunga durata in vita. La garanzia non viene considerata esecutiva qualora la causa del malfunzionamento dell’apparecchio sia ri-... -
Seite 103: Indice Alfabetico
Indice alfabetico Indice alfabetico Accettare una chiamata, 94 Data, 75 Accettazione di chiamata, 75, 88 Deregistrare, 83 Agganciare il ricevitore, 88 Deregistrazione, 92 Allarme, 95 Dichiarazione di conformità, 101 Ampliamento, 91 Disattivare, 94 Amplificazione acustica, 90 Display, 78, 98 Attivare, 94 Domande e risposte, 98 Attivazione a distanza, 97 Durata di conversazione, 90... - Seite 104 Indice alfabetico Immissione di un nome, 84 Registrare, 83, 95 Immissione di un testo, 84 Registrare un promemoria, 96 Impianti telefonici interni, 92 Registrazione, 91 Impostare il messaggio di annuncio, 95 Riduzione delle radiazioni, 76 Indicazioni di sicurezza, 72 Ripetizione di chiamata, 81, 88 Inserire gli accumulatori, 75 Riprodurre, 95, 96 Interrogazione a distanza, 96...
- Seite 105 Indice alfabetico Unità portatile, 91 Visualizzazione del numero di chiamata, 86, 93 VMWI, 93 Voci della rubrica telefonica, 79 Voci nella rubrica telefonica, 84 Volume, 94 Volume del ricevitore, 90 Volume di squillo, 90...
- Seite 106 Appunti Appunti...
- Seite 107 Contents Safety Information ....Preparing the Telephone ... Operating Elements ....Preliminary Information .
-
Seite 108: Safety Information
Safety Information Safety Information Please read this operating instruction manual thoroughly. Intended use The telephone is suitable for telephoning within a public telephone network system. Any other use is considered unintended use. Unauthorised modification or reconstruction is not permitted. Under no circumstances open the device or complete any repair work yourself. -
Seite 109: Preparing The Telephone
Connect the base station as illustrated in the diagram. For reasons of safety, only use the power adapter plug and telephone connection cable supplied with the product. Visit www.switel.com to find out whether the telephone/telephone set is already avail- able. -
Seite 110: Preparing The Telephone
Preparing the Telephone Telephone line socket Mains power outlet For the base station, use the power adapter plug labelled with no. KG2B−075−0320D and output data 7.5 V, 320 mA. Connecting the charging station Connect the charging station as illustrated in the diagram. For safety reasons, only use the power adapter plug supplied. - Seite 111 Preparing the Telephone Charging the batteries Before the handset is used for the first time, insert it in the base station/char- ging station for at least 16 hours. [When the handset is correctly inserted in the base station / charging station, an acous- tic signal issued.] [When the handset is correctly inserted in the base station / charging station, the charge control lamp lights up.] The handset warms up during the charging process.
-
Seite 112: Operating Elements
Operating Elements Operating Elements The buttons in this operating manual are subsequently depicted with a uniform contour. Therefore, slight deviations in the appearance of the symbols on the telephone buttons compared to those depicted here are possible. Handset Loudspeaker LCD display Menu / OK button Quick dial button M2 Headset connection... -
Seite 113: Preliminary Information
Preliminary Information Base station Charging contacts Loudspeaker LC display Volume + Volume − Move forward in menu / Skip to next message Play / Stop / Confirm/Cancel setting Move back in menu / Skip to previous message Delete message/ outgoing message Change menu/setting Paging button Preliminary Information... - Seite 114 Preliminary Information Icons and texts in the handset display Icon Description On: Battery charge capacity indicator. Flashing: The batteries must be charged. Run−through segments: The batteries are being charged; . Page 111. Internally assigned call number of the handset; . Page 127. 12−−59 Displays the time;...
- Seite 115 Preliminary Information Navigating in the menu All the functions can be accessed via the various menus. Refer to Menu Structure . Page 116 for information on how to access each respective function. ” Open the main menu + or , Select a submenu ”...
-
Seite 116: Menu Structure
Menu Structure Menu Structure Main menu Press the ” button to open the main menu. Then move to and select an entry using the + or , button and confirm your selection by pressing the ” button. Further information on the menu and operation; . Chapter 4. PHONEBOOK, select an entry +/, skip selection ”... -
Seite 117: Menu Structure
Menu Structure REDIAL, select entry +/,, skip selection ” NAME ë NUMBER ë SAVE TO PHONEBOOK DELETE RECORD CONFIRM? DELETE ALL CONFIRM? ALARMS ALARM 1 CLEAR TIME ë CONFIRM? ALARM 2 CLEAR TIME ë CONFIRM? HS SETTINGS EXTERNAL CALL ME- RINGER MELODY MELODY 1−10 LODY... - Seite 118 Menu Structure ' DD/MM ' MM/DD TIMEë ' ' 12 HR ' 24 HR BOOST MODE MEDIUM HIGH AUTO KEY TONE ON/OFF DISPLAY CONTRAST LEVEL 1−8 ë HANDSET NAME BACKLIGHT SETTING 5−30 SECONDS AUTO TALK ON/OFF LANGUAGE SET DEFAULT CONFIRM? For the languages available, refer to .
- Seite 119 Menu Structure BS SETTINGS, INPUT PIN ë BASE RINGER MELODY MELODY 1−5 HS RINGER VOLUME VOLUME 1−5, OFF NEW PIN ë CONFIRM PIN ë CHANGE PIN DIAL MODE TONE PULSE FLASH TIME SHORT MEDIUM LONG VMWI VMWI OFF? SET DEFAULT CONFIRM? REGISTRATION INPUT PIN ë...
-
Seite 120: Phone Book
Phone Book Phone Book You can use the phone book to store up to 100 phone numbers together with the asso- ciated names. Always enter the area access code with the phone numbers so that incoming local calls can also be assigned to a phone book entry. When the memory capacity is used up, the message MEMORY FULL appears when an attempt is made to store another number. -
Seite 121: Phone Book
Phone Book Editing phone book entries ” Open the main menu ” PHONEBOOK Open the phone book + or ,, ” Select and confirm an entry + or ,, EDIT ” Select the submenu and confirm it ë, ” Change the name and confirm it ë, ”... -
Seite 122: Call Log
Call Log Quick dial You can assign one phone number each to the quick dial buttons ^ and _. Storing phone numbers as quick dial numbers Enter the phone number or select one from the phonebook, redialling list or call log. 3 sec. - Seite 123 Call Log Storing a phone number in the calls log in the phone book A phone number in the call list can be stored in the phone book directly. «, + or , Display the call log and select an entry ”...
-
Seite 124: Telephoning
Telephoning Telephoning Taking a call {í}, ƒ or ™ Take the call Ending a call ƒ End the call Making a call ë Enter the phone number (max. 24 digits) Deletes the last digit if incorrect ƒ or ™ Dials the phone number It is also possible to press the Call button ƒ... - Seite 125 Telephoning Internal calls Making internal calls There must be two or more handsets (HS1, HS2, ...) registered on your base station in order to make internal calls free of charge. HS1: 3 sec. I Activate the internal call function e.g. " Dial the internal call number of the handset required HS2: ƒ...
- Seite 126 Telephoning Boost mode There are further boosted volume levels in addition to the 5 basic levels; . Chapter 5. Activate the boost level required to be able to use it. BOOST MODE Function Only volume levels 1−5 are available ON, LOW Additional low boost can be selected ON, MEDIUM Additional low and medium boost can be...
-
Seite 127: Extending The Telephone System
As a result, it is possible to integrate SWITEL devices and devices from other manufacturers together in one telephone sys- tem. It is possible, however, that some functions are not available. -
Seite 128: Pabx / Supplementary Services
PABX / Supplementary Services digital exchanges (TONE/DTMF mode). The dialling mode is controlled via the menu. Chapter 5 indicates the position in the menu. PABX / Supplementary Services R−button on private branch exchanges If the telephone is connected to a private branch exchange, functions such as transfer- ring calls and automatic call back can be used via the R button. -
Seite 129: Answering Machine
Answering Machine is not displayed and, as a result, is not stored in the call list. Answering machine in the telephone network An answering machine in the telephone network is a supplementary service offered by many telephone network providers. If your telephone network provider offers an answering machine in the telephone network for you, an icon on the display informs you of new messages received (VMWI ). - Seite 130 Answering Machine If no new messages have been recorded on your answering machine, your call is taken after 5 rings. End the call before the 5th ring. This means that no charges ensue. For further information on remote access, refer to . Page 132. Setting the delay ”, n / m RING DELAY IS SET TO 3/4/5/6/TIME...
- Seite 131 Answering Machine Reactivating the pre−recorded message ”, n / m ANNOUNCEMENT IS... ¬ Restore the standard outgoing message Message waiting alarm If a new message or a memo is has been recorded, an acoustic signal is issued every 10 seconds. ”, n / m MESSAGE ALERT IS OFF / MESSAGE ALERT IS ON...
- Seite 132 Answering Machine Remote access You can call your answering machine from another telephone to play messages or ex- ecute other functions. A condition is that you use a telephone which implements tone dialling. PIN code for remote access The default setting of the PIN code is 1234". It is recommended to change the default PIN code.
-
Seite 133: In Case Of Problems
In Case of Problems Repeat the message currently playing 2x 1 Play the previous message Start/Stop playback of a message Play the next message Switch the answering machine on/off Play the Help menu Delete the message during playback End remote access Answering machine display The answering machine’s display indicates the unit’s status. - Seite 134 In Case of Problems Problems and solutions Problems Solutions No telephone calls possible − The telephone is not connected properly or is defective. Only use the telephone connection cable supplied. − Test whether the telephone connection is in order by using another telephone. −...
-
Seite 135: Technical Properties
Technical Properties The answering machine does not − Check whether the answering machine mem- record any messages/memos ory is full. Delete messages from the memory, if necessary; . Page 126. No remote access functions can be − Check that the correct security code has been entered for remote access;... - Seite 136 Conformity with the above mentioned directive is confirmed by the CE symbol on the de- vice. To view the complete Declaration of Conformity, please refer to the free download available on our web site www.switel.com.
-
Seite 137: Maintenance / Guarantee
If your device does show signs of a defect within the period of guarantee, please con- tact the sales outlet where you purchased the SWITEL device, producing the purchase receipt as evidence. All claims under the terms of guarantee in accordance with this agreement can only be asserted at the sales outlet. -
Seite 138: Index
Index Index Alarm, 117, 131 Date, 111 Announcement, 130 Declaration of Conformity, 136 Answering machine, 129 Default settings, 118, 119, 136 Answering machine in the Delay, 129 telephone network, 129 Deleting, 121, 123, 131 Deleting messages, 131 Deregistration, 119, 127 Base station, 109, 127 Dialling, 124 Battery charge status, 111... - Seite 139 Index Icons, 114 Package contents, 109 Inserting the batteries, 110 Paging, 126 Internal calls, 125 Phone book, 116, 120, 124 Phone book entries, 115, 120 PIN code, 132 Key function assignment, 132 Playing, 130 Key lock, 126 Playing back, 131 Private branch exchanges, 128 Language, 129 Problems, 133...
- Seite 140 Index Safety information, 108 Saving, 115, 120 Searching for the handset, 126 Selecting the answering mode, 130 Service−Hotline, 133 Standby mode, 114 Starting up, 109 Storing, 123 Supplementary services, 128 Switching off, 129 Switching on, 129 Taking a call, 111, 124 Taking a call being recorded, 130 Talk time, 126 Technical data, 135...
- Seite 141 Notes Notes...
- Seite 142 Notes Notes...
- Seite 143 Notes Notes...
-
Seite 144: Declaration Of Conformity
Cet équipement est conforme à la directive européenne R&TTE. Pour obtenir la déclaration de conformité intégrale, veuillez vous servir du téléchargement gratuit de notre site Internet www.switel.com. Quest’apparecchiatura è conforme alla direttiva europea R&TTE. Per la dichiarazione di conformità completa si prega di voler usufruire del servizio gratuito di download dal nostro sito Internet www.switel.com.