Herunterladen Inhalt Inhalt Diese Seite drucken

Werbung

Verfügbare Sprachen
  • DE

Verfügbare Sprachen

PRIME TRAIL CAMERA
INSTRUCTION MANUAL
Model# 119932C / 119932CB
08-20

Werbung

Inhaltsverzeichnis
loading

Inhaltszusammenfassung für Bushnell 119932C

  • Seite 1 PRIME TRAIL CAMERA INSTRUCTION MANUAL Model# 119932C / 119932CB 08-20...
  • Seite 2: Important Note

    IMPORTANT NOTE Congratulations on your purchase of one of the best trail camer- as on the market! Bushnell is very proud of this little unit and we are sure you will be pleased with it as well. We appreciate your business and want to earn your trust.
  • Seite 3: Parts And Controls

    INTRODUCTION About the Prime Trail Camera The Bushnell Prime Trail Camera is a digital scouting camera. It can be triggered by any movement of game in a location, detected by a highly sensitive Passive Infra-Red (PIR) motion sensor, and then take high quality pictures (up to 24MP still photos), or 720p HD video clips.
  • Seite 4 Fig. 1 Fig. 2...
  • Seite 5 Fig. 3 Fig. 4...
  • Seite 6 You can also connect an optional Solar Panel accessory (model# 119756C –please visit www.bushnell.com for more information) to the “DC In” jack at the bottom of the Prime Trail Camera (other external power supplies should not be used, as the camera and/or display may not function correctly).
  • Seite 7: Inserting The Sd Card

    Inserting the SD Card Insert the SD card (with the camera’s power switch in the OFF position) before beginning to operate the camera. Don’t insert or remove the SD card when the power switch is in the ON position. The Prime Trail Camera uses a standard SD (Secure Digital) memory card to save photos (in .jpg format) and/or videos (in .avi format).
  • Seite 8 USING THE Prime Trail Camera Once you’ve prepared your Prime Trail Camera by properly installing batteries and an SD card, you could simply take it outside, strap it to a tree, switch it on and leave- and you might get some great photos that are exactly what you wanted. However, we highly recommend that you first spend some additional time indoors with this manual and your camera until you know a bit more about what the 3-way switch and direction keys do.
  • Seite 9 You can either move the power switch directly from OFF to ON mode, or stop at the AIM position first to change one or more settings, then move the switch to ON after you have finished doing so. AIM MODE In the AIM mode you can check and change the settings of the Prime Trail Camera with the help of its built-in LCD.
  • Seite 10 USING THE SETUP MENU TO CHANGE SETTINGS The main purpose of the AIM mode is to allow you to change the settings of the camera’s parameters so your Prime Trail Camera operates exactly the way you want it to. You will do this by entering the SETUP Menu and pressing the keys beside the LCD display, which will show you each parameter and its setting.
  • Seite 11 Parameter Setting Display The settings for each parameter are shown on the display screen of your Prime Trail Camera. Only one setting is displayed at a time, starting with the current setting for the parameter when it is first selected (Fig. 6a). To change the setting, use the UP/DOWN keys to display the new setting you want (Fig.
  • Seite 12 “Additional Set” on. Field Scan 2x with Live Trigger Feature Field Scan is a revolutionary new feature for the Bushnell Prime Trail Camera, which allows you to monitor your food plots or field edges with time lapse images.
  • Seite 13 range. The result is an effective range much greater than it would normally be, with the camera dependant on triggers generated by nearby animals. This is a great tool for hunters to scout an entire field with only one camera. Here’s how to setup and use Field Scan (be sure you’ve set the current time in “Set Clock”...
  • Seite 14 Field Scan settings: Field Scan: On Field Scan A: [Start]: 6:00 [Stop]: 8:00 Field Scan B: [Start]: 17:30 [Stop]: 19:00 Interval: 15M Note: avoid any “overlap” of Field Scan A & B recording blocks when setting their start and stop times, to assure correct operation. These settings would cause the camera to capture a photo once every 15 minutes, beginning at 6 AM, until the Field Scan "A"...
  • Seite 15 The SETUP Menu – Parameters and Setting List w / Descriptions Settings Parameter Description (Bold=default) Press OK and use the UP/DOWN keys (to change the setting) and LEFT/RIGHT keys ( to move to the Set Clock next field) to set the hour (24-hr format only, “00”=midnight, “12”=noon) and minute, and then (on the lower row), the year, month and date.
  • Seite 16 Selects resolution for still photos. Higher resolution provides more 3M=2304x1296 Image Size pixels, but creates larger files that take 12M=4608x2592 up more of the SD card capacity (fills (only affects still photos) 24M=6528x3672 up faster). 12M is a good compromise between resolution and file size.
  • Seite 17 Selects the sensitivity of the PIR sensor. The “High” setting will make the camera more sensitive to infrared (heat) and more easily triggered by motion, and the “Low” setting makes it less sensitive to heat and motion. The High setting can be useful when the ambient temperature is warm (making Sensor Level Low, Normal, High...
  • Seite 18 Long Range - High LED output Low Shutter Speed Auto, Fast Motion - High LED output Fast Long Range, Fast Shutter Speed Flash mode Motion Auto - allow the camera to determine the LED luminance and Medium Shutter Speed Select “On” to record audio along Video Sound with the video when the camera is Off, On...
  • Seite 19 Select “Yes” and press OK to restore all parameters to the original factory default settings. If the camera is behaving oddly and you think you may have changed the setting for Default Set No, Yes something accidently (but aren’t sure which one), this will reset all parameters to their most commonly used or “generic”...
  • Seite 20 MOUNTING AND POSITIONING THE Prime Trail Camera Mounting After you’ve set up the camera’s parameters to your personal preferences at home or in your truck, you’re ready to take it outside and slide the power switch to “ON”. When setting up the Prime Trail Camera for scouting game or other outdoor applications, you must be sure to mount it in place correctly and securely.
  • Seite 21: Switching On The Camera

    20 thread. Note: an accessory solar panel supplemental power source (#119756C) is also available - please visit www.bushnell.com for more information. Sensing Angle and Distance Test To test whether the Prime Trail Camera can effectively monitor the area you choose, this test is recommended to check the sensing angle and monitoring distance of the Prime Trail Camera.
  • Seite 22 • Are the batteries inserted with correct polarity and is their power level sufficient? • Does the SD card have sufficient available space and is its write- protection (lock) switch off? • Is the Power switch in the ON position? (do not leave it in AIM). PLAYING BACK/DELETING THE PHOTOS/VIDEOS After you have setup, mounted and activated your Prime Trail Camera, you will of course be eager to return later and review the images it has captured for...
  • Seite 23 related notes: • You don’t need to be concerned about the file system format of the Prime Trail Camera unless your equipment has problems reading the SD card. If this happens, please format the SD card with the Prime Trail Camera or in your computer first and then insert the card into your Prime Trail Camera and try again.
  • Seite 24: Troubleshooting / Faq

    Typically, the Prime Trail Camera will be able to capture several thousand images before the batteries die. Check to make sure you have used new alkaline or lithium batteries. Bushnell recommends using Energizer® Lithium AA batteries in your Prime Trail Camera to obtain maximum battery life.
  • Seite 25 Make sure that the camera power switch is in the “On” position and not in the “Off” or “AIM” modes. Make sure that you are using a good quality SD card in your camera. Bushnell recommends SanDisk® SD Cards up to 32GB.
  • Seite 26 Please contact Bushnell customer service. 7.Short video clips—not recording to the length set a.Check to make sure that the SD card is not full.
  • Seite 27: Photos Do Not Capture Subject Of Interest

    Photos Do Not Capture Subject of Interest Check the “Sensor Level” (PIR sensitivity) parameter setting. For warm environ- mental conditions, set the Sensor Level to “High” and for cold weather use, set the sensor for “Low”. Try to set your camera up in an area where there is not a heat source in the camera’s line of sight.
  • Seite 28 original default setting for that parameter. Field Scan (Time Lapse) not working properly Make sure that the stop and start times of Field Scan "A" and "B" do not overlap (for example, do not set the start time of "B" to 8AM if the stop time of "A" is 10AM). CAUTION!: DO NOT USE the 1s Interval setting for Video at night at a feeder or similar environment.
  • Seite 29: Technical Specifications

    TECHNICAL SPECIFICATIONS Image Sensor 3 Megapixel Color CMOS Maximum Pixel Size 6528x3672 (24 MP) Lens F = 2.8; FOV=42°; Auto IR-Cut-Remove (at night) IR-Flash Range Up to 100’ (30m) Display Screen Std B&W Display: 24x32mm (1.5”) Memory Card SD or SDHC Card, Maximum capacity 32GB Picture Size 3M=2304x1296,12M=4608x2592,24M=6528x3672 Video Size...
  • Seite 30 TWO YEARS LIMITED WARRANTY Your Bushnell® product is warranted to be free of defects in materials and workmanship for two years after the date of purchase. In the event of a defect under this warranty, we will, at our option, repair or replace the product, provided that you return the product postage prepaid.
  • Seite 31 • Consult the dealer or an experienced radio/TV technician for help. The device does not contain any user-serviceable parts. Repairs should only be made by an Authorized Bushnell repair center. Unauthorized repairs or modifications could result in permanent damage to the equipment, and will void your warranty and your authority to operate this device under Part 15 regulations.
  • Seite 32 For further questions or additional information please contact: Bushnell Outdoor Products 9200 Cody, Overland Park, Kansas 66214 (800) 423-3537 www.bushnell.com ©2020 Bushnell Outdoor Products...
  • Seite 33: Manuel D'instructions

    CAMÉRA DE SENTIERS PRIME MANUEL D’INSTRUCTIONS Numéro de modèle : 119932C / 119932CB 08-20...
  • Seite 34: Remarque Importante

    REMARQUE IMPORTANTE Félicitations pour votre achat de l’une des meilleures caméras de sentiers sur le marché! Bushnell est particulièrement fière de ce petit boîtier, et nous sommes certains qu’il vous plaira également. Nous apprécions votre clientèle et voulons gagner votre confiance. Veuillez vous reporter aux notes ci-dessous et aux instructions du présent manuel pour vous assurer...
  • Seite 35: Pièces Et Commandes

    INTRODUCTION À propos de la caméra de sentiers Prime La caméra de sentiers Bushnell Prime est une caméra de reconnaissance numérique. Elle se déclenche par tout mouvement de gibier dans un emplacement, détecté par un capteur de mouvement passif à infrarouge (PIR) hautement sensible, et prend des images de haute qualité...
  • Seite 36 Figure 1 Figure 2...
  • Seite 37 Figure 3 Figure 4...
  • Seite 38: Installation Des Piles Et De La Carte Sd

    6 piles. Veillez à insérer chaque pile en respectant les polarités (extrémité négative ou « plate » contre le long ressort de chaque logement de pile). Bushnell recommande d’utiliser un ensemble complet de piles AA au lithium (de marque Energizer®) ou alcalines AA. Les piles rechargeables NiMh ne sont pas recommandées, car la tension plus faible qu’elles produisent peut entraîner des...
  • Seite 39 la pile lithium-ion rechargeable du panneau solaire, à condition qu’elle fournisse une tension suffisante (sinon, la caméra basculera vers l’alimentation par piles). La batterie du panneau solaire alimentera la caméra pendant la nuit. Insertion de la carte SD Insérez la carte SD (avec l’interrupteur de la caméra en position Arrêt) avant de commencer à utiliser la caméra.
  • Seite 40 UTILISER LA CAMÉRA DE SENTIERS PRIME Une fois que vous avez préparé votre caméra de sentiers Prime en installant correctement les piles et une carte SD, vous pouvez simplement vous rendre à l’extérieur, l’attacher à un arbre, l’allumer et partir. Vous pourriez obtenir de superbes photos qui correspondent exactement à...
  • Seite 41 touches de commande n’ont aucun effet). La Caméra de sentiers Prime prend automatiquement des photos ou des vidéos (en fonction des réglages actuels) lorsqu’elle est activée par le capteur PIR de détection de mouvement dans la zone couverte. Vous pouvez déplacer l’interrupteur directement du mode ARRÊT au mode MARCHE, ou bien tout d’abord arrêter à...
  • Seite 42 UTILISER LE MENU DE CONFIGURATION POUR MODIFIER LES PARAMÈTRES L’objectif principal du mode AIM est de vous permettre de modifier les paramètres de votre caméra de sentiers Prime de manière à ce qu’elle fonctionne exactement comme vous le souhaitez. Pour ce faire, accédez au menu CONFIGURATION et appuyez sur les touches situées à...
  • Seite 43 Après avoir réglé les paramètres selon vos préférences, assurez-vous de mettre l’interrupteur sur MARCHE pour commencer à prendre des photos ou des vidéos en situation réelle. Aucune image ne sera capturée si l’interrupteur est laissé en position AIM (sauf si vous appuyez sur la touche DROITE/SHOT après avoir quitté le menu) : en effet, la caméra s’éteint automatiquement après quelques secondes si aucune touche n’est pressée.
  • Seite 44 Affichage des réglages des paramètres Les réglages de chaque paramètre sont affichés sur l’écran de votre caméra de sentiers Prime. Un seul réglage est affiché à la fois, en commençant par le réglage actuel du paramètre lorsqu’il est sélectionné pour la première fois (Figure 6a). Pour modifier le réglage, utilisez les touches HAUT/BAS pour afficher le nouveau réglage souhaité...
  • Seite 45 « Ensemble supplémentaire » pour accéder à l’ensemble des réglages. Balayage de champ 2x avec fonction de déclenchement en direct Le balayage de champ est une nouvelle fonction révolutionnaire intégrée à la caméra de sentiers Prime de Bushnell. Elle vous permet de surveiller vos...
  • Seite 46 parcelles de nourriture ou les bords de vos champs à l’aide d’images prises à intervalle de temps régulier. Lorsqu’elle est réglée sur « MARCHE » la caméra de sentiers Prime prend automatiquement une photo à l’intervalle de votre choix (par exemple, une fois toutes les cinq minutes) pendant une ou deux périodes que vous avez définies pour chaque jour de la semaine, sans qu’un animal actif ne soit nécessaire pour déclencher la prise de vue.
  • Seite 47 complètes. Réglez les horaires [Début] et [Fin], en commençant par l’heure de début, en utilisant les touches HAUT/BAS pour modifier le réglage (étape 3). Le réglage de l’heure est basé sur une horloge au format 24 heures (00 heure = minuit, 12 heures = midi, 23 heures = 11 heures du soir, etc).
  • Seite 48 6 h. N’oubliez pas que l’enregistrement par balayage de champ est indépendant des déclenchements normaux dus à l’activité des animaux - même si aucun animal n’entre dans la zone de détection du capteur infrarouge, une image sera quand même prise toutes les 15 minutes pendant la ou les périodes de temps définies. Remarque : un réglage du balayage de champ à...
  • Seite 49 Le menu configuration – Liste des paramètres et réglages avec descriptions Réglages Paramètre Description (Gras=par défaut) Appuyez sur OK et utilisez les touches HAUT/BAS (pour modifier le réglage) et GAUCHE/DROITE (pour Réglage de Ensemble passer au champ suivant) pour régler l’horloge l’heure (format...
  • Seite 50 trop près de la caméra la nuit. Sélectionnez MARCHE pour accéder Réglages Marche ou Arrêt à l’ensemble des réglages. supplémentair...
  • Seite 51 Sélectionne la résolution des photos. Une résolution plus élevée permet 3 M= 2304x1296 Taille de l’image d’obtenir davantage de pixels, mais 12 M = 4608x2592 crée des fichiers plus volumineux qui (ne concerne que les 24 M= 6528x3672 occuperont plus de place sur la carte photos) SD (elle se remplit plus rapidement).
  • Seite 52 Sélectionne la sensibilité du capteur PIR. Le réglage « Élevé » augmente la sensibilité de la caméra au rayonnement infrarouge (chaleur) et à la détection de mouvement, et le réglage « Bas » baisse sa sensibilité à la chaleur et au mouvement. Le réglage «...
  • Seite 53 Longue portée – puissance élevée de la DEL, faible vitesse d’obturation Automatique, Mouvement rapide – Puissance Longue portée, élevée de la DEL, vitesse d’obturation Mode flash mouvement rapide rapide Auto – permet à la caméra de déterminer elle-même luminosité de la DEL et la vitesse d’obturation moyenne Sélectionnez «...
  • Seite 54 Affiche la version du micrologiciel Version Sélectionnez « Oui » et appuyez sur OK pour rétablir tous les paramètres d’usine d’origine. Si la caméra se comporte d’une manière anormale et que vous pensez avoir modifié Valeur par défaut Non, oui accidentellement un réglage (sans savoir lequel),...
  • Seite 55 MONTAGE ET POSITIONNEMENT DE LA CAMÉRA DE SENTIERS PRIME Montage Après avoir réglé les paramètres de la caméra selon vos préférences personnelles chez vous ou en chemin, vous pouvez mettre l’interrupteur sur « Marche ». Lors de la configuration de la caméra de sentiers Prime pour la reconnaissance de gibier ou pour d’autres applications extérieures, vous devez vous assurer de la monter correctement et en toute sécurité.
  • Seite 56 1/4-20. Note : un panneau solaire complémentaire (n° 119756C) est également disponible. Veuillez consulter le site www.bushnell.com pour plus d’informations. Test d’angle de détection et de distance Afin de tester si la caméra de sentiers Prime peut surveiller efficacement la zone...
  • Seite 57 sujet est grand, plus la distance de détection possible est grande. La distance moyenne de détection est d’environ 60 pieds. Avant de laisser la caméra sans surveillance, vérifiez les éléments suivants : • Les piles sont-elles insérées en respectant la polarité et leur niveau de puissance est-il suffisant? •...
  • Seite 58 navigateur d’images, ou utilisez le navigateur d’images fourni avec le système d’exploitation de votre PC. Les images sont enregistrées dans le dossier \DCIM\100EK001 de la carte SD. Chaque nouvelle image ou vidéo sera numérotée de façon incrémentielle dans l’ordre chronologique de sa capture (les quatre premiers caractères sont toujours identiques, c’est-à-dire «...
  • Seite 59: Dépannage / Faq

    masse USB standard (cela peut prendre plusieurs secondes à la première connexion). Si vous préférez laisser votre caméra dans les bois et simplement retirer sa carte SD, un lecteur de carte SD fonctionne comme décrit dans cette section une fois que la carte est insérée et que le lecteur est connecté à votre ordinateur.
  • Seite 60 Prime est capable de capter plusieurs milliers d’images avant que les piles soient déchargées. Vérifiez que vous avez bien utilisé des piles alcalines ou au lithium neuves. Bushnell recommande d’utiliser des piles Energizer® AA dans votre Caméra de sentiers Prime pour assurer une autonomie maximale.
  • Seite 61 En mode « Arrêt » ou « AIM » Assurez-vous d’utiliser une carte SD de bonne qualité dans votre caméra. Bushnell recommande les cartes SD SanDisk® jusqu’à 32 Go. Si l’interrupteur de protection d’écriture de la carte SD est en position verrouillée, la caméra ne prendra pas de photos.
  • Seite 62 Veuillez communiquer avec le service à la clientèle de Bushnell.
  • Seite 63 7.courts clips vidéo — ne s’enregistre pas à la longueur définie a.Vérifiez que la carte SD n’est pas pleine. b.Assurez-vous que la caméra soit munie de bonnes piles. Vers la fin de la durée de vie des piles, la caméra peut choisir d’enregistrer des clips vidéo plus courts pour économiser l’énergie.
  • Seite 64 Les photos ne captent pas le sujet d’intérêt Vérifiez le réglage du paramètre « Niveau du capteur » (sensibilité PIR). Par temps chaud, réglez le niveau du capteur sur « Élevé ». Pour une utilisation par temps froid, réglez le capteur sur « Bas ». Essayez d’installer votre caméra dans un endroit où...
  • Seite 65 des paramètres que vous avez réalisés en mode configuration, en appuyant sur « OK » après avoir modifié le réglage. Si vous ne sauvegardez pas votre nouveau réglage après l’avoir modifié, la caméra continuera d’utiliser le réglage original par défaut pour ce paramètre. Le mode de balayage de champ (Photographie à...
  • Seite 66: Spécifications Techniques

    SPÉCIFICATIONS TECHNIQUES Capteur d’images CMOS couleur de 3 mégapixels Résolution maximale 6528x3672 (24 MP) Objectif F = 2,8; champ de vision = 42°; coupure IR automatique (de nuit) Rayon du flash IR Jusqu’à 100 pi (30 m) Écran d’affichage Affichage N&B standard : 24 x 32 mm (1,5 po) Carte mémoire Carte SD ou SDHC, capacité...
  • Seite 67: Garantie Limitée De Deux Ans

    GARANTIE LIMITÉE DE DEUX ANS Votre produit Bushnell® est garanti être exempt de défauts de matériaux et de fabrication pendant deux ans après la date d’achat. Advenant un défaut sous cette garantie, nous réparerons ou remplacerons le produit, à notre discrétion, à condition que vous retourniez le produit affranchi.
  • Seite 68 L’appareil ne contient aucune pièce réparable par l’utilisateur. Les réparations ne doivent être effectuées que par un centre de réparation Bushnell autorisé. Toute réparation ou modification non autorisée pourrait endommager l’équipement de façon permanente et annulerait votre garantie et votre droit de faire fonctionner l’appareil en vertu des règlements de la partie 15.
  • Seite 69 Pour d’autres questions ou des informations supplémentaires, veuillez contacter : Bushnell Outdoor Products 9200 Cody, Overland Park, Kansas 66214 (800) 423-3537 www.bushnell.com ©2020 Bushnell Outdoor Products...
  • Seite 70 CÁMARA DE CAMINO PRIME MANUAL DE INSTRUCCIONES N.º de modelo: 119932C/119932CB 08-20...
  • Seite 72: Nota Importante

    Si parece que su cámara de camino Bushnell Prime no funciona correctamente o tiene problemas con la calidad de las fotografías o los vídeos, consulte el apartado de Solución de problemas/Preguntas frecuentes.
  • Seite 73: Piezas Y Controles

    INTRODUCCIÓN Acerca de la cámara de camino Prime La cámara de camino Bushnell Prime es una cámara de exploración digital. Se puede activar por cualquier movimiento de actividad en una ubicación, detectados mediante un sensor de movimiento pasivo infrarrojo (PIR) de gran sensibilidad y, a continuación, tomar fotos de alta calidad (fotografías fijas de hasta 24 mp) o vídeo clips HD 720p.
  • Seite 74 Figura 1 Figura 2...
  • Seite 75 Figura 3 Figura 4...
  • Seite 76 Asegúrese de insertar cada pila con la polaridad correcta (extremo negativo o "plano" contra el resorte largo de cada ranura de la pila). Bushnell recomienda utilizar un conjunto completo pilas AA de litio (de la marca Energizer®) o alcalinas nuevas. No se recomiendan las pilas recargables de NiMh, ya que el voltaje más bajo que producen puede causar problemas operativos.
  • Seite 77 Insertar la tarjeta SD Inserte la tarjeta SD (con el interruptor de encendido de la cámara en la posición APAGADO) antes de comenzar a manejar la cámara. No inserte ni retire la tarjeta SD cuando el interruptor de encendido esté en la posición ENCENDIDO. La cámara de camino Prime utiliza una tarjeta de memoria SD (Secure Digital) corriente para guardar las fotos (en formato .jpg) o los vídeos (en formato .avi).
  • Seite 78 USO DE LA cámara de camino Prime Cuando haya preparado su cámara de camino Prime instalando las pilas y la tarjeta SD adecuadamente, puede llevarla al exterior, fijarla a un árbol, encenderla y marcharse y quizás consiga algunas fotos increíbles, que es exactamente lo que quiere.
  • Seite 79 tiempo para cerrar la cubierta delantera de la cámara de camino Prime, bloquearla y abandonar la zona que desea vigilar. Cuando esté en el modo ENCENDIDO, no son necesarios ni posibles los controles manuales (las teclas de control no tienen efecto).
  • Seite 80 incrementará en uno. Si la pantalla indica "SD PROTEGIDA" cuando pulsa la tecla DISPARO, apague la cámara, retire la tarjeta SD y apague su interruptor de protección. Fig.5: Pantalla de información de CONFIGURACIÓN USO DEL MENÚ DE AJUSTES PARA CAMBIAR LA CONFIGURACIÓN El objetivo principal del modo AJUSTE es permitirle cambiar la configuración de los parámetros de la cámara para que su cámara de camino Prime funcione exactamente de la manera que lo desea.
  • Seite 81 ABAJO te permite seleccionar una configuración diferente para el parámetro mostrado anteriormente. Cuando haya seleccionado su nueva configuración preferida para un parámetro, pulse el botón OK para guardar la nueva configuración (en realidad cambiarla). Cuando termine de cambiar la configuración de uno o más parámetros, pulse MENÚ...
  • Seite 82 Pantalla de configuración de parámetro La configuración de cada parámetro se muestra en la pantalla de visualización de su cámara de camino Prime. Solo se muestra una configuración a la vez, comenzando con la configuración actual para el parámetro con se selecciona por primera vez (Fig.
  • Seite 83 EJEMPLOS: cambio de la configuración de algunos parámetros comunes Después de esta página, encontrará tablas que enumeran todos los parámetros encontrados en el menú CONFIGURAR, junto con sus posibles configuraciones (o rango de configuraciones) y una descripción detallada de lo que controla el parámetro y lo que hacen las configuraciones.
  • Seite 84 Prime de Bushnell, que le permite controlar sus parcelas de cultivo o los extremos de los campos con imágenes del paso del tiempo. Cuando se activa, la cámara de camino Prime tomará una foto automáticamente a su elección de intervalos (por ejemplo, una vez cada cinco minutos) durante uno o dos bloques de tiempo que configure para cada día, sin requerir un disparador de un animal activo.
  • Seite 85 "00" horas = medianoche, "12" horas = mediodía, "23" h = 11 p.m., etc. Para pasar a la siguiente configuración, pulse la tecla DERECHA, cambie el minuto de la hora de inicio con ARRIBA/ABAJOy, después, en las configuraciones de hora y minutos para la hora de parada. Cuando termine de configurar los minutos de parada, pulse OK para confirmar su configuración para el primer bloque de grabación de Field Scan.
  • Seite 87 El menú CONFIGURACIÓN: parámetros y lista de configuraciones con descripciones Configuraci Parámetros Descripción ón (negrita = predeterminad Pulse teclas ARRIBA/ABAJO (para cambiar la configuración) teclas Fijar reloj Fijar IZQUIERDA/DERECHA (para pasar al siguiente campo) para fijar la hora (solo formato de 24 horas, "00" = medianoche, "12"...
  • Seite 88 máximo de imágenes, pero algunas pueden aparecer "descoloridas" si el animal está demasiado cerca de la cámara por la noche. Seleccione ON para acceder al Conjunto Activado o conjunto completo de configuraciones. adicional apagado...
  • Seite 89 Selecciona la resolución para fotos fijas. resolución más alta 3 M= 2304 x 1296 Tamaño de la imagen proporciona más píxeles, pero crea 12 M = 4608 x 259 archivos más grandes que ocupan (solo afecta a fotos fijas) más capacidad de la tarjeta SD (se 24 m = 6528 x 367 llena más rápido).
  • Seite 90 Selecciona la sensibilidad del sensor PIR. La configuración "Alta" hará que la cámara sea más sensible al infrarrojo (calor) y se active más fácilmente por el movimiento y la configuración "Baja" la hace menos sensible al calor y al movimiento. El ajuste Alto puede ser útil cuando la Nivel del Bajo, Normal, Alto...
  • Seite 91 Largo alcance: LED de alta emisión, velocidad del obturador baja Automático, Movimiento rápido: LED de alta largo alcance, emisión, velocidad del obturador Modo flash movimiento rápido rápida Automático: permite que la cámara determine la luminosidad del LED y la velocidad de obturación media Seleccione "Activado"...
  • Seite 92 Muestra la versión del firmware Versión Seleccione "Sí" y pulse OK para restaurar todos los parámetros a la configuración predeterminada fábrica original. Si la cámara se comporta de manera extraña y cree Conjunto No, Sí puede haber cambiado predeterminado configuración de algo por accidente (pero no está...
  • Seite 93 MONTAJE Y POSICIONAMIENTO DE LA cámara de camino Prime Montaje Cuando haya configurado los parámetros de la cámara según sus preferencias personales en casa o en su camioneta, estará listo para sacarla al exterior y encenderla. Cuando configure la cámara de camino Prime para actividades de exploración u otras aplicaciones al aire libre, debe asegurarse de montarla en su lugar de manera correcta y segura.
  • Seite 94: Encendido De La Cámara

    1/4-20 estándar. Nota: También está disponible una fuente de alimentación complementaria de panel solar adicional (n.º 119756C), visite www.bushnell.com para obtener más información.
  • Seite 95 mayor sea la diferencia de temperatura entre el entorno y el sujeto, mayor será la posible distancia de detección. La distancia de detección promedio es de aproximadamente 20 metros. Antes de dejar la cámara desatendida, verifique lo siguiente: • ¿Se han introducido las pilas con la polaridad correcta y el nivel de carga es suficiente? •...
  • Seite 96 o un navegador de imágenes incluido con el sistema operativo del PC para ver las imágenes guardadas en la tarjeta SD en la carpeta \DCIM\100EK001. Cada nueva imagen o vídeo se numerará de manera ascendente en el orden en que se capturó...
  • Seite 97 Windows posterior, puede simplemente usar las opciones en la ventana emergente para copiar, ver o imprimir sus fotos (derecha). En todos los sistemas operativos de Windows, la cámara de camino Prime también aparecerá como "Disco extraíble" si abre la ventana "MI equipo"...
  • Seite 98 Por lo general, la cámara de camino Prime podrá capturar varios miles de imágenes antes de que se agoten las pilas. Asegúrese de haber utilizado pilas alcalinas o de litio nuevas. Bushnell recomienda utilizar pilas Energizer® AA de litio en su cámara de camino Prime para conseguir la mayor duración de la pila.
  • Seite 99 Asegúrese de utilizar una tarjeta SD de buena calidad en la cámara. Bushnell recomienda las tarjetas SD SanDisk® de hasta 32 GB. Si la tarjeta SD tiene el interruptor de protección de escritura en la posición de bloqueo, la cámara no tomará imágenes.
  • Seite 100 Si se observa este hecho de manera reiterada, es posible que se tenga que reparar el sensor. Póngase en contacto con el servicio de atención al cliente de Bushnell. 7. Videoclips cortos: no se graban en la duración establecida a. Asegúrese de que la tarjeta SD no esté...
  • Seite 101 La marca de fecha/hora no aparece correctamente en las imágenes Asegúrese de que el parámetro "Marca de tiempo" se establece en "Activada". Las fotos no capturan el sujeto de interés Compruebe la configuración del parámetro "Nivel de sensor" (sensibilidad del PIR).
  • Seite 102 funcionará correctamente. La pantalla se enciende pero luego se apaga a. Asegúrese de haber instalado la tarjeta SD correctamente. La cámara no conserva la configuración Asegúrese de guardar los cambios en la configuración que haya realizado a cualquier configuración que haya realizado mientras se está en el modo Configuración pulsando la tecla "OK"...
  • Seite 103: Especificaciones Técnicas

    ESPECIFICACIONES TÉCNICAS Sensor de imágenes CMOS de color de 3 megapíxeles Tamaño máximo del píxel 6528 x 3672 (24 mp) Lente F = 2,8; FOV = 42 °; IR-Cut-Remove automático (por la noche) Alcance del flash IR Hasta 30 m Pantalla de visualización Pantalla estándar en blanco y negro: 24 x 32 mm (1,5")
  • Seite 104: Garantía Limitada De Dos Años

    GARANTÍA LIMITADA DE DOS AÑOS Su producto Bushnell® garantizado como libre de defectos en materiales y mano de obra durante dos años desde la fecha de compra. En caso de defecto bajo esta garantía, a tu elección, repararemos o sustituiremos el producto, siempre que devuelvas el producto a portes pagados.
  • Seite 105 El aparato no contiene piezas que puedan ser reparadas por el usuario. Las reparaciones únicamente deben efectuarse por personal autorizado de Bushnell. Las reparaciones o modificaciones no autorizadas podrían dañar de forma permanente el equipo y anularán la garantía y su autoridad para operar este dispositivo con arreglo a las regulaciones de la parte 15.
  • Seite 106 Si tiene más preguntas, o para obtener más información, póngase en contacto con: Bushnell Outdoor Products 9200 Cody, Overland Park, Kansas 66214 (800) 423-3537 www.bushnell.com ©2020 Bushnell Outdoor Products...
  • Seite 107: Manuale Di Istruzioni

    FOTOTRAPPOLA PRIME MANUALE DI ISTRUZIONI N. modello: 119932C/119932CB 08-20...
  • Seite 108 NOTA IMPORTANTE Congratulazioni per avere acquistato una delle migliori fototrappole presenti sul mercato. Bushnell è molto orgogliosa di questa piccola unità e siamo certi che convincerà anche te. Teniamo molto alla tua attività e vogliamo conquistare la tua fiducia. Per un utilizzo ottimale del prodotto, consulta le note sottostanti e le istruzioni di questo manuale.
  • Seite 109: Parti E Comandi

    INTRODUZIONE Informazioni sulla fototrappola Prime La fototrappola Prima Bushnell è una videocamera di rilevamento digitale. Può essere attivata da qualsiasi movimento della selvaggina in una determinata posizione, rilevato da un sensore di movimento a infrarossi passivi (PIR) altamente sensibile, e quindi scattare foto di alta qualità...
  • Seite 110 Fig. 1 Fig. 2...
  • Seite 111 Fig. 3 Fig. 4...
  • Seite 112 Assicurati di inserire ciascuna batteria con la polarità corretta (estremità negativa o "piatta" contro la molla lunga di ogni slot della batteria). Bushnell consiglia di utilizzare un set completo di batterie al litio AA (marchio Energizer®) o batterie alcaline AA nuove. Le batterie ricaricabili NiMh non sono consigliate, poiché la bassa tensione che producono può...
  • Seite 113 Inserimento della scheda SD Inserisci la scheda SD (con l'interruttore di alimentazione della fotocamera nella posizione OFF) prima di iniziare a utilizzare la fotocamera. Non inserire o rimuovere la scheda SD quando l'interruttore di accensione si trova nella posizione ON. La fototrappola Prime utilizza una scheda di memoria SD (Secure Digital) standard per salvare le foto (in formato .jpg) e/o i video (in formato .avi).
  • Seite 114 UTILIZZO DELLA fototrappola Prime Una volta preparata la fototrappola Prime installando correttamente le batterie e una scheda SD, è possibile semplicemente portarla all'esterno, legarla a un albero, accenderla e andare via: potresti così ottenere delle splendide foto, esattamente quello che volevi. Tuttavia, ti consigliamo vivamente di trascorrere prima un po' di tempo aggiuntivo in casa con questo manuale e la fotocamera fino a quando non avrai appreso qualcosa in più...
  • Seite 115 Puoi spostare l'interruttore di alimentazione dalla modalità OFF alla modalità ON direttamente o impostarlo prima nella posizione AIM per modificare una o più impostazioni e spostare l'interruttore su ON quando avrai finito. MODALITÀ AIM In modalità AIM è possibile controllare e modificare le impostazioni della fototrappola Prime con l'aiuto del relativo LCD integrato.
  • Seite 116 UTILIZZO DEL MENU SETUP PER MODIFICARE LE IMPOSTAZIONI Lo scopo principale della modalità AIM è consentire di modificare le impostazioni dei parametri della fotocamera in modo che la fototrappola Prime funzioni esattamente nel modo desiderato. Lo farai accedendo al menu SETUP e premendo i tasti accanto al display LCD, che ti mostrerà...
  • Seite 117 Display di impostazione dei parametri Le impostazioni per ciascun parametro sono visualizzate sullo schermo della fototrappola Prime. Viene visualizzata solo un'impostazione alla volta, a partire dall'impostazione corrente relativa al parametro quando viene selezionata per la prima volta (Fig. 6a). Per modificare l'impostazione, utilizza i tasti SU/GIÙ per visualizzare la nuova impostazione desiderata (Fig.
  • Seite 118 ESEMPI-Modifica delle impostazioni di alcuni parametri comuni Dopo questa pagina, troverai le tabelle che elencano tutti i parametri presenti nel menu SETUP (IMPOSTAZIONE), insieme alle relative possibili impostazioni (o intervallo delle impostazioni) e a una descrizione dettagliata di cosa controlla il parametro e di quali siano gli effetti delle impostazioni.
  • Seite 119 fototrappola Prime, che consente di monitorare gli appezzamenti coltivati o i margini dei campi con immagini time lapse. Se impostata su "On", la fototrappola Prime scatterà automaticamente una foto a tua scelta a intervalli (ad esempio, una volta ogni cinque minuti) durante uno o due blocchi temporali impostati per ogni giorno, senza richiedere un attivatore da parte di un animale attivo.
  • Seite 120 a infrarossi passivi (PIR). Il risultato è un raggio d'azione molto più grande di quello usuale, con la fotocamera dipendente da attivazioni generate dagli animali che si trovano nelle vicinanze. Si tratta di un ottimo strumento per i cacciatori per esplorare un intero campo servendosi di una sola telecamera.
  • Seite 121 (Scansione campo). Se lo desideri, è possibile creare un secondo blocco temporale premendo il tasto GIÙ per selezionare "B" (Passaggio 4) , quindi premi OK e segui la stessa procedura per impostare gli orari di inizio e fine per il blocco Field Scan (Scansione campo) "B"...
  • Seite 122 Impostazioni Field Scan (Scansione campo): Field Scan (Scansione campo): On (Attiva) Field Scan (Scansione campo) A: [Start] ([Avvio]):06:00 [Stop]: ([Interruzione]:) 08:00 Field Scan (Scansione campo) B: [Start] ([Avvio]): 17:30[Stop]: ([Interruzione]:) 19:00 Interval (Intervallo): 15 M Nota: evita qualsiasi "sovrapposizione" dei blocchi di registrazione Field Scan (Scansione campo) A e B quando imposti i relativi orari di inizio e fine, per garantire il corretto funzionamento.
  • Seite 124 Il menu SETUP (IMPOSTAZIONE) - Elenco parametri e impostazioni con descrizioni Impostazio Parametro Descrizione ni (grassetto = impostazione predefinita) Premi OK e utilizza i tasti SU/GIÙ (per modificare l'impostazione) e i tasti SINISTRA/DESTRA (per passare al Set Clock Impostazione campo successivo) per impostare (Imposta l'ora (solo formato 24 ore, "00"...
  • Seite 125 l'animale è troppo vicino alla fotocamera di notte. Seleziona ON per accedere alla suite Set aggiuntivo On (attivo) o Off completa di impostazioni. (disattivo)
  • Seite 126 Seleziona la risoluzione per le foto. Una risoluzione più elevata fornisce 3M=2304x1296 Dimensione più pixel, ma crea file più grandi che 12M=4608x2592 dell'immagine occupano più spazio della capacità 24M=6528x3672 della scheda SD (si riempie più (riguarda solo le foto) velocemente). 12 M è un buon compromesso risoluzione dimensione del file.
  • Seite 127 Seleziona la sensibilità del sensore PIR. L'impostazione "High" ("Alta") renderà la fotocamera più sensibile agli infrarossi (calore) e più facilmente attivata dal movimento, mentre l'impostazione "Low" ("Bassa") la renderà meno sensibile al calore e al movimento. L'impostazione Alta può Livello del Low (Bassa), Normal essere utile quando la temperatura ambiente sensore...
  • Seite 128 Long Range (Lunga distanza) - Alta emissione Bassa velocità Auto dell'otturatore (Automatico), Fast Motion (Movimento rapido) - Alta Modalità flash Long Range emissione LED Velocità otturatore (Lunga distanza), elevata Fast Motion Auto (Automatico) - Consente alla (Movimento rapido) fotocamera determinare luminosità...
  • Seite 129 Elimina (cancella) tutti file memorizzati su una scheda per prepararla riutilizzo. Formatta sempre una scheda che è stata precedentemente utilizzata in altri Formato No, Yes (Sì) dispositivi. Attenzione! Assicurati come prima cosa di aver scaricato e eseguito il backup di tutti i file che desideri conservare! Premi OK per eseguire, premi MENU (o seleziona NO quindi premi OK) per uscire senza...
  • Seite 130 Seleziona "Yes" ("Sì") e premi OK per ripristinare tutti parametri alle impostazioni predefinite di fabbrica originali. Se la fotocamera si sta comportando in modo strano e pensi Default Set (Set No, Yes (Sì) di aver modificato le impostazioni in predefinito) modo accidentale in relazione a qualche parametro (ma non sei sicuro di quale), questo ripristinerà...
  • Seite 131 MONTAGGIO E POSIZIONAMENTO DELLA FOTOTRAPPOLA PRIME Montaggio Dopo aver impostato i parametri della fotocamera in base alle tue preferenze personali a casa o nel tuo veicolo, sei pronto per portarla fuori e portare l'interruttore di accensione su "ON". Quando si posiziona la fototrappola Prime per l'individuazione della selvaggina o per altre applicazioni in ambiente esterno, è...
  • Seite 132: Accensione Della Fotocamera

    1/4-20. Nota: è disponibile anche una fonte di alimentazione supplementare grazie al pannello solare accessorio (n. 119756C): visita il sitowww.bushnell.com per maggiori informazioni. Verifica dell'angolo di rilevamento e della distanza È...
  • Seite 133 • Le batterie sono inserite correttamente e il loro livello di carica è sufficiente? • La scheda SD ha spazio di archiviazione sufficiente e il relativo interruttore di protezione dalla scrittura (blocco) è disattivato? • L'interruttore di accensione è in posizione ON? (non lasciarlo in posizione AIM).
  • Seite 134 note correlate: • Non devi preoccuparti del formato del file system della fototrappola Prime a meno che l'apparecchiatura non abbia problemi a leggere la scheda SD. In tal caso, formatta la scheda SD con la fototrappola Prime o tramite il tuo computer e poi inserisci la scheda nella fototrappola Prime e riprova.
  • Seite 135 Tipicamente, la fototrappola Prime è in grado di acquisire diverse migliaia di immagini prima che le batterie si scarichino. Verifica di aver utilizzato batterie alcaline o al litio nuove. Bushnell consiglia di utilizzare batterie AA al litio Energizer®...
  • Seite 136 Accertati che l'interruttore di alimentazione della fotocamera sia nella posizione "On" e non su "Off" o in modalità "AIM". Assicurati di utilizzare nella fotocamera una scheda SD di buona qualità. Bushnell consiglia schede SD SanDisk® fino a 32 GB. Se la scheda SD ha l'interruttore di protezione dalla scrittura in posizione di blocco, la fotocamera non scatterà...
  • Seite 137 In determinate condizioni di illuminazione, il sensore può confondersi e causare immagini con colori scadenti. b. Se ciò si riscontra regolarmente, potrebbe essere necessario riparare il sensore. Contatta il servizio clienti Bushnell. 7. Brevi video clip: assenza di registrazione alla lunghezza impostata a. Verifica che la scheda SD non sia piena.
  • Seite 138 Le foto non acquisiscono soggetti di interesse Controlla l'impostazione del parametro “Sensor Level” ("Livello sensore") (sensibilità PIR). Per condizioni ambientali calde, imposta il Livello del sensore su "High" ("Alto") e, per l'uso a basse temperature, impostare il sensore su “Low” ("Basso"). Prova a posizionare la videocamera in alto in un'area in cui non vi è...
  • Seite 139 l'impostazione predefinita originale per quel parametro. Field Scan (Time Lapse) non funziona correttamente Assicurati che i tempi di inizio e fine di Field Scan (Scansione campo) "A" e "B" non si sovrappongano (ad esempio, non impostare l'ora di inizio di "B" alle 08:00 se l'orario di di fine di "A"...
  • Seite 140 SPECIFICHE TECNICHE Sensore di immagini CMOS a colori da 3 Megapixel Dimensioni massime pixel 6528x3672 (24 MP) Obiettivo F = 2.8; FOV = 42°; Auto IR-Cut-Remove (di notte) Raggio massimo del flash Fino a 30 m Schermo di Display in bianco e nero standard: 24x32mm (1.5") visualizzazione Scheda di memoria Scheda SD o SDHC, capacità...
  • Seite 141: Garanzia Limitata Di Due Anni

    GARANZIA LIMITATA DI DUE ANNI Si garantisce che questo prodotto Bushnell® sarà esente da difetti di materiale e lavorazione per due anni a decorrere dalla data di acquisto. In caso di difetto durante tale periodo di garanzia, provvederemo, a nostra discrezione, alla riparazione o sostituzione del prodotto, a condizione che il cliente abbia spedito il prodotto a sue spese.
  • Seite 142 Consultare il rivenditore o un tecnico radio/TV esperto per assistenza. Il dispositivo non contiene parti che possano essere riparate dall'utilizzatore. Le riparazioni devono essere eseguite esclusivamente da un centro di riparazione autorizzato Bushnell. Le riparazioni o modifiche non autorizzate potrebbero causare un danno permanente dell'apparecchiatura, invalideranno la garanzia e priveranno il cliente della facoltà...
  • Seite 143 Per ulteriori domande o informazioni aggiuntive, rivolgersi a: Bushnell Outdoor Products 9200 Cody, Overland Park, Kansas 66214 (800) 423-3537 www.bushnell.com ©2020 Prodotti Bushnell Outdoor...
  • Seite 144 PRIME WILDKAMERA BEDIENUNGSANLEITUNG Model-Nr.: 119932C / 119932CB 08-20...
  • Seite 146: Wichtiger Hinweis

    WICHTIGER HINWEIS Herzlichen Glückwunsch zum Kauf einer der besten Wildkameras auf dem Markt! Bei Bushnell sind wir sehr stolz auf dieses kleine Gerät und sind uns sicher, dass Sie auch Ihre Freude an ihm haben werden. Wir danken Ihnen für Ihren Kauf und möchten Ihr Vertrauen auf keinen Fall enttäuschen.
  • Seite 147: Anwendungsbereiche

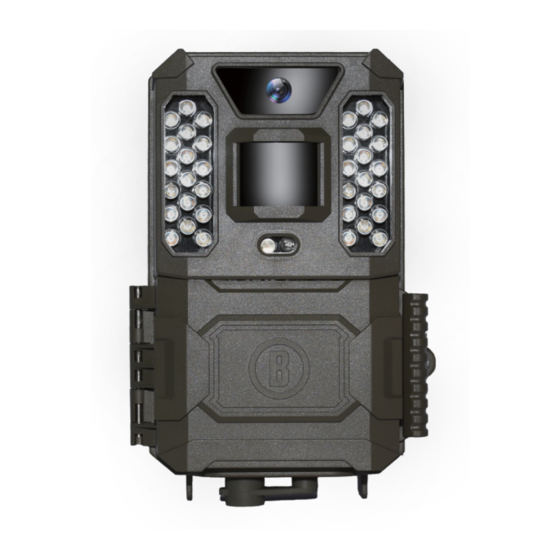
    EINFÜHRUNG Produktinfos zur Prime Wildkamera Die Bushnell Prime Wildkamera ist eine digitale Kamerafalle. Sie wird durch jegliche Bewegung von Wildtieren vor Ort ausgelöst, die durch einen hochempfindlichen pyroelektrischen Sensor (PIR-Sensor) erkannt werden. Die aufgenommenen Bilder sind qualitativ hochwertig – Fotos mit bis zu 24 MP oder HD-Videos von bis zu 720 p.
  • Seite 148 Abb. 1 Abb. 2...
  • Seite 149 Abb. 3 Abb. 4...
  • Seite 150: Einlegen Von Batterien Und Sd-Karte

    Minuspol bzw. das „flache“ Ende drückt gegen die lange Feder der einzelnen Batteriesteckplätze). Bushnell empfiehlt den Einsatz von einem vollständigen Satz aus neuen Lithium-Batterien Typ AA (der Marke Energizer®) oder Alkali-Batterien Typ AA. Wiederaufladbare NiMh- Batterien werden nicht empfohlen, da die von ihnen erzeugte niedrigere Spannung beim Betrieb zu Problemen führen kann.
  • Seite 151 Einlegen der SD-Karte Legen Sie die SD-Karte ein (stellen Sie dazu den Hauptschalter der Kamera in die Position OFF), bevor Sie die Kamera in Betrieb nehmen. Die SD-Karte darf nicht eingelegt oder entfernen werden, wenn der Hauptschalter auf ON steht. Die Prime Wildkamera nutzt eine handelsübliche SD-Speicherkarte (Secure Digital) zum Speichern Ihrer Fotos (JPG-Format) oder Videos (AVI-Format).
  • Seite 152 GEBRAUCH DER Prime Wildkamera Sobald Sie Ihre Prime Wildkamera ordnungsgemäß mit Batterien und einer SD-Karte ausgestattet haben, nehmen Sie diese einfach ins Freie, schnallen sie an einen Baum, schalten sie ein und gehen – und mit etwas Glück erhalten ein paar großartige Fotos, die genau Ihren Vorstellungen entsprechen.
  • Seite 153 Sie können den Hauptschalter entweder direkt von OFF auf ON stellen, oder in der Position AIM anhalten, um erst die eine oder andere Einstellung zu ändern. Wenn Sie damit fertig sind, stellen Sie den Schalter dann auf ON. AIM-MODUS Im AIM-Modus können Sie mithilfe des eingelassenen LCD-Displays die Einstellungen der Prime Wildkamera überprüfen und ändern.
  • Seite 154: Einstellungsänderungen Über Das Setup-Menü

    EINSTELLUNGSÄNDERUNGEN ÜBER DAS SETUP-MENÜ Der AIM-Modus dient hauptsächlich dazu, die Einstellungen der Kameraparameter ändern zu können, damit die Prime Wildkamera genau so funktioniert, wie Sie es wünschen. Öffnen Sie dazu das SETUP-Menü und betätigen Sie die Tasten neben dem LCD-Display, auf dem Ihnen die einzelnen Parameter und die zugehörigen Einstellungen angezeigt werden.
  • Seite 155 Anzeige der Parametereinstellung Die Einstellungen der einzelnen Parameter werden auf dem Display der Prime Wildkamera angezeigt. Es wird jeweils nur eine Einstellung zurzeit angezeigt und beginnt mit der aktuellen Parametereinstellung, wenn dieser zum ersten Mal ausgewählt wird (Abb. 6a). Um die Einstellung zu ändern, betätigen Sie die AUFWÄRTS-/ABWÄRTS-Tasten, um die gewünschte neue Einstellung anzuzeigen (Abb.
  • Seite 156: Beispiele - Änderung Der Einstellungen Einiger Gebräuchlicher Parameter

    BEISPIELE – Änderung der Einstellungen einiger gebräuchlicher Parameter Im Anschluss an die vorliegende Beschreibung finden Sie Tabellen, in denen alle Parameter des SETUP-Menüs mit den möglichen Einstellungen (oder Einstellungsbereichen) und detaillierten Beschreibung dazu angeführt werden, was über den Parameter gesteuert wird und was die Einstellungen bewirken. Im vorherigen Abschnitt haben Sie erfahren, wie Sie Parameter auswählen und die zugehörigen Einstellungen ändern können.
  • Seite 157 2-facher Field Scan mit Live-Auslösefunktion Field Scan ist eine revolutionäre neue Funktion der Bushnell Prime Wildkamera, mit der Sie Ihre Futterstellen oder Feldränder mit Zeitrafferaufnahmen überwachen können. Wenn die Funktion auf „On“ steht, macht die Prime Wildkamera automatisch Aufnahmen im gewünschten Zeitintervall (z. B. alle fünf Minuten) innerhalb eines Zeitraums oder von zwei Zeiträumen, die Sie für die einzelnen Tage...
  • Seite 158 = Mittag, „23“ = 11 Uhr abends usw. Die nächste Einstellung erreichen wir über die RECHTS-Taste. Ändern Sie die Minutenangabe für die Startzeit über die AUFWÄRTS- /ABWÄRTS-Tasten und wiederholen Sie den Vorgang für die Stunden- und Minuteneinstellungen der Endzeit. Nach Einstellung der Minuten des Endes drücken Sie auf OK, um Ihre Einstellungen für den ersten Zeitraum der Field Scan-Aufzeichnung zu bestätigen.
  • Seite 160 Das SETUP-Menü – Liste der Parameter und Einstellungen mit Beschreibungen Einstellungen Parameter Beschreibung (Fett=Standard) drücken über AUFWÄRTS/ABWÄRTS (Einstellung ändern) und LINKS/RECHTS (um zum Set Clock Set (Eingestellt) nächsten Feld wechseln) Stunde (nur 24- (Uhrzeit Stunden-Format, „00“=Mitternacht, einstellen) „12“=Mittag) und Minuten sowie (in der unteren Zeile) Jahr, Monat und Tag einstellen.
  • Seite 161 Zur Auswahl der Auflösung von Standbildern. Je höher die Auflösung 3M=2304x1296 Image Size (Bildgröße) desto mehr Pixel und desto größere 12M=4608x2592 Dateien, die mehr Speicherplatz der (nur für Fotos) 24M=6528x3672 SD-Karte beanspruchen (füllt sich schneller). guter Kompromiss zwischen Auflösung und Dateigröße.
  • Seite 162 Auswahl Empfindlichkeit pyroelektrischen Sensors. Einstellung „High“ Kamera empfindlicher gegenüber Infrarot (Wärme) wird leichter durch Bewegung ausgelöst. Bei der Einstellung „Low“ ist sie weniger empfindlich gegenüber Wärme und Sensor Level Low (niedrig), Normal, Bewegung. Die Einstellung „High“ ist für (Sensorstufe) High (hoch) warme Umgebungstemperaturen geeignet (durch der Sensor schwerer Tiere erkennt), und die Einstellung „Low“...
  • Seite 163 Große Reichweite – hohe LED-Leistung, lange Belichtungszeit Auto, Schnelle Bewegung – hohe LED-Leistung, Long Range (große Flash mode (Blitzmodus) kurze Belichtungszeit Reichweite), Fast Auto – LED-Leuchtdichte und die mittlere Motion (schnelle Belichtungszeit werden von der Kamera Bewegung) bestimmt Bei Auswahl von „On“ wird im Videomodus Video Sound (Videoton) zusammen Video...
  • Seite 164 Über „Yes“ und OK werden alle Parameter auf die ursprünglichen Werkseinstellungen zurückgesetzt. Zum Zurücksetzen aller Parameter auf übliche oder am häufigsten Default Set No (Nein), verwendete Einstellungen, wenn die (Standardeinstell Yes (Ja) Kamera merkwürdig funktionier und ung) glauben, Einstellung versehentlich geändert zu haben (aber nicht sicher sind, welche).
  • Seite 165 ANBRINGUNG UND AUSRICHTUNG DER Prime Wildkamera Anbringung Nachdem Sie zuhause oder im Auto die Parameter der Kamera Ihrem individuellen Bedarf entsprechend eingestellt haben, geht es mit ihr ins Freie, um den Hauptschalter auf „ON“ zu schalten. Wenn Sie die Prime Wildkamera zur Beobachtung von Wild oder für andere Zwecke im Außenbereich benutzen, muss diese richtig und sicher angebracht werden.
  • Seite 166: Prüfung Von Erfassungswinkel Und Reichweite

    Standardgewinde (1/4–20 Zoll) ausgestattet. Hinweis: Es ist auch eine zusätzliche Stromquelle über ein Solarpanel (#119756C) erhältlich – weitere Informationen finden Sie unter www.bushnell.com. Prüfung von Erfassungswinkel und Reichweite Wenn Sie prüfen möchten, ob die Prime Wildkamera den von Ihnen ausgewählten Bereich effektiv überwacht, empfehlen wir Ihnen, folgende Prüfung durchzuführen.
  • Seite 167: Wiedergabe/Löschen Der Fotos/Videos

    desto größer mögliche Erfassungsreichweite. mittlere Erfassungsreichweite beträgt etwa 20 m. Bevor Sie die Kamera unbeaufsichtigt lassen, überprüfen Sie bitte Folgendes: • Sind die Batterien mit der richtigen Polarität eingelegt und ist ihre Leistung ausreichend? • Hat die SD-Karte genügend freien Speicherplatz und ist der Schreibschutz („Lock“) ausgeschaltet? •...
  • Seite 168: Herunterladen Der Fotos/Videos

    Bild-Browser-Funktion oder einen im Betriebssystem des PC enthaltenen Bild- Browser, um die auf der SD-Karte im Ordner \DCIM\100EK001 gespeicherten Bilder anzuzeigen. Jedes neue Bild oder Video wird in der Reihenfolge der Aufnahmezeit in aufsteigender Reihenfolge nummeriert (die ersten vier Ziffern sind dieselben „DCIM“).
  • Seite 169 Kartenlesegerät ebenfalls wie oben beschrieben, sobald die Karte eingelegt und das Lesegerät an Ihren Computer angeschlossen ist. Windows XP oder neueren Betriebssystemen von Windows können Sie dann einfach die Optionen im Pop-up-Fenster verwenden, Ihre Fotos kopieren, anzuzeigen oder zu drucken (rechts). Bei allen Windows-Betriebssystemen wird die Prime Wildkamera auch als „externe Festplatte“...
  • Seite 170 Kamera nicht in der Position „AIM “ belassen wurde. Stellen Sie sicher, dass Sie eine SD-Karte mit hochwertiger Markenqualität für Ihre Kamera verwenden. Bushnell empfiehlt SD-Karten der Marke SanDisk® mit Speicherkapazitäten von bis zu 32 GB. Nach unserer Erfahrung verkürzen SD- Karten mit schlechter Qualität die Batterielebensdauer bei unserer Prime...
  • Seite 171 „OFF“ oder „AIM“ befindet. 4. Vergewissern Sie sich, dass Sie eine SD-Karte hochwertiger Markenqualität für Ihre Kamera verwenden. Bushnell empfiehlt SD-Karten der Marke SanDisk® mit Speicherkapazitäten von bis zu 32 GB. 5. Wenn sich der Schreibschutz der SD-Karte auf der Sperrposition befindet, nimmt die Kamera keine Bilder auf.
  • Seite 172 Farbbildern. b. Sollte das durchgängig der Fall sein, sollte der Sensor gewartet werden. Bitte wenden Sie sich an den Bushnell-Kundenservice. 7. Kurze Video – die Länge entspricht der Einstellung für die Aufnahmen a. Vergewissern Sie sich, dass die SD- Karte nicht voll ist.
  • Seite 173 Die Fotos erfassen kein Motiv von Interesse 21. Überprüfen Parametereinstellung „Sensorstufe“ (Empfindlichkeit pyroelektrischen Sensors). Stellen Sie die Sensorstufe in warme Umgebungen auf „High“ und für den Einsatz in kaltem Klima auf „Low“ ein. 22. Versuchen Sie, Ihre Kamera in einem Bereich aufzustellen, in dem sich keine Wärmequelle im Sichtbereich der Kamera befindet.
  • Seite 174: Field Scan (Zeitraffer) Funktioniert Nicht Richtig

    Field Scan (Zeitraffer) funktioniert nicht richtig Stellen Sie sicher, dass sich die Start- und Endzeiten von Field Scan „A“ und „B“ nicht überschneiden (setzen Sie z. B. die Startzeit von „B“ nicht auf 8:00 Uhr, wenn die Endzeit von „A“ 10:00 Uhr ist). VORSICHT!: VERWENDEN SIE NICHT die Einstellung 1S für den Parameter „Interval“...
  • Seite 175: Technische Angaben

    TECHNISCHE ANGABEN Bildsensor 3 Megapixel-Farb-CMOS Maximale Pixelgröße 6528x3672 (24 MP) Objektiv F = 2,8; FOV=42°; Automatische IR-Filter (nachts) IR-Blitzreichweite Bis zu 30 m Display-Bildschirm Std. S/W-Anzeige: 24 x 32 mm Speicherkarte SD- oder SDHC-Karte, Maximale Speicherkapazität: 32 GB Bildgröße 3M = 2304 x 1296, 12M = 4608 x 2592, 24M = 6528 x 3672 Videogröße 1920 x 1080, 1280 x 720, 640 x 368...
  • Seite 176: Zweijährige Beschränkte Garantie

    ZWEIJÄHRIGE BESCHRÄNKTE GARANTIE Ihr Bushnell®-Produkt verfügt über zwei Jahr Garantie ab dem Kaufdatum auf Material- und Herstellungsfehler. Sollte in der Garantiezeit ein Defekt auftreten, werden wir das Produkt nach unserer Wahl reparieren oder ersetzen, wenn Sie das Produkt vorausbezahlt zurücksenden. Diese Garantie deckt keine Schäden ab, die durch fehlerhafte Verwendung, unsachgemäße Handhabung oder eine von einer...
  • Seite 177 Ihre Vertriebsstelle oder an einen erfahrenen Radio-/Fernsehtechniker zu Rate ziehen. Dieses Gerät enthält keine durch den Benutzer zu wartenden Teile. Reparaturen sollten nur von einem autorisierten Bushnell Reparaturcenter durchgeführt werden. Unautorisierte Reparaturen oder Modifizierungen können zu dauerhaftem Schaden der Ausrüstung führen, und machen Ihre Garantie ungültig und den Gebrauch dieses Gerätes gemäß...
  • Seite 178 Für weitere Fragen oder Informationen wenden Sie sich bitte an: Bushnell Outdoor Products 9200 Cody, Overland Park, Kansas 66214 (800) 423-3537 www.bushnell.com ©2020 Bushnell Outdoor Products...

Diese Anleitung auch für:

119932cb

Inhaltsverzeichnis