Dedicated Micros DM/ICE-Serie Handbuch
Vandalismus-resistente kameras mit fester kugelabdeckung
Inhaltsverzeichnis
Quicklinks
0.00001
DUTCH
0.00016
DUTCH
0.00016
DUTCH
0.001
DUTCH
Vandalismebestendige vaste
Koepelcamera's
Caméras à dôme fixe anti-vandalisme
Vandalismus-resistente Kameras mit
fester Kugelabdeckung
Telecamere a cupola fissa resistenti
agli atti vandalici
Câmaras Fixas Dome Resistentes ao
Vandalismo
Фиксированные антивандальные
купольные камеры
Câmaras Fixas Dome Resistentes ao
Vandalismo
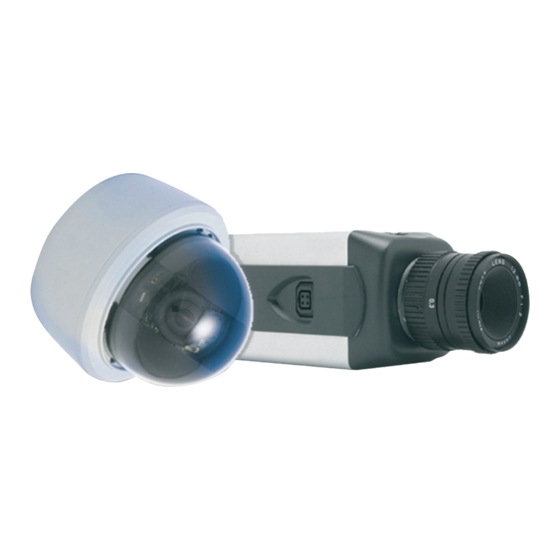
DM/ICE-VCBH39
DM/ICE-VSOBH39
DM/ICE-VSCMH39
DM/ICE-VCCMU39
DM/ICE-VSOCMU39
DM/ICE-VSDNU39
DM/ICE-VCDN3U39
DM/ICE-VSBH39
DM/ICE-VCCMH39
DM/ICE-VSOCMH39
DM/ICEVS-CMU39
DM/ICEVC-DNU39
DM/ICE-VSODN3U39
Inhaltsverzeichnis

Verwandte Anleitungen für Dedicated Micros DM/ICE-Serie


Inhaltszusammenfassung für Dedicated Micros DM/ICE-Serie
- Seite 1 0.00001 DUTCH 0.00016 DUTCH Vandalismebestendige vaste Koepelcamera’s Caméras à dôme fixe anti-vandalisme Vandalismus-resistente Kameras mit fester Kugelabdeckung Telecamere a cupola fissa resistenti agli atti vandalici Câmaras Fixas Dome Resistentes ao Vandalismo Фиксированные антивандальные купольные камеры Câmaras Fixas Dome Resistentes ao Vandalismo DM/ICE-VCBH39 DM/ICE-VSBH39...
-
Seite 2: Inhaltsverzeichnis
Introdução ............58 Введение ............70 Introducción............84 Whilst every attempt is made to ensure these manuals are accurate and current, Dedicated Micros reserve the right to alter or modify the specification of the machine described herein without prejudice. Dedicated Micros ©2011... -
Seite 3: Inleiding
Inleiding Deze instructies gelden voor vaste koepelcamera’s van de DM/ICE-Serie van Baxall. Lees al deze instructies met aandacht. Gebruik ze voor het installeren van deze camera en bewaar ze zolang de camera in gebruik is. Neem bij problemen contact op met uw leverancier. -
Seite 4: Belangrijke Veiligheidstips
Verwijder vóór gebruik van de camera alle verpakkingsmaterialen en de beschermende film van de heldere beschermkap. 3.00093 DUTCH • Raak het beeldoppervlak van de sensor niet aan. Als u de sensor per ongeluk hebt aangeraakt, reinig deze dan uitsluitend met isopropanol. 4.00011 DUTCH Dedicated Micros ©2011... - Seite 5 DM/ICED-SERV-serviceconnector (apart verkrijgbaar) en stel de camera in zoals aangegeven op pagina 49. Zorg ervoor dat de schroeven in de afscherming van de koepelcamera in het verlengde liggen van de schroefopeningen in het camerahuis om de koepelbehuizing terug te plaatsen. Dedicated Micros ©2011...
- Seite 6 Plaats de koepelbehuizing van de koepelcamera terug en schroef de inbusschroeven vast. Zorg er daarbij voor dat de bevestigingskabel in de rand van het voorpaneel niet geklemd raakt. Draai de inbusschroeven niet te hard aan. Dedicated Micros ©2011...
-
Seite 7: Camera Instellen
De camera-unit kan worden ingesteld alle drie de assen (afbeelding 6). Stel de camera zó in dat deze in de gewenste richting wijst. 4.0006 DUTCH Gezichtsveld en focus Gebruik de hendels op het varifocale objectief om het gezichtsveld en de focus van de camera in te stellen. 5.00018 DUTCH Dedicated Micros ©2011... - Seite 8 Kies INT (Intern) of LL (Instelbaar). De LL-instelling maakt via de twee knoppen voor het vooruitschuiven en vertragen van de LL-fase een faseverschuiving mogelijk van plm. 180°. De standaardinstelling is LL. Door de beide knoppen gelijktijdig in te drukken, zet u de LL-functie naar de standaard-fabrieksinstelling terug). Dedicated Micros ©2011...
-
Seite 9: Eindmontage
Hierbij hebt u een als optie leverbare serviceconnector nodig, artikelcode DM/ICED- SERV (niet meegeleverd). 14.0001 DUTCH Eindmontage Nadat u alle verbindingen en instellingen hebt voltooid, plaatst u de afscherming van de camera en de koepelbehuizing terug. 15.00011 DUTCH Dedicated Micros ©2011... - Seite 10 Bijlage Afmetingen 112 mm 160 mm 4.41" 6.30" 160 mm 96 mm 6.30" 3.78" 66 mm 2.60" 104 mm 148 mm 4.09" 5.83" 95 mm 148 mm 3.74" 5.83" 55 mm 2.17" 17.00002 DUTCH Dedicated Micros ©2011...
-
Seite 11: Quick Start
Quickstart VS VERSIONS 17.00003 DUTCH Dedicated Micros ©2011... - Seite 12 Dedicated Micros ©2011...
- Seite 13 Quickstart VC VERSIONS 17.00006 DUTCH Dedicated Micros ©2011...
- Seite 14 Dedicated Micros ©2011...
- Seite 15 18.00002 DUTCH Model voor VC Plafond Dome 5mm( ”) 16mm( ”) NOT TO SCALE 18.00003 DUTCH Model voor VS Plafond Dome ø7 NOT TO SCALE 0.00001 FRENCH 0.00016 FRENCH 1.00016 FRENCH Dedicated Micros ©2011...
-
Seite 16: Introduction
Montage en surface avec réchauffeur externe Jour/nuit ultra résolution 540 TVL 1,0 / 0,15 lux à F1,6 Anti-effraction DM/ICE-VSDNU39 Plafond DM/ICE-VSDNU39 Surface DM/ICE-VSODN3U39 Montage en surface avec réchauffeur externe Chaque modèle est équipé d’un capteur CCD SuperHAD™ 1/3”. 3.0001 FRENCH Dedicated Micros ©2011... -
Seite 17: Précautions Importantes
Enlevez tous les matériaux d’emballage et de calage ainsi que le film de protection sur le couvercle de dôme avant d’utiliser la caméra. 3.00093 FRENCH • Ne touchez pas la surface image du capteur. Si vous touchez accidentellement le capteur, nettoyez-le en utilisant de l’isopropanol. 4.00011 FRENCH Dedicated Micros ©2011... - Seite 18 à la page 17. Alignez visuellement les vis sur le capot avant du dôme avec les trous de vis sur le logement de la caméra pour faciliter la remise en place du couvercle de dôme. Dedicated Micros ©2011...
- Seite 19 Ne serrez pas trop les vis torx. Remarque: pour plus de sécurité, ce dôme utilise des vis à six lobes dévissables à l’aide de l’outil fourni. 4.0004 FRENCH Dedicated Micros ©2011...
- Seite 20 La caméra est réglable suivant les trois axes. Réglez la caméra pour qu’elle soit pointée dans la direction voulue. 4.0006 FRENCH Champ de vision et mise au point Utilisez les leviers sur l’objectif à focale variable pour régler le champ de vision de la caméra, et la mise au point. 5.00018 FRENCH Dedicated Micros ©2011...
- Seite 21 Sélectionnez INT (interne) ou LL (réglable). Sur LL, on peut régler la phase sur ±180° via les deux boutons Avance/Retard de Phase LL. Le réglage par défaut est LL. En appuyant simultanément sur les deux boutons, on réinitialisera le verrouillage de ligne LL sur les paramètres défaut usine. 9.00038 FRENCH Dedicated Micros ©2011...
-
Seite 22: Montage Final
Utilisez le connecteur de service en option DM/ICED-SERV (non fourni). 14.0001 FRENCH Montage final Une fois que les connexions et réglages ont été faits, remettez en place le manchon de la caméra et le couvercle du dôme. 15.00011 FRENCH Dedicated Micros ©2011... - Seite 23 Appendix Dimensions 112 mm 160 mm 4.41" 6.30" 160 mm 96 mm 6.30" 3.78" 66 mm 2.60" 104 mm 148 mm 4.09" 5.83" 95 mm 148 mm 3.74" 5.83" 55 mm 2.17" 17.00002 FRENCH Dedicated Micros ©2011...
- Seite 24 Quickstart VS VERSIONS 17.00003 FRENCH Dedicated Micros ©2011...
- Seite 25 Dedicated Micros ©2011...
- Seite 26 Quickstart VC VERSIONS 17.00006 FRENCH Dedicated Micros ©2011...
- Seite 27 Dedicated Micros ©2011...
- Seite 28 18.00002 FRENCH Modèle pour le dôme de plafond VC 5mm( ”) 16mm( ”) NOT TO SCALE 18.00003 FRENCH Modèle pour le dôme de plafond VS ø7 NOT TO SCALE 0.00001 GERMAN 0.00016 GERMAN Dedicated Micros ©2011...
-
Seite 29: Einleitung
Farbe/Mono, ultrahochauflösend, 540 TVL, 0,7 Lux bei F1.2 vandalismusbeständig DM/ICE-VCCMU39 Deckenbefestigung DM/ICE-VSCMU39 Aufputzmontage DM/ICE-VSOCMU39 Aufputzmontage mit Außenheizung Tag/Nacht, ultrahochauflösend, 540 TVL, 1,0/0,15 Lux bei F1.6 vandalismusbeständig DM/ICE-VSDNU39 Deckenbefestigung DM/ICE-VSDNU39 Aufputzmontage DM/ICE-VSODN3U39 Aufputzmontage mit Außenheizung Jedes Modell ist mit einem 1/3” SuperHAD™ CCD ausgestattet. 3.0001 GERMAN Dedicated Micros ©2011... -
Seite 30: Wichtige Vorsichtsmaßnahmen
Beachten Sie die nachfolgend aufgeführten Punkte, um eine Beschädigung Ihrer Kamera zu vermeiden: VORSICHT 3.0009 GERMAN • Entfernen Sie vor der Installation der Kamera alle Verpackungsmaterialien. 3.00093 GERMAN • Bildaufnehmer des Sensors nicht berühren! Bei versehentlicher Berührung des Sensors – nur mit Isopropanol reinigen! 4.00011 GERMAN Dedicated Micros ©2011... -
Seite 31: Installieren Ihrer Kamera
Maschinenschrauben und den Federclips an der Deckenplatte. Ziehen Sie die Schrauben nicht zu fest an. Verbinden Sie optional mit Hilfe eines DM/ICED-SERV-Steckverbinders (separat erhältlich) einen lokalen Monitor mit dem Testpunkt und richten Sie die Kamera wie beschrieben ein. Dedicated Micros ©2011... -
Seite 32: Modelle Für Aufputzmontage
Anschlussleitung an. Schließen Sie das Stromversorgungskabel an die Netzanschlussklemmen an. Die Kamera kann mit einer 12-VDC- oder 24-VAC- Stromversorgung gespeist werden. Anschlüsse und Polaritäten sind neben den Anschlussklemmen angegeben. Die Stromversorgung muss eine isolierte Stromversorgung des Typs UL, Klasse 2 sein. Dedicated Micros ©2011... -
Seite 33: Kameraeinstellung
Die Kamerabaugruppe lässt sich in Richtung aller drei Achsen einstellen. Stellen Sie die Kamera solange ein, bis sie in die gewünschte Richtung zeigt. 4.0006 GERMAN Bildwinkel und Fokus Verwenden Sie die am Varioobjektiv befindlichen Hebel, um den Bildwinkel der Kamera einzustellen und die Schärfeneinstellung vorzunehmen 5.00018 GERMAN Dedicated Micros ©2011... -
Seite 34: Schaltereinstellungen
±180° über die beiden LL-Phasen-Beschleunigungs-/Verzögerungs- Tasten. Die Standardvorgabe lautet LL. Durch gleichzeitige Betätigung beider Tasten wird die Funktion LL automatisch auf die Werkseinstellung zurück gesetzt. Die Einstellung “LL” kann über den LL Potentiometer, der in einigen Versionen verfügbar ist, angepasst werden. Dedicated Micros ©2011... - Seite 35 Stellen Sie den Schalter zur Automat. Verstärkungsregelung auf AUS. Stellen Sie das Objektivpegelpotenziometer so ein, dass ein 1-V-Spitze-zu-Spitze- Signal erreicht wird. Achten Sie darauf, dass das Potenziometer nicht beschädigt wird. Stellen Sie den Schalter zur automat. Verstärkungsregelung auf EIN. 13.0002 GERMAN Dedicated Micros ©2011...
-
Seite 36: Ausgang Lokales Videosignal
Es ist möglich, einen lokalen Videomonitor anzuschließen, der die Einstellung der Kamera erleichtern soll. Verwenden Sie den optionalen ServDM/ICE-Anschluss DM/ICED-SERV (nicht im Lieferumfang enthalten). 14.0001 GERMAN Endmontage Nachdem alle Anschlüsse und Einstellungen vorgenommen wurden sind die Kamerainnenauskleidung und die Dome-Abdeckung wieder anzubringen. 15.00011 GERMAN Dedicated Micros ©2011... -
Seite 37: Anhang
Abmessungen VC Versionen 112 mm 160 mm 4.41" 6.30" 160 mm 96 mm 6.30" 3.78" 66 mm 2.60" 104 mm 148 mm 4.09" 5.83" 95 mm 148 mm 3.74" 5.83" 55 mm 2.17" VS Versionen 17.00002 GERMAN Dedicated Micros ©2011... - Seite 38 Quickstart VS VERSIONS 17.00003 GERMAN Dedicated Micros ©2011...
- Seite 39 Dedicated Micros ©2011...
- Seite 40 Quickstart VC VERSIONS 17.00006 GERMAN Dedicated Micros ©2011...
- Seite 41 Dedicated Micros ©2011...
- Seite 42 18.00002 GERMAN Vorlage für VC-Domekamera zur Deckenmontage 5mm( ”) 16mm( ”) NOT TO SCALE 18.00003 GERMAN Vorlage für VS-Domekamera zur Deckenmontage ø7 NOT TO SCALE 0.00001 ITALIAN 0.00016 ITALIAN 1.00016 ITALIAN Dedicated Micros ©2011...
-
Seite 43: Introduzione
Montaggio su superficie con riscaldatore esterno Giorno/Nottte ultra risoluzione 540 TVL 1,0/0,15 lux a F1.6 DM/ICE-VSDNU39 Montaggio a soffitto DM/ICE-VSDNU39 Montaggio su superficie DM/ICE-VSODN3U39 Montaggio su superficie con riscaldatore esterno Ogni modello è dotato di un CCD SuperHAD™ da 1/3”. 3.0001 ITALIAN Dedicated Micros ©2011... -
Seite 44: Norme Di Sicurezza Importanti
ITALIAN • Togliere la pellicola protettiva dal coperchio della cupola prima di usare la telecamera. 3.00093 ITALIAN • Non toccare la superficie di rilevazione immagini del sensore. In caso di contatto accidentale, pulirlo con isopropanolo. 4.00011 ITALIAN Dedicated Micros ©2011... - Seite 45 ICED-SERV (disponibile separatamente) e regolare la telecamera come descritto a pagina 41. Per facilitare il posizionamento della protezione della cupola, allineare visivamente le viti sulla copertura anteriore a cupola ai fori per viti sul corpo della telecamera. Dedicated Micros ©2011...
- Seite 46 Non serrare eccessivamente le viti con foro a stella. Nota: per aumentare il livello di protezione, questo domo è dotato di viti Torx non standard, che possono essere svitate soltanto utilizzando lo strumento in dotazione. 4.0004 ITALIAN Dedicated Micros ©2011...
-
Seite 47: Regolazione Della Telecamera
La telecamera si muove in tutte e tre le direzioni assiali. Regolare la telecamera fin quando non punta nella direzione desiderata. 4.0006 ITALIAN Campo visivo e messa a fuoco Utilizzare le leve della lente varifocale per regolare il campo visivo della telecamera e la messa a fuoco. 5.00018 ITALIAN Dedicated Micros ©2011... - Seite 48 Selezionare INT (interno) o LL (regolabile). L’impostazione LL consente una regolazione di fase a ±180° grazie ai due pulsanti LL Phase Advance/Retard. L’impostazione predefinita è LL. Premendo contemporaneamente entrambi I pulsanti si resetta l’impostazione LL a quella predefinita in fabbrica. 9.00038 ITALIAN Dedicated Micros ©2011...
-
Seite 49: Assemblaggio Finale
(1, figura 9). Utilizzare il connettore di servizio opzionale DM/ICED-SERV (non in dotazione). 14.0001 ITALIAN Assemblaggio finale Una volta eseguite tutte le connessioni e regolazioni, riapplicare il rivestimento interno della telecamera e la protezione della cupola. 15.00011 ITALIAN Dedicated Micros ©2011... - Seite 50 Appendice Dimensioni 112 mm 160 mm 4.41" 6.30" 160 mm 96 mm 6.30" 3.78" 66 mm 2.60" 104 mm 148 mm 4.09" 5.83" 95 mm 148 mm 3.74" 5.83" 55 mm 2.17" 17.00002 ITALIAN Dedicated Micros ©2011...
- Seite 51 Quickstart VS VERSIONS 17.00003 ITALIAN Dedicated Micros ©2011...
- Seite 52 Dedicated Micros ©2011...
- Seite 53 Quickstart VC VERSIONS 17.00006 ITALIAN Dedicated Micros ©2011...
- Seite 54 Dedicated Micros ©2011...
- Seite 55 18.00002 ITALIAN Schema per domo VC per soffitto 5mm( ”) 16mm( ”) NOT TO SCALE 18.00003 ITALIAN Schema per domo VS per soffitto ø7 NOT TO SCALE 0.00001 PORTUGEUSE 17.00006 PORTUGEUSE Dedicated Micros ©2011...
- Seite 56 Dedicated Micros ©2011...
- Seite 57 18.00002 PORTUGEUSE Padrão para Dome de Tecto VC 5mm( ”) 16mm( ”) NOT TO SCALE 18.00003 PORTUGEUSE Padrão para Dome de Tecto VS ø7 NOT TO SCALE 0.00016 PORTUGUESE Dedicated Micros ©2011...
-
Seite 58: Introdução
Resolução ultra diurna/nocturna 540 TVL 1,0 / 0,15 lux a F1.6 DM/ICE-VSDNU39 Montagem no tecto DM/ICE-VSDNU39 Montagem à superfície DM/ICE-VSODN3U39 Montagem à superfície com aquecedor de exterior Cada modelo utiliza um CCD SuperHAD™ de 1/3”. 3.0001 PORTUGUESE Dedicated Micros ©2011... -
Seite 59: Segurança Do Produto
PORTUGUESE • Remova todos os elementos de acondicionamento antes de instalar a câmara 3.00093 PORTUGUESE • Não toque na superfície de imagens do sensor. No caso de tocar acidentalmente no sensor, limpe-o utilizando apenas isopropanol. 4.00011 PORTUGUESE Dedicated Micros ©2011... -
Seite 60: Instalação
Não aperte demasiado os parafusos torx. Nota: Esta dome utiliza parafusos Torx não standard para maior segurança, os quais só podem ser desapertados utilizando a ferramenta fornecida. 4.00031 PORTUGUESE Dedicated Micros ©2011... - Seite 61 4.0004 PORTUGUESE Ajuste da câmara 4.0005 PORTUGUESE Posição da câmara O conjunto da câmara ajusta-se nos três eixos (figura 6). Ajuste a câmara até estar a apontar na direcção pretendida. 4.0006 Dedicated Micros ©2011...
- Seite 62 PORTUGUESE Campo de visão e focagem Utilize as alavancas da objectiva para regular o campo de visão e a focagem da câmara. 5.00018 PORTUGUESE Dedicated Micros ©2011...
-
Seite 63: Switch Settings
Seleccione INT (interno) ou LL (regulável). A regulação LL permite um ajuste de fase de ±180º através dos dois botões de Avanço e Atraso de fase LL (3 e 4, figura 9). A predefinição é LL. Premindo simultaneamente os dois botões repõe o LL na predefinição de fábrica. 9.00038 PORTUGUESE Dedicated Micros ©2011... -
Seite 64: Montagem Final
Para auxiliar com a configuração da câmara pode-se ligar um monitor de vídeo local. Utilize o conector de manutenção opcional DM/ICED-SERV (não fornecido). 14.0001 PORTUGUESE Montagem Final Quando tiver terminado de fazer todas as ligações, regulações e ajustes, volte a instalar o resguardo e a cobertura da dome. 15.00011 PORTUGUESE Dedicated Micros ©2011... - Seite 65 Apêndice Dimensões 112 mm 160 mm 4.41" 6.30" 160 mm 96 mm 6.30" 3.78" 66 mm 2.60" 104 mm 148 mm 4.09" 5.83" 95 mm 148 mm 3.74" 5.83" 55 mm 2.17" 17.00002 PORTUGUESE Dedicated Micros ©2011...
-
Seite 66: Quick Start
Quickstart VS VERSIONS 17.00003 PORTUGUESE Dedicated Micros ©2011... - Seite 67 Dedicated Micros ©2011...
- Seite 68 Quickstart VC VERSIONS 0.00016 RUSSIAN Dedicated Micros ©2011...
- Seite 69 Dedicated Micros ©2011...
-
Seite 70: Введение
Изображение сверхвысокого разрешения при использовании в дневных и ночных условиях 540 ТВЛ 1,0 / 0,15 лк при F1.6 DM/ICE-VSDNU39 Потолочный монтаж DM/ICE-VSDNU39 Монтаж на поверхности DM/ICE-VSODN3U39 Монтаж на поверхности с обогревателем для наружного использования Все модели используют датчик ПЗС SuperHAD™ с диагональю 1/3”. 3.0001 RUSSIAN Dedicated Micros ©2011... -
Seite 71: Важные Меры Безопасности
Во избежание повреждений камеры соблюдайте следующие требования: CAUTION 3.0009 RUSSIAN • Перед установкой камеры удалите все упаковочные вставки. 3.00093 RUSSIAN • Не прикасайтесь к поверхности изображения датчика. При случайном прикосновении к датчику протрите его, используя только изопропанол. 4.00011 RUSSIAN Dedicated Micros ©2011... -
Seite 72: Установка
шурупов и дюбелей, входящих в комплект поставки, либо двух затяжных винтов и пружинных зажимов. Не затягивайте винты слишком сильно. Дополнительно можно подключить локальный монитор к контрольной точке с помощью служебного разъема DM/ICED-SERV (приобретается дополнительно) и настроить камеру, как описано на с. 65. Dedicated Micros ©2011... - Seite 73 Дополнительно можно подключить локальный монитор к контрольной точке с помощью служебного разъема DM/ICED-SERV (приобретается дополнительно) и настроить камеру, как описано на с. 65. Для облегчения установки купольной крышки совместите винты на передней крышке купола с отверстиями для винтов на корпусе камеры. Dedicated Micros ©2011...
- Seite 74 4.0005 RUSSIAN Положение камеры Камера в сборе регулируется по всем трем осям. Отрегулируйте камеру, чтобы она находилась в нужном направлении. 4.0006 RUSSIAN Поле обзора и фокусировка Используйте рычажки на вариообъективе, чтобы настроить поле обзора камеры. 5.00018 RUSSIAN Dedicated Micros ©2011...
- Seite 75 Выберите INT (внутренняя) или LL (регулируемая). Выбор LL обеспечивает регулировку фазы ±180° с помощью двух кнопок Опережение/Запаздывание фазы LL (3 и 4, рис. 9). По умолчанию LL. Нажатие обеих кнопок одновременно установит LL на заводскую настройку по умолчанию. Dedicated Micros ©2011...
- Seite 76 Отрегулируйте величину диафрагмы объектива в соответствии с условиями освещенности. Выключите переключатель автоматического контроля усиления (OFF) (Выкл.) Установите регулятор уровня объектива (1,ак чтобы достигался сигнал 1 В дв.ампл. Проявляйте аккуратность, чтобы не повредить регулятор. Включите переключатель автоматического контроля усиления (ON) (Вкл.) 13.0002 RUSSIAN Dedicated Micros ©2011...
- Seite 77 Для облегчения настройки камеры предусмотрен выход для подключения локального видеомонитора. Используйте дополнительный служебный соединитель DM/ICED-SERV (не поставляется). 14.0001 RUSSIAN Окончательная сборка После завершения всех подключений и регулировок установите на место облицовку камеры и купольную крышку. 15.00011 RUSSIAN Dedicated Micros ©2011...
- Seite 78 Приложение Габариты 112 mm 160 mm 4.41" 6.30" 160 mm 96 mm 6.30" 3.78" 66 mm 2.60" 104 mm 148 mm 4.09" 5.83" 95 mm 148 mm 3.74" 5.83" 55 mm 2.17" 17.00002 RUSSIAN Dedicated Micros ©2011...
- Seite 79 Живой Вздрагивать VS VERSIONS 17.00003 RUSSIAN Dedicated Micros ©2011...
- Seite 80 Dedicated Micros ©2011...
- Seite 81 Живой Вздрагивать VC VERSIONS 17.00006 RUSSIAN Dedicated Micros ©2011...
- Seite 82 Dedicated Micros ©2011...
- Seite 83 18.00002 RUSSIAN Схема потолочного купола видеокамеры серии VC 5mm( ”) 16mm( ”) NOT TO SCALE 18.00003 RUSSIAN Схема потолочного купола видеокамеры серии VS ø7 NOT TO SCALE 0.00001 SPANISH 0.00016 SPANISH Dedicated Micros ©2011...
-
Seite 84: Introducción
Montagem à superfície com aquecedor de exterior Resolução ultra diurna/nocturna 540 TVL 1,0/0,15 lux a F1.6 DM/ICE-VSDNU39 Montagem no tecto DM/ICE-VSDNU39 Montagem à superfície DM/ICE-VSODN3U39 Montagem à superfície com aquecedor de exterior Cada modelo utiliza um CCD SuperHAD™ de 1/3”. 3.0001 SPANISH Dedicated Micros ©2011... -
Seite 85: Precauciones Importantes
3.0009 SPANISH • Quite todos los materiales de embalaje antes de instalar la cámara 3.00093 SPANISH • No toque la superficie de imágenes del sensor. Si tocara accidentalmente el sensor, utilice exclusivamente isopropanol para limpiarlo. 4.00011 SPANISH Dedicated Micros ©2011... - Seite 86 Em opção, ligue um monitor local ao ponto de teste utilizando um conector de serviço DM/ICED-SERV (disponível em separado) e regule a câmara como se descreve na página 57. Alinhe visualmente os parafusos na tampa Dome frontal com os orifícios do corpo da câmara para colocar a tampa Dome. Dedicated Micros ©2011...
- Seite 87 Dome. Volte a colocar a tampa frontal Dome e aperte os parafusos torx, tendo o cuidado de não entalar o fio de fixação na extremidade da tampa frontal. Não aperte demasiado os parafusos torx. Dedicated Micros ©2011...
- Seite 88 O conjunto da câmara ajusta-se nos três eixos. Ajuste a câmara até estar a apontar na direcção pretendida. 4.0006 SPANISH Campo de visão e focagem Utilize as alavancas da objectiva para regular o campo de visão e a focagem da câmara. 5.00018 SPANISH Dedicated Micros ©2011...
- Seite 89 Se puede elegir entre INT (interno) o LL (regulable). La posición LL permite ajustar la fase ±180° con los dos botones de adelanto/retardo de fase LL. La posición predeterminada es LL. Pulse los dos botones al mismo tiempo para recuperar la configuración predeterminada en fábrica. 9.00038 SPANISH Dedicated Micros ©2011...
- Seite 90 Utilice el conector opcional DM/ICED-SERV (no incluido). 14.0001 SPANISH Conjunto Final Una vez establecidas todas las conexiones y completados los ajustes, vuelva a colocar el revestimiento de la cámara y la cubierta del domo. 15.00011 SPANISH Dedicated Micros ©2011...
- Seite 91 Anexo Dimensiones 112 mm 160 mm 4.41" 6.30" 160 mm 96 mm 6.30" 3.78" 66 mm 2.60" 104 mm 148 mm 4.09" 5.83" 95 mm 148 mm 3.74" 5.83" 55 mm 2.17" 17.00002 SPANISH Dedicated Micros ©2011...
-
Seite 92: Quick Start
Quickstart VS VERSIONS 17.00003 SPANISH Dedicated Micros ©2011... - Seite 93 Dedicated Micros ©2011...
- Seite 94 Quickstart VC VERSIONS 17.00006 SPANISH Dedicated Micros ©2011...
- Seite 95 Dedicated Micros ©2011...
- Seite 96 18.00002 SPANISH Plantilla para domo de techo VC 5mm( ”) 16mm( ”) NOT TO SCALE 18.00003 SPANISH Plantilla para domo de techo VS ø7 NOT TO SCALE Dedicated Micros ©2011...
- Seite 97 Dia/noite ..............................64 Diafragma electrónico..........................89 Dichiarazione di conformità ......................... 44 Dimensiones ..............................91 Dimensioni ..............................50 Dimensions ..............................23 Dimensões..............................65 EI (Электронная диафрагмаI) ........................75 Eindmontage ..............................9 Einleitung ..............................29 Electromagnetic Compatability (EMC)......................44 Dedicated Micros ©2011...
- Seite 98 Padrão para Dome de Tecto VC ........................57 Padrão para Dome de Tecto VS ........................57 Plantilla para domo de techo VC ......................... 96 Plantilla para domo de techo VS ......................... 96 Posição da câmara ............................61 Dedicated Micros ©2011...
- Seite 99 Сертификация ............................71 Сигнал цветовой синхронизации ......................76 Синхронизация с частотой строк ......................75 Схема потолочного купола видеокамеры серии VC ................83 Схема потолочного купола видеокамеры серии VS ................83 Уровень объектива ............................ 76 Электромагнитная совместимость (ЭМС) ....................71 Dedicated Micros ©2011...
- Seite 100 Neckarstrafle 15, 23456 Hawthorne Blvd. 41836 Hückelhoven, Germany Suite 100, Torrance, CA 90505, USA Dedicated Micros France Dedicated Micros, Australia PTY. 9-13 rue du Moulinet 5/3 Packard Avenue, Castle Hill, 75013 Paris, France NSW 2154, Australia Dedicated Micros Slovenia Dedicated Micros, Asia PTY...