Herunterladen Inhalt Inhalt Diese Seite drucken
Inhaltsverzeichnis

Werbung

Verfügbare Sprachen

Verfügbare Sprachen

Schnurlostelefon
Téléphone sans fil
DCT 577x
Telefono senza fili
Cordless telephone
Bedienungsanleitung
D
Mode d'emploi
F
Istruzioni per l'uso
I
Operating Instructions
GB
Downloaded from
www.Manualslib.com
manuals search engine

Werbung

Inhaltsverzeichnis
loading

Inhaltszusammenfassung für switel DCT 577x

  • Seite 1 Schnurlostelefon Téléphone sans fil DCT 577x Telefono senza fili Cordless telephone Bedienungsanleitung Mode d’emploi Istruzioni per l’uso Operating Instructions Downloaded from www.Manualslib.com manuals search engine...
  • Seite 2 Downloaded from www.Manualslib.com manuals search engine...
  • Seite 3: Inhaltsverzeichnis

    Inhaltsverzeichnis 1 Sicherheitshinweise ........2 2 Telefon in Betrieb nehmen .
  • Seite 4: Sicherheitshinweise

    Sicherheitshinweise 1 Sicherheitshinweise Lesen Sie diese Bedienungsanleitung sorgfältig durch. Bestimmungsgemäße Verwendung Dieses Telefon ist geeignet zum Telefonieren innerhalb eines Telefonnetzes. Jede andere Verwendung gilt als nicht bestimmungsgemäß. Eigenmächtige Veränderungen oder Umbauten sind nicht zulässig. Öffnen Sie das Gerät in keinem Fall selbst und führen Sie keine eigenen Reparaturversuche durch. Aufstellungsort Vermeiden Sie Belastungen durch Rauch, Staub, Erschütterungen, Chemika- lien, Feuchtigkeit, Hitze oder direkte Sonneneinstrahlung.
  • Seite 5: Medizinische Geräte

    Sicherheitshinweise Medizinische Geräte Achtung: Benutzen Sie das Telefon nicht in der Nähe von medizinischen Geräten. Eine Beeinflussung kann nicht völlig ausgeschlossen werden. DECT -Telefone können in Hörgeräten einen unangenehmen Brummton verursachen. Entsorgung Wollen Sie Ihr Gerät entsorgen, bringen Sie es zur Sammel- stelle Ihres kommunalen Entsorgungsträgers (z.
  • Seite 6: Telefon In Betrieb Nehmen

    Sicherheitshinweise in Kapitel 1. Verpackungsinhalt prüfen Zum Lieferumfang gehören: Inhalt DCT 577x-Modell 5771 5772 5773 5774 Basisstation mit Netzteil Ladestation mit Netzteil Mobilteil Telefonanschlusskabel Akkus Bedienungsanleitung Unter www.switel.com erfahren Sie, ob dieses Telefonset bereits erhältlich ist. Downloaded from www.Manualslib.com manuals search engine...
  • Seite 7: Basisstation Anschließen

    Telefon in Betrieb nehmen Basisstation anschließen Achtung: Stellen Sie die Basisstation mit einem Mindestabstand von 1 m zu anderen elektronischen Geräten auf, da es sonst zu gegenseitigen Störungen kommen kann. Schließen Sie die Basisstation wie auf der Skizze abgebildet an. Verwenden Sie aus Sicherheitsgründen nur das mitgelieferte Netzteil sowie das beigefüg- te Telefonanschlusskabel.
  • Seite 8: Akkus Einlegen

    Telefon in Betrieb nehmen Akkus einlegen Öffnen Sie das Akkufach. Legen Sie die Akkus in das Akkufach ein. Schließen Sie das Akkufach. Achtung: Verwenden Sie nur NiMH-Akkus vom Typ AAA (Microzellen)! Niemals Batterien/Primärzellen verwenden! Achten Sie auf die richtige Polarität! Akkus aufladen ☞...
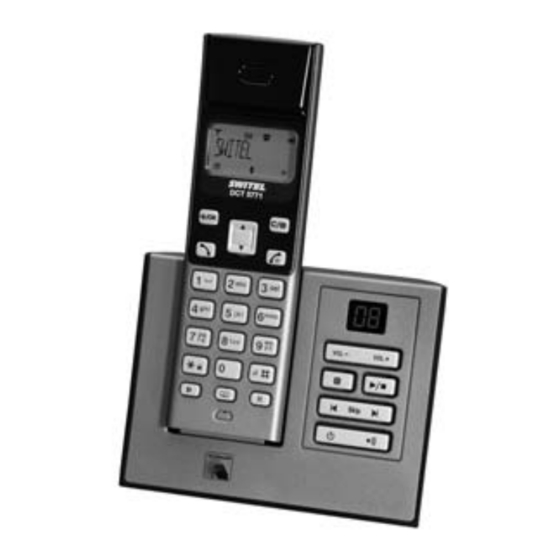
  • Seite 9: Bedienelemente

    Bedienelemente 3 Bedienelemente Hörkapsel Auf-/Ab-Taste Display Softkey DCT 5771 Softkey (Int / C = Cancel) (Menü / OK) Auflegetaste Abnehmetaste Zifferntasten R-Taste Freisprechtaste (Signaltaste) Telefonbuchtaste Mikrofon Downloaded from www.Manualslib.com manuals search engine...
  • Seite 10 Bedienelemente Anzeige Lauststärke Lösch-Taste DCT 5771 Start/Stopp Vor/Zurück Anrufbeantworter ein/aus Mobilteil suchen (Paging) Ladekontakte Downloaded from www.Manualslib.com manuals search engine...
  • Seite 11: Einführende Informationen

    Einführende Informationen 4 Einführende Informationen In diesem Kapitel finden Sie grundlegende Informationen zur Handhabung der Bedienungsanleitung und des Telefons. Darstellungweise in der Bedienungsanleitung Darstellung Beschreibung Darstellung von Tasten Abgebildete Taste drücken Ziffern oder Buchstaben eingeben Mobilteil klingelt Basisstation klingelt Mobilteil aus der Basisstation nehmen Mobilteil in die Basisstation stellen NAME? Darstellung von Display-Texten...
  • Seite 12 Einführende Informationen Konstant: Eine Weckzeit ist eingestellt. Blinkt: Die eingestellte Weckzeit ist erreicht. Tastensperre ist eingeschaltet. Konstant: Anrufbeantworter ist eingeschaltet. Blinkt: Neue Nachrichten auf dem Anrufbeantworter. Sie haben eine Nachricht in der Sprachbox Ihres Netzbetreibers (abhängig vom Netzbetreiber) Konstant: Sie führen ein Interngespräch (nur bei mehreren Mobilteilen an einer Basis).
  • Seite 13: Bereitschaftsmodus

    Einführende Informationen Bereitschaftsmodus Alle Beschreibungen in dieser Bedienungsanleitung gehen davon aus, dass sich das Mobilteil im Bereitschaftsmodus befindet. Den Bereitschaftsmo- dus erreichen Sie, indem Sie die Taste drücken. Strahlungsreduzierung (ECO-Mode) Im Gesprächsmodus wird die Strahlung im Vergleich zu Standard-DECT- Schnurlostelefonen erheblich reduziert. Navigation im Menü...
  • Seite 14: Beispiel: Telefonbucheintrag Anlegen

    Einführende Informationen Beispiel: Telefonbucheintrag anlegen Wie Sie in den Menüs navigieren und Einstellungen vornehmen, ist hier anhand des Beispiels zum Anlegen eines Telefonbucheintrags erklärt. Verfahren Sie bei allen Einstellungen wie in diesem Beispiel. Drücken Sie die Telefonbuchtaste. oder Drücken Sie den Softkey Menü. Wählen Sie TELEFONBUCH und bestätigen Sie mit OK.
  • Seite 15: Telefonieren

    Telefonieren 5 Telefonieren Anruf annehmen Ihr Telefon klingelt. Befindet sich das Mobilteil nicht in der Basis: Drücken Sie die Abnehmetaste oder die Freisprechtaste. Befindet sich das Mobilteil in der Basis und AUTO-ANTWORT ist nicht eingeschaltet: Nehmen Sie das Mobilteil aus der Basis und drücken Sie die Abnehmetaste oder die Freisprechtaste.
  • Seite 16: Wahlwiederholung

    Telefonieren Wahlwiederholung ☞ Ihr Telefon speichert die 5 zuletzt gewählten Rufnummern. Ist für die Rufnummer ein Telefonbucheintrag angelegt, wird der Name angezeigt. Um die zugehörige Rufnummer anzuzeigen drücken Sie die Raute-Taste Die zuletzt gewählte Rufnummer steht immer am Anfang der Liste. Öffnen Sie die Wahlwiederholungsliste.
  • Seite 17: Anzeige Der Gesprächsdauer

    Telefonieren Anzeige der Gesprächsdauer Während eines Gesprächs wird die Gesprächsdauer in Stunden, Minuten und Sekunden angezeigt. Hörer-/Lautsprecherlautstärke einstellen Sie können während eines Gesprächs die Lautstärke in 5 Stufen einstellen (bei Hörerbetrieb -> Hörerlautstärke, bei Freisprechen -> Lautsprecherlautstärke). Die Einstellungen sind getrennt voneinander und bleiben auch nach Ende des Gespräches gespeichert.
  • Seite 18 Telefonieren Externes Gespräch vermitteln Während eines Externgespräches . . . Drücken Sie den Softkey Menü. Wählen Sie INTERN aus und drücken Sie OK. Geben Sie die interne Rufnummer ein. Das externe Gespräch wird gehalten. Wenn das gerufene Mobilteil eingeschaltet wird ggf. Gespräch ankündigen.
  • Seite 19: Weitere Leistungsmerkmale

    Weitere Leistungsmerkmale 6 Weitere Leistungsmerkmale Tastensperre ☞ Die Tastensperre verhindert ein unbeabsichtigtes Betätigen der Tasten. Eintreffende Anrufe können wie gewohnt entgegengenommen werden. Drücken und halten Sie die Stern-Taste bis im Display das Symbol für die Tastensperre erscheint. Zum Entsperren der Tastatur drücken und halten Sie die Stern-Taste erneut bis das Symbol wieder erlischt.
  • Seite 20: Anrufliste / Wahlwiederholung

    Anrufliste / Wahlwiederholung 7 Anrufliste / Wahlwiederholung Anrufliste bearbeiten Öffnen Sie die Anrufliste. Wählen Sie einen Eintrag aus. Drücken Sie den Softkey Menü. Wählen Sie aus den folgenden Möglichkeiten und bestätigen Sie mit OK: NR.SPEICHERN Die Rufnummer wird im Telefonbuch gespeichert. Geben Sie einen Namen ein, bestätigen oder bearbeiten Sie die Ruf- nummer und legen Sie eine Tonrufmelodie für diesen Eintrag fest.
  • Seite 21: Neuen Eintrag Anlegen

    Telefonbuch 8 Telefonbuch ☞ Im Telefonbuch können Sie 20 Rufnummern und zugehörige Namen speichern. Sie können jedem Eintrag eine eigene Melodie zuordnen, mit der ein Anruf signalisiert werden soll. Geben Sie die Rufnummern immer mit der Ortsvorwahl ein; das ermöglicht eine korrekte Anzeige des jeweiligen Anrufers, für den ein Eintrag angelegt ist und dessen Übertragung der Rufnummer an Ihrem Anschluss verfügbar ist.
  • Seite 22: Telefonbucheinträge Bearbeiten

    Telefonbuch ☞ Sie können das Telefonbuch auch über das Menü öffnen. TELEFONBUCH Telefonbucheinträge bearbeiten Drücken Sie die Telefonbuchtaste. Wählen Sie einen Eintrag aus. Drücken Sie den Softkey Menü. Wählen Sie aus den folgenden Möglichkeiten und bestätigen Sie mit OK: EINTRAG NEU Sie können einen neuen Eintrag anlegen. ANSEHEN Der Eintrag wird angezeigt.
  • Seite 23: Telefon Einstellen

    Telefon einstellen 9 Telefon einstellen Datum/Zeit Drücken Sie den Softkey Menü. Wählen Sie MT-EINSTEL. aus und drücken Sie OK. Wählen Sie DATUM & ZEIT aus und drücken Sie OK. Wählen Sie aus den folgenden Möglichkeiten und bestätigen Sie mit OK: DATUMSFORMAT Sie können die Darstellung des Datums einstellen: (TT-MM-JJ oder MM-TT-JJ).
  • Seite 24 Telefon einstellen Tonruf für das Mobilteil einstellen Drücken Sie den Softkey Menü. Wählen Sie MT-EINSTEL. aus und drücken Sie OK. Wählen Sie TONRUF aus und drücken Sie OK. Wählen Sie aus den folgenden Möglichkeiten und bestätigen Sie mit OK: INTERN Wählen Sie eine Melodie für die Signalisierung eines inter- nen Anrufes aus.
  • Seite 25: Mobilteilnamen Einstellen

    Telefon einstellen Mobilteilnamen einstellen Drücken Sie den Softkey Menü. Wählen Sie MT-EINSTEL. aus und drücken Sie OK. Wählen Sie MT-NAME aus und drücken Sie OK. Löschen Sie den alten Namen mit , geben Sie mit den Zifferntasten einen neuen Namen ein und drücken Sie OK. Displayanzeige einstellen Drücken Sie den Softkey Menü.
  • Seite 26: Wahlverfahren Einstellen

    Telefon einstellen Tonruflautstärke für die Basis einstellen Drücken Sie den Softkey Menü. Wählen Sie BS-EINSTEL. aus und drücken Sie OK. Wählen Sie TONRUFLAUTST aus und drücken Sie OK. Wählen Sie eine Lautstärke und bestätigen Sie mit OK. Wahlverfahren einstellen Drücken Sie den Softkey Menü. Wählen Sie BS-EINSTEL.
  • Seite 27: Telefon In Den Auslieferungszustand Zurücksetzen

    Telefon einstellen Telefon in den Auslieferungszustand zurücksetzen Drücken Sie den Softkey Menü. Wählen Sie RUCKSETZEN aus und drücken Sie OK. Geben Sie die aktuelle PIN ein und drücken Sie OK. Bestätigen Sie auch die nachfolgende Sicherheitsabfrage mit ☞ Das Telefonbuch wird nicht gelöscht. Bitte löschen Sie das Telefonbuch über das Telefonbuch-Menü.
  • Seite 28: Anrufbeantworter

    Anrufbeantworter 10 Anrufbeantworter Der integrierte digitale Anrufbeantworter bietet abhängig von der eingestellten Kompressionsrate* eine Gesamtaufzeichnungszeit von bis zu 15 Minuten für Ansagetexte und Nachrichten. Maximal können 59 Nachrichten entgegenge- nommen werden. Selbst aufgenommene Memos werden wie Nachrichten behandelt. Der Anrufbeantworter kann sowohl von der Basis als auch vom Mobilteil bedient werden.
  • Seite 29 Anrufbeantworter Das Display an der Basis gibt Ihnen je nach Betriebszustand folgende Infor- mationen: Striche konstant an: Anrufbeantworter ist aus. Striche blinken: Anrufbeantworter ist an, Uhrzeit ist nicht eingestellt. Konstant leuchtende Ziffern: Anzahl der alten Nachrichten Blinkende Ziffern: Anzahl der neuen Nachrichten. Blinkt: Auf den Anrufbeantworter wird von einem Mobilteil oder per Fernabfrage/-bedienung zugegriffen.
  • Seite 30: Bedienungsmöglichkeiten An Der Basis

    Anrufbeantworter Bedienungsmöglichkeiten an der Basis An der Basis können Sie den Anrufbeantworter ein-/ausschalten, Nachrichten abhören und löschen. Datum und Uhrzeit der eingegangenen Nachricht wer- den nur bei Abfrage über das Mobilteil in dessen Display angezeigt. Anrufbeantworter ein- / ausschalten. Lautstärke der Wiedergabe einstellen. Wiedergabe starten / stoppen.
  • Seite 31: Ansagetext Anhören

    Anrufbeantworter Ansagetext anhören Drücken Sie den Softkey Menü. Wählen Sie ANRUFBEANTW. aus und drücken Sie OK. Wählen Sie AB EINST. aus und drücken Sie OK. Wählen Sie ANSAGEN aus und drücken Sie OK. Wählen Sie OHNE AUFZ. für die Betriebsart „Nur Ansage“ bzw.
  • Seite 32: Memo Aufnehmen

    Anrufbeantworter ☞ Diese Funktionen können Sie auch mit den Zifferntasten durchführen: - Taste 5: Wiedergabe stoppen - Taste 6: zur nächsten Nachricht - Taste 4: zur vorherigen Nachricht bzw. zum Anfang der aktuellen Nachricht (Taste 4 zweimal drücken). - Taste 2: aktuelle Nachricht löschen. Alle alten Nachrichten löschen Drücken Sie den Softkey Menü.
  • Seite 33 Anrufbeantworter ANTW.VERZ. Wählen Sie mit den Pfeiltasten die Verzögerung, mit der der Anrufbeantworter einen Anruf annimmt: - 2 RUFE (4, 6, 8 Rufe): Annahme nach 2 bzw. 4, 6, 8 Rufen - SPARMODUS: Sind neue Nachrichten vorhanden, meldet sich der Anrufbeantworter nach zwei Rufsignalen. Liegen keine neuen Nachrichten vor, wird der Anruf nach sechs Rufsignalen angenommen.
  • Seite 34: Gespräch Vom Anrufbeantworter Übernehmen

    Anrufbeantworter Gespräch vom Anrufbeantworter übernehmen Sie können eine bereits vom Anrufbeantworter angenomme- nes Gespräch mit Ihrem Mobilteil übernehmen, um selbst mit dem Anrufer zu sprechen. Drücken Sie die Abnehme- oder die Freisprechtaste. Fernabfrage/Fernbedienung Eine Fernabfrage/Fernbedienung kann von einem MFV-fähigen Telefon erfol- gen.
  • Seite 35: Mobilteile An-/Abmelden

    Mobilteile an-/abmelden 11 Mobilteile an-/abmelden An einer Basisstation können bis zu 5 Mobilteile angemeldet werden. Die mit Ihrem Telefon ausgelieferten Mobilteile sind bereits an der Basis angemeldet. Zum Anmelden eines „fremden“ Mobilteils ziehen Sie bitte auch dessen Bedienungsanleitung zu Rate. Weiteres Mobilteil des gleichen Typs anmelden Drücken Sie den Softkey Menü.
  • Seite 36: Betrieb An Telefonanlagen/Zusatzdienste

    Betrieb an Telefonanlagen/Zusatzdienste 12 Betrieb an Telefonanlagen/Zusatzdienste Betrieb an Telefonanlagen Ist Ihr Telefon an einer Telefonanlage angeschlossen, können Sie über die R-Taste Funktionen, wie z. B. Anrufe weiterleiten und automatischen Rückruf nutzen. Lesen Sie bitte in der Bedienungsanleitung Ihrer Telefonanlage, wel- che Flash-Zeit Sie zur Nutzung dieser Funktionen einstellen müssen.
  • Seite 37: Menüstruktur

    Anhang 13 Anhang Menüstruktur ANRUFLISTE TELEFONBUCH BS-EINSTEL. TONRUF MELODIE 1...5 TONRUFLAUTST AUS, 1...5 MT ABMELDEN WAHLVERFAHR. TONWAHL IMPULSWAHL FLASH-ZEIT KURZ MITTEL LANG PIN ANDERN MT-EINSTEL. WECKER AUS/EIN / Weckzeit TONRUF INTERN MELODIE 1...10 EXTERN MELODIE 1...10 TONRUFLAUTST AUS, 1…5 TONE TASTENTON EIN / AUS AKKU LEER...
  • Seite 38 Anhang Fehlersuche Haben Sie Probleme mit Ihrem Telefon, kontrollieren Sie zuerst die folgenden Hinweise. Bei technischen Problemen können Sie sich an unsere Service-Hot- line unter Tel. 0900 00 1675 innerhalb der Schweiz (Kosten aus dem Festnetz von Swisscom bei Drucklegung: CHF 2.00/min) wenden. Bei Garantieansprü- chen wenden Sie sich an Ihren Fachhändler.
  • Seite 39 Anhang Werkseinstellungen/Auslieferungszustand Anrufliste Kein Eintrag Telefonbuch Kein Eintrag Wecker Tonruf Mobilteil Intern: Melodie 1 Extern: Melodie 2 Tonruflautstärke: 5 Tonruf Basis Melodie 1 Tonruflautstärke: 3 Hinweistöne Tastenton: Ein Akku leer: Ein Reichweite: Ein Sprache Deutsch Mobilteilname DCT 5771 Displayanzeige Mobilteilname Autom.
  • Seite 40: Technische Daten

    Anhang Technische Daten Standard: DECT / GAP Kanalzahl: 120 Duplexkanäle Frequenzen: 1880 MHz bis 1900 MHz Duplexverfahren: Zeitmultiplex, 10ms Rahmenlänge Kanalraster: 1728 kHz Bitrate: 1152 kBit / s Modulation: GFSK Sprachkodierung: 32 kBit / s Sendeleistung: 10 mW (mittlere Leistung pro Kanal) Reichweite: bis zu 300 Meter im Freien, in Gebäuden bis zu 50 Metern Stromversorgung Basisstation: 230 V / 50 Hz (Steckernetzgerät), 6 V / 450 mA...
  • Seite 41: Konformitätserklärung

    Reinigen Sie die Gehäuseoberflächen mit einem weichen und fusselfreien Tuch. Verwenden Sie keine Reinigungs- oder Lösungsmittel. Garantie SWITEL-Geräte werden nach den modernsten Produktionsverfahren herge- stellt und geprüft. Ausgesuchte Materialien und hoch entwickelte Technolo- gien sorgen für einwandfreie Funktion und lange Lebensdauer.
  • Seite 42 Sollte Ihr Gerät dennoch einen Defekt innerhalb der Garantiezeit aufweisen, wenden Sie sich bitte unter Vorlage Ihrer Kaufquittung ausschließlich an das Geschäft, in dem Sie Ihr SWITEL-Gerät gekauft haben. Alle Gewährleistungs- ansprüche nach diesen Bestimmungen sind ausschließlich gegenüber Ihrem Fachhändler geltend zu machen. Nach Ablauf von zwei Jahren nach Kauf und Übergabe unserer Produkte können Gewährleistungsrechte nicht mehr gel-...
  • Seite 43 Anhang Stichwortverzeichnis Externes Gespräch vermitteln ..16 Akkus ......2 Akkus aufladen ....6 Fehlersuche .
  • Seite 44 Anhang Mobilteil ausschalten ... . .17 Wecker ..... . .21 Mobilteile an-/abmelden .
  • Seite 45 Table des matières 1 Consignes de sécurité ........2 2 Mettre votre téléphone en service .
  • Seite 46: Consignes De Sécurité

    Consignes de sécurité 1 Consignes de sécurité Lisez très attentivement ce mode d’emploi. Utilisation conforme aux prescriptions Ce téléphone convient pour téléphoner à l’intérieur d’un réseau téléphonique. Tout autre utilisation est considérée comme non conforme à l’usage. Des modifications ou changements effectués d’un propre gré ne sont pas autori- sés.
  • Seite 47: Consignes De Sécurité

    Consignes de sécurité Appareils médicaux Attention: N’utilisez pas ce téléphone à proximité d’appareils médicaux. Leur influence ne peut pas être entièrement exclue. Les téléphones DECT peuvent causer un bourdonnement désagréable dans les prothèses auditives. Élimination Si vous ne voulez plus vous servir de votre appareil, veuillez l’apporter au centre de collecte de l’organisme d’élimination des déchets de votre commune (par ex.
  • Seite 48: Mettre Votre Téléphone En Service

    Base avec bloc d’alimentation Chargeur avec bloc d’alimentation - Combiné Câble de raccordement téléphonique Piles rechargeables Mode d’emploi À l’adresse www.switel.com, vous apprendrez si ce kit téléphonique est déjà dis- ponible à la vente. Downloaded from www.Manualslib.com manuals search engine...
  • Seite 49: Raccorder La Base

    Mettre votre téléphone en service Raccorder la base Attention: Posez la base à une distance minimum d’1 m par rapport à d’autres appareils électroniques, une distance inférieure pouvant provoquer des interactions. Raccordez la base comme représenté sur le croquis. Pour des raisons de sécurité, n’utilisez que le bloc d’alimentation fourni avec l’appareil ainsi que le câble de raccordement téléphonique ci-joint.
  • Seite 50 Mettre votre téléphone en service Mettre en place les piles rechargeables Ouvrez le compartiment à piles. Introduisez les piles dans le compartiment prévu à cet effet. Fermez le compartiment à piles. Attention: N’utilisez que des piles rechargeables de type AAA Ni-MH 1,2 V. Observez une polarisation cor- recte ! Ne jamais utiliser de piles ou piles primaires ! Recharger les piles rechargeables ☞...
  • Seite 51: Éléments De Manipulation

    Éléments de manipulation 3 Éléments de manipulation Haut-parleur Touche haut/bas Écran Touche softkey DCT 5771 Touche softkey (Int / C = Cancel) (Menu / OK) Raccrocher Répondre Pavé numérique Touche R (Flash) Mains-libres Touche répertoire Microphone Downloaded from www.Manualslib.com manuals search engine...
  • Seite 52 Éléments de manipulation Écran Volume sonore Effacer DCT 5771 Reproduction de messages / Stop Message précédent / suivant Répondeur marche / arrêt Chercher le combiné (Paging) Contacts de charge- ment Downloaded from www.Manualslib.com manuals search engine...
  • Seite 53: Introduction

    Introduction 4 Introduction Dans ce chapitre, vous trouverez des informations de base vous expliquant comment vous servir du mode d’emploi et du téléphone. Mode de représentation dans le mode d’emploi Visualisation Description Visualisation des touches Appuyer sur la touche représentée Saisir des chiffres ou des lettres Le combiné...
  • Seite 54 Introduction Constant : la fonction d’alarme est activée. Clignotant : alarme. Le verrouillage du clavier est activé. Constant: le répondeur est allumé. Clignotant: nouveaux messages sur le répondeur. Vous avez un message dans la boite vocale de votre exploitant de réseau (selon l’exploitant de réseau) Constant : vous tenez une communication interne (uniquement si base avec plusieurs combinés).
  • Seite 55: Mode Veille

    Introduction Mode veille Toutes les descriptions dans ce mode d’emploi partent du principe que le combiné se trouve en mode veille. Vous parviendrez au mode veille en appuyant sur la touche Réduction du rayonnement (mode ÉCO) En comparaison avec les téléphones sans fil DECT standard, le rayonnement est considérablement réduit en mode de communication.
  • Seite 56 Introduction Créer des enregistrements dans le répertoire - exemple L’exemple Créer des enregistrements dans le répertoire vous explique comment naviguer dans les menus et saisir des données. Pour tous les réglages, procédez comme dans cet exemple. Ouvrir le répertoire Appuyer touche softkey Menu. Sélectionner REPERTOIRE et confirmer sur OK.
  • Seite 57: Téléphoner

    Téléphoner 5 Téléphoner Prendre l’appel Votre téléphone sonne. Si le combiné ne se trouve pas sur la base: Appuyez sur la touche décrocher ou la touche mains-libres. Si le combiné se trouve sur la base et REPONSE AUTO n’est pas activé: Prenez le combiné...
  • Seite 58 Téléphoner Répétition des derniers numéros ☞ Votre téléphone mémorise les cinq derniers numéros de téléphone composés. Si le numéro de téléphone est mémorisé dans le répertoire, le nom s’affiche. Pour afficher le numéro de téléphone correspondant, appuyez sur la touche dièse Le dernier numéro de téléphone composé...
  • Seite 59: Affichage De La Durée De La Communication

    Téléphoner Affichage de la durée de la communication Pendant une communication, sa durée est affichée en heures, minutes et secon- des. Régler le volume sonore de l’écouteur Vous disposez de 5 niveaux pour régler le volume pendant une communication (sous fonctionnement de l’écouteur-> Volume sonore de l’écouteur, en mains-libres ->...
  • Seite 60 Téléphoner Transfert d’une communication externe Pendant une communication externe. . . Appuyez la touche softkey Menu. Sélectionnez INTERN et appuyez sur OK. Entrez le numéro interne. La communication externe est main- tenue. Si le combiné appelé est activé, annoncer la communication le cas échéant Appuyez sur la touche raccrocher.
  • Seite 61: Fonctions Spéciales

    Fonctions spéciales 6 Fonctions spéciales Verrouillage du clavier ☞ La touche verrouillage empêche une manipulation involontaire des touches. Les appels peuvent être reçus comme d’habitude. Appuyez et maintenez la touche étoile jusqu’à l’apparition du symbole de verrouillage des touches. Pour déverrouiller le clavier, appuyez et maintenez de nouveau la touche étoile jusqu'à...
  • Seite 62: Liste D'appels / Répétition Des Derniers Numéros

    Liste d’appels / Répétition des derniers numéros 7 Liste d’appels / Répétition des derniers numéros Utiliser la liste d’appels Ouvrez la liste d’appels. Sélectionnez une entrée. Appuyez sur touche softkey Menu. Sélectionnez l’une des options suivantes et confirmez avec AJOUTER Le numéro est enregistré...
  • Seite 63: Répertoire

    Répertoire 8 Répertoire ☞ Dans le répertoire, vous pouvez mémoriser 20 numéros et noms correspon- dants. Vous pouvez associer à chaque entrée une mélodie propre par laquelle un appel doit être signalé. Entrez toujours les numéros avec le préfixe ; ceci permet un affichage correct de chaque appelant dont il existe une entrée et dont le trans- fert de numéro à...
  • Seite 64 Répertoire Utiliser les entrées du répertoire Appuyez la touche répertoire. Sélectionnez une entrée. Appuyez la touche softkey Menu. Sélectionnez parmi les options suivantes et confirmez avec AJOUTER Vous pouvez effectuer une nouvelle entrée. EDITER L’entrée est affichée. Avec les touches fléchées, vous pouvez voir nom, numéro et mélodie.
  • Seite 65: Réglage Du Téléphone

    Réglage du téléphone 9 Réglage du téléphone Date/heure Appuyez touche softkey Menu. Sélectionnez REGL. COMB et appuyer sur OK. Sélectionnez DATE & HEURE et appuyer sur OK. Choisissez parmi les options suivantes et confirmez avec OK: FORMAT DATE Vous pouvez régler la représentation de la date : (JJ-MM-AA ou MM-JJ-AA).
  • Seite 66 Réglage du téléphone Régler la sonnerie du combiné Appuyez touche softkey Menu. Sélectionnez REGL. COMB et appuyer sur OK. Sélectionnez SONNERIE et appuyez sur OK. Choisissez parmi les options suivantes et confirmez avec OK.: SONNERIE INT Sélectionnez une mélodie pour la signalisation d’un appel inter- SONNERIE EXT Sélectionnez une mélodie pour la signalisation d’un appel exter- VOL.SONNERIE Sélectionnez le volume de la sonnerie.
  • Seite 67 Réglage du téléphone Régler le nom du combiné Appuyez touche softkey Menu. Sélectionnez REGL. COMB et appuyer sur OK. Sélectionnez RENOMMER CB et appuyez sur OK. Effacez l’ancien nom avec , entrez le nouveau nom avec les touches de chiffres et appuyez sur OK. Régler l’affichage de l’écran Appuyez touche softkey Menu.
  • Seite 68: Modifier Le Pin

    Réglage du téléphone Régler le volume de la sonnerie de la base Appuyez touche softkey Menu. Sélectionnez REGL. BASE et appuyer sur OK. Sélectionnez VOL.SONNERIE et appuyez sur OK. Sélectionnez un volume et confirmez avec OK. Régler le processus de numérotation Appuyez touche softkey Menu.
  • Seite 69 Réglage du téléphone Remettre le téléphone comme à l’état de livraison Appuyez touche softkey Menu. Sélectionnez DEFAUT et appuyez sur OK. Entrez le PIN actuel et appuyez sur OK. Confirmez aussi la question de sécurité suivante avec OK. ☞ Le répertoire n’est pas effacé. Veuillez effacer le répertoire via le menu du répertoire.
  • Seite 70: Répondeur

    Répondeur 10 Répondeur Le répondeur numérique intégré offre un temps d’enregistrement total jusqu’à 15 minutes dépendamment du degré de compression* réglé pour textes d’annonce et messages. Un maximum de 59 messages peut être réceptionné. Les mémos réceptionnés sont traités comme des messages. Le répondeur peut être commandé...
  • Seite 71 Répondeur L’écran de la base vous fournit les informations suivantes en fonction de l’état de fonctionnement: Tirets en permanence : répondeur désactivé. Clignotant: répondeur activé, Heure non réglée. Chiffres éclairés constamment : nombre des anciens messages Chiffres clignotant : nombre des nouveaux messages. Clignotant : il y a accès au répondeur depuis un combiné...
  • Seite 72: Activer/Désactiver Le Répondeur

    Répondeur Options de commande sur la base Vous pouvez activer/désactiver le répondeur sur la base, ecouter et effacer des messages. Activer/désactiver répondeur. Régler volume de la lecture. Commencer/arrêter lecture. Effacer message. Message suivant/message précédent. Activer/désactiver le répondeur Appuyez touche softkey Menu. Sélectionnez REPONDEUR et appuyez sur OK.
  • Seite 73 Répondeur Ecouter le texte de l’annonce Appuyez touche softkey Menu. Sélectionnez REPONDEUR et appuyez sur OK. Sélectionnez REGLAGES REP. et appuyez sur OK. Sélectionnez ANNONCES et appuyez sur OK. Sélectionnez REP. SEUL pour le mode de fonctionnement „annonce uniquement“ ou REP. ENREG. pour le mode de fonc- tionnement „annonce avec enregistrement de message“...
  • Seite 74 Répondeur ☞ Vous pouvez exécuter ces fonctions avec les touches de chiffres: - Touche 5: arrêter la lecture - Touche 6: vers le message suivant - Touche 4: vers le message précédent ou au début du message actuel (appuyez deux fois sur la touche 4). - Touche 2: effacer le message actuel.
  • Seite 75 Répondeur NB SONNERIES Sélectionnez avec les touches fléchées l’attente après laquelle le répondeur répond à un appel: - 2 SONNERIES (4, 6, 8 appels): Réponse après 2 ou 4, 6, 8 appels - ECO APPEL: S’il y a de nouveaux messages, le répondeur se déclanche après deux signaux d’appel.
  • Seite 76 Répondeur Prendre une communication depuis le répondeur Vous pouvez prendre avec votre combiné une communication déjà réceptionnée par le répondeur, afin de parler personnelle- ment avec l’appelant. Appuyez la touche répondre ou mains-libres. Interrogation/Commande à distance Une interrogation/commande à distance peut avoir lieu depuis un téléphone per- mettant le procédé...
  • Seite 77: Déclarer/Retirer Un Combiné

    Déclarer/retirer un combiné 11 Déclarer/retirer un combiné Sur une base, vous pouvez déclarer jusqu’à 5 combinés. Les combinés livrés avec votre téléphone sont déjà déclarés sur la base. Pour déclarer un combiné „étranger“, consultez aussi la notice d’utilisation de ce combiné. Déclarer un autre combiné...
  • Seite 78: Installations À Postes Supplém. / Services Confort

    Installations à postes supplém. / services confort 12 Installations à postes supplém. / services confort Installations à postes supplémentaires Si votre téléphone est raccordé à une installation à postes supplémentaires, vous pouvez au moyen de la touche R tirer profit de certaines fonctions comme par ex. le transfert d’appels et le rappel automatique.
  • Seite 79: Structure Du Menu

    Annexe 13 Annexe Structure du menu JOURNAL REPERTOIRE REGL. BASE SONN. BASE MELODIE 1...5 VOL.SONNERIE OFF, 1...5 ANNULER COMB NUMEROTATION FREQ. VOCALE DECIMALE DELAI R COURT MEDIUM LONG MODIFIER PIN REGL. COMB ALARME OFF/ON/ heure d’alarme SONNERIE SONNERIE INT MELODIE 1...10 SONNERIE EXT MELODIE 1...10 VOL.SONNERIE...
  • Seite 80 Annexe Recherche erronée Si vous avez des problèmes avec votre téléphone, contrôlez d’abord les indica- tions suivantes. En cas de problèmes techniques, vous pouvez vous adresser à notre hotline de service en appelant le numéro 0900 00 1675 en Suisse (frais Swisscom à...
  • Seite 81 Annexe Configuration d’origine/Etat à la livraison Liste d’appels Vide Repertoire Vide Alarme Sonnerie combine Interne Melodie 1 Externe Melodie 2 Vol. sonnerie 5 Sonnerie base Melodie 1 Vol. sonnerie 3 Alertes son. Bips touches: Activer Accu faible: Activer Hors portée: Activer Langue Allemand Nom combine...
  • Seite 82: Caractéristiques Techniques

    Annexe Caractéristiques techniques Standard : DECT / GAP Nombre de canaux : 120 canaux duplex Fréquences : 1880 MHz jusqu’à 1900 MHz Processus duplex : multiplexage par répartition dans le temps (MRT), 10ms longueur de marge Trame canaux : 1728 kHz Débit binaire : 1152 kbits / s Modulation : GFSK Codage langue : 32 kbits / s...
  • Seite 83: Déclaration De Conformité

    N’utilisez pas de produits d’entretien ou de solvants. Garantie Les appareils SWITEL sont fabriqués selon les procédes les plus modernes et sont contrôlés. Des matériels sélectionnés et des technologies de pointe ont pour effet un fonctionnement irréprochable et une longue durée de vie. La garantie ne rentre pas en jeu si l’exploitant du réseau téléphonique ou une installation à...
  • Seite 84 Si votre appareil devait malgré tout présenter une défectuosité pendant la période de garantie, veuillez vous adressez, muni de la quittance d’achat, exclusivement au magasin où vous avez acheté votre appareil SWITEL. Vous ne pouvez faire valoir vos droits à la garantie selon ces dispositions qu’auprès de votre revendeur exclusivement.
  • Seite 85 Annexe Index Élimination .....3 Activer/désactiver le répondeur ..28 Enregistrer le texte d’annonce ..28 Affichage de l’écran .
  • Seite 86 Annexe Postes supplémentaires ..34 Prendre l’appel ....13 Utilisation conforme aux Prendre une communication depuis le prescriptions .
  • Seite 87 Contenuto 1 Indicazioni di sicurezza ........2 2 Mettere in funzione il telefono .
  • Seite 88: Indicazioni Di Sicurezza

    Indicazioni di sicurezza 1 Indicazioni di sicurezza Leggere attentamente le presenti istruzioni per l’uso. Impiego conforme agli usi previsti Il presente telefono consente di svolgere telefonate all’interno di una rete telefoni- ca. Qualsiasi altro impiego è considerato come non conforme agli usi previsti. Non sono consentite modifiche o trasformazioni non autorizzate.
  • Seite 89: Apparecchiature Mediche

    Indicazioni di sicurezza Apparecchiature mediche Attenzione: Non utilizzare il telefono in prossimità di apparecchiature mediche. Non è possibile escludere il subentro di eventuali interferenze. Telefoni DECT possono causare un fastidioso ronzio in apparecchi acustici. Smaltimento Procedere allo smaltimento dell’apparecchio esaurito conse- gnandolo presso uno dei punti di raccolta istituiti dalla propria società...
  • Seite 90: Mettere In Funzione Il Telefono

    Stazione di carica con alimentatore Unità portatile Cavo di collegamento telefonico Accumulatore ricaricabile Istruzioni per l’uso Per ulteriori informazioni riguardo la disponibilità di questo set telefonico si prega di visitare il sito www.switel.com. Downloaded from www.Manualslib.com manuals search engine...
  • Seite 91: Collegare La Stazione Base

    Mettere in funzione il telefono Collegare la stazione base Attenzione: Montare la stazione base con una distanza minima di 1 m da altri apparecchi elettronici in modo da evitare interferenze reciproche. Procedere al collegamento della stazione base seguendo quanto raffigurato nella figura.
  • Seite 92 Mettere in funzione il telefono Inserire l’accumulatore ricaricabile Inserire le batterie ricaricabili nel vano batterie precedente- mente aperto. Chiudere infine il vano accumulatore. Attenzione: Utilizzare a tale scopo solo batterie ricaricabili del tipo AAA Ni-MH da 1,2 V. Osservare la corretta polarità! Non utilizzare mai batterie/celle primarie! Caricare le batterie ☞...
  • Seite 93: Elementi Di Comando

    Elementi di comando 3 Elementi di comando Altoparlante Tasti Su/Giù Display Tasto softkey DCT 5771 Tasto softkey Tasto di Fine chia- Tasto di chiamata/ mata risposta Tasti numerici Tasto R (flash) Tasto Viva Voce Tasto Rubrica Microfono Downloaded from www.Manualslib.com manuals search engine...
  • Seite 94 Elementi di comando Display Volume Cancellare DCT 5771 Riproduzione/Stop Messaggio preceden- te/successivo Segreteria telefonica ON / OFF Cercare l’unità portati- le (funzione di paging) Contatti di carica Downloaded from www.Manualslib.com manuals search engine...
  • Seite 95: Informazioni Introduttive

    Informazioni introduttive 4 Informazioni introduttive In questo capitolo sono riportate le principali informazioni riguardo l’uso delle pre- senti istruzioni e del telefono. Modi di rappresentazione delle istruzioni per l’uso Rappresentazione Descrizione Rappresentazione dei tasti Premere il tasto raffigurato Inserire numeri o lettere L’unità...
  • Seite 96 Informazioni introduttive La segnalazione acustica di chiamata è disinserita. Costante: Funzione allarme inserita. Lampeggiante: Allarme. Il blocco tastiera è attivato. Costante: la segreteria telefonica è collegata. Lampeggiante: Nuovi messaggi sulla segreteria telefonica. Nuovo messaggio nella Casella Vocale dell’Operatore di Rete (variabile a seconda dell’operatore di rete). Costante: E’...
  • Seite 97: Modalità Di Stand-By

    Informazioni introduttive Modalità di stand-by In tutte le descrizioni del presente manuale di istruzioni si considera l’unità portatile in modalità di stand-by. Per passare alla modalità di stand-by, premere il tasto Riduzione delle radiazioni (modalità ECO) Le radiazioni sono considerevolmente ridotte in modalità conversazione rispetto ad un telephono cordless a standard DECT.
  • Seite 98 Informazioni introduttive Creare voci nella rubrica telefonica - Esempio La navigazione nei menu e la procedura da seguire per inserire nuove voci è indi- cata a titolo esemplificativo in „Creare voci nella rubrica telefonica“. Si consiglia di seguire quanto riportato nell’esempio per tutte le altre impostazioni che si deside- rano compiere.
  • Seite 99: Compiere Telefonate

    Compiere telefonate 5 Compiere telefonate Ricevere una chiamata Il telefono suona. L’unità portatile non si trova inserita nell’unità base: Premere il tasto di risposta o il vivavoce. L’unità portatile non si trova inserita nell’unità base e la RISPOSTA AUT non è inserita: Sollevare l’unità...
  • Seite 100: Ripetizione Di Selezione

    Compiere telefonate Ripetizione di selezione ☞ Il telefono memorizza gli ultimi 5 numeri composti. Se il numero è stato inserito nella rubrica del telefono, apparirà il nome memorizzato con quel numero. Per visualizzare il numero corrispondente al nome premere il tasto cancelletto .
  • Seite 101: Compiere Chiamate Interne

    Compiere telefonate Visualizzazione della durata di conversazione Durante lo svolgimento di una chiamata, la durata della telefonata è visualizzata in ore, minuti e secondi. Impostare il volume del ricevitore Il volume è regolabile durante lo svolgimento di una chiamata in 5 livelli (dal ricevitore ->...
  • Seite 102 Compiere telefonate Trasferire chiamate esterne Nel corso di una chiamata esterna. . . Premere il softkey Menu. Selezionare INTERNO e premere OK. Digitate il numero interno. La chiamata esterna verrà trattenuta. Se l’unità portatile chiamata è accesa, verrà eventualmente annunciata la comunicazione. Premere il tasto di fine chiamata.
  • Seite 103: Funzioni Speciali

    Funzioni speciali 6 Funzioni speciali Blocco tastiera ☞ Il blocco tastiera impedisce la digitazione involontaria dei tasti. Le chiamate in arrivo possono essere ricevute come di consueto. Tenere premuto il tasto asterisco fino a quando appare sul display il simbolo del blocco tastiera. Per sbloccare la tastiera tenere premuto nuovamente il tasto asterisco fino a quando il simbolo non scompare di nuovo.
  • Seite 104: Elenco Chiamate/Ripetizione Di Selezione

    Elenco chiamate/ripetizione di selezione 7 Elenco chiamate/ripetizione di selezione Modificare l’elenco chiamate Accedere all’elenco chiamate. Selezionare una voce. Premere il softkey Menu. Selezionare una delle seguenti opzioni e confermare con OK: AGG A RUBR Il numero di chiamata verrà memorizzato nella rubrica. Se è inserito un nome, confermare o modificare il numero di telefono ed associare una suoneria per questa voce della rubrica.
  • Seite 105: Rubrica Telefonica

    Rubrica telefonica 8 Rubrica telefonica ☞ Nella rubrica è possibile memorizzare fino a 20 numeri di telefono e relativi nomi. E‘ possibile associare ad ogni voce una suoneria, con la quale verrà segnalata la chiamata. Immettere sempre il numero di telefono con il relativo prefisso;...
  • Seite 106 Rubrica telefonica ☞ E‘ possibile accedere alla rubrica anche dal menu. RUBRICA Modificare le voci della rubrica. Premere il tasto rubrica. Selezionare la voce. Premere il softkey Menu. Selezionare una delle seguenti opzioni e confermare con OK. AGGIUNGI Per aggiungere una nuova voce alla rubrica. VISUALIZZA La voce della rubrica verrà...
  • Seite 107: Impostazioni Telefono

    Impostazioni Telefono 9 Impostazioni Telefono Data/Ora Premere il softkey Menu. Selezionare IMPOSTA PT e premere OK. Selezionare DATA E ORA e premere OK. Selezionare una delle seguenti opzioni e confermare con OK: FORMATO DATAPer impostare il formato data: (DD-MM-YY oppure MM-DD-YY). FORMATO ORAPer impostare il formato ora: (24 ore oppure 12 ore).
  • Seite 108 Impostazioni Telefono Impostare il tono di chiamata dell’unità mobile Premere il softkey Menu. Selezionare IMPOSTA PT e premere OK. Selezionare IMP SUONERIA e premere OK. Selezionare una delle seguenti opzioni e confermare con OK: CHIAMATE INT Selezionare una suoneria per la segnalazione di una chiamata interna.
  • Seite 109 Impostazioni Telefono Impostare nome dell’unità portatile Premere il softkey Menu. Selezionare IMPOSTA PT e premere OK. Selezionare RINOMINA PT e premere OK. Eliminare il vecchio nome con , inserire il nuovo nome con i tasti cifra e premere OK. Impostazione messaggio display Premere il softkey Menu.
  • Seite 110 Impostazioni Telefono Impostazione volume toni per l’unità base Premere il softkey Menu. Selezionare IMPOSTA BS e premere OK. Selezionare VOLUME BS e premere OK. Selezionare un livello di volume e confermare con OK. Impostazione modalità di selezione Premere il softkey Menu. Selezionare IMPOSTA BS e premere OK.
  • Seite 111 Impostazioni Telefono Rimpostare il telefono secondo la configurazione predefinita Premere il softkey Menu. Selezionare DEFAULT e premere OK. Inserire il codice PIN attuale e premere OK. Confermare anche la successiva richiesta di conferma con OK. ☞ La rubrica non viene cancellata. Cancellare la rubrica dal menu-rubrica. L’unità...
  • Seite 112: Segreteria Telefonica

    Segreteria telefonica 10 Segreteria telefonica La segreteria telefonica digitale integrata contiene fino a 15 minuti di messaggi, a seconda del grado di compressione impostato per annunci e messaggi. Possono essere contenuti fino a 59 messaggi. I promemoria inseriti vengono trattati come messaggi. La segreteria telefonica può...
  • Seite 113: Segreteria Telefonica

    Segreteria telefonica Il display sull’unità base fornisce, a seconda della modalità, le seguenti informa- zioni: Trattini costantemente accesi: segreteria telefonica spenta. Lampeggiante: la segreteria telefonica è inserita, l’ora non è impostata. Cifre illuminate: quantità vecchi messaggi Cifre lampeggianti: quantità nuovi messaggi. Lampeggiante: viene dato l’accesso alla segreteria telefonica da un’unità...
  • Seite 114 Segreteria telefonica Possibilità di utilizzo sull’unità base Sull’unità base è possibile inserire/disinserire la segreteria telefonica, ascoltare e cancellare messaggi. Inserire/disinserire la segreteria telefonica. Impostare il volume della riproduzione. Avviare/fermare la riproduzione. Cancellare messaggio. Messaggio Successivo/messaggio precedente. Inserire/Disinserire la segreteria telefonica Premere il softkey Menu.
  • Seite 115 Segreteria telefonica Ascoltare annuncio Premere il softkey Menu. Selezionare SEGRETERIA e premere OK. Selezionare IMPOSTA SEGR e premere OK. Selezionare IMPOSTA OGM e premere OK. Selezionare SOLO RISP. per la modalità „solo annuncio“ o RISP & REG. per la modalità “annuncio con registrazione di messaggio”...
  • Seite 116 Segreteria telefonica ☞ Queste funzioni possono essere eseguite anche con i tasti cifra: Tasto 5: terminare la riproduzione Tasto 6: messaggio successivo Tasto 4: messaggio precedente o inizio messaggio corrente (premere due volte il tasto 4). Tasto 2: eliminare il messaggio corrente. Eliminare tutti i vecchi messaggi Premere il softkey Menu.
  • Seite 117 Segreteria telefonica RITARDO RISP Selezionare con i tasti freccia il tempo di risposta di una chia- mata della segreteria telefonica: - 2 SQUILLI (4, 6, 8 squilli): Risposta dopo 2 o rispettivamente 4, 6, 8 squilli - SALVAGETTONE: Se ci sono nuovi messaggi, la segreteria telefonica risponde dopo due squilli.
  • Seite 118 Segreteria telefonica Accettare una conversazione dalla segreteria telefonica E‘ possibile intercettare una chiamata già accettata dalla segre- teria telefonica, per parlare direttamente con la persona in linea. Premere il tasto di risposta o il tasto vivavoce. Accesso remoto/comando a distanza E‘...
  • Seite 119: Registrare/Cancellare Un'unità Portatile

    Registrare/cancellare un’unità portatile 11 Registrare/cancellare un’unità portatile Su una stazione base possono essere registrate fino a 5 unità portatili. Le unità portatili fornite con il vostro telefono sono già registrate con l’unità base. Per regi- strare un’unità mobile „estranea“ si prega di consultare il manuale di istruzioni. Registrare un’altra unità...
  • Seite 120: Impianti Telefonici Interni / Servizi Addizionali

    Impianti telefonici interni / Servizi addizionali 12 Impianti telefonici interni / Servizi addizionali Impianti telefonici interni Avendo collegato il telefono ad un impianto telefonico interno, il tasto R consente di accedere a tutte le altre funzioni disponibili come per es. trasferimento di chia- mata e funzione di richiamata automatica.
  • Seite 121: Appendice

    Appendice 13 Appendice Struttura di menu LISTA CHIAM RUBRICA IMPOSTA BS SUONERIA BS MELODIA 1...5 VOLUME BS SILENZIOSO, 1...5 CANCELLA PT MODO SELEZ TONI IMPULSI TEMPO FLASH BREVE MEDIA LUNGO CAMBIA PIN IMPOSTA PT SVEGLIA DISATTIVA / ATTIVA / HH:MM IMP SUONERIA CHIAMATE INT MELODIA 1...10...
  • Seite 122: Localizzazione Guasti

    Appendice Localizzazione guasti In presenza di problemi con il telefono, seguire le indicazioni riportate qui di segui- to. In caso di problemi tecnici è possibile rivolgersi alla nostra hotline di assistenza tecnica chiamando al numero 0900 00 1675 valido per la Svizzera (spese da rete Swisscom alla data di stampa: CHF 2.00 / min).
  • Seite 123 Appendice Impostazioni predefinite/Configurazioni predefinite Elenco chiamate Vuoto Rubrica telefonica Vuoto Sveglia Disattivato Suoneria pt Interno: Melodia 1 Esterno: Melodia 2 Volume: 5 Suoneria bs Melodia 1 Volume: 3 Imposta toni Toni tasti: Attivato Toni batt: Attivato Fuoriportata: Attivato Lingua Tedesco Nome portatile DCT 5771 Display...
  • Seite 124: Dati Tecnici

    Appendice Dati Tecnici Standard: DECT / GAP Numero di canali: 120 canali duplex Frequenza: 1880 MHz - 1900 MHz Procedura duplex: a divisione di tempo, 10 ms lunghezza trama Distanza canali: 1728 kHz Bit rate: 1152 kBit / s Modulazione: GFSK Codifica Voce: 32 kBit / s Potenza di trasmissione: 10 mW (potenza media per canale) Copertura: fino a 300 metri all’aperto, fino a 50 metri all’interno di un edificio...
  • Seite 125: Dichiarazione Di Conformità

    Non utilizzare mai detergenti o solventi. Garanzia Gli apparecchi SWITEL sono costruiti e collaudati in osservanza dei processi di produzione più moderni. L’impiego di materiali selezionati e tecnologie altamente sviluppate sono garanti di una perfetta funzionalità e lunga durata in vita. La garanzia non viene considerata esecutiva qualora la causa del malfunzionamento dell’apparecchio è...
  • Seite 126 Nel caso in cui il presente apparecchio dovesse ciò nonostante presentare un difetto durante il periodo di garanzia, si prega di rivolgersi esclusivamente al negozio di rivendita dell’apparecchio SWITEL assieme al relativo scontrino di acquisto. In base alle presenti disposizioni, tutti i diritti di garanzia dovranno esse- re fatti valere esclusivamente nei confronti del rivenditore autorizzato.
  • Seite 127 Appendice Indice alfabetico Accesso remoto ....32 Elenco chiamate ... . .14, 18 Accettazione di chiamata automatica .6 Eliminare tutti i vecchi messaggi .
  • Seite 128 Appendice Registrare annunci ....28 Volume del ricevitore ... .15 Registrare un promemoria ..30 Volume toni .
  • Seite 129 Table of contents 1 Safety Information ......... .2 2 Preparing the Telephone .
  • Seite 130: Safety Information

    Safety Information 1 Safety Information Please read this operating instruction manual thoroughly. Intended use The telephone is suitable for telephoning within a public telephone network system. Any other use is considered unintended use. Unauthorised modifica- tion or reconstruction is not permitted. Under no circumstances open the device or complete any repair work yourself.
  • Seite 131: Medical Equipment

    Safety Information Medical equipment Attention: Never use the telephone in the vicinity of medical equipment. Effects on such equipment cannot be fully ruled out. DECT telephones can cause an unpleasant humming sound in hearing aids. Disposal In order to dispose of your device, take it to a collection point provided by your local public waste authorities (e.g.
  • Seite 132 5771 5772 5773 5774 Base station with power adapter plug Charging station with power adapter plug Handset Telephone connection cable Rechargeable batteries Operating instructions Visit www.switel.com to find out whether this telephone is available. Downloaded from www.Manualslib.com manuals search engine...
  • Seite 133: Preparing The Telephone

    Preparing the Telephone Connecting the base station Attention: Position the base station at least 1 m away from other electronic devices, otherwise there is a risk of mutual disturbance. Connect the base station as illustrated in the diagram. For reasons of safety, only use the power adapter plug and telephone connection line supplied.
  • Seite 134: Auto Answer

    Preparing the Telephone Inserting the batteries Open the battery compartment cover. Put in the batteries. Close the battery compartment cover. Attention: Use only type AAA NiMH rechargeable batteries. Never use normal batteries / primary cell batteries. Observe the correct polarity! Charging the batteries ☞...
  • Seite 135: Operating Elements

    Operating Elements 3 Operating Elements Earpiece Up/down key Display Softkey DCT 5771 Softkey (Int / C = Cancel) (Menu / OK) On Hook button Off Hook button Digit keys R-key Handsfree Phone book Microphone Downloaded from www.Manualslib.com manuals search engine...
  • Seite 136 Operating Elements Display Volume Delete key DCT 5771 Start/Stop Skip/back TAM on/off Locate handset (Paging) Charge contacts Downloaded from www.Manualslib.com manuals search engine...
  • Seite 137: Preliminary Information

    Preliminary Information 4 Preliminary Information This chapter provides basic information on using the operating instruction manual and the telephone. Description of operating sequences in the manual Display Description Displays the contour of buttons. Press the button depicted. Enter digits or letters. Handset rings.
  • Seite 138 Preliminary Information On: The alarm function is activated. Flashing: The alarm is ringing. The key lock is activated On: Answering machine is on. Flashing: New messages on the answering machine. You received a message in your answering machine provided by the telephone network (depending on telephone network/provider).
  • Seite 139: Standby Mode

    Preliminary Information Standby mode All descriptions in this operating manual assume that the handset is in Stand- by mode. The system switches to Standby mode by pressing the but- ton. Low-radiation operation (ECO mode) In call mode, the radiation is reduced considerably as compared to standard, cordless DECT telephones.
  • Seite 140 Preliminary Information Creating phone book entries - example The way in which to navigate through the menus and enter data is explained by means of the example “Creating phone book entries“. Proceed as in this example for all the settings. Press the phone book key.
  • Seite 141: Telephoning

    Telephoning 5 Telephoning Taking a call Your phone is ringing. If the handset is not in the base station: Press the Off Hook button or the Handsfree button. If the handset is in the base station and AUTO ANSWER is not activated: Remove the handset from the base and press the Off Hook button or the Handsfree button.
  • Seite 142: Making A Call From The Phone Book

    Telephoning Redial ☞ Your handset saves the last 5 dialled telephone numbers. If a caller is stored in your phone book, the name will be displayed. Whilst the name is displayed to show the respective number press The most recent last number will be displayed at the top of the list. Open the redial list.
  • Seite 143: Call Timer

    Telephoning Call timer Your handset automatically times the duration of every call in hours, minutes and seconds. Setting the earpiece/loudspeaker volume During a call you can adjust the volume in 5 levels (if tele- phoning “normally“ -> earpiece volume, with hands-free -> loudspeaker volume).
  • Seite 144 Telephoning Transferring an external call to another handset During an external call . . . Press the Menu softkey. Select INTERCOM and press OK. Enter the internal telephone number. The external call is put on hold. When the called handset answers you can announce the call transfer.
  • Seite 145: Other Features

    Other Features 6 Other features Key lock ☞ The key lock prevents functions assigned to buttons being activated inadvertently. Incoming calls can still be taken in the normal way even when the key lock function is activated. Press and hold down the star-key until the key lock icon appears in the display.
  • Seite 146: Call List / Redial

    Call list / Redial 7 Call list / Redial Editing the call list Open the call list. Select an entry. Press the Menu softkey. Select one of the following options and confirm with OK: ADD TO PB The telephone number will be stored in the telephone book. Enter a name, confirm or edit the telephone number and select a ringtone melody for the entry.
  • Seite 147: Creating A New Entry

    Phonebook 8 Phone book ☞ Your phone can store up to 20 private phonebook entries with names and numbers. You can also select different ringtones for your phonebook entries. Always enter the phone numbers with the area code; this enables a correct display of the respective caller for whom there is an existing entry and whose phone number transmission to your connection is available.
  • Seite 148: Editing Telephone Book Entries

    Phonebook Editing telephone book entries Press the phone book key. Select an entry. Press the Menu softkey. Select one of the following options and confirm with OK: You can create a new entry. VIEW The entry is shown. Using the up/down key you switch between name, number and melody.
  • Seite 149: Setting The Telephone

    Setting the telephone 9 Setting the telephone Date/Time Press the Menu softkey. Select HS SETTINGS and press OK. Select DATE & TIME and press OK. Select one of the following options and confirm with OK: DATE FORMAT You can select your desired date format: (DD-MM-YY or MM-DD-YY).
  • Seite 150 Setting the telephone Setting the ringer for the handset Press the Menu softkey. Select HS SETTINGS and press OK. Select RING SETUP and press OK. Select one of the following options and confirm with OK: INT. RING Select a melody for internal calls. EXT.
  • Seite 151: Setting The Handset Name

    Setting the telephone Setting the handset name Press the Menu softkey. Select HS SETTINGS and press OK. Select RENAME HS and press OK. Delete the old name with , enter a new name using the digit keys and confirm with OK. Setting the display Press the Menu softkey.
  • Seite 152: Setting The Dial Mode

    Setting the telephone Setting the ringer volume for the base station Press the Menu softkey. Select BS SETTINGS and press OK. Select RING VOLUME and press OK. Select the volume and press OK. Setting the dial mode Press the Menu softkey. Select BS SETTINGS and press OK.
  • Seite 153: Resetting Your Phone

    Setting the telephone Resetting your phone Press the Menu softkey. Select DEFAULT and press OK. Enter the relevant PIN (default 0 0 0 0) and press OK. Confirm the confirmation query with OK. ☞ The phone book entries will not be deleted. Please delete the phone book using the menu item “PHONE BOOK/DELETE ALL“...
  • Seite 154: Answering Machine

    Answering Machine 10 Answering Machine The integrated digital answering machine offers a total recording time of up to 15 minutes for outgoing and incoming messages depending on the selected compression rate*. A maximum of 59 messages can be taken. Self recorded memos are treated like messages. You can access the answering machine from the base station as well as from the handset.
  • Seite 155: Answering Machine

    Answering Machine The display on the base station shows the operating state and gives you fur- ther information: Dashes steadily on: Answering machine is off. Flashing: Answering machine is on, date/time not set. Digits steadily on: Number of old (already heard) messages. Flashing digits: Number of new messages.
  • Seite 156 Answering Machine Accessing the answering machine through the base Through the base station you can turn the answering machine on or off, play- back and delete messages. Answering machine on/off. Adjusting the volume for playback. Start/stop playback. Deleting messages (press and hold down). Skip/back.
  • Seite 157 Answering Machine Playback outgoing message Press the Menu softkey. Select ANS. MACHINE and press OK. Select TAM SETTINGS and press OK. Select OGM SETTINGS and press OK. Select ANSWER ONLY for the “answer-only mode“ or ANS & REC for the “answer and record-mode“ and press Select PLAYBACK and press OK.
  • Seite 158 Answering Machine ☞ These options you can access via the digit keys as well. Press: - key 5: to stop playback. - key 6: to skip to the next message. - key 4: to begin the relevant message again or to go back to the previous message (press key 4 twice).
  • Seite 159 Answering Machine ANSWER DELAY Use the up/down key to select the delay for answering the call: - 2 RINGS (4, 6, 8 rings): Call will be answered after 2, 4, 6, 8 rings. - TIME SAVER: If new messages are available, the answer- ing machine will answer after two rings.
  • Seite 160: Remote Access

    Answering Machine Taking a call from the answering machine It is possible to take a call even if the answering machine has already begun to take it. So you can talk with the person who called. Press the Off Hook button or the Handsfree button. Remote access You can ring your phone from another tone-dialing phone to switch on or off the answering machine and listen to your messages remotely.
  • Seite 161: Registering/De-Registering Handsets

    Registering/de-registering handsets 11 Registering/de-registering handsets Five handsets can be registered to a base station. The handsets delivered with your telephone are already registered. To register a “foreign“ handset please refer to it’s user manual. Registering a handset of the same type Press the Menu softkey.
  • Seite 162: Pbx / Supplementary Services

    PBX / Supplementary Services 12 PBX / Supplementary Services If the telephone is connected to a private branch exchange, functions such as transferring calls and automatic call back can be used via the R button. Refer to the operating manual provided with your private branch exchange as to which Flash time must be set in order to use these functions.
  • Seite 163: Appendix

    Appendix 13 Appendix Menu Structure CALL LIST PHONEBOOK BS SETTINGS BS RINGER MELODY 1...5 RING VOLUME OFF, 1...5 DELETE HS DIAL MODE TONE PULSE FLASH TIME SHORT MEDIUM LONG CHANGE PIN HS SETTINGS ALARM OFF/ON / Alarm time RING SETUP INT.
  • Seite 164: In Case Of Problems

    Appendix In Case of Problems Should problems arise with the telephone, please refer to the following infor- mation first. In the case of technical problems, you can contact our hotline service, Tel. 0900 00 1675 within Switzerland (Costs for call from Swisscom landline at time of going to print: CHF 2.00/min).
  • Seite 165: Default Settings

    Appendix Default settings Call list No entry Phonebook No entry Alarm Ringer handset Internal call: Melody 1 External call: Melody 2 Volume: 5 Ringer base Melody 1 Volume: 3 Tone setup Key tone: On Battery tone: On Out of range: On Language German Handset name...
  • Seite 166: Technical Data

    Appendix Technical data Standard: DECT / GAP Number of channels: 120 duplex channels Frequencies: 1880 MHz to 1900 MHz Duplex mode: Time division multiplex, 10ms frame length Channel spacing: 1728 kHz Bit rate: 1152 kBit / s Modulation: GFSK Voice encoding: 32 kBit / s Transmitter power: 10 mW (average power per channel) Range: up to 300 m outside, up to 50 m inside buildings Electricity supply base station:...
  • Seite 167: Declaration Of Conformity

    Do not use any cleaning agents or solvents. Guarantee SWITEL equipment is produced and tested according to the latest production methods. The implementation of carefully chosen materials and highly devel- oped technologies ensure trouble-free functioning and a long service life. The...
  • Seite 168 If your device shows signs of defect during the period of guarantee, please return it to the sales outlet in which you purchased the SWITEL device togeth- er with the purchase receipt. All claims under the terms of guarantee in accor- dance with this agreement can only be asserted at the sales outlet.
  • Seite 169 Appendix Index Alarm ......21 Guarantee .....39 Alert tones .
  • Seite 170 Appendix Package contents ....4 Taking a call ....13 PBX .
  • Seite 171 Downloaded from www.Manualslib.com manuals search engine...
  • Seite 172 Quest’apparecchiatura è conforme alla direttiva europea R&TTE. Per la dichiarazione di conformità completa si prega di voler usufruire del servizio gratuito di download dal nostro sito Internet www.switel.com. This equipment complies with the European R&TTE directive. To view the complete Declaration of Conformity, please refer to the free download available at our web site: www.switel.com.

Inhaltsverzeichnis