Inhaltszusammenfassung für ECOVACS ROBOTICS Deebot OZMO T8
Seite 1
Instruction Manual/Bedienungsanleitung/Manual de instrucciones /Manuel d'instructions/Manuale d'uso/Руководство по эксплуатации...
Seite 2
Should you encounter situations that have not been properly addressed in this Instruction Manual, please contact our Customer Service Center where a technician will be able to help you with your specific problem or question. For more information, please visit the ECOVACS ROBOTICS official website: www.ecovacs.com The company reserves the right to make technological and/or design changes to this product for continuous improvement.
1. Important Safety Instructions to a step or stairs, you should operate the Appliance to ensure that it can detect the step IMPORTANT SAFETY INSTRUCTIONS without falling over the edge. It may become When using an electrical Appliance, basic necessary to place a physical barrier at the precautions should always be followed, including edge to keep the unit from falling.
Seite 5
11. Keep hair, loose clothing, fingers, and all parts power cord, or pull power cord around sharp of body away from any openings and moving edges or corners. Do not run Appliance over parts. the power cord. Keep power cord away from 12.
Seite 6
29. The Appliance must be used in accordance with the directions in this Instruction Manual. ECOVACS ROBOTICS cannot be held liable or responsible for any damages or injuries caused by improper use. 30. The robot contains batteries that are only replaceable by skilled persons.
Seite 7
To disable Wi-Fi module on DEEBOT, power the For EU Countries robot ON. For EU Declaration of Conformity information, visit Place the robot on the Auto-Empty Station making https://www.ecovacs.com/global/compliance sure the Charging Contacts on DEEBOT and the Auto-Empty Station Pins make a connection. Press and hold the AUTO Mode Button on the robot for 20 seconds until DEEBOT emits 3 beeps.
2. Package Contents/2.1 Package Contents Instruction Manual Robot Auto-Empty Station Power Cord Dust Bag OZMO Pro Disposable Cleaning High Efficiency Filter and Side Brushes Oscillating System Cloths Sponge Filter Note: Figures and illustrations are for reference only and may differ from actual product appearance. Product design and specifications are subject to changes without notice.
Seite 9
2. Package Contents/2.2 Product Diagram Robot RESET Button Top Cover AUTO Mode Button Wi-Fi Indicator Light TrueDetect 3D Power Switch Sensor Multi-function Cleaning Tool Auto-Empty Dust Bin TrueMapping Distance Sensor Auto-Empty Outlet Sponge Filter Dust Bin Handle Release Button Anti-collision Bumper Filter Net High Efficiency Filter...
Bottom View Auto-Empty Station Charging Contacts Carpet Detection Universal Wheel Sensor Lid Release Button Side Brushes Indicator Light Main Brush Driving Wheels Infrared Singnal Emitter Auto-Empty Station Pins Auto-Empty Inlet Anti-drop Sensors Main Brush Release Button Water Outlet Anti-drop Sensors Substitute Module (Pre-installed)
Seite 11
Auto-Empty Station (Back) Auto-Empty Station (Bottom) Power Cord Wrap Power Cord Port Base Screw Socket Dust Evacuation Tube Cover Set Screws Auto-Empty Station (Top) Dust Evacuation Tube + Tube Cover Dust Bag Socket Dust Evacuation Tube Blower Cover...
Power Cord OZMO Pro Oscillating System Water Inlet Reservoir Reservoir Release Button Disposable Cleaning Cloth * Please only attach the Disposable Cleaning Cloth to OZMO Pro.
3. Operating and Programming/3.1 Notes Before Cleaning Tidy up the area to be cleaned by putting During the first use, make sure each room door It may be necessary to place a physical furniture, such as chairs, in their proper place. is open to help DEEBOT fully explore your house.
Seite 14
3. Operating and Programming/3.2 Quick Start Remove Protective Materials Assemble Auto-Empty Station Install Side Brushes Click...
Seite 15
3. Operating and Programming/ Power ON 3.3 Charging DEEBOT Auto-Empty Station Placement Note: I = ON, = OFF. DEEBOT cannot be charged when being powered OFF. Charge DEEBOT flashes when DEEBOT is charging. goes out when DEEBOT is fully charged. * Before charging DEEBOT, make sure to install the Substitute Module.
Seite 16
3. Operating and Programming/3.4 ECOVACS HOME App To enjoy all available features, it is recommended to control your DEEBOT via the ECOVACS HOME app. Before you start, make sure that: Wi-Fi Indicator Light • Your mobile phone is connected to a Wi-Fi network. Disconnected to Wi-Fi or Slowly flashing waiting for Wi-Fi connection...
Seite 17
3. Operating and Programming/3.5 Operating DEEBOT During the first cleaning, please supervise DEEBOT and assist it should there be a problem. Start Return to Charge Pause Pressing for 3 seconds to send DEEBOT back to the Auto-Empty Station. * When Auto-Empty Station is connected to power, DEEBOT automatically returns to the station to charge and empty the Dust Bin as it needs.
Seite 18
3. Operating and Programming/3.6 OZMO Pro Oscillating System Note: 1.Install OZMO Pro Oscillating System for floor scrubbing. 2.With electric oscillating mopping up to 480 times per minute, OZMO Pro is applicable for areas of highly concentrated dirt or dust. 3.Before installing OZMO Pro, please make sure the contacts are thoroughly dry. 4.Please avoid using OZMO Pro on the carpet.
Seite 19
Dry Contacts Thoroughly Start Mopping Install OZMO Pro...
Maintenance/4.1 Regular Maintenance To keep DEEBOT running at peak performance, perform maintenance tasks and replace parts with the following frequencies: Robot Part Maintenance Frequency Replacement Frequency Disposable Cleaning Cloth Replace after each use Dust Bags should be replaced when prompted by Dust Bag the Indicator Light/ECOVACS HOME App.
Seite 21
Maintenance/4.2 OZMO Pro Oscillating System Remove OZMO Pro Disposable Cleaning Cloth * After DEEBOT finishes mopping, please empty the reservoir. Wipe OZMO Pro Clean * Wipe OZMO Pro Oscillating System with a clean, dry cloth. Do not soak into water.
Seite 22
Maintenance/4.3 Auto-Empty Dust Bin and Filters Dust Bin Filter...
Seite 23
Maintenance/4.4 Main Brush and Side Brushes Main Brush Side Brushes...
Seite 24
Maintenance/4.5 Auto-Empty Station Note: Before performing cleaning and maintenance on Auto-Empty Station, unplug it first. * For a proper maintenance, wipe with a clean dry cloth, and avoid using any detergent or cleaning spray. Auto-Empty Station Pins Infrared Signal Emitter Dust Bag Dispose the Dust Bag * The Dust Bag will be sealed by the handle so the dust will not leak.
Seite 25
Clean the Blower Cover Close the Dust Container Lid Install the Dust Bag...
Seite 26
Dust Evacuation Tube Unscrew the Dust Evacuation Uninstall the Dust Evacuation Clean the Dust Evacuation Tube Tube Cover Tube Cover...
Seite 27
Maintenance/4.6 Other Components Note: Before cleaning the robot’s Charging Contacts and Auto-Empty Station Pins, turn the robot OFF and unplug the Auto-Empty Station.
Seite 28
Maintenance/4.6 Storage If DEEBOT will not be used for a while, fully charge DEEBOT and power OFF before storage. Charge DEEBOT every 1.5 month to prevent battery drain. Note: When DEEBOT is not cleaning, it is recommended to keep DEEBOT powered ON and charging.
5. Indicator Light DEEBOT will tell you something is wrong with an indicator light and voice report. More detailed support is available through the ECOVACS HOME App and online website. Indicator Light Scenario The robot is cleaning AUTO Mode Button glows a solid WHITE The robot is paused while cleaning The robot is charging AUTO Mode Button flashes WHITE...
Troubleshooting/6.1Troubleshooting Problem Possible Causes Solutions DEEBOT is not switched ON. Switch ON DEEBOT. DEEBOT has not connected to the Auto-Empty Be sure that the robot’s Charging Contacts have connected Station. to the Auto-Empty Station Pins. The Power Cord is not connected to the Auto- Make sure the Power Cord is firmly connected to the Auto- 1 DEEBOT is not charging.
Seite 31
Malfunction Possible Causes Solutions Working time varies according to floor surface, room complexity and the Cleaning Turn on Continuous Cleaning function in ECOVACS Mode selected. When the battery gets low, HOME App. DEEBOT will automatically resume the DEEBOT automatically switches to Recharge uncompleted cleaning cycle when Continuous Cleaning Mode and returns to the Auto-Empty Station is enabled.
Seite 32
Malfunction Possible Causes Solutions Remove power cords and small objects from the floor The cleaning cycle is interfered by small to ensure cleaning efficiency. DEEBOT will automatically objects or barriers on the floor. clean the area missed, please avoid moving DEEBOT manually or block the path during the cleaning cycle.
Seite 33
Malfunction Possible Causes Solutions DEEBOT does not clean the Remove small objects from the floor and tidy up the The cleaning area is not tidy. whole area. cleaning area before DEEBOT starts cleaning. DEEBOT Side Brushes drop Make sure the Side Brushes click into place when The Side Brushes are not correctly installed.
Seite 34
Malfunction Possible Causes Solutions Please install the Auto-Empty Dust Bin with two Auto- The Auto-Empty Dust Bin is not installed. Empty Outlets on the bottom. The Dust Bag is full. Replace the Dust Bag and close the Dust Container Lid. DEEBOT fails to auto-empty the Dust Bin.
Seite 35
Troubleshooting/6.2 Wi-Fi Connection Before Wi-Fi setup, make sure DEEBOT, mobile phone, and Wi-Fi network meet the following requirements. DEEBOT and Mobile Phone Requirements • DEEBOT is fully charged and the power switch of DEEBOT is turned on. • Wi-Fi status light slowly flashes. •...
7. Technical Specifications Model DLX11-54 Auto-Empty Station Model CH1918 CH1822 (Sold Separately) 50 - 60Hz 50 - 60Hz 220-240V 100-240V Rated Input (Charging) Input 0.3A 0.5A Rated Output Output Power (Auto-Emptying) 1000W Frequency bands 2400-2483.5MHz Off Mode Power Less than 0.50W Networked Standby Power Less than 2.00W Output power of the Wi-Fi module is less than 100mW.
Seite 37
Sie sich an das Kundenservicecenter, damit sich ein Techniker mit Ihrem speziellen Problem bzw. Ihrer Frage befassen kann. www.ecovacs.com Weitere Informationen finden Sie auf der offiziellen Webseite von ECOVACS ROBOTICS: Das Unternehmen behält sich im Sinne einer kontinuierlichen Verbesserung das Recht auf technische Änderungen und/ oder Designänderungen an diesem Produkt vor.
1. Wichtige Sicherheitshinweise 3. Wenn sich im zu reinigenden Bereich Absätze in Form von Stufen oder Treppen befinden, ist das WICHTIGE SICHERHEITSHINWEISE Gerät so zu bedienen, dass die Stufe erkannt Beim Gebrauch eines elektrischen Gerätes sind wird, ohne dass das Gerät über die Kante fällt. Es kann erforderlich sein, eine physische Barrie- einige grundlegende Sicherheitshinweise zu beach- re an der Kante anzubringen, um ein Herunterfal-...
Seite 40
9. Verwenden Sie das Gerät nicht in Bereichen, in Sie die Ansaugöffnung frei von Staub, Flusen, denen sich brennende Kerzen oder zerbrechli- Haaren oder sonstigen den Luftstrom behindern- che Gegenstände befinden. den Materialien. 10. Verwenden Sie das Gerät nicht bei extrem hei- 18.
Seite 41
wenden Sie das Gerät oder die Station zur auto- 29. Verwenden Sie das Gerät immer gemäß den An- matischen Leerung nicht, wenn es bzw. sie nicht weisungen in dieser Bedienungsanleitung. ECO- einwandfrei funktioniert, heruntergefallen ist, be- VACS ROBOTICS übernimmt keine Haftung für schädigt wurde, im Freien gelassen wurde oder Verletzungen und Schäden, die durch unsachge- mit Wasser in Berührung gekommen ist.
U m d a s W L A N - M o d u l a m D E E B O T z u Für EU-Länder deaktivieren, schalten Sie den Roboter EIN. Informationen zur EU-Konformitätserklärung Setzen Sie den Roboter in die Station zur finden Sie unter automatischen Leerung, und vergewissern Sie https://www.ecovacs.com/global/compliance...
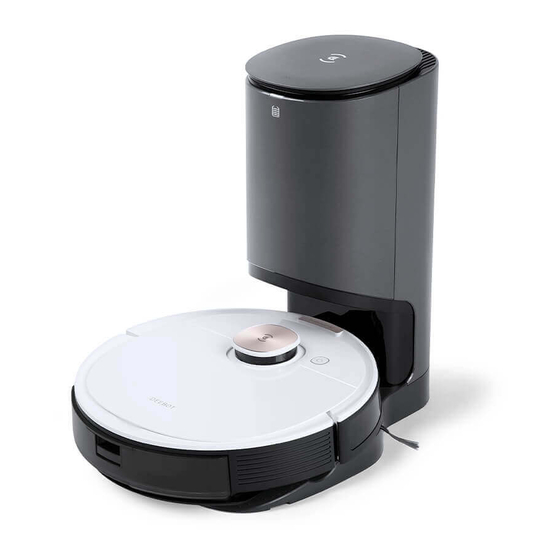
Lieferumfang/2.1 Lieferumfang Station zur automatischen Roboter Netzkabel Staubbeutel Bedienungsanleitung Leerung OZMO Pro Feinstaubfilter und Seitenbürsten Einweg-Reinigungstücher Oszillationssystem Filterschwamm Hinweis: Abbildungen dienen nur als Referenz und können vom tatsächlichen Erscheinungsbild des Produkts abweichen. Produktdesign und technische Daten können ohne Vorankündigung geändert werden.
Ansicht von unten Station zur automatischen Leerung Ladekontakte Teppicherkennungs- Entriegelungsknopf Universalrad sensoren für den Deckel Seitenbürsten Anzeige Hauptbürste Antriebsräder Infrarot-Signalsender Kontakte der Station zur Einlass für die automatischen Leerung automatische Leerung Absturzsensoren Entriegelungs- taste für die Hauptbürste Wasserauslass Absturzsensoren Ersatzmodul (vorinstalliert)
Station zur automatischen Leerung (Rückseite) Station zur automatischen Leerung (Unterseite) Netzkabelaufwicklung Anschluss für Netzkabel Basisschraubensockel Stellschrauben für die Abdeckung des Staubabsaugrohrs Station zur automatischen Leerung (Oberseite) Staubabsaugrohr + Rohrabdeckung Staubbeutelsockel Staubabsaugrohr Gebläseabdeckung...
Seite 47
Netzkabel OZMO Pro Oszillationssystem Wassereinlass Behälter Entriegelungsknopf für den Behälter Einweg- Reinigungstuch * Bitte bringen Sie nur das Einweg-Reinigungstuch am OZMO Pro an.
3. Betrieb und Programmierung/3.1 Vor der Reinigung Stellen Sie Möbel wie Stühle in dem Stellen Sie bei der ersten Verwendung sicher, Es kann erforderlich sein, eine physische zu reinigenden Bereich an den dafür dass jede Tür geöffnet ist, damit der DEEBOT Barriere an der Kante einer Stufe vorgesehenen Platz.
Seite 49
3. Bedienung und Programmierung/3.2 Kurzanleitung Schutzmaterial entfernen Zusammensetzen der Station zur automatischen Leerung Installation der Seitenbürsten Klicken Sie auf...
3. Bedienung und Programmierung/ Einschalten des Geräts 3.3 Aufladen des DEEBOT Aufstellen der Station zur automatischen Leerung Hinweis: I = EIN, = AUS Der DEEBOT kann nicht aufgeladen werden, wenn er ausgeschaltet ist. Aufladen des DEEBOT blinkt, wenn der DEEBOT lädt. erlischt, wenn der DEEBOT vollständig aufgeladen ist.
3. Bedienung und Programmierung/3.4 ECOVACS HOME-App Um alle verfügbaren Funktionen nutzen zu können, wird empfohlen, Ihren DEEBOT über die ECOVACS HOME-App zu steuern. Bevor Sie beginnen, stellen Sie Folgendes sicher: WLAN-Statusleuchte • Ihr Mobiltelefon ist mit einem WLAN-Netzwerk verbunden. WLAN-Verbindung ist getrennt Blinkt langsam oder auf WLAN-Verbindung •...
3. Bedienung und Programmierung/3.5 Bedienung des DEEBOT Überwachen Sie den DEEBOT bei der ersten Reinigung und helfen Sie bei Problemen. Start Rückkehr zur Ladestation Pause Drücken Sie 3 Sekunden lang , um den DEEBOT zur Station zur automatischen Leerung zurückzuschicken. * Wenn die Station zur automatischen Leerung an die Stromversorgung angeschlossen ist, kehrt der DEEBOT automatisch zur Station zurück, um zu laden und den Staubbehälter nach Bedarf zu leeren.
3. Bedienung und Programmierung/3.6 OZMO Pro Oszillationssystem Hinweis: 1. Installieren Sie das OZMO Pro Oszillationssystem zum Wischen des Bodens. 2. Dank des elektrischen Wischers mit bis zu 480 Oszillationen pro Minute ist OZMO Pro für stark verschmutzte oder verstaube Bereiche geeignet. 3. Vergewissern Sie sich vor der Installation von OZMO Pro, dass die Kontakte vollständig trocken sind. 4.
Seite 54
Kontakte gründlich trocknen Wischvorgang starten OZMO Pro installieren...
Wartung/4.1 Regelmäßige Wartung Um die maximale Leistung des DEEBOT dauerhaft zu gewährleisten, führen Sie Wartungsaufgaben und den Austausch der Komponenten gemäß der nachfolgend angegebenen Häufigkeit aus. Roboterkomponente Wartungshäufigkeit Austauschhäufigkeit Einweg-Reinigungstuch Nach jedem Gebrauch austauschen Staubbeutel sollten ausgetauscht werden, wenn Staubbeutel Sie von der Leuchtanzeige/ECOVACS HOME-App dazu aufgefordert werden Seitenbürste Einmal alle zwei Wochen...
Wartung/4.2 OZMO Pro Oszillationssystem OZMO Pro entfernen Einweg-Reinigungstuch * Nach Beendigung des Wischvorgangs ist der Behälter des DEEBOT zu entleeren. OZMO Pro Clean abwischen * Wischen Sie das OZMO Pro Oszillationssystem mit einem sauberen, trockenen Tuch ab. Nicht in Wasser eintauchen.
Wartung/4.5 Station zur automatischen Leerung Hinweis: Trennen Sie die Station zur automatischen Leerung vor der Reinigung und Wartung vom Netz. * Für eine ordnungsgemäße Wartung mit einem sauberen, trockenen Tuch abwischen und kein Reinigungsmittel oder Reinigungsspray verwenden. Kontakte der Station zur automatischen Leerung Infrarot-Signalsender Staubbeutel Staubbeutel entsorgen...
Seite 60
Gebläseabdeckung reinigen Abdeckung des Staubbehälters schließen Staubbeutel einlegen...
Seite 61
Staubabsaugrohr Abdeckung des Staubabsaugrohrs Abdeckung des Staubabsaugrohrs Staubabsaugrohr reinigen abschrauben entfernen...
Wartung/4.6 Sonstige Bauteile Hinweis: Schalten Sie vor der Reinigung der Ladekontakte des Roboters und der Kontakte der Station zur automatischen Leerung den Roboter AUS, und trennen Sie die Station zur automatischen Leerung vom Netz.
Wartung/4.6 Lagerung Wenn der DEEBOT einige Zeit nicht verwendet wird, laden Sie ihn vollständig auf, und schalten Sie ihn vor der Lagerung AUS. Laden Sie den DEEBOT alle 1,5 Monate auf, um eine Batterieentladung zu vermeiden. Hinweis: Wenn der DEEBOT nicht reinigt, empfehlen wir, ihn eingeschaltet (Betriebsschalter EIN) zu lassen und zu laden.
5. Kontrollleuchte Der DEEBOT weist über die Kontrollleuchte und mit Sprachbericht auf aufgetretene Probleme hin. Detaillierteren Support erhalten Sie über die ECOVACS Home-App und online auf der Website. Anzeige Szenario Der Roboter befindet sich im Reinigungsmodus. Die AUTO-Modus-Taste leuchtet durchgehend WEISS. Der Roboter wird während der Reinigung angehalten.
Fehlerbehandlung/6.1 Fehlerbehandlung Störung Mögliche Ursachen Fehlerbehebung Der DEEBOT ist nicht eingeschaltet Schalten Sie den DEEBOT EIN. (Betriebsschalter EIN). Der DEEBOT hat keinen Kontakt zur Station Stellen Sie sicher, dass die Ladekontakte des Roboters die zur automatischen Leerung. Kontakte der Station zur automatischen Leerung berühren. Das Netzkabel ist nicht an die Station zur Achten Sie darauf, dass das Netzkabel fest mit der Station 1 Der DEEBOT lädt nicht.
Seite 66
Funktionsstörung Mögliche Ursachen Fehlerbehebung Die Arbeitszeit schwankt je nach Oberflächenbeschaffenheit des Bodens, der Komplexität der Raumaufteilung und dem Aktivieren Sie die Funktion „Kontinuierliche Reinigung“ in gewählten Reinigungsmodus. Bei niedrigem der ECOVACS HOME-App. Der DEEBOT setzt den nicht Akkuladestand wechselt der DEEBOT abgeschlossenen Reinigungszyklus automatisch fort, Der DEEBOT kehrt zur automatisch in den Lademodus und kehrt...
Seite 67
Funktionsstörung Mögliche Ursachen Fehlerbehebung Entfernen Sie Netzkabel und kleine Gegenstände vom Boden, Der Reinigungszyklus wird durch kleine um die Reinigungseffizienz zu gewährleisten. Der DEEBOT reinigt Gegenstände oder Barrieren auf dem automatisch den ausgelassenen Bereich. Bewegen Sie den Boden gestört. DEEBOT nicht von Hand und blockieren Sie den Pfad während des Reinigungszyklus nicht.
Seite 68
Funktionsstörung Mögliche Ursachen Fehlerbehebung Entfernen Sie kleine Gegenstände vom Boden, und Der DEEBOT reinigt nicht die Der Reinigungsbereich wurde nicht räumen Sie den zu reinigenden Bereich auf, bevor der gesamte Fläche. aufgeräumt. DEEBOT mit dem Reinigungsvorgang beginnt. Die DEEBOT-Seitenbürsten Die Seitenbürsten sind nicht ordnungsgemäß Vergewissern Sie sich, dass die DEEBOT-Seitenbürsten fallen während des Gebrauchs beim Anbringen hörbar einrasten.
Seite 69
Funktionsstörung Mögliche Ursachen Fehlerbehebung Installieren Sie den Staubbehälter zur automatischen Der Staubbehälter für die automatische Leerung mit zwei Auslässen für die automatische Leerung Leerung ist nicht installiert. an der Unterseite. Setzen Sie den Staubbeutel wieder ein, und schließen Sie Der Staubbeutel ist voll. Der DEEBOT entleert den Deckel des Staubbehälters.
Fehlerbehebung/6.2 WLAN-Verbindung Vergewissern Sie sich vor der WLAN-Einrichtung, dass DEEBOT, Mobiltelefon und WLAN-Netzwerk die folgenden Anforderungen erfüllen. Anforderungen an DEEBOT und Mobiltelefon • Der DEEBOT ist vollständig geladen und der Netzschalter des DEEBOT ist eingeschaltet. • Die WLAN-Statusleuchte blinkt langsam. •...
7. Technische Daten Modell DLX11-54 Modell der Station zur CH1918 CH1822 (Separat erhältlich) automatischen Leerung 50 - 60 Hz 50 - 60 Hz 220-240 V 100-240 V Nenneingangsstrom Eingangsspannung 0,3 A 0,5 A (Ladevorgang) 20 V 20 V Nennausgangsstrom Ausgangsspannung Leistung (automatische 1000 W Leerung)
Seite 72
Centro de Atención al Cliente, donde un técnico podrá ayudarle debidamente. www.ecovacs.com Para obtener más información, visite la web oficial de ECOVACS ROBOTICS: La compañía se reserva el derecho a realizar cambios tecnológicos o de diseño en sus productos para una continua mejora.
Seite 73
Índice 1. Instrucciones importantes de seguridad ........................74 2. Contenido de la caja ...............................78 3. Funcionamiento y programación ...........................83 4. Mantenimiento .................................90 5. Indicador luminoso ................................99 6. Solución de problemas ..............................100 7. Especificaciones técnicas ............................106...
1. Instrucciones importantes de levante las cortinas o manteles que pudieran es- tar a nivel del suelo. seguridad 3. Si en el área de limpieza existe un desnivel debi- INSTRUCCIONES IMPORTANTES DE do a la presencia de un escalón o escaleras, le recomendamos que controle el dispositivo para SEGURIDAD cerciorarse de que sea capaz de detectar el es-...
Seite 75
10. No use el dispositivo en entornos extremada- abertura libre de polvo, pelusa, pelo o cualquier mente fríos o calurosos (temperatura inferior a partícula que pueda reducir el flujo de aire. -5 ˚C [23 ˚F] o superior a 40 ˚C [104 ˚F]). 18. Tenga cuidado de no dañar el cable de alimen- 11.
Seite 76
funcionan correctamente, si han sufrido una caí- 29. El dispositivo se debe usar respetando lo esta- da, si están dañados, si se han dejado olvidados blecido en este manual de usuario. ECOVACS en el exterior o si han entrado en contacto con ROBOTICS no asume ninguna responsabilidad agua.
Seite 77
Para desactivar el módulo de Wi-Fi en el DEEBOT, Para países de la Unión Europea encienda el robot. Para obtener información sobre la Declaración Coloque el robot en la estación con vaciado de conformidad de la UE, visite automático y compruebe que la conexión entre https://www.ecovacs.com/global/compliance los contactos de carga del DEEBOT y los de la estación con vaciado automático sea correcta.
Seite 78
2. Contenido de la caja/2.1 Contenido de la caja Estación con vaciado Manual de Robot Cable de alimentación Bolsa para polvo automático instrucciones Sistema oscilante Paños de limpieza Filtro de alta eficiencia y Cepillos laterales OZMO Pro desechables filtro de esponja Nota: Las figuras e ilustraciones se muestran solo como referencia y pueden ser diferentes del aspecto real del producto.
2. Contenido de la caja /2.2 Esquema del producto Robot Botón de reinicio (RESET) Tapa Botón del modo automático Luz indicadora de Wi-Fi Interruptor de Sensor 3D alimentación TrueDetect Herramienta de limpieza multifunción Sensor de Recipiente para polvo con vaciado automático distancia TrueMapping Salida de la estación con vaciado automático...
Vista inferior Estación con vaciado automático Contactos de carga Sensor de detección Botón de liberación Rueda universal de alfombras de la tapa Cepillos laterales Indicador luminoso Cepillo principal Ruedas de propulsión Emisor de la señal infrarroja Conectores de la estación con vaciado Entrada de la estación automático con vaciado automático...
Seite 81
Estación con vaciado automático (parte trasera) Estación con vaciado automático (parte inferior) Sujeción del cable de alimentación Puerto del cable de alimentación Cavidad del tornillo de la base Tornillos de ajuste de la cubierta del tubo de evacuación del polvo Tubo de evacuación Estación con vaciado automático (parte superior) del polvo + cubierta...
Cable de alimentación Sistema oscilante OZMO Pro Entrada de agua Depósito Botón de liberación del depósito Paño de limpieza desechables Coloque únicamente el paño de limpieza desechable en el sistema OZMO Pro.
Seite 83
3. Funcionamiento y programación/3.1 Observaciones antes de limpiar Ordene la zona que se va a limpiar colocando Durante el primer uso, asegúrese de que todas Tal vez sea necesario colocar una los muebles, como sillas, en su sitio. las habitaciones tienen las puertas abiertas para barrera física en el borde de cualquier que DEEBOT pueda explorar la casa al completo.
Seite 84
3. Funcionamiento y programación/3.2 Inicio rápido Retirada del material protector Montaje de la estación con vaciado automático Colocación de los cepillos laterales Haga clic en...
3. Funcionamiento y programación/ Encendido 3.3 Carga de DEEBOT Ubicación de la estación con vaciado automático Nota: I = ENCENDIDO, = APAGADO. El DEEBOT no se puede cargar cuando está apagado. Carga del DEEBOT parpadea cuando el DEEBOT se está cargando. se apaga cuando el DEEBOT está...
Seite 86
3. Funcionamiento y programación/3.4 Aplicación ECOVACS HOME Para poder usar todas las funciones disponibles, se recomienda controlar el DEEBOT mediante la aplicación ECOVACS HOME. Antes de comenzar, asegúrese de que: Luz indicadora de Wi-Fi • El teléfono móvil está conectado a una red Wi-Fi. Sin conexión Wi-Fi o Parpadeo lento esperando conexión Wi-Fi...
Seite 87
3. Funcionamiento y programación/3.5 Funcionamiento del DEEBOT Durante la primera limpieza, controle el DEEBOT y ayúdele si hay algún problema. Arranque Retorno al cargador Pausa Pulse durante 3 segundos para enviar el DEEBOT de vuelta a la estación con vaciado automático. * Si la estación con vaciado automático está...
Seite 88
3. Funcionamiento y programación/3.6 Sistema oscilante OZMO Pro Nota: 1. Instale el sistema oscilante OZMO Pro de limpieza del suelo. 2. Con un fregado de oscilación eléctrica de hasta 480 pasadas por minuto, el sistema OZMO Pro es válido para zonas con mucho polvo o suciedad. 3.
Seite 89
Secado completo de los contactos Fregado Instalación del sistema OZMO Pro...
Seite 90
Mantenimiento/4.1 Mantenimiento habitual Para mantener el rendimiento óptimo del DEEBOT, realice las tareas de mantenimiento y las sustituciones con las siguientes frecuencias: Pieza del robot Frecuencia de mantenimiento Frecuencia de sustitución Paño de limpieza desechables Sustituir después de cada uso Las bolsas para polvo deben cambiarse cuando Bolsa para polvo lo solicite la luz indicadora/aplicación ECOVACS...
Seite 91
Mantenimiento/4.2 Sistema oscilante OZMO Pro Apagado de OZMO Pro Paño de limpieza desechables * Vacíe el depósito cuando el DEEBOT haya terminado de fregar. Limpieza de OZMO Pro * Limpie el sistema oscilante OZMO Pro con un paño seco y limpio. No lo sumerja en agua.
Seite 92
Mantenimiento/4.3 Recipiente para polvo y filtros con vaciado automático Depósito de polvo Filtro...
Seite 93
Mantenimiento/4.4 Cepillo principal y cepillos laterales Cepillo principal Cepillos laterales...
Seite 94
Mantenimiento/4.5 Estación con vaciado automático Nota: Desconecte la estación con vaciado automático antes de realizar tareas de limpieza y mantenimiento. * Para un mantenimiento adecuado, límpiela con un paño limpio y seco. Evite también usar detergente o espray limpiador. Conectores de la estación con vaciado automático Emisor de señal de infrarrojos Bolsa para polvo Deseche la bolsa para polvo...
Seite 95
Limpie la cubierta del soplador Cierre la tapa del contenedor de polvo Coloque la bolsa para polvo...
Seite 96
Tubo de evacuación del polvo Desenrosque la cubierta de tubo Desinstale la cubierta del tubo de Limpie el tubo de evacuación del de evacuación del polvo evacuación del polvo polvo...
Seite 97
Mantenimiento/4.6 Otros componentes Nota: Antes de limpiar los contactos de carga del robot y los conectores de la estación con vaciado automático, apague el robot y desenchufe la estación con vaciado automático.
Mantenimiento/ 4.6 Almacenamiento Si no va a utilizar el DEEBOT durante un periodo de tiempo prolongado, cárguelo por completo y apáguelo antes de almacenarlo. Cargue el DEEBOT cada mes y medio para evitar que se dañe la batería. Nota: Cuando el DEEBOT no esté en funcionamiento, se recomienda dejarlo encendido y cargando.
5. Indicador luminoso El DEEBOT le indicará que hay algún problema a través de un indicador luminoso y un informe de voz. Puede encontrar asistencia más detallada en el sitio web en línea y en la aplicación ECOVACS HOME. Indicador luminoso Situación El robot está...
6. Solución de problemas/6.1 Solución de problemas N.º Problema Posibles causas Soluciones El DEEBOT no está encendido. Encienda el DEEBOT. Asegúrese de que los conectores del robot se hayan El DEEBOT no se ha conectado a la estación conectado a los contactos de carga de la estación con con vaciado automático.
Seite 101
N.º Problema Posibles causas Soluciones El tiempo de funcionamiento varía en función de la superficie del suelo, la complejidad de la Active la función de limpieza continua en la estancia y el modo de limpieza seleccionado. aplicación ECOVACS HOME. El DEEBOT reanudará Cuando el nivel de la batería es bajo, el automáticamente el ciclo de limpieza incompleto cuando DEEBOT pasa automáticamente al modo de...
Seite 102
N.º Problema Posibles causas Soluciones Retire del suelo los cables de alimentación y los objetos pequeños para garantizar una limpieza eficaz. El DEEBOT El ciclo de limpieza se ha visto interferido por limpiará automáticamente la zona que falta, evite mover pequeños objetos o barreras en el suelo.
Seite 103
N.º Problema Posibles causas Soluciones El DEEBOT no limpia Retire del suelo los objetos pequeños y ordene la zona de La zona de limpieza no está ordenada. toda la zona. limpieza antes de que el DEEBOT comience a limpiar. Los cepillos laterales del Los cepillos laterales no están instalados Asegúrese de que los cepillos laterales encajan DEEBOT se caen durante la...
Seite 104
N.º Problema Posibles causas Soluciones El recipiente para polvo con vaciado Instale el recipiente para polvo con vaciado automático automático no está instalado. con las dos salidas en la parte inferior. Vuelva a colocar la bolsa para polvo y cierre la tapa del La bolsa para polvo está...
6. Solución de problemas/6.2 Conexión Wi-Fi Antes de configurar la red Wi-Fi, asegúrese de que el DEEBOT, el teléfono móvil y la red Wi-Fi cumplen los siguientes requisitos. Requisitos del DEEBOT y del teléfono móvil • El DEEBOT está totalmente cargado y el interruptor de alimentación del DEEBOT está apagado. •...
7. Especificaciones técnicas Modelo DLX11-54 Modelo con estación con CH1918 CH1822 (Se vende por separado) vaciado automático 50 - 60 Hz 50 - 60 Hz 220-240 V 100-240 V Tensión nominal de Entrada 0,3 A 0,5 A entrada (carga) Corriente nominal de 20 V 20 V Salida...
Seite 107
Nos techniciens se mettront à votre disposition pour résoudre votre problème ou répondre à une question particulière. www.ecovacs.com Pour plus d'informations, consultez le site Web officiel ECOVACS ROBOTICS : La société se réserve le droit d'apporter des modifications technologiques et/ou conceptuelles à ce produit pour en assurer l'amélioration continue.
Seite 108
Table des matières 1. Consignes de sécurité importantes..........................109 2. Contenu de l'emballage ..............................113 3. Fonctionnement et programmation ..........................118 4. Entretien ..................................125 5. Voyant .....................................134 6. Dépannage ..................................135 7. Spécifications techniques ............................141...
1. Consignes de sécurité l'appareil. Replier les franges sous les tapis et relever les rideaux et les nappes pour qu'ils ne importantes traînent pas sur le sol. CONSIGNES DE SÉCURITÉ 3. Si le sol présente une déclivité dans la zone IMPORTANTES à...
Seite 110
8. Ne pas utiliser l'appareil sans réservoir à pous- 17. Ne pas placer d'objet dans la tête d'aspiration. sière et/ou sans filtre. Ne pas utiliser l'appareil si la tête d'aspiration est 9. Ne pas faire fonctionner l'appareil en présence bloquée. Retirer de la tête d'aspiration la pous- de bougies allumées ou d'objets fragiles.
Seite 111
Ne pas tructions figurant dans ce manuel d'instructions. utiliser l'appareil ou la station de vidage automa- ECOVACS ROBOTICS ne peut être tenu respon- tique s'ils ne fonctionnent pas correctement, ont sable de tout dommage ou préjudice causé par subi une chute, ont été...
Seite 112
Pour désactiver le module Wi-Fi du DEEBOT, mettre Pour les pays de l'Union européenne le commutateur du robot en position ON. Pour obtenir des informations sur la déclaration Placer le robot sur la station de vidage automatique en de conformité de l'UE, rendez-vous sur veillant à...
2. Contenu de l'emballage/2.1 Contenu de l'emballage Station de vidage Robot Cordon d'alimentation Sac à poussière Manuel d'instructions automatique Système oscillant Chiffons de nettoyage Filtre haute efficacité et Brosses latérales OZMO Pro jetables filtre éponge Remarque : Les figures et illustrations sont fournies uniquement à titre de référence, et peuvent ne pas représenter l'apparence du produit. La conception et les spécifications du produit peuvent être modifiées sans préavis.
Seite 114
2. Contenu de l'emballage/2.2 Schéma du produit Robot Bouton de réinitialisation Capot supérieur Bouton du mode automatique Voyant Wi-Fi Commutateur Capteur 3D d'alimentation TrueDetect Outil de nettoyage multifonction Capteur de Réservoir à poussière de vidage automatique distance TrueMapping Sortie de vidage automatique Filtre éponge Poignée du réservoir à...
Vue de dessous Station de vidage automatique Contacts de charge Capteur de Bouton de détection de déverrouillage du Roue universelle moquette/tapis couvercle Brosses latérales Voyant Brosse principale Roues motrices Émetteur infrarouge Broches de la station de Entrée de vidage vidage automatique automatique Capteurs antichute Bouton de...
Seite 116
Station de vidage automatique (arrière) Station de vidage automatique (bas) Attache du cordon d'alimentation Port du cordon d'alimentation Douille à vis de base Vis de fixation du couvercle du tube d'évacuation de la poussière Tube d'évacuation de Station de vidage automatique (haut) la poussière + couvercle du tube Connexion du sac à...
Cordon d'alimentation Système oscillant OZMO Pro Entrée d'eau Réservoir d'eau Bouton de déverrouillage du réservoir d'eau Chiffon de nettoyage jetable Fixer uniquement le chiffon de nettoyage jetable au système OZMO Pro.
Seite 118
3. Fonctionnement et programmation/3.1 Remarques avant le nettoyage Ranger la zone à nettoyer en mettant les Pour la première utilisation, assurez-vous Il peut s'avérer nécessaire de placer une meubles, par exemple les chaises, à leur que les portes de toutes les pièces sont barrière physique aux abords de la déclivité...
Seite 119
3. Fonctionnement et programmation/3.2 Démarrage rapide Retirer les protections Assembler la station de vidage automatique Installation des brosses latérales Clic...
3. Fonctionnement et programmation/ Mise sous tension 3.3 Chargement du robot DEEBOT Positionnement de la station de vidage automatique Remarque : I = ON, = OFF. Il est impossible de charger le DEEBOT s'il n'est pas hors tension (OFF). Charge du DEEBOT clignote que le DEEBOT est en charge.
Seite 121
3. Fonctionnement et programmation/3.4 Application ECOVACS HOME Pour profiter de toutes les fonctionnalités disponibles, il est recommandé de commander votre DEEBOT via l'application ECOVACS HOME. Avant de commencer à utiliser le robot, assurez-vous que : Voyant Wi-Fi • votre téléphone portable est connecté à un réseau Wi-Fi ; Déconnecté...
Seite 122
3. Fonctionnement et programmation/3.5 Utilisation du DEEBOT Pour le premier nettoyage, surveiller le DEEBOT et l'aider en cas de problème. Démarrage Retour au chargeur Mise en pause Appuyer sur pendant 3 secondes pour renvoyer le DEEBOT à la station de vidage automatique. * Lorsque la station de vidage automatique est connectée au secteur, le DEEBOT retourne automatiquement à...
Seite 123
3. Fonctionnement et programmation/3.6 Système oscillant OZMO Pro Remarque : 1. Installer le système oscillant OZMO Pro pour le lavage des sols. 2. Avec un lavage électrique oscillant jusqu'à 480 fois par minute, OZMO Pro est adapté aux zones très sales ou poussiéreuses. 3.
Seite 124
Sécher soigneusement les lentilles Commencer à laver Installer OZMO Pro...
Entretien/4.1 Entretien régulier Pour maintenir les performances optimales du DEEBOT, réaliser les tâches d'entretien et remplacer les pièces à la fréquence suivante : Pièce du robot Fréquence d'entretien Fréquence de remplacement Chiffon de nettoyage jetable Remplacer après chaque utilisation Les sacs à poussière doivent être remplacés Sac à...
Seite 126
Maintenance/4.2 Système oscillant OZMO Pro Retirer OZMO Pro Chiffon de nettoyage jetable * Une fois que le robot DEEBOT a terminé le nettoyage, vider le réservoir. Essuyer le système OZMO Pro * Essuyer le système oscillant OZMO Pro avec un chiffon propre et sec. Ne pas tremper dans l'eau.
Seite 127
Entretien/4.3 Réservoir à poussière et filtres de vidage automatique Réservoir à poussière Filtre...
Seite 128
Entretien/4.4 Brosse principale et brosses latérales Brosse principale Brosses latérales...
Seite 129
Maintenance/4.5 Station de vidage automatique Remarque : Avant de procéder au nettoyage et à l'entretien de la station de vidage automatique, la débrancher d'abord. * Pour un bon entretien, essuyer avec un chiffon propre et sec, et éviter d'utiliser tout détergent ou spray de nettoyage. Broches de la station de vidage automatique Émetteur infrarouge Sac à...
Seite 130
Nettoyer le couvercle du ventilateur Fermer le couvercle du réservoir à poussière Installer le sac à poussière...
Seite 131
Tube d'évacuation de la poussière Dévisser le couvercle du tube Retirer le couvercle du tube Nettoyer le tube d'évacuation de la d'évacuation de la poussière d'évacuation de la poussière poussière...
Seite 132
Entretien/4.6 Autres composants Remarque : Avant de nettoyer les contacts de charge et les broches de la station de vidage automatique, mettre le robot hors tension et débrancher la station de vidage automatique.
Seite 133
Entretien/4.6 Rangement Si le DEEBOT n'est pas utilisé pendant un certain moment, charger complètement le DEEBOT, puis l'éteindre avant de le ranger. Charger le DEEBOT tous les 1,5 mois pour éviter de vider la batterie. Remarque : Lorsque le DEEBOT ne nettoie pas, il est conseillé de le laisser sous tension et en charge.
5. Voyant Le DEEBOT vous indiquera la présence d'un dysfonctionnement par un voyant et un rapport vocal. Une assistance complémentaire est disponible via l'application ECOVACS HOME et le site Web. Voyant Scénario Le robot est en cours de nettoyage Le bouton de mode automatique clignote en BLANC fixe Le robot se met en pause en cours de nettoyage Le robot est en charge Le bouton de mode automatique clignote en BLANC...
Dépannage/6.1 Dépannage N°. Problème Causes possibles Solutions Le DEEBOT n'est pas sous tension. Mettre le DEEBOT sous tension. S'assurer que les contacts de charge du robot sont Le DEEBOT ne s'est pas connecté à la station connectés aux broches de la station de vidage de vidage automatique.
Seite 136
N°. Dysfonctionnement Causes possibles Solutions Le temps de travail varie selon la surface du sol, la complexité de la pièce et le Activer la fonction de nettoyage continu dans mode de nettoyage sélectionné. Lorsque la l'application ECOVACS HOME. Le DEEBOT reprend batterie devient faible, le DEEBOT bascule automatiquement le cycle de nettoyage non terminé...
Seite 137
N°. Dysfonctionnement Causes possibles Solutions Retirer les cordons d'alimentation et les petits objets présents sur le sol pour garantir l'efficacité du nettoyage. Le cycle de nettoyage est perturbé par de Le DEEBOT nettoie automatiquement la zone ratée. Éviter petits objets ou des barrières au sol. de déplacer le DEEBOT manuellement ou de bloquer le passage pendant le cycle de nettoyage.
Seite 138
N°. Dysfonctionnement Causes possibles Solutions Le DEEBOT ne peut pas Retirer les petits objets présents sur le sol et ranger la La zone de nettoyage n'est pas rangée. nettoyer toute la zone. zone à nettoyer avant le début du nettoyage. Les brosses latérales du Les brosses latérales ne sont pas Assurez-vous que les brosses latérales émettent un clic...
Seite 139
N°. Dysfonctionnement Causes possibles Solutions Installer le réservoir à poussière de vidage automatique Le réservoir à poussière de vidage avec les deux sorties de vidage automatique dans le automatique n'est pas installé. fond. Remettre le sac à poussière en place et fermer le Le sac à...
Seite 140
Dépannage/6.2 Connexion Wi-Fi Avant de configurer le Wi-Fi, assurez-vous que votre DEEBOT, votre téléphone portable et votre réseau Wi-Fi répondent aux exigences énoncées ci-dessous. Exigences du DEEBOT et du téléphone portable • Le DEEBOT est complètement chargé et son interrupteur d'alimentation activé. •...
7. Spécifications techniques Modèle DLX11-54 Modèle de station de CH1918 CH1822 (Vendu séparément) vidage automatique 50 - 60 Hz 50 - 60Hz 220-240 V 100-240 V Courant nominal d'entrée Entrée 0,3 A 0,5 A (chargement) 20 V 20 V Courant de sortie nominal Sortie Alimentation 1000W...
Seite 142
Un tecnico risponderà alle vostre domande e vi aiuterà a risolvere il problema. www.ecovacs.com Per ulteriori informazioni, visitare il sito Web ufficiale di ECOVACS ROBOTICS: L'azienda si riserva il diritto di apportare modifiche migliorative tecniche o di design al prodotto.
Seite 143
Indice 1. Importanti istruzioni sulla sicurezza ..........................144 2. Contenuto della confezione ............................148 3. Funzionamento e programmazione ..........................153 4. Manutenzione ................................160 5. Spia ....................................169 6. Risoluzione dei problemi ..............................170 7. Specifiche tecniche ...............................176...
1. Importanti istruzioni sulla sollevare dal pavimento oggetti come tende e tovaglie. sicurezza 3. In caso di possibilità di caduta nell'area da IMPORTANTI ISTRUZIONI SULLA pulire, ad esempio a causa di scalini, è neces- sario impostare l'apparecchio in modo che SICUREZZA possa rilevare i gradini senza cadere.
Seite 145
10. Non utilizzare in condizioni climatiche estre- 18. Fare attenzione a non danneggiare il cavo di mamente calde o fredde (sotto i -5 °C o sopra alimentazione. Non tirare o trascinare l'appa- i 40 °C). recchio o la stazione di svuotamento automa- 11.
Seite 146
no o se sono venuti a contatto con acqua. In 29. L'apparecchio dev'essere utilizzato secondo questi casi, sarà necessaria la riparazione da le indicazioni di questo Manuale d'uso. ECO- parte del produttore o tramite il servizio clienti VACS ROBOTICS non potrà essere ritenuta per evitare rischi.
Seite 147
Per disattivare il modulo Wi-Fi su DEEBOT, Per i paesi dell'Unione europea accendere il robot. Per informazioni sulla dichiarazione di conformità Posizionare il robot sulla stazione di svuotamento UE, visitare il sito Web automatico assicurandosi che i contatti di ricarica https://www.ecovacs.com/global/compliance su DEEBOT e i pin della stazione di svuotamento automatico formino una connessione.
2. Contenuto della confezione/ 2.1 Contenuto della confezione Stazione di svuotamento Manuale d'uso Robot Cavo di alimentazione Sacchetto per la polvere automatico Sistema con moto Filtro di spugna e filtro ad Spazzole laterali Panni di pulizia usa e getta oscillante OZMO Pro alta efficienza Nota: le figure e le illustrazioni sono solo per riferimento e potrebbero differire dal reale aspetto del prodotto.
Seite 149
2. Contenuto della confezione/2.2 Diagramma del prodotto Robot Pulsante di RESET Coperchio superiore Pulsante Modalità AUTO Spia Wi-Fi Interruttore di Sensore alimentazione TrueDetect 3D Strumento di pulizia multi-funzione Sensore di Svuotamento automatico della cassetta di raccolta distanza TrueMapping Uscita di svuotamento automatico Filtro di spugna Maniglia della cassetta di raccolta...
Vista inferiore Stazione di svuotamento automatico Contatti di ricarica Sensore rilevamento Pulsante rilascio Ruota universale tappeti coperchio Spazzole laterali Spazzola Spia principale Ruote motrici Emettitore di segnale a infrarossi Ingresso di Pin della stazione di svuotamento svuotamento automatico Sensori anticaduta automatico Pulsante di rilascio della...
Seite 151
Stazione di svuotamento automatico (Nero) Stazione di svuotamento automatico (Parte inferiore) Avvolgicavo per il cavo di alimentazione Porta per il cavo di Alloggiamento vite alimentazione della base Viti di fermo del coperchio del tubo di evacuazione della polvere Tubo di evacuazione Stazione di svuotamento automatico (Parte superiore) della polvere + coperchio del tubo...
Cavo di alimentazione Sistema con moto oscillante OZMO Pro Inserimento acqua Serbatoio Pulsante rilascio serbatoio Panno di pulizia usa e getta Utilizzare esclusivamente il panno di pulizia usa e getta con OZMO Pro.
Seite 153
3. Funzionamento e programmazione/3.1 Note prima della pulizia Mettere gli arredi, come le sedie, al loro posto Durante il primo utilizzo, accertarsi che tutte le Potrebbe essere necessario posizionare prima di pulire la zona desiderata. porte della stanza siano aperte per consentire a delle barriere sul bordo del dislivello per DEEBOT di esplorare tutta l'abitazione.
Seite 154
3. Funzionamento e programmazione/3.2 Avvio rapido Rimuovere i materiali protettivi Montare la stazione di svuotamento automatico Installazione delle spazzole laterali Clic...
3. Funzionamento e Accensione (ON) programmazione/ 3.3 Ricarica di DEEBOT Posizionamento della stazione di svuotamento automatico Nota: I = ON, = OFF. Non è possibile caricare DEEBOT quando è spento. Ricarica di DEEBOT lampeggia quando DEEBOT è in carica. si spegne quando DEEBOT è...
Seite 156
3. Funzionamento e programmazione/3.4 App ECOVACS HOME Per sfruttare tutte le funzioni disponibili, si consiglia di controllare DEEBOT tramite l'app ECOVACS HOME. Prima di iniziare, accertarsi che: Spia Wi-Fi • Il telefono cellulare sia connesso alla rete Wi-Fi. Rete Wi-Fi disconnessa o in Lampeggia lentamente attesa di connessione •...
Seite 157
3. Funzionamento e programmazione/3.5Funzionamento di DEEBOT Durante la prima pulizia, controllare DEEBOT e fornire assistenza in caso di problemi. Avvio Ritorno alla Docking Station Pausa Premere per 3 secondi per inviare DEEBOT alla stazione di svuotamento automatico. * Quando la stazione di svuotamento automatico è collegata all'alimentazione, DEEBOT torna automaticamente alla stazione per ricaricarsi e svuotare la cassetta di raccolta secondo necessità.
3. Funzionamento e programmazione/ 3.6 Sistema con moto oscillante OZMO Pro Nota: 1. Installare il sistema con moto oscillante OZMO Pro per lo strofinamento del pavimento. 2. Grazie al moto oscillante elettrico con frequenza fino a 480 volte al minuto, OZMO Pro è adatto alla pulizia di aree ad alta concentrazione di polvere o sporcizia.
Seite 159
Far asciugare perfettamente i contatti Avviare il lavaggio Installare OZMO Pro...
Seite 160
Manutenzione/4.1 Manutenzione regolare Per mantenere DEEBOT in esecuzione con prestazioni ottimali, eseguire le operazioni di manutenzione e sostituzione dei componenti con le seguenti frequenze: Parte robot Frequenza di manutenzione Frequenza di sostituzione Panno di pulizia usa e getta Sostituire dopo ogni utilizzo I sacchetti per la polvere devono essere sostituiti Sacchetto per la polvere quando richiesto dalla spia luminosa/dall'app...
Seite 161
Manutenzione/4.2 Sistema con moto oscillante OZMO Pro Rimuovere OZMO Pro Panno di pulizia usa e getta * Al termine della pulizia con DEEBOT, svuotare il serbatoio. Pulire OZMO Pro * Pulire il sistema con moto oscillante OZMO Pro con un panno pulito e asciutto .
Manutenzione/ 4.3 Cassetta di raccolta per svuotamento automatico e filtri Cassetta di raccolta ad alta efficienza...
Seite 163
Manutenzione/4.4 Spazzola principale e spazzole laterali Spazzola principale Spazzole laterali...
Seite 164
Manutenzione/4.5 Stazione di svuotamento automatico Nota: Prima di eseguire la pulizia e la manutenzione della stazione di svuotamento automatico, scollegarla. * Per una corretta manutenzione, strofinare con un panno pulito e asciutto ed evitare di utilizzare detergenti o spray per la pulizia. Pin della stazione di svuotamento automatico Emettitore di segnale a infrarossi Sacchetto per la polvere...
Seite 165
Pulire il coperchio del ventilatore Chiudere il coperchio del contenitore polvere Montare il sacchetto per la polvere...
Seite 166
Tubo di evacuazione della polvere Svitare la copertura del tubo Disinstallare la copertura Pulire il tubo di evacuazione della di evacuazione della polvere del tubo di evacuazione della polvere polvere...
Seite 167
Manutenzione/4.6 Altri componenti Nota: Prima di pulire i contatti di ricarica del robot e i pin della stazione di svuotamento automatico, spegnere il robot e scollegare la stazione di svuotamento automatico.
Seite 168
Manutenzione/ 4.6 Conservazione Se DEEBOT non viene utilizzato per un po', ricaricarlo completamente e spegnerlo prima di riporlo. Ricaricarlo ogni 1,5 mesi per evitare potenziali danni alla batteria. Nota: Quando DEEBOT non sta pulendo, è consigliabile tenerlo acceso e in carica.
5. Spia DEEBOT informa circa un eventuale problema con spie e messaggi vocali. Informazioni di assistenza più dettagliate sono disponibili nell'app ECOVACS HOME e sul sito Web online. Spia Situazione Il robot è in fase di pulizia Il pulsante della modalità AUTO emette una luce BIANCA fissa Il robot viene messo in pausa durante la pulizia Il robot è...
6. Risoluzione dei problemi/6.1 Risoluzione dei problemi N° Problema Possibili cause Soluzioni DEEBOT non è acceso. Accendere DEEBOT. DEEBOT non è collegato alla stazione di Assicurarsi che i contatti di ricarica del robot siano collegati svuotamento automatico. ai pin della stazione di svuotamento automatico. Il cavo di alimentazione non è...
Seite 171
N° Malfunzionamento Possibili cause Soluzioni Il tempo di funzionamento varia in base alla superficie del pavimento, alla complessità della stanza e alla modalità di pulizia Attivare la funzione Pulizia continua nell'app ECOVACS selezionata. Quando il livello di carica della HOME. DEEBOT riprenderà automaticamente il ciclo di batteria diventa insufficiente, DEEBOT pulizia interrotto quando è...
Seite 172
N° Malfunzionamento Possibili cause Soluzioni Per garantire l'efficienza della pulizia, togliere dal Oggetti di piccole dimensioni o barriere sul pavimento cavi di alimentazione e piccoli oggetti. pavimento possono interferire con il ciclo di DEEBOT provvederà automaticamente a pulire le zone pulizia.
Seite 173
N° Malfunzionamento Possibili cause Soluzioni DEEBOT non pulisce Rimuovere dal pavimento i piccoli oggetti e sistemare L'area da pulire non è priva di ostacoli. tutta l'area. l'area da pulire prima che DEEBOT inizi la fase di pulizia. Le spazzole laterali non sono installate Le spazzole laterali di DEEBOT Assicurarsi che le spazzole laterali in posizione durante si sganciano durante l'uso.
Seite 174
N° Malfunzionamento Possibili cause Soluzioni Installare la cassetta di raccolta per lo svuotamento La cassetta di raccolta per lo svuotamento automatico con due uscite di svuotamento automatico automatico non è installata. sulla parte inferiore. Sostituire il sacchetto per la polvere e chiudere il DEEBOT non è...
6. Risoluzione dei problemi/6.2 Connessione Wi-Fi Prima di configurare la connessione alla rete Wi-Fi, assicurarsi che DEEBOT, il telefono cellulare e la rete Wi-Fi soddisfino i seguenti requisiti. Requisiti di DEEBOT e telefoni cellulari • DEEBOT è completamente carico e l'interruttore di alimentazione di DEEBOT è acceso. •...
7. Specifiche tecniche Modello DLX11-54 Modello di stazione di CH1918 CH1822 ( Venduto separatamente ) svuotamento automatico 50 - 60 Hz 50 - 60 Hz 220-240 V 100-240 V Ingresso nominale Ingresso 0,3 A 0,5 A (ricarica) 20 V 20 V Uscita nominale Uscita Potenza...
Seite 177
помощью в авторизированный сервисный центр, где наши специалисты смогут помочь вам в решении конкретных проблем или ответить на ваши вопросы. Дополнительную информацию можно получить на официальном сайте ECOVACS ROBOTICS по адресу: www.ecovacs.com Компания оставляет за собой право вносить технологические и/или конструктивные изменения в данное изделие...
Seite 178
Содержание 1. Инструкции по технике безопасности........................179 2. Комплектация ................................183 3. Эксплуатация и программирование .........................188 4. Техническое обслуживание ............................195 5. Световой индикатор..............................204 6. Устранение неисправностей ............................205 7. Технические характеристики .............................211...
1. Инструкции по технике Заправьте бахрому ковра под ковер и поднимите занавески и скатерти над полом. безопасности Если поверхность для очистки имеет перепады ИНСТРУКЦИИ ПО ТЕХНИКЕ высот, например ступени, управляйте прибором, БЕЗОПАСНОСТИ чтобы убедиться, что он распознает их и не падает При...
Seite 180
Не используйте прибор в помещении с зажженны- стии не должно быть пыли, ворса, волос или дру- ми свечами или хрупкими объектами. гих объектов, которые могут препятствовать потоку 10. Не используйте прибор при очень высокой или воздуха. очень низкой температуре (ниже -5˚C/23˚F или 18.
Seite 181
после падения, повреждения, пребывания на от- теля. Компания ECOVACS ROBOTICS не несет крытом воздухе или попадания в воду. В целях какой-либо ответственности за повреждения или обеспечения безопасности ремонт прибора должен неисправности, вызванные ненадлежащей эксплу- выполняться представителем производителя или атацией прибора.
Seite 182
Для стран Европейского Союза Включите робота, чтобы отключить модуль Wi- Fi на DEEBOT. Для получения информации о Декларации о Установите робота на станцию с функцией соответствии ЕС перейдите по адресу автоматического опустошения и убедитесь, что https://www.ecovacs.com/global/compliance зарядные контакты робота DEEBOT и станции с...
2. Комплектация / 2.1 Комплектация Станция с функцией Руководство по Робот Кабель питания Мешок для сбора пыли автоматического эксплуатации опустошения Система OZMO Pro Одноразовые чистящие Высокоэффективный и Боковые щетки с вибрационным салфетки губчатый фильтры приводом Примечание. Рисунки и иллюстрации приведены в ознакомительных целях и могут отличаться от фактического внешнего вида изделия. Конструкция...
Seite 184
2. Комплектация / 2.2 Схема изделия Робот Кнопка сброса Кнопка Верхняя крышка автоматического режима AUTO Индикатор Wi-Fi Переключатель Датчик питания TrueDetect 3D Многофункцио- нальный инстру- мент очистки Пылесборочный контейнер с возможностью Датчик автоматического опустошения расстояния Выпускное отверстие для TrueMapping автоматического опустошения Ручка...
Вид снизу Станция с функцией автоматического опустошения Зарядные контакты Кнопка Датчики Универсальное разблокировки обнаружения ковров колесо крышки Боковые щетки Световой индикатор Главная щетка Ведущие колеса Излучатель инфракрасного сигнала Контакты станции с функцией Впускное отверстие Датчики для автоматического для автоматического предотвращения опустошения...
Seite 186
Станция с функцией автоматического Станция с функцией автоматического опустошения (вид сзади) опустошения (вид снизу) Приспособление для хранения кабеля питания в свернутом виде Порт для кабеля Отверстие для винта питания в базовой станции Установочные винты для крышки тракта для сброса пыли Тракт...
Seite 187
Кабель питания Система OZMO Pro с вибрационным приводом Отверстие для наливания воды Резервуар Кнопка разблокировки резервуара Одноразовая чистящая салфетка Прикрепляйте только одноразовую чистящую салфетку к OZMO Pro.
Seite 188
3. Эксплуатация и программирование/3.1 Подготовка к очистке Приведите в порядок зону уборки, При первом использовании откройте двери Возможно, потребуется установить расставив мебель, например стулья, на во все комнаты, чтобы робот DEEBOT физическое препятствие на границе свое обычное место. полностью исследовал ваш дом. перепада...
Seite 189
3. Эксплуатация и программирование/3.2 Краткое руководство Снимите защитные материалы Соберите станцию с функцией автоматического опустошения Установите боковые щетки Щелчок...
3. Эксплуатация и Включение питания программирование/ 3.3 Зарядка робота DEEBOT Размещение станции с функцией автоматического опустошения Примечание. "I" = "ВКЛ.", "O" = "ВЫКЛ.". Робот DEEBOT не заряжается в отключенном состоянии. Зарядка робота DEEBOT мигает во время зарядки робота DEEBOT. гаснет, когда робот...
Seite 191
3. Эксплуатация и программирование/3.4 Приложение ECOVACS HOME Чтобы воспользоваться всеми доступными функциями, рекомендуется управлять роботом DEEBOT через приложение ECOVACS HOME. Перед началом работы убедитесь, что: Индикатор Wi-Fi • Мобильный телефон подключен к сети Wi-Fi. Нет подключения к сети Wi-Fi Медленно мигает или...
Seite 192
3. Эксплуатация и программирование/3.5 Эксплуатация робота DEEBOT Во время первой уборки следите за работой робота DEEBOT и помогайте ему при возникновении проблем. Запуск Возвращение на зарядную станцию Нажмите и удерживайте кнопку в течение 3 секунд для отправки Приостановка работы робота DEEBOT обратно на станцию с функцией автоматического опустошения.
Seite 193
3. Эксплуатация и программирование/ 3.6 Система OZMO Pro с вибрационным приводом Примечание. 1. Установите систему OZMO Pro с вибрационным приводом для мытья пола. 2. Благодаря электрическому блоку для мытья пола с вибрационным приводом, обеспечивающим до 480 вибраций в минуту, OZMO Pro подходит...
Seite 195
4. Техническое обслуживание/4.1 Регулярное обслуживание Чтобы робот DEEBOT продолжал обеспечивать наилучшее качество уборки, выполняйте обслуживание и замену расходников в соответствии со следующими инструкциями. Детали робота Частота обслуживания Частота замены Одноразовая чистящая салфетка Замена после каждого использования Мешки для сбора пыли необходимо заменять при...
4. Техническое обслуживание/ 4.2 Система OZMO Pro с вибрационным приводом Снимите OZMO Pro Одноразовая чистящая салфетка * Когда робот DEEBOT завершит уборку, опустошите резервуар. Начисто протрите OZMO Pro * Протрите систему OZMO Pro с вибрационным приводом чистой сухой тканью. Не погружайте в воду.
Seite 197
4. Техническое обслуживание/4.3 Фильтры и пылесборочный контейнер с возможностью автоматического опустошения Пылесборочный контейнер Фильтр...
Seite 198
4. Техническое обслуживание/4.4 Главная щетка и боковые щетки Главная щетка Боковые щетки...
Seite 199
4. Техническое обслуживание/ 4.5 Станция с функцией автоматического опустошения Примечание. Прежде чем приступить к очистке и техническому обслуживанию станции с функцией автоматического опустошения, отключите ее от электросети. * Для поддержания надлежащего состояния протрите ее чистой сухой тканью и не используйте моющие средства или чистящие спреи. Контакты...
Seite 200
Очистите крышку вентилятора Закройте крышку контейнера для сбора пыли Установите мешок для сбора пыли...
Seite 201
Тракт для сброса пыли Открутите крышку тракта Снимите Очистите тракт для сброса пыли для сброса пыли крышку тракта для сброса пыли...
Seite 202
4. Техническое обслуживание/4.6 Другие компоненты Примечание. Прежде чем приступить к очистке зарядных контактов робота и станции с функцией автоматического опустошения, отключите робота и извлеките вилку станции с функцией автоматического опустошения из розетки.
Seite 203
4. Техническое обслуживание/ 4.6 Хранение Если вы не планируете использовать устройство DEEBOT в течение некоторого времени, полностью его зарядите и отключите перед помещением на хранение. Заряжайте робота DEEBOT каждые 1,5 месяца, чтобы предотвратить утечку тока аккумулятора. Примечание. Когда робот DEEBOT не выполняет уборку, рекомендуется...
5. Световой индикатор Робот DEEBOT сообщает о неполадках с помощью светового индикатора и голосовых уведомлений. Дополнительные сведения о поддержке доступны в приложении ECOVACS HOME и на веб-сайте. Световой индикатор Состояние Робот выполняет уборку Кнопка автоматического режима AUTO непрерывно светится БЕЛЫМ Робот...
6. Устранение неисправностей/6.1 Поиск и устранение неисправностей № Проблема Возможные причины Решение Робот DEEBOT не включен. Включите робота DEEBOT. Убедитесь, что зарядные контакты робота соединены Робот DEEBOT не подключен к станции с контактами станции с функцией автоматического с функцией автоматического опустошения. опустошения.
Seite 206
№ Неисправность Возможные причины Решение Время работы зависит от поверхности пола, сложности комнаты и выбранного Включите функцию продолжения уборки в приложении режима уборки. Когда заряд аккумулятора ECOVACS HOME. Если включена функция снижается, робот DEEBOT автоматически продолжения уборки, робот DEEBOT автоматически переключается...
Seite 207
№ Неисправность Возможные причины Решение Уберите с пола провода и небольшие предметы для Выполнению цикла уборки мешают обеспечения эффективной уборки. Робот DEEBOT небольшие предметы или препятствия на автоматически выполнит уборку пропущенного полу. участка. Не перемещайте DEEBOT вручную и не преграждайте ему путь во время выполнения уборки. Робот...
Seite 208
№ Неисправность Возможные причины Решение Уберите мелкие предметы с пола и расчистите Робот DEEBOT не выполняет Область уборки не расчищена. область уборки, прежде чем робот DEEBOT приступит уборку всей области. к работе. Боковые щетки выпадают из Боковые щетки робота DEEBOT должны робота...
Seite 209
№ Неисправность Возможные причины Решение Пылесборочный контейнер с Установите пылесборочный контейнер с возможностью возможностью автоматического автоматического опустошения и двумя выходными опустошения не установлен. отверстиями для автоматического опустошения снизу. Замените мешок для сбора пыли и закройте крышку Мешок для сбора пыли заполнен. контейнера...
Seite 210
6. Устранение неисправностей/6.2 Подключение к сети Wi-Fi Перед настройкой сети Wi-Fi убедитесь, что робот DEEBOT, мобильный телефон и сеть Wi-Fi соответствуют следующим требованиям. Требования к роботу DEEBOT и мобильному телефону • Робот DEEBOT полностью заряжен, а его переключатель питания включен. •...
7. Технические характеристики Модель DLX11-54 Модель со станцией с функцией CH1918 CH1822 (Приобретается отдельно) автоматического опустошения Номинальная 50 - 60 Hz 50 - 60 Hz 220-240 V 100-240 V потребляемая мощность Вход 0,3 A 0,5 A ( во время зарядки ) Номинальная...
Seite 212
Ecovacs Robotics Co., Ltd. No. 18 You Xiang Road, Wuzhong District, Suzhou City, Jiangsu Province, P.R.China 451-1921-1605...