Herunterladen Diese Seite drucken
Klarstein Meat Machine Handbuch

Klarstein Meat Machine Handbuch

Smoker-grill
Vorschau ausblenden Andere Handbücher für Meat Machine:

Werbung

Verfügbare Sprachen
  • DE

Verfügbare Sprachen

  • DEUTSCH, seite 1
Meat Machine
Smoker-Grill
Smoker Grill
Barbacoa con ahumador
Barbecue fumoir
Barbecue con affumicatore
10034819

Werbung

loading

Inhaltszusammenfassung für Klarstein Meat Machine

  • Seite 1 Meat Machine Smoker-Grill Smoker Grill Barbacoa con ahumador Barbecue fumoir Barbecue con affumicatore 10034819...
  • Seite 3: Hersteller

    Sehr geehrter Kunde, wir gratulieren Ihnen zum Erwerb Ihres Gerätes. Lesen Sie die folgenden Hinweise sorgfältig durch und befolgen Sie diese, um möglichen Schäden vorzubeugen. Für Schäden, die durch Missachtung der Hinweise und unsachgemäßen Gebrauch entstehen, übernehmen wir keine Haftung. Scannen Sie den folgenden QR-Code, um Zugriff auf die aktuellste Bedienungsanleitung und weitere Informationen rund um das Produkt zu erhalten.
  • Seite 4: Sicherheitshinweise

    SICHERHEITSHINWEISE WARNUNG Erstickungsgefahr! Der Grill ist nur für die Nutzung im Freien bestimmt. Er darf nicht in Gebäuden, Garagen oder anderen geschlossenen Bereichen verwendet werden. Es können sich giftige Dämpfe bilden, die zum Ersticken führen. • Der Grill ist nicht für gewerbliche Zwecke geeignet. •...
  • Seite 5 VORSICHT! VERWENDEN SIE KEINEN ALKOHOL ODER BENZIN ZUM ANZÜNDEN ODER WIEDERANZÜNDEN!
  • Seite 6: Einzelteile

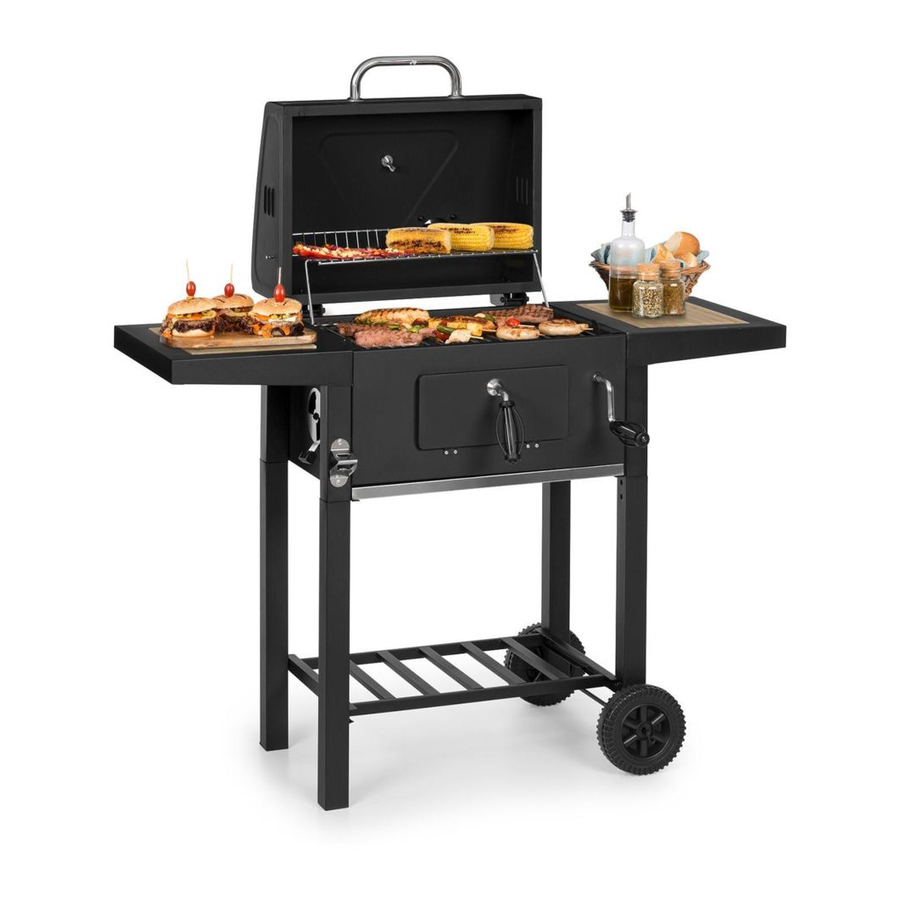
    EINZELTEILE Teil Bild Teil Bild Brennkammer Brennkammer Seitenwände Frontplatte (2x) (1x) Brennkammer Kurzes Rückwand Standbein (1x) (2x) Langes Untere Standbein Ablage (2x) (1x) Holzkohle- rost halter (2x) (1x) Radachse Holzkohle rost (1x) (1x) Unteres Oberes Scharnier Scharnier (2x) (2x) Deckel Deckelgriff (1x) (1x)
  • Seite 7 Teil Bild Teil Bild Kohletür- Thermometer Verrie gelung (1x) (1x) Seiten ablage Asche behälter (2x) (1x) Warmhalte - Grillrost gitter (1x) (1x) Kohlerost- Lüftungsgitter kurbel (2x) (1x) Bambus- Schneide- Rauchdeckel bretter (1x) (2x) Schornstein (1x) Teil Bild Teil Bild M6×12 M6 Mutter Schrauben (24x)
  • Seite 8: Zusammenbau

    ZUSAMMENBAU Montieren Sie die Brennkammer, indem Sie die Seitenwand (1), die Frontplatte (2) und die Rückwand (3) mit den Schrauben (A) aneinander befestigen. Befestigen Sie die Lüftungsgitter (26) und die Seitenablage (21) mit Schrauben (A) und Muttern (B) an den Seitenwänden der Brennkammer.
  • Seite 9 Befestigen Sie die kurzen Standbeine (4) und die langen Standbeine (5) mit Schrauben (A) und Schrauben (D) an der Brennkammer. Befestigen Sie die untere Ablage (6) mit Schrauben (A) an den Standbeinen.
  • Seite 10 Befestigen Sie die Radachse (9), indem Sie diese durch die Öffnungen der kurzen Standbeine (4) stecken. Montieren Sie dann die Räder (8) an die Radachse (9) und sichern Sie diese mit den Splinten (E). Befestigen Sie den Holzkohlerost (10) und den Holzkohlerosthalter (7) innen mit Schrauben (A).
  • Seite 11 Befestigen Sie das obere Scharnier (12) mit Schrauben (C) und Muttern (B) auf der Rückseite des Grilldeckels (13). Montieren Sie den Deckelgriff (14) und die Deckelgriffblende (15) mit Schrauben (A) am Deckel (13). Bringen Sie das Thermometer (19) am Deckel (13) an. Befestigen Sie den Schornstein (29) mit Schrauben (A) und Muttern (B) am Deckel (13) und verschließen Sie den Schornstein mit dem Rauchdeckel (28) mit einer Schraube (A).
  • Seite 12 Befestigen Sie den Türgriff (17), die Griffblende (18) und die Türverriegelung (20) mit einer Mutter (B) an der Frontplatte (2) der Brennkammer. Montieren Sie die Kohlerostkurbel (25) am Holzkohle rost halter (7). Setzen Sie das Warmhaltegitter (23) und den Grillrost (24) in die Brennkammer ein.
  • Seite 13 Befestigen Sie den Deckel (13) mit Schraube (F) und Mutter M6 (B) an der Rückwand (3). Schieben Sie den Aschebehälter (22) unter die Brennkammer. Legen Sie die Bambus-Schneidebretter (27) auf die Seitenablage (21).
  • Seite 15 Dear Customer, Congratulations on purchasing this device. Please read the following instructions carefully and follow them to prevent possible damages. We assume no liability for damage caused by disregard of the instructions and improper use. Scan the QR code to get access to the latest user manual and more product information.
  • Seite 16: Safety Instructions

    SAFETY INSTRUCTIONS WARNING Risk of suffocation! This grill is for outdoor use only and shall not be used in a building, garage or any other enclosed area. Toxic carbon monoxide fumes can accumulate and cause asphyxiation. • This grill is not for commercial use. •...
  • Seite 17 CAUTION! DO NOT USE SPIRIT OR PETROL FOR LIGHTING OR RE-LIGHTING!
  • Seite 18 PARTS Part Picture Part Picture Firebox Firebox side panel front panel (2x) (1x) Firebox Short leg back panel (2x) (1x) Long leg Bottom shelf (2x) (1x) Charcoal Wheel plate fixer (2x) (1x) Charcoal Axle plate (1x) (1x) Under hinged Upper hinged support support (2x)
  • Seite 19 Part Picture Part Picture Thermometer Door latch (1x) (1x) Side shelf Ash drawer (2x) (1x) Warming grill Cooking grill (1x) (1x) Charcoal Vent plate handle (1x) (1x) Bamboo Chimney lid cutting boards (1x) (2x) Chimney (1x) Part Picture Part Picture M6×12 screw M6 nut (36x)
  • Seite 20 ASSEMBLY Assemble the fire bowl by attaching the side panel (1), front panel (2) and back panel (3) together with screws (A). Attach the vents (26) and the side shelfs (21) to the side panels of the fire box with screws (A) and nuts (B).
  • Seite 21 Fix the short legs (4) and long legs (5) to the fire box with screws (A) and screws (D). Fix the bottom shelf (6) to the legs with screws (A).
  • Seite 22 Insert the axle (9) through the openings of the short legs (4), attach the wheels (8) to the axle (9) and secure them with pins (E). Assemble the charcoal plate (10) and charcoal plate fixer (7) inside with screws (A).
  • Seite 23 Attach the upper hinge support (12) to the back side with screws (C) and nuts (B). Attach the lid handle (14) and lid spacer (15) to the top lid (13) with screws (A). Attach the thermometer (19) to the top lid (13). Attach the chimney (29) to the top lid (13) with screws (A) and nuts (B), then lock the chimney with the smoke lid (28) with a screw (A).
  • Seite 24 Attach door handle (17), charcoal door spacer (18) and the door latch (20) to the front panel with a nut (B). Fix the charcoal plate handle (25) to the charcoal plate fixer (7). Place the warming grill (23) and cooking grill (24) into the fire box.
  • Seite 25 Attach the top lid (13) to the back panel (3) with bolt (F) and M6 nut (B). Insert the ash drawer (22) under the fire bowl. Put the bamboo cutting boards (27) onto the side shelf (21).
  • Seite 27 Chère cliente, cher client, Toutes nos félicitations pour l’acquisition de ce nouvel appareil. Veuillez lire attentivement et respecter les instructions de ce mode d’emploi afin d’éviter d’éventuels dommages. Nous ne saurions être tenus pour responsables des dommages dus au non-respect des consignes et à...
  • Seite 28: Consignes De Sécurité

    CONSIGNES DE SÉCURITÉ MISE EN GARDE Risque d‘étouffement ! Le gril est destiné à un usage extérieur seulement. Il ne doit pas être utilisé dans des bâtiments, garages ou autres espaces clos. Il peut former des fumées toxiques qui provoquent la suffocation.
  • Seite 29 ATTENTION ! NE PAS UTILISER D'ALCOOL OU D'ESSENCE POUR ALLUMER OU RALLUMER !
  • Seite 30: Pièces Détachées

    PIÈCES DÉTACHÉES N° Pièce Illustration N° Pièce Illustration Panneau Parois frontal chambre de chambre de combustion combustion (1x) Paroi arrière chambre de Pied court combustion (2x) (1x) Plateau Pied long inférieur (2x) (1x) Support grille Roue à charbon (2x) (1x) Grille à...
  • Seite 31 N° Pièce Illustration N° Pièce Illustration Verrou de Thermomètre la porte à (1x) charbon (1x) Etagère Support d‘axe latérale (1x) (2x) Grille de Grille de réchauffage cuisson (1x) (1x) Manivelle Grille grille à d‘aération charbon (2x) (1x) Planches à Couvercle de découper en fumoir bambou (2x)
  • Seite 32 ASSEMBLAGE Assemblez la chambre de combustion en fixant le panneau latéral (1), le panneau avant (2) et le panneau arrière (3) avec les vis (A). Fixez les grilles d‘aération (26) et la tablette latérale (21) aux parois latérales de la chambre de combustion à...
  • Seite 33 Fixez les pieds courts (4) et les pieds longs (5) à la chambre de combustion avec les vis (A) et les vis (D). Fixez la tablette inférieure (6) aux pieds avec les vis (A).
  • Seite 34 Fixez l‘axe de roue (9) en l‘insérant dans les ouvertures des pieds courts (4). Montez ensuite les roues (8) sur l’axe de roue (9) et fixez-les avec les goupilles fendues (E). Fixer la grille à charbon (10) et le support à charbon (7) à l‘intérieur avec des vis (A).
  • Seite 35 Fixez la charnière supérieure (12) à l‘arrière du couvercle du barbecue (13) à l‘aide des vis (C) et des écrous (B). Montez la poignée du couvercle (14) et l‘enjoliveur de la poignée du couvercle (15) à l’aide des vis (A) sur le couvercle (13). Fixez le thermomètre (19) au couvercle (13).
  • Seite 36 Fixez la poignée de porte (17), l‘enjoliveur de poignée (18) et le verrou de porte (20) au panneau avant de la chambre de combustion (2) à l‘aide d‘un écrou (B). Monter la manivelle de grille à charbon (25) sur le support de grille à charbon (7). Insérez la grille de réchauffement (23) et la grille de cuisson (24) dans la chambre de combustion...
  • Seite 37 Fixer le couvercle (13) sur la paroi arrière (3) avec la vis (F) et l‘écrou M6 (B). Faites glisser le cendrier (22) sous la chambre de combustion. Placez les planches à découper en bambou (27) sur l‘étagère latérale (21).
  • Seite 39 Estimado cliente, Le felicitamos por la adquisición de este producto. Lea atentamente las siguientes instrucciones y sígalas para evitar posibles daños. No asumimos ninguna responsabilidad por los daños causados por el incumplimiento de las instrucciones y el uso inadecuado. Escanee el siguiente código QR para obtener acceso a la última guía del usuario y más información sobre el producto.
  • Seite 40: Indicaciones De Seguridad

    INDICACIONES DE SEGURIDAD ADVERTENCIA ¡Riesgo de asfi xia! La barbacoa de jardín está concebida para utilizarse únicamente en el exterior. No debe utilizarse en un edifi cio, garaje o área cerrada. Se pueden crear humos tóxicos y provocar asfi xia. •...
  • Seite 41 ATENCIÓN! ¡NO UTILICE ALCOHOL O GASOLINA PARA ENCEDER LA BARBACOA!
  • Seite 42 PARTES INDIVIDUALES Núm. Pieza Imagen Núm. Pieza Imagen Paredes Placa laterales delantera cámara cámara de combustión combustión (2x) (1x) Pared trasera cámara de Pata corta combustión (2x) (1x) Pata larga Balda inferior (2x) (1x) Soporte rejilla Rueda carbón (2x) (1x) Eje de la Rejilla carbón rueda...
  • Seite 43 Núm. Pieza Imagen Núm. Pieza Imagen Bloqueo Termómetro puerta para el (x1) carbón (x1) Recipiente Balda lateral para las (2x) cenizas (x1) Rejilla Parrilla para mantenimiento el grill calor (1x) (1x) Manivela para Rejilla de la rejilla del ventilación carbón (1x) (2x) Tabla de Tapa del...
  • Seite 44 ENSAMBLAJE Monte la cámara de combustión fijando entre sí las paredes laterales (1), la placa delantera (2) y la pared trasera (3) con los tornillos (A). Fije la rejilla de ventilación (26) y la balda lateral (21) con tornillos (A) y tuercas (B) a las paredes laterales de la cámara de combustión.
  • Seite 45 Fije las patas cortas (4) y las patas largas (5) con tornillos (A) y tornillos (D) a la cámara de combustión. Fije la balda inferior (6) con tornillos (A) a las patas.
  • Seite 46 Fije el eje de la rueda (9) encajándolo por los orificios de las patas cortas (4) . A continuación, monte las ruedas (8) en el eje de la rueda (9) y asegúrelas con los pasadores (E). Fije la rejilla para el carbón (10) y el soporte de la rejilla para el carbón (7) en el interior con tornillos (A).
  • Seite 47 Fije la bisagra superior (12) con tornillos (C) y tuercas (B) en la parte trasera de la tapa de la parrilla (13). Monte el asa de la tapa (14) y el separador de la tapa (15) con tornillos (A) en la tapa (13). Monte el termómetro (19) en la tapa (13). Fije la chimenea (29) con tornillos (A) y tuercas (B) a la tapa (13) y cierre la chimenea con la tapa del ahumador (28) con un tornillo (A).
  • Seite 48 Fije el asa de la puerta (17), el separador del asa (18) y el bloqueo de la puerta (20) con una tuerca (B) a la placa delantera (2) de la cámara de combustión. Monte la manivela de la rejilla para el carbón (25) en el soporte de la rejilla para el carbón (7).
  • Seite 49 Fijar la tapa (13) a la pared trasera (3) con el tornillo (F) y la tuerca M6 (B). Desplace el recipiente para las cenizas (22) hacia la parte inferior de la cámara de combustión. Coloque la tabla de cortar de bambú (27) en la balda lateral (21).
  • Seite 51 Gentile cliente, La ringraziamo per aver acquistato il dispositivo. La preghiamo di leggere attentamente le seguenti istruzioni per l’uso e di seguirle per evitare possibili danni. Non ci assumiamo alcuna responsabilità per danni scaturiti da una mancata osservazione delle avvertenze di sicurezza e da un uso improprio del dispositivo.
  • Seite 52: Avvertenze Di Sicurezza

    AVVERTENZE DI SICUREZZA ATTENZIONE Pericolo di soffocamento! La griglia da giardino è progettato per il solo uso all’aperto. Non può essere utilizzato in edifi ci, garage o altri ambienti chiusi. Possono formarsi vapori tossici, che provocano il soffocamento. • La griglia non è adatto a utilizzi commerciali. •...
  • Seite 53 ATTENZIONE! NON UTILIZZARE ALCOOL O BENZINA PER ACCENDERE O RIACCENDERE LA GRIGLIA!
  • Seite 54 PARTI SINGOLE N° Componente Immagine N° Componente Immagine Pannello Pareti laterali frontale camera camera affumicazione affumicazione (2x) (1x) Retro camera Piede affumicazione d’appoggio (1x) corto (2x) Piede Ripiano d’appoggio inferiore lungo (2x) (1x) Supporto griglia a Ruota carbone (2x) (1x) Asse della Griglia a ruota...
  • Seite 55 N° Componente Immagine N° Componente Immagine Fermo dello Termometro sportello per (1x) carbonella (1x) Ripiano Contenitore laterale cenere (2x) (1x) Griglia per Griglia mantenere in (1x) caldo (1x) Manovella Griglia di griglia a areazione carbone (1x) (2x) Tagliere di Coperchio bambù...
  • Seite 56 MONTAGGIO Montare la camera di affumicazione avvitando insieme la parete laterale (1), il pannello frontale (2) e il retro (3) con le viti (A). Fissare la griglia di areazione (26) e il ripiano laterale (21) alle pareti laterali della camera di affumicazione con le viti (A) e i dadi (B).
  • Seite 57 Fissare i piedi d’appoggio corti (4) e lunghi (5) alla camera di affumicazione con le viti (A) e (D). Fissare il ripiano inferiore (6) ai piedi d’appoggio con le viti (A).
  • Seite 58 Fissare l’asse della ruota (9) inserendola nelle aperture dei piedi d’appoggio corti (4). Montare poi le ruote (8) all’asse della ruota (9) assicurandole con le coppiglie (E). Fissare internamente la griglia a carbone (10) e il supporto per griglia a carbone (7) con le viti (A).
  • Seite 59 Fissare la cerniera superiore (12) sul retro del coperchio del barbecue (13) con le viti (C) e i dadi (B). Montare l’impugnatura del coperchio (14) e l’inserto per maniglia (15) sul coperchio (13) con le viti (A). Applicare il termometro (19) sul coperchio (13).
  • Seite 60 Fissare la maniglia dello sportello (17), l’inserto per maniglia (18) e il fermo dello sportello (20) al pannello frontale (2) della camera di affumicazione con un dado (B). Montare la manovella del contenitore a griglia a carbone (25) al supporto per griglia (7).
  • Seite 61 Fissare il coperchio (13) alla parete posteriore (3) con la vite (F) e il dado M6 (B). Spingere il contenitore per la cenere (22) sotto la camera di affumicazione. Appoggiare il tagliere di bambù (27) sul ripiano laterale (21).

Diese Anleitung auch für:

10034819