Herunterladen Inhalt Inhalt Diese Seite drucken
Klarstein 10028784 BDA Bedienungsanleitung

Klarstein 10028784 BDA Bedienungsanleitung

Elektrischer grill

Werbung

Verfügbare Sprachen
  • DE

Verfügbare Sprachen

  • DEUTSCH, seite 1
Elektrischer Grill
10028784

Werbung

Inhaltsverzeichnis
loading

Inhaltszusammenfassung für Klarstein 10028784 BDA

  • Seite 1 Elektrischer Grill 10028784...
  • Seite 2: Inhaltsverzeichnis

    Sehr geehrter Kunde, wir gratulieren Ihnen zum Erwerb Ihres Gerätes. Lesen Sie die folgenden Hinweise sorgfältig durch und befolgen Sie diese, um möglichen Schäden vorzubeugen. Für Schäden, die durch Missachtung der Hinweise und unsachgemäßen Gebrauch entstehen, übernehmen wir keine Haftung. Inhalt Technische Daten .
  • Seite 3 • Überprüfen Sie das Gerät und die Verkabelung regelmäßig. Benutzen Sie sie nicht weiter, falls Probleme mit dem Gerät auftreten. • Tauchen Sie das Gerät mit dem Heizelement nicht in Wasser. • Das Gerät sollte ausgeschaltet werden, wenn es nicht benutzt wird. •...
  • Seite 4 • Tauchen Sie das Netzkabel oder die Thermostatstecker nicht in Wasser oder eine andere Flüssigkeit. • Verwenden Sie Verlängerungskabel nur, nachdem Sie sich vergewissert haben, dass sie geerdet sind, und mindestens 10 A führen können. • Legen Sie das Kabel so, dass ein unbeabsichtigtes Berühren oder Ziehen nicht möglich ist. •...
  • Seite 5: Geräteübersicht

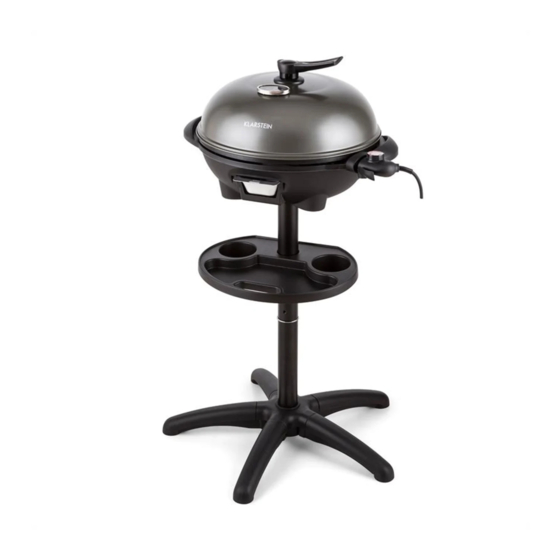
    Geräteübersicht 1 Grillhaube 2 Griffe der Haube 3 Grillplatte 4 Fettauffangschale 5 Gerätebasis 6 Zubehör-Ablage 7 Oberes Stativrohr 8 Verzierung 9 Unteres Stativrohr 10 A Standfuß B Standbasis 11 Griff der Gerätebasis 12 Öffnung für die Gerätesteckdose 13 Lampe für die Temperaturanzeige 14 Abnehmbarer Temperaturregler mit Kabel 15 Gerätesteckdose...
  • Seite 6: Montage

    Montage Stecken Sie die Füße Legen Sie die Unter- legscheibe (16) auf (10A) fest in den So- den Sockel und zie- ckel (10B). Wenn ein Fuß richtig einrastet hen Sie die Schrau- ben (17) auf der Un- klickt es. terlegscheibe fest, um den Sockel und die Standfüße fest...
  • Seite 7 Stellen Sie die Fettauf- Stellen Sie die Grill- fangschale(4) in die Hal- platte (3) auf das Gerät terung, die zur Geräte- (5). Führen Sie die Ge- basis gehört. rätesteckdose (15) in die dafür vorgesehene Öffnung (12). Stellen Sie anschließend die Grillplatte waagerecht auf die Gerätebasis.
  • Seite 8: Bedienung

    Bedienung Bevor Sie das Gerät zum ersten Mal benutzen • Entfernen Sie die Verpackung und reinigen Sie die Grillplatte (3), Fettauffangschale (4) und die Grillhaube (1) vollständig. Das Gerät benutzen 1. Schließen Sie das Gerät an die Stromversorgung an. 2. Stellen Sie den Temperaturregler (14) auf die gewünschte Temperatur ein. (Gewöhnlich braucht das Gerät 3 Minuten zum Aufheizen.) 3.
  • Seite 9: Reinigung Und Pflege

    • Wenn das Grillgut auf der Grillplatte klebt, reiben Sie die Platte hin und wieder mit einem in Öl getränkten Küchentuch ab. Reinigung und Pflege 1. Trennen Sie das Gerät von der Stromversorgung. 2. Lassen Sie den Grill vollständig abkühlen. 3.
  • Seite 10: Technical Data

    Dear Customer, Congratulations on purchasing this equipment. Please read this manual carefully and take care of the fol- lowing hints on installation and use to avoid technical damages. Any failure caused by ignoring the men- tioned items and cautions mentioned in the operation and installation instructions are not covered by our warranty and any liability.
  • Seite 11 • Never immerse the appliance with heating element. • The appliance should be switched off at mains when not in use. • Use only one appliance per plug and always use an earthed extension cable, with cross section of at least 1.0 mm •...
  • Seite 12 • Only use extension leads after having made sure that their condition is faultless and use an earthed wise with a minimum capacity of 10 A. • Put the wire so that unintentional touching or drawing is impossible. • Never bring the extension wire in touch with the hot grill plate. •...
  • Seite 13: Product Overview

    Product Overview 1 Metal grill hood 2 Handle of hood 3 Grill Plate 4 Fat collecting bowl 5 Base of appliance 6 Condiment tray 7 Upper stand tube 8 Decoration 9 Nether stand tube 10 A Stand foot B Stand base 11 Handle of base 12 Opening for appliance socket 13 Temperature indicator lamp...
  • Seite 14: Installation

    Installation Place the washer (16) Install the stand feet (10A) into the stand onto the stand base, and then install the base (10B) properly. There will be a “click” screws (17) into the sound when washer to fix the stand feet and stand stand foot is fixed completely base firmly.
  • Seite 15 Put the fat collecting Place the grill plate (3) bowl (4) into the bracket on the base of the ap- supplied for it in the base pliance (5). First of all of the appliance, buckle insert the appliance the hole of fat collecting socket (15) into the bowl onto the screw to opening intended for...
  • Seite 16: Operation

    Operation Before using the appliance for the first time • Remove all the packaging materials and wash the grill plate (3), fat collecting bowl (4) and metal grill hood (1) thoroughly. • Dry all the different parts thoroughly. This applies especially to the appliance socket (14) .Never immerse the detachable temperature regulator (13) in water.
  • Seite 17: Cleaning And Care

    Tips for grilling • Your meat will be tendered if you marinade it overnight before cooking (the marinade is always made of oil (to and moistness), vinegar (to tenderize) and a mixture of seasonings). • Always use tongs or some form of scoop to turn the grilled food (using a fork to turn the food will dry it out and damage the non-stick coating).
  • Seite 18: Declaration Of Conformity

    Declaration of Conformity Producer: CHAL-TEC Vertriebs- + Handels GmbH, Wallstraße 16, 10179 Berlin. This product is conform to the following European Directives: 2004/108/EC (EMC) 2006/95/EC (LVD) 2011/65/EU (RoHS)
  • Seite 19: Dati Tecnici

    Gentile cliente, La ringraziamo per aver scelto il nostro prodotto. La preghiamo di leggere e di seguire attentamente le se- guenti istruzioni per evitare eventuali danni tecnici. Decliniamo ogni responsabilità in caso di danni dovuti a una mancata osservanza delle norme di sicurezza e ad un uso improprio del prodotto.
  • Seite 20 • Controllare regolarmente il cavo e il dispositivo e in caso si riscontrino dei problemi, non utilizzare il di- spositivo. • Non immergere il dispositivo e l’ e lemento riscaldante nell’ a cqua. • A fine utilizzo spegnere il dispositivo. •...
  • Seite 21 • Utilizzare una prolunga solo dopo aver accertato che questa sia con messa a terra e adatta a una corrente di minimo 10 A. • Dislocare il cavo in modo che non sia di intralcio o intoppo. • La prolunga non deve entrare in contatto con la graticola. •...
  • Seite 22: Descrizione Del Dispositivo

    Descrizione del dispositivo 1 Coperchio 2 Manico del coperchio 3 Griglia 4 Vaschetta raccogli-grasso 5 Base del dispositivo 6 Vassoio accessorio 7 Tubo stativo superiore 8 Guarnizione 9 9 Tubo stativo inferiore 10 A Piedi d’ a ppoggio B Base d’ a ppoggio 11 Impugnatura della base...
  • Seite 23: Montaggio

    Montaggio Collocare la rondel- Inserire i piedi di ap- poggio (10A) nelle la di bloccaggio (16) fessure poste sotto sotto la base d’ a p- poggio e, avvitando la base d’ a ppoggio (10B). Un click in- le viti (17) alla ron- della di bloccaggio, dicherà...
  • Seite 24 Inserire la vaschetta rac- Posizionare orizzontal- cogli-grasso (4) nell’ a p- mente la griglia (3) sulla posita apertura. base del dispositivo a forma di ciotola (5) in modo che la presa per il termostato (15) si in- serisca nell’ a pposita apertura (12) posta alla base del barbecue.
  • Seite 25: Utilizzo

    Utilizzo Prima di utilizzare il dispositivo per la prima volta: • Rimuovere i materiali di imballaggio e lavare accuratamente la griglia (3), la vaschetta raccogli-grasso (4) e il coperchio (1). Impiego del dispositivo 1. Collegare il dispositivo alla rete elettrica. 2.
  • Seite 26: Pulizia E Manutenzione

    • Non grigliare troppo a lungo la carne. La stessa carne di maiale è più saporita e appetitosa se viene servita leggermente rosata. • Se gli alimenti si attaccano alla griglia, passarci sopra un panno da cucina impregnato di olio. Pulizia e manutenzione 1.
  • Seite 27: Données Techniques

    Chère cliente, cher client, Toutes nos félicitations pour l’ a cquisition de ce nouvel appareil. Veuillez lire attentivement les instructions de branchement et d’utilisation afin d’ é viter d’ é ventuels dommages techniques. Le fabricant ne saurait être tenu pour responsable des dommages dus au non-respect des consignes de sécurité et à la mauvaise utilisation de l’...
  • Seite 28 seulement une fois que celles-ci aient été entièrement sensibilisées aux consignes d’utilisation et de sécu- rité. Veiller à ce que les enfants ne jouent pas avec l’ a ppareil. • Ne pas brancher l’ a ppareil à une prise télécommandée ou à une minuterie externe. •...
  • Seite 29: Aperçu De L'appareil

    Aperçu de l’appareil 1 Couvercle 2 Poignée 3 Plaque de grill 4 Collecteur de graisse 5 Tablette 6 Tube de support supérieur 7 Elément décoratif 8 Tube de support inférieur 9 A Pieds B Disque de soutien 10 Poignée 11 Ouverte pour le branchement 12 Témoin lumineux de la température 13 Thermostat avec cordon...
  • Seite 30: Montage

    Montage Introduire les pieds Placer le disque de soutien (16) sur la (10A) dans le sup- partie inférieure du port central (110B) jusqu’ à ce qu’ils s’ e n- support central et le fixer à l’ a ide des clenchent. vis (17), comme l’in- dique l’illustration ci- contre.
  • Seite 31 Introduire le collecteur Placer la grille (8) sur de graisse (9) dans l’ o u- la cuve. Le port pour le verture de la cuve. thermostat et le bran- chement doit s’insérer parfaitement dans le réceptacle de la cuve à cet effet.
  • Seite 32: Utilisation

    Utilisation Avant la première utilisation • Retirer tous les éléments d’ e mballage et nettoyer la plaque de grill (3), le collecteur de graisse (4) et le couvercle (1) avec précaution Utilisation de l’appareil 1. Rraccorder la fiche du cordon d‘alimentation à une prise de courant. 2.
  • Seite 33: Entretien Et Nettoyage

    • Ne pas laisser la viande griller trop longtemps. La viande de porc est meilleure lorsqu’ e lle est servie légè- rement saignante et juteuse. • Si les aliments collent à la plaque du grill, la frotter avec de l’ e ssuie-tout imbibé d’un peu d’huile. Entretien et nettoyage 1.
  • Seite 34: Datos Técnicos

    Estimado cliente: Le felicitamos por la adquisición de este producto. Lea atentamente el siguiente manual y siga cuidadosa- mente las instrucciones de uso con el fin de evitar posibles daños. La empresa no se responsabiliza de los daños ocasionados por un uso indebido del producto o por haber desatendido las indicaciones de seguridad. Índice Datos técnicos .
  • Seite 35 y si están supervisadas por otra persona. Los niños deberán estar vigilados para evitar que juegen con el aparato. • No conecte el aparato a tomas de corriente con temporizador ni con control remoto. • Si el cable de alimentación o el enchufe están dañados, no utilice el aparato y contacte con el fabricante para que sustituya la pieza defectuosa.
  • Seite 36: Descripción Del Aparato

    Descripción del aparato 1 Tapa 2 Asa 3 Parrilla 4 Bandeja recoge grasa extraíble 5 Base de la parrilla 6 Bandeja 7 Soporte superior 8 Embellecedor 9 Soporte inferior 10 A. Base B. Patas 11 Asa 12 Conector para el termostato 13 LED indicador de temperatura 14 Termostato con cable y enchufe 15 Conexión a la red eléctrica...
  • Seite 37: Montaje

    Montaje Encaje las patas (16b) Coloque la junta (17) en la parte inferior de en los enganches de las patas y atorníllela la base (16a) hasta que queden comple- tal y como se indica en la ilustración. tamente fijos. Enrosque la barra Una el soporte a las roscada en el sopor- patas para completar la...
  • Seite 38 SIntroduzca la bandeja Encaje la parrilla en su recoge grasa en la aber- base. El termostato y el tura correspondiente. conector de la red eléc- trica deberán colocarse exactamente en el lu- gar indicado. Fije el asa a la tapa con Introduzca el termó- un tornillo, una arandela metro (18) en el orifico...
  • Seite 39: Uso

    Antes del primer uso • Retire el embalaje y limpie la parrilla (3), la bandeja recoge grasa (4) y la tapa (1). Utilizar el aparato 1. Conecte el aparato al suministro eléctrico. 2. Ajuste el regulador de temperatura (14) para conseguir la temperatura deseada (el aparato necesita unos tres minutos para calentarse).
  • Seite 40: Limpieza Y Cuidado

    • Si el alimento se queda pegado a la parrilla, frote esta última con un paño empapado en aceite Limpieza y cuidado 1. Desenchufe el aparato. 2. Deje que la parrilla se enfríe completamente. 3. Extraiga el regulador de temperatura del conector del aparato. 4.

Inhaltsverzeichnis