Herunterladen Inhalt Inhalt Diese Seite drucken
Beurer EA 34 Gebrauchsanweisung

Beurer EA 34 Gebrauchsanweisung

Akupunkturgerät mit tens-funktion
Vorschau ausblenden Andere Handbücher für EA 34:
Inhaltsverzeichnis

Werbung

Verfügbare Sprachen
  • DE

Verfügbare Sprachen

  • DEUTSCH, seite 1
D
Akupunkturgerät mit TENS-Funktion
Gebrauchsanweisung ...................2-18
Acupuncture device with TENS
function
Operating instructions ................. 19-35
Appareil d'acupuncture et TENS
F
Mode
Aparato de acupuntura con función
E
TENS
Instrucciones de uso ................... 53-69
Downloaded from
www.Manualslib.com
d'emploi.............................
Beurer GmbH • Söflinger Str. 218 • D-89077 Ulm (Germany)
Tel.: +49 (0) 731 / 39 89-144 • Fax: +49 (0) 731 / 39 89-255
www.beurer.de • Mail: kd@beurer.de
manuals search engine
Dispositivo per agopuntura con fun-
IT
zione TENS
Istruzioni per l'uso........................70-86
TENS fonksiyonlu akupunktur cihazÕ
TR
Kullanma TalimatÕ ..................... 87-103
RUS
36-52
(TENS)
Urz dzenie do akupunktury z
PL
funkcj TENS
Instrukcja obsáugi .................... 121-140
EA 34
-
......104-120
0344

Werbung

Inhaltsverzeichnis
loading

Inhaltszusammenfassung für Beurer EA 34

  • Seite 1 TENS Instrucciones de uso ....53-69 Instrukcja obsáugi ....121-140 Beurer GmbH • Söflinger Str. 218 • D-89077 Ulm (Germany) Tel.: +49 (0) 731 / 39 89-144 • Fax: +49 (0) 731 / 39 89-255 0344 www.beurer.de • Mail: kd@beurer.de Downloaded from www.Manualslib.com...
  • Seite 2: Inhaltsverzeichnis

    Deutsch Inhalt 1 Zum Kennenlernen ......3 2 Zeichenerklärung......4 3 Hinweise ........4 4 Gerätebeschreibung ...... 9 5 Bedienung Akupunktur ....11 6 Bedienung der TENS-Funktion ... 13 7 Technische Angaben....15 8 Gerät reinigen und pflegen..17 9 Entsorgen ........17 10 Problemlösung......
  • Seite 3: Zum Kennenlernen

    Sie die Hinweise. den Bereichen Wärme, Gewicht, Blutdruck, Mit freundlicher Empfehlung Körpertemperatur, Puls, Sanfte Therapie, Ihr Beurer-Team Massage und Luft. Bitte lesen Sie diese Zum Kennenlernen Das Gerät ist ein Kombigerät und vereint Der schmerzlindernde bzw. -unterdrückende...
  • Seite 4: Zeichenerklärung

    Zeichenerklärung Folgende Symbole werden in der Ge- Folgende Symbole werden auf dem Typen- schild verwendet. brauchsanleitung verwendet. Warnung Warnhinweis auf Verlet- Anwendungsteil Typ BF zungsgefahren oder Ge- fahren für Ihre Gesund- heit. Achtung! Achtung Sicherheitshinweis auf Gebrauchsanleitung lesen. mögliche Schäden am Gerät/Zubehör.
  • Seite 5 Warnung Verwenden Sie das Gerät ausschließlich: x am Menschen x Nicht nach der Einnahme von Substanzen x zur äußerlichen Anwendung verwenden, die zu einer eingeschränkten x für den Zweck, für den es entwickelt wur- Wahrnehmung führen (z.B. schmerzlin- de und auf die in dieser Gebrauchsanlei- dernde Medikamente, Alkohol).
  • Seite 6 x Behandeln Sie keine Körperpartien die x Bei Hautausschlägen (z.B. Allergien), krankheitsbedingte Veränderungen wie Verbrennungen, Prellungen, Schwellun- z.B. Schwellungen, Verbrennungen, Ent- gen und offenen sowie sich im Heilungs- zündungen, Hautausschläge, Wunden, prozess befindliche Wunden. Vernarbungen oder empfindliche Stellen x An Operationsnarben die in der Heilung aufweisen.
  • Seite 7 Halten Sie vor einer Anwendung des Ge- Zusätzlich gelten für die TENS- räts Rücksprache mit Ihrem behandelnden Anwendung folgende Sicher- Arzt bei: heitshinweise! x Akuten Erkrankungen, insbesondere bei Verwenden Sie das Gerät ausschließlich Verdacht oder Vorliegen von Bluthoch- mit den mitgelieferten und nachbestellba- druckerkrankungen, Blutgerinnungsstö- ren Original-Zubehörteilen, ansonsten er- rungen, Neigung zu thromboemboli-...
  • Seite 8 Vor Inbetriebnahme Achtung Achtung x Der Hersteller haftet nicht für Schäden, die durch unsachgemäßen oder falschen x Vor Gebrauch des Gerätes ist jegliches Gebrauch verursacht wurden. Verpackungsmaterial zu entfernen. x Schützen Sie das Gerät vor Staub, x Öffnen Sie das Batteriefach wie auf S. 16 Schmutz und Feuchtigkeit.
  • Seite 9: Gerätebeschreibung

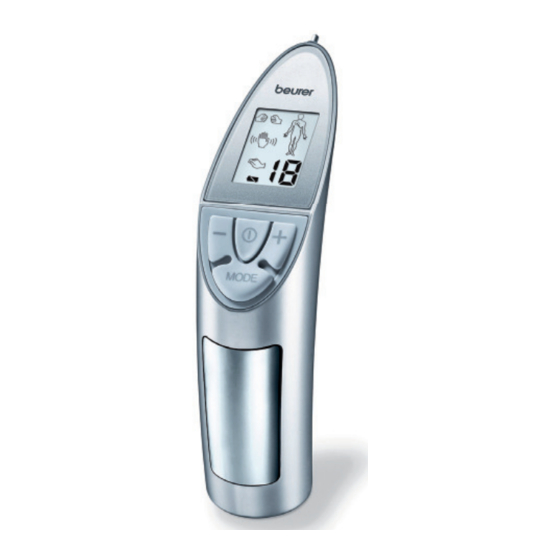
    Gerätebeschreibung Übersicht Pos. Bezeichnung Schalter: A: Akupunkturbetrieb T: TENS-Betrieb Akupunkturspitze Anzeige Bedienfeld Passive Kontaktplatte (Neutral- elektrode) Anschluss für Verbindungskabel Pos. Bezeichnung Batteriefach Verbindungskabel für TENS Klebeelektroden für TENS Achtung! (2 St.) Gerätesockel (nicht darge- Wenn Sie während der Anwendung stellt) den Schalter (0) verändern, schaltet sich das Gerät automatisch ab! Drücken Sie den Ein-Ausschalter...
  • Seite 10 Bedienfeld MODE Taste Erklärung Ein-/Aus-Schalter [10] Zum Einschalten den Schalter drücken. Der Ton des Suchmodus ertönt. Mode-Taste [12] Wahl des Stimulationsmodus x Klopfstimulation x Massagestimulation x Knetstimulation Intensitätstasten [9, 11] Einstellung der Stimulationsintensität (15 Stufen). x Intensität erhöhen: Taste „+“ wiederholt drücken x Intensität reduzieren: Taste „–“...
  • Seite 11: Bedienung Akupunktur

    Bedienung Akupunktur Einschalten x Die Kontaktplatte [4] am Griff muss permanent berührt werden, um den Achten Sie darauf, dass sich das Stromfluss nicht zu unterbrechen. Gerät im ausgeschalteten Zustand befindet. Stellen Sie dann den x Führen Sie die Akupunkturspitze [1] des Schalter [0] auf Position A und Geräts über den Körperbereich, in dem sich der gewünschte Akupunkturpunkt...
  • Seite 12 Stimulation Wenn der gewünschte Akupunkturpunkt gefunden ist, kann die Stimulation begin- Die gefundenen Akupunkturpunkte können nen: mit 3 verschiedenen Programmen (Mas- sage, Kneten, Klopfen) mit jeweils 15 In- x Wählen Sie den Stimulationsmodus. tensitätsstufen stimuliert werden. x Nach Start der Stimulation wird der Ton des Suchmodus ausgeschaltet.
  • Seite 13: Bedienung Der Tens-Funktion

    Bedienung der TENS-Funktion Es gilt als Richtlinie für die Wahl der Angaben zu möglichen Positionen der Elektrodenabstände: Elektroden entnehmen Sie bitte der bei- gefügten Anlage „Elektrodenplatzierung“. x sinnvollster Abstand: ca. 5 –15 cm, Sie können die Elektrodenplatzierung x unter 5 cm werden primär ober- auch in entsprechender Fachliteratur flächliche Strukturen stark stimuliert, nachschlagen.
  • Seite 14 Stimulation Anwendungsdauer Achten Sie darauf, dass sich das Die Anwendungsdauer sollte so gewählt Gerät im ausgeschalteten Zustand werden, dass diese als angenehm emp- befindet. Stellen Sie dann den funden wird, maximal 15 Minuten. Schalter [0] auf Position T und Bei auftretenden Schmerzen bitte sofort schalten Sie das Gerät wieder ein.
  • Seite 15: Technische Angaben

    Technische Angaben Abmessungen (BHT) 45 x 148 x 122,5 mm Gewicht 0,21 kg inkl. Batterien Ausgangskurvenform monophasische Rechteckimpulse Impulsdauer 200 bis 360 Ps Maximale Ausgangsspannung 35 V ± 20% (an 500 Ohm) Stimulationsfrequenz 10 – 20 Hz Stimulationsprogramme Intensitäten Spannungsversorgung 3 V (2 x 1,5 V AA, LR06) Batterielebensdauer bei einer Be- ca.
  • Seite 16: Batteriewechsel

    Batteriewechsel Impulsfrequenz Die Frequenz gibt die Anzahl der Einzelim- Wenn das Batteriewechselsymbol [17] pulse pro Sekunde an, ihre Angabe erfolgt im Display angezeigt wird, wechseln in Hz (Hertz). Sie bitte die Batterien. Impulsbreite x Schalten Sie das Gerät am Bedienfeld Mit ihr wird die Dauer eines Einzelimpulses durch einen Druck auf den Ein/Aus- in Mikrosekunden angegeben.
  • Seite 17: Gerät Reinigen Und Pflegen

    Gerät reinigen und pflegen Benutzen Sie keine scharfen Reinigungs- Ihr Gerät ist wartungsfrei, nur das Außen- mittel oder harte Bürsten und halten Sie gehäuse bedarf der regelmäßigen Reini- das Gerät niemals unter Wasser. gung. Entfernen Sie zur Reinigung die Bat- terien aus dem Batteriefach! Achtung Das Gehäuse ist mit einem weichen, mit...
  • Seite 18: Problemlösung

    Die Garantie ist innerhalb eines Zeitraumes tum auf Material- und Fabrikationsfehler von 3 Jahren ab Kaufdatum gegenüber der des Produktes. Beurer GmbH, Söflinger Straße 218, 89077 Ulm, Deutschland, geltend zu machen. Der Die Garantie gilt nicht: Kunde hat im Garantiefall das Recht zur Reparatur der Ware bei unserem eigenen x im Falle von Schäden, die auf unsach-...
  • Seite 19: Included In Delivery

    English Contents 1 Getting acquainted ...... 20 2 Signs and symbols ...... 20 3 Notes ........... 21 4 Unit description......26 5 Using the acupuncture function... 28 6 Using the TENS function ..... 29 7 Technical specifications....32 8 Cleaning and care of the unit ..34 9 Disposal........
  • Seite 20: Getting Acquainted

    With kind regards sure, body temperature, pulse, gentle ther- Your Beurer team apy, massage and air. Please read these instructions carefully and keep them for Getting acquainted This device combines...
  • Seite 21: Signs And Symbols

    Signs and symbols The following symbols appear in these in- The following symbols are used on the type plate. structions. Warning Warning instruction indi- Type BF applied part cating a risk of injury or damage to health. Important Safety note indicating CAUTION! possible damage to the Read the operating instructions.
  • Seite 22 x Keep the unit far away from sources of x When using the unit for the first time, do heat and do not use it in close proximity so while sitting or standing. If you start to (~1 m) to shortwave or microwave units feel faint, shut off the unit immediately (e.g.
  • Seite 23: Consult Your Doctor Before Use In The Following Situations

    x If you have tumour diseases. Warning x If you have artery disease or impaired circulation. In order to prevent damage to health, it is x If you are pregnant. strongly recommended that you do not x On small children in the area of the fon- use TENS or acupuncture: tanelle.
  • Seite 24 Consult your doctor before using the device The following safety instructions also apply when using TENS. if you are experiencing: x Acute diseases, particularly with sus- Only use the device with the supplied or pected or known high blood pressure, reordered original accessory parts, other- blood clotting disorders, susceptibility to wise the warranty is voided...
  • Seite 25 Before using the unit for the first Important time x The manufacturer is not liable for dam- age caused by improper or incorrect use. Important x Protect the unit from dust, dirt and mois- x Before you use the unit for the first time, ture.
  • Seite 26: Unit Description

    Unit description Overview Item Name Switch: A: Acupuncture mode T: TENS mode Acupuncture tip Display Control panel Passive contact plate (neutral electrode) Connection for connecting cable Item Name Battery compartment Connecting cable for TENS Adhesive electrodes for TENS Important! (2x) Device base (not pictured) If you adjust the switch (0) while using the unit, the unit automati-...
  • Seite 27 Control panel MODE Button Explanation On/off button [10] Press the button to switch on. The signal for search mode sounds. Mode button [12] Select the stimulation mode x Pulse stimulation x Massage stimulation x Knead stimulation Intensity buttons [9, 11] Adjustment of stimulation intensity (15 steps).
  • Seite 28: Using The Acupuncture Function

    Using the acupuncture function Switching on the unit x The contact plate [4] on the handle must remain in permanent contact with Ensure that the device is switched the skin so that the current flow is not off. Then move the [0] switch to the interrupted.
  • Seite 29 Stimulation Once the desired acupuncture point has been found, stimulation can begin: Once located, the acupuncture points can be stimulated using 3 different pro- x Select the stimulation mode. grammes (Massage, Knead, Pulse) each x After stimulation begins, the search operating at one of 15 intensity levels.
  • Seite 30: Using The Tens Function

    Using the TENS function As a guideline when choosing the dis- Please consult the enclosed appendix tance between the electrodes: “Electrode positioning” for information on where to position the electrodes. You x The ideal distance is about 5 – 15 can also refer to the corresponding spe- cialised literature on electrode position- x Using distances under 5 cm will...
  • Seite 31 Stimulation Duration of use Ensure that the device is switched Select a duration that is comfortable, up to off. Then move the [0] switch to the a maximum of 15 minutes. T position and switch the device If you start to feel pain, stop using the unit back on again.
  • Seite 32: Technical Specifications

    Technical specifications Dimensions (WHD) 45 x 148 x 122.5 mm Weight 0.21 kg (including batteries) Output curve form monophasic rectangular pulse Pulse duration 200 to 360 Ps Maximum output voltage 35 V ± 20 % (at 500 Ohm) Stimulation frequency 10 –...
  • Seite 33 Pulse frequency Changing the batteries The frequency specifies the number of indi- When the battery symbol [17] appears vidual pulses per second; they are speci- in the display, please change the bat- fied in Hz (Hertz). teries. Pulse width x Switch off the device on the control pa- The pulse width specifies the duration of an nel by pressing the On/off button [10].
  • Seite 34: Cleaning And Care Of The Unit

    Cleaning and care of the unit Do not use any strong cleaning agents or The device is maintenance-free. Only the stiff brushes, and never hold the unit under case requires regular cleaning. Remove the water. batteries from the battery compartment for cleaning! Important Clean the housing with a soft cloth mois-...
  • Seite 35: Troubleshooting

    Troubleshooting Problem/Question Possible Cause/Remedy The electrodes de- 1. Clean the adhesive surface of the electrodes with a damp, lint-free tach themselves cloth. Then leave to dry naturally and reattach. If the electrodes from the body. still will not stick, they must be replaced. What should I do? 2.
  • Seite 36 Français Sommaire 1 Familiarisation avec l'appareil ..37 2 Symboles utilisés......38 3 Remarques ........38 4 Description de l'appareil ....43 5 Utilisation de la fonction acupuncture......... 45 6 Utilisation de la fonction TENS..47 7 Caractéristiques techniques ..49 8 Nettoyage et entretien de l'appareil ........
  • Seite 37: Familiarisation Avec L'appareil

    : chaleur, contrôle de poids, diagnos- Sincères salutations, tic de pression artérielle, mesure de tempé- Votre équipe Beurer rature du corps et du pouls, thérapies dou- Familiarisation avec l'appareil L'appareil est un appareil combiné et réunit L'effet atténuant ou supprimant les douleurs...
  • Seite 38: Symboles Utilisés

    Symboles utilisés Voici les symboles utilisés dans la notice Les symboles suivants sont utilisés sur la plaque signalétique. d'utilisation : Ce symbole vous avertit Partie d'application, type BF Avertisse- des risques de blessu- ment res ou des dangers pour votre santé. Attention ! Ce symbole vous avertit Attention...
  • Seite 39 Avertissement Utilisez l'appareil exclusivement : x sur l'homme x Ne pas utiliser l'appareil après la prise de x pour un traitement extérieur substances qui conduisent à une percep- x pour le but, pour lequel il a été développé tion limitée (p. ex. médicaments atténuant et de la manière décrite dans le présent la douleur, alcool).
  • Seite 40 x Ne traitez aucune partie du corps présen- x Sur une peau sujette à une maladie ai- tant des changements dus à une maladie guë ou chronique (blessure ou inflamma- tels que tuméfactions, brûlures, inflam- tion), p. ex. en cas d'inflammations dou- mations, éruptions cutanées, plaies, cica- loureuses et indolores, rougeurs.
  • Seite 41 tive supérieure à 2 mA/cm2 nécessite Avant l'utilisation de l'appareil, une attention particulière). consultez votre médecin dans x Ne confondez pas les câbles des élec- les cas suivants : trodes avec les contacts avec vos écou- x Affections aiguës, notamment en cas de teurs ou d'autres appareils et ne connec- troubles supposés ou réels de la coagu- tez pas les électrodes sur d'autres appa-...
  • Seite 42: Avant La Mise En Service

    Avant la mise en service Attention x Le fabricant n'est pas responsable pour Attention des dommages causés par une utilisation x Avant l'utilisation de l'appareil, retirez inappropriée ou incorrecte. tous les matériaux d'emballage. x Protégez l'appareil contre la poussière, x Ouvrez le compartiment des piles tel que les saletés et l'humidité.
  • Seite 43: Description De L'appareil

    Description de l'appareil Aperçu Rep. Désignation Commutateur : A : mode acupuncture T : mode TENS Pointe d'acupuncture Affichage Panneau de commande Plaque de contact passive (électrode neutre) Connexion pour câble de rac- Rep. Désignation cordement Câble de raccordement pour Compartiment à...
  • Seite 44 Panneau de commande MODE Touche Explication Interrupteur Marche / Arrêt [10] Pour la mise en marche, presser l'interrupteur. La tonalité du mode de recherche retentit. Touche "Mode" [12] Sélection du mode de stimulation x Stimulation par tapotement x Stimulation par massage x Stimulation par malaxage Touches d'intensité...
  • Seite 45: Utilisation De La Fonction Acupuncture

    Utilisation de la fonction acupuncture x La plaque de contact [4] sur la poignée Mise en marche doit être touchée en permanence, afin Veillez à ce que l'appareil soit de ne pas interrompre le flux de cou- éteint. Placez ensuite le commuta- rant.
  • Seite 46 Lorsque le point d'acupuncture souhaité a Stimulation été trouvé, la stimulation peut commencer : Les points d'acupuncture trouvés peuvent être stimulés au moyen de 3 programmes x Sélectionnez le mode de stimulation. différents (massage, malaxage, tapote- x Après le démarrage de la stimulation, la ment), avec respectivement 15 niveaux tonalité...
  • Seite 47: Utilisation De La Fonction Tens

    Utilisation de la fonction TENS Règle générale applicable pour le choix Vous trouverez des informations sur les de la distance entre les électrodes : emplacements possibles des électrodes dans l'annexe "Emplacement des élec- x distance recommandée : trodes" fourni. Vous pouvez également env.
  • Seite 48 Stimulation Durée du traitement Veillez à ce que l'appareil soit La durée du traitement devrait être choisie éteint. Placez ensuite le commuta- de telle manière à percevoir uniquement teur [0] sur la position T et allumez une sensation agréable, sans toutefois de nouveau l'appareil.
  • Seite 49: Caractéristiques Techniques

    Caractéristiques techniques Dimensions (l x h x p) 45 x 148 x 122,5 mm Poids 0,21 kg, piles incluses Forme de la courbe de sortie Impulsions rectangulaires monophasées Durée d'impulsion 200 à 360 Ps Tension de sortie maximale 35 V ± 20 % (sur 500 ohms) Fréquence de stimulation 10 –...
  • Seite 50 Fréquence des impulsions Remplacement des piles La fréquence indique le nombre des impul- Veuillez remplacer les piles lorsque le sions individuelles par seconde ; elle est symbole de remplacement des piles exprimée en Hz (Hertz). [17] apparaît sur l'afficheur. Largeur des impulsions x Désactivez l'appareil en pressant l'inter- Ce paramètre permet de définir la durée rupteur Marche / Arrêt [10] sur le pan-...
  • Seite 51: Nettoyage Et Entretien De L'appareil

    Nettoyage et entretien de l'appareil N'utilisez aucun produit de nettoyage Votre appareil ne nécessite pas d'entretien, agressif ni des brosses dures, et n'immer- seul le corps extérieur doit être nettoyé ré- gez jamais l'appareil dans de l'eau. gulièrement. Pour le nettoyage, retirez les piles du compartiment à...
  • Seite 52: Dépannage

    Dépannage Problèmes / Cause possible / solution questions Les électrodes se 1. Nettoyer la surface adhérente des électrodes à l'aide d'un chiffon décollent du corps. humide non pelucheux. Les laisser ensuite sécher à l'air libre et les Que faire ? refixer.
  • Seite 53: Volumen De Suministro

    Español Índice 1 Para conocerlo ......54 2 Aclaración de las ilustraciones ..55 3 Notas ........... 55 4 Descripción del aparato....60 5 Manejo de la acupuntura..... 62 6 Manejo de la función TENS..64 7 Características técnicas ....66 8 Limpieza y cuidado del aparato...
  • Seite 54: Para Conocerlo

    ámbitos del calor, el peso, la Atentamente tensión arterial, la temperatura corporal, el Su equipo Beurer pulso, las terapias no agresivas, los masajes y el aire. Lea atentamente estas Para conocerlo Éste es un aparato combinado que aúna determinada naturaleza y apto para el autotratamiento sencillo.
  • Seite 55: Aclaración De Las Ilustraciones

    Aclaración de las ilustraciones En estas instrucciones de uso se utilizan Los siguientes símbolos se utilizan en la placa de características. los símbolos siguientes. Advertencia Nota de advertencia Parte aplicable tipo BF sobre peligros de lesiones o para su salud. Atención: Nota de seguridad sobre ¡Atención!
  • Seite 56 Advertencia Utilice el aparato exclusivamente: x en personas x No emplee el aparato tras la ingestión de x para uso externo sustancias que reduzcan la sensibilidad (p. x con la finalidad para la que ha sido ej. calmantes, alcohol). desarrollado y de la forma que se indica x Si el aparato se utilizara por varias en estas instrucciones de uso.
  • Seite 57 x No trate ninguna zona del cuerpo que x Enfermedad aguda o crónica de la piel presente modificaciones patológicas, (lesiones o inflamaciones), p. ej., como pueden ser hinchazones, inflamación dolorosa o indolora, quemaduras, inflamaciones, erupciones enrojecimiento. cutáneas, heridas, cicatrizaciones o x En erupciones cutáneas (p.
  • Seite 58 Antes de utilizar el aparato, Una densidad de corriente efectiva superior a 2 mA/cm2 requiere una consulte a su médico en caso mayor supervisión). x No intercambie los cables de los x Enfermedades agudas, especialmente si electrodos con los contactos con unos hay indicios o existencia de trastornos de auriculares ni con otros aparatos ni la coagulación sanguínea, propensión a...
  • Seite 59: Antes De La Puesta En Servicio

    Antes de la puesta en servicio Atención: x El fabricante no se hará responsable de Atención: los daños causados por un uso x Antes de utilizar el aparato debe retirar incorrecto o indebido. todo el material de embalaje. x Proteja el aparato del polvo, la suciedad x Abra el compartimento de las pilas tal y y la humedad.
  • Seite 60: Descripción Del Aparato

    Descripción del aparato Vista general Pos. Denominación Interruptor: A: Modo acupuntura T: Modo TENS Punta de acupuntura Indicación Panel de mandos Placa de contacto pasivo (electrodo neutro) Conexión para el cable de Pos. Denominación conexión Cable de conexión para Compartimento de las pilas TENS Electrodos adhesivos para ¡Atención!
  • Seite 61 Panel de mandos MODE Tecla Explicación Interruptor de Para conectar, pulsar el interruptor. Se emite la señal del encendido/apagado [10] modo de búsqueda. Tecla de modo [12] Selección del modo de estimulación x Estimulación pulsante x Estimulación por masaje x Estimulación por fricción Teclas de intensidad Ajuste de la intensidad de estimulación (15 niveles).
  • Seite 62: Manejo De La Acupuntura

    Manejo de la acupuntura Encendido x Es preciso tocar permanentemente la placa de contactos [4] del mango con el Asegúrese de que el aparato se fin de no interrumpir el flujo de encuentre apagado. A continuación, corriente. coloque el interruptor [0] en la posición A y encienda de nuevo el aparato.
  • Seite 63 Estimulación Una vez localizado el punto de acupuntura deseado se puede iniciar la estimulación: Los puntos de acupuntura localizados pueden estimularse con 3 programas x Seleccione el modo de estimulación. diferentes (masaje, fricción, pulsación) con x Una vez iniciada la estimulación, el tono 15 niveles de intensidad cada uno.
  • Seite 64: Manejo De La Función Tens

    Manejo de la función TENS estimulación. Para aumentar la Puede consultar las indicaciones sobre las posibles ubicaciones de los estimulación, será preciso incrementar la electrodos en el anexo "Ubicación de los intensidad de los impulsos. electrodos". También puede consultar la Para seleccionar la distancia entre ubicación de los electrodos en la electrodos se aplica la siguiente norma:...
  • Seite 65 Estimulación Tiempo de aplicación Asegúrese de que el aparato se Utilice el aparato el tiempo que estime encuentre apagado. A necesario (hasta un máximo de 15 continuación, coloque el interruptor minutos) siempre que no sienta molestias. [0] en la posición T y encienda de En caso de sentir dolor, interrumpa de nuevo el aparato.
  • Seite 66: Características Técnicas

    Características técnicas Dimensiones (AnxAlxPr) 45 x 148 x 122,5 mm Peso 0,21 kg incl. pilas Forma de la curva de salida Impulsos monofásicos en ángulo recto Duración de impulso De 200 a 360 Ps Tensión máxima de salida 35 V ± 20% (a 500 ohmios) Frecuencia de estimulación 10 –...
  • Seite 67 Cambio de las pilas Frecuencia de impulsos La frecuencia señala la cantidad de Si en la pantalla se muestra el símbolo impulsos individuales por segundo; se de cambio de las pilas [17], sustituya indica en Hz (hercios). las pilas. Amplitud de impulsos x Desconecte el aparato pulsando una Con ella se indica la duración de un vez el interruptor de encendido/apagado...
  • Seite 68: Limpieza Y Cuidado Del Aparato

    Limpieza y cuidado del aparato No utilice ningún producto de limpieza Su aparato no requiere mantenimiento. abrasivo ni cepillos de cerdas duras, Únicamente es preciso limpiar tampoco sumerja nunca el aparato en regularmente la carcasa exterior. Para agua. limpiarla, extraiga las pilas del compartimento.
  • Seite 69: Resolución De Problemas

    Resolución de problemas Problemas/preguntas Causa posible/solución Los electrodos se 1. Limpie la superficie adherente de los electrodos utilizando un despegan del cuerpo. paño húmedo y exento de pelusas. A continuación, déjelos ¿Qué debe hacerse? secar al aire y colóquelos de nuevo. Si los electrodos continuaran sin sujetarse correctamente, deberán sustituirse.
  • Seite 70 Italiano Indice 1 Introduzione......... 71 2 Spiegazione dei simboli....72 3 Avvertenze........72 4 Descrizione del dispositivo ..77 5 Impiego dell'agopuntura ....79 6 Impiego della funzione TENS..81 7 Dati tecnici ........83 8 Pulizia e cura del dispositivo ..85 9 Smaltimento.........
  • Seite 71: Introduzione

    Cordiali saluti pulsazioni, terapia dolce, massaggio e aria. Il Beurer Team Legga attentamente queste istruzioni per Introduzione Questo è un dispositivo combinato e coniu- L'effetto analgesico viene ottenuto eserci-...
  • Seite 72: Spiegazione Dei Simboli

    Spiegazione dei simboli Nelle istruzioni per l'uso sono utilizzati i se- Sulla targhetta vengono utilizzati i seguenti simboli. guenti simboli. Segnalazione di rischi di Parte applicata di tipo BF Pericolo lesioni o pericoli per la salute. Attenzione Segnalazione di rischi di Attenzione! possibili danni all'appa- Leggere le istruzioni per l'uso.
  • Seite 73 Pericolo Utilizzare il dispositivo esclusivamente: x sugli esseri umani x Non impiegare il dispositivo in seguito al- x per uso esterno l'assunzione di sostanze che possono limi- x per lo scopo previsto dal dispositivo stes- tare le percezioni (come farmaci analgesici so, attenendosi a quanto indicato in que- o alcool).
  • Seite 74: Prima Dell'utilizzo Consultare Un Medico In Caso Di

    x Non applicare su parti del corpo con gon- x In caso di eruzioni cutanee (ad es. aller- fiori, ustioni, infiammazioni, eruzioni cu- gie), ustioni, contusioni, gonfiori, ferite tanee, ferite, cicatrici o in punti partico- aperte o in corso di cicatrizzazione. larmente sensibili.
  • Seite 75 x Patologie acute, in particolare se si è af- Per l'impiego della TENS occorre fetti (o si presuppone di esserlo) da pro- inoltre attenersi alle seguenti in- blemi di ipertensione o coagulazione del dicazioni di sicurezza: sangue, se si ha predisposizione per pa- Utilizzare il dispositivo esclusivamente con tologie tromboemboliche, così...
  • Seite 76: Prima Della Messa In Funzione

    Prima della messa in funzione Attenzione x Il costruttore non risponde per danni cau- Attenzione sati da uso improprio o non corretto. x Prima di usare il dispositivo rimuovere x Proteggere il dispositivo da polvere, tutti i materiali d'imballaggio. sporco e umidità. x Aprire lo scomparto batterie come de- x Per nessuna ragione aprire o cercare di scritto a pag.
  • Seite 77: Descrizione Del Dispositivo

    Descrizione del dispositivo Panoramica Pos. Denominazione Interruttore: A: modalità agopuntura T: modalità TENS Punta per agopuntura Display Comandi Piastra portacontatti passiva (elettrodo neutro) Raccordo per il cavo di collega- Pos. Denominazione mento Cavo di collegamento per Scomparto batterie TENS Elettrodi adesivi per TENS Attenzione! (2 pz.) Custodia del dispositivo (non...
  • Seite 78 Comandi MODE Tasto Spiegazione Interruttore On/Off [10] Per l'accensione del dispositivo premere l'interruttore. Viene emesso il segnale acustico che caratterizza la modalità ricer- Tasto modalità [12] Selezione della modalità di stimolazione x Stimolazione a impulsi x Stimolazione massaggio x Stimolazione tonificante Tasti intensità...
  • Seite 79: Impiego Dell'agopuntura

    Impiego dell'agopuntura cinanza della punta del dispositivo a un Accensione punto di agopuntura. Accertarsi che il dispositivo sia spento. Portare poi l'interruttore [0] x Mantenere sempre il contatto con la pi- in posizione A e attivare nuova- astra portacontatti [4] sull'impugnatura del dispositivo per non interrompere il mente il dispositivo.
  • Seite 80 Una volta individuato il punto di agopuntu- Stimolazione ra desiderato, può iniziare la stimolazione: I punti di agopuntura rilevati possono es- sere stimolati con 3 diversi programmi x Selezionare la modalità di stimolazione. (massaggio, stimolazione a impulsi o toni- x All'avvio della stimolazione il segnale ficante), ciascuno con 15 diverse intensità.
  • Seite 81: Impiego Della Funzione Tens

    Impiego della funzione TENS Per la selezione della distanza tra gli e- Per maggiori dettagli sulla posizione de- lettrodi, attenersi a quanto riportato di gli elettrodi, consultare l'appendice dal ti- seguito: tolo "Posizionamento degli elettrodi". È inoltre possibile ottenere ulteriori infor- x distanza ottimale: ca.
  • Seite 82 Stimolazione Durata di utilizzo Accertarsi che il dispositivo sia La durata di utilizzo deve essere impostata spento. Portare poi l'interruttore [0] in modo da risultare sempre gradevole, al in posizione T e attivare nuova- massimo 15 minuti. mente il dispositivo. Qualora si avvertano dei dolori interrompe- Il dispositivo viene attivato premendo l'in- re subito l'utilizzo ed eventualmente sele-...
  • Seite 83: Dati Tecnici

    Dati tecnici Dimensioni (larghezza, altezza, pro- 45 x 148 x 122,5 mm fondità) Peso 0,21 kg batterie comprese Forma della curva di uscita Impulsi rettangolari monofasici Durata degli impulsi da 200 a 360 Psec. Tensione di uscita massima 35 V ± 20% (con res.
  • Seite 84 Frequenza degli impulsi Sostituzione delle batterie La frequenza indica il numero di singoli im- Quando sul display viene visualizzato il pulsi al secondo, e viene misurata in Hz simbolo [17] è necessario sostituire le (Hertz). batterie. Larghezza degli impulsi x Spegnere il dispositivo premendo l'inter- Indica la durata di un singolo impulso, mi- ruttore On/Off [10] sui comandi.
  • Seite 85: Pulizia E Cura Del Dispositivo

    Pulizia e cura del dispositivo Non impiegare detergenti aggressivi o Questo dispositivo non necessita di inter- spazzole dure e non immergere mai il di- venti di manutenzione, è sufficiente pulire spositivo nell'acqua. regolarmente soltanto l'involucro esterno. Prima di procedere alla pulizia, togliere le batterie dallo scomparto.
  • Seite 86: Risoluzione Dei Problemi

    Risoluzione dei problemi Problemi/domande Possibile causa/rimedio Gli elettrodi si stac- 1.Pulire la superficie adesiva degli elettrodi con un panno umido che cano dal corpo. Co- non lasci pelucchi. Lasciarli asciugare all'aria, dopodiché applicar- sa fare? li nuovamente. Qualora gli elettrodi continuino a staccarsi come prima, sarà...
  • Seite 87 Türkçe øçindekiler 1 TanÕtÕm ........88 2 Sembol açÕklamasÕ ...... 89 3 UyarÕlar ........89 4 Cihaz AçÕklamasÕ......94 5 Akupunktur kullanÕmÕ ....96 6 TENS fonksiyonunun kullanÕmÕ ... 98 7 Teknik Veriler......100 8 Cihaz Temizli÷i ve BakÕmÕ ..102 9 ømha...........
  • Seite 88: Tanõtõm

    SaygÕlarÕmÕzla kontrollerden geçirilmiú yüksek kaliteli Beurer Ekibiniz ürünlerin simgesidir. Lütfen bu kullanma kÕlavuzunu itinayla okuduktan sonra, ileride TanÕtÕm Bu, çok fonksiyonlu bir cihazdÕr ve Sinirlere a÷rÕnÕn iletiminin yok edilmesiyle (kÕsacasÕ...
  • Seite 89: Sembol Açõklamasõ

    Sembol açÕklamasÕ KullanÕm kÕlavuzunda aúa÷Õdaki semboller Tip plakasÕnda aúa÷Õdaki semboller kullanÕlmÕútÕr. kullanÕlacaktÕr. BF tipi kullanÕm parçasÕ Yaralanma tehlikelerine UyarÕ veya sa÷lÕ÷ÕnÕzla ilgili tehlikelere yönelik uyarÕlar. Dikkat! Cihazla/aksesuarlarÕyla Dikkat KullanÕm kÕlavuzu okunmalÕdÕr. ilgili olasÕ hasarlara yönelik güvenlik uyarÕlarÕ. Önemli bilgilere yönelik notlar.
  • Seite 90 UyarÕ CihazÕ sadece: x insan üzerinde, x AlgÕyÕ sÕnÕrlayan maddelerin (örn. a÷rÕ x harici kullanÕm için kesici ilaçlar ve alkol) alÕnmasÕndan sonra x geliútirildi÷i amaca yönelik ve bu kullanÕm kullanmayÕnÕz. kÕlavuzunda belirtildi÷i úekilde kullanÕnÕz. x Cihaz birden fazla kiúi tarafÕndan x Bu cihaz ticari ya da klinik amaçlÕ...
  • Seite 91 x øyileúmiú ameliyat yaralarÕnda. x Örne÷in kabarma, yanma, iltihaplanma, egzama, yara veya hassas yerler gibi x AynÕ anda yüksek frekanslÕ bir ameliyat hastalÕ÷Õ etkileyebilecek de÷iúikliklere cihazÕna ba÷lÕ olunmasÕ durumunda. neden olabilecek vücut bölgelerinde x Ventriküler fibrilasyon riskini kullanmayÕnÕz. arttÕrabilece÷i için gö÷üs kafesi x KullanÕm sÕrasÕnda deride tahriú...
  • Seite 92 CihazÕ kullanmadan önce doktorunuza TENS uygulamasÕ için ilave danÕúÕnÕz: olarak aúa÷Õdaki güvenlik uyarÕlarÕ da geçerlidir! x Akut hastalÕklarda, özellikle hipertansiyon varlÕ÷Õ veya bundan Bu cihazÕ sadece birlikte verilen veya úüphelenilmesi durumunda, sonradan sipariú edebilece÷iniz orijinal tromboembolik hastalÕklara meyilli aksesuarlarla kullanÕnÕz, aksi takdirde olunmasÕ...
  • Seite 93 øúletime almadan önce Dikkat x Üretici, kuralÕna uygun olmayan veya Dikkat yanlÕú kullanÕmlardan do÷an hasarlardan x CihazÕ kullanmadan önce her türlü sorumlu de÷ildir. ambalaj malzemesini çÕkartÕnÕz. x CihazÕ toz, kir ve nemden koruyunuz. x Pil bölmesini 101. sayfada tarif edildi÷i x CihazÕ...
  • Seite 94: Cihaz Açõklamasõ

    Cihaz AçÕklamasÕ Genel görünüm Poz. TanÕm Dü÷me: A: Akupunktur modu T: TENS modu Akupunktur ucu Görünüm Kumanda alanÕ Pasif temas plakasÕ (nötr elektrotlar) Ba÷lantÕ kablosu için ba÷lantÕ Poz. TanÕm Pil bölmesi TENS için ba÷lantÕ kablosu TENS için yapÕúkan elektrotlar Dikkat! (2 adet) Cihaz altlÕ÷Õ...
  • Seite 95 Kumanda alanÕ MODE Tuú AçÕklama Açma/Kapama Dü÷mesi Açmak için dü÷meye basÕnÕz. Arama modu sesi durulur. [10] Mod tuúu [12] UyarÕm modu seçimi x Darbe uyarÕmÕ x Masaj uyarÕmÕ x Yumuúatma uyarÕmÕ ùiddet tuúlarÕ [9, 11] UyarÕm yo÷unlu÷unun ayarlanmasÕ (15 kademe). x Yo÷unlu÷un artÕrÕlmasÕ: "+“...
  • Seite 96: Akupunktur Kullanõmõ

    Akupunktur kullanÕmÕ x østenen akupunktur noktasÕnÕ tespit Açma etmek için cihazÕn akupunktur ucunu [1] CihazÕn kapalÕ konumda olmasÕna vücudun üzerinde gezdiriniz. (Bkz. dikkat ediniz. Dü÷meyi [0] A Akupunktur noktalarÕ eki). konumuna getiriniz ve cihazÕ tekrar açÕnÕz. Cihaz, kumanda alanÕndaki Açma/Kapama dü÷mesine [10] basÕlarak devreye alÕnÕr.
  • Seite 97 østenen akupunktur noktasÕ bulunmuúsa UyarÕm uyarÕm baúlayabilir: Bulunan akupunktur noktalarÕ 3 farklÕ programla (masaj, yumuúatma, darbe) ve x UyarÕm modunu seçiniz. 15 úiddet kademesiyle uyarÕlabilir. x UyarÕmÕn baúlatÕlmasÕndan sonra arama modu sesi kesilir. Ekranda seçilen uyarÕm modu [13, 18, 19] ve seçilen úiddet [16] gösterilir.
  • Seite 98: Tens Fonksiyonunun Kullanõmõ

    TENS fonksiyonunun kullanÕmÕ Elektrot mesafelerinin seçimi için kural ElektrotlarÕn olasÕ pozisyonlarÕna iliúkin úu úekildedir: bilgileri "Elektrot yerleútirme" ekinde bulabilirsiniz. Elektrot yerleútirmeyi ilgili x En uygun mesafe: teknik kaynaklardan da ö÷renebilirsiniz. yaklaúÕk 5 –15 cm, BazÕ durumlarda hassas cilt x 5 cm'nin altÕnda oldu÷unda birincil yaralanmalarÕnÕ...
  • Seite 99 UyarÕm Uygulama süresi CihazÕn kapalÕ konumda olmasÕna Uygulama süresi, rahat hissetme süresine dikkat ediniz. Dü÷meyi [0] T göre seçilmelidir; maksimum 15 dakika. konumuna getiriniz ve cihazÕ tekrar AcÕ hissedilmeye baúlandÕ÷Õnda lütfen açÕnÕz. uygulamayÕ sonlandÕrÕnÕz ve gerekirse baúka bir úiddet kademesi seçiniz. Cihaz, kumanda alanÕndaki Açma/Kapama dü÷mesine [10] basÕlarak devreye alÕnÕr.
  • Seite 100: Teknik Veriler

    Teknik Veriler Boyutlar (GYU) 45 x 148 x 122,5 mm A÷ÕrlÕk Piller dahil 0,21 kg ÇÕkÕú e÷risi biçimi monofazik dikdörtgen darbe Darbe süresi 200 - 360 Ps Maksimum çÕkÕú gerilimi 35 V ± %20 (500 Ohm'da) UyarÕm frekansÕ 10 – 20 Hz UyarÕm programÕ...
  • Seite 101 Darbe frekansÕ Pil de÷iúimi Frekans, saniyedeki darbe sayÕsÕnÕ verir, Ekranda pil de÷iúim sembolü [17] Hz (Hertz) olarak ölçülür. görünürse lütfen pilleri de÷iútiriniz. Darbe geniúli÷i x Kumanda alanÕndaki açma/kapama Bununla her bir darbenin süresi mikro dü÷mesine [10] basarak cihazÕ saniye cinsinden belirlenir. Darbe geniúli÷i kapatÕnÕz.
  • Seite 102: Cihaz Temizli÷I Ve Bakõmõ

    Cihaz Temizli÷i ve BakÕmÕ Asla keskin temizlik maddeleri veya sert CihazÕnÕz bakÕm gerektirmez, sadece dÕú fÕrça kullanmayÕnÕz ve cihazÕn üzerine su gövdenin düzenli olarak temizlenmesi dökmeyiniz. gereklidir. Temizlik için pilleri pil bölmesinden çÕkartÕnÕz! Dikkat CihazÕn gövdesi yumuúak ve sÕcak suyla ÕslatÕlmÕú...
  • Seite 103: Problem Çözümü

    Problem çözümü Sorunlar/Sorular OlasÕ neden/Giderme Elektrotlar 1. ElektrotlarÕn yapÕúkan yüzeyini Õslak ve tüy bÕrakmayan bir bezle vücuttan temizleyiniz. Bunun ardÕndan kurumaya bÕrakÕnÕz ve yeniden sökülüyor. Ne takÕnÕz. Elektrotlar önceki gibi sÕkÕ tutmuyorsa de÷iútirilmelidir. yapÕlmalÕ? 2. Her kullanÕmdan önce cildi temizleyiniz, uygulamadan önce deri üzerindeki cilt kremini ve bakÕm ya÷ÕnÕ...
  • Seite 104 ....105 .... 106 ........106 ....111 ......113 (TENS)......115 .. 117 ....... 119 ....120 ........120 EA34 2 x 1,5 Mignon (LR 06) x 1 x .: 661.06 Downloaded from www.Manualslib.com manuals search engine...
  • Seite 105 Beurer (TENS). TENS TENS. TENS - . TENS Downloaded from www.Manualslib.com manuals search engine...
  • Seite 106 Downloaded from www.Manualslib.com manuals search engine...
  • Seite 107 (~1 ) 5-10 Downloaded from www.Manualslib.com manuals search engine...
  • Seite 108 (TENS) > 39 °C). Downloaded from www.Manualslib.com manuals search engine...
  • Seite 109 9 A/ 2 A/ , . . (TENS) Downloaded from www.Manualslib.com manuals search engine...
  • Seite 110 . 118 Downloaded from www.Manualslib.com manuals search engine...
  • Seite 111 TENS TENS TENS (10). Downloaded from www.Manualslib.com manuals search engine...
  • Seite 112 MODE [10] [12] [9, 11] «+». «-». [13, 18, 19] [13] [19] [18] [14] [15] [16] [17] Downloaded from www.Manualslib.com manuals search engine...
  • Seite 113 [10] « »). Downloaded from www.Manualslib.com manuals search engine...
  • Seite 114 [13, 18, 19] +/- [9, 11] [16]. [12] [16]. Æ Æ Æ Æ «-» [11]. [10] Downloaded from www.Manualslib.com manuals search engine...
  • Seite 115 (TENS) «P ». . 5-15 Downloaded from www.Manualslib.com manuals search engine...
  • Seite 116 [10] [12] TENS. [12]. +/- [9, 11] [12] [10] Downloaded from www.Manualslib.com manuals search engine...
  • Seite 117 ( x x ) 45 x 148 x 122,5 0,21 200-360 P ± 20% 10-20 (2 x 1,5 AA, LR06) 5 ° - 40 ° C, ” 80 % -20° C -55° C, ” 95% 93/42/EC EN60601-1 EN60601-1-2, EN60601-2-10, Downloaded from www.Manualslib.com manuals search engine...
  • Seite 118 [17], [10] 1,5 , . Mignon (LR06). « » Downloaded from www.Manualslib.com manuals search engine...
  • Seite 119 2002/96/EC - WEEE (Waste Electrical and Electronic Equipment). Pb = Cd = Hg = Downloaded from www.Manualslib.com manuals search engine...
  • Seite 120 • • • • AE 10 – 10. 04305 24.02.2009 23.02.2012 89077- 109451 . , 62, ) 495—658 54 90 Downloaded from www.Manualslib.com manuals search engine...
  • Seite 121 Polski Spis tre ci 1 Informacje o urz dzeniu .... 122 2 Obja nienia do rysunków ..123 3 Wskazówki......... 123 4 Opis urz dzenia......128 5 Funkcja akupunktury ....130 6 Funkcja TENS ......132 7 Dane techniczne......134 8 Czyszczenie i konserwacja urz dzenia .........
  • Seite 122: Informacje O Urz Dzeniu

    Szanowni Klienci, dzi kujemy, e wybrali Pa stwo produkt z zawartych w niej wskazówek. Instrukcj naszego asortymentu. Firma Beurer oferuje nale y daü do przeczytania innym dokáadnie przetestowane produkty wysokiej u ytkownikom urz dzenia oraz zachowaü jako ci przeznaczone do pomiaru ci aru, do wgl du.
  • Seite 123: Obja Nienia Do Rysunków

    Obja nienia do rysunków W instrukcji obsáugi zastosowano Na tabliczce znamionowej zastosowano nast puj ce symbole: nast puj ce symbole: ü stosowana typu BF Ostrze enie Ostrze enie przed niebezpiecze stwem obra e ciaáa lub utraty zdrowia. Uwaga! Ostrze enie przed Uwaga Przeczytaü...
  • Seite 124 Ostrze enie Urz dzenie mo na stosowaü wyá cznie: x do terapii ludzi x Nie u ywaü urz dzenia po za yciu x do u ytku zewn trznego substancji, które powoduj ograniczenie x zgodnie z przeznaczeniem, w sposób percepcji (np. rodków przeciwbólowych, podany w instrukcji obsáugi.
  • Seite 125 x Nie stosowaü terapii na obszarach ciaáa x Wykwity skórne (np. alergie), oparzenia, zmienionych chorobowo, np. z zasinienia, obrzmienia oraz otwarte, a opuchliznami, oparzeniami, stanami tak e goj ce si rany. zapalnymi, wysypkami skórnymi, ranami, x Niezagojone blizny pooperacyjne. bliznami i nadwra liwo ci . x Korzystanie z urz dzenia chirurgicznego x W przypadku wyst pienia podra nie o wysokiej cz stotliwo ci.
  • Seite 126 x Nie zaleca si wcze niejszego W trakcie stosowania terapii smarowania skóry táustym kremem lub TENS nale y dodatkowo ma ci , poniewa przyspiesza to uwzgl dniü nast puj ce zu ycie elektrod lub mo e prowadziü do wskazówki dotycz ce niemiáych skoków napi cia.
  • Seite 127: Przed Pierwszym U Yciem

    Przed pierwszym u yciem Uwaga x Producent nie ponosi odpowiedzialno ci Uwaga za szkody powstaáe w wyniku x Przed u yciem urz dzenia nale y u ytkowania urz dzenia niezgodnego z caákowicie usun ü opakowanie. przeznaczeniem. x Otworzyü komor na baterie w sposób x Urz dzenie nale y chroniü...
  • Seite 128: Opis Urz Dzenia

    Opis urz dzenia Budowa Poz. Nazwa Przycisk: A: Tryb akupunktury T: Tryb TENS Ostrze gáowicy magnetycznej Wy wietlacz Pulpit obsáugi Pasywna páyta kontaktowa (elektroda neutralna) Gniazdo przewodu á cz cego Poz. Nazwa Komora na baterie Przewód á cz cy do TENS Elektrody samoprzylepne do Uwaga! TENS...
  • Seite 129 Pulpit obsáugi MODE Przycisk Obja nienie Aby wá czyü urz dzenie nale y przycisn ü przycisk Wá cznik/wyá cznik [10] Wá./Wyá. Rozlega si sygnaá trybu wyszukiwania. Przycisk trybu [12] Wybór trybu stymulacji x Ostukiwanie x Masa x Ugniatanie Przyciski regulacji Ustawianie intensywno ci stymulacji (15 poziomów).
  • Seite 130: Funkcja Akupunktury

    Funkcja akupunktury x Páyta kontaktowa [4] w uchwycie Wá czanie wymaga staáego kontaktu dotykowego, Upewniü si , e urz dzenie jest co zapobiega przerwaniu przepáywu wyá czone. Ustawiü przeá cznik [0] pr du. w pozycji A i ponownie wá czyü urz dzenie.
  • Seite 131 Po odnalezieniu danego punktu Stymulacja akupunktury mo na rozpocz ü stymulacj : Odnalezione punkty akupunktury mo na stymulowaü za pomoc 3 ró nych x Wybraü tryb stymulacji. programów (masa u, ugniatania, x Po rozpocz ciu stymulacji wyá cza si ostukiwania) o 15 poziomach d wi k trybu wyszukiwania.
  • Seite 132: Funkcja Tens

    Funkcja TENS Poni ej znajduj si wytyczne dotycz ce Informacje na temat mo liwych pozycji elektrod znajduj si w zaá czniku wyboru odst pu mi dzy elektrodami: „Rozmieszczenie elektrod“. x optymalny odst p: ok. 5 –15 cm, Rozmieszczenie elektrod jest opisane x odst p poni ej 5 cm powoduje siln równie w odpowiedniej literaturze stymulacj struktur...
  • Seite 133 Stymulacja Czas trwania stymulacji Upewniü si , e urz dzenie jest Czas trwania nale y dobraü w taki sposób, wyá czone. Ustawiü przeá cznik [0] aby stymulacja sprawiaáa przyjemno ü, w pozycji T i ponownie wá czyü maksymalnie 15 minut. urz dzenie.
  • Seite 134: Dane Techniczne

    Dane techniczne Wymiary (szer. x wys. x gá.) 45 x 148 x 122,5 mm 0,21 kg wraz z bateriami Wyj ciowy ksztaát krzywej Jednofazowe impulsy prostok tne Czas trwania impulsu 200 do 360 Ps Maksymalne napi cie wyj ciowe 35 V ± 20% (500 omów) Cz stotliwo ü...
  • Seite 135 Cz stotliwo ü impulsu Wymiana baterii Cz stotliwo ü informuje o liczbie W przypadku pojawienia si na pojedynczych impulsów na sekund , wy wietlaczu symbolu wymiany baterii jednostk pomiaru jest Hz (herc). [17], nale y wymieniü baterie. Szeroko ü impulsu x Wyá...
  • Seite 136: Czyszczenie I Konserwacja Urz Dzenia

    Czyszczenie i konserwacja urz dzenia Nie u ywaü r cych rodków czyszcz cych Urz dzenie nie wymaga konserwacji, ani twardych szczotek i nigdy nie myü jedynie obudowa zewn trzna powinna byü urz dzenia pod bie c wod . regularnie czyszczona. Przed przyst pieniem do czyszczenia wyj ü...
  • Seite 137: Usuwanie Usterek

    Usuwanie usterek Problemy/Pytania Mo liwa przyczyna/Sposób usuni cia Elektrody odklejaj 1. Oczy ciü samoprzylepn powierzchni elektrod wilgotn , nie si od ciaáa. Co pozostawiaj c pyáków ciereczk . Pozostawiü do wyschni cia i robiü? ponownie naáo yü. Je li elektrody nadal nie chc si trzymaü, nale y je wymieniü.
  • Seite 138 Downloaded from www.Manualslib.com manuals search engine...
  • Seite 139 Downloaded from www.Manualslib.com manuals search engine...
  • Seite 140 Downloaded from www.Manualslib.com manuals search engine...

Inhaltsverzeichnis