Lutron GRAFIK Eye QS Schnell Installations- Und Betriebsanleitung
Mit dali
Vorschau ausblenden
Andere Handbücher für GRAFIK Eye QS:
- Installation und betriebsanleitung (144 Seiten) ,
- Installationsanweisungen (72 Seiten) ,
- Installationsanleitung (56 Seiten)
Inhaltsverzeichnis
Werbung
Verfügbare Sprachen
Verfügbare Sprachen
Quicklinks
Please Read
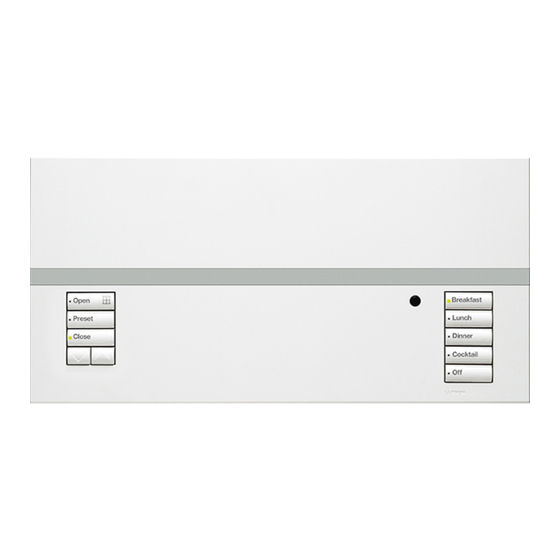
The GRAFIK Eye QS with DALI control unit allows for control of both lights
and window treatments, without interfaces, using a single control unit.
Features include pushbutton scene recall, info screen that displays energy
savings and status, IR receiver, astronomic timeclock, contact closure input,
and engravable backlit buttons that are easy to find and operate. The built-in
DALI bus link can control up to 64 DALI devices.
Model Numbers: QSGRK-6D, QSGRK-8D, QSGRK-16D
QSGR-6D, QSGR-8D, QSGR-16D
QSGRM-6D, QSGRM-8D, QSGRM-16D
Ratings: 100 - 240 V
CE 230 V
Output: PELV (Class 2: USA) supply 24 V
DALI Link: 18 V
English
Downloaded from
www.Manualslib.com
®
50/60 Hz 100 mA
50/60 Hz 100 mA
150 mA
250 mA
Español
Français
manuals search engine
with DALI
LUTRON
Italiano
Deutsch
Quick Installation
and Operation
Contents
Features and Functions
. . . . . . . . . . . . . . . . . . . . . . .
Wiring the GRAFIK Eye
QS with DALI
®
Overview of Line Voltage/Mains
and DALI Wiring . . . . . . . . . . . . . . . . . . . . . . . . . 3
Line Voltage Wiring Details . . . . . . . . . . . . . . . . . . 4
DALI Bus Wiring Details . . . . . . . . . . . . . . . . . . . . 5
Overview of PELV (Class 2: USA) Wiring . . . . . . . 6
QS Link Control Wiring Details . . . . . . . . . . . . . . . 7
Completing Installation . . . . . . . . . . . . . . . . . .
Programming Mode
. . . . . . . . . . . . . . . . . . . . . . . 9
Wireless Mode . . . . . . . . . . . . . . . . . . . . . . . . .
Zone Setup
. . . . . . . . . . . . . . . . . . . . . . . . . . . . . . 11
DALI Setup Overview:
Build System . . . . . . . . . 12
DALI Setup
. . . . . . . . . . . . . . . . . . . . . . . . . . . . . . 13
Associating Wireless Occupancy Sensors . .
Occupancy Sensor Setup:
Scene Mode . . . . . 15
Associating Wireless Daylight Sensors . . . . .
Daylight Sensor Setup
Mode Assignment . . . . . . . . . . . . . . . . . . . . . . . . 17
Zone Mode . . . . . . . . . . . . . . . . . . . . . . . . . . . . . 18
Group Mode . . . . . . . . . . . . . . . . . . . . . . . . . . . . 19
Scene Setup
. . . . . . . . . . . . . . . . . . . . . . . . . . . . . 21
Troubleshooting . . . . . . . . . . . . . . . . . . . . . . .
Troubleshooting: DALI Functions . . . . . . . . . .
Warranty, Contact Information . . . . . . . . . . . .
For additional information, see the complete
installation and operation guide at
www.lutron.com/qs
Guide
2
8
10
14
16
22
23
24
Werbung
Kapitel
Inhaltsverzeichnis
Fehlerbehebung

Verwandte Anleitungen für Lutron GRAFIK Eye QS


Inhaltszusammenfassung für Lutron GRAFIK Eye QS
-
Seite 1: Inhaltsverzeichnis
Daylight Sensor Setup LUTRON Mode Assignment . . . . . . . . . . . . . . . . . . . . . . . . 17 Zone Mode . - Seite 2 USB type mini B Hinged faceplate For handheld remote use For programming via PC Note: 6-zone control unit will show only zones 1 through 6. For additional information, see the complete installation and operation guide at www.lutron.com/qs GRAFIK Eye QS with DALI Quick Installation and Operation Guide 2 ® ® Downloaded from www.Manualslib.com...
- Seite 3 100 – 240 V 50 / 60 Hz Distribution Panel To additional DALI Terminal labels: devices L: Hot/Live N: Neutral : Ground For additional information, see the complete installation and operation guide at www.lutron.com/qs GRAFIK Eye QS with DALI Quick Installation and Operation Guide 3 ® ® Downloaded from www.Manualslib.com manuals search engine...
-
Seite 4: Line Voltage Wiring Details
• Strip 8 mm (5/16 in) of insulation off the 25 mm (1 in) for faceplate overhang on line voltage/mains cables in the wallbox. all sides. Note: 4-gang wallbox available from Lutron; P/N 241400. 8 mm (5/16 in) • Connect the line voltage/mains, ground, Faceplate overhangs wallbox on all sides;... -
Seite 5: Dali Bus Wiring Details
Eye QS with DALI connected to it. No DALI bus wiring cables (1,5 mm additional DALI bus supplies can be on 16 AWG) are available from Lutron, part the link. numbers C-CBL-216-GR-1 (non-plenum) • Up to 64 DALI devices can be connected and C-PCBL-216-CL-1 (plenum). -
Seite 6: Overview Of Pelv (Class 2: Usa) Wiring
IR connection (by others) Contact Closure Input Wiring 1 2 3 4 5 6 L N For settings, see complete installation and operation guide at www.lutron.com/qs. A: CCI SIG B: 24 V C: CCI COM Control Wiring Common and power (terminals 1 and 2):... -
Seite 7: Qs Link Control Wiring Details
LUTRON LUTRON LUTRON LUTRON LUTRON data link. LUTRON LUTRON LUTRON LUTRON LUTRON LUTRON Sivoia (Refer to Spec. ® - Cable is available from Lutron: LUTRON LUTRON Submittal) LUTRON LUTRON LUTRON LUTRON LUTRON LUTRON LUTRON LUTRON LUTRON LUTRON LUTRON GRX-CBL-346S-500 (non-plenum) and... - Seite 8 3. Apply the protective overlay to the control cover and faceplate will open fully, unit. See the complete installation and as shown. operation guide at www.lutron.com for instructions for naming zones. Protective overlay (apply after installation) For additional information, see the complete installation and operation guide at www.lutron.com/qs...
-
Seite 9: Programming Mode
Pressing it repeatedly will eventually return you to the main menu, but will not exit programming mode. When the screen displays a Yes/No question, the Timeclock button is “No”. For additional information, see the complete installation and operation guide at www.lutron.com/qs GRAFIK Eye QS with DALI Quick Installation and Operation Guide 9 ®... -
Seite 10: Wireless Mode
Wireless Mode Many models of the GRAFIK Eye QS support wireless communication with other ® Lutron products. This feature allows for easy integration of wireless sensors, keypads, Master remotes, and window treatments for single-room wireless applications, as well as buttons 9-16 compatibility with other Lutron wireless systems. -
Seite 11: Zone Setup
Unaffected.) Press the OK button to accept. 5. The info screen will confirm that your load type has been saved. Saved 6. Exit programming mode (see page 9). For additional information, see the complete installation and operation guide at www.lutron.com/qs GRAFIK Eye QS with DALI Quick Installation and Operation Guide 11 ® ® Downloaded from www.Manualslib.com... -
Seite 12: Build System
Erase digital load device does not respond, repeat the “Build System” command Programming? and/or check the wiring. Searching... Found x Loads Found For additional information, see the complete installation and operation guide at www.lutron.com/qs GRAFIK Eye QS with DALI Quick Installation and Operation Guide 12 ® ® Downloaded from www.Manualslib.com manuals search engine... -
Seite 13: Dali Setup
(each device can be assigned to only 1 zone at a time). Devices can be assigned only to zones set to DALI load type. Refer to page 11 for instructions on changing load type. For additional information, see the complete installation and operation guide at www.lutron.com/qs GRAFIK Eye QS with DALI Quick Installation and Operation Guide 13 ®... - Seite 14 Associating Wireless Occupancy Sensors and GRAFIK Eye QS Wireless Control Units ® (for wireless enabled units only) Lutron’s wireless Radio Powr Savr occupancy and vacancy sensors can On the wireless occupancy sensor, press and hold the be associated with the GRAFIK Eye QS Wireless to activate scenes when “Lights On”...
-
Seite 15: Scene Mode
(see page 14). Saved *Assigned* Occ Sensor Occupied Scene Unoccupied Scene Actions Saved Saved Scene 1 Scene Off 3 seconds Setup For additional information, see the complete installation and operation guide at www.lutron.com/qs GRAFIK Eye QS with DALI Quick Installation and Operation Guide 15 ® ® Downloaded from www.Manualslib.com manuals search engine... - Seite 16 QS Wireless Control Units ® (for wireless enabled units only) Lutron’s wireless Radio Powr Savr daylight sensors can be associated with the GRAFIK Eye QS Wireless to adjust light levels when certain daylight levels are detected. This section applies to installations where the GRAFIK Eye QS Wireless is being used in Master a single-room wireless installation.
-
Seite 17: Mode Assignment
Setup Note: Changing modes will remove all previous daylight assignments. Daylight Sensor Daylight Sensor Saved Saved Zone Mode Group Mode For additional information, see the complete installation and operation guide at www.lutron.com/qs GRAFIK Eye QS with DALI Quick Installation and Operation Guide 17 ® ® Downloaded from www.Manualslib.com manuals search engine... -
Seite 18: Zone Mode
(see page 16). Sensor Name Adjust Light Daylight Sensor Saved Setup More light Saved Zone 1 button 3 seconds Calibrate Less light For additional information, see the complete installation and operation guide at www.lutron.com/qs GRAFIK Eye QS with DALI Quick Installation and Operation Guide 18 ® ® Downloaded from www.Manualslib.com manuals search engine... -
Seite 19: Group Mode
Assigning a device already associated with another group will Ballast 2/23 replace its existing programming. *Assigned* (continued on next page) Group 1 Ballast 2/23 *Group 2* For additional information, see the complete installation and operation guide at www.lutron.com/qs GRAFIK Eye QS with DALI Quick Installation and Operation Guide 19 ® ® Downloaded from www.Manualslib.com manuals search engine... - Seite 20 (see page 16). Daylight Sensor Adjust Light Calibrate Saved Setup More light Saved Group 1 3 seconds Calibrate Less light For additional information, see the complete installation and operation guide at www.lutron.com/qs GRAFIK Eye QS with DALI Quick Installation and Operation Guide 20 ® ® Downloaded from www.Manualslib.com manuals search engine...
-
Seite 21: Scene Setup
Repeat for any additional shade button groups. Press the OK button to accept. For window treatment programming, see the complete installation and operation guide at www. Scene 1 lutron.com/qs. 7. The info screen will confirm that your scene has been saved. Set shade Groups 8. - Seite 22 Set the date Location is not set correctly Set the latitude and longitude correctly Holiday schedule is in effect Remove the holiday schedule from your programming For additional information, see the complete installation and operation guide at www.lutron.com/qs GRAFIK Eye QS with DALI Quick Installation and Operation Guide 22 ® ®...
- Seite 23 Recalibrate the associated daylight sensors raised to full On “Build System” command does not find DALI loads D1 and/or D2 are miswired or not connected Check wiring; if wiring is correct, call Lutron Technical Support For additional information, see the complete installation and operation guide at www.lutron.com/qs GRAFIK Eye QS with DALI Quick Installation and Operation Guide 23 ®...
-
Seite 24: Contact Information
Contact Information Warranty Lutron Electronics Co., Inc. Internet: www.lutron.com LOSS OF PROFITS, CONFIDENTIAL OR OTHER INFORMATION, OR One Year Limited Warranty PRIVACY; BUSINESS INTERRUPTION; PERSONAL INJURY; FAILURE E-mail: product@lutron.com For a period of one year from the date of purchase, and subject TO MEET ANY DUTY, INCLUDING OF GOOD FAITH OR OF to the exclusions and restrictions described below, Lutron warrants REASONABLE CARE; NEGLIGENCE, OR ANY OTHER PECUNIARY WORLD HEADQUARTERS each new unit to be free from manufacturing defects. Lutron will, OR OTHER LOSS WHATSOEVER), NOR FOR ANY REPAIR WORK at its option, either repair the defective unit or issue a credit equal UNDERTAKEN WITHOUT LUTRON’S WRITTEN CONSENT ARISING Lutron Electronics Co., Inc. to the purchase price of the defective unit to the Customer against OUT OF OR IN ANY WAY RELATED TO THE INSTALLATION, the purchase price of comparable replacement part purchased DEINSTALLATION, USE OF OR INABILITY TO USE THE UNIT OR 7200 Suter Road, Coopersburg, PA 18036-1299 from Lutron. Replacements for the unit provided by Lutron or, at its... - Seite 25 Configuración del DALI LUTRON ........13 Cómo Asociar los Sensores de Ocupación La unidad de control GRAFIK Eye QS con DALI permite Inalámbricos ........... controlar tanto luces como cortinas, sin necesidad de interfaces, Configuración del sensor de ocupación utilizando una única unidad de control. Incluye un botón a Modo Escena............
- Seite 26 Para la programación mediante PC Nota: la unidad de control de 6 zonas mostrará solamente las zonas 1 a 6. Para información adicional, consulte la guía completa de instalación y operación en www.lutron.com/qs Guía Rápida de Instalación y Operación del GRAFIK Eye QS con DALI 2 ®...
-
Seite 27: Cableado Del Grafik Eye ® Qs Con Dali
Etiquetas de los terminales: adicionales DALI L: Vivo N: Neutro : Tierra Para información adicional, consulte la guía completa de instalación y operación en www.lutron.com/qs ® Guía Rápida de Instalación y Operación del GRAFIK Eye QS con DALI 3 ®... -
Seite 28: Detalles Del Cableado De Voltaje De Línea
L: Vivo N: Neutro LUTRON :Tierra Para información adicional, consulte la guía completa de instalación y operación en www.lutron.com/qs Guía Rápida de Instalación y Operación del GRAFIK Eye QS con DALI 4 ® ® Downloaded from www.Manualslib.com... -
Seite 29: Detalles De Cableado Del Bus Dali
DALI. Para información adicional, consulte la guía completa de instalación y operación en www.lutron.com/qs ® Guía Rápida de Instalación y Operación del GRAFIK Eye QS con DALI 5 ®... - Seite 30 Nota: Utilice dispositivos de conexión de cables apropiados según los códigos locales. Para información adicional, consulte la guía completa de instalación y operación en www.lutron.com/qs ® Guía Rápida de Instalación y Operación del GRAFIK Eye QS con DALI 6 ®...
-
Seite 31: (Clase 2: E.u.a.)
LUTRON LUTRON LUTRON LUTRON Panel inteligente LUTRON de potencia QS Para información adicional, consulte la guía completa de instalación y operación en www.lutron.com/qs ® Guía Rápida de Instalación y Operación del GRAFIK Eye QS con DALI 7 ® LUTRON LUTRON... -
Seite 32: Finalización De La Instalación
Revestimiento de protección (aplíquelo después de la instalación) Para información adicional, consulte la guía completa de instalación y operación en www.lutron.com/qs ® Guía Rápida de Instalación y Operación del GRAFIK Eye QS con DALI 8 ®... -
Seite 33: Modo De Programación
Cuando la pantalla despliega una pregunta Sí/No, el botón de reloj es “No”. Para información adicional, consulte la guía completa de instalación y operación en www.lutron.com/qs Guía Rápida de Instalación y Operación del GRAFIK Eye QS con DALI 9 ®... -
Seite 34: Modo Inalámbrico
Los números de modelo de las unidades que admiten una comunicación inalámbrica comienzan con QSGRJ o QSGRK. Botón de La función inalámbrica de la unidad de control inalámbrica GRAFIK Eye QS tiene tres (3) modos de reloj (atrás) funcionamiento. • Desactivado: Se utiliza sólo para sistemas cableados. -
Seite 35: Configuración De Zona
Guardado de carga ha sido guardado. 6. Salga del modo de programación (vea la página 9). Para información adicional, consulte la guía completa de instalación y operación en www.lutron.com/qs ® Guía Rápida de Instalación y Operación del GRAFIK Eye QS con DALI 11 ®... -
Seite 36: Generalidades De Configuración Del Dali
“Configurar Sistema” y/o verifique el cableado. Buscando... Encontrado x Cargas Encontrado Para información adicional, consulte la guía completa de instalación y operación en www.lutron.com/qs Guía Rápida de Instalación y Operación del GRAFIK Eye QS con DALI 12 ® ® Downloaded from www.Manualslib.com... -
Seite 37: Configuración Del Dali
DALI. Consulte la página 11 para las instrucciones para cambiar el tipo de carga. Para información adicional, consulte la guía completa de instalación y operación en www.lutron.com/qs ® Guía Rápida de Instalación y Operación del GRAFIK Eye QS con DALI 13 ®... -
Seite 38: Cómo Asociar Los Sensores De Ocupación
GRAFIK Eye QS. GRAFIK Eye QS: 1. Asegúrese de que el modo inalámbrico de la unidad de control GRAFIK Eye QS Nota: Al presionar el botón “Encender Luces” se inicia la esté “Habilitado” (consulte la página 10). -
Seite 39: Configuración Del Sensor De Ocupación
Acciones Guardado Escena 1 Escena Apagar 3 segundos Configuración Para información adicional, consulte la guía completa de instalación y operación en www.lutron.com/qs ® Guía Rápida de Instalación y Operación del GRAFIK Eye QS con DALI 15 ® Downloaded from www.Manualslib.com... - Seite 40 GRAFIK Eye QS inalámbrico para ajustar los niveles de luz cuando se detectan determinados niveles de luz del dia. Botones Esta sección se aplica a instalaciones donde el GRAFIK Eye QS inalámbrico se utiliza en una Maestros instalación inalámbrica de una sola habitación.
- Seite 41 Grupo. Botón de OK El Modo de Zona (por defecto) es útil cuando el GRAFIK Eye QS está controlando luces en múltiples habitaciones o áreas. El modo zona permite que cada zona ajuste su nivel de “salida” de Botón de luz basado en los niveles medidos de luz del dia.
- Seite 42 Configuración Botón Cal Zona 1 3 segundos Calibre Menos luz Para información adicional, consulte la guía completa de instalación y operación en www.lutron.com/qs ® Guía Rápida de Instalación y Operación del GRAFIK Eye QS con DALI 18 ® Downloaded from www.Manualslib.com...
- Seite 43 *Asignado* (continúa en la página siguiente) Grupo 1 Balasto 2/23 *Grupo 2* Para información adicional, consulte la guía completa de instalación y operación en www.lutron.com/qs ® Guía Rápida de Instalación y Operación del GRAFIK Eye QS con DALI 19 ®...
-
Seite 44: De Luz Del Dia
Configuración Más luz Grupo 1 3 segundos Menos luz Calibre Para información adicional, consulte la guía completa de instalación y operación en www.lutron.com/qs ® Guía Rápida de Instalación y Operación del GRAFIK Eye QS con DALI 20 ® Downloaded from www.Manualslib.com... -
Seite 45: Configuración De Escena
8. Salga del modo de programación (vea la página 9). Disminuir en zona Guardado Para información adicional, consulte la guía completa de instalación y operación en www.lutron.com/qs ® Guía Rápida de Instalación y Operación del GRAFIK Eye QS con DALI 21 ®... -
Seite 46: Solución De Problemas
El programa de Feriado está en efecto Quite el horario de feriado de su programación Para información adicional, consulte la guía completa de instalación y operación en www.lutron.com/qs Guía Rápida de Instalación y Operación del GRAFIK Eye QS con DALI 22 ®... -
Seite 47: Solución De Problemas: Funciones De Dali
Verifique el cableado; si escorrecto, llame al Soporte las cargas DALI Técnico de Lutron Para información adicional, consulte la guía completa de instalación y operación en www.lutron.com/qs ® Guía Rápida de Instalación y Operación del GRAFIK Eye QS con DALI 23 ®... -
Seite 48: Información De Contacto
Información de contacto: Garantía Lutron Electronics Co., Inc. CONFIDENCIAL O DE OTRA NATURALEZA, O DE LA PRIVACIDAD; Internet: www.lutron.com Garantía Limitada por Un Año INTERRUPCIÓN DE LOS NEGOCIOS; DAÑOS PERSONALES; E-mail: product@lutron.com Por un período de un año a partir de la fecha de compra, y sujeto INCUMPLIMIENTO DE TAREAS, INCLUYENDO LA BUENA FE O EL a las exclusiones y restricciones que se describen más abajo, Lutron CUIDADO R AZONABLE; N EGLIGENCIA, O C UALQUIER O TRA P ÉRDIDA SEDE CENTRAL MUNDIAL garantiza que todas las unidades nuevas estarán libres de defectos PECUNIARIA O DE OTRA CLASE), NI POR TRABAJOS E.U.A. - Seite 49 Réglage de zone ............11 LUTRON Exposé général de la configuration de DALI Les unités de contrôle GRAFIK Eye QS avec DALI permettent le Construire un système ..........12 contrôle de l’éclairage et des stores sans besoin d’interfaces, en Configuration de DALI ..........
- Seite 50 Remarque : une unité de contrôle à 6 zones montre seulement les zones 1 à 6. Pour obtenir de plus amples informations, référez vous au Guide d’Installation et de Fonctionnement complet au www.lutron.com/qs Guide Rapide d’Installation et de Fonctionnement du Système GRAFIK Eye QS avec DALI 2 ®...
- Seite 51 L : Phase/Sous tension N : Neutre : Mise à la terre Pour obtenir de plus amples informations, référez vous au Guide d’Installation et de Fonctionnement complet au www.lutron.com/qs Guide Rapide d’Installation et de Fonctionnement du Système GRAFIK Eye QS avec DALI 3 ®...
- Seite 52 N : Neutre : Mise à la terre LUTRON Pour obtenir de plus amples informations, référez vous au Guide d’Installation et de Fonctionnement complet au www.lutron.com/qs Guide Rapide d’Installation et de Fonctionnement du Système GRAFIK Eye QS avec DALI 4 ®...
- Seite 53 à l’entretien du bus d’alimentation DALI Pour obtenir de plus amples informations, référez vous au Guide d’Installation et de Fonctionnement complet au www.lutron.com/qs Guide Rapide d’Installation et de Fonctionnement du Système GRAFIK Eye QS avec DALI 5 ®...
- Seite 54 Remarque : Faites usage de dispositifs de raccordement appropriés, exigés par les codes/ autorités locaux. Pour obtenir de plus amples informations, référez vous au Guide d’Installation et de Fonctionnement complet au www.lutron.com/qs Guide Rapide d’Installation et de Fonctionnement du Système GRAFIK Eye QS avec DALI 6 ®...
-
Seite 55: Détails Du Contrôle De Liaison De Câblage Qs
LUTRON Panneau d’alimentation LUTRON LUTRON intelligent QS Pour obtenir de plus amples informations, référez vous au Guide d’Installation et de Fonctionnement complet au www.lutron.com/qs Guide Rapide d’Installation et de Fonctionnement du Système GRAFIK Eye QS avec DALI 7 ® ®... -
Seite 56: Compléter L'installation
Revêtement de protection (appliquer après installation) Pour obtenir de plus amples informations, référez vous au Guide d’Installation et de Fonctionnement complet au www.lutron.com/qs Guide Rapide d’Installation et de Fonctionnement du Système GRAFIK Eye QS avec DALI 8 ®... -
Seite 57: Mode De Programmation
Lorsque l’écran affiche une question Oui/Non, le bouton Minuterie est « Non ». Pour obtenir de plus amples informations, référez vous au Guide d’Installation et de Fonctionnement complet au www.lutron.com/qs Guide Rapide d’Installation et de Fonctionnement du Système GRAFIK Eye QS avec DALI 9 ®... -
Seite 58: Mode Sans Fil
Bouton OK Les appareils supportant les communications sans fil arborent des numéros de modèles débutant par QSGRJ ou QSGRK. Bouton La fonctionnalité sans fil de l’unité de contrôle sans fil GRAFIK Eye QS possède 3 modes minuterie de fonctionnement. (arrière) •... -
Seite 59: Réglage De Zone
été sauvegardé. 6. Sortie du mode de programmation (voir page 9). Pour obtenir de plus amples informations, référez vous au Guide d’Installation et de Fonctionnement complet au www.lutron.com/qs Guide Rapide d’Installation et de Fonctionnement du Système GRAFIK Eye QS avec DALI 11 ®... -
Seite 60: Exposé Général De La Configuration De Dali
Recherche... Trouvé x Charges Trouvé Pour obtenir de plus amples informations, référez vous au Guide d’Installation et de Fonctionnement complet au www.lutron.com/qs Guide Rapide d’Installation et de Fonctionnement du Système GRAFIK Eye QS avec DALI 12 ® ®... -
Seite 61: Configuration De Dali
DALI. Voir page 11 pour des directives de changement de type de charge. Pour obtenir de plus amples informations, référez vous au Guide d’Installation et de Fonctionnement complet au www.lutron.com/qs Guide Rapide d’Installation et de Fonctionnement du Système GRAFIK Eye QS avec DALI 13 ®... -
Seite 62: Association Des Détecteurs De Présence Sans Fil
GRAFIK Eye Pour associer les détecteurs d’inoccupation et les unités de contrôle du GRAFIK Eye QS : 1. Assurez-vous que le mode sans fil de l’unité de contrôle du GRAFIK Eye QS soit Remarque : appuyer sur «... -
Seite 63: Mode Scène
Actions Sauvegardé Scène 1 Scène Off Réglage Pour obtenir de plus amples informations, référez vous au Guide d’Installation et de Fonctionnement complet au www.lutron.com/qs Guide Rapide d’Installation et de Fonctionnement du Système GRAFIK Eye QS avec DALI 15 ® ®... -
Seite 64: Sans Fil
Les détecteurs sans fil de lumière du jour Lutron Radio Powr Savr peuvent être associés avec le GRAFIK Eye QS sans fil pour activer des scènes lorsqu’un certain niveau de lumière du jour Boutons est détecté. Cette section s’applique aux installations où le GRAFIK Eye QS sans fil est utilisé... -
Seite 65: Réglage Du Capteur De Lumière Du Jour
Dét. de lumière Sauvegardé Mode Zone Mode Groupe Pour obtenir de plus amples informations, référez vous au Guide d’Installation et de Fonctionnement complet au www.lutron.com/qs Guide Rapide d’Installation et de Fonctionnement du Système GRAFIK Eye QS avec DALI 17 ®... - Seite 66 « Cal » Zone 1 Calibrer Moins Lumière Pour obtenir de plus amples informations, référez vous au Guide d’Installation et de Fonctionnement complet au www.lutron.com/qs Guide Rapide d’Installation et de Fonctionnement du Système GRAFIK Eye QS avec DALI 18 ®...
- Seite 67 (à suivre page suivante) Groupe 1 Ballast 2/23 *Group 2* Pour obtenir de plus amples informations, référez vous au Guide d’Installation et de Fonctionnement complet au www.lutron.com/qs Guide Rapide d’Installation et de Fonctionnement du Système GRAFIK Eye QS avec DALI 19 ®...
- Seite 68 Plus Lumière Groupe 1 Moins Lumière Calibrer Pour obtenir de plus amples informations, référez vous au Guide d’Installation et de Fonctionnement complet au www.lutron.com/qs Guide Rapide d’Installation et de Fonctionnement du Système GRAFIK Eye QS avec DALI 20 ® ®...
-
Seite 69: Configuration De Scène
8. Sortie du mode de programmation (voir page 9). Zone baisser Sauvegardé Pour obtenir de plus amples informations, référez vous au Guide d’Installation et de Fonctionnement complet au www.lutron.com/qs Guide Rapide d’Installation et de Fonctionnement du Système GRAFIK Eye QS avec DALI 21 ®... -
Seite 70: Dépistage De Défauts
Le calendrier des jours fériés est en vigueur Supprimer le calendrier des jours fériés de votre programmation Pour obtenir de plus amples informations, référez vous au Guide d’Installation et de Fonctionnement complet au www.lutron.com/qs Guide Rapide d’Installation et de Fonctionnement du Système GRAFIK Eye QS avec DALI 22 ®... -
Seite 71: Dépistage De Défauts : Fonctions Dali
Vérifier le câblage; si lecâblage est correct, appeler le Centre charges de DALI de Soutien technique de Lutron Pour obtenir de plus amples informations, référez vous au Guide d’Installation et de Fonctionnement complet au www.lutron.com/qs Guide Rapide d’Installation et de Fonctionnement du Système GRAFIK Eye QS avec DALI 23 ®... - Seite 72 Coordonnées Garantie Lutron Electronics Co., Inc. Internet : www.lutron.com OU AUTRE INFORMATION, OU INTIMITÉ; INTERRUPTION DE Garantie Limitée d’Un An TRAVAIL; LÉSION CORPORELLE; À DÉFAUT DE RENCONTRER Courriel : product@lutron.com SES RESPONSABILITÉS. INCLUANT DE BONNE FOI OU SOINS Pour une période d’un an à partir de la date d’achat et sous réserve RAISONNABLE; NÉGLIGENCE, PÉCUNIÈRE OU TOUT AUTRE des exclusions et restrictions décrites ci-dessous, Lutron garantie que SIÈGE SOCIAL INTERNATIONAL PERTE QUELLE QU’ELLE SOIT), NI POUR AUCUNE RÉPARATION chaque nouvelle unité est exempte de tout défaut de fabrication. Lutron États-Unis ENTREPRISE SANS LE CONSENTEMENT PAR ÉCRIT DE LUTRON s’engage à sa discrétion, soit de réparer l’appareil défectueux ou émettre Lutron Electronics Co., Inc. PROVENANT DE OU LIÉ DE QUELQUE FAÇON À L’INSTALLATION, un crédit au client qui est égal au prix d’achat de l’appareil défectueux LA DÉINSTALLATION, L’UTILISATION OU L’EMPÊCHEMENT D’UTILISER 7200 Suter Road, Coopersburg, PA 18036-1299 contre l’achat d’une pièce de remplacement semblable de Lutron. Les...
- Seite 73 50/60 Hz 100 mA Garanzia, Indirizzi sedi Lutron . . . . . . . . . . . . Uscita: PELV (Classe 2: USA) alimentazione 24 V 150 mA Per ulteriori informazioni, vedere ...
-
Seite 74: Caratteristiche E Funzioni Della Centralina Grafik Eye ® Qs
Pannello frontale incernierato Per l’uso di telecomando Per la programmazione remoto tramite PC Nota: 6-zona sistema visualizza zone 1 - 6. Per ulteriori informazioni, vedere www.lutron.com/qs Guida all’uso e all’installazione rapida GRAFIK Eye QS con DALI 2 ® ® Downloaded from www.Manualslib.com manuals search engine... -
Seite 75: Cablaggio Della Centralina Grafik Eye
50 / 60 Hz Ad altri dispositivi DALI Etichette morsetti: L: fase N: neutro : terra 1-6: Uscite in tensione (rete) regolate/ commutate Per ulteriori informazioni, vedere www.lutron.com/qs Guida all’uso e all’installazione rapida GRAFIK Eye QS con DALI 3 ® ® Downloaded from www.Manualslib.com manuals search engine... -
Seite 76: Dettaglio Dei Collegamenti A Tensione Di Rete
Nota: la scatola da 4 moduli è disponibile scatola a muro. presso Lutron; codice 241400. Lasciare 25 mm (1 pol) 8 mm per l’apertura del pannello frontale su tutti i lati. -
Seite 77: Dettagli Del Collegamento - Bus Dali
NEC rispettare. ® 2,5 mm 427 m Classe 1. • Lutron raccomanda di utilizzare colori 14 AWG 1 400 pi distinti per i conduttori D1 e D2 (bus Fase 4: Interruttore automatico in DALI). Ciò eviterà errori di cablaggio nelle... -
Seite 78: Panoramica Dei Collegamenti A Bassa Tensione (Pelv - Classe 2: Usa)
N H 1 2 3 GRAFIK Eye GRAFIK Eye QS). Per un esempio dettagliato di Dati (morsetti 3 e 4) . collegamento, vedere www.lutron. Un doppino schermato intrecciato da com/qs. 0,5 mm (22 AWG) ogni morsetto Nota: Utilizzare i dispositivi di collegamento dei cavi appropriati in conformità... -
Seite 79: Dettaglio Del Cablaggio Di Comando Del Link Qs
LUTRON 1,0 mm (22 AWG) per il link dati. LUTRON LUTRON LUTRON LUTRON LUTRON Sivoia (Fare riferimento LUTRON ® - Presso Lutron è disponibile il seguente cavo: GRX-CBL- LUTRON LUTRON LUTRON LUTRON LUTRON alla scheda LUTRON LUTRON LUTRON LUTRON LUTRON... -
Seite 80: Completamento Dell'installazione Della Centralina Grafik Eye ® Qs Con Dali
3. Applicare il rivestimento protettivo alla coperchio incernierato e il pannello centralina. Per le istruzioni sui nomi delle frontale si aprano completamente, zone, vedere www.lutron.com/qs. come mostrato in figura. Rivestimento protettivo (applicare dopo l’installazione) Per ulteriori informazioni, vedere www.lutron.com/qs Guida all’uso e all’installazione rapida GRAFIK Eye... -
Seite 81: Modalità Programmazione
Quando sul display viene visualizzata una domanda che prevede la scelta fra Sì e No, il pulsante orologio rappresenta l’opzione “No”. Per ulteriori informazioni, vedere www.lutron.com/qs Guida all’uso e all’installazione rapida GRAFIK Eye QS con DALI 9 ®... -
Seite 82: Modalità Wireless
Master controllo di un singolo ambiente e assicura la compatibilità con altri sistemi wireless Lutron. Pulsante OK Il codice modello delle unità che supportano le comunicazioni wireless inizia con QSGRJ o QSGRK. -
Seite 83: Configurazione Zona
OK per confermare. 5. Il display visualizza un messaggio di conferma che il tipo di carico è stato salvato. 6. Uscire dalla modalità programmazione (vedere pagina 9). Per ulteriori informazioni, vedere www.lutron.com/qs Guida all’uso e all’installazione rapida GRAFIK Eye QS con DALI 11 ® ®... -
Seite 84: Dali - Descrizione Generale Della Configurazione
“Configurazione del Carica Digitale Sistema” e/o verificare i collegamenti. Ricerca in Corso... Trovato x Carichi Trovato Per ulteriori informazioni, vedere www.lutron.com/qs Guida all’uso e all’installazione rapida GRAFIK Eye QS con DALI 12 ® ® Downloaded from www.Manualslib.com... -
Seite 85: Configurazione Dali
I dispositivi possono essere assegnati solo alle zone impostate per tipi di carico DALI . Per istruzioni su come modificare il tipo di carico, vedere la pagina 11. Per ulteriori informazioni, vedere www.lutron.com/qs Guida all’uso e all’installazione rapida GRAFIK Eye QS con DALI 13 ®... -
Seite 86: Associazione Dei Sensori Di Presenza Wireless Con Le Centraline Grafik Eye
QS wireless ® (solo per unità con funzionalità wireless) Sul sensore di presenza I sensori di presenza wireless Lutron Radio Powr Savr possono venire associati a wireless, tenere premuto una centralina GRAFIK Eye QS wireless per attivare scene quando viene rilevata la i pulsanti “Luci accese”... -
Seite 87: Configurazione Del Sensore Di Presenza
Sensore di Presenza Scena occupato Scena Non Occupato Azioni Saved S alvato Scena 1 Scena spento (OFF) 3 seconds Configurazione Per ulteriori informazioni, vedere www.lutron.com/qs Guida all’uso e all’installazione rapida GRAFIK Eye QS con DALI 15 ® ® Downloaded from www.Manualslib.com manuals search engine... -
Seite 88: Associazione Dei Sensori Di Luminosità Wireless E Delle Centraline Wireless Grafik Eye
Associazione dei sensori di luminosità wireless e delle centraline wireless GRAFIK Eye ® (solo per unità con funzionalità wireless) I sensori di luminosità wireless Lutron Radio Powr SavrTM possono venire associati a una centralina GRAFIK Eye QS wireless per regolare i livelli di luminosità quando vengono rilevati livelli di luce naturale specifici. -
Seite 89: Configurazione Del Sensore Di Luminosità
Configurazione Sensore di lum... Sensore di lum... Saved S alvato Modalità di Zona Modalità di Gruppo Per ulteriori informazioni, vedere www.lutron.com/qs Guida all’uso e all’installazione rapida GRAFIK Eye QS con DALI 17 ® ® Downloaded from www.Manualslib.com manuals search engine... -
Seite 90: Modalità A Zone
Sensore di lumin... Nom del sensore Modifica Luminosità Salvato Configurazione Più Luce Saved Bottone Zona 1 3 seconds Calibrare “Cal” Meno Luce Per ulteriori informazioni, vedere www.lutron.com/qs Guida all’uso e all’installazione rapida GRAFIK Eye QS con DALI 18 ® ® Downloaded from www.Manualslib.com manuals search engine... -
Seite 91: Modalità A Gruppo
L’assegnazione di un dispositivo già associato a un altro gruppo determinerà la cancellazione della precedente assegnazione. Ballast 2/23 *Assegnato* (continua alla pagina successiva) Gruppo 1 Ballast 2/23 *Gruppo 2* Per ulteriori informazioni, vedere www.lutron.com/qs Guida all’uso e all’installazione rapida GRAFIK Eye QS con DALI 19 ® ® Downloaded from www.Manualslib.com manuals search engine... - Seite 92 (vedere pagina 16). Sensore di lum... Modifica Lumin... Calibrare Salvato Configurazione Più Luce Saved Gruppo 1 3 seconds Calibrare Meno Lucet Per ulteriori informazioni, vedere www.lutron.com/qs Guida all’uso e all’installazione rapida GRAFIK Eye QS con DALI 20 ® ® Downloaded from www.Manualslib.com manuals search engine...
-
Seite 93: Configurazione Scena
Ripetere per eventuali altri gruppi pulsanti tende. secondi Premere il pulsante OK per confermare. Per informazioni sulla programmazione dei sistemi motorizzati per tende, vedere www.lutron.com/qs. Scena 1 7. Il display visualizza un messaggio di conferma che la scena è stata salvata. -
Seite 94: Individuazione Ed Eliminazione Dei Guasti
Impostare la data La località non è impostata correttamente Impostare correttamente la latitudine e la longitudine È in corso un programma vacanza Togliere il programma vacanze dalla programmazione Per ulteriori informazioni, vedere www.lutron.com/qs Guida all’uso e all’installazione rapida GRAFIK Eye QS con DALI 22 ® ®... -
Seite 95: Dei Guasti: Dali Funzioni
D1 e D2 non sono collegati Verificare i collegamenti D1 e D2 sul lato posteriore della massima luminosità centralina GRAFIK Eye QS con DALI Verificare la tensione; tensione minima di 12 V I dispositivi DALI non lampeggiano quando eseguo I dispositivi DALI non sono indirizzati Indirizzare i dispositivi DALI il comando “Crea sistema”... -
Seite 96: Garanzia, Indirizzi Sedi Lutron
Indirizzi sedi Lutron Garanzia Lutron Electronics Co. Inc. Sito Internet: www.lutron.com CASO DI BUONA FEDE O RAGIONEVOLE DILIGENZA, NEGLIGENZA Garanzia limitata di 1 anno O PERDITE PECUNIARIE O DI QUALSIASI ALTRA NATURA), NÉ PER E-mail: product@lutron.com RIPARAZIONI ESEGUITE SENZA IL PREVIO CONSENSO SCRITTO Per un periodo di un anno dalla data di acquisto e nel rispetto delle DI LUTRON CONSEGUENTI O IN QUALSIASI MODO COLLEGATE esclusioni e delle restrizioni descritte di seguito, Lutron garantisce che SEDE PRINCIPALE ALL’INSTALLAZIONE, LA DISINSTALLAZIONE, L’UTILIZZO O ogni unità nuova è priva di difetti di fabbricazione. A propria discrezione, L’IMPOSSIBILITÀ A UTILIZZARE L’UNITÀ O, IN OGNI MODO, AI SENSI Lutron potrà scegliere di riparare l’unità difettosa o rilasciare al Cliente O IN RELAZIONE A QUALSIASI DISPOSIZIONE DELLA PRESENTE un credito pari al prezzo di acquisto dell’unità difettosa corrispondente Lutron Electronics Co., Inc. GARANZIA O ACCORDI DI CUI LA PRESENTE GARANZIA FA PARTE, al prezzo di un elemento sostitutivo equivalente venduto da Lutron. 7200 Suter Road, Coopersburg, PA 18036-1299 ANCHE IN CASO DI COLPA, ATTO ILLECITO (INCLUSA NEGLIGENZA), L’elemento sostitutivo dell’unità fornito da Lutron o, a propria discrezione,... - Seite 97 DALI Setup . . . . . . . . . . . . . . . . . . . . . . . . . . . . Zuordnung von Funkpräsenzmeldern und LUTRON GRAFIK Eye QS-Funksteuerstellen .
-
Seite 98: Merkmale Und Funktionen Des Grafik Eye Qs Mit Dali
Infrarotempfänger USB-Typ Mini-B Schwenkbare Frontplatte Zur Verwendung mit Zur Programmierung per PC Fernbedienungen : 6-zonen anzeige zonen 1-6. Hinweis Steuerstelle Weitere Informationen, siehe www.lutron.com/qs Schnell Installations- und Betriebsanleitung für GRAFIK Eye QS mit DALI 2 ® ® Downloaded from www.Manualslib.com manuals search engine... -
Seite 99: Dali-Bus-Verdrahtung
100 – 240 V 50 / 60 Hz Schaltschrank Zu weiteren DALI- Klemmenbeschriftungen: Geräten L: Phase N: Neutralleiter : Erde Weitere Informationen, siehe www.lutron.com/qs Schnell Installations- und Betriebsanleitung für GRAFIK Eye QS mit DALI 3 ® ® Downloaded from www.Manualslib.com manuals search engine... -
Seite 100: Verdrahtung Des Grafik Eye Angaben Zum Anschluss Der Netzleitungen
Netzspannungsleitungen angeschlossen Vor allen Arbeiten muss immer der Leuchtstofflampen installiert werden, die werden! Sicherungsautomat ausgeschaltet nicht mit DALI elektronischen von Lutron oder bzw. die Hauptsicherung entfernt ähnlichen DALI-Geräte für Ihren Standort werden. Bevor die Lasten an der zugelassenen Komponenten ausgestattet GRAFIK Eye QS mit DALI-Steuerstelle... - Seite 101 • Überprüfen Sie, ob alle geltenden Vorschriften 2,5 mm 427 m Klasse 1 getrennt geführt werden. erfüllt werden. AWG 14 • Lutron empfiehlt, für die Leitungen D1 Schritt 4: Einschalten sie der 1,5 mm 275 m und D2 (DALI-Bus) zwei unterschiedliche Sicherungsautomat auf für Stromversorgung.
- Seite 102 2: IR COM IR-Anschluss (eines anderen Herstellers) Verkabelung von Eingängen mit 1 2 3 4 5 6 L N potenzialfreien Kontakten Zu Einstellung siehe www.lutron.com/qs. A: CCI SIG B: 24 V C: CCI COM Steuerleitungen Masse und Stromversorgung (Klemmen 1 und 2): Beispiel: Präsenzmelder...
-
Seite 103: Verdrahtung Des Grafik Eye Angaben Zu Den Qs-Bus-Steuerleitungen
LUTRON LUTRON LUTRON LUTRON LUTRON LUTRON LUTRON LUTRON Internationale see LUTRON LUTRON LUTRON LUTRON - Kabel sind von Lutron erhältlich: GRX-CBL-346S-500 LUTRON LUTRON Touch-Bedienstelle LUTRON ® (nicht zur Verwendung in abgehängten Decken) und LUTRON LUTRON LUTRON LUTRON LUTRON LUTRON Sivoia (Siehe Datenblatt) GRX-PCBL-346S-500 (zur Verwendung in abgehängten... -
Seite 104: Fertigstellung Der Installation Des Grafik Eye
Hinweis: Beim Anziehen der Montageschrauben ist darauf dimmt. zu achten, dass sich die 3. Bringen Sie den Schutzüberzug an der schwenkbare Abdeckung und die Steuerstelle an. Siehe www.lutron.com für Frontplatte wie dargestellt ganz Anweisungen zur Benennung von Zonen öffnen. Schutzauflage (nach der Installation anbringen) Weitere Informationen, siehe www.lutron.com/qs... -
Seite 105: Programmiermodus
Schritt zurück. Durch wiederholtes Drücken kehren Sie schließlich zum Hauptmenü zurück, verlassen jedoch den Programmiermodus nicht. Wenn auf dem Bildschirm eine Ja/Nein-Frage erscheint, steht die Stechuhr-Taste für “Nein”. Weitere Informationen, siehe www.lutron.com/qs Schnell Installations- und Betriebsanleitung für GRAFIK Eye QS mit DALI 9 ®... -
Seite 106: Modus Des Drahtlosen Systems
Stechuhr- • Deaktiviert: Wird für ausschließlich verdrahtete Systeme verwendet. Taste (zurück) • Aktiviert: Die GRAFIK Eye QS-Funksteuerstelle reagiert auf alle Programmierbefehle von Lutron- QS-Funkprodukten (und kompatiblen Produkten), die sich in der Nähe befinden. • Programmierung nicht beachten (Standardeinstellung): Die GRAFIK Eye QS-Funksteuerstelle reagiert nur auf normale Betriebsbefehle von drahtlosen Geräten, die im Modus “Aktiviert”... -
Seite 107: Setup Der Zone
Drücken Sie zur Bestätigung die OK-Taste. Gespeichert 5. Auf dem Informationsbildschirm wird bestätigt, dass der Lasttyp gespeichert worden ist. 6. Beenden Sie den Programmiermodus (siehe Seite 9). Weitere Informationen, siehe www.lutron.com/qs Schnell Installations- und Betriebsanleitung für GRAFIK Eye QS mit DALI 11 ® ®... -
Seite 108: Übersicht Zum Dali-Setup
Wenn ein Gerät nicht reagiert, muss der Befehl ausschalten “Systemaufbau” wiederholt und/oder die Verdrahtung überprüft Programmierung? werden. Suche... gefunden x Belastung gefunden Weitere Informationen, siehe www.lutron.com/qs Schnell Installations- und Betriebsanleitung für GRAFIK Eye QS mit DALI 12 ® ® Downloaded from www.Manualslib.com manuals search engine... -
Seite 109: Dali Setup
Zone 3 jeweils 1 Zone zugeordnet sein). Geräte können nur Zonen zugeordnet werden, die auf DALI-Lasttyp eingestellt sind. Siehe Seite 11 für Anweisungen zur Änderung des Lasttyps. Weitere Informationen, siehe www.lutron.com/qs Schnell Installations- und Betriebsanleitung für GRAFIK Eye QS mit DALI 13 ® ®... -
Seite 110: Zuordnung Von Funkpräsenzmeldern Und Grafik Eye
Empfängt Signale vom Funkpräsenzmelder, so Sendet Signale zur GRAFIK Eye dass der Präsenzmelder Szenen am GRAFIK QS-Steuerstelle, wodurch Szenen am Eye QS aktiviert. GRAFIK Eye QS aktiviert werden. Weitere Informationen, siehe www.lutron.com/qs Schnell Installations- und Betriebsanleitung für GRAFIK Eye QS mit DALI 14 ® ® Downloaded from www.Manualslib.com... -
Seite 111: Einstellung Von Präsenzmeldern
(siehe Seite 14). Saved *Bestimmt* Belegungssensor Szene Bezetzt Szene Nicht Bezetzt Tätigkeiten Saved Gespeichert Szene 1 Szene Aus 3 seconds Setup Weitere Informationen, siehe www.lutron.com/qs Schnell Installations- und Betriebsanleitung für GRAFIK Eye QS mit DALI 15 ® ® Downloaded from www.Manualslib.com manuals search engine... -
Seite 112: Zuordnung Von Drahtlosen Tageslichtsensoren Und Grafik Eye® Qs-Funksteuerstellen
Dadurch wird die Programmierung des Sensors aus der Druecken Sie OK... GRAFIK Eye QS-Steuerstelle entfernt. Hinweis: Das Funksignal hat eine Reichweite von 10 m durch Standardkonstruktionen. Saved *Bestimmt* Weitere Informationen, siehe www.lutron.com/qs Schnell Installations- und Betriebsanleitung für GRAFIK Eye QS mit DALI 16 ® ® Downloaded from www.Manualslib.com... -
Seite 113: Einstellung Von Tageslichtsensoren
Konfiguration des Gruppen-Modus. Setup Hinweis: Bei Änderung des Modus werden alle vorherigen Tageslichtsensor-Zuordnungen entfernt. Tageslichtsensor Tageslichtsensor ODER Saved Gespeichert Zonen-Modus Gruppen-Modus Weitere Informationen, siehe www.lutron.com/qs Schnell Installations- und Betriebsanleitung für GRAFIK Eye QS mit DALI 17 ® ® Downloaded from www.Manualslib.com manuals search engine... - Seite 114 (siehe Seite 16). Sensoresnamen Licht einstellen Tageslichtsensor Gespeichert Setup Mehr Licht Saved Tasten Zone 1 “Cal” 3 seconds Kalibrieren Weniger Licht Weitere Informationen, siehe www.lutron.com/qs Schnell Installations- und Betriebsanleitung für GRAFIK Eye QS mit DALI 18 ® ® Downloaded from www.Manualslib.com manuals search engine...
- Seite 115 Bei Zuordnung eines Geräts, das bereits einer Ballast 2/23 Gruppe zugeordnet wurde, wird seine vorhandene Programmierung ersetzt. *Bestimmt* (Fortsetzung auf der nächsten Seite) ODER Gruppe 1 Ballast 2/23 *Gruppe 2* Weitere Informationen, siehe www.lutron.com/qs Schnell Installations- und Betriebsanleitung für GRAFIK Eye QS mit DALI 19 ® ® Downloaded from www.Manualslib.com manuals search engine...
-
Seite 116: Sensorauswahl
überprüft werden, ob sie richtig zugeordnet worden sind (siehe Seite 16). Tageslichtsensor Licht einstellen Calibrate Gespeichert Setup Mehr Licht Saved Gruppe 1 3 seconds Kalibrieren Weniger Licht Weitere Informationen, siehe www.lutron.com/qs Schnell Installations- und Betriebsanleitung für GRAFIK Eye QS mit DALI 20 ® ® Downloaded from www.Manualslib.com manuals search engine... -
Seite 117: Setup Der Szene
Rollo einstellen gespeichert worden ist. gruppen Zone heller 8. Beenden Sie den Programmiermodus (siehe Seite 9). Zone dunkler Gespeichert Weitere Informationen, siehe www.lutron.com/qs Schnell Installations- und Betriebsanleitung für GRAFIK Eye QS mit DALI 21 ® ® ® Downloaded from www.Manualslib.com manuals search engine... -
Seite 118: Fehlersuche
Das Datum einstellen Der Standort ist nicht richtig eingestellt Längen- und Breitengrad richtig einstellen Die Feiertagszeitfolge ist in Kraft Die Feiertagszeitfolge aus der Programmierung entfernen Weitere Informationen, siehe www.lutron.com/qs Schnell Installations- und Betriebsanleitung für GRAFIK Eye QS mit DALI 22 ® ® Downloaded from www.Manualslib.com... -
Seite 119: Fehlersuche: Dali Funktionen
Ein DALI-Gerät auf voller Helligkeit kann nicht D1 und D2 sind nicht angeschlossen Die D1- und D2-Anschlüsse an der Rückseite des gesteuert werden GRAFIK Eye QS mit DALI kontrollieren Spannung kontrollieren: Mindestspannung 12 V Die DALI-Geräte blinken nicht bei Ausführung des Die DALI-Geräte wurden nicht adressiert Die DALI-Geräte adressieren... -
Seite 120: Gewährleistung
Kontaktinformationen Gewährleistung Lutron Electronics Co., Inc. Internet: www.lutron.com NACHLÄSSIGKEIT ODER FINANZIELLE ODER SONSTIGE VERLUSTE), Eingeschränkte Gewährleistung für ein Jahr NOCH FÜR REPARATURARBEITEN, DIE OHNE LUTRONS SCHRIFTLICHE E-Mail: product@lutron.com GENEHMIGUNG DURCHGEFÜHRT WERDEN UND MIT EINBAU, AUSBAU, Für einen Zeitraum von einem Jahr ab Kaufdatum unter Beachtung der VERWENDUNG ODER NICHT MÖGLICHER VERWENDUNG DER nachstehend beschriebenen Ausschlüsse und Einschränkungen garantiert WELTWEITE ZENTRALE KOMPONENTE ZU TUN HABEN, ODER SONSTWIE IN ZUSAMMENHANG Lutron, dass jede neue Komponente frei von Herstellungsmängeln ist. Nach MIT VORKEHRUNGEN DIESER GARANTIE ODER IRGENDEINER DIESE eigenem Ermessen repariert Lutron entweder die defekte Komponente oder GARANTIE ENTHALTENDEN ABMACHUNG, SELBST WENN DER FEHLER schreibt dem Kunden eine Summe in Höhe des Kaufpreises zum Erwerb eines Lutron Electronics Co., Inc. (EINSCHLIESSLICH NACHLÄSSIGKEIT), DIE KAUSALHAFTUNG, DER vergleichbaren Ersatzteils von Lutron gut. Die von Lutron oder von einem von 7200 Suter Road, Coopersburg, PA 18036-1299 VERTRAGSBRUCH ODER DER GARANTIEBRUCH AUF SEITEN LUTRONS Lutron anerkannten Anbieter gelieferten Ersatzteile für die Komponente können...